Configurar la autenticación basada en MAC y la omisión de autenticación MAC (MAB)
Siga estos pasos para configurar un dispositivo cableado para autenticar dispositivos en función de sus direcciones MAC.
Puede utilizar la autenticación MAC junto con la autenticación basada en certificados o en credenciales como una capa adicional de seguridad.
Juniper Mist Access Assurance admite la anulación de autenticación MAC (MAB) para un control de acceso uniforme a través de redes cableadas e inalámbricas. En este tema se proporciona un ejemplo para configurar MAB para un dispositivo cableado.
En el ejemplo se muestra cómo crear autenticación MAC para un dispositivo cableado además de la autenticación EAP-TLS basada en certificados. La tarea también incluye los pasos para crear una directiva de autenticación para un dispositivo cableado que no admite el punto 1x (como un concentrador Phillips).
Prerrequisitos
-
Debe haber configurado la autenticación basada en certificados. Consulte Configurar la autenticación basada en certificados (EAP-TLS) para redes inalámbricas.
-
Un conmutador de la serie EX de Juniper Networks.
Configurar la autenticación basada en MAC para dispositivos cableados
Vea los siguientes vídeos para aprender a configurar y validar la autenticación basada en MAC para dispositivos cableados:
Well, what about wired devices? How do we authenticate an authorized wired client? Well, it turns out we could do it right here in the same place. So we could create a couple of more rules. So we can say OK, if we look at wired devices that are using certificates to authenticate , we could just call this rule wired certificate authentication. We can effectively apply the same matching criteria as for wireless. There's no difference whatsoever here.
On the right-hand side, we'll decide where we want to move these devices after authentication and the right policy match. And finally, what about non-.1x capable devices on the wired side? So for example, I have here a Phillips hub that does not support .1x. How can I authenticate a Phillips app? So I could create a label for the Phillips device. The label will be client list. And I'll just say approved Phillips app. And I'll just put the MAC address of that device in. Oh. And you could put a list of MAC addresses. You can put the list of Mac OUIs. And remember that all of these labels that I'm creating in the UI - they're all available through the REST API. So there is always an endless possibility of integration with existing, say, inventory management systems that can just put all the new device MAC addresses in those lists for authentication and authorization.
So we'll just click Create. Create this label. And we'll create a rule. We'll call it approved Phillips devices. And here we are matching on wired devices that are doing MAC address authentication bypass that are part of this client list label. And in this case, we will move them to - well, I don't want to move them to Corp VLAN. That's not what I want. I will create an IoT VLAN. And in our case, that's going to be VLAN 3000. And I'm going to add this to an IoT VLAN. And now, we have our authentication policies configuration done.
OK, so how do we validate, right? So we've connected a couple of clients to the switch. One is a laptop that's doing .1x using certificate. Another one is the Phillips Hue app. That doesn't do any .1x, and just doing MAC authentication. So we could see those two clients are connected.
Let's take a look at the laptop one. So we could click on the port. We see that there is a client with a username flashing up. Let's take a look at the wired client insights. And what we can see here is that the user has been authenticated. You could see the port up and down events from the switch side. We see all the authentication phases, same as we saw in the wireless side. The client trusts the server. The server trusts the client certificate. We get all the metadata here. We then are saying client access is allowed. And voila. We matched the same authentication policy rule. Great. So now, we know that this part is working.
Now, we go to switch back. And let's look at the Philips device. That device is not doing any form of .1x authentication. So let's just take a look at the wired client insights. Yeah, and we are seeing that here the user is authenticated. And there is a client access allowed event here as well. And in this case, the authentication type is Mac address bypass - the MAC address that we've added to the client list. And voila. We are matching the right approved Phillips device rule.
Siga estos pasos para configurar la autenticación basada en MAC en una red mediante el portal de Juniper Mist:
- Crear políticas de autenticación.
- En el menú izquierdo del portal de Juniper Mist, seleccione Organización > políticas de acceso > autenticación.
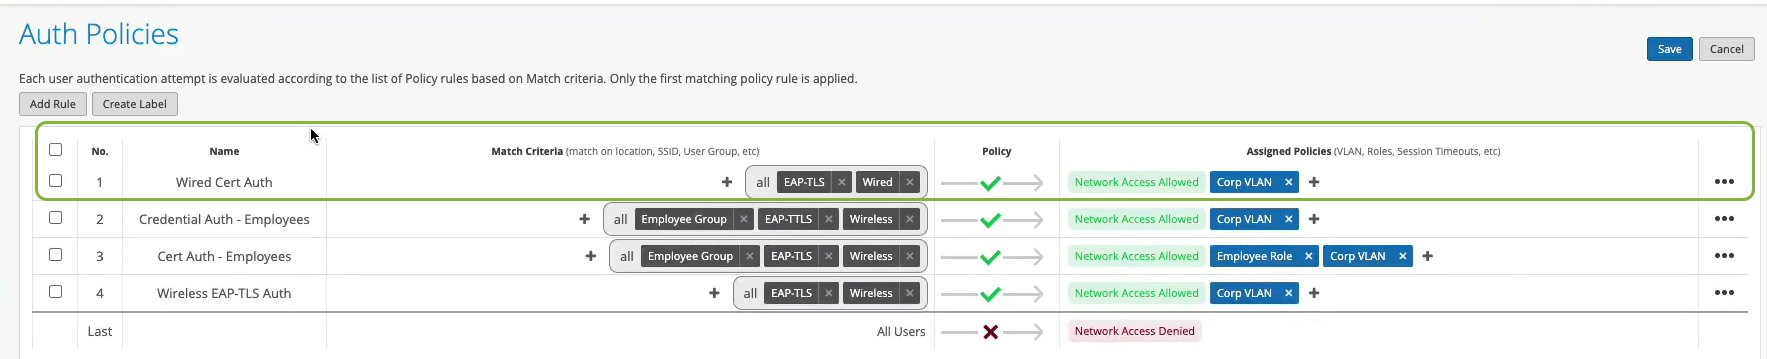
Cree una nueva regla para proporcionar acceso a los clientes con certificados válidos. Consulte Configurar directiva de autenticación.Figura 1: Crear una política de autenticación para un cliente
 cableado
Defina una política de autenticación con los siguientes detalles:
cableado
Defina una política de autenticación con los siguientes detalles:- Nombre: introduce el nombre de la política (por ejemplo, Wired Cert Auth).
- Criterios de coincidencia: seleccione EAP-TLS y por cable.
- Política: seleccione Permitido
- Acción de política: acceso a la red permitido
- VLAN asignada: VLAN corporativa
- En el menú izquierdo del portal de Juniper Mist, seleccione Organización > políticas de acceso > autenticación.
- Para proporcionar autenticación para un dispositivo que no sea dot1.x en el lado LAN, cree una nueva etiqueta de directiva.
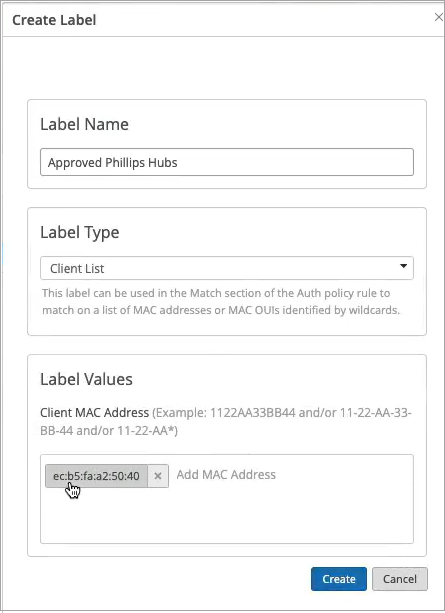
- En la página Políticas de autenticación, seleccione Crear etiqueta e introduzca los detalles.
Figura 2: Etiqueta para dispositivos
 que no son Dot1x
Introduzca la siguiente información en los campos respectivos:
que no son Dot1x
Introduzca la siguiente información en los campos respectivos:- Nombre de la etiqueta: introduzca el nombre de la etiqueta (por ejemplo: Phillips Hubs aprobados)
- Tipo de etiqueta: seleccione el tipo Lista de clientes
- Valores de etiqueta: introduzca la dirección MAC del dispositivo
- En la página Políticas de autenticación, seleccione Crear etiqueta e introduzca los detalles.
- Cree una nueva política de autenticación.
- Haga clic en Agregar regla para crear una nueva regla.
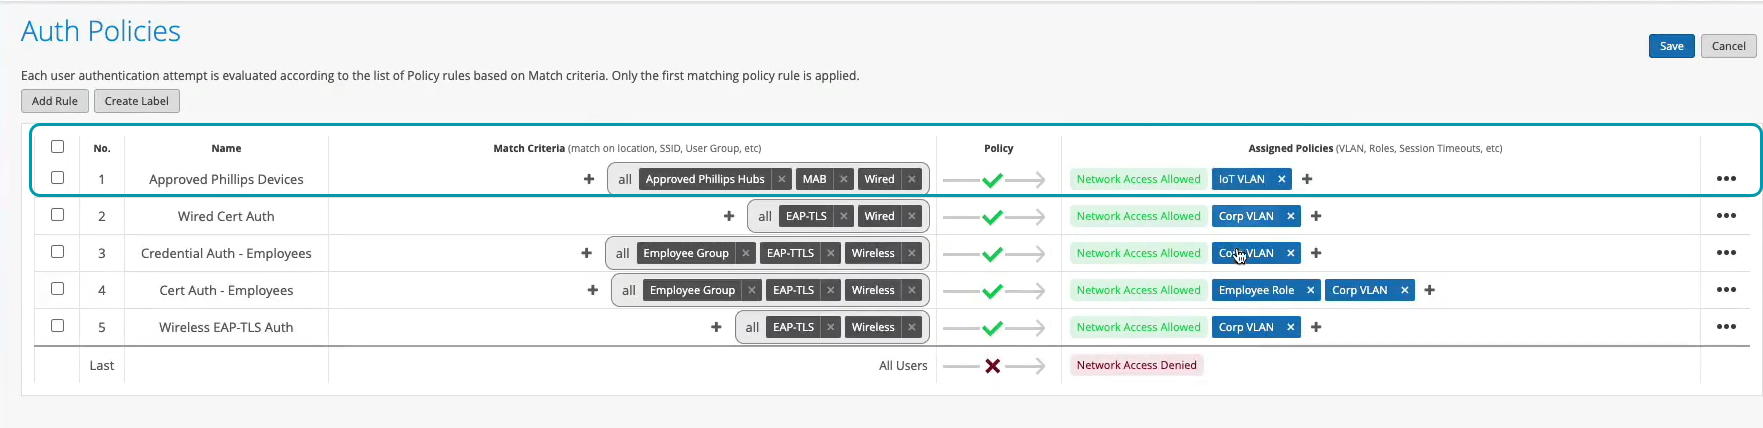
En esta regla, use la etiqueta que creó en el paso anterior para un dispositivo que no sea dot1x. En esta regla, use la etiqueta que creó en el paso anterior para un dispositivo que no sea dot1x.Figura 3: Política de autenticación para dispositivos
 que no son Dot1X
Introduzca la siguiente información en los campos respectivos:
que no son Dot1X
Introduzca la siguiente información en los campos respectivos:- Nombre: introduzca el nombre. Ejemplo: dispositivos Phillips aprobados.
- Criterios de coincidencia: seleccione concentradores Phillips aprobados, MAB (derivación de autenticación MAC) y por cable.
- Directiva: seleccione Permitido.
- Acción de directiva: seleccione Acceso a la red permitido.
- Políticas asignadas: seleccione VLAN de IoT.
Ahora ha creado una política para autenticar dispositivos que no sean dot1X.
- Haga clic en Agregar regla para crear una nueva regla.
- Configure el conmutador para realizar la autenticación.
- Desplácese hacia abajo hasta la sección Perfil de puerto e ingrese los detalles.
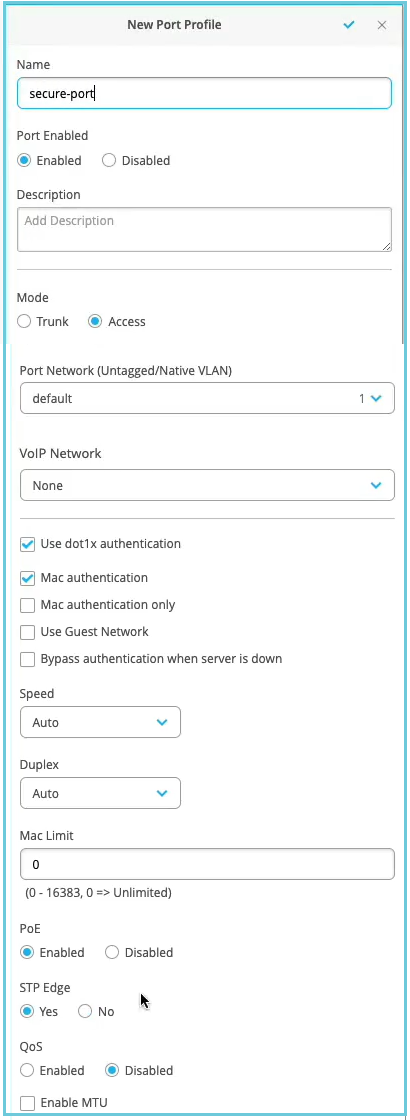
Figura 4: Opciones de perfil deIntroduzca la información necesaria o seleccione las opciones necesarias en los campos siguientes:
 puerto
- Nombre: introduzca un nombre (por ejemplo: secure-port).
- Modo: seleccione Acceso.
- Habilite las opciones Usar autenticación dot1x y Usar autenticación MAC . Si el dispositivo cliente admite 802.1X, el puerto del conmutador realiza la autenticación 802.1X. Si el dispositivo cliente no es compatible con 802.1X, el puerto del conmutador realiza la autenticación MAC.
- Borde STP: seleccione Sípara configurar el puerto como puerto perimetral del Protocolo de árbol de expansión (STP). Esta configuración garantiza que el puerto se trate como un puerto perimetral.
En este ejemplo se utilizan los valores predeterminados para los campos restantes.
- Asigne un perfil de puerto a cada puerto del conmutador en el que los clientes cableados conectados requieran acceso a la red.
En la sección Select Switches Configuration (Seleccionar configuración de conmutadores), en la ficha Port Config (Configuración de puertos), haga clic en Add Port Range (Agregar intervalo de puertos ) para asociar un perfil de puerto a un puerto.
Figura 5: Asignar perfil de puerto a rangos de puertos en un conmutador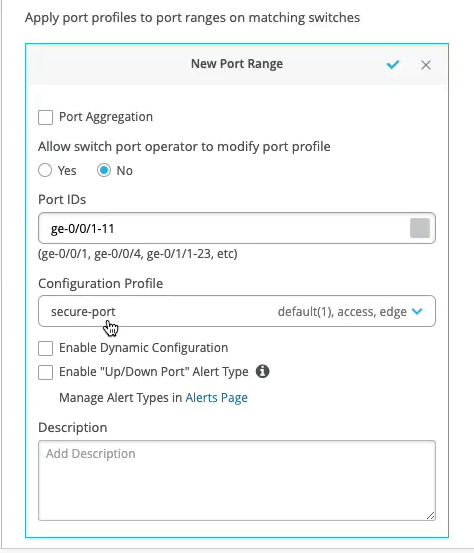
Introduzca un ID de puerto y seleccione el perfil de configuración que creó en el paso anterior.
- Desplácese hacia abajo hasta la sección Perfil de puerto e ingrese los detalles.
Ahora su red está lista para autenticar clientes de forma segura. La nube de Juniper Mist verifica los certificados de cliente y concede acceso y autorización en función de la configuración de la política de autenticación.
Puede ver los clientes asociados en el portal de Juniper Mist.
- Seleccione Clientes > clientes cableados para ver los detalles del cliente
- Seleccione Supervisar > niveles de servicio > Insights para ver los eventos del cliente.