Utilizar certificados digitales
Siga estos pasos para generar y usar certificados para el servidor de RADIUS que está integrado con Juniper Mist Access Assurance para cada organización.
Cuando se utiliza la autenticación EAP, tanto el cliente como el servidor deben verificar la identidad del otro. El cliente debe confiar en el servidor con el que se está comunicando y el servidor debe autenticar al cliente. El certificado de servidor es el primer paso en este proceso de autenticación mutua y el cliente debe validarlo o confiar en él antes de continuar con la comunicación.
Si echamos un vistazo a cualquier transacción EAP (digamos EAP-TLS o EAP-TTLS), independientemente de si se trata de autenticación inalámbrica o por cable, el primer paso es que el servidor se identifique enviando un mensaje de "Saludo al servidor" al dispositivo cliente.
Cuando un dispositivo cliente recibe un certificado de servidor, consulta la lista de autoridades de certificación (CA) de confianza en el perfil de Wi-Fi o LAN y comprueba si el certificado del servidor está firmado por una de las CA de confianza. Opcionalmente, si está configurado, comprueba si el nombre del servidor coincide con la lista de nombres de servidores de confianza en la configuración del cliente.
Recomendamos no omitir el paso de validación y el certificado del servidor de confianza. Este es un alto riesgo de seguridad y puede abrir ataques MITM (Man in the middle).
Puede utilizar uno de los siguientes métodos para generar y usar certificados para el servidor de RADIUS que está integrado con Juniper Mist Access Assurance para cada organización.
- Certificado de AC: Juniper Mist requiere certificados de AC específicos para establecer la confianza con los dispositivos de sus clientes. Estos certificados, emitidos por autoridades de certificación (CA) de confianza, permiten que Juniper Mist Access Assurance otorgue acceso de red a los dispositivos del cliente. La validación de los dispositivos del cliente por parte de Juniper Mist se basa en la presentación de certificados por parte de los dispositivos, los cuales deben estar firmados por la misma autoridad de AC.
- Certificado Mist Access Assurance Juniper predeterminado: Mist organización mantiene su autoridad de certificación de Mist (AC) única y privada responsable de emitir el certificado del servidor de Access Assurance. En ausencia de configuraciones específicas, los clientes recibirán un certificado predeterminado autenticado por sus respectivos AC de organización Mist. Este certificado corresponde al dominio "auth.mist.com".
- Certificado de servidor personalizado: el certificado de servidor personalizado se prefiere cuando prefiere no modificar la configuración actual del cliente y desea que los clientes confíen en los certificados de servidor emitidos por la misma autoridad de certificación (AC) que proporcionó los certificados de cliente. Debe introducir la clave privada y el certificado firmado que obtuvo del servidor de RADIUS.
Lea los siguientes procedimientos para comprender cómo usar los certificados anteriores.
Usar certificado de autoridad de certificación (AC)
Para que funcione la autenticación basada en certificados del Protocolo de autenticación extensible-Capa de transporte de seguridad (EAP-TLS), debe agregar el certificado de AC de confianza en el portal de Juniper Mist.
Este paso permite que la autenticación de acceso de Juniper Mist confíe en certificados de cliente firmados por sus CA agregadas.
Puede obtener el certificado de una AC externa. El AC puede ser una AC pública conocida o una AC empresarial.
Mire el siguiente video para aprender a generar un certificado para pruebas o uso en laboratorio:
How to create certificates both CA certificates and client certificates that you could use for lab testing to repeat all the steps in our tutorials. So in order to do things easily and quickly, assuming there is no existing infrastructure, assuming there is nothing you can use that you're available on-hand, you could use some open source tools that are out there on the internet. I will use degree-based certificate authority and key management called XCA.
You can Google it. You can download it. It's available for everyone to use. So now, when we will use XCA tool, first thing we will need to do, we'll need to create a new database. You could think of this creating a specific BQ infrastructure right on your laptop. So we can just say missed access insurance tutorial. Database, save it in there, it will ask you to encrypt it, which is a good thing. Click OK. So now we have the database created.
So the first thing we will need to create our certificate infrastructure is the certificate authority. That's the thing that will sign all the certificates of all your client devices that you will be using for testing. And that's the ultimate source of trust in your BQ infrastructure. So I'm going to click on new certificate. I'm going to select that, this is going to be a self-signed certificate because technically, every certificate authority, the root certificate authority is a self-signed.
Has a self-signed certificate. We'll select the template called CA from this list, will then go to subject. We can give it some internal name but doesn't matter, we could just say lab mist CA. You can fill in some of the data in there. Again, it doesn't really matter what you will put in there. But for testing purposes, just use anything you really like, organization name. Common name is important. This is how you identify certificates in real life. So one of the important attributes is common name. And we will take a look at the other one later, which is called the subject alternative name.
So common name, let's just call it lab-mist-ca@justify.com. Maybe something like this. I'm going to click that. We'll need to create a private key. A private key is what will prove that the certificate-- oh, owned and certificate holder is actually that same device or it's same CA. So we'll generate a new key, we'll set it to be 4,000 bytes, create. It will automatically selected here. It's good. We'll go to extensions. The type will be certification authority. It will add a few attributes in the certificate saying this is a CA cert.
This is where we will add the subject to alternative name. So typically what you'll do is you click edit, you will say I want to copy common name and there. Click apply. That's it. This will typically go and take your common name and copy it into a assign attribute.
Nowadays, many clients are using SAN to validate-- certificate validity. And the key usage, what do we need there? We need certificate signs, CRL sign. That's pretty much it. So we'll click OK. This now created our certificate authority in here. So we have the certificate. This is a CA cert, it has a common name.
The expiry date is, well, next year, but typically CA cert would be valid for like 10 years or something like that. For our intents and purposes, this is just a lot testing one year is more than enough.
So what will then need to do is will create a client cert. So click select our CA, will click new certificate. Now see under signing section, we are going to use this CA cert for signing certificates. It's not going to be self-signed anymore. So now our certificate authority will sign a new certificate that will be issued by the client. This is how we will establish this chain of trust. So create, select the template-- TLS client. We'll go to subject. That just say this is going to be a test lab client. Doesn't matter.
So common name is important. So this is where I would recommend you to use something that is an actual username that you want to use later on with your testing, whether you have an identity provider with your test username or things like that. So in my case, I will use one username I have in my Okta IdP that I will use later on. So I'm going to just use my Juniper email address. I'm going to copy it. We'll need to generate a private key, again, 4,000 bits.
We'll go to extensions, we'll select end entity. We'll click on subject, alternative name. Again, we'll just say copy common name. We'll go to key usage, will now need to select that this is a client certificate not the service certificate. And we will need key encipherments, digital signature, it should be OK. Now we click OK. We now have a client certificate.
So now we see there is a little dropdown in there. So we have a CA but now sign the client certificate. So now we have a CA and now we have a client certificate. What we'll do will need to export the CA. I will click on export. The CA cert, we are only exporting the public certificate, we are not touching the private key. Private Key stays untouched. It it is never exported anywhere. This is the only thing that protects the ownership of that certificate.
So we are exporting the private key in our test folder-- .mistCRT that's all we need. Click OK. The next thing we'll need is we'll need to export the certificate and the private key that we will use for client testing. Again, normally in production environment, you're not going to export private keys, they will be automatically pushed and distributed through MDM securely so they're never exposed to the network or anybody. But in our case, since we're testing, that's OK to do for now. So we'll click export.
In this case, the export format is pfx. That's the format that will include the client certificate, the client private key, and the CA cert in one package. So you can later on imported to one of your testing clients. And generally, this format is well understood by different operating systems.
It will ask you to encrypt that package. So just do a very secure password of 1234. Now we have to search, export it. We have a CA cert and we have a client cert. For now, this is good enough for our testin
Para agregar un certificado de AC:
- Haga clic en Agregar autoridad de certificación.
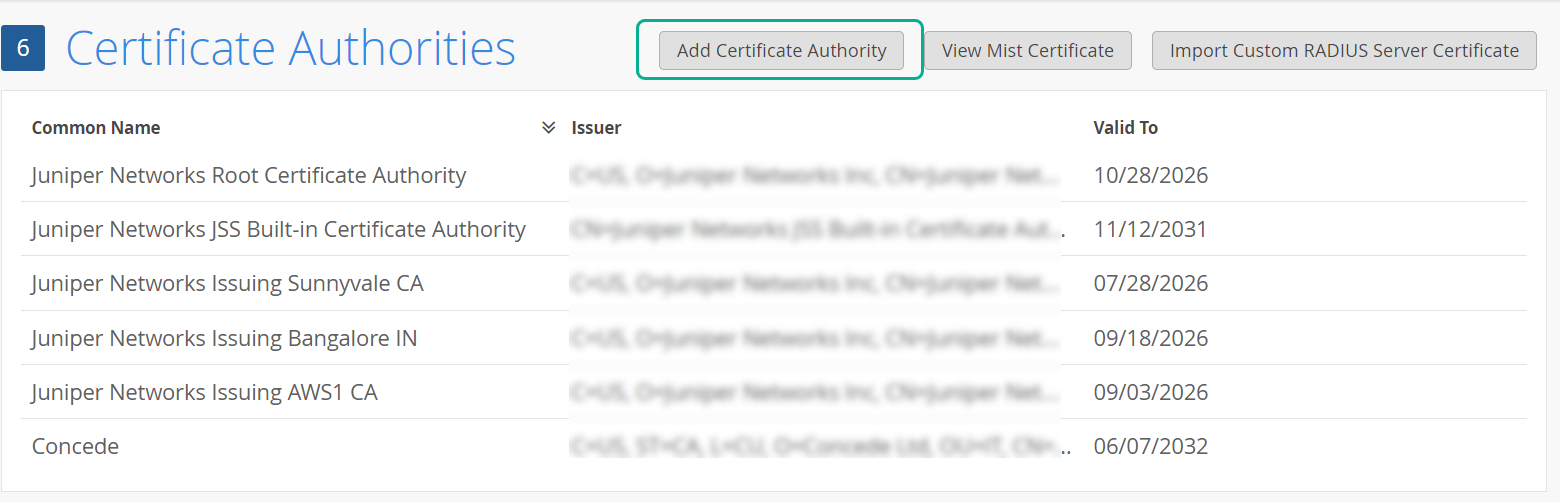
- Pegue el certificado de AC en el campo Certificado firmado.
Figura 1: Agregar autoridad
 de certificación
El texto debe incluir las
—–BEGIN CERTIFICATE—–líneas y—–END CERTIFICATE—–.El sistema analiza y decodifica el certificado de AC importado y muestra las propiedades del certificado en el panel Propiedades . Le recomendamos que agregue su AC raíz, así como todas sus CA intermedias o certificados emisores.
Usar certificado de servidor predeterminado de Juniper Mist Access Assurance
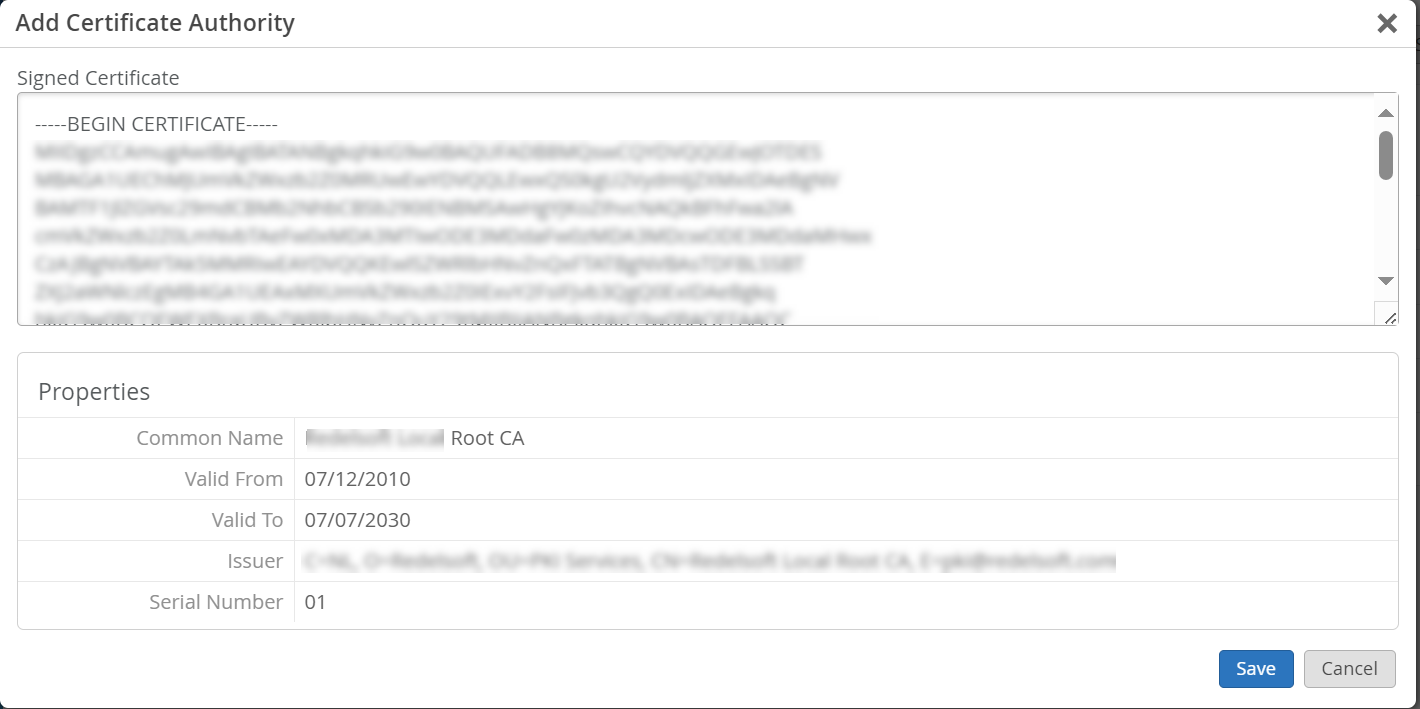
Juniper Mist nube actúa como una autoridad de certificación privada (AC) para cada organización agregada al Juniper Mist nube. Juniper Mist emite un certificado de servidor. Si no se configura ningún certificado, el portal de Juniper Mist presenta un certificado de servidor predeterminado firmado por la AC de Juniper Mist en los dispositivos del cliente.
Se emitirá un certificado para el nombre auth.mist.com y muestra la información de manera similar a la que se ve en la Figura 2.
Para descargar el certificado del servidor de Juniper Mist:
- Haga clic en Ver certificado de Mist.
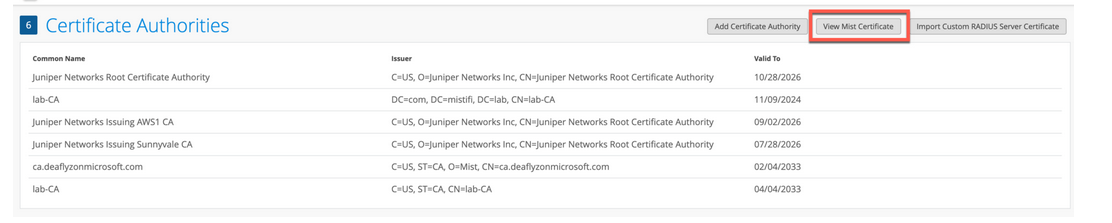 En la pantalla se muestran los detalles del certificado firmado . Copie el contenido del certificado del campo Certificado firmado .Figura 3: Ver y copiar el certificado de
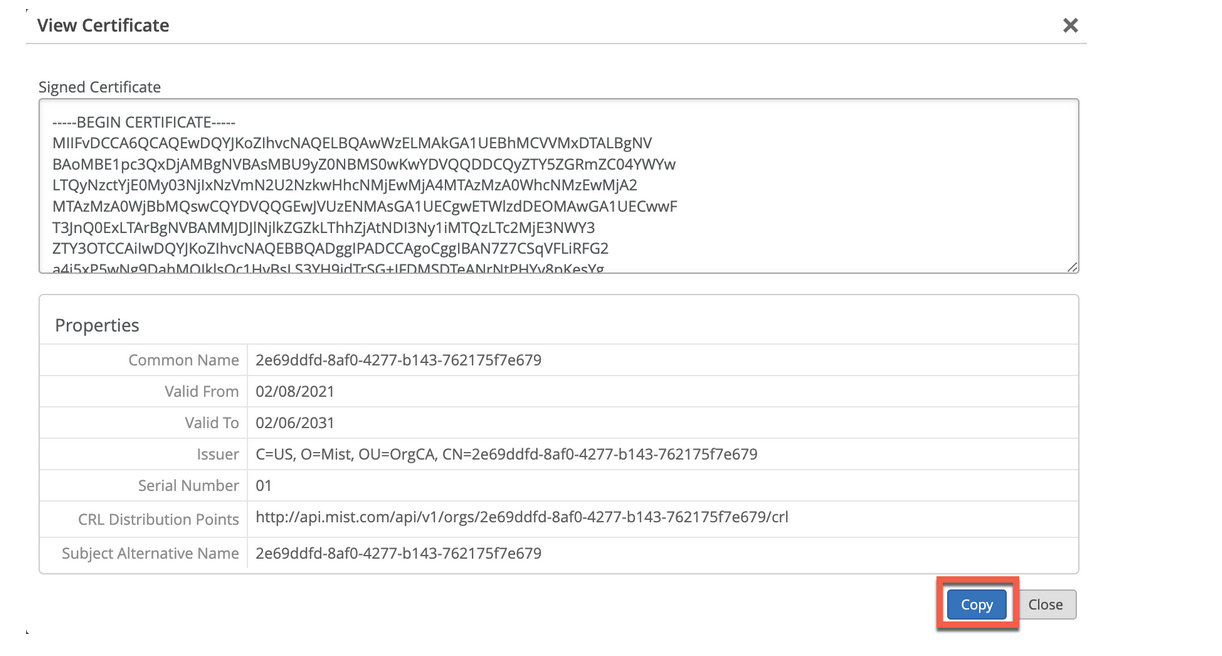 Mist
Mist
Usar certificados de servidor personalizados
Es posible que ya tenga una PKI y desee mantener la configuración existente intacta. En tal caso, debe cargar el certificado público de su AC raíz y el par de claves pública/privada del servidor de RADIUS en el portal de Mist Juniper.
Asegúrese de que los dispositivos cliente también utilicen los mismos certificados para que el servidor de RADIUS valide el certificado de cada cliente (suplicante). Realice esta tarea si desea mantener la configuración actual de los clientes sin cambios y desea que los clientes confíen en el certificado de servidor emitido por la misma AC que emitió sus certificados.
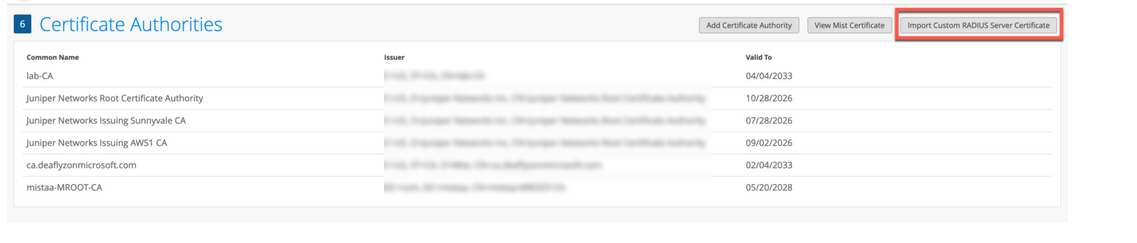
Para cargar su certificado en el portal de Juniper Mist:
- Haga clic en Importar certificado de radio personalizado para abrir la página del certificado.
Figura 4: Importar certificado
 de servidor RADIUS personalizado
- En la página Importar certificado de servidor RADIUS personalizado, escriba los detalles de su certificado de AC:
Figura 5: Ingrese los detalles
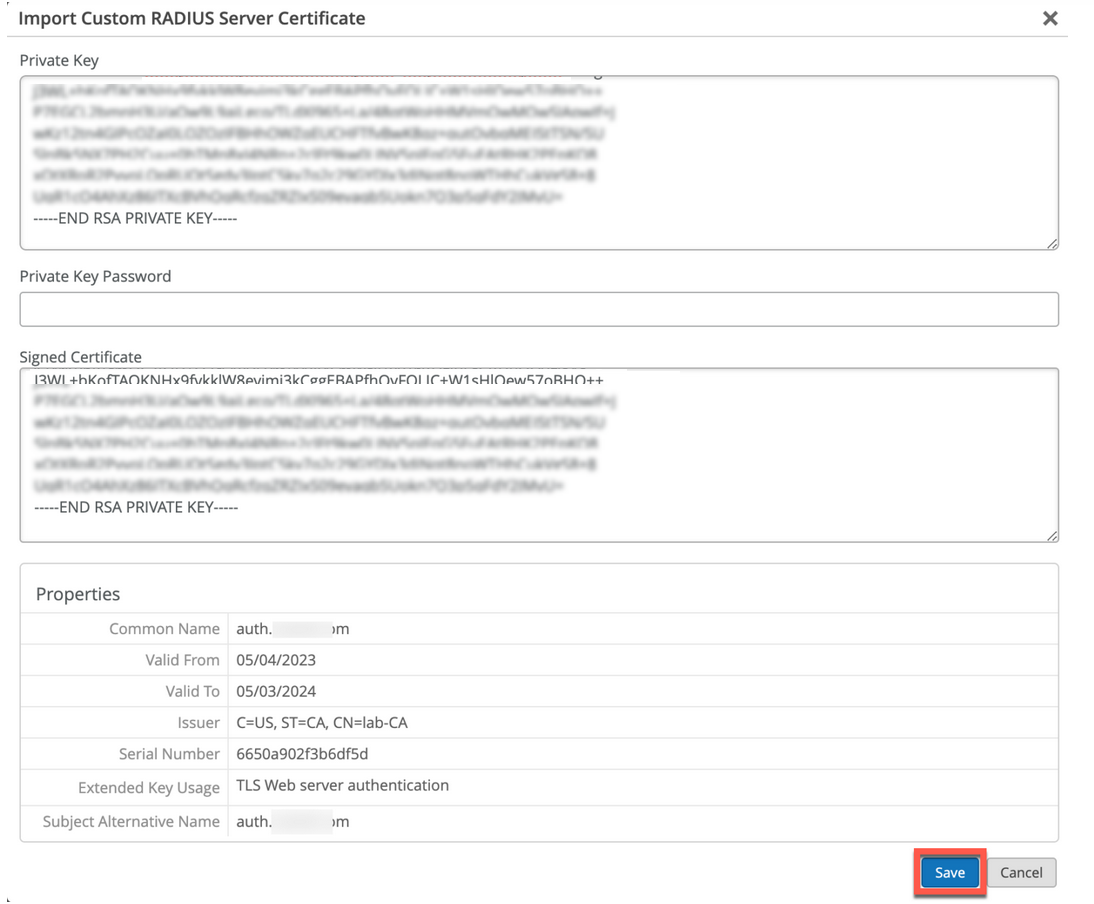 del certificado de servidor personalizado
- Clave privada: copie y pegue la información de la clave privada. El texto debe incluir las
BEGIN RSA PRIVATE KEYlíneas yEND RSA PRIVATE KEY. - Contraseña de clave privada: introduzca la frase de contraseña de la clave privada (si está disponible).
- Certificado firmado: copie y pegue el certificado como texto. Asegúrese de incluir todas las entidades de certificación intermedias y el certificado de AC raíz. El texto debe incluir las
—–BEGIN CERTIFICATE—–líneas y—–END CERTIFICATE—–.
- Clave privada: copie y pegue la información de la clave privada. El texto debe incluir las
Guidelines for using custom server certificates:
- Do not use a wildcard certificate, for example: *.abc.com for 802.1X authentication.
- You can use a certificate that contains a common name (CN) or a subject alternative name (SAN) for 802.1X authentication..
- We recommend the following x509 extension attributes. The majority of the client device operating systems support these extensions.
- Use certificate version 3 or v3 (not legacy v1)
- If the server name is being used as a validation criterion on the client side, then the certificate should include the SAN extension with the DNS name of the server.
- Include Extended Key Usage as a TLS web server authentication criterion (required for most Android devices).
Ahora puede avanzar con el proceso de autenticación basada en certificados.
Ver también
Requisitos del certificado de cliente
Cuando se implementa la autentificación basada en certificados con Juniper Mist Access Assurance, los certificados de cliente deben cumplir requisitos específicos para garantizar una funcionalidad adecuada en todas las funciones, como las búsquedas de IdP y la integración de MDM.
- Requisitos de seguridad
- Requisitos para las búsquedas de proveedores de identidad
- Comportamiento de búsqueda del proveedor de identidad para certificados de máquina
- Consideraciones sobre la integración de MDM
Requisitos de seguridad
Los certificados de cliente deben cumplir estos estándares mínimos de seguridad:
- Tipo de certificado: Certificado X.509 v3
- Longitud de la clave: 2048 bits o superior (se recomiendan 4096 bits) o ECDSA (P-256 o superior)
- Algoritmo de firma: SHA-256 o más fuerte (SHA-384, SHA-512)
- Extensiones necesarias: Uso extendido de claves con autenticación de cliente (1.3.6.1.5.5.7.3.2)
Requisitos para las búsquedas de proveedores de identidad
Para que la coincidencia correcta de la identidad del usuario con su IdP, asegúrese de que sus certificados de cliente incluyen uno de los siguientes campos. La búsqueda debe realizarse con el nombre principal del usuario en el nube IdP (formato user@domain.xyz). Los siguientes campos se comprueban en el orden que se indica a continuación:
- Nombre común del sujeto (CN)
- Nombre alternativo del firmante - UPN (SAN:UPN)
- Nombre alternativo del asunto - Correo electrónico (SAN:Email)
Comportamiento de búsqueda del proveedor de identidad para certificados de máquina
Para que la coincidencia correcta de la identidad de la máquina con su IdP (principalmente se refiere al ID de Entrada, ya que otros IdP de la nube no tienen identidades de máquina), asegúrese de que sus certificados de cliente incluyan uno de los siguientes campos.
La búsqueda debe realizarse utilizando el nombre del dispositivo (excluyendo el nombre de dominio) en su EntraID. Los siguientes campos se comprueban en el orden que se indica a continuación:
- Nombre común del sujeto (CN)
- Nombre alternativo del firmante - DNS (SAN:DNS)
Consideraciones sobre la integración de MDM
Cuando se usan certificados con soluciones MDM:
- Incluya identificadores de dispositivo en el certificado (como DeviceId o UDID en el campo SAN:DNS) para búsquedas basadas en dispositivos.
- Consulte con la documentación de integración relevante para cada proveedor de MDM en el Portal de documentación de Juniper: NAC de Juniper Mist Access Assurance
Pruebe la configuración del certificado con un pequeño conjunto de dispositivos antes de implementarlo en toda la organización para garantizar una funcionalidad adecuada en todas las funciones de Access Assurance.