예: EX 시리즈 스위치 및 Aruba ClearPass Policy Manager로 디바이스 프로파일링 구성
이 구성 예에서는 EX 시리즈 스위치 및 Aruba ClearPass Policy Manager의 기능을 사용하여 엔드포인트 인증 프로세스의 일부로 디바이스 프로파일링을 수행하는 방법을 보여줍니다.
이 예에서 조직의 유선 인프라에는 액세스 정책을 정의한 네 가지 유형의 엔드포인트가 있습니다.
액세스 포인트 - 액세스 포인트로 프로파일링된 엔드포인트는 네트워크에 액세스할 수 있으며 AP_VLAN VLAN에 동적으로 할당됩니다.
IP 전화기 - IP 전화기로 프로파일링된 엔드포인트는 네트워크에 액세스할 수 있습니다. IPPhone_VLAN은 동적으로 VoIP VLAN으로 할당됩니다.
회사 랩톱 - 802.1X 신청자가 있는 엔드포인트는 사용자 자격 증명으로 인증됩니다. 사용자가 성공적으로 인증되면 랩톱에 네트워크에 대한 액세스 권한이 부여되고 Windows_VLAN VLAN에 배치됩니다.
회사 이외의 랩톱 - 802.1X 신청자가 없고 Windows 디바이스로 프로파일링된 엔드포인트는 네트워크에 대한 액세스가 거부됩니다.
이 주제는 다음 내용을 다룹니다.
요구 사항
이 예는 정책 인프라에 대해 다음과 같은 하드웨어 및 소프트웨어 구성 요소를 사용합니다.
Junos OS 릴리스 15.1R3 이상을 실행하는 EX4300 스위치
6.3.3.63748 이상을 실행하는 Aruba ClearPass Policy Manager 플랫폼
개요 및 토폴로지
엔드포인트 액세스 정책을 구현하기 위해 정책 인프라는 다음과 같이 구성됩니다.
스위치의 모든 액세스 인터페이스는 처음에 교정 VLAN 역할을 하는 VLAN 100에 있도록 구성됩니다. 엔드포인트가 성공적으로 인증되지 않았거나 지원되는 엔드포인트 중 하나로 성공적으로 프로파일링되지 않은 경우 교정 VLAN에 남아 있습니다.
802.1X 신청자가 있는 엔드포인트는 802.1X PEAP 인증을 사용하여 인증됩니다. 802.1X PEAP 인증에 대한 자세한 내용은 EX 시리즈 스위치 및 Aruba ClearPass Policy Manager로 802.1X PEAP 및 MAC RADIUS 인증 구성을 참조하십시오.
802.1X 신청자가 없는 엔드포인트는 MAC RADIUS 인증을 사용하여 인증되며 프로파일링되어 디바이스 유형을 결정합니다. 이러한 엔드포인트는 2단계 인증 프로세스를 거칩니다.
첫 번째 단계는 엔드포인트가 스위치에 처음 연결된 후 Aruba ClearPass Profile에 의해 프로파일링되기 전에 발생합니다. 연결 후 엔드포인트는 MAC RADIUS 인증을 사용하여 인증됩니다. Aruba ClearPass는 엔드포인트에 인터넷 액세스 권한을 부여하도록 스위치에 지시하지만 내부 네트워크에는 액세스하지 못하도록 하는 시행 정책을 적용합니다.
두 번째 단계는 엔드포인트가 성공적으로 프로파일링된 후에 발생합니다. 첫 번째 단계에서 인증된 후 엔드포인트는 DHCP 서버에 연결하여 IP 주소를 요청합니다. 스위치는 엔드포인트에서 DHCP 서버로 보낸 DHCP 메시지를 Aruba ClearPass에도 릴레이하며, 이를 통해 ClearPass가 엔드포인트를 프로파일링할 수 있습니다. 엔드포인트를 프로파일링하고 엔드포인트를 엔드포인트 리포지토리에 추가한 후 ClearPass는 RADIUS CoA(Change of Authorization) 메시지를 스위치에 보내 세션을 종료하도록 지시합니다. 그런 다음 스위치는 엔드포인트를 대신하여 재인증을 시도합니다. 이제 엔드포인트가 엔드포인트 저장소에 존재하므로 Aruba ClearPass는 엔드포인트를 인증할 때 디바이스 유형에 적합한 적용 정책을 적용할 수 있습니다. 예를 들어, 엔드포인트가 액세스 포인트인 경우 ClearPass는 액세스 포인트를 AP_VLAN VLAN에 동적으로 할당하는 시행 정책을 적용합니다.
그림 1 은 이 예에서 사용된 토폴로지를 보여줍니다.
 에 사용된 토폴로지
구성
이 섹션에서는 다음에 대한 단계별 지침을 제공합니다.
EX4300 스위치 구성
CLI 빠른 구성
이 예를 빠르게 구성하려면, 아래 명령을 복사하여 텍스트 파일로 붙여 넣은 다음 모든 라인브레이크를 제거하고, 네트워크 구성을 일치하는 데 필요한 세부 사항을 변경하고, 계층 수준에서 명령을 [edit] CLI로 복사해 붙여 넣은 다음, 구성 모드에서 commit 을 입력합니다.
[edit]
set access radius-server 10.105.5.153 dynamic-request-port 3799
set access radius-server 10.105.5.153 secret password
set access radius-server 10.105.5.153 source-address 10.105.5.91
set access profile CP-Test-Profile accounting-order radius
set access profile CP-Test-Profile authentication-order radius
set access profile CP-Test-Profile radius authentication-server 10.105.5.153
set access profile CP-Test-Profile radius accounting-server 10.105.5.153
set access profile CP-Test-Profile radius options nas-identifier 10.105.5.91
set protocols dot1x authenticator authentication-profile-name CP-Test-Profile
set protocols dot1x authenticator interface ge-0/0/6.0 mac-radius
set protocols dot1x authenticator interface ge-0/0/6.0 supplicant multiple
set protocols dot1x authenticator interface ge-0/0/8.0 mac-radius
set protocols dot1x authenticator interface ge-0/0/8.0 supplicant multiple
set protocols dot1x authenticator interface ge-0/0/22.0  mac-radius
set protocols dot1x authenticator interface ge-0/0/22.0  supplicant multiple
set vlans AP_VLAN vlan-id 130
set vlans IPPhone_VLAN vlan-id 120
set vlans Windows_VLAN vlan-id 150
set vlans v100 description "Remediation VLAN"
set vlans v100 vlan-id 100
set interfaces ge-0/0/6 unit 0 family ethernet-switching interface-mode access
set interfaces ge-0/0/6 unit 0 family ethernet-switching vlan members v100
set interfaces ge-0/0/8 unit 0 family ethernet-switching interface-mode access
set interfaces ge-0/0/8 unit 0 family ethernet-switching vlan members v100
set interfaces ge-0/0/22 unit 0 family ethernet-switching interface-mode access
set interfaces ge-0/0/22 unit 0 family ethernet-switching vlan members v100
set interfaces irb unit 100 family inet address 10.10.100.1/24
set interfaces irb unit 120 family inet address 10.10.120.1/24
set interfaces irb unit 130 family inet address 10.10.130.1/24
set interfaces irb unit 150 family inet address 10.10.150.1/24
set vlans AP_VLAN l3-interface irb.130
set vlans IPPhone_VLAN l3-interface irb.120
set vlans Windows_VLAN l3-interface irb.150
set vlans v100 l3-interface irb.100
set forwarding-options dhcp-relay server-group dhcp-dot1x 10.10.10.10
set forwarding-options dhcp-relay server-group dhcp-dot1x 10.105.5.153
set forwarding-options dhcp-relay active-server-group dhcp-dot1x
set forwarding-options dhcp-relay group all interface irb.100
set forwarding-options dhcp-relay group all interface irb.120
set forwarding-options dhcp-relay group all interface irb.130
set forwarding-options dhcp-relay group all interface irb.150
set firewall family ethernet-switching filter Internet_Only_Access term Allow_DHCP from destination-port 67
set firewall family ethernet-switching filter Internet_Only_Access term Allow_DHCP from destination-port 68
set firewall family ethernet-switching filter Internet_Only_Access term Allow_DHCP from ip-protocol udp
set firewall family ethernet-switching filter Internet_Only_Access term Allow_DHCP then accept
set firewall family ethernet-switching filter Internet_Only_Access term Allow_DNS from destination-port 53
set firewall family ethernet-switching filter Internet_Only_Access term Allow_DNS from ip-protocol udp
set firewall family ethernet-switching filter Internet_Only_Access term Allow_DNS from ip-protocol tcp
set firewall family ethernet-switching filter Internet_Only_Access term Block_Internal from ip-destination-address 192.168.0.0/16
set firewall family ethernet-switching filter Internet_Only_Access term Block_Internal then discard
set firewall family ethernet-switching filter Internet_Only_Access term Allow_All then accept
단계별 절차
EX4300 스위치를 구성하는 일반적인 단계는 다음과 같습니다.
Aruba ClearPass Policy Manager에 대한 연결을 구성합니다.
802.1X 프로토콜에서 사용하는 액세스 프로필을 만듭니다. 액세스 프로필은 802.1X 프로토콜에 사용할 인증 서버 및 인증 방법과 인증 방법의 순서를 알려줍니다.
802.1X 프로토콜을 구성합니다.
VLAN을 구성합니다.
액세스 포트에서 이더넷 스위칭을 구성합니다.
통합 라우팅 및 브리징(IRB) 인터페이스를 구성하고 VLAN에 할당합니다.
디바이스 프로파일링을 수행할 수 있도록 DHCP 패킷을 Aruba ClearPass로 전송하도록 DHCP 릴레이를 구성합니다.
내부 네트워크에 대한 액세스를 차단하는 방화벽 정책을 만듭니다.
EX4300 스위치를 구성하려면 다음과 같이 하십시오.
RADIUS 서버 연결 정보를 제공합니다.
[edit access]
user@Policy-EX4300-01# set radius-server 10.105.5.153 dynamic-request-port 3799
user@Policy-EX4300-01# set radius-server 10.105.5.153 secret password
user@Policy-EX4300-01# set radius-server 10.105.5.153 source-address 10.105.5.91
액세스 프로필을 구성합니다.
[edit access]
user@Policy-EX4300-01# set profile CP-Test-Profile accounting-order radius
user@Policy-EX4300-01# set profile CP-Test-Profile authentication-order radius
user@Policy-EX4300-01# set profile CP-Test-Profile radius authentication-server 10.105.5.153
user@Policy-EX4300-01# set profile CP-Test-Profile radius accounting-server 10.105.5.153
user@Policy-EX4300-01# set profile CP-Test-Profile radius options nas-identifier 10.105.5.91
CP-Test-Profile을 사용하도록 802.1X를 구성하고 각 액세스 인터페이스에서 프로토콜을 활성화합니다. 또한 MAC RADIUS 인증을 지원하고 각각 개별적으로 인증해야 하는 두 개 이상의 서플리컨트를 허용하도록 인터페이스를 구성합니다.
기본적으로 스위치는 먼저 802.1X 인증을 시도합니다. 엔드포인트에서 EAP 패킷을 수신하지 않아 엔드포인트에 802.1X 신청자가 없음을 나타내는 경우 MAC RADIUS 인증을 시도합니다.
[edit protocols]
user@Policy-EX4300-01# set dot1x authenticator authentication-profile-name CP-Test-Profile
user@Policy-EX4300-01# set dot1x authenticator interface ge-0/0/6.0 mac-radius
user@Policy-EX4300-01# set dot1x authenticator interface ge-0/0/6.0 supplicant multiple
user@Policy-EX4300-01# set dot1x authenticator interface ge-0/0/8.0 mac-radius
user@Policy-EX4300-01# set dot1x authenticator interface ge-0/0/8.0 supplicant multiple
user@Policy-EX4300-01# set dot1x authenticator interface ge-0/0/22.0  mac-radius
user@Policy-EX4300-01# set dot1x authenticator interface ge-0/0/22.0  supplicant multiple
이 예에서 사용되는 VLAN을 구성합니다.
[edit vlans]
user@Policy-EX4300-01# set AP_VLAN vlan-id 130
user@Policy-EX4300-01# set IPPhone_VLAN vlan-id 120
user@Policy-EX4300-01# set Windows_VLAN vlan-id 150
user@Policy-EX4300-01# set v100 description "Remediation VLAN"
user@Policy-EX4300-01# set v100 vlan-id 100
동적 VLAN 할당이 작동하려면 인증을 시도하기 전에 스위치에 VLAN이 존재해야 합니다. VLAN이 없으면 인증이 실패합니다.
액세스 포트를 구성합니다.
각 액세스 포트는 교정 VLAN인 VLAN v100에 있도록 구성됩니다. 이 VLAN은 Aruba ClearPass가 엔드포인트를 인증할 때 동적 VLAN 정보를 전송하지 않는 경우 엔드포인트에서 사용됩니다.
[edit interfaces]
user@Policy-EX4300-01# set ge-0/0/6 unit 0 family ethernet-switching interface-mode access
user@Policy-EX4300-01# set ge-0/0/6 unit 0 family ethernet-switching vlan members v100
user@Policy-EX4300-01# set ge-0/0/8 unit 0 family ethernet-switching interface-mode access
user@Policy-EX4300-01# set ge-0/0/8 unit 0 family ethernet-switching vlan members v100
user@Policy-EX4300-01# set ge-0/0/22 unit 0 family ethernet-switching interface-mode access
user@Policy-EX4300-01# set ge-0/0/22 unit 0 family ethernet-switching vlan members v100
IRB 인터페이스를 구성하고 VLAN에 할당합니다.
[edit interfaces]
user@Policy-EX4300-01# set irb unit 100 family inet address 10.10.100.1/24
user@Policy-EX4300-01# set irb unit 120 family inet address 10.10.120.1/24
user@Policy-EX4300-01# set irb unit 130 family inet address 10.10.130.1/24
user@Policy-EX4300-01# set irb unit 150 family inet address 10.10.150.1/24
[edit vlans]
user@Policy-EX4300-01# set v100 l3-interface irb.100
user@Policy-EX4300-01# set IPPhone_VLAN l3-interface irb.120
user@Policy-EX4300-01# set AP_VLAN l3-interface irb.130
user@Policy-EX4300-01# set Windows_VLAN l3-interface irb.150
DHCP 요청 패킷을 Aruba ClearPass로 전달하도록 DHCP 릴레이를 구성합니다.
[edit forwarding-options]
user@Policy-EX4300-01# set dhcp-relay server-group dhcp-dot1x 10.10.10.10
user@Policy-EX4300-01# set dhcp-relay server-group dhcp-dot1x 10.105.5.153
user@Policy-EX4300-01# set dhcp-relay active-server-group dhcp-dot1x
user@Policy-EX4300-01# set dhcp-relay group all interface irb.100
user@Policy-EX4300-01# set dhcp-relay group all interface irb.120
user@Policy-EX4300-01# set dhcp-relay group all interface irb.130
user@Policy-EX4300-01# set dhcp-relay group all interface irb.150
참고:이 컨피그레이션 예에서는 DHCP 릴레이 컨피그레이션을 시연하기 위해 액세스 스위치에서 엔드포인트 VLAN에 대한 레이어 3 인터페이스를 구성합니다. 그러나 일반적인 엔터프라이즈 구축에서는 엔드포인트 VLAN에 대한 레이어 3 인터페이스가 어그리게이션 또는 코어 레이어 스위치에 구성됩니다. 이러한 구축에서는 엔드포인트에서 Aruba ClearPass로 DHCP 요청을 전달하도록 어그리게이션 또는 코어 스위치의 DHCP 릴레이를 구성해야 합니다.
MAC RADIUS 인증으로 인증되었지만 아직 프로파일링되지 않은 디바이스에 사용할 방화벽 필터 Internet_Only_Access를 구성합니다.
이 필터는 엔드포인트가 내부 네트워크(192.168.0.0/16)에 액세스하지 못하도록 차단합니다.
[edit firewall]
user@Policy-EX4300-01# set family ethernet-switching filter Internet_Only_Access term Allow_DHCP from destination-port 67
user@Policy-EX4300-01# set family ethernet-switching filter Internet_Only_Access term Allow_DHCP from destination-port 68
user@Policy-EX4300-01# set family ethernet-switching filter Internet_Only_Access term Allow_DHCP from ip-protocol udp
user@Policy-EX4300-01# set family ethernet-switching filter Internet_Only_Access term Allow_DHCP then accept
user@Policy-EX4300-01# set family ethernet-switching filter Internet_Only_Access term Allow_DNS from destination-port 53
user@Policy-EX4300-01# set family ethernet-switching filter Internet_Only_Access term Allow_DNS from ip-protocol udp
user@Policy-EX4300-01# set family ethernet-switching filter Internet_Only_Access term Allow_DNS from ip-protocol tcp
user@Policy-EX4300-01# set family ethernet-switching filter Internet_Only_Access term Block_Internal from ip-destination-address 192.168.0.0/16
user@Policy-EX4300-01# set family ethernet-switching filter Internet_Only_Access term Block_Internal then discard
user@Policy-EX4300-01# set family ethernet-switching filter Internet_Only_Access term Allow_All then accept
결과
구성 모드에서 다음 show 명령을 입력하여 구성을 확인합니다.
user@Policy-EX4300-01# show access
radius-server {
    10.105.5.153 {
        dynamic-request-port 3799;
        secret "$9$FYxf3A0Ehrv87yl7Vs4DjfTz3Ct0BIcre"; ## SECRET-DATA
        source-address 10.105.5.91;
    }
}
profile CP-Test-Profile {
    accounting-order radius;
    authentication-order radius;
    radius {
        authentication-server 10.105.5.153;
        accounting-server 10.105.5.153;
        options {
            nas-identifier 10.105.5.91;
        }
    }
}
user@Policy-EX4300-01# show protocols
dot1x {
    authenticator {
        authentication-profile-name CP-Test-Profile;
        interface {
            ge-0/0/6.0 {
               supplicant multiple;
               mac-radius;
            }
            ge-0/0/8.0 {
                supplicant multiple;
                mac-radius;
            }
            ge-0/0/22.0 {
                supplicant multiple;
                mac-radius;
	            }
        }
    }
}
user@Policy-EX4300-01# show interfaces
ge-0/0/6 {
    unit 0 {
        family ethernet-switching {
            vlan {
                members v100;
            }
        }
    }
}
ge-0/0/8 {
    unit 0 {
        family ethernet-switching;
            vlan {
                members v100;
            }
        }
    }
}
ge-0/0/22 {
    unit 0 {
        family ethernet-switching {
            vlan {
                members v100;
            }
        }
    }
}
irb {
    unit 100 {
        family inet {
            address 10.10.100.1/24;
        }
    }
    unit 120 {
        family inet {
            address 10.10.120.1/24;
        }
    }
    unit 130 {
        family inet {
            address 10.10.130.1/24;
        }
    }
    unit 150 {
        family inet {
            address 10.10.150.1/24;
        }
    }
}
user@Policy-EX4300-01# show vlans
AP_VLAN {
    vlan-id 130;
    l3-interface irb.130;
}
IPPhone_VLAN {
    vlan-id 120;
    l3-interface irb.120;
}
Windows_VLAN {
    vlan-id 150;
    l3-interface irb.150;
}
v100 {
    description "Remediation VLAN";
    vlan-id 100;
    l3-interface irb.100;
}
user@Policy-EX4300-01# show forwarding-options
dhcp-relay {
    server-group {
        dhcp-dot1x {
            10.10.10.10;
            10.105.5.153;
        }
    }
    active-server-group dhcp-dot1x;
    group all {
        interface irb.100;
        interface irb.120;
        interface irb.130;
        interface irb.150;
    }
}
user@Policy-EX4300-01# show firewall
family ethernet-switching {
    filter Internet_Only_Access {
        term Allow_DHCP {
            from {
                destination-port [ 67 68 ];
                ip-protocol udp;
            }
            then accept;
        }
        term Allow_DNS {
            from {
                destination-port 53;
                ip-protocol [ udp tcp ];
            }
        }
        term Block_Internal {
            from {
                ip-destination-address {
                    192.168.0.0/16;
                }
            }
            then discard;
        }
        term Allow_All {
            then accept;
        }
    }
}
디바이스 구성을 마쳤으면 구성 모드에서 을 입력합니다 commit .
Aruba ClearPass Policy Manager 구성
단계별 절차
Aruba ClearPass를 구성하는 일반적인 단계는 다음과 같습니다.
장치 프로파일링을 사용하도록 설정합니다.
이 구성 예에서 사용된 몇 가지 추가 주니퍼 네트웍스 RADIUS 속성을 포함하도록 주니퍼 네트웍스 RADIUS 사전 파일을 수정합니다.
EX4300을 네트워크 디바이스로 추가합니다.
802.1X PEAP 인증에 사용되는 서버 인증서가 설치되었는지 확인합니다.
이 예에서 802.1X 인증에 사용된 로컬 사용자를 추가합니다.
다음과 같은 적용 프로파일을 생성합니다.
엔드포인트를 VLAN 150에 배치하는 Employee_Windows_Profile.
VLAN 120을 VoIP VLAN으로 정의하는 IPPhone_Profile.
엔드포인트를 VLAN 130에 배치하는 AccessPoint_Profile.
아직 프로파일링되지 않은 디바이스에 방화벽 필터를 사용할 Internet_Only_Access 지정하는 Internet_Access_Only_Profile.
두 가지 적용 정책을 만듭니다.
MAC RADIUS 인증을 사용할 때 호출되는 정책입니다.
802.1X 인증을 사용할 때 호출되는 정책입니다.
MAC RADIUS 인증 서비스 및 802.1X 인증 서비스를 정의합니다.
MAC RADIUS 인증 서비스가 802.1X 인증 서비스 전에 평가되었는지 확인합니다.
Aruba ClearPass 구성:
장치 프로파일링을 사용하도록 설정합니다.
단계별 절차
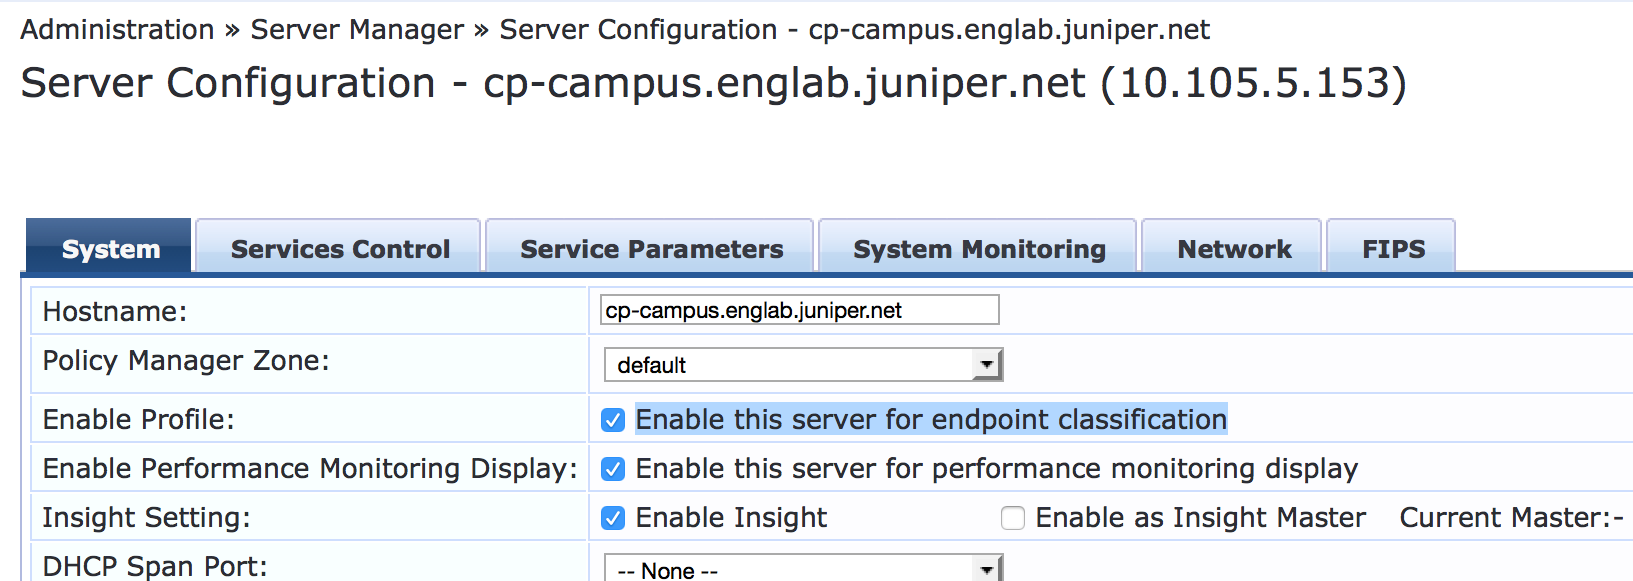
관리 > 서버 관리자 > 서버 구성에서 Aruba ClearPass 서버의 이름을 클릭합니다.
시스템 탭에서 끝점 분류에 이 서버 사용을 클릭합니다.
주니퍼 네트웍스 RADIUS 사전 파일을 업데이트합니다.
주니퍼 네트웍스 RADIUS 사전 파일은 Aruba ClearPass에 사전 설치된 상태로 제공됩니다. EX 시리즈 스위치용 Junos OS 버전 15.1R3은 사전 파일에 추가해야 하는 3개의 새로운 주니퍼 네트웍스 VSA에 대한 지원을 추가합니다.
단계별 절차
Aruba ClearPass에서 Administration > Dictionaries > RADIUS로 이동합니다.
RADIUS Dictionaries(RADIUS 사전) 창의 Filter(필터) 필드를 사용하여 Vendor Name(벤더 이름)에서 Juniper 를 검색합니다.
Juniper 사전 이름을 클릭한 다음 내보내기 를 클릭하고 파일을 바탕 화면에 저장합니다 RadiusDictionary.xml .

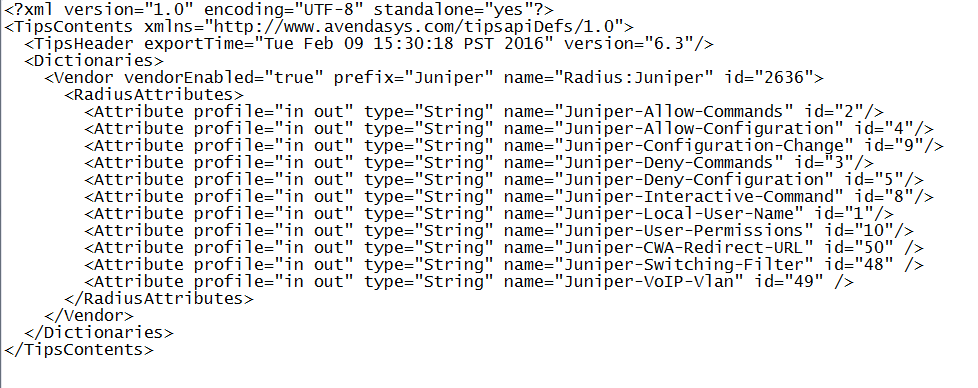
다음 세 가지 특성을 복사하여 에 붙여넣 RadiusDictionary.xml고 파일을 저장합니다.
<Attribute profile="in out" type="String" name="Juniper-CWA-Redirect-URL" id="50" />
<Attribute profile="in out" type="String" name="Juniper-Switching-Filter" id="48" />
<Attribute profile="in out" type="String" name="Juniper-VoIP-Vlan" id="49" />
사전 파일은 붙여넣기를 완료하면 다음과 같아야 합니다.
RADIUS 사전 창을 클릭하고
 파일을 찾아 Aruba ClearPass로 가져옵니다RadiusDictionary.xml.
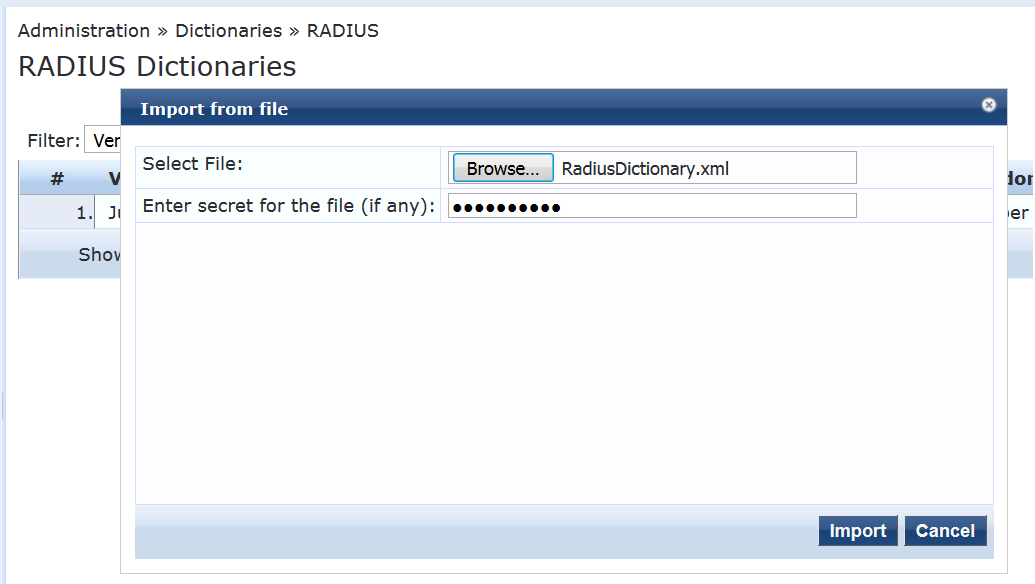
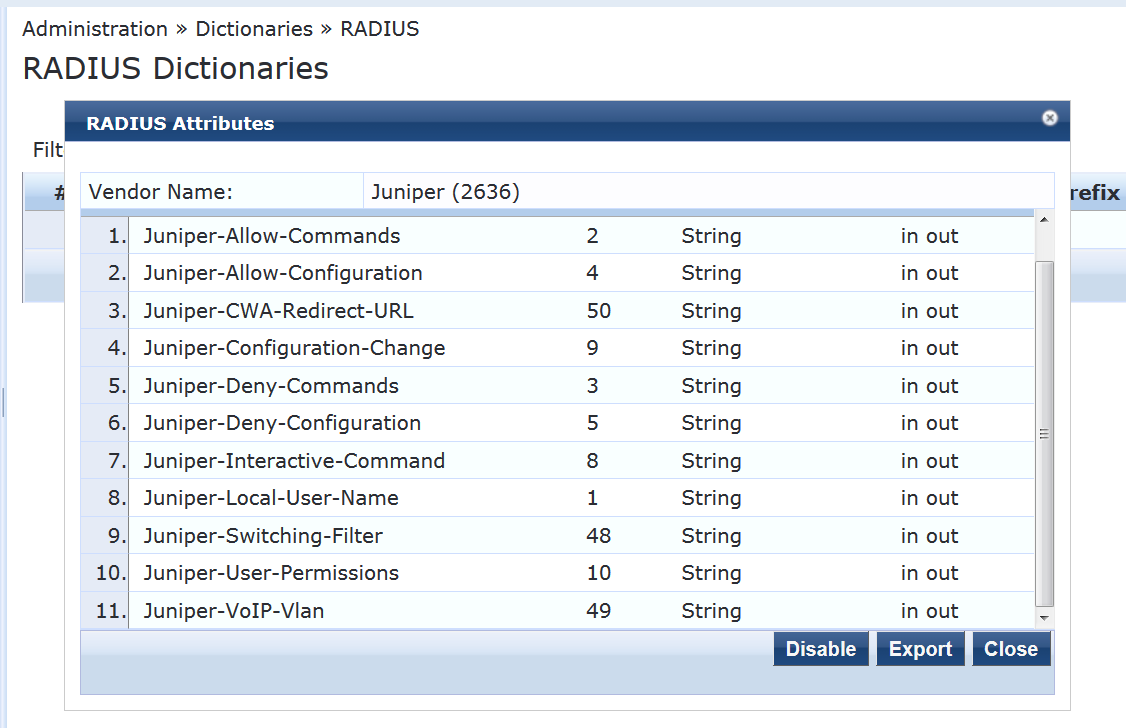
파일을 가져온 후 Juniper 사전 파일은 다음과 같아야 합니다.
EX4300 스위치를 네트워크 디바이스로 추가합니다.
단계별 절차
Configuration > Network > Devices(네트워크 장치)에서 Add(추가)를 클릭합니다.

Device(디바이스) 탭에서 스위치의 호스트 이름 및 IP 주소와 스위치에 구성한 RADIUS 공유 암호를 입력합니다. Vendor Name(공급업체 이름) 필드를 Juniper로 설정합니다.

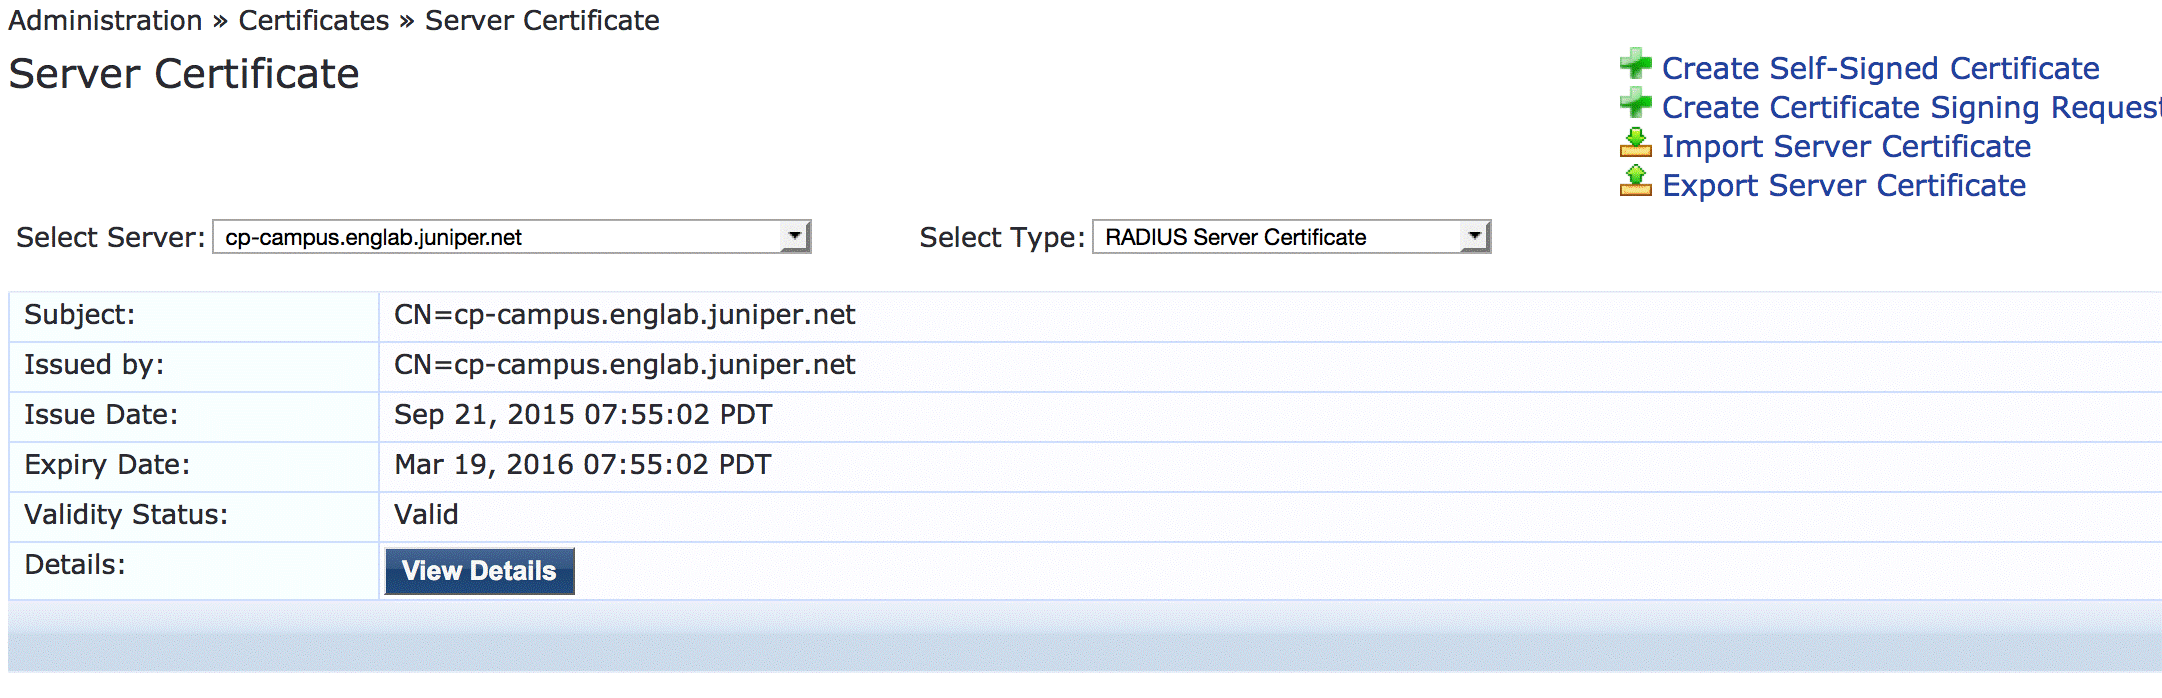
802.1X PEAP 인증을 위한 서버 인증서가 있는지 확인합니다.
인증서 > 서버 인증서> 관리에서 Aruba ClearPass에 유효한 서버 인증서가 설치되어 있는지 확인합니다. 그렇지 않은 경우 유효한 서버 인증서를 추가합니다. Aruba ClearPass 설명서 및 인증 기관은 인증서를 획득하고 ClearPass로 가져오는 방법에 대한 자세한 내용을 제공할 수 있습니다.
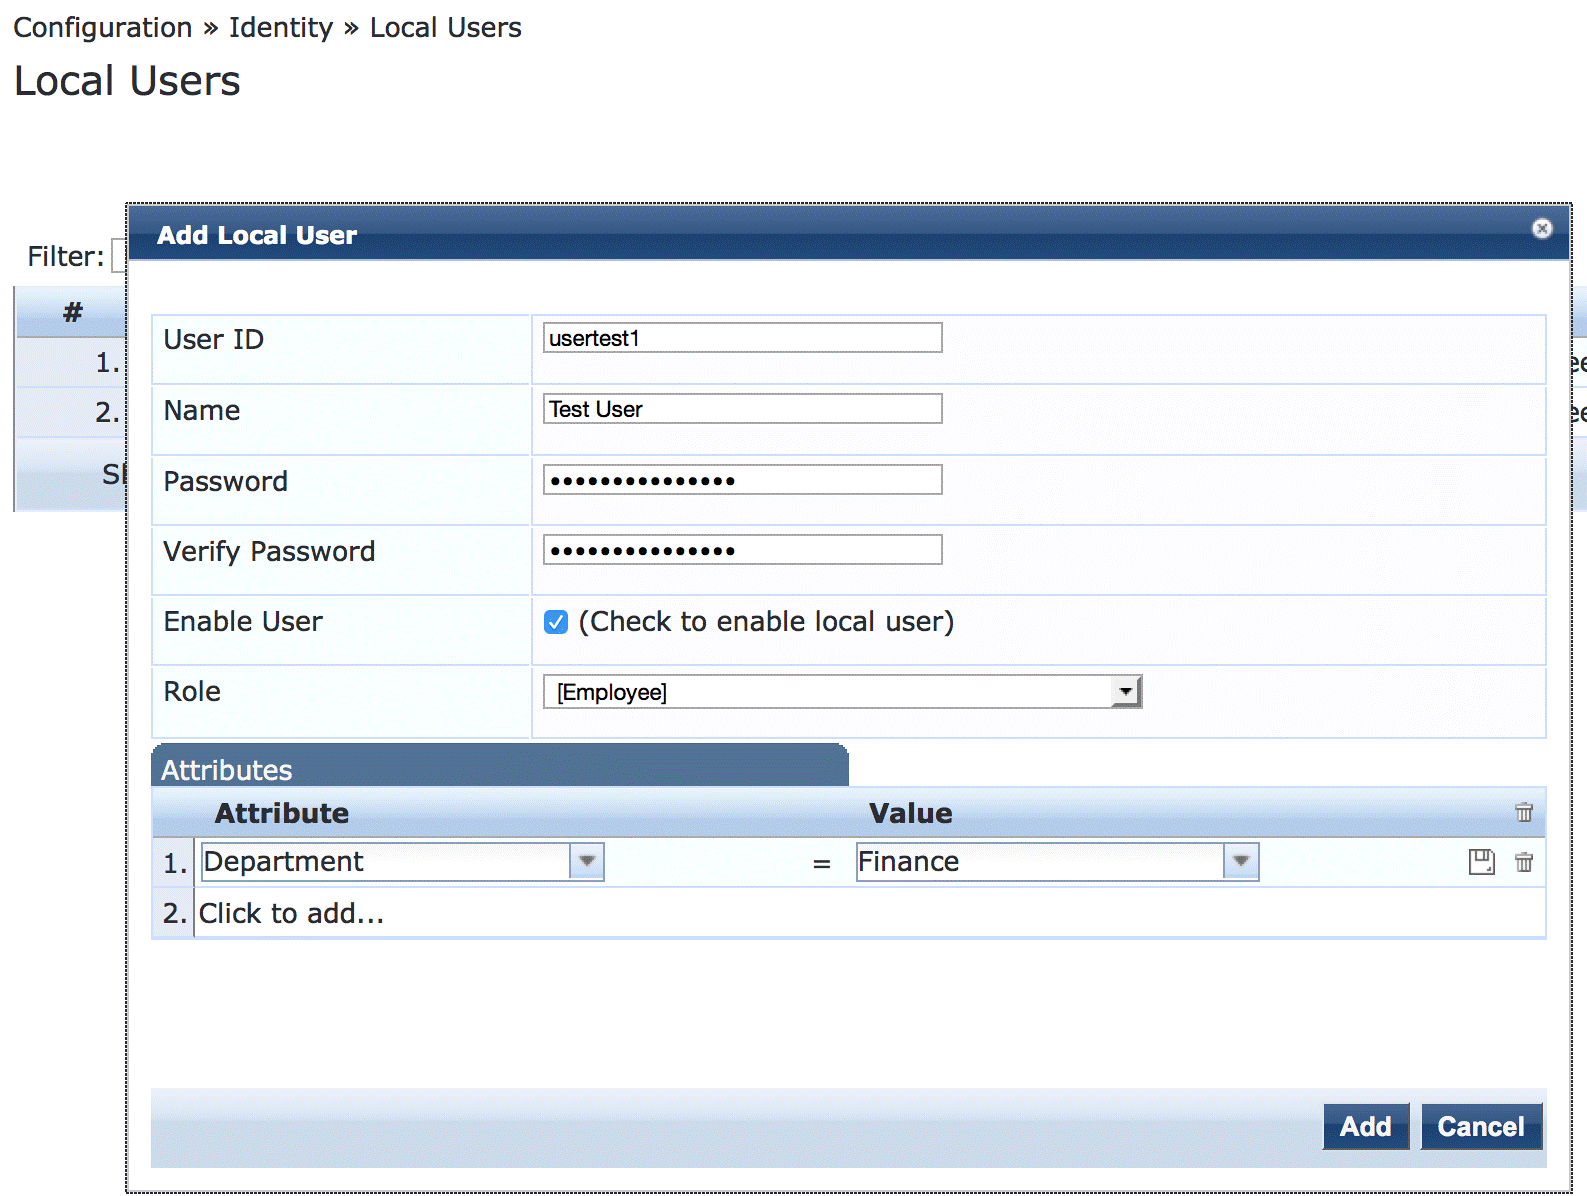
로컬 사용자 리포지토리에 테스트 사용자를 추가합니다.
이 사용자는 802.1X 인증을 확인하는 데 사용됩니다.
단계별 절차
Configuration > Identity > Local Users(로컬 사용자)에서 Add(추가)를 클릭합니다.
로컬 사용자 추가 창에서 사용자 ID(usertest1), 사용자 이름(테스트 사용자) 및 암호를 입력합니다. 그런 다음 사용자 역할로 직원을 선택합니다. Attributes(특성)에서 Department 특성을 선택하고 Value(값) 아래에 Finance(재무 )를 입력합니다.
802.1X를 사용하여 인증하는 직원 Windows 랩톱 또는 데스크톱에 대한 적용 프로필을 구성합니다.
이 프로필은 엔드포인트를 VLAN 150에 배치합니다.
단계별 절차
Configuration > Enforcement > Profiles(구성 적용 프로파일)에서 Add(추가)를 클릭합니다.
Profile(프로파일) 탭에서 Template(템플릿)을 RADIUS Based Enforcement(RADIUS 기반 적용 )로 설정하고 Name(이름) 필드에 프로파일 이름 Employee_Windows_Profile를 입력합니다.
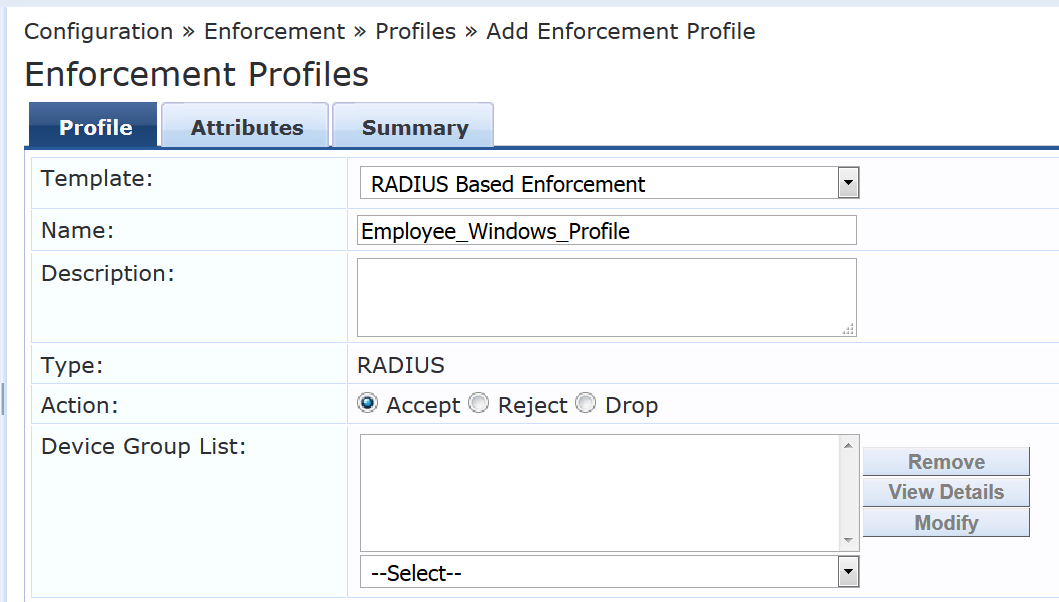
Attributes(특성) 탭에서 표시된 대로 특성을 구성합니다.

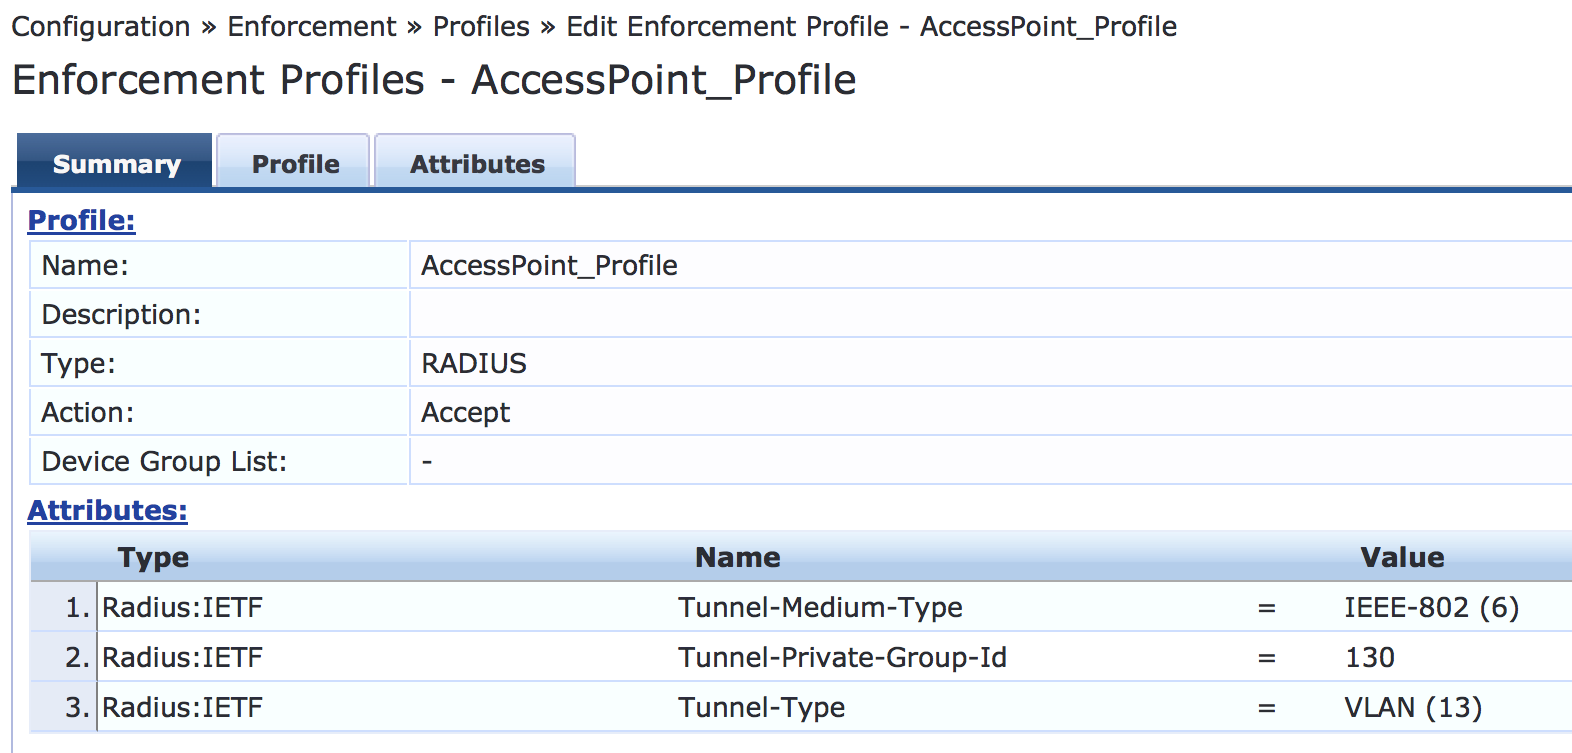
액세스 포인트를 VLAN 130에 배치하는 액세스 포인트 적용 프로파일을 구성합니다.
이전 단계에서 사용한 것과 동일한 기본 절차를 사용하여 이 프로필을 만듭니다. 프로필을 완료하면 요약 탭의 정보가 표시된 대로 나타납니다.
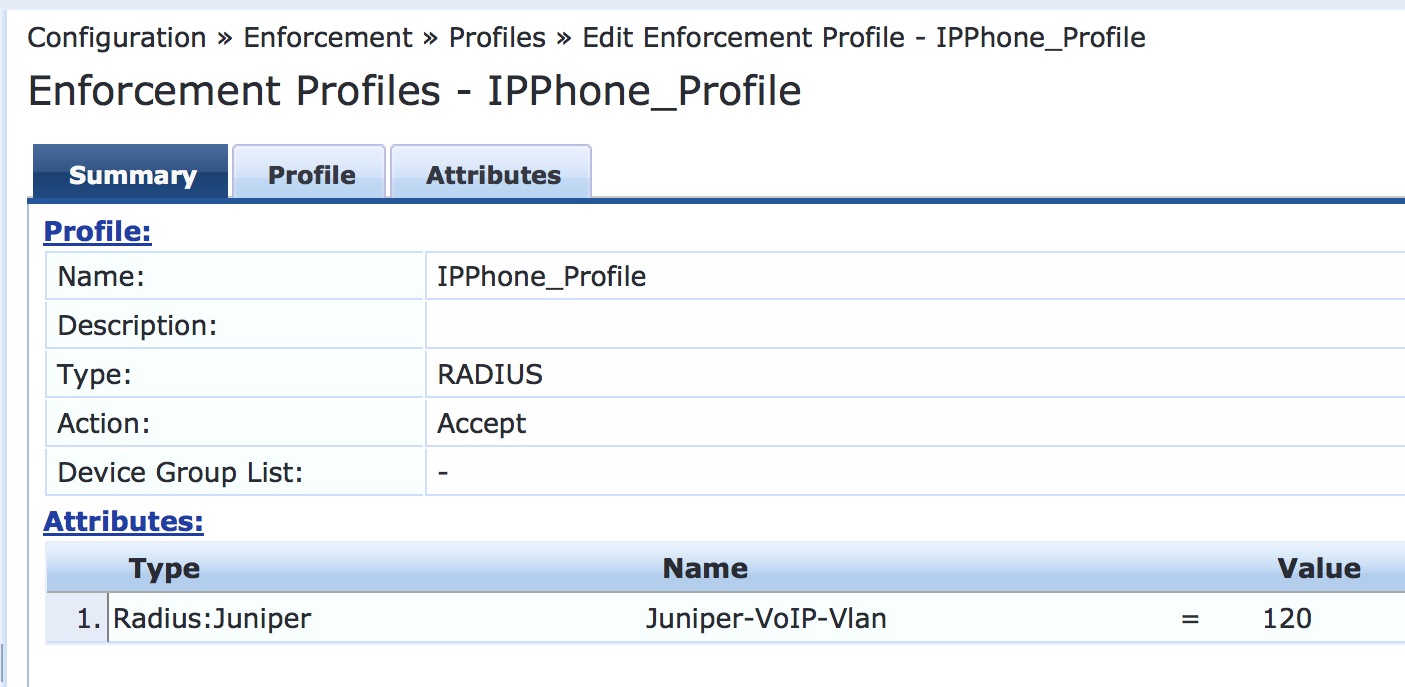
IP 전화 적용 프로파일을 구성합니다.
이 프로필은 Aruba ClearPass에 VLAN 120을 VoIP VLAN으로 사용해야 하는 VLAN으로 반환하도록 지시합니다. 주니퍼 네트웍스 RADIUS 사전은 이러한 목적으로 사용할 특별한 RADIUS 속성을 정의합니다. 속성 유형으로 RADIUS-Juniper를 선택하고 속성 이름으로 Juniper-VoIP-Vlan 을 선택합니다.
프로필을 완료하면 요약 탭의 정보가 표시된 대로 나타납니다.
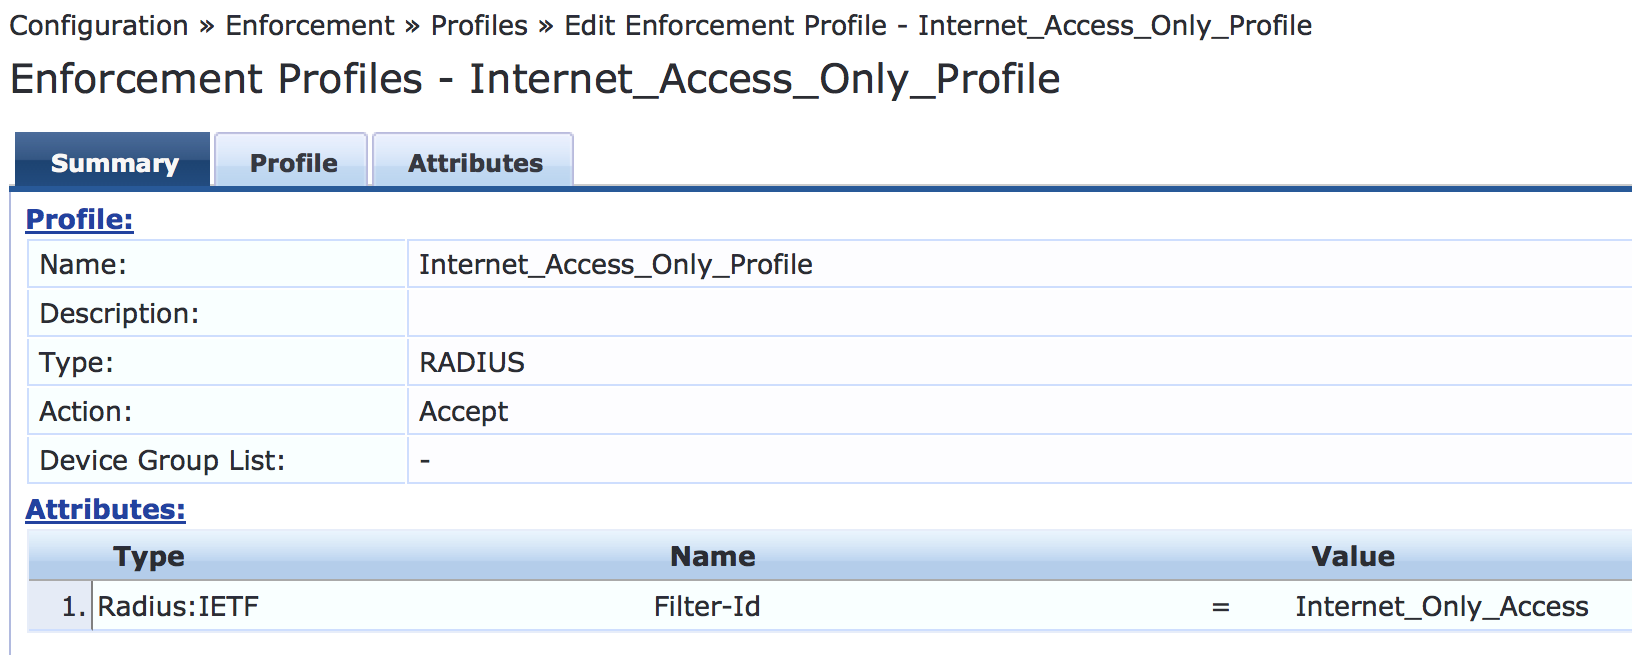
인터넷 액세스 전용 적용 프로파일을 구성합니다.
이 실행 프로필은 내부 네트워크에 대한 액세스를 차단하는 스위치에 구성한 방화벽 필터인 방화벽 필터 Internet_Only_Access의 이름을 반환하도록 Aruba ClearPass에 지시합니다. 이 프로필을 완료하면 요약 탭의 정보가 표시된 대로 나타납니다.
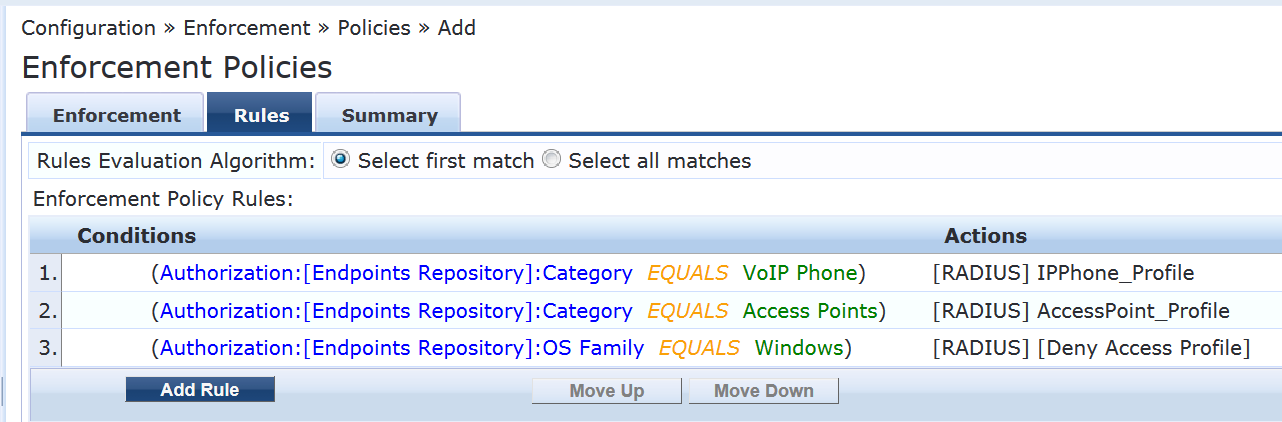
MAC RADIUS 인증 시행 정책을 구성합니다.
MAC RADIUS 인증으로 인증되는 엔드포인트의 경우, 이 정책은 디바이스 프로파일에 따라 적용 정책을 적용하도록 Aruba ClearPass에 지시합니다. AccessPoint_Profile은 액세스 포인트로 프로파일링된 엔드포인트에 적용되고, IPPhone_Profile는 VoIP 전화로 프로파일링된 엔드포인트에 적용됩니다. 사전 정의된 적용 정책 Deny Access Profile은 Windows 디바이스로 프로파일링된 엔드포인트에 적용됩니다. 이렇게 하면 802.1X 신청자가 있는 랩톱만 네트워크에 액세스할 수 있다는 조직 액세스 정책이 적용됩니다. 아직 프로파일링되지 않은 끝점을 포함하여 다른 모든 끝점의 경우 Internet_Access_Only 프로필이 적용됩니다.
단계별 절차
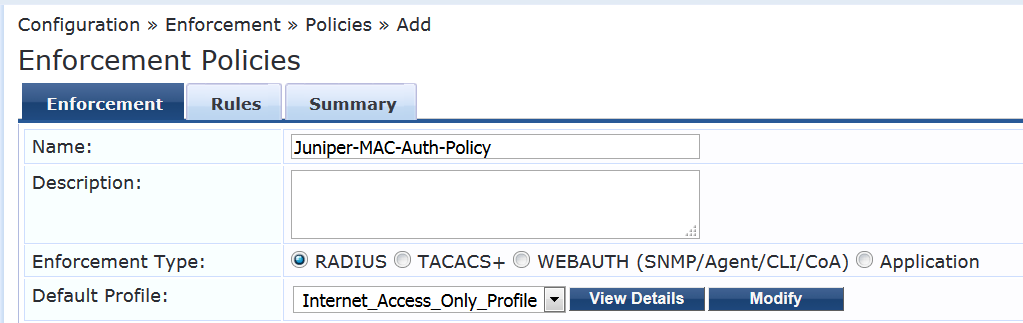
Configuration > Enforcement > Policies(구성 적용 정책)에서 Add(추가)를 클릭합니다.
적용(Enforcement) 탭에서 정책 이름()을 입력하고 기본 프로필(Juniper-MAC-Auth-PolicyDefault Profile)을 Internet_Access_Only로 설정합니다.
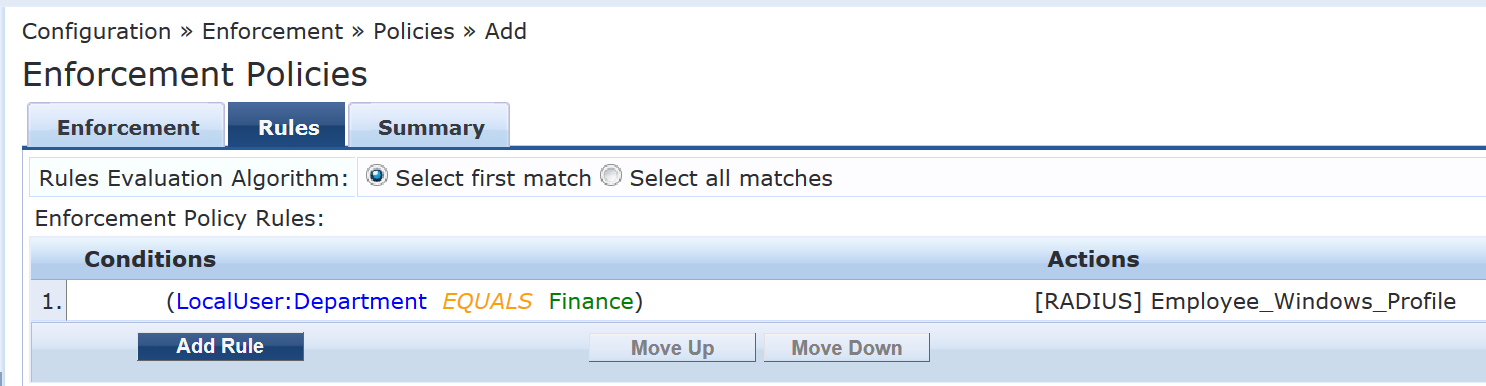
Rules(규칙) 탭에서 Add Rule(규칙 추가 )을 클릭하고 표시된 규칙을 추가합니다.
다음 규칙을 만들기 전에 저장을 클릭하여 규칙을 순차적으로 추가해야 합니다.
802.1X 적용 정책을 구성합니다.
이 정책은 사용자가 재무 부서의 구성원으로 성공적으로 인증된 경우 Aruba ClearPass에 Employee_Windows_Profile 적용 프로파일을 사용하도록 지시합니다.
단계별 절차
Configuration > Enforcement > Policies(구성 적용 정책)에서 Add(추가)를 클릭합니다.
[적용] 탭에서 정책 이름(Juniper_Dot1X_Policy)을 입력하고 기본 프로필을 [액세스 프로필 허용]으로 설정합니다. (미리 정의된 프로필입니다.)
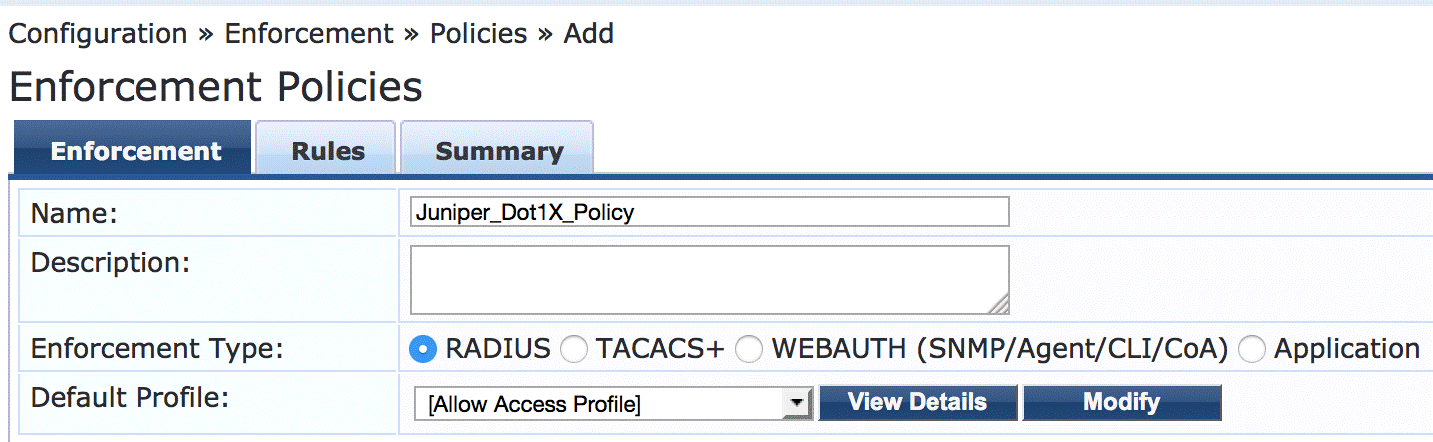
Rules(규칙) 탭에서 Add Rule(규칙 추가 )을 클릭하고 표시된 규칙을 추가합니다.
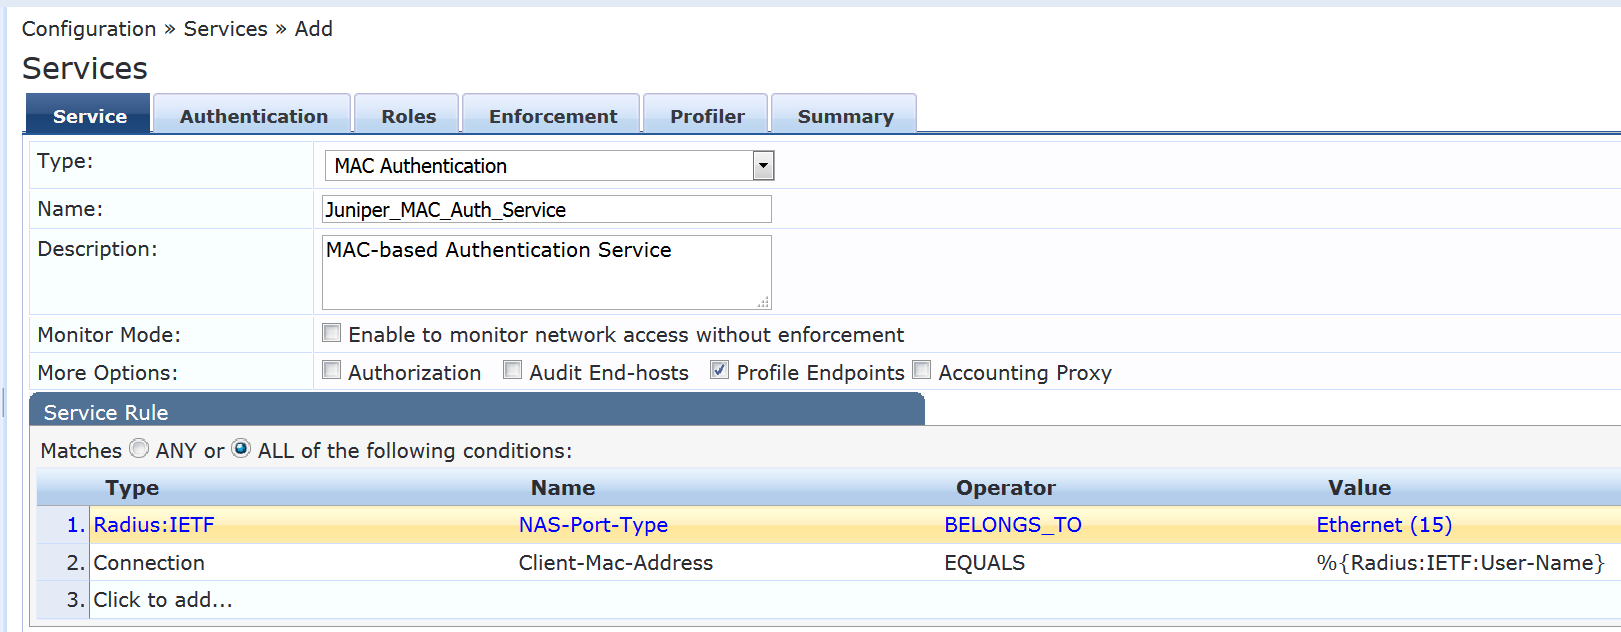
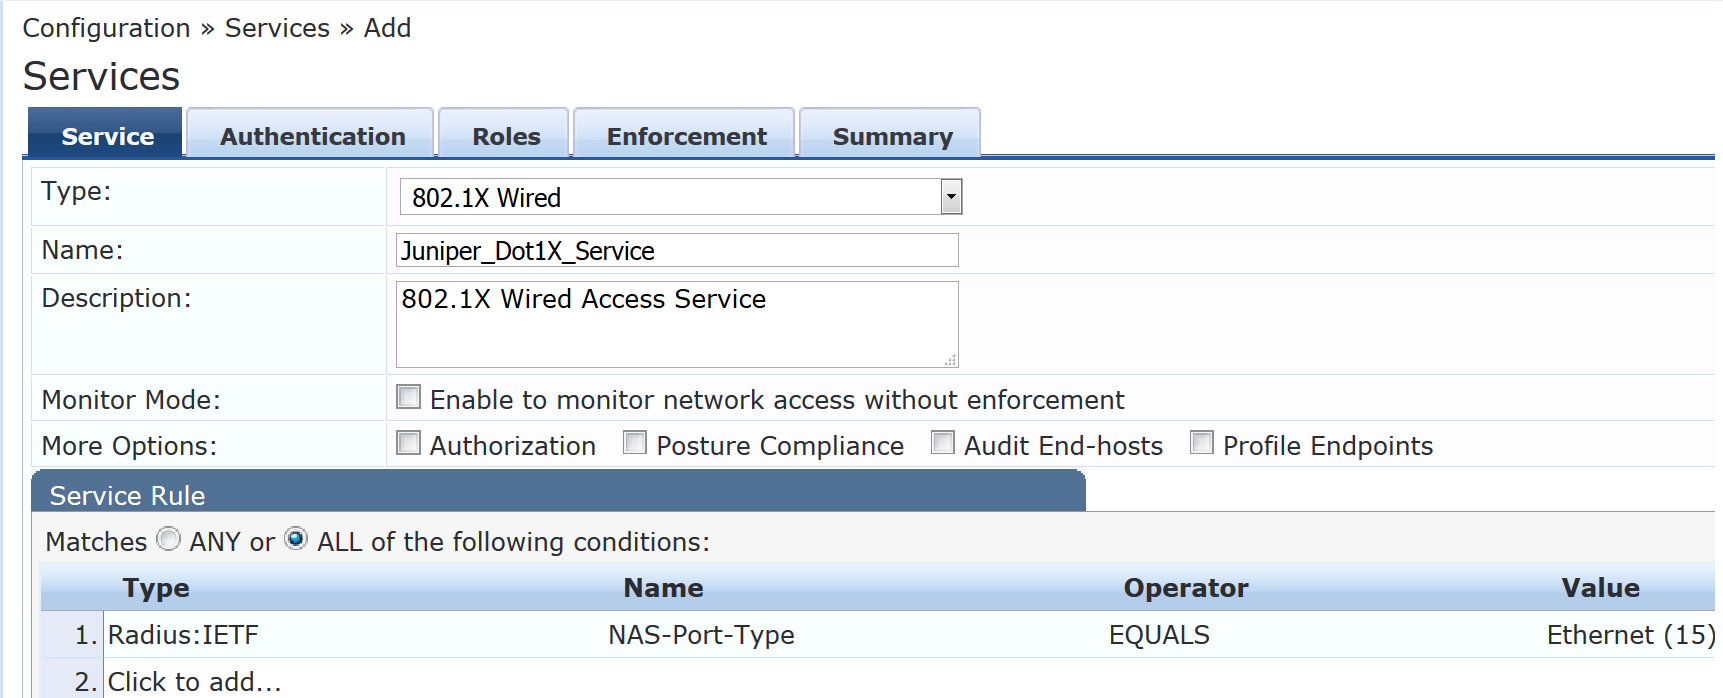
MAC RADIUS 인증 서비스를 구성합니다.
이 서비스를 구성하면 수신된 RADIUS User-Name 특성과 Client-MAC-Address 특성의 값이 같을 때 MAC RADIUS 인증이 수행됩니다.
단계별 절차
Configuration > Services(구성 서비스)에서 Add(추가)를 클릭합니다.
Services(서비스) 탭에서 표시된 대로 필드를 채웁니다. 프로필 끝점 옵션을 선택해야 합니다.
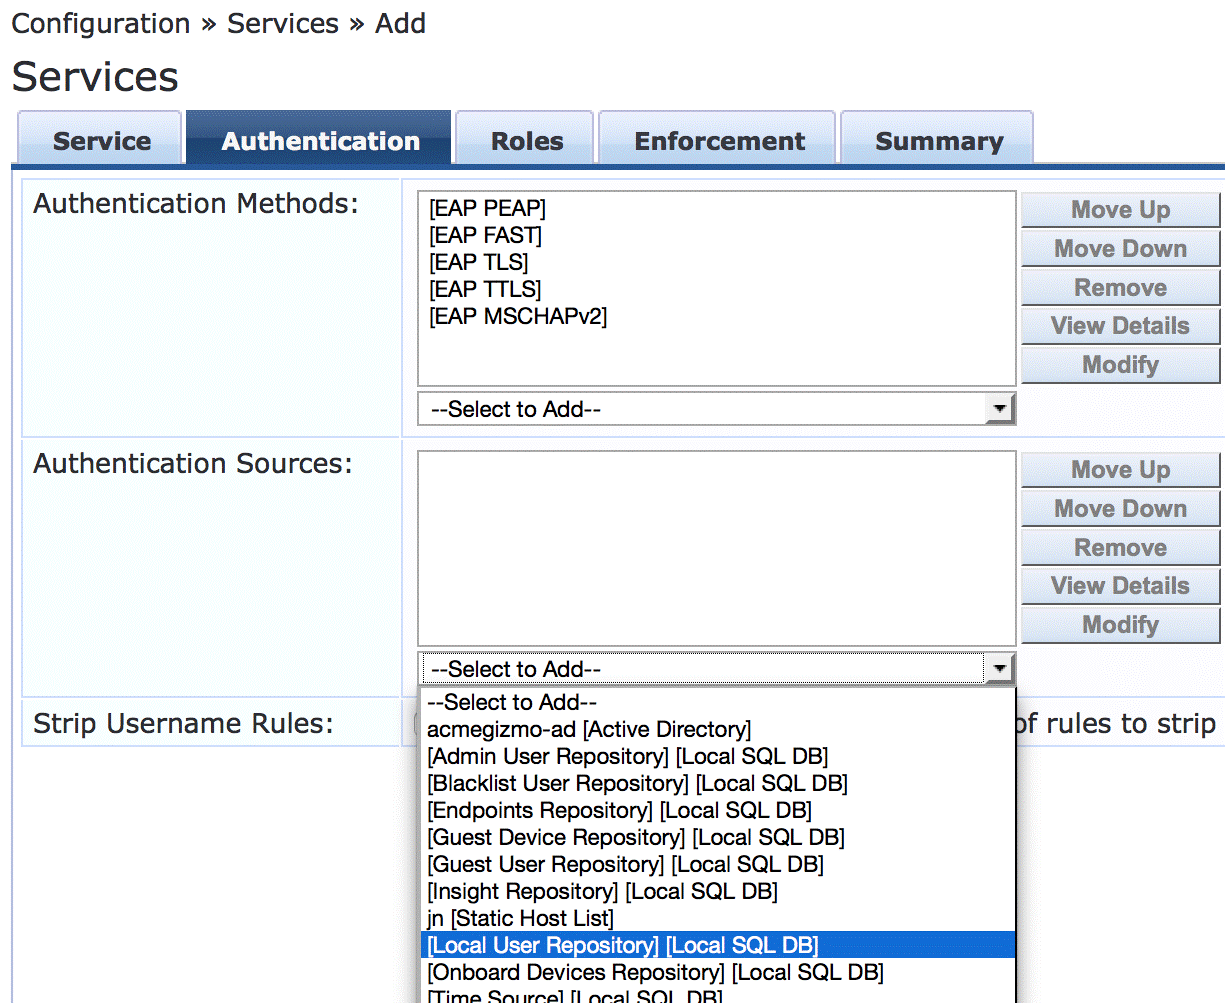
인증 탭에서 다음을 수행합니다.
인증 방법 목록에서 [MAC AUTH] 를 삭제하고 목록에 [EAP MD5] 를 추가합니다.
인증 소스 목록에서 [엔드포인트 리포지토리], [로컬 SQL DB] 를 선택합니다.
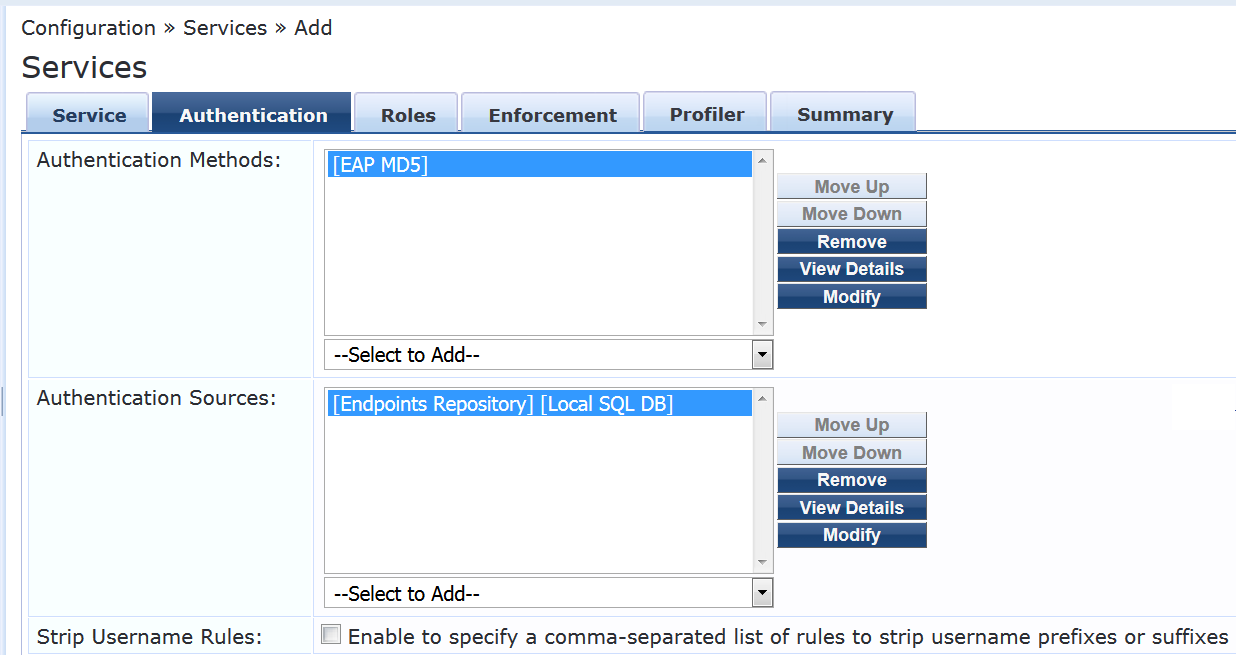
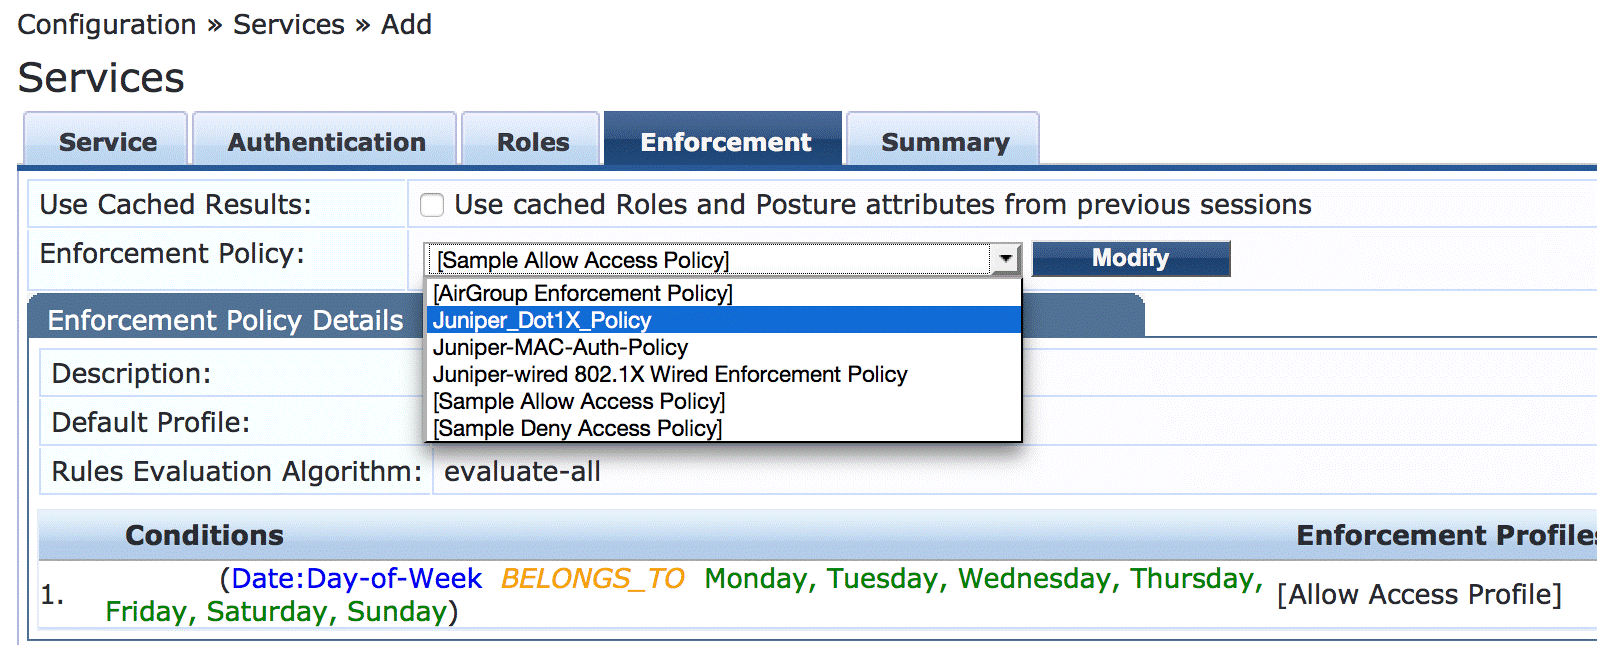
Enforcement(적용) 탭에서 Juniper-MAC-Auth-Policy를 선택합니다.

프로파일러 탭에서 다음을 수행합니다.
컴퓨터, VoIP 전화, 액세스 포인트를 엔드포인트 분류 목록에 추가합니다.
RADIUS CoA Action(RADIUS CoA 작업 ) 목록에서 [Juniper Terminate Session(주니퍼 세션 종료)] 을 선택합니다.
이 구성을 사용하면 엔드포인트가 프로파일링되고 엔드포인트 리포지토리에 추가된 후 재인증을 거치게 됩니다. 엔드포인트가 프로파일링되기 전에 인증된 사용자 세션에 Internet_Access_Only_Profile 적용 프로파일이 적용됩니다. (이 프로필은 10단계에서 구성한 MAC 인증 정책의 기본 프로필입니다.) Aruba ClearPass는 디바이스를 성공적으로 분류한 후 RADIUS CoA를 스위치로 전송하며, 이로 인해 스위치가 세션을 종료합니다. 그런 다음 스위치는 엔드포인트 재인증을 시도합니다. 이제 엔드포인트의 디바이스 프로필이 엔드포인트 리포지토리에 있으므로 엔드포인트가 인증될 때 적절한 디바이스 적용 프로필이 적용됩니다.

802.1X 인증 서비스를 구성합니다.
단계별 절차
Configuration > Services(구성 서비스)에서 Add(추가)를 클릭합니다.
Service(서비스) 탭에서 표시된 대로 필드를 채웁니다.
인증 탭에서 인증 소스를 [로컬 사용자 저장소][로컬 SQL DB]로 설정합니다.
Enforcement(적용) 탭에서 Enforcement Policy(적용 정책)를 Juniper_Dot1X_Policy()로 설정합니다.
MAC RADIUS 인증 서비스 정책이 802.1X 인증 서비스 정책 전에 평가되는지 확인합니다.
Aruba ClearPass는 RADIUS User-Name 속성과 동일한 값을 갖는 Client-MAC-Address 속성으로 MAC RADIUS 인증 요청을 인식하도록 구성되었기 때문에 MAC RADIUS 서비스 정책을 먼저 평가하는 것이 더 효율적입니다.
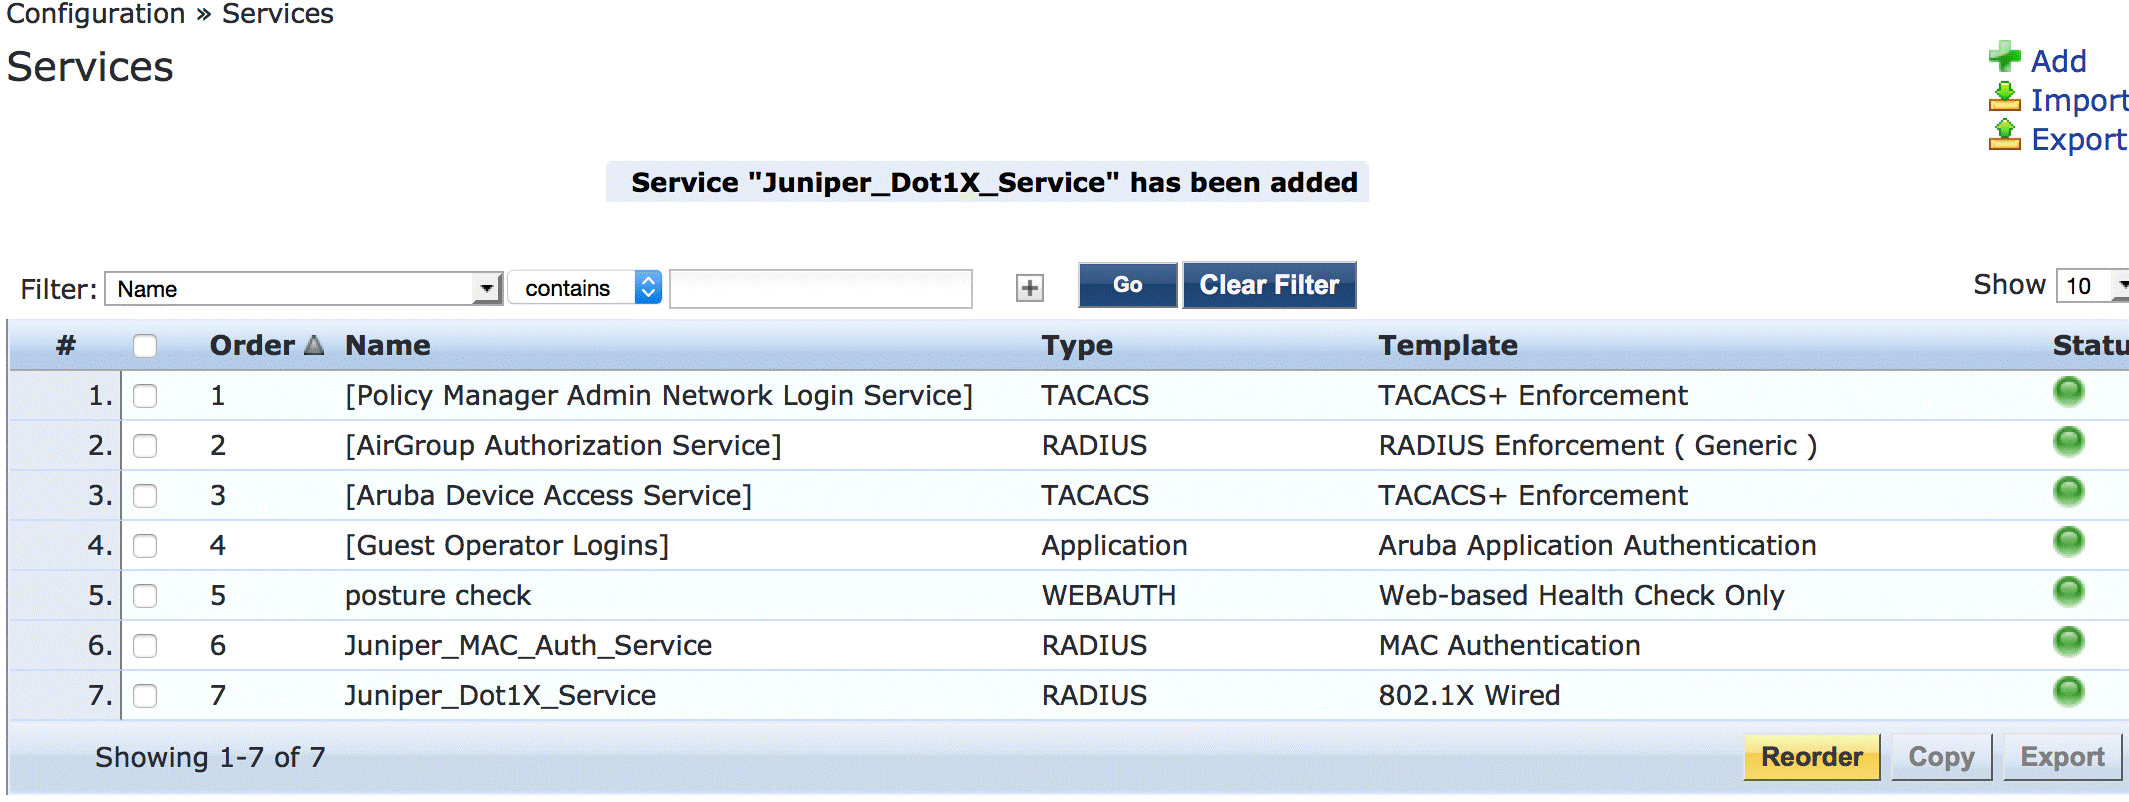
서비스 메인 창에서 Juniper-MAC-Auth-Policy 가 서비스 목록에서 Juniper-MAC_Dot1X_Policy 앞에 표시되는지 확인합니다. 그렇지 않은 경우 Reorder(재정렬 )를 클릭하고 Juniper-MAC-Auth-Policy 를 Juniper-MAC_Dot1X_Policy 위로 이동합니다.
확인
구성이 올바르게 작동하고 있는지 확인합니다.
- EX4300 스위치에서 802.1X 인증 확인
- EX4300 스위치에서 액세스 포인트 인증 확인
- EX4300 스위치에서 VoIP 전화 및 회사 외 노트북 인증 확인
- Aruba ClearPass Policy Manager에서 인증 요청 상태 확인
EX4300 스위치에서 802.1X 인증 확인
목적
테스트 사용자 usertest1이 인증되고 올바른 VLAN에 배치되는지 확인합니다.
이 절차를 수행하려면 usertest1에 대한 인증 정보를 전달하는 활성 802.1X 신청자가 있는 Windows 디바이스가 있어야 합니다. 802.1X PEAP 인증을 위해 Windows 7 신청자를 구성하는 방법에 대한 자세한 내용은 EX 시리즈 스위치 및 Aruba ClearPass Policy Manager로 802.1X PEAP 및 MAC RADIUS 인증 구성을 참조하십시오.
작업
Windows 7 노트북을 EX4300 스위치의 ge-0/0/22에 연결합니다.
스위치에서 다음 명령을 입력합니다.
user@Policy-EX4300-01> show dot1x interface ge-0/0/22.0
802.1X Information:
Interface     Role           State           MAC address          User
ge-0/0/22.0   Authenticator  Authenticated   00:50:56:9B:03:7F    usertest1
동적 VLAN 할당을 포함한 자세한 내용을 보려면 다음을 입력합니다.
user@Policy-EX4300-01> show dot1x interface ge-0/0/22.0 detail
ge-0/0/22.0
  Role: Authenticator
  Administrative state: Auto
  Supplicant mode: Multiple
  Number of retries: 3
  Quiet period: 60 seconds
  Transmit period: 30 seconds
  Mac Radius: Disabled
  Mac Radius Restrict: Disabled
  Reauthentication: Enabled
  Configured Reauthentication interval: 3600 seconds
  Supplicant timeout: 30 seconds
  Server timeout: 30 seconds
  Maximum EAPOL requests: 2
  Guest VLAN member: not configured
  Number of connected supplicants: 1
    Supplicant: usertest1, 00:50:56:9B:03:7F
      Operational state: Authenticated
      Backend Authentication state: Idle
      Authentication method: Radius
      Authenticated VLAN: Windows_VLAN
      Session Reauth interval: 3600 seconds
      Reauthentication due in 2682 seconds
      Session Accounting Interim  Interval: 600 seconds
      Accounting Update  due in 282 seconds
출력은 usertest1이 성공적으로 인증되어 VLAN에 배치되었음을 보여줍니다Windows_VLAN.
EX4300 스위치에서 액세스 포인트 인증 확인
목적
액세스 포인트가 성공적으로 인증되고 올바른 VLAN에 배치되었는지 확인합니다.
작업
액세스 포인트를 EX4300 스위치의 ge-0/0/6에 연결합니다.
스위치에서 다음 명령을 입력합니다.
user@Policy-EX4300-01> show dot1x interface ge-0/0/6
ge-0/0/6.0
  Role: Authenticator
  Administrative state: Auto
  Supplicant mode: Single
  Number of retries: 3
  Quiet period: 60 seconds
  Transmit period: 30 seconds
  Mac Radius: Enabled
  Mac Radius Restrict: Disabled
  Mac Radius Authentication Protocol: EAP-MD5
  Reauthentication: Enabled
  Configured Reauthentication interval: 3600 seconds
  Supplicant timeout: 30 seconds
  Server timeout: 30 seconds
  Maximum EAPOL requests: 2
  Guest VLAN member: not configured
  Number of connected supplicants: 1
    Supplicant: c46413c07cda, C4:64:13:C0:7C:DA
      Operational state: Authenticated
      Backend Authentication state: Idle
      Authentication method: Mac Radius
      Authenticated VLAN: AP_VLAN
      Session Reauth interval: 3600 seconds
      Reauthentication due in 1669 seconds
      Session Accounting Interim  Interval: 600 seconds
      Accounting Update  due in 379 seconds
출력은 액세스 포인트가 인증되어 AP_VLAN VLAN에 배치되었음을 보여줍니다.
EX4300 스위치에서 VoIP 전화 및 회사 외 노트북 인증 확인
목적
VoIP 전화가 성공적으로 인증되었고 회사 이외의 랩톱이 인증되지 않았는지 확인합니다.
작업
VoIP 전화기를 EX4300 스위치의 ge-0/0/8에 연결하고, 활성화된 802.1X 서플리컨트가 없는 노트북을 전화기의 이더넷 포트에 연결합니다.
디바이스의 인증 상태를 확인하려면 스위치에 다음 명령을 입력합니다.
user@Policy-EX4300-01> show dot1x interface ge-0/0/8
ge-0/0/8.0
  Role: Authenticator
  Administrative state: Auto
  Supplicant mode: Multiple
  Number of retries: 3
  Quiet period: 60 seconds
  Transmit period: 30 seconds
  Mac Radius: Enabled
  Mac Radius Restrict: Disabled
  Mac Radius Authentication Protocol: EAP-MD5
  Reauthentication: Enabled
  Configured Reauthentication interval: 3600 seconds
  Supplicant timeout: 30 seconds
  Server timeout: 30 seconds
  Maximum EAPOL requests: 2
  Guest VLAN member: not configured
  Number of connected supplicants: 2
    Supplicant: 08173515ec53, 08:17:35:15:EC:53
      Operational state: Authenticated
      Backend Authentication state: Idle
      Authentication method: Mac Radius
      Authenticated VLAN: IPPhone_VLAN
      Session Reauth interval: 3600 seconds
      Reauthentication due in 3591 seconds
      Session Accounting Interim  Interval: 600 seconds
      Accounting Update  due in 591 seconds
    Supplicant: No User, D0:67:E5:50:E3:DD
      Operational state: Connecting
      Backend Authentication state: Idle
      Authentication method: None
      Session Reauth interval: 0 seconds
      Reauthentication due in 0 seconds
      Session Accounting Interim  Interval: 600 seconds
      Accounting Update  due in 0 seconds
출력은 각각 MAC 주소로 식별되는 두 개의 서플리컨트가 포트에 연결되어 있음을 보여줍니다. VoIP 전화가 성공적으로 인증되어 IPPhone_VLAN에 배치되었습니다. 랩톱이 인증되지 않은 연결 상태이며, 이는 인증에 실패했음을 나타냅니다.
VLAN IPPhone_VLAN VoIP VLAN으로 할당되었는지 확인하려면 다음 명령을 입력합니다.
user@Policy-EX4300-01> show ethernet-switching interface ge-0/0/8
Routing Instance Name : default-switch
Logical Interface flags (DL - disable learning, AD - packet action drop,
                         LH - MAC limit hit, DN - interface down,
                         MMAS - Mac-move action shutdown,
                         SCTL - shutdown by Storm-control )

Logical     Vlan         TAG  MAC    STP       Logical         Tagging
interface   members           limit  state     interface flags
ge-0/0/8.0                    65535                            tagged,untagged
            default      1    65535  Forwarding                untagged
            IPPhone_VLAN 120  65535  Forwarding                tagged
IPPhone_VLAN 태그가 지정된 VLAN으로 표시되어 VoIP VLAN임을 나타냅니다.
Aruba ClearPass Policy Manager에서 인증 요청 상태 확인
목적
엔드포인트가 올바르게 인증되고 있는지, 스위치와 Aruba ClearPass 간에 올바른 RADIUS 속성이 교환되고 있는지 확인합니다.
작업
Monitoring > Live Monitoring > Access Tracker로 이동하여 인증 요청의 상태를 표시합니다.
액세스 추적기는 인증 요청이 발생할 때 이를 모니터링하고 상태를 보고합니다.
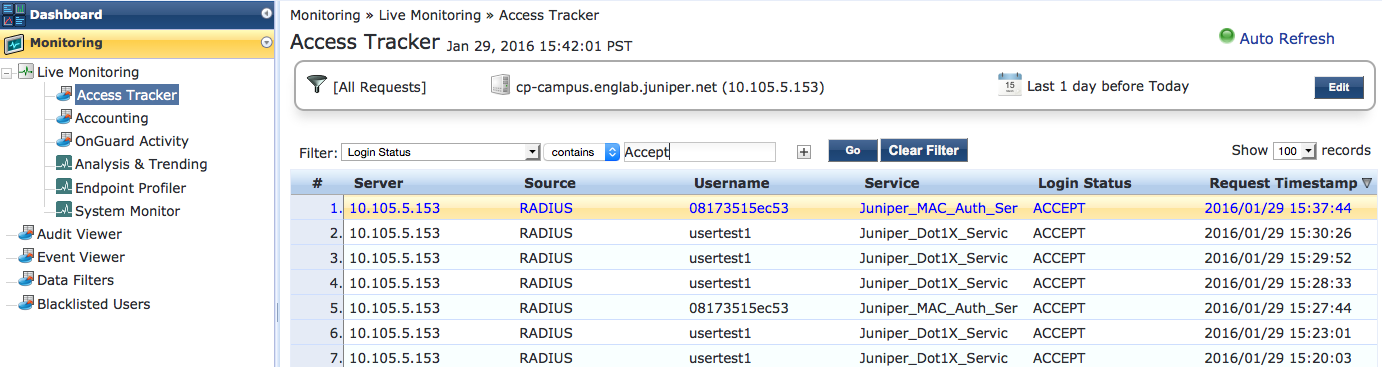
특정 인증 요청에 대한 자세한 내용을 보려면 요청을 클릭하십시오.
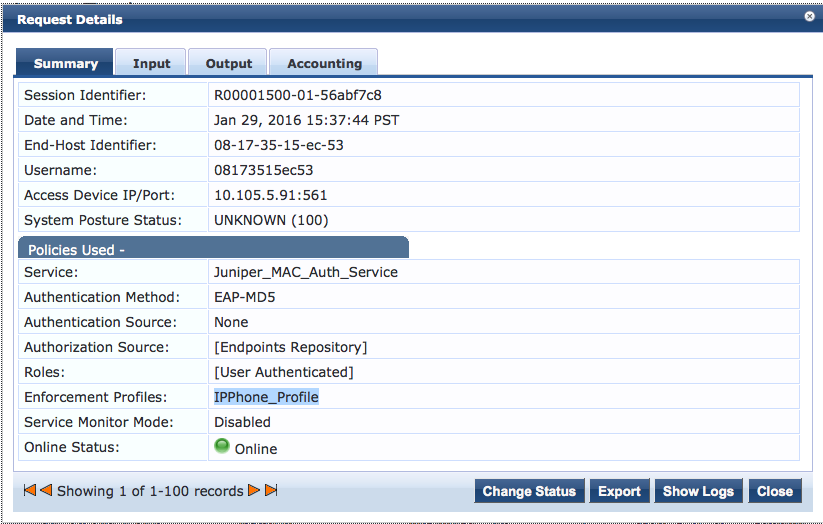
Aruba ClearPass가 이 요청에 대해 스위치로 다시 전송한 RADIUS 속성을 확인하려면 출력 탭을 클릭합니다.
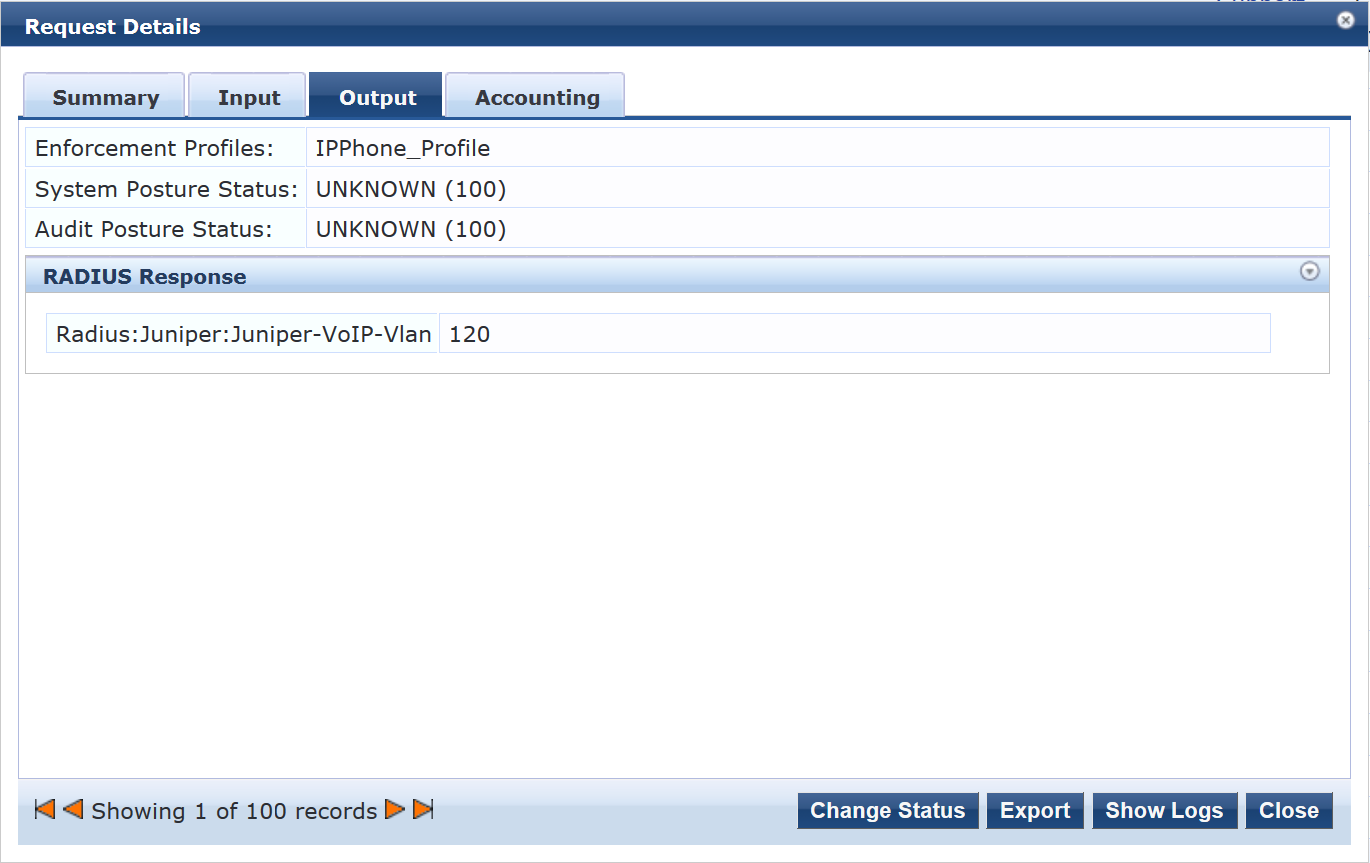
의미
IP 전화의 인증 요청이 성공했으며 VoIP VLAN에 대한 올바른 정보가 스위치로 반환되었습니다.