MAC 기반 인증 및 MAC 인증 바이패스(MAB) 구성
MAC 주소를 기반으로 디바이스를 인증하도록 유선 디바이스를 구성하려면 다음 단계를 따르십시오.
인증서 기반 또는 자격 증명 기반 인증과 함께 MAC 인증을 추가 보안 계층으로 사용할 수 있습니다.
Juniper Mist Access Assurance는 유무선 네트워크 전반에서 일관된 액세스 제어를 위해 MAC 인증 바이패스(MAB)를 지원합니다. 이 주제는 유선 디바이스용 MAB를 구성하는 예를 보여줍니다.
이 예에서는 인증서 기반 EAP-TLS 인증 외에 유선 디바이스에 대한 MAC 인증을 생성하는 방법을 보여 줍니다. 이 작업에는 dot 1x를 지원하지 않는 유선 측 디바이스(예: Phillips 허브)에 대한 인증 정책을 만드는 단계도 포함됩니다.
필수 구성 요소
-
인증서 기반 인증을 이미 구성했어야 합니다. 무선 네트워크에 대한 인증서 기반(EAP-TLS) 인증 구성의 내용을 참조하십시오
-
주니퍼 네트웍스 EX 시리즈 스위치.
유선 디바이스를 위한 MAC 기반 인증 구성
다음 비디오를 시청하여 유선 디바이스에 대한 MAC 기반 인증을 구성하고 검증하는 방법을 알아보십시오.
Well, what about wired devices? How do we authenticate an authorized wired client? Well, it turns out we could do it right here in the same place. So we could create a couple of more rules. So we can say OK, if we look at wired devices that are using certificates to authenticate , we could just call this rule wired certificate authentication. We can effectively apply the same matching criteria as for wireless. There's no difference whatsoever here.
On the right-hand side, we'll decide where we want to move these devices after authentication and the right policy match. And finally, what about non-.1x capable devices on the wired side? So for example, I have here a Phillips hub that does not support .1x. How can I authenticate a Phillips app? So I could create a label for the Phillips device. The label will be client list. And I'll just say approved Phillips app. And I'll just put the MAC address of that device in. Oh. And you could put a list of MAC addresses. You can put the list of Mac OUIs. And remember that all of these labels that I'm creating in the UI - they're all available through the REST API. So there is always an endless possibility of integration with existing, say, inventory management systems that can just put all the new device MAC addresses in those lists for authentication and authorization.
So we'll just click Create. Create this label. And we'll create a rule. We'll call it approved Phillips devices. And here we are matching on wired devices that are doing MAC address authentication bypass that are part of this client list label. And in this case, we will move them to - well, I don't want to move them to Corp VLAN. That's not what I want. I will create an IoT VLAN. And in our case, that's going to be VLAN 3000. And I'm going to add this to an IoT VLAN. And now, we have our authentication policies configuration done.
OK, so how do we validate, right? So we've connected a couple of clients to the switch. One is a laptop that's doing .1x using certificate. Another one is the Phillips Hue app. That doesn't do any .1x, and just doing MAC authentication. So we could see those two clients are connected.
Let's take a look at the laptop one. So we could click on the port. We see that there is a client with a username flashing up. Let's take a look at the wired client insights. And what we can see here is that the user has been authenticated. You could see the port up and down events from the switch side. We see all the authentication phases, same as we saw in the wireless side. The client trusts the server. The server trusts the client certificate. We get all the metadata here. We then are saying client access is allowed. And voila. We matched the same authentication policy rule. Great. So now, we know that this part is working.
Now, we go to switch back. And let's look at the Philips device. That device is not doing any form of .1x authentication. So let's just take a look at the wired client insights. Yeah, and we are seeing that here the user is authenticated. And there is a client access allowed event here as well. And in this case, the authentication type is Mac address bypass - the MAC address that we've added to the client list. And voila. We are matching the right approved Phillips device rule.
Juniper Mist 포털을 사용하여 네트워크에서 MAC 기반 인증을 설정하려면 다음 단계를 따르십시오.
- 인증 정책을 만듭니다.
- Juniper Mist 포털의 왼쪽 메뉴에서 조직 > 액세스 > 인증 정책을 선택합니다.
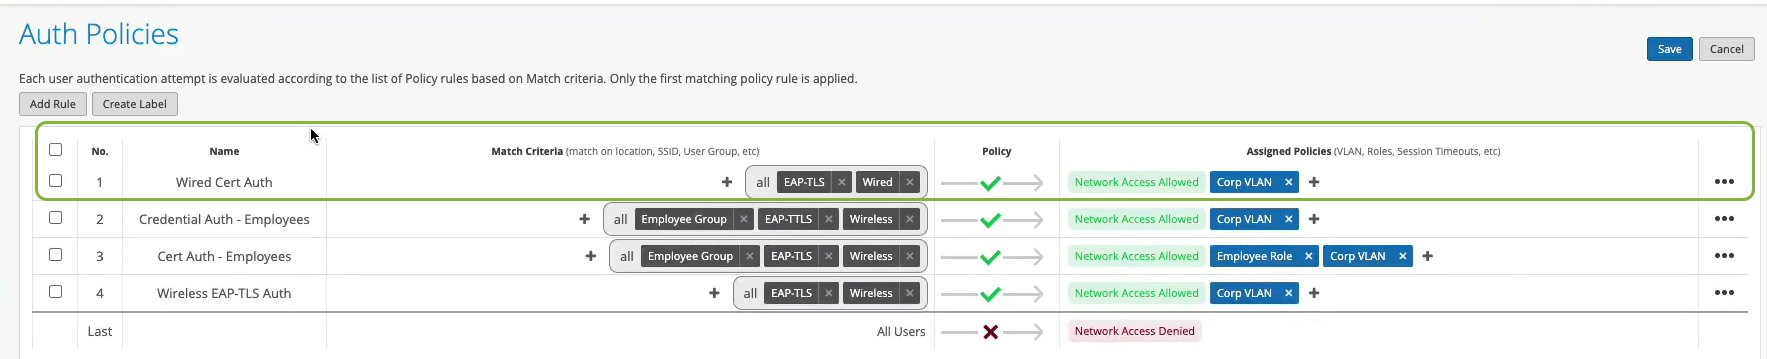
유효한 인증서가 있는 클라이언트에 대한 액세스를 제공하는 새 규칙을 만듭니다. 인증 정책 구성의 내용을 참조하십시오.그림 1: 유선 클라이언트
 에 대한 인증 정책 생성
다음 세부 정보를 사용하여 인증 정책을 정의합니다.
에 대한 인증 정책 생성
다음 세부 정보를 사용하여 인증 정책을 정의합니다.- Name(이름) - 정책의 이름(예: Wired Cert Auth)을 입력합니다
- 일치 기준 - EAP-TLS 및 유선을 선택합니다.
- Policy(정책) - Allowed(허용)를 선택합니다.
- 정책 작업—네트워크 액세스 허용됨
- 할당된 VLAN—회사 VLAN
- Juniper Mist 포털의 왼쪽 메뉴에서 조직 > 액세스 > 인증 정책을 선택합니다.
- LAN 측에서 dot1.x가 아닌 디바이스에 대한 인증을 제공하려면 새 정책 레이블을 생성합니다.
- Auth Policies(인증 정책) 페이지에서 Create Label(레이블 생성)을 선택하고 세부 정보를 입력합니다.
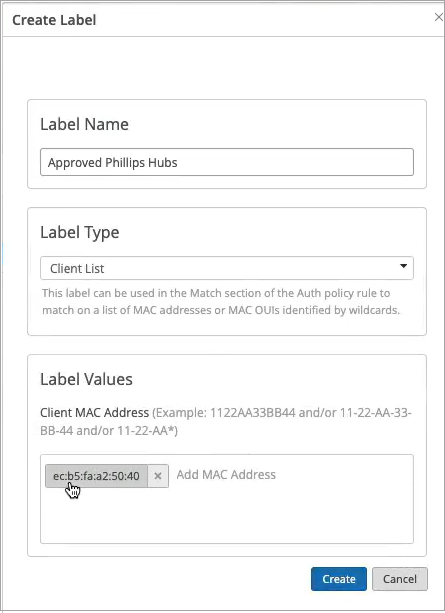
그림 2: Dot1x가 아닌 디바이스
 에 대한 레이블
각 필드에 다음 정보를 입력합니다.
에 대한 레이블
각 필드에 다음 정보를 입력합니다.- Label Name(레이블 이름) - 레이블 이름을 입력합니다(예: Approved Phillips Hubs).
- Label Type(레이블 유형) - Client List(클라이언트 목록) 유형을 선택합니다
- Label Values(레이블 값) - 디바이스의 MAC 주소 입력
- Auth Policies(인증 정책) 페이지에서 Create Label(레이블 생성)을 선택하고 세부 정보를 입력합니다.
- 새 인증 정책을 만듭니다.
- Add Rule(규칙 추가)을 클릭하여 새 규칙을 만듭니다.
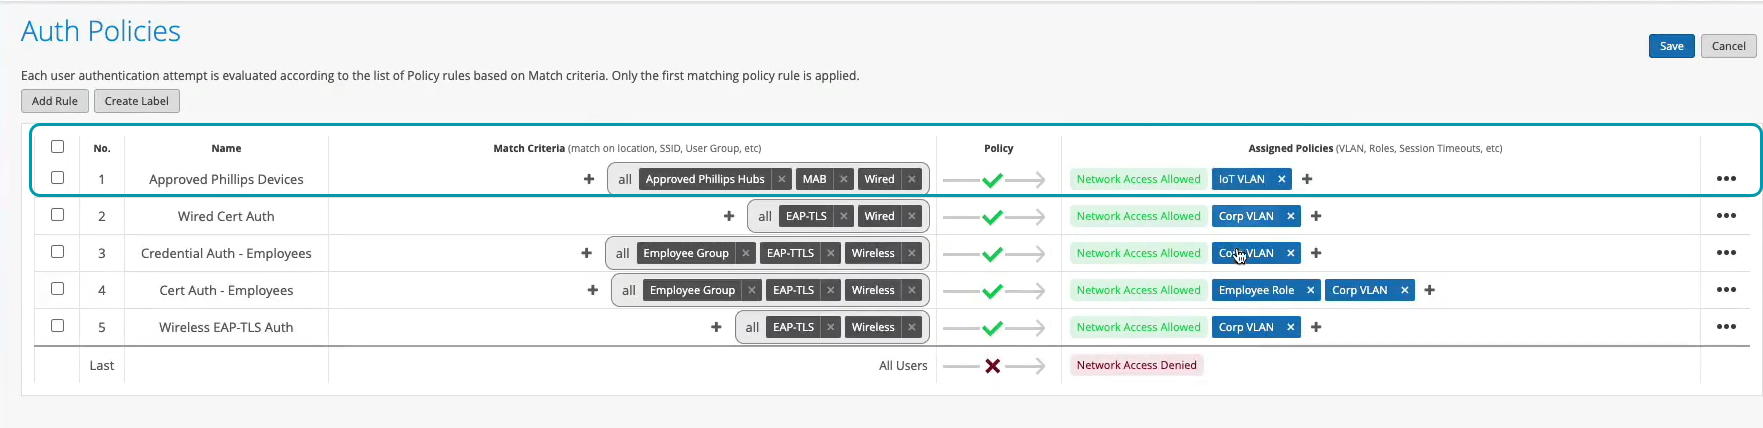
이 규칙에서는 dot1x가 아닌 디바이스에 대해 이전 단계에서 생성한 레이블을 사용합니다. 이 규칙에서는 dot1x가 아닌 디바이스에 대해 이전 단계에서 생성한 레이블을 사용합니다.그림 3: 비 Dot1X 디바이스
 에 대한 인증 정책
각 필드에 다음 정보를 입력합니다.
에 대한 인증 정책
각 필드에 다음 정보를 입력합니다.- Name(이름) - Name(이름)을 입력합니다. 예: 승인된 Phillips 디바이스.
- 일치 기준 - 승인된 필립스 허브, MAB(MAC 인증 바이패스) 및 유선을 선택합니다.
- Policy(정책) - Allowed(허용)를 선택합니다.
- Policy action(정책 작업) - Network Access Allowed(네트워크 액세스 허용)를 선택합니다.
- Assigned policies(할당된 정책) - IoT VLAN을 선택합니다.
이제 dot1X가 아닌 디바이스를 인증하는 정책을 생성했습니다.
- Add Rule(규칙 추가)을 클릭하여 새 규칙을 만듭니다.
- 인증을 수행할 스위치를 구성합니다.
- 아래로 스크롤하여 Port Profile(포트 프로필) 섹션으로 이동하고 세부 정보를 입력합니다.
그림 4: 포트 프로필 옵션필요한 정보를 입력하거나 다음 필드에서 필요한 옵션을 선택합니다.
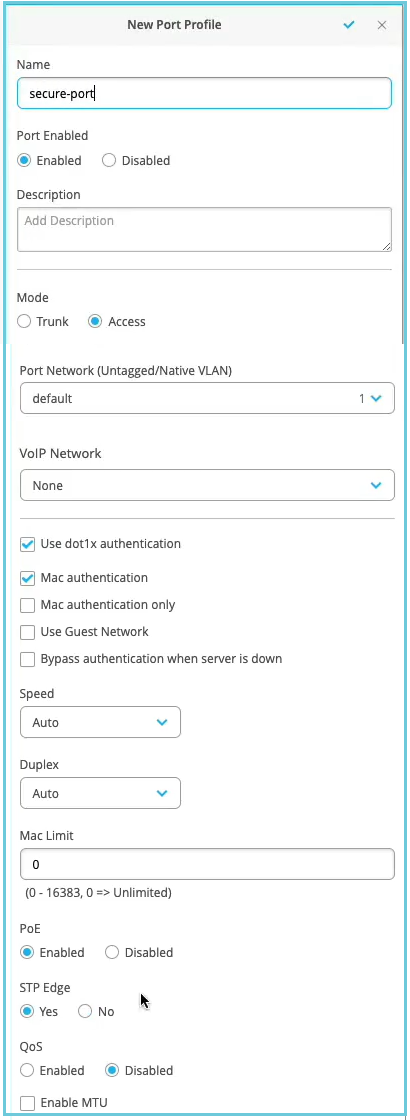
- Name(이름) secure-port- 이름을 입력합니다(예: ).
- Mode(모드) - Access(액세스)를 선택합니다.
- dot1x 인증 사용 및 MAC 인증 사용 옵션을 활성화합니다. 클라이언트 디바이스가 802.1X를 지원하는 경우 스위치 포트는 802.1X 인증을 수행합니다. 클라이언트 디바이스가 802.1X를 지원하지 않는 경우 스위치 포트는 MAC 인증을 수행합니다.
- STP Edge(STP 에지) - 포트를 STP(Spanning Tree Protocol) 에지 포트로 구성하려면 Yes(예)를 선택합니다. 이 설정을 사용하면 포트가 Edge 포트로 처리됩니다.
이 예제에서는 나머지 필드에 기본값을 사용합니다.
- 연결된 유선 클라이언트가 네트워크 액세스를 필요로 하는 스위치의 각 포트에 포트 프로필을 할당합니다.
Select Switches Configuration(스위치 구성 선택) 섹션의 Port Config(포트 구성) 탭에서 Add Port Range(포트 범위 추가 )를 클릭하여 포트 프로필을 포트와 연결합니다.
그림 5: 스위치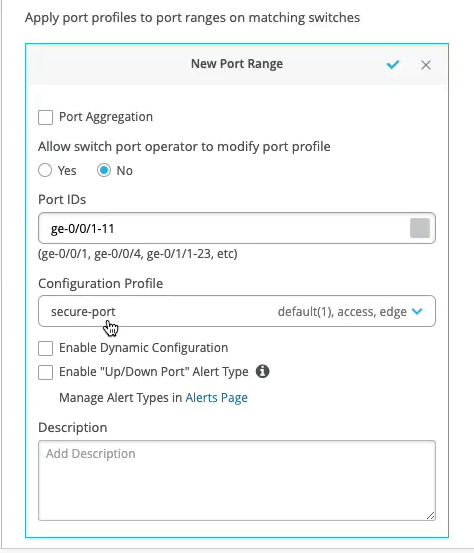 의 포트 범위에 포트 프로필 할당
포트 ID를 입력하고 이전 단계에서 만든 구성 프로필을 선택합니다.
- 아래로 스크롤하여 Port Profile(포트 프로필) 섹션으로 이동하고 세부 정보를 입력합니다.
이제 네트워크는 클라이언트를 안전하게 인증할 준비가 되었습니다. Juniper Mist 클라우드는 클라이언트 인증서를 확인하고 인증 정책 구성에 따라 액세스 및 권한을 부여합니다.
Juniper Mist 포털에서 연결된 클라이언트를 볼 수 있습니다.
- 클라이언트 > 유선 클라이언트를 선택하여 클라이언트 세부 정보를 확인합니다
- Monitor > Service Levels > Insights(서비스 수준 인사이트 모니터링)를 선택하여 클라이언트 이벤트를 확인합니다.