디지털 인증서 사용
각 조직의 주니퍼 Mist Access Assurance와 통합된 RADIUS 서버에 대한 인증서를 생성하고 사용하려면 다음 단계를 따르십시오.
EAP 인증을 사용할 때 클라이언트와 서버 모두 서로의 ID를 확인해야 합니다. 클라이언트는 통신 중인 서버를 신뢰해야 하며 서버는 클라이언트를 인증해야 합니다. 서버 인증서는 이러한 상호 인증 프로세스의 첫 번째 단계이며 클라이언트는 통신을 진행하기 전에 서버 인증서의 유효성을 검사하거나 신뢰해야 합니다.
EAP 트랜잭션(예: EAP-TLS 또는 EAP-TTLS)을 살펴보면 무선 또는 유선 인증인지에 관계없이 첫 번째 단계는 서버가 클라이언트 디바이스에 "Server Hello" 메시지를 전송하여 자신을 식별하는 것입니다.
클라이언트 디바이스가 서버 인증서를 수신하면 Wi-Fi 또는 LAN 프로파일에서 신뢰할 수 있는 인증 기관(CA) 목록을 확인하고 서버 인증서가 신뢰할 수 있는 CA 중 하나에 의해 서명되었는지 확인합니다. 선택적으로 구성된 경우 서버 이름이 클라이언트 구성의 신뢰할 수 있는 서버 이름 목록과 일치하는지 확인합니다.
유효성 검사 단계 및 신뢰 서버 인증서를 우회하지 않는 것이 좋습니다. 이는 높은 보안 위험이며 MITM(Man in the Middle) 공격을 시작할 수 있습니다.
다음 방법 중 하나를 사용하여 각 조직의 주니퍼 Mist Access Assurance와 통합된 RADIUS 서버에 대한 인증서를 생성하고 사용할 수 있습니다.
- CA 인증서—주니퍼 Mist는 클라이언트 디바이스와의 신뢰를 구축하기 위해 특정 CA 인증서가 필요합니다. 신뢰할 수 있는 인증 기관(CA)에서 발급한 이러한 인증서를 통해 주니퍼 Mist Access Assurance는 클라이언트 디바이스에 네트워크 액세스 권한을 부여할 수 있습니다. 주니퍼 Mist에 의한 클라이언트 디바이스의 유효성 검사는 디바이스의 인증서 제시를 기반으로 하며, 해당 인증서는 동일한 CA가 서명해야 합니다.
- 기본 주니퍼 Mist Access Assurance 인증서 - Mist 조직은 Access액세스 Assurance 서버 인증서 발급을 담당하는 고유한 개인 Mist 인증 기관(CA)을 유지합니다. 특정 구성이 없는 경우 클라이언트는 해당 Mist 조직 CA에서 인증한 기본 인증서를 받게 됩니다. 이 인증서는 도메인 "auth.mist.com"에 해당합니다.
- 사용자 지정 서버 인증서 - 현재 클라이언트 구성을 수정하지 않으려는 경우 사용자 지정 서버 인증서가 선호되며 클라이언트 인증서를 제공한 동일한 인증 기관(CA)에서 발급한 서버 인증서를 클라이언트가 신뢰하도록 합니다. RADIUS 서버에서 얻은 개인 키와 서명된 인증서를 입력해야 합니다.
위의 인증서를 사용하는 방법을 이해하려면 다음 절차를 읽어보십시오.
인증 기관(CA) 인증서 사용
EAP-TLS(Extensible Authentication Protocol–전송 레이어 보안) 인증서 기반 인증이 작동하려면 주니퍼 Mist 포털에서 신뢰할 수 있는 CA 인증서를 추가해야 합니다.
이 단계를 통해 주니퍼 Mist 액세스 인증이 추가한 CA로 서명된 클라이언트 인증서를 신뢰하도록 활성화합니다.
외부 CA에서 인증서를 얻을 수 있습니다. CA는 잘 알려진 공용 CA 또는 엔터프라이즈 CA일 수 있습니다.
테스트 또는 랩에서 사용할 인증서를 생성하는 방법에 대해 알아보려면 다음 비디오를 시청하세요.
How to create certificates both CA certificates and client certificates that you could use for lab testing to repeat all the steps in our tutorials. So in order to do things easily and quickly, assuming there is no existing infrastructure, assuming there is nothing you can use that you're available on-hand, you could use some open source tools that are out there on the internet. I will use degree-based certificate authority and key management called XCA.
You can Google it. You can download it. It's available for everyone to use. So now, when we will use XCA tool, first thing we will need to do, we'll need to create a new database. You could think of this creating a specific BQ infrastructure right on your laptop. So we can just say missed access insurance tutorial. Database, save it in there, it will ask you to encrypt it, which is a good thing. Click OK. So now we have the database created.
So the first thing we will need to create our certificate infrastructure is the certificate authority. That's the thing that will sign all the certificates of all your client devices that you will be using for testing. And that's the ultimate source of trust in your BQ infrastructure. So I'm going to click on new certificate. I'm going to select that, this is going to be a self-signed certificate because technically, every certificate authority, the root certificate authority is a self-signed.
Has a self-signed certificate. We'll select the template called CA from this list, will then go to subject. We can give it some internal name but doesn't matter, we could just say lab mist CA. You can fill in some of the data in there. Again, it doesn't really matter what you will put in there. But for testing purposes, just use anything you really like, organization name. Common name is important. This is how you identify certificates in real life. So one of the important attributes is common name. And we will take a look at the other one later, which is called the subject alternative name.
So common name, let's just call it lab-mist-ca@justify.com. Maybe something like this. I'm going to click that. We'll need to create a private key. A private key is what will prove that the certificate-- oh, owned and certificate holder is actually that same device or it's same CA. So we'll generate a new key, we'll set it to be 4,000 bytes, create. It will automatically selected here. It's good. We'll go to extensions. The type will be certification authority. It will add a few attributes in the certificate saying this is a CA cert.
This is where we will add the subject to alternative name. So typically what you'll do is you click edit, you will say I want to copy common name and there. Click apply. That's it. This will typically go and take your common name and copy it into a assign attribute.
Nowadays, many clients are using SAN to validate-- certificate validity. And the key usage, what do we need there? We need certificate signs, CRL sign. That's pretty much it. So we'll click OK. This now created our certificate authority in here. So we have the certificate. This is a CA cert, it has a common name.
The expiry date is, well, next year, but typically CA cert would be valid for like 10 years or something like that. For our intents and purposes, this is just a lot testing one year is more than enough.
So what will then need to do is will create a client cert. So click select our CA, will click new certificate. Now see under signing section, we are going to use this CA cert for signing certificates. It's not going to be self-signed anymore. So now our certificate authority will sign a new certificate that will be issued by the client. This is how we will establish this chain of trust. So create, select the template-- TLS client. We'll go to subject. That just say this is going to be a test lab client. Doesn't matter.
So common name is important. So this is where I would recommend you to use something that is an actual username that you want to use later on with your testing, whether you have an identity provider with your test username or things like that. So in my case, I will use one username I have in my Okta IdP that I will use later on. So I'm going to just use my Juniper email address. I'm going to copy it. We'll need to generate a private key, again, 4,000 bits.
We'll go to extensions, we'll select end entity. We'll click on subject, alternative name. Again, we'll just say copy common name. We'll go to key usage, will now need to select that this is a client certificate not the service certificate. And we will need key encipherments, digital signature, it should be OK. Now we click OK. We now have a client certificate.
So now we see there is a little dropdown in there. So we have a CA but now sign the client certificate. So now we have a CA and now we have a client certificate. What we'll do will need to export the CA. I will click on export. The CA cert, we are only exporting the public certificate, we are not touching the private key. Private Key stays untouched. It it is never exported anywhere. This is the only thing that protects the ownership of that certificate.
So we are exporting the private key in our test folder-- .mistCRT that's all we need. Click OK. The next thing we'll need is we'll need to export the certificate and the private key that we will use for client testing. Again, normally in production environment, you're not going to export private keys, they will be automatically pushed and distributed through MDM securely so they're never exposed to the network or anybody. But in our case, since we're testing, that's OK to do for now. So we'll click export.
In this case, the export format is pfx. That's the format that will include the client certificate, the client private key, and the CA cert in one package. So you can later on imported to one of your testing clients. And generally, this format is well understood by different operating systems.
It will ask you to encrypt that package. So just do a very secure password of 1234. Now we have to search, export it. We have a CA cert and we have a client cert. For now, this is good enough for our testin
CA 인증서를 추가하려면 다음을 수행합니다.
- Add Certificate Authority(인증 기관 추가)를 클릭합니다.
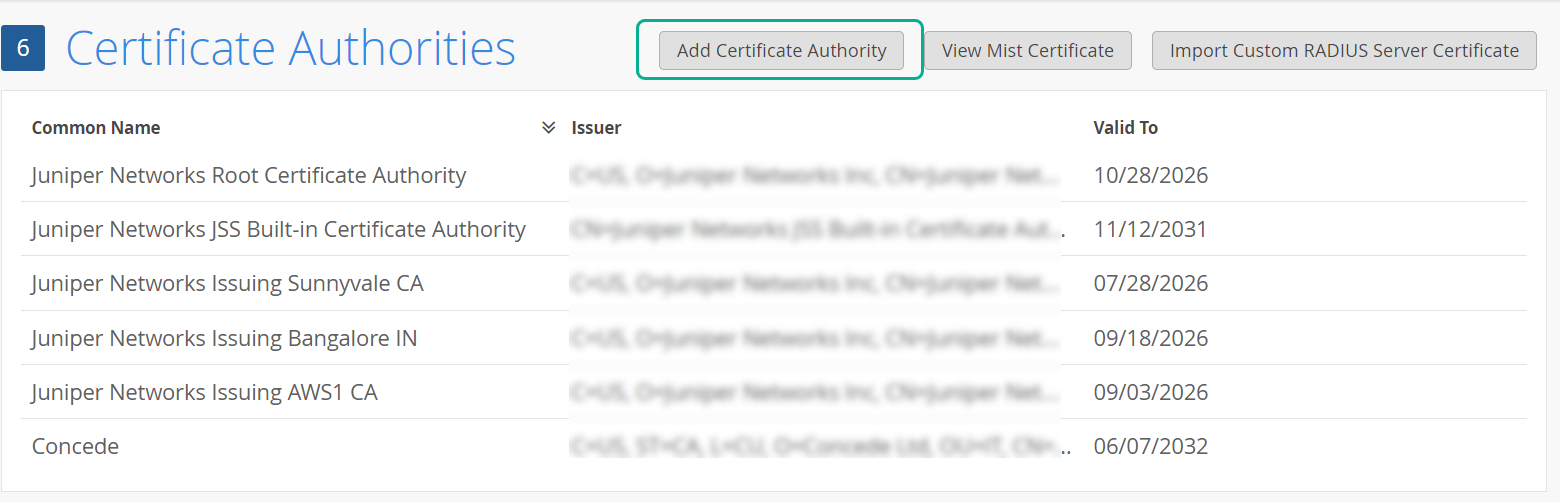
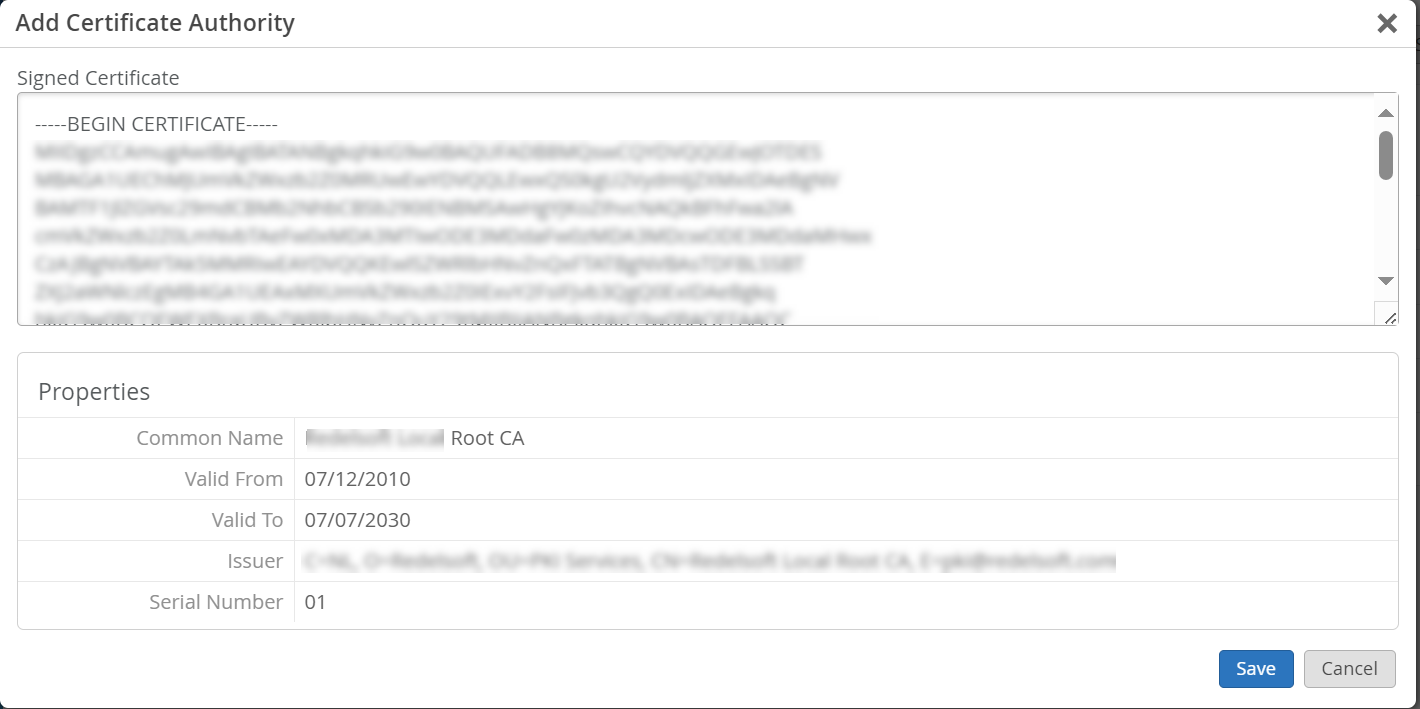
- 서명된 인증서 필드에 CA 인증서를 붙여넣습니다.
그림 1: 인증 기관
 추가
추가
텍스트에는 and
—–END CERTIFICATE—–행이 포함되어야 합니다.—–BEGIN CERTIFICATE—–시스템은 가져온 CA 인증서를 구문 분석 및 디코딩하고 속성 창 아래에 인증서 속성을 표시합니다. 루트 CA와 모든 중간 CA 또는 인증서 발급을 추가하는 것이 좋습니다.
주니퍼 Mist Access Assurance의 기본 서버 인증서 사용
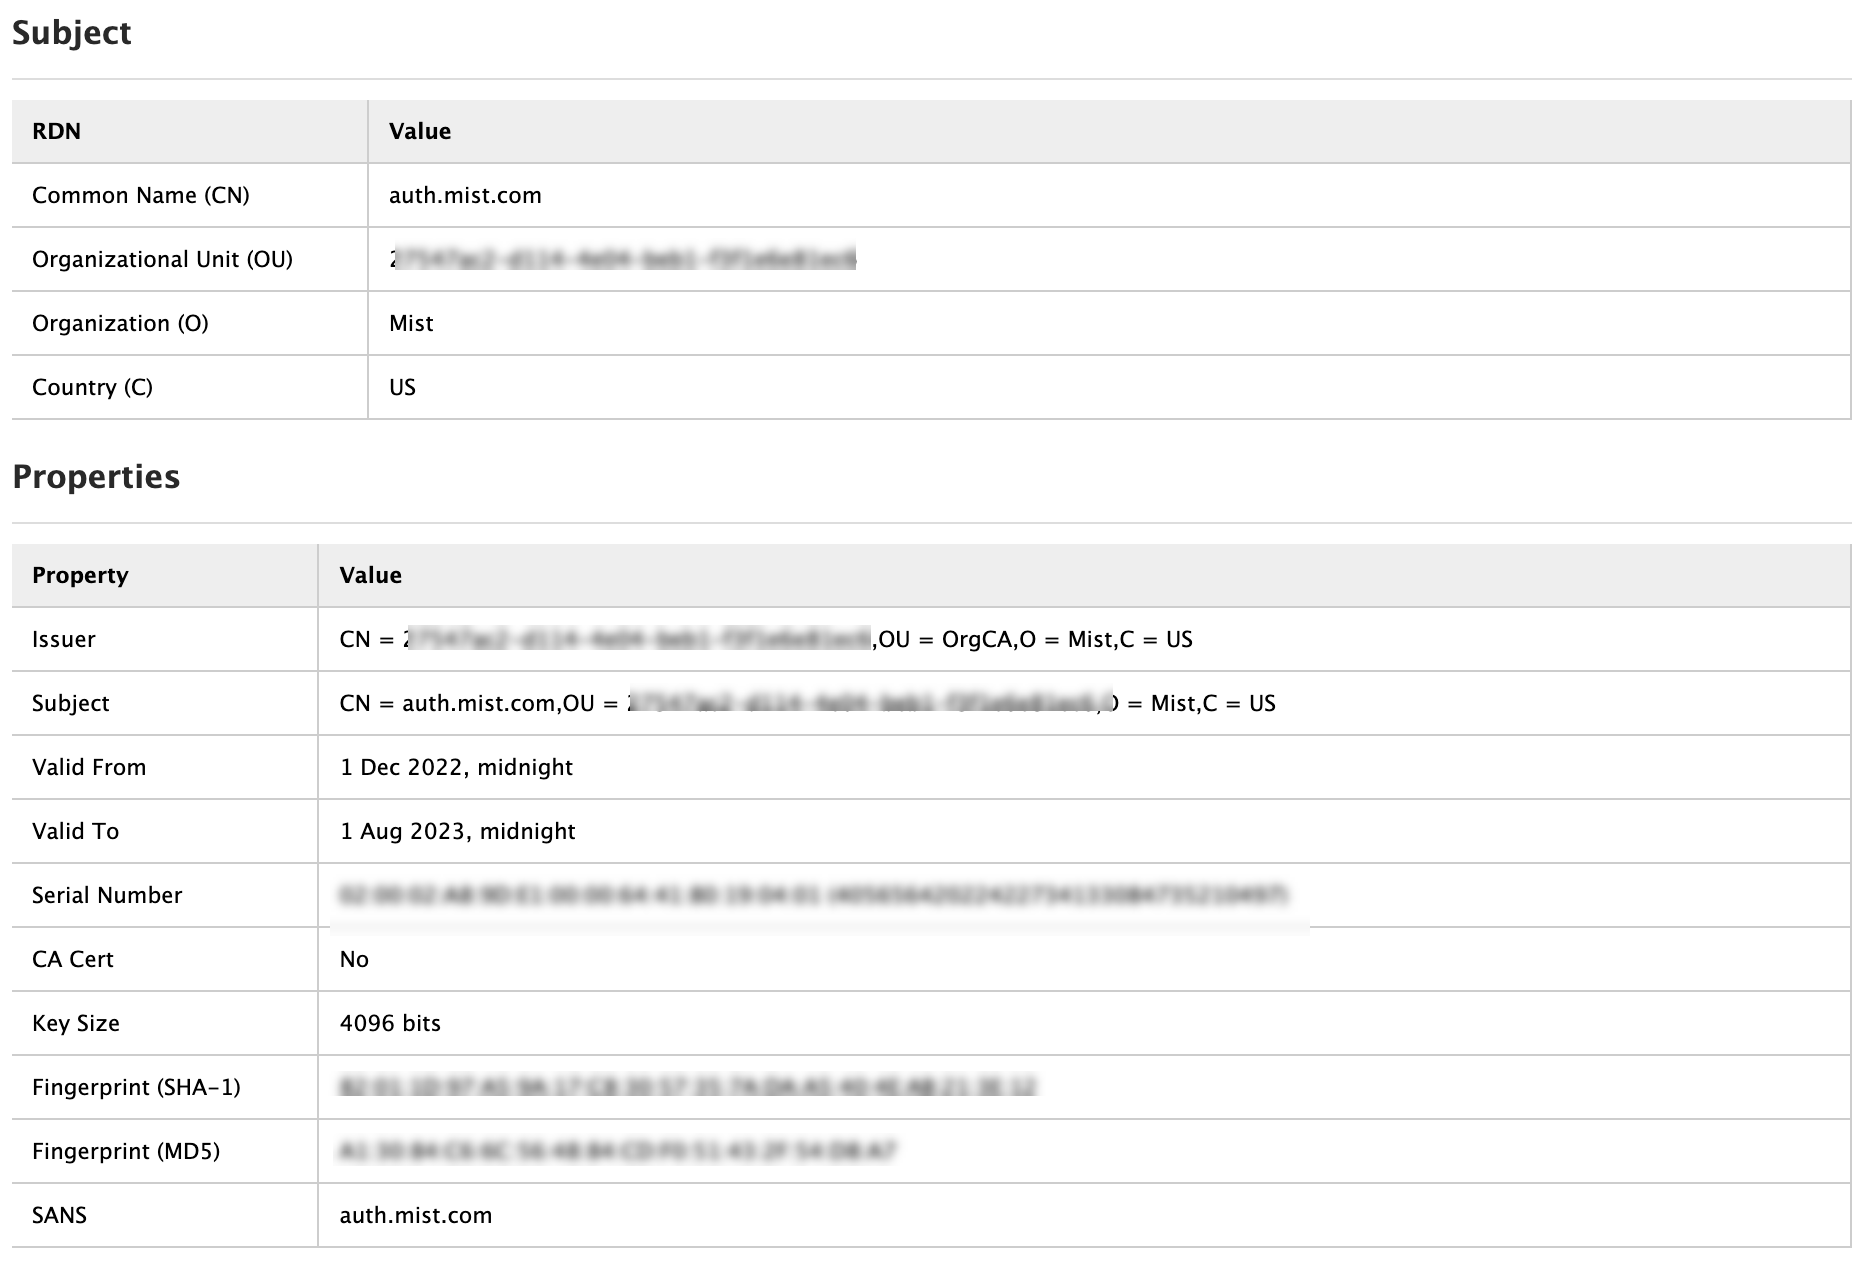
주니퍼 Mist 클라우드는 주니퍼 Mist 클라우드에 추가된 각 조직에 대한 사설 인증 기관(CA) 역할을 합니다. 주니퍼 Mist는 서버 인증서를 발급합니다. 인증서가 구성되지 않은 경우 주니퍼 Mist 포털은 클라이언트 디바이스에 주니퍼 Mist CA에서 서명한 기본 서버 인증서를 제공합니다.
이름 auth.mist.com 에 대한 인증서가 발급되고 그림 2와 유사한 정보가 표시됩니다.
 에서 발급한 서버 인증서
주니퍼 Mist 서버 인증서를 다운로드하려면 다음을 따르십시오.
- Mist 인증서 보기를 클릭합니다.
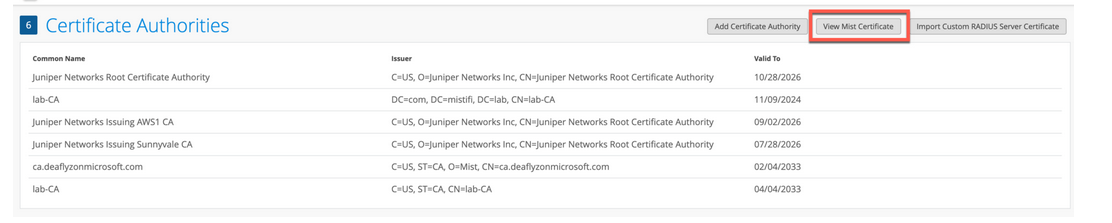 화면에 서명된 인증서 세부 정보가 표시됩니다. 서명된 인증서 필드에서 인증서 내용을 복사합니다.그림 3: Mist 인증서
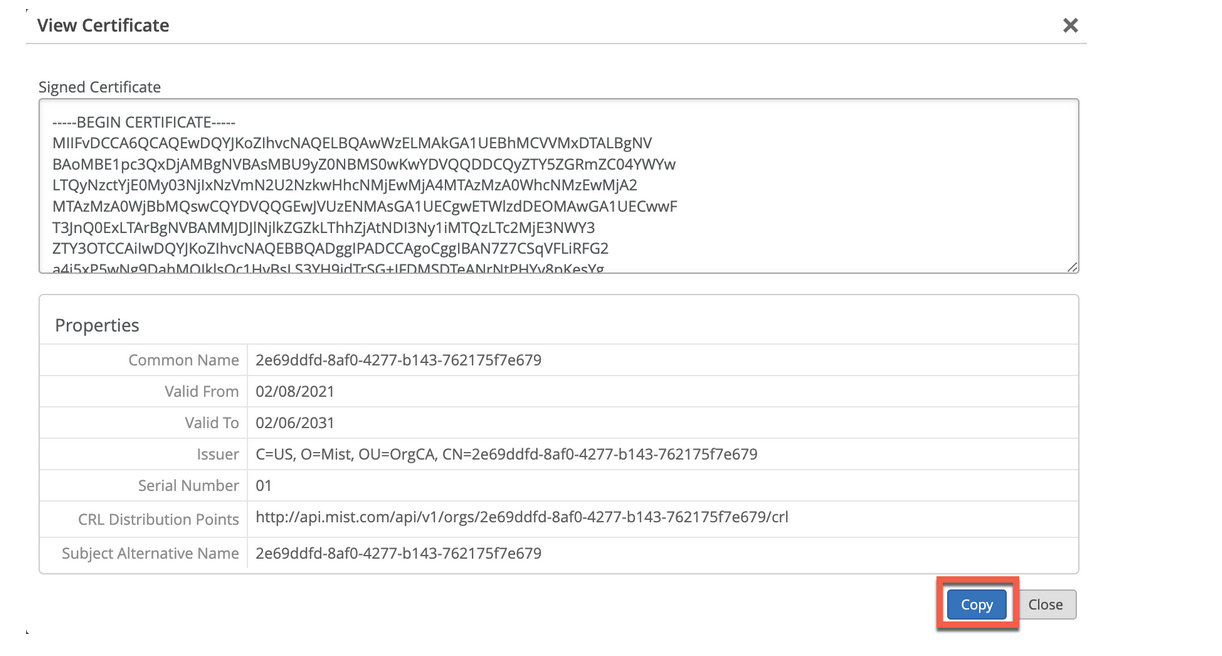 보기 및 복사
사용자 지정 서버 인증서 사용
이미 PKI가 있고 기존 구성을 방해받지 않고 유지하기를 원할 수 있습니다. 이러한 시나리오에서는 루트 CA의 공용 인증서와 주니퍼 Mist 포털에 있는 RADIUS 서버의 공개/비공개 키 쌍을 업로드해야 합니다.
RADIUS 서버가 각 클라이언트(신청자)의 인증서를 검증할 수 있도록 클라이언트 디바이스도 동일한 인증서를 사용하는지 확인합니다. 클라이언트의 현재 설정을 변경하지 않고 클라이언트가 인증서를 발급한 동일한 CA에서 발급한 서버 인증서를 신뢰하도록 하려면 이 작업을 수행합니다.
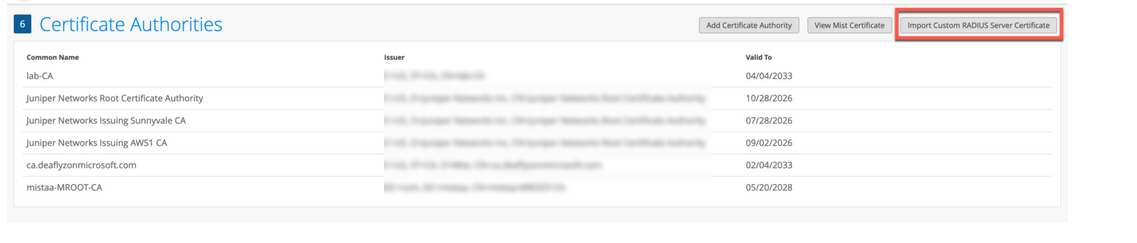
주니퍼 Mist 포털에 인증서를 업로드하려면 다음을 따르십시오.
- 사용자 지정 RADIUS 인증서 가져오기를 클릭하여 인증서 페이지를 엽니다.
그림 4: 사용자 지정 RADIUS 서버 인증서
 가져오기
가져오기
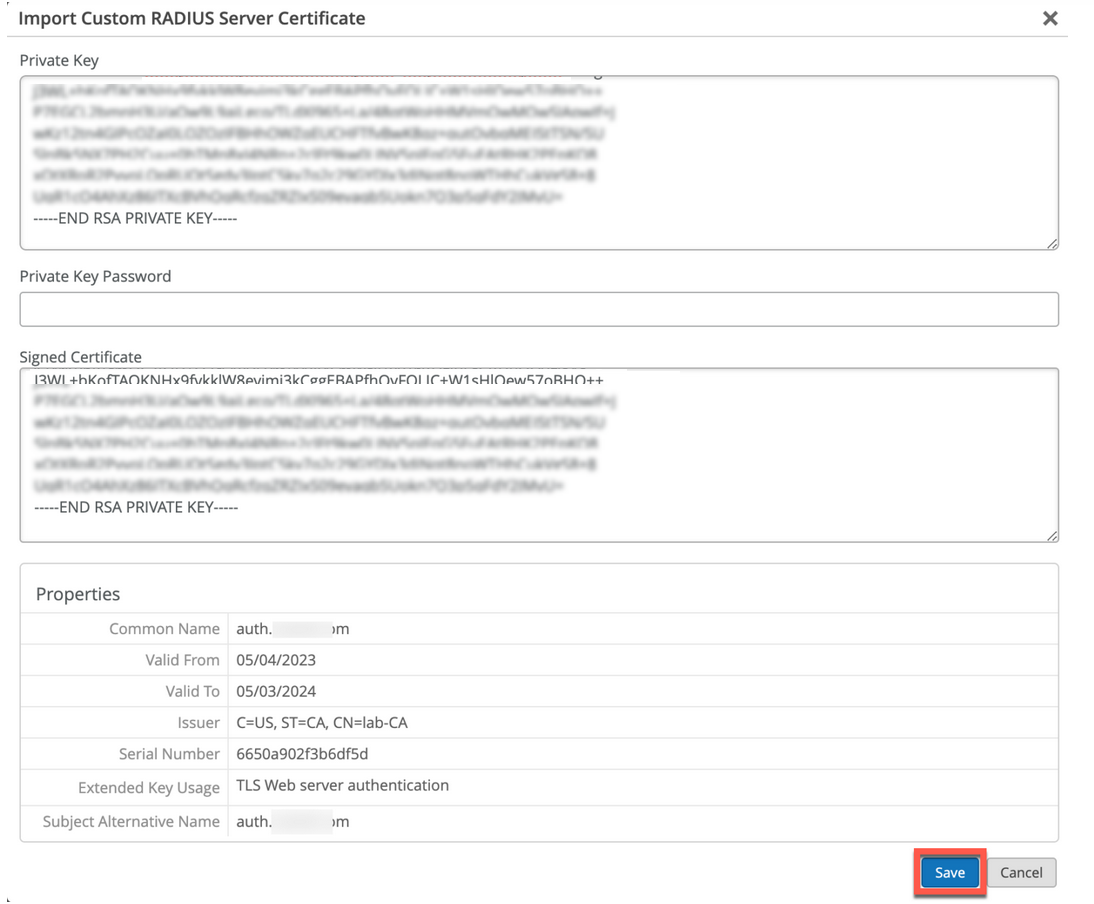
- 사용자 지정 RADIUS 서버 인증서 가져오기 페이지에서 CA 인증서 세부 정보를 입력합니다.
그림 5: 사용자 지정 서버 인증서 세부 정보
 입력
입력
- 개인 키 - 개인 키 정보를 복사하여 붙여넣습니다. 텍스트에는 and
END RSA PRIVATE KEY행이 포함되어야 합니다.BEGIN RSA PRIVATE KEY - Private Key Password—개인 키의 암호(사용 가능한 경우)를 입력합니다.
- 서명된 인증서 - 인증서를 복사하여 텍스트로 붙여넣습니다. 모든 중간 CA 및 루트 CA 인증서를 포함해야 합니다. 텍스트에는 and
—–END CERTIFICATE—–행이 포함되어야 합니다.—–BEGIN CERTIFICATE—–
- 개인 키 - 개인 키 정보를 복사하여 붙여넣습니다. 텍스트에는 and
Guidelines for using custom server certificates:
- Do not use a wildcard certificate, for example: *.abc.com for 802.1X authentication.
- You can use a certificate that contains a common name (CN) or a subject alternative name (SAN) for 802.1X authentication..
- We recommend the following x509 extension attributes. The majority of the client device operating systems support these extensions.
- Use certificate version 3 or v3 (not legacy v1)
- If the server name is being used as a validation criterion on the client side, then the certificate should include the SAN extension with the DNS name of the server.
- Include Extended Key Usage as a TLS web server authentication criterion (required for most Android devices).
이제 인증서 기반 인증 프로세스를 진행할 수 있습니다.
또한보십시오
클라이언트 인증서 요구 사항
주니퍼 Mist Access Assurance로 인증서 기반 인증을 구현할 때 클라이언트 인증서는 IdP 조회 및 MDM 통합과 같은 기능 전반에 걸쳐 적절한 기능을 보장하기 위해 특정 요구 사항을 충족해야 합니다.
보안 요구 사항
클라이언트 인증서는 다음과 같은 최소 보안 표준을 충족해야 합니다.
- 인증서 유형: X.509 v3 인증서
- 키 길이: 2048비트 이상(4096비트 권장) 또는 ECDSA(P-256 이상)
- 서명 알고리즘: SHA-256 이상(SHA-384, SHA-512)
- 필수 확장: 클라이언트 인증과 함께 확장된 키 사용(1.3.6.1.5.5.7.3.2)
ID 공급자 조회 요구 사항
IdP와 사용자 ID를 성공적으로 일치시키려면 클라이언트 인증서에 다음 필드 중 하나가 포함되어 있는지 확인하십시오. 조회는 클라우드 IdP( 형식 user@domain.xyz)의 사용자 계정 이름을 사용하여 수행해야 합니다. 다음 필드는 아래에 설명된 순서대로 선택됩니다.
- 주제 일반 이름(CN)
- 제목 대체 이름 - UPN(SAN:UPN)
- 제목 대체 이름 - 이메일(SAN:Email)
시스템 인증서에 대한 ID 공급자 조회 동작
IdP와 머신 ID를 성공적으로 일치시키려면(다른 클라우드 IdP에는 머신 ID가 없으므로 주로 Entra ID와 관련됨) 클라이언트 인증서에 다음 필드 중 하나가 포함되어 있는지 확인합니다.
조회는 EntraID의 디바이스 이름(도메인 이름 제외)을 사용하여 수행해야 합니다. 다음 필드는 아래에 설명된 순서대로 선택됩니다.
- 주제 일반 이름(CN)
- 주체 대체 이름 - DNS(SAN:DNS)
MDM 통합 고려 사항
MDM 솔루션과 함께 인증서를 사용하는 경우:
- 디바이스 기반 조회를 위해 인증서에 디바이스 식별자(예: SAN:DNS 필드의 DeviceId 또는 UDID)를 포함합니다.
- 주니퍼 문서 포털에서 각 MDM 벤더의 관련 통합 문서를 참조하십시오. 주니퍼 Mist Access Assurance NAC
조직 전체에 배포하기 전에 소규모 디바이스 세트로 인증서 구성을 테스트하여 액세스 보장 기능 전반에 걸쳐 적절한 기능을 보장합니다.