인증서 기반(EAP-TLS) 인증 구성
아래의 적절한 절차와 비디오 데모에 따라 무선 또는 유선 네트워크에 대한 인증서 기반 EAP-TLS 인증을 구성합니다.
무선 또는 유선 연결을 설정할 때 중요한 단계는 보안 네트워크 액세스를 구성하는 것입니다. 주니퍼 Mist Access Assurance를 통해 802.1X를 사용하여 인증 방법을 설정할 수 있습니다.
802.1X 인증를 지원하는 프로토콜 중 하나인 EAP-TLS(Extensible Authentication Protocol–전송 레이어 보안)는 통신 경로의 각 지점에서 클라이언트 및 서버 인증서를 모두 확인합니다. 이 인증 방법은 신뢰할 수 있는 디지털 인증서를 사용하여 사용자의 유효성을 검사하고 원활한 네트워크 액세스를 제공합니다.
필수 구성 요소
-
신뢰할 수 있는 써드파티인 CA(인증 기관)로부터 디지털 인증서, 즉 소스 X.509 인증서를 얻거나 내부적으로 인증서를 생성해야 합니다.
-
클라이언트 디바이스를 RADIUS 서버가 802.1X를 사용하여 인증할 수 있는 신청자로 구성해야 합니다. 일반적으로 프로덕션 배포에서 MDM(모바일 디바이스 관리) 또는 그룹 정책을 사용하여 클라이언트를 구성합니다.
-
네트워크에 무선 클라이언트 인증을 수행하려면 주니퍼® 시리즈 고성능 액세스 포인트가 있어야 합니다.
-
클라우드 RADIUS 서버가 사용할 퍼블릭 또는 프라이빗 엔터프라이즈 TLS 서버 인증서를 구성합니다.
- 다음 절차를 숙지하십시오.
무선 네트워크에 대한 인증서 기반(EAP-TLS) 인증 구성
주니퍼 Mist 포털을 사용하여 무선 네트워크에서 인증서 기반 인증 설정하기:
다음 비디오는 무선 네트워크에 대한 인증서 기반(EAP-TLS) 인증을 구성하는 방법을 보여줍니다.
Let's start it with Mist Access Assurance and we'll start by looking at various 802.1x authentication use cases. There's both wireless and wired but the first very simple use case we'll look at the wireless certificate-based or EAP-TLS authentication. What do we need to get this up and running? So objective is allow you know our clients to authenticate to the network and allow them on the network if they're presenting trusted digital certificates.
Prerequisites we need client certificates installed on client devices. We have a separate video how you can create your own certificate authority and sign client certificates if you don't have any PKI and you just want to do your lab testing for example. That's a there is a good video covering that.
In production environment in production deployments the client certificates are typically distributed automatically by MDM solutions or mobile device management or group policies if you're in the Windows environment or any other onboarding solutions. But we are assuming that in for our exercise client certificates are already in there. Before we go into configuration I just want to review the authentication flow.
What's actually going to happen when client is trying to access the network? So we have a wireless client, we have a Mist AP, we have access assurance service that's configured. So client will try to associate to the AP which advertises 802.1x enabled SSID. The client the AP will ask about the IP identity.
In other words, what's your what's your username? Client will send the IP identity response. At this point, the Mist Access Assurance will present its server certificate that's to provide the mutual authentication.
So client will need to trust the Mist access assurance certificate to say okay I'm actually trusting this service to pass authentication credentials. Then after the client validates the service certificate and client can either truly validate the certificate or it can bypass that service certificate validation that there is a setting that you can configure. Not a great practice, actually, a horrible practice from a security point of view, but for testing in lab purposes, would be a good option.
Now after the client validated the server certificate in a TLS scenario, client is presenting its own client certificate, or in other words, called client hello and sends it over through the AP to the Mist access assurance service. At this point, access assurance will look at the client certificate and validate it against the trusted certificate authority list that that it has configured. In other words it will look at okay so which certificate authorities do I trust in my configuration? Is any of those trusted CA's signed the client certificate? And if yes, great the certificate is validated right, and at this point, we can look through authentication policy rules and make sure that we are matching a configured authentication policy rule and at this point we declare success.
If configured, we can also send a VLAN. We can send a role to the AP so it can assign the client into the right network and at this point we're good to go. Now let's look at the actual setup procedure - what do we need to configure this? So right now, we have an organization, the test organization. We'll be using for this tutorial that has one test AP connected, one switch connected with virtually no config on it whatsoever.
So we will start by configuring the access assurance for our use case to authenticate clients using EAP-TLS only validating certificates all we need to do is to go to Organization > access certificates. We'll need to import our certificate authority. If you have your own PKI infrastructure then you would import your root certificate authority typically also your intermediate CA so it's going to be a couple of certs that you will need to to import only the public certificate you would need to import obviously not the private keys. So we just we are just telling access assurance which certificates to trust based on this trust chain.
In our case, we're using our lab certificates that we've created in in another video so I'm going to open up this lab Mist CA that we've created in a different video I'm going to copy the certificate contents paste it in here so it will now decode my CA common name it will see okay it's valid until this at this date it's actually a CA cert because it's self-issued we can hit save. So now we've imported the certificate authority at this point we are trusting any client certificates have been issued by the CA right very very simple and remember in in the in this step where the client is validating the server certificate how do you know which server certificate to trust so by default Mist access assurance will get its own cert signed by your organization CA. So this is an automatically generated certificate authority for your Mist organization that is signing the certificate for access assurance authentication service.
You can optionally import your own certificate if you want to if you want clients to trust certificates issued by your organization right. For now, we will just use default search. Now the next step for us to complete our basic scenario we can go to organization auth policies by default you could see there is there no policies configured all the authentication requests will be implicitly denied so we'll need to create a rule to allow valid clients to connect. So click on add rule. We'll just say this is wireless EAP-TLS authentication and all we need is to say on the left hand side we are matching on certain criteria. User labels on the right hand side we're deciding what we want to do with this types of users. So here, we are saying we want to look at wireless users. These are predefined labels that that we have in access assurance by default and we want to match on the authentication type EAP-TLS meaning clients will use certificates at this point, that's really all you need to do.
The initial testing right your your policy says allow clients to connect if they match these two criterias and you know technically you would you would have been also able to assign VLANs. We can actually do that here as welL. So we want to assign a VLAN, how do we do that? We can create a label. We can create a label and let's say we want to assign a VLAN 750 let's just say it's going to be our corp VLAN the label type will be AAA attribute okay and the label value would be VLAN. So in this case, you want to assign VLAN 750 and now we if we click here oh now we have our new label showing up so what what this rule is going to do is if a client has a valid cert and it's a wireless client we will allow them to connect and we will assign them to VLAN 750. Very simple very easy let's say.
The next step is to configure our SSID, right? We'll go to Organization > WLAN Templates. We'll create a template we'll call it mist-secure-net i don't know create add WLAN. I'm going to use the same SSID name i'm going to configure it as 8.1x security actually we can also use WPA3 we can then scroll down under authentication service list. We don't need to configure radio servers anymore none of that all we have to do is say our authentication server is Mist Auth. That's it.
The last step is if we are doing dynamic VLAN assignment which we do in in our scenario we want to enable dynamic VLANs we'll say the VLAN type is standard and we'll just say that for now we will only allow VLAN 750 and if no VLAN is sent back from from access assurance, we'll just call it we'll just assign the client into default VLAN 1, that's it just enabling some filters as best practices. Click create our SSID is ready. The last thing for us is to assign this to our org so the template will get advertised on our app. We only have one side, so we can assign it to the org, otherwise you could have assigned the template to the side of your choosing. Hit save. Now our configuration is ready and we can now go ahead and test with a real client.
Create the authentication policies with Mist Access Assurance considering the same exact scenario with TLS users authenticating using certificates and TLS users authenticating using credentials. The first thing that we will do is we will import the root CA certificate so we can trust the certificates on our client signed by that CA. So we'll go to organization > access certificates and I'll click on add certificate authority.
I will go to my folder where I have all the pre-configured items ready. I'm going to copy my root CA cert, import it in here. It's the same cert we used with the other two vendors. It's now imported, it's decoded, we're good to go and good to proceed. We'll then go to organization authentication policies. Actually we go to identity providers first.
We need to configure an identity provider in here and unlike with ClearPass and ICE, we don't need to have a local AD on-prem. We would actually be able to talk to Okta as our identity provider to fetch the user group information to authenticate users and provide them with network access. So I will click on add IDP.
I will select this connector type as auth since we will use native API connector to talk to Okta. I will open my setup instructions since my Okta app has been pre-created. Same as AD for other providers so I'm going to take tenants. I'm going to select the auth type as Okta, paste the tenant ID. I'll take the client ID, paste it in here. I'll take the private key so we can authenticate ourselves to Okta.
Add it right there and finally I'll configure the ROPC API ID for TTLS authentication and it's secret. The last thing I will do is I will configure the domain name. So the domain name would actually tell us based on the user realm like when the user signs in as user at like in this case lab.mystify.com. We'll take that domain based on the domain. We'll talk to a respective IDP in our configuration so just give it a name called Okta. Click create. We have our IDP configured now.
The last step is to go to access authentication policies and create the two policies that we need based on our requirements. First, we will create a rule for certificate authentication. What we'll then do is in the match criteria on the left hand side we will use labels to match in certain conditions.
In our case, we need to match on wireless users that are using certificates or TTLS to authenticate and we also need it to match on the group employee that we will take from IDP. But as you can see by default we are not having any label associated with the group so what we can do is we can create a label right from that same place. We'll call it employee group.
We will select label type as directory attribute and the label value will be group and the actual value will be employee. Click create. We can now select this label on the left hand side. It shows up here as the directory attribute. Now we are matching on all these three conditions. Then on the right hand side we are deciding what we want to do with these types of users. By default we will allow access to the network but we also want to assign VLAN 750 and role corp. Again we need to create labels for that. So we'll go and create first corp VLAN label.
The label type will be AAA attribute and the value would be VLAN. I'll configure it as 750. I'll then create corp role attribute and I'll just configure it as corp. And then I'm going to create also labels for BYD VLAN and BYD role. So 751 and finally BYD role. Good to go.
So we can select corp VLAN and corp role. Now we'll create one more rule for our users that are doing TTLS based authentication. So we'll call it credential authentication and we'll match on wireless users that are doing TTLS and that they're also part of the same employee group.
And on the right hand side we'll assign them BYD VLAN and BYD role. At this point we can hit save and our authentication policy setup is done. The last thing is to create the actual WLAN template. So I'm going to go to WLAN templates. I'm going to create a new one. I'm going to call it MIST 802.1X. I'm going to click create.
Add a WLAN. Select security as 802.1X. And in this case we don't need to configure radio servers one by one. We don't need to add APs as radio clients. None of that is required. We'll just go and select MIST authentication as our authentication service. That's it. We'll then just go on and configure dynamic VLANs. It's the same two VLANs that we will be sending. So 750.751. Click create and just assign this template to the org.
Click save. At this point we should be able to test with our client devices. We have one laptop that's connected using a certificate. It got the role corp. We have a mobile device that connected using TTLS using username and password and got the role BYD. And now let's take a look deeper and look at the client insights.
What can we see with MIST access assurance here? So what you could see is in addition to the all the client events that are coming from the access point and that are showing the user experience, from the network perspective, you also see all the events coming from the NAC side of things as the client goes through the authentication and authorization process. So, first event is, okay, we're seeing the client certificate. We are grabbing all the metadata about the user certificate.
We see that the client trusted our server cert that's provided by the MIST authentication service. We'll then did a IDP lookup against Okta. And we got all the user group information from Okta. So we know now this user is part of all these user groups. And we see one of these groups is actually employee, which we needed to match on. And finally, when we look at the NAC client allowed access event, we're saying, okay, this client is good to go. It's allowed in the network. This is the VLAN that we are assigning from a NAC perspective. This is the user role that we are assigning from the NAC perspective.
And this is the authentication rule that hit during that process. So if we click on that link, it will actually go and highlight, this is the rule that this particular user hit during the auth process, right? Similarly, if we look at the mobile device, if we look at the client insights, we're now seeing that in this case, client trusted the service certificate, but instead of showing the client certificate, it actually did the IDP authentication using username and password credentials against Okta. Finally, we got the user role and group information from Okta.
And we've allowed client to access the network, assign a different VLAN 751 and different user group. But in this case, we are hitting a different authentication rule in our policy. So again, if we click on it, we're saying that particular user went through a different role.
이제 네트워크에서 EAP-TLS를 사용하여 클라이언트를 안전하게 인증할 준비가 되었습니다. 주니퍼 Mist 클라우드는 클라이언트 인증서를 확인하고 인증 정책 구성에 따라 액세스 및 권한을 부여합니다.
다음 주니퍼 Mist 포털에서 연결된 클라이언트를 볼 수 있습니다.
- 클라이언트 > 유선 클라이언트를 선택하여 클라이언트 세부 정보를 확인합니다.
- 클라이언트 이벤트를 보려면 Monitor > Service Levels > Insights 를 선택합니다.
유선 네트워크에 대한 인증서 기반(EAP-TLS) 인증 구성
주니퍼 Mist 포털을 사용하여 유선 네트워크에 대한 인증서 기반 인증을 설정하려면 다음을 수행합니다.
- 신뢰할 수 있는 루트 인증 기관(CA)을 가져옵니다. 주니퍼 Mist는 CA에서 생성한 인증서를 서버 인증서로 사용합니다. 자세한 내용은 디지털 인증서 사용을 참조하십시오.
- 인증 정책을 생성합니다.
- 스위치를 구성합니다.
- 연결된 유선 클라이언트가 네트워크 액세스를 필요로 하는 스위치의 각 포트에 포트 프로필을 할당합니다.
포트 구성 탭의 스위치 구성 선택 섹션에서 포트 범위 추가 를 클릭하여 포트 프로필을 포트와 연결합니다.
그림 1: 스위치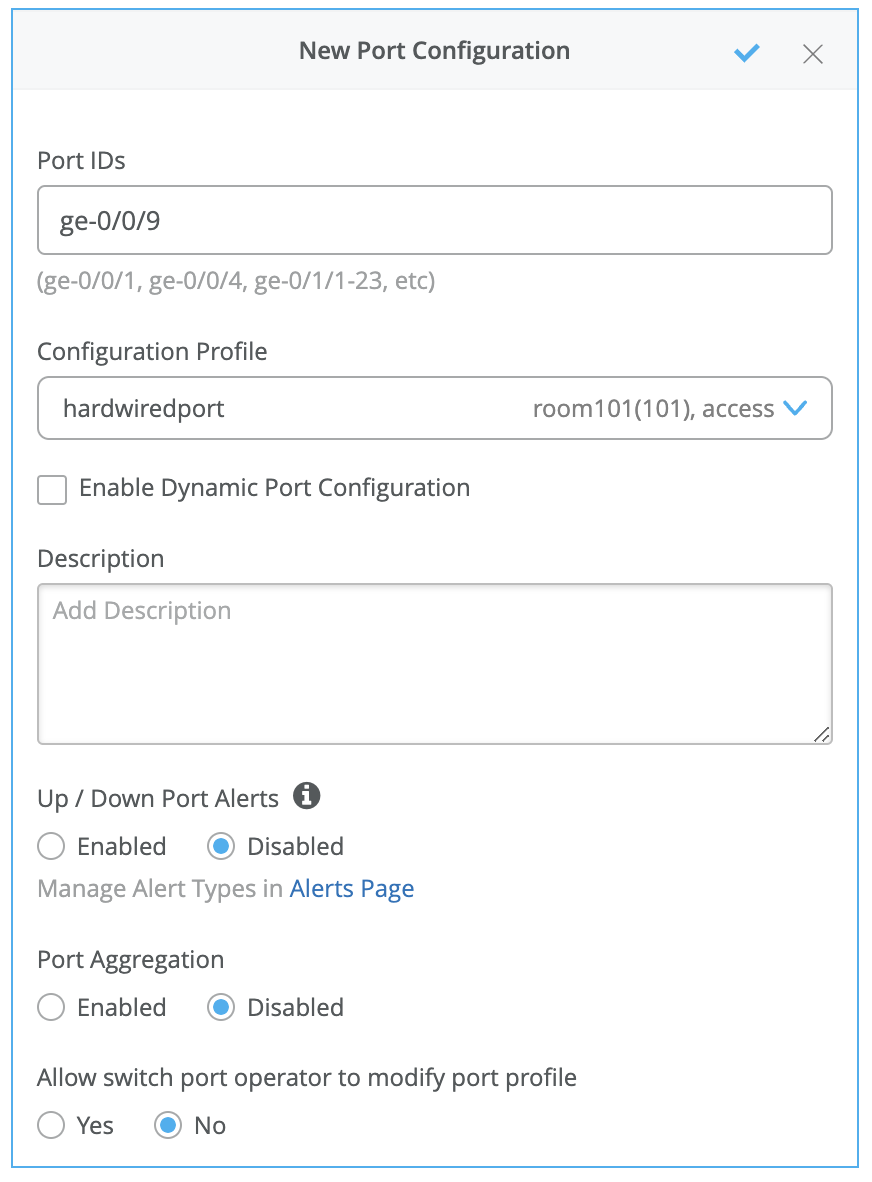 의 포트 범위에 포트 프로파일 할당
- 연결된 유선 클라이언트가 네트워크 액세스를 필요로 하는 스위치의 각 포트에 포트 프로필을 할당합니다.
인증서 속성을 활용하여 인증 정책을 생성하는 절차는 다음 비디오를 시청하십시오.
Authentication policies a little bit. How can we use them in combination with certificates alone? What we will do is we'll create another example, right? So far we've just authenticated the user that used the test certificate we've created before. What if we want to differentiate between different types of users just by looking at certificates? So what I have done is I've created another test user certificate that has a different common name, that has different attributes in the subject that we will use to differentiate between our original test user and the new one.
So what I will do is I will create a label matching on certificate attribute and I will call this my new user one cert because our test user, where is it, the common name is different on the certificate. It's user one at different domain name, right? So we'll take a look at the certificate attribute and we'll match on the common name of this certificate. So in this case, we want to do a full match and just let's say we want to say if this certificate is being used, then we want to assign these users or this user into a different VLAN.
Let's just say other VLAN. So label value VLAN, let's say VLAN one. So I'm going to create another rule. I'm going to say special user or special cert, I should say, select wireless, select TLS. But in this case, we are also going to match on the certificate attribute that we've just configured. So all three conditions here must match in order for this specific policy to hit, right? And when it hits, we will assign the user into a different VLAN.
So we're going to hit save. Now we have two policy rules. Now let's connect the device. I've already configured my iPad with this new certificate. Okay. Now the iPad is connected to a different VLAN. Okay. We see that this is a new user, a different username connected to the same SSID, just assigned to a different VLAN ID. So if we click on it, we'll look at the insights. Let's see if we have new events in there just coming in. Okay. Now we are seeing the new set of events coming in.
We're seeing the new certificate. With a different common name in assert, this is the attribute we've been matching on. And now we see the new rule hit. And in this case, this specific user, this specific client went and hit a different rule. This is how we can make policies just by looking at the certificate with nothing else at our hands. And this is just an example. You could look at part of the subject in the certificate. You could look at the issuers if you have different CAs issuing certificates for other users. You could look at virtually any certificate attribute that you want to look at and use that as the differentiation factor in your access policies.
이제 네트워크에서 EAP-TLS를 사용하여 클라이언트를 안전하게 인증할 수 있습니다. 주니퍼 Mist 클라우드는 클라이언트 인증서를 확인하고 인증 정책 구성에 따라 액세스 및 권한을 부여합니다.
주니퍼 Mist 포털에서 연결된 클라이언트를 볼 수 있습니다.
- 클라이언트 > 유선 클라이언트를 선택하여 클라이언트 세부 정보를 확인합니다.
- 모니터 > 서비스 수준 > 인사이트를 선택하여 클라이언트 이벤트를 확인합니다.
테스트 또는 랩 사용을 위한 EAP-TLS 인증에 대해 Windows 클라이언트 디바이스를 구성하는 방법을 알아보려면 다음 비디오를 시청하세요.
Configure a Windows device to use a certificate to authenticate-- again, still talking about the lab use cases where you need to man ually install a certificate, manually connect a device to the network . So we have our test lab client certificate with the CA cert embedded. We have our Mist certificate we've exported from the Mist dashboard previously.
So we're going to take those two files. We're going to copy them. We'll move over to our Windows machine. We're just going to paste those two files. So now we will install the client certificate. It is going to be installed as a user certificate. Click Next, put in the import password, confirm installation, and then install the Mist certificate as the trusted certification authority. So we could do-- here, we're going to install it as a trusted certification authority. Next click Finish. And we have installed our CA cert.
Now the next step is to configu re a profile on the Windows device to connect to our SSID using EAP-TLS using our client certificates. So now - by the way, if we want to validate that the client certificate has installed, we could sea rch for certificate manager, go to personal certificates. We now have our test certificate installed that we've created in th e previous step, assigned by our lab CA. You could see it right there.
So now we will create a manual network profile. So we'll go to Control Panel. We'll go to Network and Sharing Center. We'll click on Setup a new connection or network. We'll select Manually connect to a wireless network. We'll put in our SSID name. Security type will be WPA3 enterprise, right? Don't start this connection automatically just yet.
Let's click Next. Change connection settings, that's important. We'll then go to Security. So we'll change the default PIP for smart card or other cert EAP-TLS. We'll go to Settings. We'll then select the Mist certificate we've just imported. This is for the client to trust the Mist authentication service. Again, this is about the mutual authentication piece. We will then click OK. We'll go to Advanced Settings. And we'll use user authentication, because we have a user certificate, in our case. Click OK. Click OK. Click Close. We'll go select Turn on Wi-Fi. We'll connect to our Mist securenet SSID. We'll select our certificate. That's the certificate we've imported. Click OK. And our client device is connected.
테스트 또는 랩 사용을 위한 EAP-TLS 인증에 대해 Android 클라이언트 디바이스를 구성하는 방법을 알아보려면 다음 비디오를 시청하세요.
Let's take a look how we configure an Android device, in this particular case this is a Pixel 7 device, with our certificate. So we have the same two certs that we need to copy over to the Android device, either through USB or any other way. You'll then go to Settings. You'll then go to Security and Privacy. You'll then need to install those certificates. We will go to encryption and credentials. Install a certificate. Always select Wi-Fi certificate.
First, select the mist certificate. Just call it mistcert. Click OK. Then install the user certificate, the test-lab-client that we have created before. That is the client - oh, that's the password. Should have read that. Desktop client. Installed as well, great.
Final step is to go to Netw ork settings. Go to internet. We will find our SSID we are trying to connect to. We'll select the EAP method as TLS. CA certificate will be mistcert, right there. Now, Domain is the name of the server common name. In the case of Mist default cert, that's off auth.mist.com. The user certificate will be test-lab-client. And identity is your common name of the certificate, basically, your username. In my case, that's my email address. I'm going to click Connect. And now you see my client disconnected using a certificate that we'll just load it.
예: 사이트 변수를 사용하여 인증 정책 구성
인증 정책에서 사이트 변수를 사용하여 사이트에 특정한 VLAN을 할당할 수 있습니다. 이러한 유연성은 다양한 위치에서 인증 정책을 생성하고 관리할 때 특히 유용할 수 있습니다. 사이트 변수를 활용하면 인증 정책 구성 프로세스를 간소화하고 여러 사이트 간에 일관성을 보장할 수 있습니다.
- 사이트 변수를 만듭니다.
- 주니퍼 Mist 클라우드 포털에서 조직 > 관리 > 사이트 구성을 클릭합니다.
- 사이트 변수를 구성할 사이트를 선택합니다.
- 사이트 변수 창까지 아래로 스크롤하고 변수 추가 버튼을 클릭합니다.
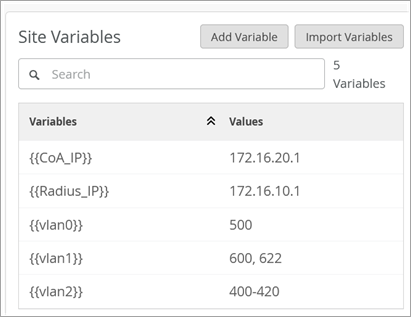
- 팝업 화면이 나타나면 변수의 이름을 입력하고 변수가 나타내는 값을 지정합니다.
그림 2: 사이트 변수다음 표는 이 예에서 사용되는 변수 목록을 보여줍니다.
 만들기
만들기
표 1: 사이트 변수 샘플 사이트 변수 값 제1기지 {{vlan0}} 100 {{vlan1}} 200,222 {{vlan2}} 20-30 {{Radius_IP}} 172.16.20.1 {{CoA_IP}} 172.16.10.1 제2기지 {{vlan0}} 500 {{vlan1}} 600,622 {{vlan2}} 400-420 {{Radius_IP}} 172.16.40.1 {{CoA_IP}} 172.16.30.1 - 저장을 클릭합니다.
- 인증 정책 레이블을 생성합니다.
주니퍼 Mist 포털의 왼쪽 메뉴에서 조직 > 액세스 > 인증 정책 레이블을 선택합니다.
그림 3: 레이블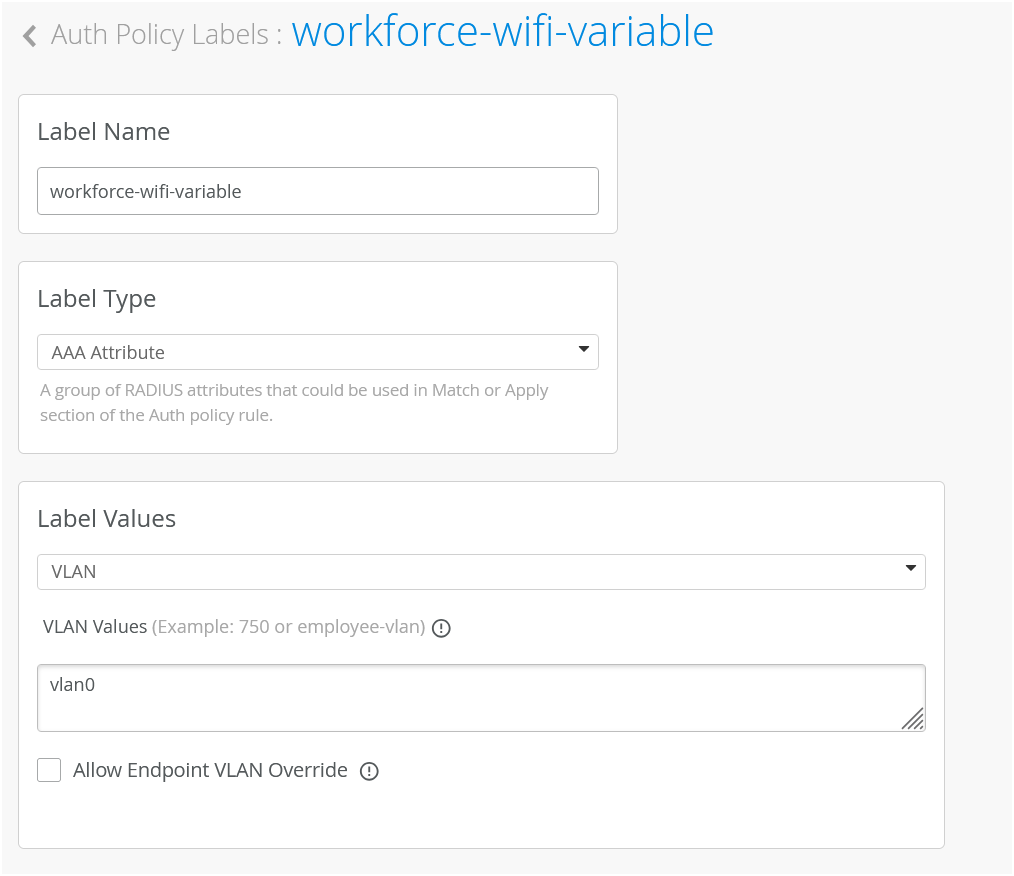 만들기
만들기
- 레이블 이름 - 레이블 이름을 입력합니다(예: workforce-wifi-variable).
- Label Type— AAA Attributes로 유형을 선택합니다.
- 레이블 값 - 클라이언트 레이블을 입력합니다. 이 예에서는 레이블 값을 vlan0으로 입력합니다. 이는 이전 절차에서 만든 사이트 변수입니다.
- 만들기를 클릭합니다.
- 인증 정책을 생성합니다.
주니퍼 Mist 포털의 왼쪽 메뉴에서 조직 > 액세스 > 인증 정책을 선택합니다.
인증 정책 페이지에서 새 정책을 추가합니다.
Add Rule(규칙 추가)을 클릭하여 규칙을 생성합니다. 이 규칙에서는 이전 단계에서 만든 레이블을 사용합니다.
그림 4: 인증 정책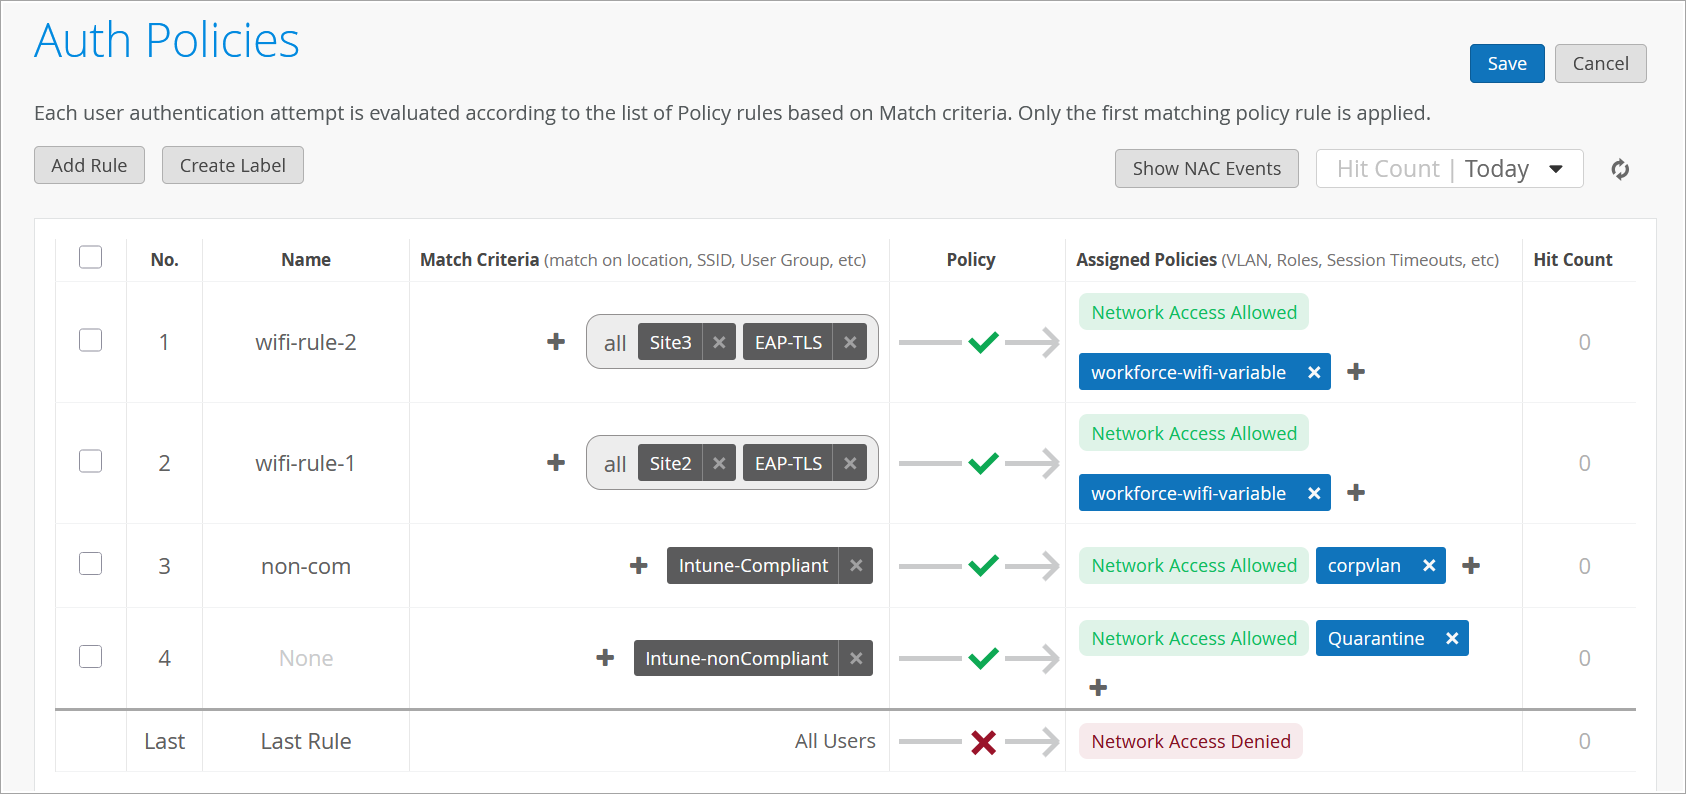 생성
생성
- 이름 - 정책의 이름을 입력합니다.
- 일치 기준 - 사이트와 같은 일치 기준과 EAP-TLS와 같은 인증 유형을 선택합니다.
- 정책 - 허용을 선택합니다.
- 정책 작업—네트워크 액세스 허용을 선택합니다.
- 할당된 정책 - AAA 속성에서 이전 절차에서 생성된 레이블을 선택합니다.
- SSID를 구성합니다.
무선 LAN(WLAN)은 모듈식 요소이며 각 WLAN에는 지정된 SSID(서비스 집합 식별자)에 대한 구성이 포함됩니다.
- 다음 필드 각각에 대해 옵션을 선택합니다.
- 보안 유형 - 엔터프라이즈(802.1X)를 선택합니다. 또한 WPA2 또는 WPA3를 선택합니다.
- 인증 서버 - MIST 인증.
- VLAN—동적을 선택합니다. VLAN 유형에서 명명을 선택하고 VLAN에 대해 생성된 사이트 변수를 입력합니다.
그림 5: WLAN 템플릿
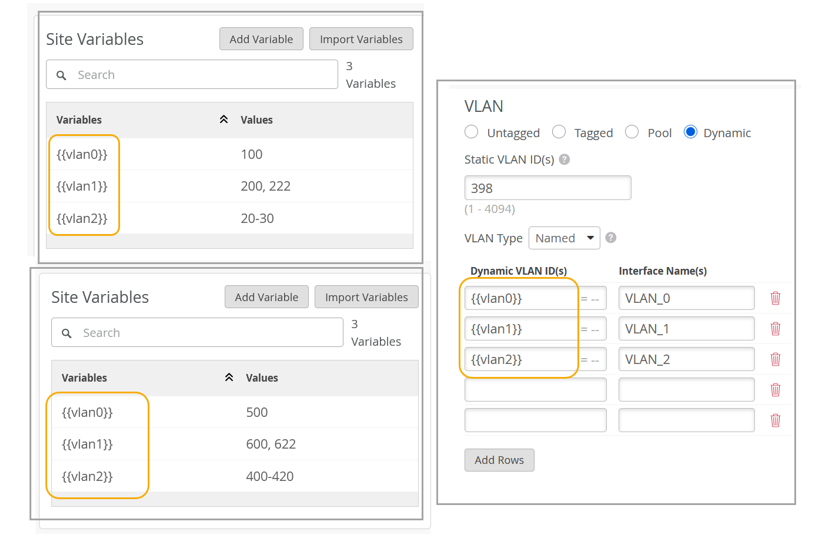 에서 VLAN 구성
이제 SSID 구성이 완료되었습니다.
- RADIUS 인증 서버를 사용하는 경우 WLAN 템플릿 페이지에서 인증 서버 섹션으로 이동하고 드롭다운 상자에서 RADIUS를 선택합니다.
그림 6: RADIUS 인증 서버
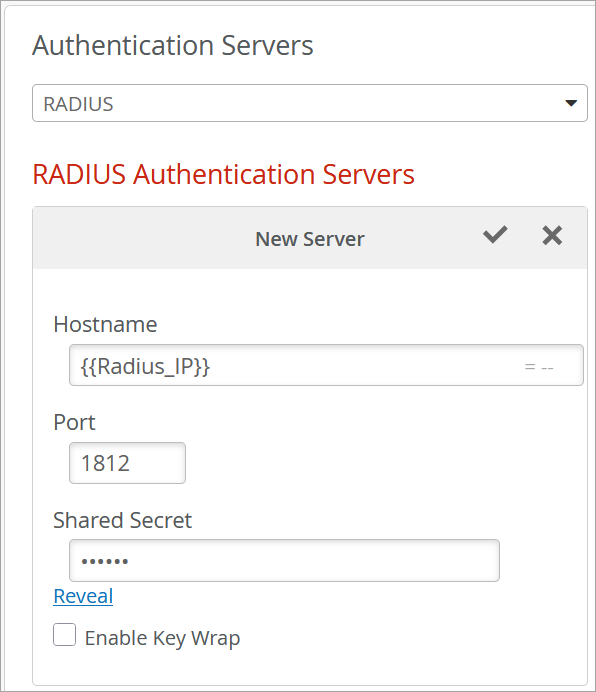 구성
구성
다음 세부 정보를 입력합니다.
- Hostname— RADIUS 서버의 IP 주소 또는 FQDN입니다. 여기에 생성한 변수를 입력합니다.
- Port— 일반적으로 기본 RADIUS 포트는 인증의 경우 1812, 어카운팅의 경우 1813이지만, 이는 서버 구성에 따라 다를 수 있습니다.
- 공유 암호 - RADIUS 서버를 사용하여 Mist AP를 인증하는 데 사용되는 공유 암호입니다.
- (선택 사항) 키 랩 활성화 - RADIUS 서버가 키 랩핑을 지원하는 경우 이 기능을 활성화하고 필요한 키 세부 정보를 입력합니다.
- 또한 WLAN 생성 프로세스의 일부로 CoA(Change of Authorization) 또는 DM(Disconnect Message) 서버를 활성화할 수도 있습니다.
CoA/DM Server(CoA/DM 서버) 섹션까지 아래로 스크롤하고 Enabled(활성화) 상자를 선택합니다.
그림 7: CoA/DM 서버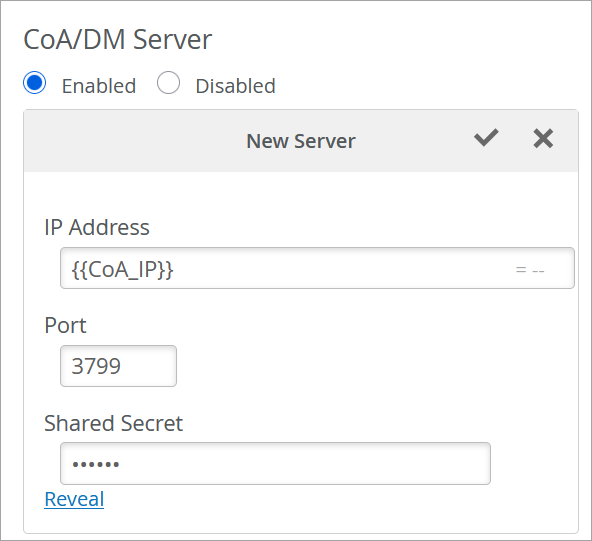 구성
구성
다음 세부 정보를 입력합니다.
- Hostname—CoA/DM 서버의 IP 주소입니다. 여기에 생성한 변수를 입력합니다.
- Port— 기본 포트는 3799입니다.
- 공유 암호 - 서버와 함께 Mist AP를 인증하는 데 사용되는 공유 암호입니다.
- 다음 필드 각각에 대해 옵션을 선택합니다.
구성이 완료되면 인증 정책은 사이트 변수를 사용하여 사이트 1과 사이트 2에 무선 VLAN을 할당합니다. 정책이 적용되면 사이트 1의 경우 값 100에 VLAN 0이 할당됩니다. 사이트 2와 마찬가지로 값 500에 VLAN 1이 할당됩니다. 같은 방식으로 사이트 1에는 IP 주소가 172.16.20.1인 Radius 서버와 IP 주소가 172.16.10.1인 CoA 서버가 사용되며, 사이트 2에는 IP 주소가 172.16.30.1인 RADIUS 서버와 IP 주소가 172.16.40.1인 CoA 서버가 사용됩니다.