TCP 인증 옵션(TCP-AO)
요약 BGP 및 LDP 세션에 대한 TCP-AO(TCP 인증 옵션)에 대해 알아보십시오.
BGP 및 LDP 세션을 위한 TCP-AO
BGP 및 LDP 프로토콜은 전송에 TCP를 사용합니다. TCP-AO는 BGP 및 LDP 세션 중에 교환되는 TCP 세그먼트의 보안 및 신뢰성을 향상시키기 위해 RFC5925, TCP 인증 옵션을 통해 제안된 새로운 인증 방법입니다. 또한 IPv4 및 IPv6 트래픽도 지원합니다.
TCP-AO의 이점
TCP-AO는 TCP MD5에 대해 다음과 같은 이점을 제공합니다.
-
더 강력한 알고리즘 - HMAC-SHA-1-96 및 AES-128-CMAC-96( RFC5925, TCP 인증 옵션에서 위임)과 같은 여러 개의 강력한 인증 알고리즘을 지원합니다. HMAC-SHA-1-96은 해시 기반 MAC이며 AES-128-CMAC-96은 암호 기반 MAC이므로 MD5 알고리즘을 사용하여 생성된 다이제스트보다 메시지 다이제스트가 더 복잡하고 안전합니다.
-
두 가지 보안 — TCP-AO 방법에서 구성된 인증 알고리즘은 두 단계로 사용됩니다. 일단 사용자 구성 키에서 내부 트래픽 키를 생성한 다음 생성된 트래픽 키를 사용하여 메시지 다이제스트를 생성하기 위해, TCP MD5 방법에서 MD5 알고리즘은 사용자 구성 키를 사용하여 메시지 다이제스트를 생성합니다.
-
더 나은 키 관리 및 민첩성 - 세션에 대해 최대 64개 키를 구성할 수 있으며 세션 수명 동안 언제든지 추가할 수 있습니다. TCP 연결이 닫히는 일 없이 동일한 연결 내에서 키를 변경하는 기능(한 키에서 다른 키로 이동)을 제공하여 간단한 키 조정 메커니즘을 제공합니다. 설정된 연결 중에 TCP MD5 키를 변경하면 연결에서 플랩 또는 재시작이 발생할 수 있습니다.
-
수명이 긴 연결에 적합 - BGP 및 LDP와 같은 라우팅 프로토콜과 단일 연결의 반복 인스턴스에 걸쳐 수명이 긴 연결에 더 적합합니다.
TCP-AO란?
TCP-AO는 다음과 같은 프레임워크를 제공합니다.
-
HMAC-SHA1 및 AES-128과 같은 여러 강력한 알고리즘을 지원하여 내부 트래픽 키 및 메시지 다이제스트를 생성합니다.
-
새 사용자 구성 키를 추가하여 설정된 연결에 대한 내부 트래픽 키를 다시 생성하고 BGP 또는 LDP 피어 간의 키 변경을 동기화하는 메커니즘을 추가합니다.
이전 릴리스에서 Junos 디바이스는 BGP 및 LDP 세션에 대한 TCP MD5 인증 방법만 지원했습니다. MD5 방법은 TCP-AO보다 덜 안전한 MD5 알고리즘만 지원합니다. 또한 MD5 키를 변경하면 일반적으로 TCP-AO와 달리 TCP 세션이 중단됩니다. TCP MD5는 TCP MD5 서명 옵션을 통한 BGP 세션 보호 RFC2385에 정의되어 있습니다. TCP MD5에 대한 자세한 내용은 TCP를 참조하십시오.
-
Junos 디바이스가 TCP-AO 및 TCP MD5 인증 방법을 모두 지원하는 반면, 해당 연결에 대해 두 가지를 동시에 사용할 수는 없습니다.
-
TCP-AO는 무중단 활성 라우팅을 지원합니다.
다음 다이어그램에서는 TCP-AO와 TCP MD5 인증의 차이점을 설명합니다. 첫 번째 플로우는 TCP-AO의 구성 및 처리 플로우를 보여주며, 두 번째 플로우는 TCP-MD5의 구성 및 처리 플로우를 보여줍니다.

아래는 그림 1에 표시된 처리 흐름에 대한 설명입니다.
-
TCP-AO - 사용자는 필요한 모든 매개 변수를 사용하여 키체인(키 0 및 키 1)에서 두 개의 키를 구성했습니다. 키체인은 두 가지 알고리즘인 HMAC SHA1과 AES-128(RFC5925에 따라 의무화)을 지원합니다. TCP는 그림의 타임스탬프에 의해 표시된 대로 현재 활성 키인 키 0을 가져옵니다. 이 예에서 키 0은 HMAC-SHA1로 구성됩니다.
SHA1은 키 0 구성에서 "암호"를 취하고 암호화에 대한 특정 매개 변수를 연결하고 내부 트래픽 키를 생성합니다.
SHA1은 내부 트래픽 키와 TCP 세그먼트를 다시 암호화하여 메시지 다이제스트를 생성합니다. 다이제스트는 TCP 세그먼트의 TCP-AO 옵션의 TCP-AO MAC 필드에 복사됩니다. 그런 다음 세그먼트가 수신 디바이스로 전송됩니다.
-
TCP-MD5 - TCP MD5 옵션은 연결에 대해 하나의 키만 지원하기 때문에 사용자가 단일 키를 구성했습니다. 또한 MD5 알고리즘만 지원합니다. MD5 알고리즘은 암호화를 위해 키 및 TCP 세그먼트에서 "암호"를 가져와 메시지 다이제스트를 생성합니다. 그런 다음 이 메시지 다이제스트는 TCP 세그먼트의 MD5 다이제스트 필드로 복사되어 수신 디바이스로 전송됩니다.
구성
먼저 키체인을 구성합니다. 그런 다음 TCP-AO를 BGP 또는 LDP 세션에 적용합니다.
TCP-AO(하나의 키 포함)에 대한 키체인을 구성하려면 계층 수준에서 다음 문을 [edit security] 구성합니다.
[edit security]
user@router# set authentication-key-chains key-chain key-chain key id secret secretpassword start-time YYYY-MM-DD.HH:MM algorithm ao ao-attribute send-id send-id recv-id recv-id cryptographic-algorithm cryptographic-algorithm tcp-ao-option enabled
TCP-AO를 BGP 세션(구성된 키체인 포함)에 적용하려면 계층 수준에서 다음 문을 [edit protocols] 구성합니다.
[edit protocols]
user@router# set bgp group group neighbor neighbor authentication-algorithm ao
user@router# set bgp group group neighbor neighbor authentication-key-chain key-chain
TCP-AO를 LDP 세션(구성된 키체인 포함)에 적용하려면 계층 수준에서 다음 문을 [edit protocols] 구성합니다.
[edit protocols]
user@router# set ldp session session authentication-algorithm ao
user@router# set ldp session session authentication-key-chain key-chain
예: 키체인 구성(TCP-AO)
요약 이 예에서는 BGP 또는 LDP 세션을 인증하기 위해 TCP-AO 키체인을 만드는 방법을 보여줍니다.
이 예는 다음과 같은 하드웨어 및 소프트웨어 구성 요소를 사용합니다.
MX 시리즈 또는 PTX 시리즈 라우터.
릴리스 20.3R1 이상 버전 Junos OS.
이 예에서는 BGP 또는 LDP 세션을 인증하기 위해 TCP-AO 키체인을 만드는 방법을 보여줍니다.
이 예에서는 디바이스 R1과 R2에서 두 개의 키 key 0 key 1 로 키체인 new_auth_key 을 생성할 수 있습니다.
성공적으로 키체인을 만들었습니다!
키체인을 삭제하려면 구성 모드에서 명령을 사용합니다 delete security authentication-key-chains key-chain key-chain-name .
-
단 하나의 TCP-AO 키체인을 수명 동안 BGP 또는 LDP 세션과 연결할 수 있습니다. 수명 동안 또 다른 키체인을 세션에 가리킬 수 없습니다.
-
키체인 내의 두 후속 키의 시작 시간 사이에 최소 30분 간격을 권장합니다.
-
키체인이 구성되고 TCP 연결에서 사용되면 활성 키의 또는
recv-id값을 변경할send-id수 없습니다. 그러나 키의 다른 매개 변수를 변경할 수 있으며 업데이트된 키체인과 관련된 새로운 연결은 연결 설정에 대한 업데이트된 매개 변수를 가합니다. -
릴리스 21.2R1 Junos OS TCP-AO가 하나라도 TCP-AO를 구성하지 않은 경우, TCP-AO 없이 연결을 설정할 수 있도록 하려면 을(를) 사용할
tcpao-auth-mismatch allow-without-tcpao수 있습니다.
운영 모드에서 기존 키체인(있는 경우)에 대한 정보를 표시하려면 명령을 사용합니다 show security keychain . 다음은 샘플 출력입니다.
user@R1> show security keychainKeychain Active-ID Next-ID Transition Tolerance
Send Receive Send Receive
new_auth_key 1 1 None None None 3600 (secs)
예: TCP-AO를 사용하여 BGP 세션 인증
요약 이 예에서는 TCP 인증 옵션(TCP-AO) 키체인을 사용하여 BGP 세션을 인증하는 방법을 보여줍니다.
요구 사항
이 예는 다음과 같은 하드웨어 및 소프트웨어 구성 요소를 사용합니다.
-
MX 시리즈 또는 PTX 시리즈 라우터.
-
릴리스 20.3R1 이상 버전 Junos OS.
-
키체인
new_auth_key을 구성합니다. 키체인 구성(TCP-AO)을 참조하십시오.
개요
BGP는 TCP를 전송 프로토콜로 사용합니다. TCP-AO는 BGP 세션을 인증하는 데 사용할 수 있는 방법입니다. TCP-AO 키체인은 BGP neighbor 또는 구성 계층의 BGP 그룹 수준에서 적용할 수 있습니다.
토폴로지
 을 위한 토폴로지
구성
이 예에서는 BGP 세션을 인증하기 위해 두 디바이스 모두에서 TCP-AO 인증 키체인 new_auth_key 및 인증 알고리즘 ao 을 연결합니다.
CLI 빠른 구성
이 예를 빠르게 구성하려면, 아래 명령을 복사하여 텍스트 파일로 붙여 넣은 다음 모든 라인브레인을 제거하고, 네트워크 구성을 일치하는 데 필요한 세부 사항을 변경한 다음 명령을 복사하여 CLI에 붙여 넣습니다.
R1
[edit]
set interfaces ge-0/0/1 description R1-to-R2-Link
set interfaces ge-0/0/1 unit 0 family inet address 192.0.2.1/30
set interfaces lo0 unit 0 family inet address 192.168.0.11/32
set routing-options router-id 192.168.0.11
set routing-options autonomous-system 65500
set protocols bgp group ebgp_grp type external
set protocols bgp group ebgp_grp peer-as 65501
set protocols bgp group ebgp_grp neighbor 192.0.2.2
set protocols bgp group ebgp_grp neighbor 192.0.2.2 authentication-key-chain new_auth_key
set protocols bgp group ebgp_grp neighbor 192.0.2.2 authentication-algorithm ao
R2
[edit]
set interfaces ge-0/0/1 description R2-to-R1-Link
set interfaces ge-0/0/1 unit 0 family inet address 192.0.2.2/30
set interfaces lo0 unit 0 family inet address 192.168.0.12/32
set routing-options router-id 192.168.0.12
set routing-options autonomous-system 65501
set protocols bgp group ebgp_grp type external
set protocols bgp group ebgp_grp peer-as 65500
set protocols bgp group ebgp_grp neighbor 192.0.2.1
set protocols bgp group ebgp_grp neighbor 192.0.2.1 authentication-key-chain new_auth_key
set protocols bgp group ebgp_grp neighbor 192.0.2.1 authentication-algorithm ao
단계별 절차
-
구성 모드를 입력합니다.
-
두 디바이스에서 인터페이스 IP 주소, 인터페이스 설명, 루프백 주소, 라우터 ID, AS 번호와 같은 기본 설정을 구성합니다.
R1
[edit]user@R1# set interfaces ge-0/0/1 description R1-to-R2-Link user@R1# set interfaces ge-0/0/1 unit 0 family inet address 192.0.2.1/30 user@R1# set interfaces lo0 unit 0 family inet address 192.168.0.11/32 user@R1# set routing-options router-id 192.168.0.11 user@R1# set routing-options autonomous-system 65500R2
[edit]user@R2# set interfaces ge-0/0/1 description R2-to-R1-Link user@R2# set interfaces ge-0/0/1 unit 0 family inet address 192.0.2.2/30 user@R2# set interfaces lo0 unit 0 family inet address 192.168.0.12/32 user@R2# set routing-options router-id 192.168.0.12 user@R2# set routing-options autonomous-system 65501 -
R1과 R2 사이에 EBGP를 구성합니다.
R1
[edit]user@R1# set protocols bgp group ebgp_grp type external user@R1# set protocols bgp group ebgp_grp peer-as 65501 user@R1# set protocols bgp group ebgp_grp neighbor 192.0.2.2R2
[edit]user@R2# set protocols bgp group ebgp_grp type external user@R2# set protocols bgp group ebgp_grp peer-as 65500 user@R2# set protocols bgp group ebgp_grp neighbor 192.0.2.1 -
인증 키체인
new_auth_key과 인증 알고리즘ao을 두 디바이스의 BGP 세션에 연결합니다.R1
[edit]user@R1# set protocols bgp group ebgp_grp neighbor 192.0.2.2 authentication-key-chain new_auth_key user@R1# set protocols bgp group ebgp_grp neighbor 192.0.2.2 authentication-algorithm aoR2
[edit]user@R2# set protocols bgp group ebgp_grp neighbor 192.0.2.1 authentication-key-chain new_auth_key user@R2# set protocols bgp group ebgp_grp neighbor 192.0.2.1 authentication-algorithm ao -
두 디바이스의 구성 모드에서 을(를) 입력
commit합니다.두 디바이스 모두에서 구성 문을 커밋하면 BGP 세션이 TCP-AO 인증 방법을 사용하여 설정해야 합니다.
결과
구성 모드에서 , show routing-options및 show protocols 명령을 사용하여 show interfaces구성을 확인합니다.
user@R1# show interfaces
ge-0/0/1 {
     description R1-to-R2-Link;
    unit 0 {
        family inet {
            address 192.0.2.1/30;
        }
    }
}
lo0 {
     unit 0 {
        family inet {
            address 192.168.0.11/32;
        }
    }
}
user@R1# show routing-options
autonomous-system 65500;
user@R1# show protocols
bgp {
    group ebgp_grp {
        type external;
        peer-as 65500;
        neighbor 192.0.2.1 {
            authentication-algorithm ao;
            authentication-key-chain new_auth_key;
        {
    {
{
bgp {
    group ebgp_grp {
        type external;
        peer-as 65551;
    neighbor 192.0.2.2 {
        authentication-algorithm ao;
        authentication-key-chain new_auth_key;
        }
    }
}
확인
BGP 세션 설정 확인
목적
TCP-AO를 활성화한 후 BGP 세션 설정 출력을 확인합니다.
작업
운영 모드 명령을 사용하여 BGP 세션 상태의 BGP 요약을 show bgp summary 봅니다.
user@R1> show bgp summary
Threading mode: BGP I/O
Default eBGP mode: advertise - accept, receive - accept
Groups: 1 Peers: 1 Down peers: 0
Table          Tot Paths  Act Paths Suppressed    History Damp State    Pending
inet.0
                       0          0          0          0          0          0
Peer                     AS      InPkt     OutPkt    OutQ   Flaps Last Up/Dwn State|#Active/Received/Accepted/Damped...
192.0.2.2             65501          6          4       0       0        1:19 Establ
  inet.0: 0/0/0/0
의미
강조 표시된 출력 값은 BGP가 1:19분 전에 TCP-AO 인증 방법과 세션을 성공적으로 설정했음을 나타냅니다.
BGP 세션이 TCP-AO를 사용하는지 확인
목적
BGP neighbor가 TCP-AO 키체인으로 인증되었는지 확인합니다.
작업
show bgp neighbor neighbor 명령을 사용하여 BGP 피어의 구성 세부 정보를 볼 수 있습니다. 출력에서 인증 관련 세부 정보만 필터링하려면 파이프(|) 기능을 사용하고 와(과) 을(를) 일치authentication합니다.
user@R1> show bgp neighbor 192.0.2.2 | match authentication
Authentication key chain: new_auth_key
  Authentication algorithm: ao
의미
출력은 인증 키체인 new_auth_key 및 인증 알고리즘 ao 이 BGP 인접 192.0.2.2라우터에 적용되었음을 나타냅니다.
예: TCP-AO를 사용하여 LDP 세션 인증
요약 이 예에서는 TCP 인증 옵션(TCP-AO) 키체인을 사용하여 LDP 세션을 인증하는 방법을 보여줍니다.
요구 사항
이 예는 다음과 같은 하드웨어 및 소프트웨어 구성 요소를 사용합니다.
-
MX 시리즈 또는 PTX 시리즈 라우터.
-
릴리스 20.3R1 이상 버전 Junos OS.
-
키체인
new_auth_key을 구성합니다. 키체인 구성(TCP-AO)을 참조하십시오.
개요
LDP(Label Distribution Protocol)는 MPLS 신호 전송 프로토콜입니다. 이를 통해 라우터는 네트워크를 통해 레이블 스위칭 경로(LSP)를 설정할 수 있습니다. TCP-AO는 LDP 피어 간에 생성된 세션의 보안을 강화하는 데 도움이 됩니다.
 을 위한 토폴로지
구성
이 예에서는 TCP-AO 인증 키체인 new_auth_key 및 인증 알고리즘 ao 을 두 디바이스에 연결하여 LDP 세션을 인증합니다.
CLI 빠른 구성
이 예를 빠르게 구성하려면, 아래 명령을 복사하여 텍스트 파일로 붙여 넣은 다음 모든 라인브레인을 제거하고, 네트워크 구성을 일치하는 데 필요한 세부 사항을 변경한 다음 명령을 복사하여 CLI에 붙여 넣습니다.
R1
[edit]
set interfaces ge-0/0/1 description R1-to-R2-Link
set interfaces ge-0/0/1 unit 0 family inet address 192.0.2.1/30
set interfaces ge-0/0/1 unit 0 family mpls
set interfaces lo0 unit 0 family inet address 192.168.0.11/32
set routing-options router-id 192.168.0.11
set protocols ldp interface ge-0/0/1.0
set protocols ldp interface lo0.0
set protocols ldp session 192.168.0.12 authentication-algorithm ao
set protocols ldp session 192.168.0.12 authentication-key-chain new_auth_key
set protocols ospf area 0.0.0.0 interface ge-0/0/1.0
set protocols ospf area 0.0.0.0 interface lo0.0
R2
[edit]
set interfaces ge-0/0/1 description R2-to-R1-Link
set interfaces ge-0/0/1 unit 0 family inet address 192.0.2.2/30
set interfaces ge-0/0/1 unit 0 family mpls
set interfaces lo0 unit 0 family inet address 192.168.0.12/32
set routing-options router-id 192.168.0.12
set protocols ldp interface ge-0/0/1.0
set protocols ldp interface lo0.0
set protocols ldp session 192.168.0.11 authentication-algorithm ao
set protocols ldp session 192.168.0.11 authentication-key-chain new_auth_key
set protocols ospf area 0.0.0.0 interface ge-0/0/1.0
set protocols ospf area 0.0.0.0 interface lo0.0
단계별 절차
-
구성 모드를 입력합니다.
-
R1 및 R2의 디바이스 인터페이스, 루프백, 인터페이스 설명, 라우터 ID, AS 번호와 같은 기본 설정을 구성합니다.
R1
[edit]user@R1# set interfaces ge-0/0/1 description R1-to-R2-Link user@R1# set interfaces ge-0/0/1 unit 0 family inet address 192.0.2.1/30 user@R1# set interfaces lo0 unit 0 family inet address 192.168.0.11/32 user@R1# set routing-options router-id 192.168.0.11R2
[edit]user@R2# set interfaces ge-0/0/1 description R2-to-R1-Link user@R2# set interfaces ge-0/0/1 unit 0 family inet address 192.0.2.2/30 user@R2# set interfaces lo0 unit 0 family inet address 192.168.0.12/32 user@R2# set routing-options router-id 192.168.0.12 -
두 디바이스 모두에서 MPLS 및 LDP를 구성합니다.
R1
[edit]user@R1# set interfaces ge-0/0/1 unit 0 family mpls user@R1# set protocols ldp interface ge-0/0/1.0 user@R1# set protocols ldp interface lo0.0R2
[edit]user@R2# set interfaces ge-0/0/1 unit 0 family mpls user@R2# set protocols ldp interface ge-0/0/1.0 user@R2# set protocols ldp interface lo0.0 -
루프백 주소 도달 가능성을 광고하는 내부 게이트웨이 프로토콜(IGP)을 구성합니다. 이 예에서 OSPF를 구성합니다.
R1
[edit protocols]user@R1# set ospf area 0.0.0.0 interface ge-0/0/1.0 user@R1# set ospf area 0.0.0.0 interface lo0.0 passiveR2
[edit protocols]user@R2# set ospf area 0.0.0.0 interface ge-0/0/1.0 user@R2# set ospf area 0.0.0.0 interface lo0.0 passive -
및
authentication-algorithm ao을 R1 및 R2의 레이블 공간 ID와 연결authentication-key-chain new_auth_key합니다.R1
[edit protocols]user@R1# set ldp session 192.168.0.12 authentication-algorithm ao user@R1# set ldp session 192.168.0.12 authentication-key-chain new_auth_keyR2
[edit protocols]user@R2# set ldp session 192.168.0.11 authentication-algorithm ao user@R2# set ldp session 192.168.0.11 authentication-key-chain new_auth_key -
두 디바이스의 구성 모드에서 을(를) 입력
commit합니다.
결과
, show routing-options 및 show protocols 명령을 사용하여 구성을 show interfaces확인합니다.
user@R1# show interfaces
ge-0/0/1 {
     description R1-to-R2-Link;
    unit 0 {
        family inet {
            address 192.0.2.1/30;
        }
    }
}
lo0 {
     unit 0 {
        family inet {
            address 192.168.0.11/32;
        }
    }
}
user@R1# show routing-options
router-id 192.168.0.11;
user@R1# show protocols
ldp {
     interface ge-0/0/1.0;
    interface lo0.0 passive;
            authentication-algorithm ao;
            authentication-key-chain new_auth_key;
        {
{
ospf {
    area 0.0.0.0 {
        interface ge-0/0/1.0;
        interface lo0.0;
    {
{
확인
LDP 세션 확인
목적
TCP-AO를 통한 LDP 세션 설정 확인.
작업
show ldp session detail 작동 모드 명령을 사용하여 LDP 세션이 올바르게 설정되었는지 확인합니다.
user@R1> show ldp session detail

Address: 192.168.0.12, State: Operational, Connection: Open, Hold time: 22
  Session ID: 192.168.0.11:0--192.168.0.12:0
  Next keepalive in 2 seconds
  Passive, Maximum PDU: 4096, Hold time: 30, Neighbor count: 1
  Neighbor types: discovered
  Keepalive interval: 10, Connect retry interval: 1
  Local address: 192.168.0.11, Remote address: 192.168.0.12
  Up for 01:11:59
  Last down 01:13:12 ago; Reason: authentication key was changed
  Number of session flaps: 2
  Capabilities advertised: none
  Capabilities received: none
  Protection: disabled
  Session flags: none
  Authentication type: new_auth_key(ao key-chain, 192.168.0.12/32)
  Local - Restart: disabled, Helper mode: enabled
  Remote - Restart: disabled, Helper mode: enabled
  Local maximum neighbor reconnect time: 120000 msec
  Local maximum neighbor recovery time: 240000 msec
  Local Label Advertisement mode: Downstream unsolicited
  Remote Label Advertisement mode: Downstream unsolicited
  Negotiated Label Advertisement mode: Downstream unsolicited
  MTU discovery: disabled
  Nonstop routing state: Not in sync
  Next-hop addresses received:
    192.0.2.2
    192.168.0.12
    128.49.110.110
의미
출력은 LDP 세션이 설정되었음을 나타냅니다.
예: TCP-AO를 사용하여 RPKI 검증 세션 인증
개요
RPKI(Resource Public Key Infrastructure)는 인터넷의 라우팅 인프라, 특히 BGP를 보호하도록 설계된 공용 키 인프라 프레임워크입니다. RPKI는 IP 주소와 같은 인터넷 번호 리소스 정보를 신뢰 앵커에 연결하는 방법을 제공합니다. RPKI를 사용하여 적법한 수의 리소스 보유자는 인터넷 라우팅 프로토콜의 작동을 제어하여 경로 하이재킹 및 기타 공격을 방지할 수 있습니다.
릴리스 22.2R1 Junos OS TCP 인증 옵션(TCP-AO) 및 키체인을 사용하여 RPKI 세션을 인증할 수 있습니다.
이 예에서는 TCP-AO 키체인을 사용하여 RPKI 검증 세션을 인증하는 방법을 보여줍니다. 클라이언트 디바이스(R1)와 서버(R2) 사이에 인증된 RPKI 세션을 설정합니다.
요구 사항
이 예는 다음과 같은 하드웨어 및 소프트웨어 구성 요소를 사용합니다.
- MX 시리즈 라우터 2개
- 릴리스 22.2R1 이상 버전 Junos OS.
토폴로지
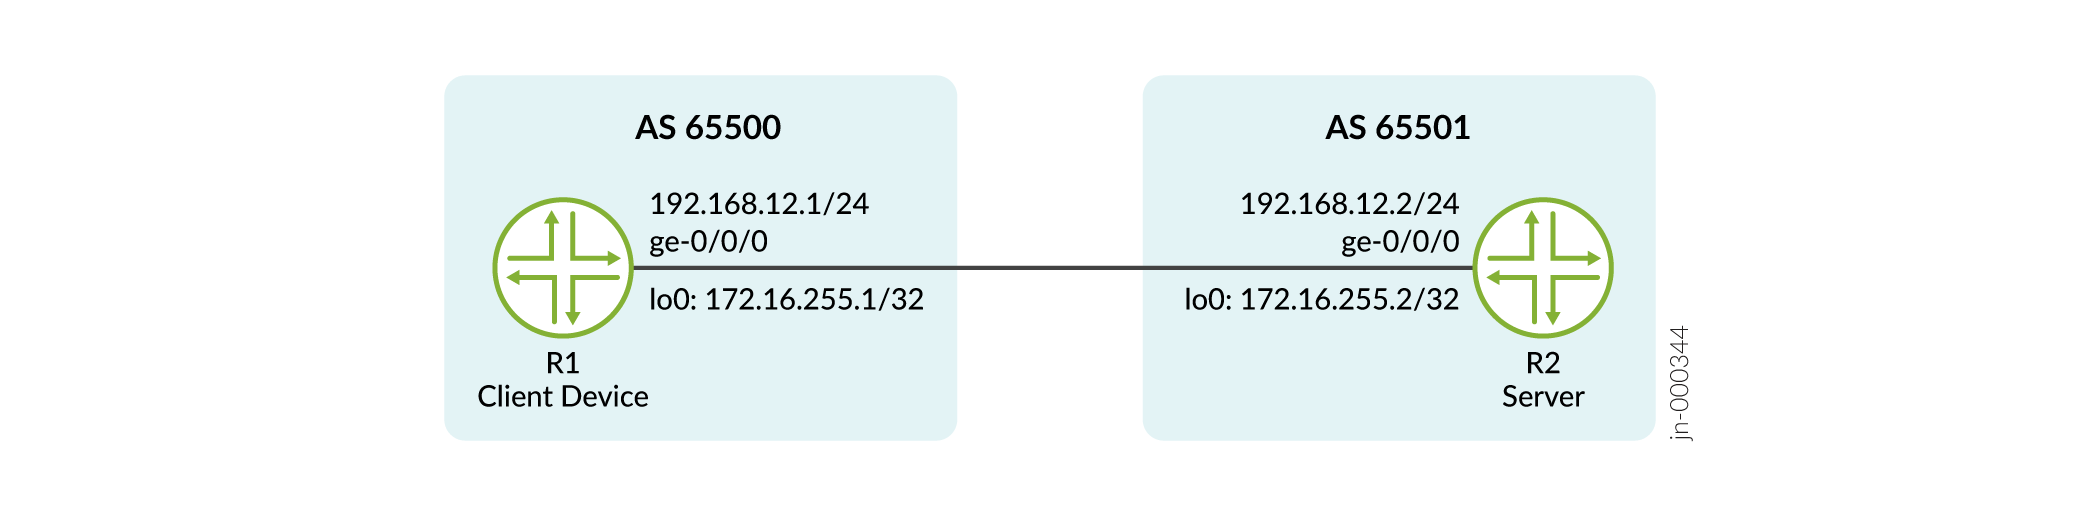 위한 토폴로지
구성
이 예에서는 RPKI 연결을 인증하려면 두 디바이스 모두에서 TCP-AO 인증 키체인 new_auth_key 및 인증 알고리즘 ao 을 연결해야 합니다.
CLI 빠른 구성
이 예를 빠르게 구성하려면, 아래 명령을 복사하여 텍스트 파일로 붙여 넣은 다음 모든 라인브레인을 제거하고, 네트워크 구성을 일치하는 데 필요한 세부 사항을 변경한 다음 명령을 복사하여 CLI에 붙여 넣습니다.
R1
[edit]
set system host-name R1
set interfaces ge-0/0/0 description R1-to-R2-Link
set interfaces ge-0/0/0 unit 0 family inet address 192.168.12.1/24
set interfaces lo0 unit 0 family inet address 172.16.255.1/32
set routing-options router-id 172.16.255.1
set routing-options autonomous-system 65500
set security authentication-key-chains key-chain new_auth_key key 0 secret "$ABC123"
set security authentication-key-chains key-chain new_auth_key key 0 start-time "2022-5-18.04:00:00 -0700"
set security authentication-key-chains key-chain new_auth_key key 0 algorithm ao
set security authentication-key-chains key-chain new_auth_key key 0 ao-attribute send-id 3
set security authentication-key-chains key-chain new_auth_key key 0 ao-attribute recv-id 8
set security authentication-key-chains key-chain new_auth_key key 1 secret "$ABC123"
set security authentication-key-chains key-chain new_auth_key key 1 start-time "2022-6-18.04:00:00 -0700"
set security authentication-key-chains key-chain new_auth_key key 1 algorithm ao
set security authentication-key-chains key-chain new_auth_key key 1 ao-attribute send-id 1
set security authentication-key-chains key-chain new_auth_key key 1 ao-attribute recv-id 2
set routing-options validation group to_servers session 192.168.12.2 port 8282
set routing-options validation group to_servers session 192.168.12.2 authentication-algorithm ao
set routing-options validation group to_servers session 192.168.12.2 authentication-key-chain new_auth_key
R2
[edit]
set system host-name R2
set logical-systems rv_server_1 interfaces ge-0/0/0 unit 0 family inet address 192.168.12.2/24
set interfaces lo0 unit 0 family inet address 172.16.255.2/32
set routing-options router-id 172.16.255.2
set routing-options autonomous-system 65501
set logical-systems rv_server_1 routing-options validation local-cache listen-port 8282
set logical-systems rv_server_1 routing-options validation group to_dut session 192.168.12.1 local-cache
set logical-systems rv_server_1 routing-options validation group to_dut session 192.168.12.1 local-address 192.168.12.2
set security authentication-key-chains key-chain new_auth_key key 0 secret "$ABC123"
set security authentication-key-chains key-chain new_auth_key key 0 start-time "2022-5-18.04:00:00 -0700"
set security authentication-key-chains key-chain new_auth_key key 0 algorithm ao
set security authentication-key-chains key-chain new_auth_key key 0 ao-attribute send-id 8
set security authentication-key-chains key-chain new_auth_key key 0 ao-attribute recv-id 3
set security authentication-key-chains key-chain new_auth_key key 1 secret "$ABC123"
set security authentication-key-chains key-chain new_auth_key key 1 start-time "2022-6-18.04:00:00 -0700"
set security authentication-key-chains key-chain new_auth_key key 1 algorithm ao
set security authentication-key-chains key-chain new_auth_key key 1 ao-attribute send-id 2
set security authentication-key-chains key-chain new_auth_key key 1 ao-attribute recv-id 1
set logical-systems rv_server_1 routing-options validation group to_dut session 192.168.12.1 authentication-algorithm ao
set logical-systems rv_server_1 routing-options validation group to_dut session 192.168.12.1 authentication-key-chain new_auth_key
단계별 절차
-
두 디바이스에서 인터페이스, 루프백 주소, 라우터 ID 및 AS 번호와 같은 기본 설정을 구성합니다. R2에서 서버의 논리적 시스템 인터페이스를 구성합니다.
R1
[edit]
user@R1# set system host-name R1
user@R1# set interfaces ge-0/0/0 description R1-to-R2-Link
user@R1# set interfaces ge-0/0/0 unit 0 family inet address 192.168.12.1/24
user@R1# set interfaces lo0 unit 0 family inet address 172.16.255.1/32
user@R1# set routing-options router-id 172.16.255.1
user@R1# set routing-options autonomous-system 65500
R2
[edit]
user@R2# set system host-name R2
user@R2# set logical-systems rv_server_1 interfaces ge-0/0/0 unit 0 family inet address 192.168.12.2/24
user@R2# set interfaces lo0 unit 0 family inet address 172.16.255.2/32
user@R2# set routing-options router-id 172.16.255.2
user@R2# set routing-options autonomous-system 65501
-
대체 TCP 포트 번호가 있는 RPKI 서버(R2)가 있는 클라이언트 디바이스(R1)에서 TCP 세션을 구성합니다.
R1
[edit]
user@R1# set routing-options validation group to_servers session 192.168.12.2 port 8282
-
서버 R2에서 원본 검증을 위해 클라이언트 R1과의 RPKI 세션을 구성합니다.
[edit]
user@R2# set logical-systems rv_server_1 routing-options validation group to_dut session 192.168.12.1 local-cache
user@R2# set logical-systems rv_server_1 routing-options validation group to_dut session 192.168.12.1 local-address 192.168.12.2
-
첫 번째 키(키 0)로 키체인
new_auth_key을 생성합니다.R1
[edit security]
user@R1# set authentication-key-chains key-chain new_auth_key key 0 secret secretpassword start-time 2022-5-18.04:00 algorithm ao ao-attribute send-id 3 recv-id 8
R2 (send-id 및 recv-id 값이 역으로)
[edit security]
user@R2# set authentication-key-chains key-chain new_auth_key key 0 secret secretpassword start-time 2022-5-18.04:00 algorithm ao ao-attribute send-id 8 recv-id 3
-
키 0을 생성한 후 다른 키(키 1)를 추가하려면 다음을 수행합니다.
R1
[edit security authentication-key-chains key-chain new_auth_key]
user@R1# set key 1 secret secretpassword start-time 2022-6-18.04:00 algorithm ao ao-attribute send-id 1 recv-id 2
R2 (send-id 및 recv-id 값이 역으로)
[edit security authentication-key-chains key-chain new_auth_key]
user@R2# set key 1 secret secretpassword start-time 2022-6-18.04:00 algorithm ao ao-attribute send-id 2 recv-id 1
-
R1과 R2 모두에 구성된 키체인
new_auth_key및 인증 알고리즘ao을 적용합니다.R1
[edit]
user@R1# set routing-options validation group to_servers session 192.168.12.2 authentication-algorithm ao
user@R1# set routing-options validation group to_servers session 192.168.12.2 authentication-key-chain new_auth_key
R2
[edit]
user@R2# set logical-systems rv_server_1 routing-options validation group to_dut session 192.168.12.1 authentication-algorithm ao
user@R2# set logical-systems rv_server_1 routing-options validation group to_dut session 192.168.12.1 authentication-key-chain new_auth_key
-
두 디바이스의 구성 모드에서 을(를) 입력
commit하여 변경 사항을 활성화합니다. -
구성된 두 키로 키체인
new_auth_key을 확인하려면 구성 모드에서 명령을 사용합니다show security authentication-key-chains.
결과
R1에서 키체인 구성 결과를 확인합니다.
user@R1# show security authentication-key-chains
key-chain new_auth_key {
    key 0 {
        secret "$ABC123"; ## SECRET-DATA
        start-time "2022-5-18.04:00:00 -0700";
        algorithm ao;
        ao-attribute {
            send-id 3;
            recv-id 8;
        }
    }
    key 1 {
        secret "$ABC123"; ## SECRET-DATA
        start-time "2022-6-18.04:00:00 -0700";
        algorithm ao;
        ao-attribute {
            send-id 1;
            recv-id 2;
        }
    }
}
다음 명령을 사용하여 R1에 적용된 나머지 구성을 확인합니다.
user@R1# show interfaces
ge-0/0/0 {
    description R1-to-R2-Link;
    unit 0 {
        family inet {
            address 192.168.12.1/24;
        }
    }
}
lo0 {
    unit 0 {
        family inet {
            address 172.16.255.1/32;
        }
    }
}
user@R1# show routing-options
router-id 172.16.255.1;
autonomous-system 65500;
validation {
    group to_servers {
        session 192.168.12.2 {
            authentication-algorithm ao;
            authentication-key-chain new_auth_key;
            port 8282;
        }
    }
}
확인
목적
두 피어에 구성된 TCP-AO 키체인 및 알고리즘으로 세션이 설정되었는지 확인합니다.
작업
운영 모드 명령을 사용하여 show validation session 192.168.12.2 detail 검증된 세션을 봅니다.
user@R1> show validation session 192.168.12.2 detail
Session 192.168.12.2, State: up, Session index: 2
  Group: to_servers, Preference: 100
  Port: 8282
  Refresh time: 300s
  Hold time: 600s
  Record Life time: 3600s
  Serial (Full Update): 6
  Serial (Incremental Update): 6
  Authentication key-chain: new_auth_key
    Session flaps: 1
    Session uptime: 2d 01:40:05
    Last PDU received: 00:04:59
    IPv4 prefix count: 0
    IPv6 prefix count: 0
의미
출력은 세션이 구성된 키체인 new_auth_key으로 작동 중임을 나타냅니다.