Contrail Command를 설치하고 Contrail 클러스터를 프로비저닝하는 방법
이 문서를 사용하여 Contrail Networking의 그래픽 사용자 인터페이스인 Contrail Command를 설치하고 서버 또는 VM을 Contrail 클러스터의 노드로 프로비저닝하십시오. 서버 또는 VM은 컴퓨팅 노드, 제어 노드, 오케스트레이터 노드, Contrail Insights 노드, Contrail Insights Flows 노드 또는 서비스 노드로 프로비저닝되어 이 절차에 따라 Contrail 클러스터를 생성합니다.
Contrail Insights 및 Contrail Insights Flows의 이전 명칭은 Appformix 및 Appformix Flows였습니다.
이 문서를 사용하는 경우
Contrail Networking의 구성 및 유지 관리를 위한 기본 인터페이스로 Contrail Command를 사용하는 것이 좋습니다.
따라서 Contrail Networking 환경에서 초기 구성 작업으로 이 문서의 절차를 완료해야 합니다.
서버 요구 사항
Contrail Networking 환경에는 서버 기능을 제공하는 물리적 서버 또는 VM이 포함될 수 있지만, 가능하면 확장성 및 가용성을 위해 물리적 서버를 사용하는 것이 좋습니다.
Contrail 환경의 각 서버에는 최소한 다음이 있어야 합니다.
64GB 메모리.
300GB 하드 드라이브.
4개의 CPU 코어.
하나 이상의 이더넷 포트.
Contrail Networking의 서버 요구 사항에 대한 자세한 내용은 서버 요구 사항 및 지원 플랫폼을 참조하십시오.
소프트웨어 요구 사항
Contrail Command 및 Contrail Networking
Contrail Command와 Contrail Networking은 동시에 업데이트되며 항상 동일한 버전의 Contrail Networking 소프트웨어를 실행합니다.
각 Contrail Networking 릴리스에는 오케스트레이션 플랫폼 버전, 오케스트레이션 플랫폼 구축에 사용된 배포자, 지원되는 서버 운영 체제 버전 및 기타 소프트웨어 요구 사항에 기반한 소프트웨어 호환성 요구 사항이 있습니다.
모든 Contrail Networking 릴리스에 대해 지원되는 플랫폼 목록과 추가적인 환경별 소프트웨어 요구 사항은 Contrail Networking 지원 플랫폼 목록을 참조하십시오.
Contrail Insights 및 Contrail Insights 플로우
Contrail 릴리스 2005부터 Contrail Networking 릴리스를 지원하는 Contrail Insights 및 Contrail Insights Flows 이미지는 Contrail Command 내에서 자동으로 프로비저닝됩니다. Contrail Command 버전을 다운로드하면 Contrail Command는 주니퍼 Contrail 레지스트리 내에서 Contrail Networking 버전에 대한 Contrail Insights 및 Contrail Insights Flows 이미지를 자동으로 가져옵니다. 따라서 개별 Contrail Insights 소프트웨어를 별도로 다운로드하거나 설치에 대한 Contrail Insights 또는 Contrail Insights 버전 번호를 인식할 필요가 없습니다.
Contrail 이미지 획득 방법
이 문서에 사용된 절차는 hub.juniper.net 주니퍼 네트웍스 Contrail Docker 프라이빗 보안 레지스트리에서 Contrail Command, Contrail Insights 및 Contrail Insights Flows 소프트웨어를 다운로드합니다. 이 레지스트리에 대한 액세스 자격 증명을 얻기 위해 mailto:contrail-registry@juniper.net 이메일을 보냅니다.
Contrail 레지스트리에서 Contrail 이미지를 검색하려면 Contrail 이미지에 대한 을 Container Tags (를) 알아야 합니다. Contrail Registry 21XX에 대한 README 액세스를 참조하십시오.
Contrail Networking 이미지는 Contrail 다운로드 페이지에서도 사용할 수 있습니다. 제품 이름으로 입력합니다 Contrail Networking .
Contrail Insights 및 Contrail Insights Flows 이미지는 Contrail Insights 다운로드 페이지에서도 사용할 수 있습니다. 제품 이름으로 입력합니다 Contrail Insights .
Contrail Command 설치 방법
Contrail Command는 Contrail Networking을 위한 단일 창 GUI 인터페이스입니다. 최적화된 Contrail 네트워킹 경험을 위해 Contrail 클러스터를 생성하기 전에 Contrail Command를 설치하는 것이 좋습니다. Contrail Command는 이러한 지침에 따라 설치됩니다.
Contrail Command에 대한 자세한 내용은 Contrail 네트워킹 구성 요소 이해하기를 참조하십시오.
시작하기 전에
Contrail Command를 호스팅할 Contrail Command 서버가 다음과 같은 최소 시스템 요구 사항을 충족하는 가상 머신(VM) 또는 물리적 x86 서버인지 확인합니다.
vCPU 4개
32 기가바이트 램
100GB의 디스크 스토리지(모든 사용자 스토리지가 "/" 파티션에 포함됨).
"/home" 파티션이 있는 경우 해당 파티션을 제거하고 "/" 파티션을 해제된 저장 공간의 양만큼 늘립니다.
서버 요구 사항에 나열된 사양을 충족합니다.
사용 중인 Contrail Networking 버전을 지원하는 CentOS 버전을 실행합니다.
Contrail Networking 및 오케스트레이션 플랫폼 조합으로 지원되는 CentOS 버전 목록은 Contrail Networking 지원 플랫폼 목록을 참조하십시오.
명령을 사용하여 업데이트된 패키지와 함께 CentOS를 설치할 수 있습니다
yum update.hub.juniper.net 에서 Contrail Container 레지스트리에 액세스할 수 있습니다. 이 액세스 권한이 필요한 이유는 Contrail Command Docker 이미지를 포함하는 Contrail Command 배포자가 이 설치 절차 중에 이 레지스트리에서 검색되기 때문입니다.
Contrail Container 레지스트리에 대한 액세스 권한이 없는 경우 mailto:contrail-registry@juniper.net 이메일을 보내 액세스 자격 증명을 받으십시오. 이 레지스트리 액세스에 대한 자세한 내용은 Contrail Registry 21XX에 대한 액세스 읽어 보기를 참조하십시오.
인터넷에 연결되어 있습니다.
관리 네트워크에 연결된 하나 이상의 활성 IP 인터페이스를 포함합니다. Contrail Command는 관리 IP 인터페이스를 통해 Contrail 및 오케스트레이터 클러스터를 관리합니다.
설치 중인 릴리스에 대한 컨테이너 태그를 가져옵니다. 컨테이너 태그는 이 절차 중에 설치된 hub.juniper.net 리포지토리에서 Contrail Command 컨테이너 파일을 식별하는 데 필요합니다.
모든 Contrail 릴리스 21 기반 이미지의 컨테이너 태그는 Contrail Registry 21XX에 대한 README 액세스에서 찾을 수 있습니다.
설치를 위한 Contrail Command Server 준비
설치를 위해 서버 또는 VM을 준비하려면 다음을 수행합니다.
Contrail Command 설치
서버에 Contrail Command를 설치하는 방법:
Contrail 클러스터에 서버를 프로비저닝하는 방법
이 절차에 따라 Contrail 클러스터에 서버를 프로비저닝합니다. Contrail 클러스터는 클라우드 네트워킹 환경에서 컴퓨팅 노드, 제어 노드, 오케스트레이터 노드, Contrail Insights 노드, Contrail Insights Flows 노드 또는 서비스 노드로 프로비저닝된 상호 연결된 서버의 모음입니다.
시작하기 전에
시작하기 전에:
토폴로지를 계획합니다.
대역 외 관리 네트워크가 설정되었는지 확인합니다.
Contrail Command가 설치되어 있는지 확인합니다. contrail 명령 설치 방법을 참조하십시오.
Contrail 클러스터 기능을 호스팅하는 모든 서버가 서버 요구 사항에 나열된 사양을 충족하는지 확인합니다.
Contrail 클러스터 프로비저닝 방법
Contrail 클러스터를 프로비저닝하려면 다음을 수행합니다.
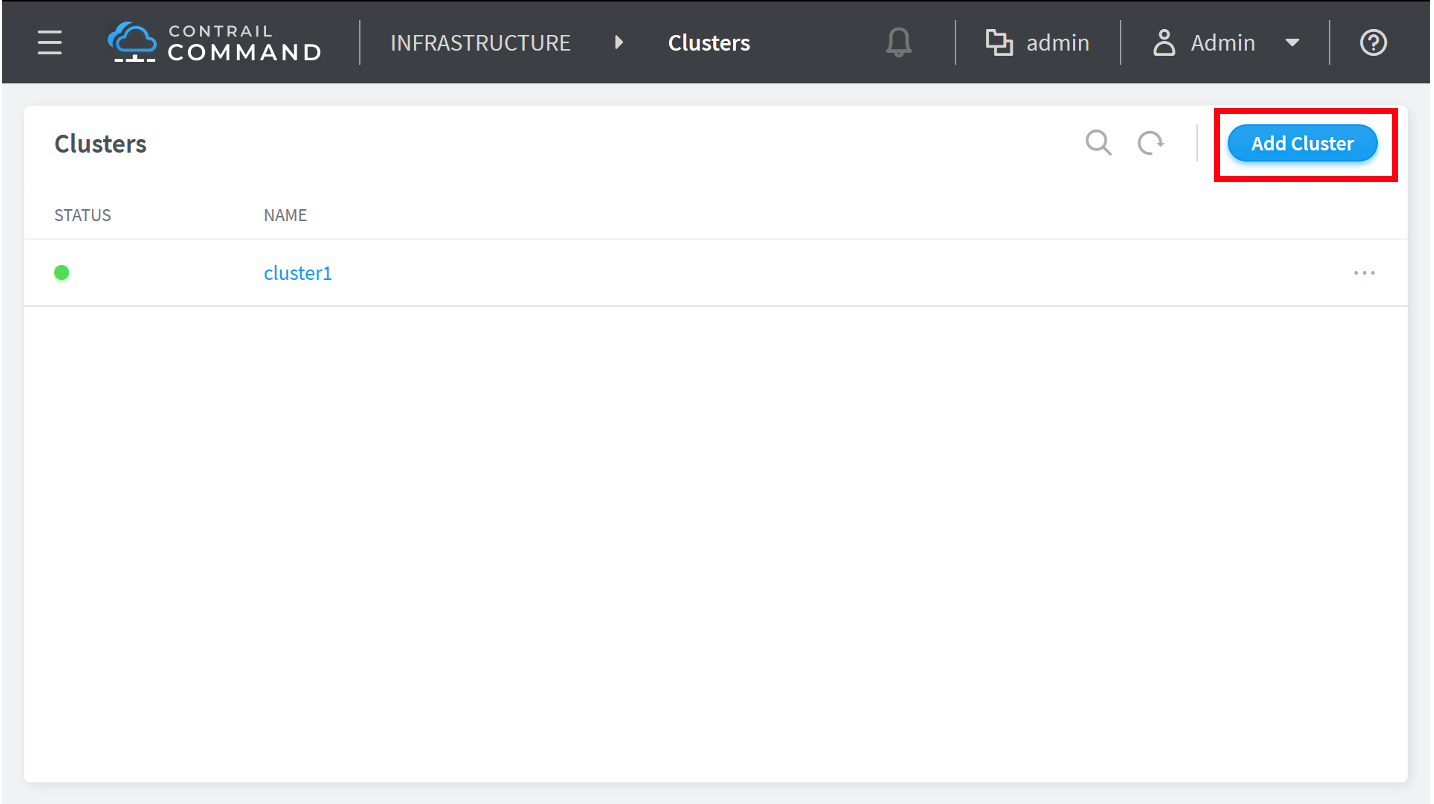
- 로그인하면 > Clusters 메뉴로 Infrastructure 이동합니다. Add Cluster 버튼을 클릭하여 클러스터 프로비저닝 프로세스를 시작합니다.
그림 1: 클러스터
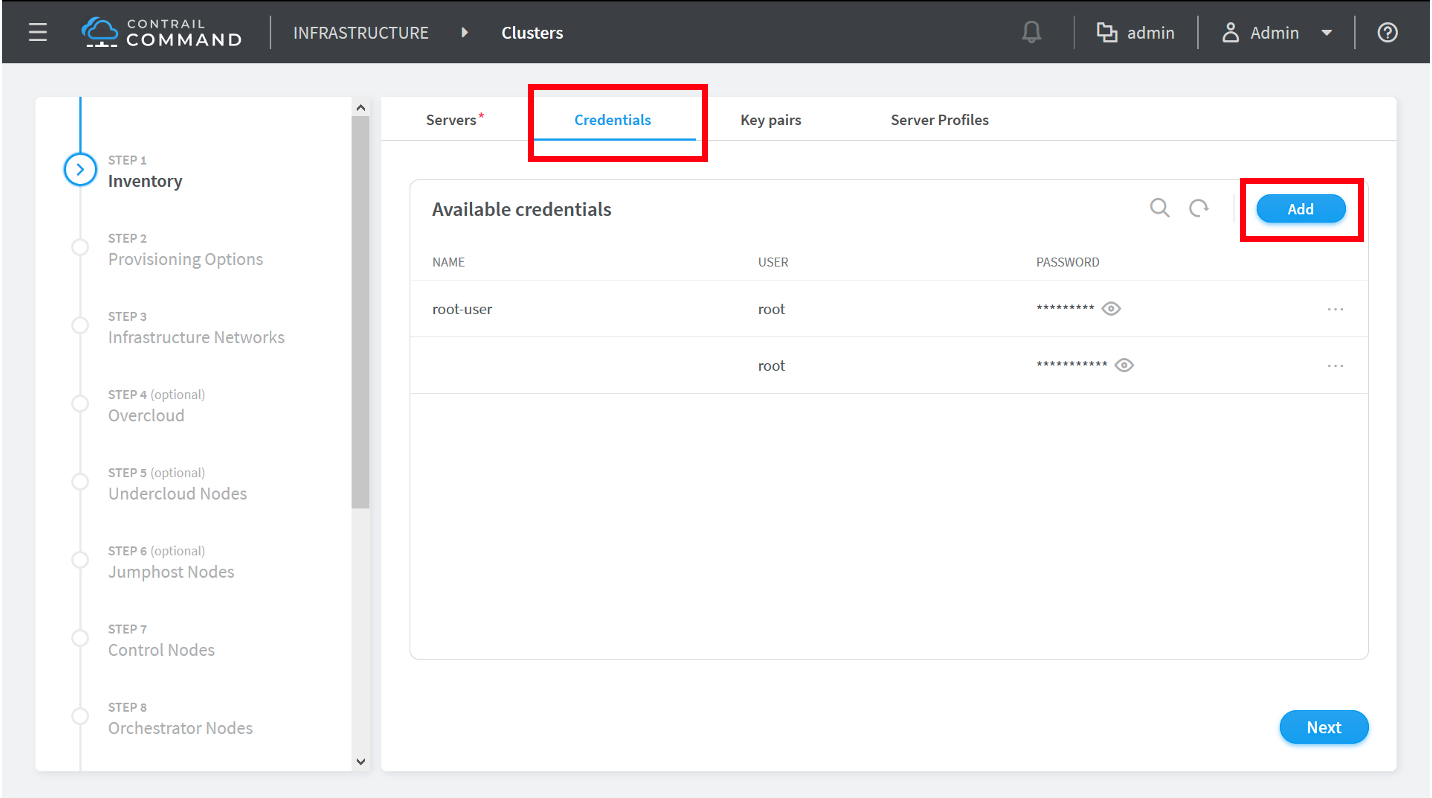
- Credentials 탭을 클릭하여 상자로 Credentials 이동한 다음Add, 단추를 클릭하여 클러스터에 추가될 장치에 대한 액세스 자격 증명을 추가합니다.
그림 2: 사용 가능한 자격 증명
- Add 상자에 클러스터의 장치에 대한 액세스 자격 증명을 추가합니다. Add 버튼을 클릭하여 프로세스를 완료하고 액세스 자격 증명을 추가합니다.
그림 3: 대화 상자
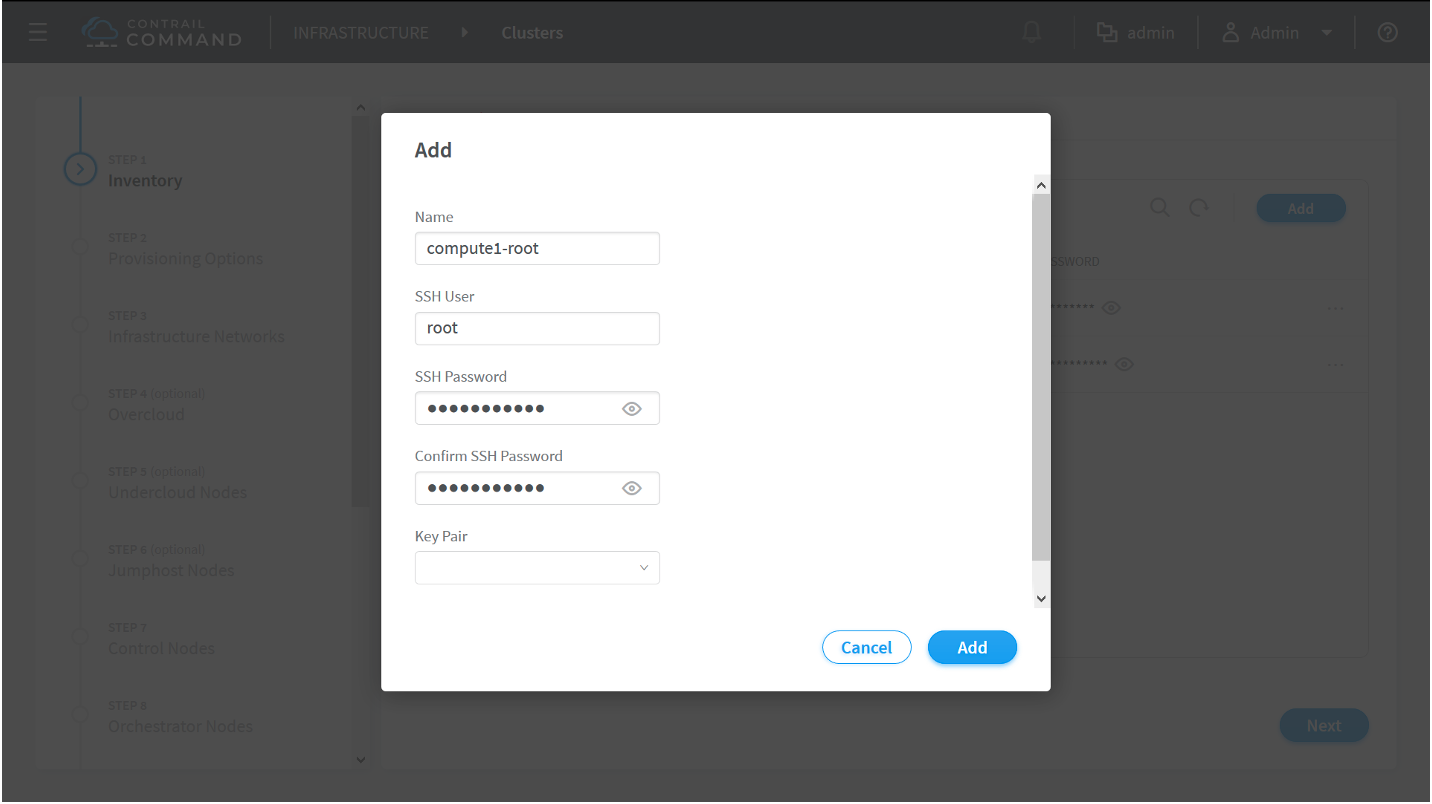 추가
추가
4단계와 5단계를 반복하여 클러스터의 각 서버 또는 VM에 대한 액세스 자격 증명을 추가합니다.
- Add 상자의 단추를 Available Servers 클릭합니다.
그림 4: 사용 가능한 서버
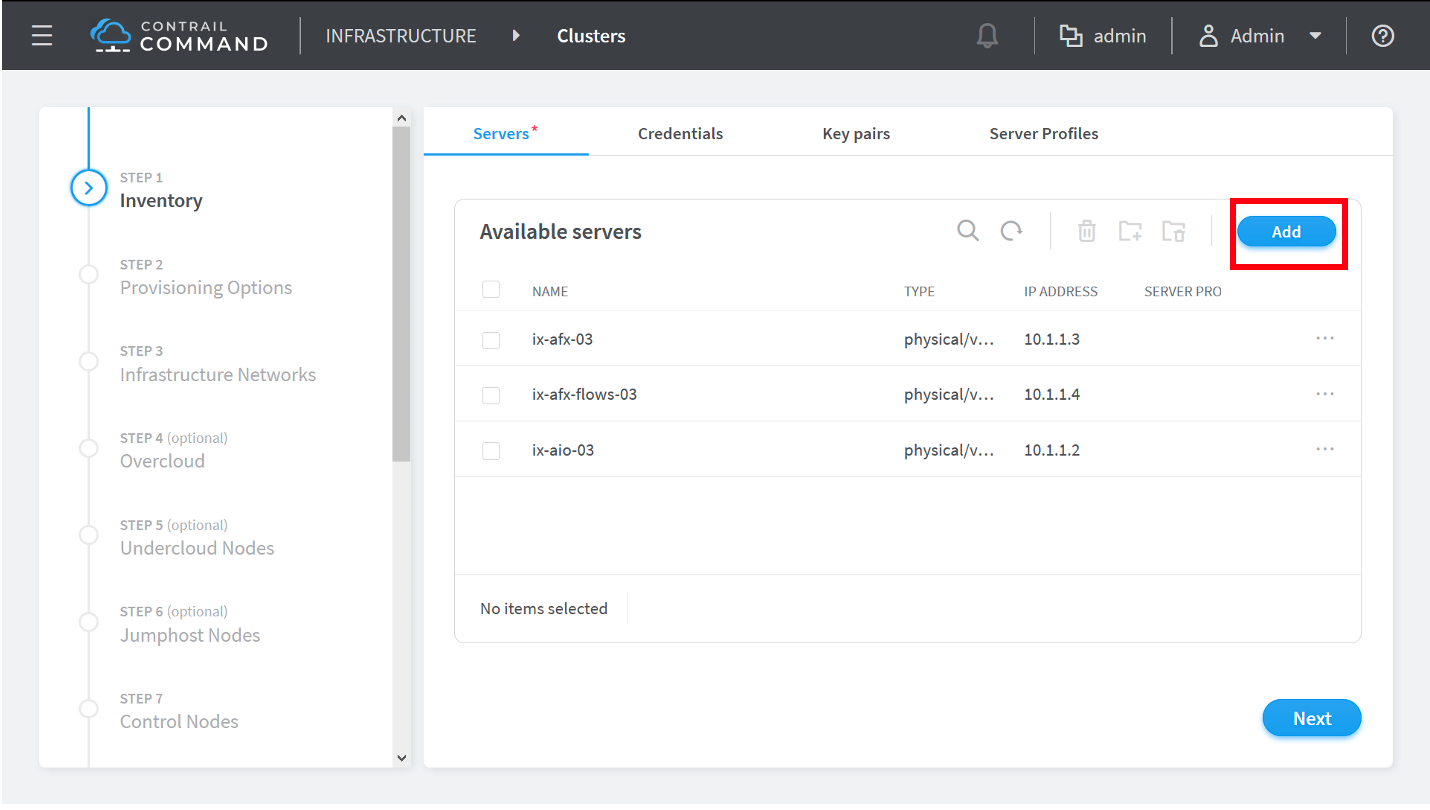
Create Server 대화 상자가 나타납니다.
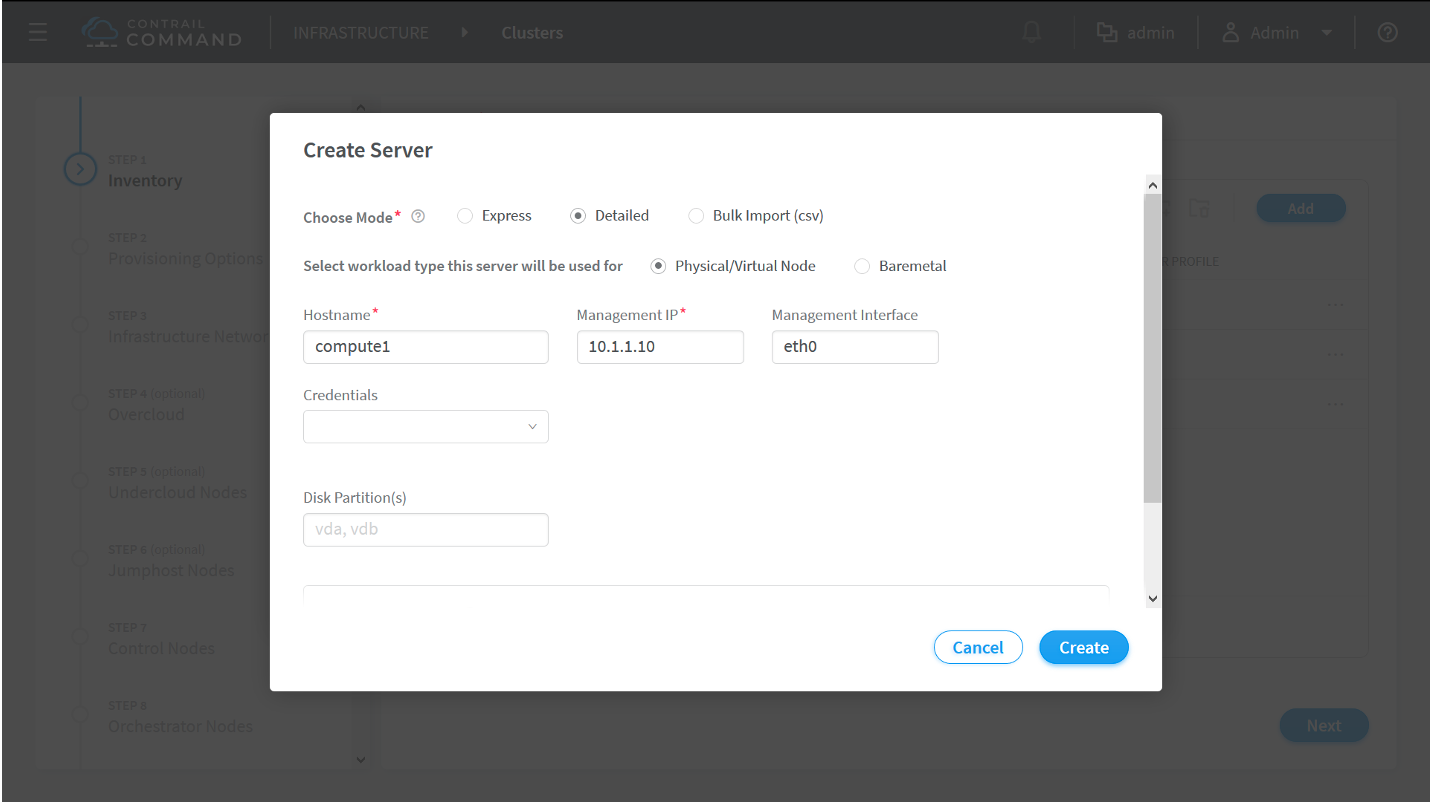
- Contrail 클러스터의 각 물리적 서버 또는 VM에 대해 대화 상자의 필드를 Create Server 완료합니다. 클러스터에서 컴퓨팅 노드, 제어 노드, 오케스트레이터 노드, Contrail Insights 노드, Contrail Insights 플로우 노드 또는 서비스 노드로 작동할 각 물리적 서버 또는 VM은 프로비저닝 프로세스의 이 단계에서 서버로 추가해야 합니다.
그림 5: 서버
 만들기
만들기
필드 설명:
Choose Mode- 옵션에는 , , 또는 이 포함됩니다ExpressBulk Import (CSV). Detailed 대부분의 환경에서 또는 Bulk Import (CSV) 모드를 사용하여 Detailed 모든 서버 필드 데이터가 입력되도록 하고 절차의 뒷부분에서 수동 구성 작업을 수행하지 않도록 하는 것이 좋습니다.
Express- 각 서버 또는 VM에 입력해야 하는 제한된 수의 필수 필드를 포함합니다.
Detailed- 각 서버 또는 VM에 대해 입력할 모든 필드를 제공합니다.
Bulk Import (CSV)- CSV 파일에서 물리적 서버 또는 VM 필드를 가져옵니다.
Select workload type this server will be used for
Physical/Virtual Node- 가상화된 물리적 서버 또는 VM. 이 옵션은 Contrail Networking 환경에서 대부분의 서버 또는 VM에 사용됩니다.
Baremetal- 가상화되지 않은 서버입니다.
Hostname- 물리적 서버 또는 VM의 이름입니다.
Management IP- 물리적 서버 또는 VM의 관리 IP 주소입니다.
Management Interface- 물리적 서버 또는 VM의 관리 네트워크 연결 인터페이스 이름입니다.
Credentials- 드롭다운 메뉴에 표시되는 자격 증명을 선택합니다.
Disk Partition(s)- (선택 사항) 사용할 디스크 파티션을 지정합니다.
이 필드는 비워 두는 경우가 많습니다.
Name (네트워크 인터페이스) - 물리적 서버 또는 VM에 있는 네트워크 연결 인터페이스의 이름입니다.
IP Address (네트워크 인터페이스) - 물리적 서버 또는 VM에 있는 네트워크 연결 인터페이스의 IP 주소입니다.
상자에서 추가를 Network Interfaces 클릭하여 서버 또는 VM에 대한 네트워크 인터페이스를 추가합니다.
Create 모든 필드를 완료한 후 버튼을 클릭하여 서버 또는 VM을 추가합니다.
Contrail 클러스터에서 컴퓨팅 노드, 제어 노드, 오케스트레이터 노드, Contrail Insights 노드, Contrail Insights Flows 노드 또는 서비스 노드로 작동할 각 물리적 서버 또는 VM에 대해 이 단계를 반복합니다.
- 최종 서버를 추가한 후 > Clusters > Servers 메뉴로 Infrastructure 돌아갑니다. Next 버튼을 클릭하면 해당 Provisioning Options 페이지로 이동합니다.
그림 6: 사용 가능한 서버

- 페이지의 필드를 Provisioning Options 완료합니다.
그림 7: 프로비저닝 옵션
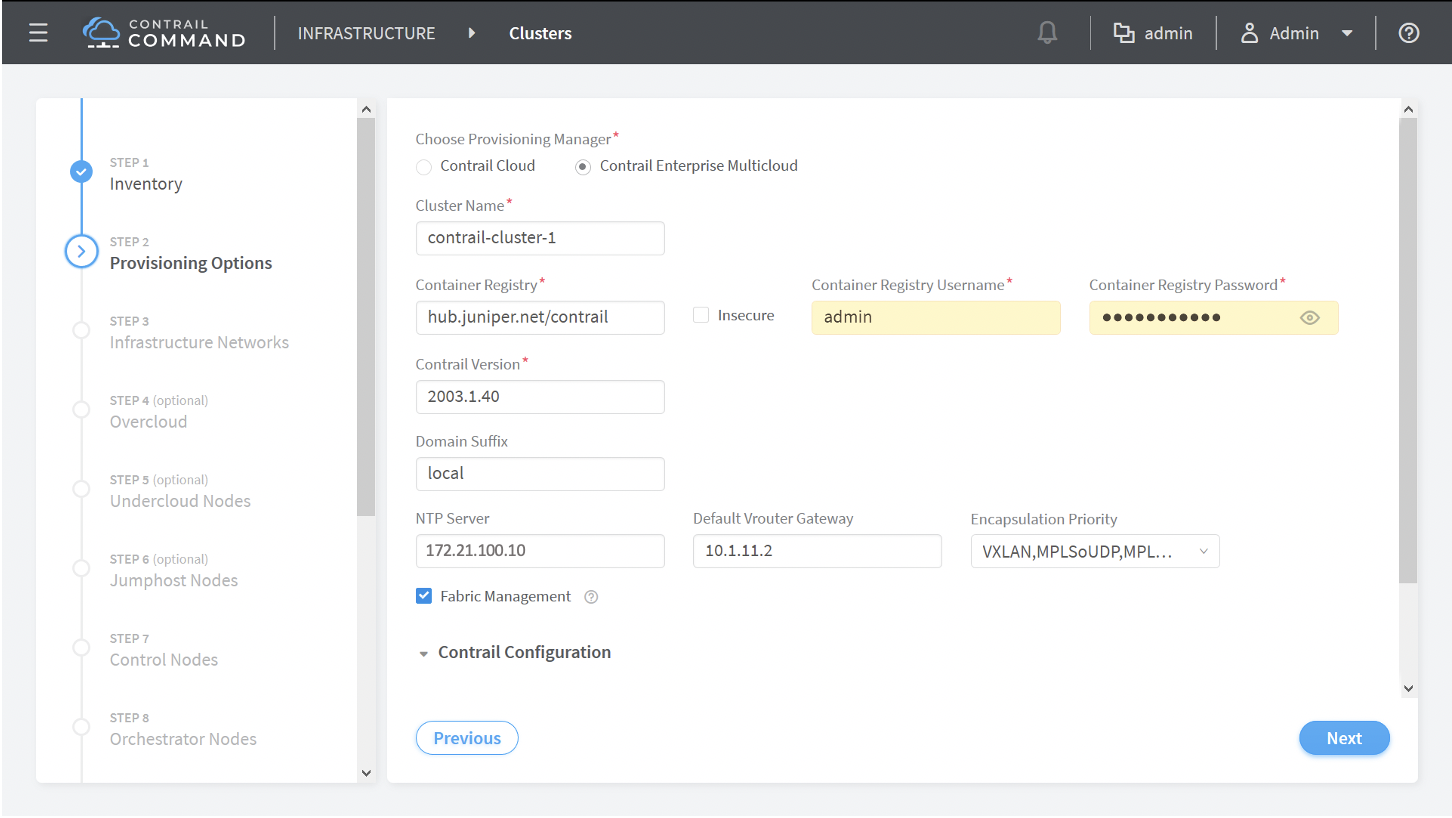
필드 설명:
Choose Provisioning Manager
Contrail Cloud—Contrail Cloud Provisioning Manager. 이 프로비저닝 관리자 옵션을 사용하지 마십시오.
Contrail Enterprise Multicloud—(기본값) Contrail Enterprise Multicloud Provisioning Manager. 프로비저닝 관리자로 Contrail Enterprise Multicloud를 선택하십시오.
이 절차의 나머지 단계에서는 Contrail Enterprise Multicloud가 프로비저닝 관리자로 선택되었다고 가정합니다.
Cluster Name- Contrail 클러스터의 이름을 지정합니다.
Container Registry- Contrail Networking 이미지를 가져오기 위한 컨테이너 레지스트리의 경로입니다. 주니퍼 컨테이너 레지스트리 hub.juniper.net/contrail 의 경로는 기본 컨테이너 레지스트리 경로로 설정되어 있습니다. 이 경로 또는 조직에서 사용하는 리포지토리의 경로를 입력합니다.
Insecure checkbox - HTTP와 같은 비보안 프로토콜을 사용하여 안전하지 않은 레지스트리에 연결하려는 경우에만 이 옵션을 선택해야 합니다.
이 상자는 기본적으로 선택되어 있지 않습니다. 에 있는 주니퍼 컨테이너 레지스트리 hub.juniper.net/contrail 에 연결하거나 안전하게 액세스할 수 있는 다른 레지스트리에 액세스하려면 이 확인란을 선택하지 않은 상태로 둡니다.
Container Registry Username- 컨테이너 레지스트리에 액세스하기 위한 사용자 이름입니다.
이 필드에서는 주니퍼 컨테이너 레지스트리를 사용하여 Contrail Networking 이미지를 획득합니다. 주니퍼 컨테이너 레지스트리에 액세스하기 위한 레지스트리 사용자 이름과 비밀번호 조합을 받을 이메일 mailto:contrail-registry@juniper.net .
Container Registry Password- 컨테이너 레지스트리에 액세스하기 위한 암호입니다.
이 필드에서는 주니퍼 컨테이너 레지스트리를 사용하여 Contrail Networking 이미지를 획득합니다. 주니퍼 컨테이너 레지스트리에 액세스하기 위한 레지스트리 사용자 이름과 비밀번호 조합을 받을 이메일 mailto:contrail-registry@juniper.net .
Contrail Version- 저장소에 있는 업그레이드에 사용할 Contrail Networking 이미지의 버전을 지정합니다.
태그를 사용하여 latest 저장소에서 가장 최근 이미지를 검색할 수 있으며, 이것이 기본 설정입니다. 버전의 release 태그를 사용하여 이 필드에서 특정 릴리스를 지정할 수도 있습니다.
Contrail Networking 릴리스 21XX 릴리스 태그에 대한 릴리스 태그를 얻으려면 Contrail Registry 21XX에 대한 추가 정보 액세스를 참조하십시오.
Domain Suffix—(선택 사항) 클러스터의 도메인 이름입니다.
NTP Server- NTP 서버의 IP 주소입니다.
Default vRouter Gateway- 기본 vRouter 게이트웨이의 IP 주소입니다.
이 주소는 일반적으로 서버의 네트워크 대면 인터페이스에 연결되는 패브릭의 리프 디바이스에 있는 인터페이스의 IP 주소입니다.
Encapsulation Priority- 드롭다운 메뉴에서 캡슐화 우선 순위 순서를 선택합니다.
대부분의 Contrail Networking 환경에서 선택하십시오 VXLAN, MPLSoUDP, MPLSoGRE .
Fabric Management 확인란 - 오케스트레이션을 위해 Openstack을 사용하는 환경에 배포하는 경우 이 옵션을 선택합니다.
-
Contrail Configuration의 세부 정보를 입력하려면 Add( 추가)를 클릭합니다. 그러면 아래와 같이 Contrail Configuration 섹션에 Key-Value 쌍이 추가됩니다.
그림 8: Contrail 구성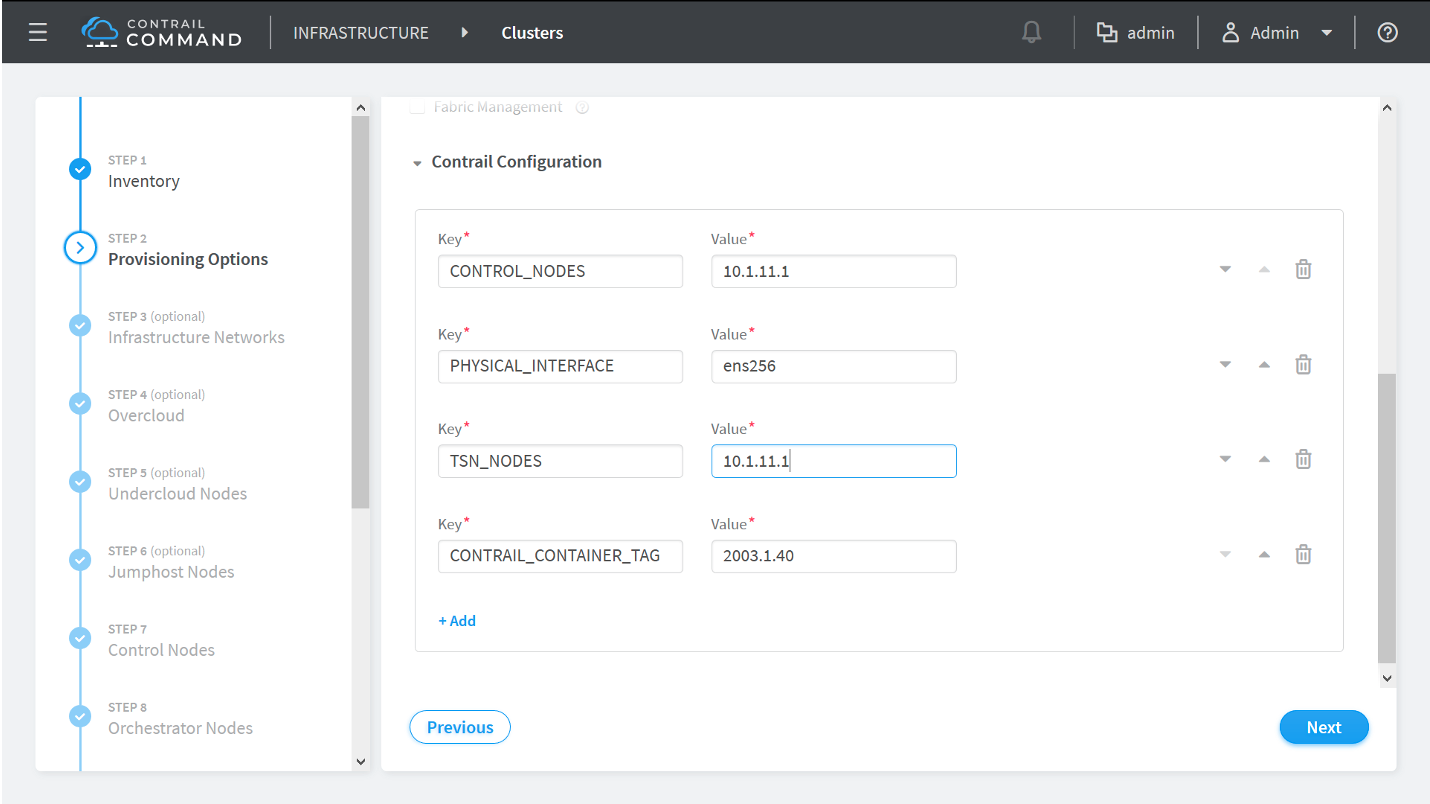
아래 표에 따라 키/값 쌍 세부 정보를 입력합니다.
표 1: Contrail 구성 섹션 키
값
CONTROL_NODES
Contrail Control 노드의 쉼표로 구분된 패브릭 언더레이 인터페이스 IP 주소 목록. 예를 들어, Value를 '10.1.11.1'로 사용하면 Contrail Cluster 서버에 제어 노드를 설치하게 됩니다. 따라서 이 IP 주소는 Contrail Cluster 서버를 패브릭 언더레이에 연결하는 IP 주소입니다.
PHYSICAL_INTERFACE
패브릭 언더레이에 연결되는 인터페이스의 이름입니다.
TSN_NODES
이 필드는 '선택 사항'입니다. Contrail Service 노드의 쉼표로 구분된 패브릭 언더레이 인터페이스 IP 주소 목록을 지정합니다. 예를 들어, Contrail Cluster 서버에 서비스 노드 '10.1.11.1'을 설치합니다. 따라서 이 IP 주소는 Contrail Cluster 서버를 패브릭 언더레이에 연결하는 IP 주소입니다.
CONTRAIL_CONTAINER_TAG
Contrail Registry 21XX에 대한 README 액세스에 명시된 대로 원하는 Contrail 및 OpenStack 릴리스 조합에 대한 컨테이너 태그입니다.
API__DEFAULTS__enable_latency_stats_log
(선택 사항. Contrail Networking 릴리스 2008부터 사용 가능) API 서버에서 Cassandra, Zookeeper 및 Keystone 호출에 대해 Contrail Networking 및 Contrail Insights에서 지연 시간 통계를 로깅하고 저장할 수 있습니다.
API__DEFAULTS__enable_api_stats_log
(Contrail Networking 릴리스 2008부터 선택 사항으로 사용 가능) Contrail Networking 및 Contrail Insights for Rest API 호출에서 지연 시간 통계 및 통화 시간 통계의 로깅 및 저장을 활성화합니다.
키-값 설명에 대한 자세한 내용은 다음 참조를 참조하세요.
Next 버튼을 클릭하여 프로비저닝 페이지로 이동합니다Control Nodes.
- Control Nodes 프로비전 페이지에서 서버 옆에 있는 아이콘을 클릭하여 > 상자로 Assigned Control Nodes 이동하여 8단계에서 만든 서버를 제어 노드로 할당합니다.
내의 제어 노드에서 역할을 제거할 수 있는 옵션이 있습니다 Assigned Control Nodes. 대부분의 배포에서 제어 노드 역할을 제거할 필요가 없으며 결과에 대해 잘 알고 있는 전문 사용자인 경우에만 역할을 제거해야 합니다.
그림 9: 할당된 제어 노드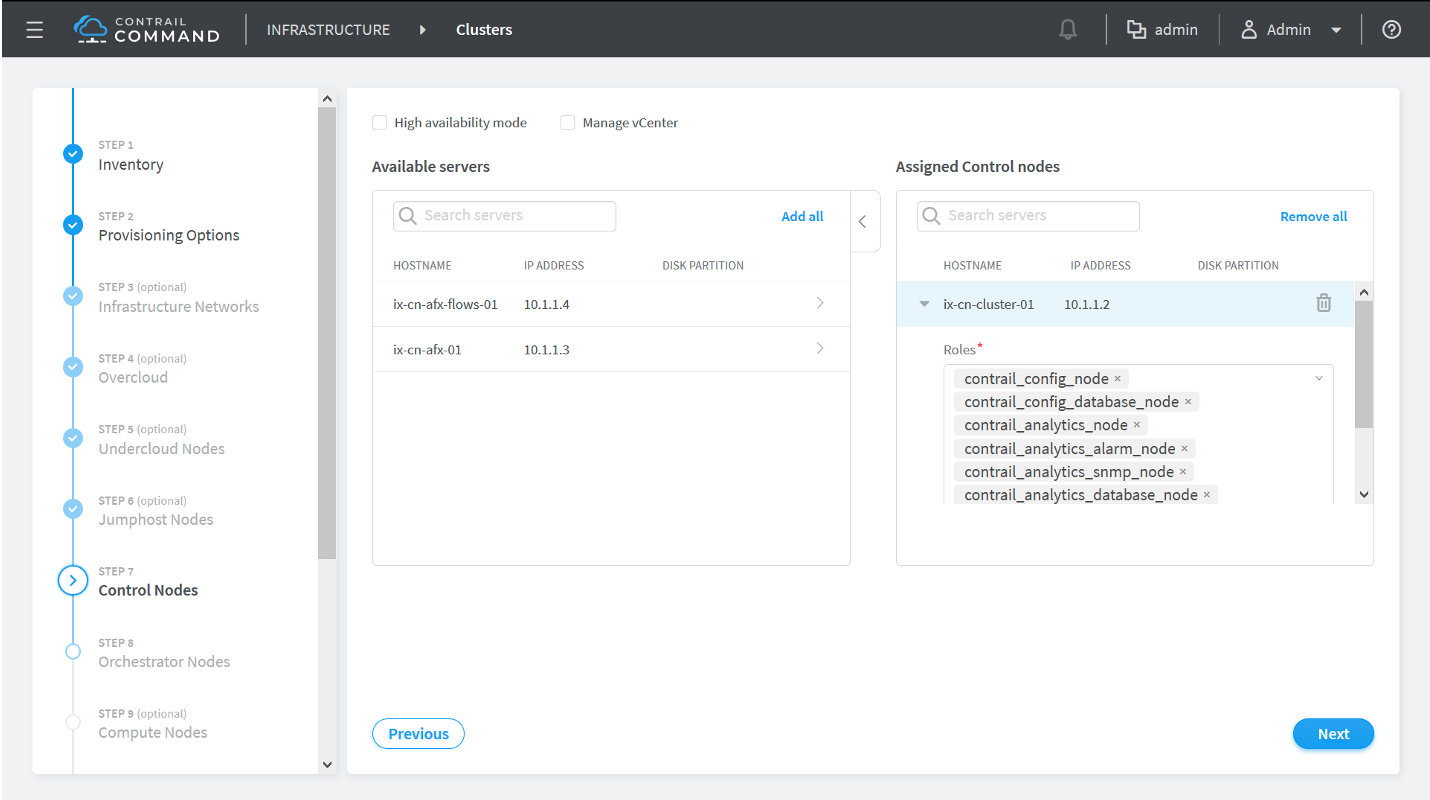
(VMWare vCenter를 사용한 설치만 해당) VMware vCenter와 통합된 제어 노드를 설치하려면 다음 단계를 완료하십시오. vCenter와 Contrail Networking의 통합에 대한 자세한 내용은 VMware-Contrail Networking Fabric 통합 이해를 참조하십시오.
참고:주니퍼는 Contrail Networking 릴리스 21.4.L3부터 Contrail Networking에 대한 VMWare 지원을 중단했습니다.
필수 구성 요소:
vCenter 버전 6.5 이상이 설치되어 있어야 합니다.
ESX 버전 6.5 이상이 설치되어 있어야 합니다.
DVS(Distributed Virtual Switch)를 지원하는 vCenter 라이센스.
vCenter에 대한 로그인 자격 증명입니다.
통합을 수행하려면 다음을 수행합니다.
vCenter 관리 확인란을 선택합니다.
vCenter 자격 증명 섹션이 표시됩니다.
다음 정보를 입력합니다.
vCenter IP 주소 필드에 vCenter IP 주소를 입력합니다.
데이터 센터 이름 필드에 CVFM이 작업할 vCenter 아래의 데이터 센터 이름을 입력합니다.
사용자 이름 필드에 vCenter 사용자 이름을 입력합니다.
암호 필드에 vCenter 암호를 입력합니다.
서버 이름 옆에 있는 > 클릭하여 Available Servers(사용 가능한 서버) 테이블의 서버를 제어 노드로 지정합니다. 그런 다음 서버가 지정된 제어 노드 테이블에 추가됩니다.
contrail_vcenter_fabric_manager_node이(가) 역할 목록에 추가됩니다.다음을 클릭합니다.
모든 제어 노드를 할당한 후 버튼을 클릭하여 Next 프로비저닝 페이지로 이동합니다 Orchestrator Nodes .
- 드롭다운 메뉴에서 Orchestrator Type 오케스트레이션 플랫폼을 선택합니다.
서버 옆에 있는 아이콘을 클릭하여 > 상자로 Assigned nodes 이동하여 8단계에서 만든 서버 중 하나를 오케스트레이터 노드로 할당합니다.
그림 10: 할당된 노드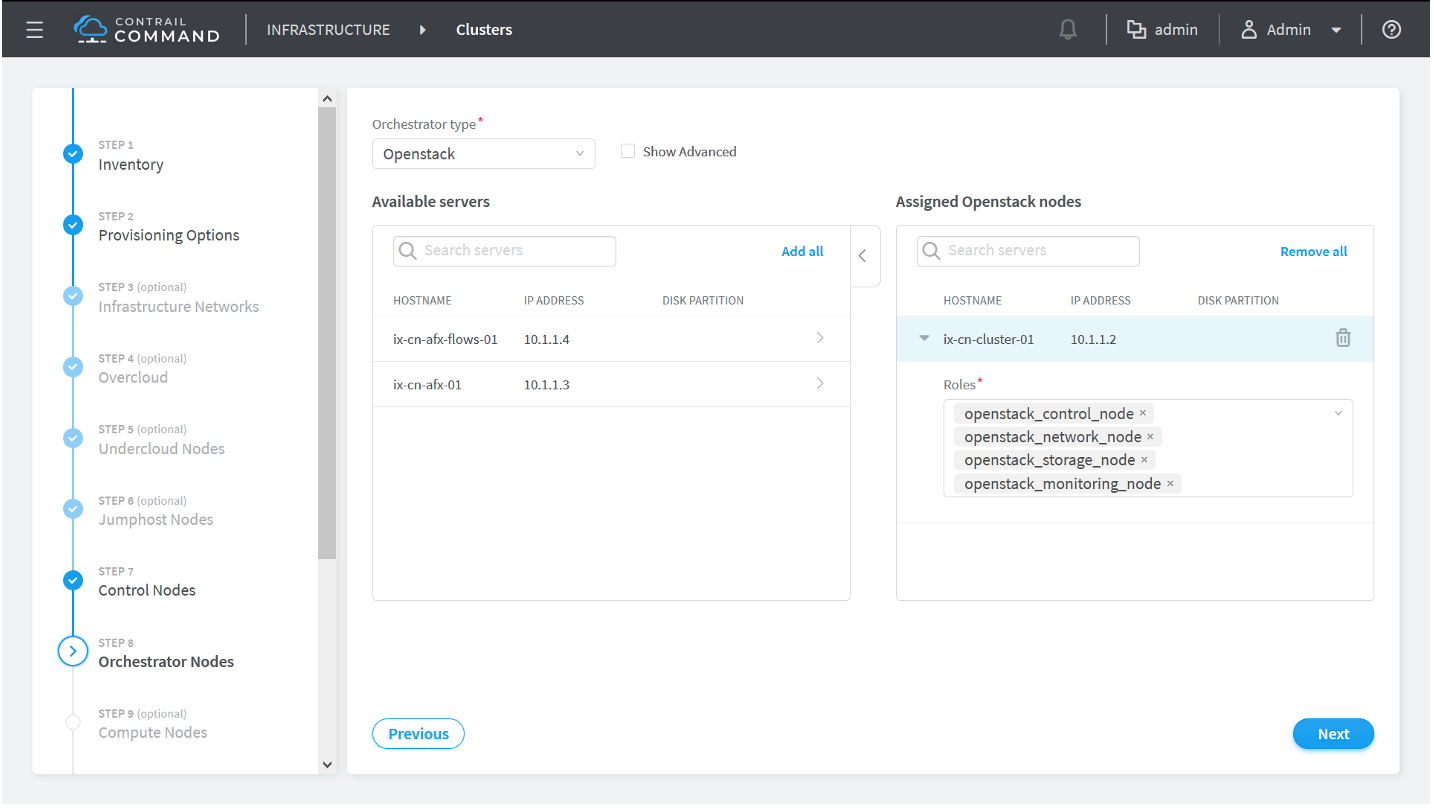
이 단계의 나머지 프로세스는 오케스트레이션 플랫폼에 따라 다릅니다.
오픈스택
Show Advanced 상자를 클릭한 다음 스크롤하여 Kolla Globals 을 클릭합니다+Add.
대부분의 환경에서 다음 Kolla 전역 Key 및 Value 쌍을 추가합니다.
표 2: Kolla Globals 키 값 쌍 키
값
enable_haproxy
아니요
enable_ironic
아니요
enable_swift
예
swift_disk_partition_size
20기가바이트
모든 오케스트레이터 노드와 Kolla 전역 키 및 값을 할당한 후 버튼을 클릭하여 Next 프로비저닝 페이지로 진행합니다 Compute Nodes .
쿠버네티스
사용 가능한 서버 목록에서 Kubernetes 노드를 선택하고 서버에 해당 역할을 할당합니다.
기본적으로 Kubernetes 노드에는 kubernetes_master_node, kubernetes_kubemanager_node 및 kubernetes_node 역할이 할당됩니다.
모든 노드에 역할을 할당한 후 버튼을 클릭하여 Next 프로비저닝 페이지로 진행합니다 Compute Nodes .
- 8단계에서 만든 서버를 서버 옆에 있는 아이콘을 클릭하여 > 상자로 Assigned Compute nodes 이동하여 계산 노드로 할당합니다.
서버를 상자로 Assigned Compute nodes 이동한 후 상자에 기본 vRouter 게이트웨이 IP 주소를 Default Vrouter Gateway 입력합니다.
그림 11: 할당된 계산 노드Figure 11: Assigned Compute nodes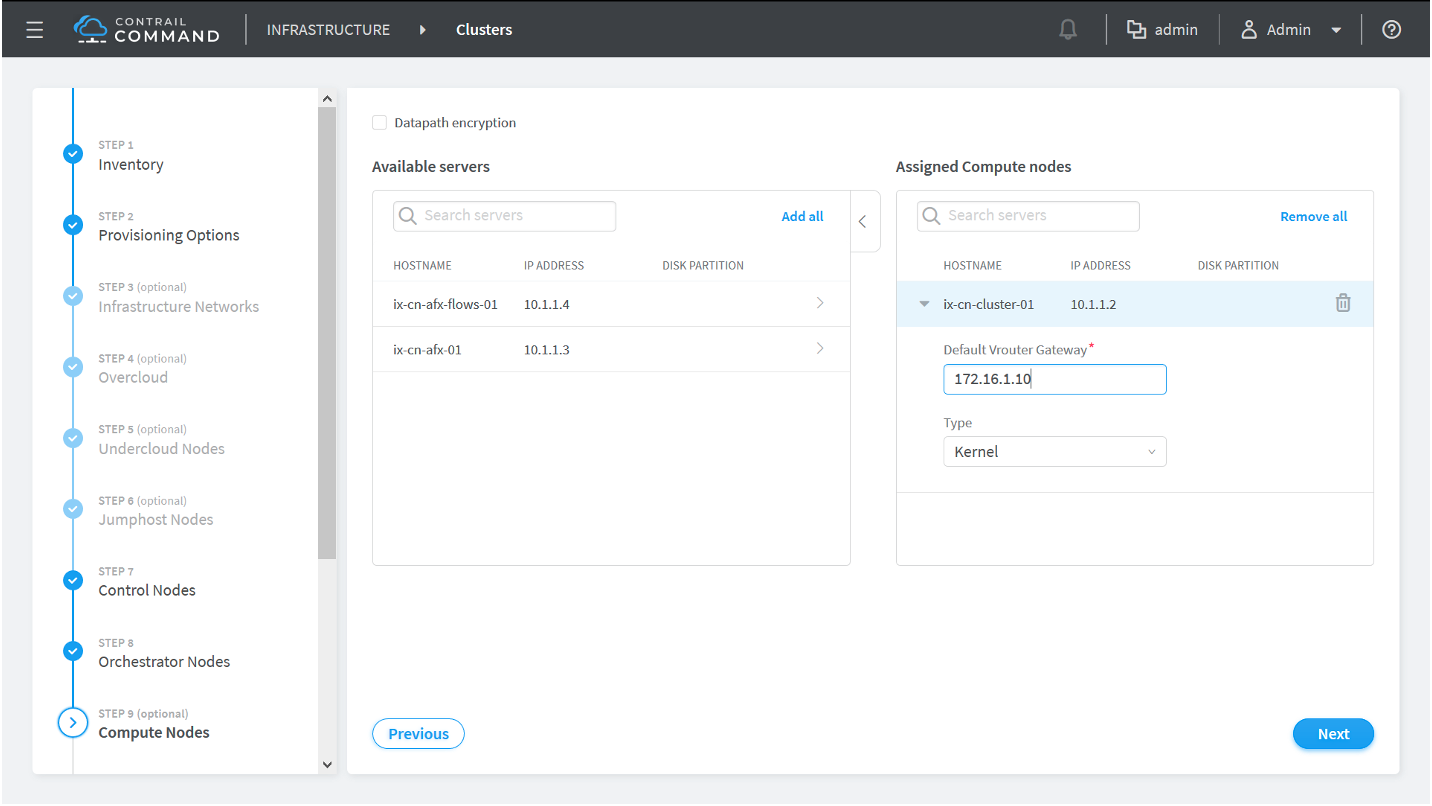
모든 계산 노드를 할당한 후 버튼을 클릭하여 Next 프로비저닝 페이지로 진행합니다 Contrail Service Nodes .
- Contrail Insights Flows는 일부 환경에서 사용되지 않는 옵션 제품입니다. 사용자 환경에서 Contrail Insights Flows를 사용하지 않는 경우 이 단계에서 서버를 Appformix Flows 노드로 할당하지 않고 버튼을 클릭 Next 하기만 하면 됩니다.
참고:
Appformix Flows는 Contrail Insights Flows로 이름이 변경되었습니다. Appformix Flows의 이름 지정은 이 Contrail Command 페이지에서 여전히 사용됩니다.
환경에서 Contrail Insights Flows를 사용하는 경우 다음과 같은 구성을 선택합니다.
Appformix 플로우 노드 프로비저닝 유형:
Out-of-Band- (기본값) Appformix Flows 노드는 대역 외 관리 네트워크에서 관리됩니다.
In-Band- Appformix 흐름 노드는 대역 내 연결에서 관리됩니다.
Virtual IP Address- 노드를 관리 네트워크에 연결하는 Appformix Flows 노드의 가상 IP 주소 관리 주소입니다.
(Contrail Insights 및 Contrail Insights Flow는 동일한 서버에만 해당) Contrail Networking 릴리스 2008부터 동일한 서버 노드에서 Contrail Insights 및 Contrail Insights Flows를 활성화할 수 있습니다.
동일한 노드에서 Contrail Insights 및 Contrail Insights Flows를 활성화하는 경우 다음 단계를 수행합니다.
- AppFormix Flows Configuration Parameters 상자에서 옵션을 클릭하여 +Add 및 Value 구성 옵션을 엽니다Key.
다음 키 값 쌍을 추가합니다.
Key: health_port
Value: 8205
Key: kafka_broker_port
Value: 9195
Key: zookeeper_client_port
Value: 3281
Key: redis_port
Value: 6479
그림 12: AppFormix 흐름 구성 매개 변수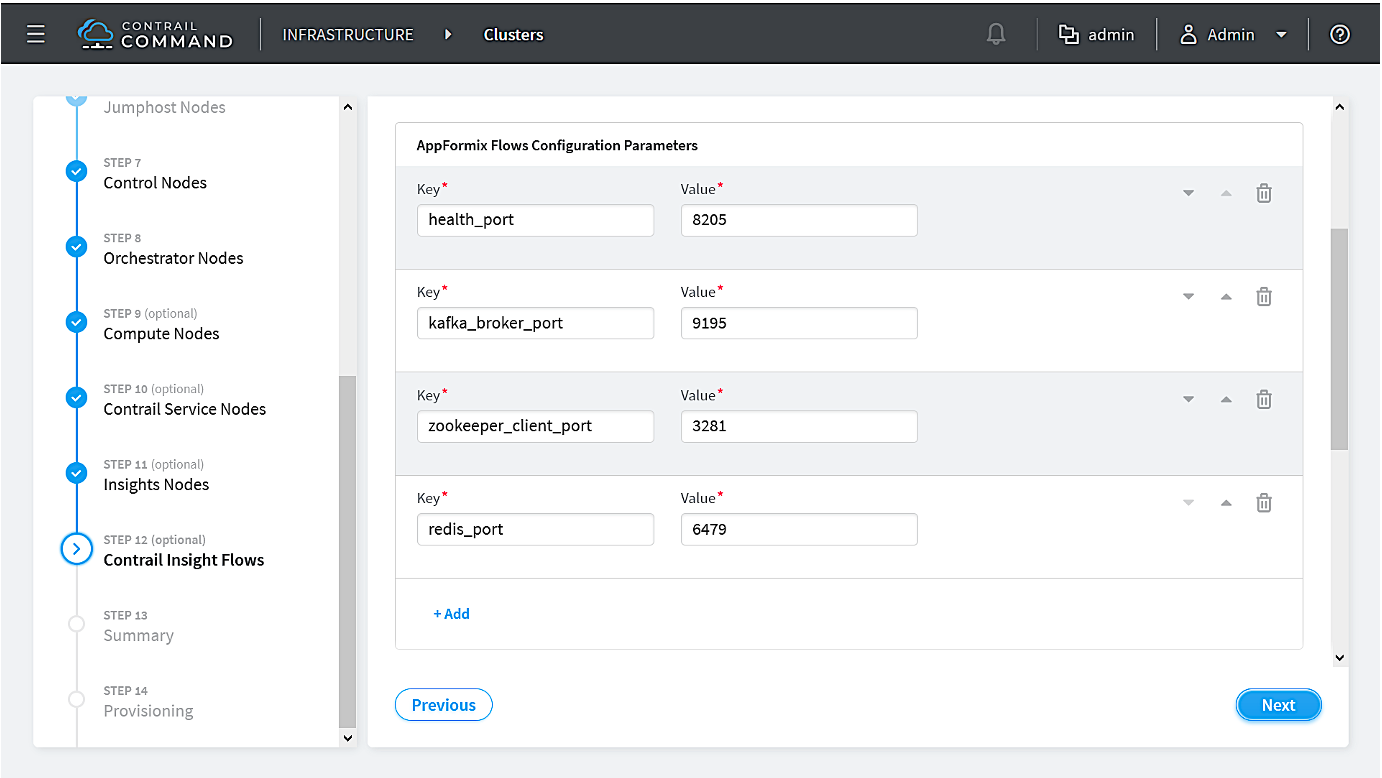
> 상자에서 서버 또는 VM Available servers 옆에 있는 아이콘을 클릭하여 상자로 Assigned AppFormix Flows Nodes 이동합니다.
그림 13: 사용 가능한 서버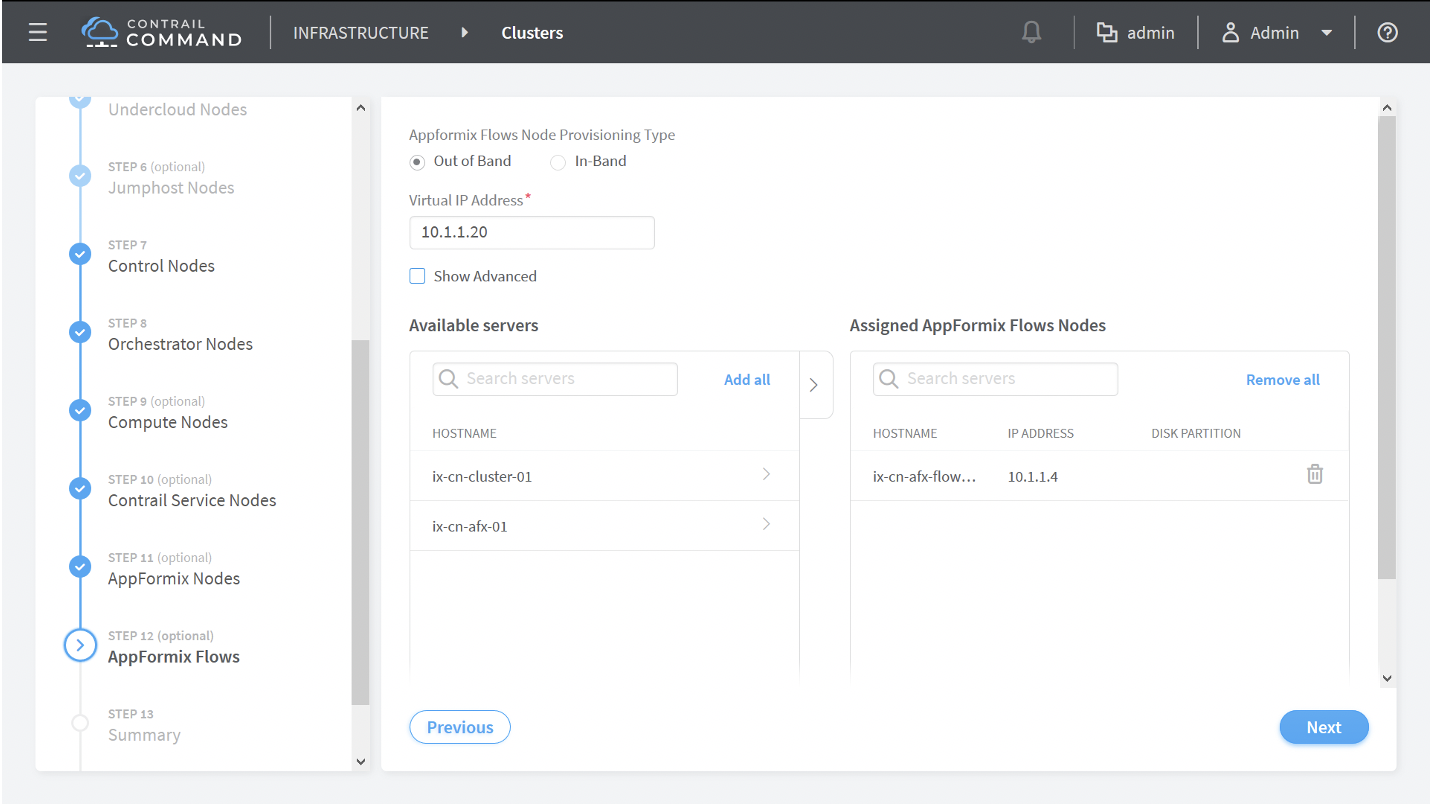
Next 버튼을 클릭하면 페이지로 이동합니다Summary.
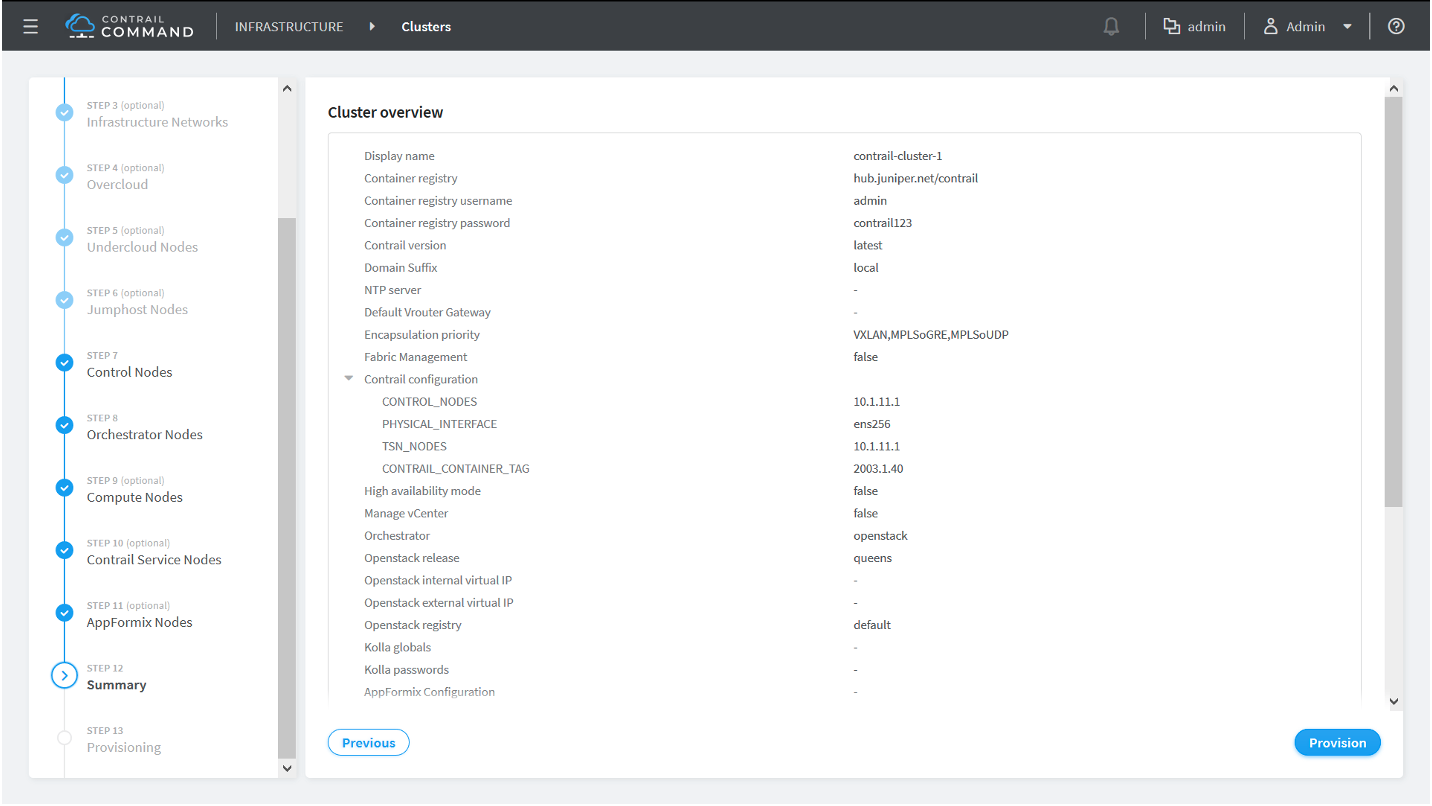
- 화면에서 설정을 Cluster overview 검토합니다.
그림 14: 클러스터 개요
상자에서 아무 탭 Nodes Overview 이나 클릭하여 구성을 검토합니다.
그림 15: 노드 개요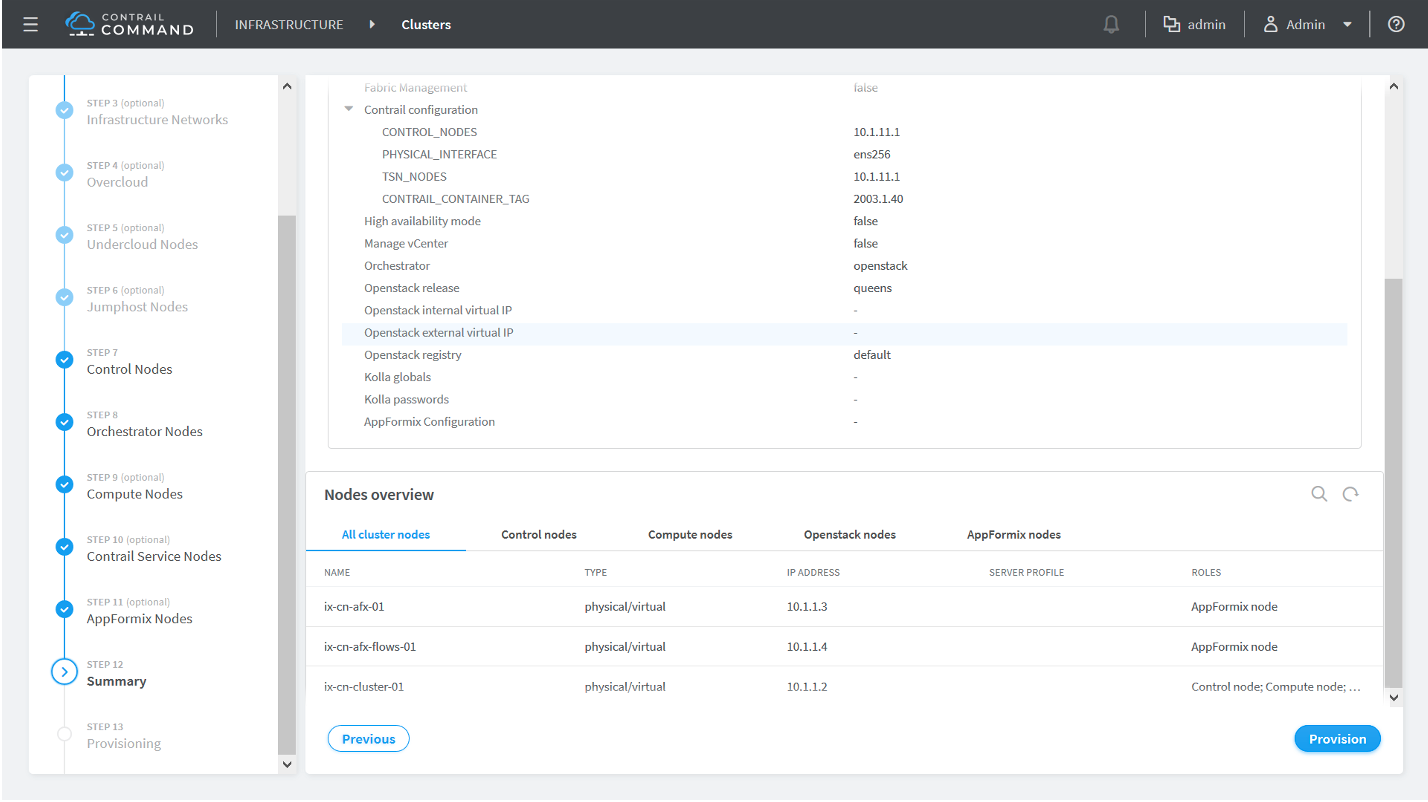
Provision 설정을 확인한 후 버튼을 클릭하여 클러스터를 프로비저닝합니다.
클러스터 프로비저닝 프로세스가 시작됩니다. 이 프로비저닝 프로세스 시간은 환경 및 배포에 따라 다릅니다. 테스트 환경에서는 보통 90분 이상이 걸렸습니다.
Contrail Command 설치를 위한 샘플 command_servers.yml 파일
최소 command_servers.yml 파일
다음 샘플 파일에는 Contrail Command를 설치할 때 필요한 최소 구성이 있습니다.
보안을 위해 사용자 환경에서 고유한 사용자 이름 및 암호 조합을 만드는 것이 좋습니다. 이 예에서는 설명 목적으로만 사용자 이름과 비밀번호 조합이 제공됩니다.
---
# Required for Appformix and Appformix Flows installations in Release 2003 and earlier
user_command_volumes:
- /opt/software/appformix:/opt/software/appformix
- /opt/software/xflow:/opt/software/xflow
command_servers:
server1:
ip: <IP Address> # IP address of server where you want to install Contrail Command
connection: ssh
ssh_user: root
ssh_pass: <contrail command server password>
sudo_pass: <contrail command server root password>
ntpserver: <NTP Server address>
registry_insecure: false
container_registry: hub.juniper.net/contrail
container_tag: <container_tag>
container_registry_username: <registry username>
container_registry_password: <registry password>
config_dir: /etc/contrail
contrail_config:
            database:
                type: postgres
                dialect: postgres
                password: contrail123
            keystone:
                assignment:
                    data:
                    users:
                        admin:
                          password: contrail123
insecure: true
client:
password: contrail123
전체 command_servers.yml 파일
다음 샘플 파일에는 Contrail Command를 설치할 때 사용할 수 있는 전체 구성 및 지원 매개 변수 목록이 포함되어 있습니다.
보안을 위해 사용자 환경에서 고유한 사용자 이름 및 암호 조합을 만드는 것이 좋습니다. 이 예에서는 설명 목적으로만 사용자 이름과 비밀번호 조합이 제공됩니다.
---
# Required for Appformix and Appformix Flows installations in Release 2003 and earlier
user_command_volumes:
- /opt/software/appformix:/opt/software/appformix
- /opt/software/xflow:/opt/software/xflow

# User defined volumes
#user_command_volumes:
#  - /var/tmp/contrail:/var/tmp/contrail

command_servers:
    server1:
        ip: <IP Address>
        connection: ssh
        ssh_user: root
        ssh_pass: <contrail command server password>
        sudo_pass: <contrail command server root password>
        ntpserver: <NTP Server address>

        # Specify either container_path
        #container_path: /root/contrail-command-051618.tar
        # or registry details and container_name
        registry_insecure: false
        container_registry: hub.juniper.net/contrail
        container_name: contrail-command
        container_tag: <container_tag>
        container_registry_username: <registry username>
        container_registry_password: <registry password>
        config_dir: /etc/contrail

        # contrail command container configurations given here go to /etc/contrail/contrail.yml
        contrail_config:
            # Database configuration. PostgreSQL supported
            database:
                type: postgres
                dialect: postgres
                host: localhost
                user: root
                password: contrail123
                name: contrail_test
                # Max Open Connections for DB Server
                max_open_conn: 100
                connection_retries: 10
                retry_period: 3s

            # Log Level
            log_level: debug

            # Cache configuration
            cache:
              enabled: true
              timeout: 10s
              max_history: 100000
              rdbms:
                enabled: true

            # Server configuration
            server:
              enabled: true
              read_timeout: 10
              write_timeout: 5
              log_api: true
              address: ":9091"

              # TLS Configuration
              tls:
                  enabled: true
                  key_file: /usr/share/contrail/ssl/cs-key.pem
                  cert_file: /usr/share/contrail/ssl/cs-cert.pem

              # Enable GRPC or not
              enable_grpc: false

              # Static file config
              # key: URL path
              # value: file path. (absolute path recommended in production)
              static_files:
                  /: /usr/share/contrail/public

              # API Proxy configuration
              # key: URL path
              # value: String list of backend host
              #proxy:
              #    /contrail:
              #    - http://localhost:8082

              notify_etcd: false

              # VNC Replication
              enable_vnc_replication: true

            # Keystone configuration
            keystone:
                local: true
                assignment:
                    type: static
                    data:
                      domains:
                        default: &default
                          id: default
                          name: default
                      projects:
                        admin: &admin
                          id: admin
                          name: admin
                          domain: *default
                        demo: &demo
                          id: demo
                          name: demo
                          domain: *default
                      users:
                        admin:
                          id: admin
                          name: Admin
                          domain: *default
                          password: contrail123
                          email: admin@juniper.nets
                          roles:
                          - id: admin
                            name: admin
                            project: *admin
                        bob:
                          id: bob
                          name: Bob
                          domain: *default
                          password: bob_password
                          email: bob@juniper.net
                          roles:
                          - id: Member
                            name: Member
                            project: *demo
                store:
                    type: memory
                    expire: 36000
                insecure: true
                authurl: https://localhost:9091/keystone/v3

            # disable authentication with no_auth true and comment out keystone configuraion.
            #no_auth: true
            insecure: true

            etcd:
              endpoints:
                - localhost:2379
              username: ""
              password: ""
              path: contrail

            watcher:
              enabled: false
              storage: json

            client:
              id: admin
              password: contrail123
              project_name: admin
              domain_id: default
              schema_root: /
              endpoint: https://localhost:9091

            compilation:
              enabled: false
              # Global configuration
              plugin_directory: 'etc/plugins/'
              number_of_workers: 4
              max_job_queue_len: 5
              msg_queue_lock_time: 30
              msg_index_string: 'MsgIndex'
              read_lock_string: "MsgReadLock"
              master_election: true

              # Plugin configuration
              plugin:
                  handlers:
                      create_handler: 'HandleCreate'
                      update_handler: 'HandleUpdate'
                      delete_handler: 'HandleDelete'

            agent:
              enabled: true
              backend: file
              watcher: polling
              log_level: debug

         # The following are optional parameters used to patch/cherrypick
         # revisions into the contrail-ansible-deployer sandbox. These configs
         # go into the /etc/contrail/contrail-deploy-config.tmpl file
#        cluster_config:
#            ansible_fetch_url: "https://review.opencontrail.org/Juniper/contrail-ansible-deployer refs/changes/80/40780/20"
#            ansible_cherry_pick_revision: FETCH_HEAD
#            ansible_revision: GIT_COMMIT_HASH
재해 복구 및 문제 해결
요약 이 섹션에서는 일반적으로 볼 수 있는 오류 및 실패 시나리오와 이를 해결하는 절차를 나열합니다.
문제
설명
Recovering the Galera Cluster Upon Server Shutdown- Kolla 및 OpenStack Rocky를 사용하여 프로비저닝된 OpenStack HA 설정에서 모든 서버를 동시에 종료했다가 나중에 가동하면 Galera 클러스터가 실패합니다.
솔루션
Galera 클러스터를 복구하려면 다음 단계를 수행합니다.
/etc/kolla/mariadb/galera.cnf 파일을 편집하여 다음과 같이 컨트롤러 중 하나에서 주소를 제거합니다
wsrep.wsrep_cluster_address = gcomm:// #wsrep_cluster_address = gcomm://10.x.x.8:4567,10.x.x.10:4567,10.x.x.11:4567
참고:관리되는 시나리오에서 모든 컨트롤러가 동시에 종료되는 경우 마지막으로 종료된 컨트롤러를 선택해야 합니다.
Docker는 파일을 편집한 컨트롤러에서 mariadb를 시작합니다.
몇 분 동안 기다렸다가 mariadb 컨테이너가 다시 시작되지 않는지 확인한 다음 나머지 컨트롤러에서 docker start mariadb를 시작합니다.
/etc/kolla/mariadb/galera.cnf 파일 변경 사항을 복원하고 이전에 선택한 컨트롤러에서 mariadb 컨테이너를 다시 시작합니다.
문제
설명
Containers from Private Registry Not Accessible- CONTAINER_REGISTRY라는 개인 레지스트리에서 가져온 컨테이너에 액세스할 수 없는 상황이 있을 수 있습니다.
솔루션
이 문제를 해결하려면 REGISTRY_PRIVATE_INSECURE True로 설정되어 있는지 확인합니다.