
分析用データコレクターのインストール
概要
分析機能は、データコレクターを介してネットワークデバイスからNorthStar Controllerにデータをストリーミングし、そこで処理、保存、Web UIで表示できるようにします。
テレメトリデータの収集と表示については、 NorthStar Controllerユーザーガイド を参照してください。
分析を使用するには、Junos OSリリース15.1F6以降が必要です。分析ノードのハードウェア要件については、 NorthStar Controllerのシステム要件を参照してください。サポートされている導入シナリオについては、「 プラットフォームとソフトウェアの互換性」を参照してください。
NorthStarアプリケーションの高可用性(HA)を使用していない場合は、NorthStar Controllerアプリケーションがインストールされているのと同じノード(シングルサーバーの導入)または、ログの収集と保存専用の1つ以上の外部ノードにデータコレクタをインストールできます。どちらの場合も、提供されているインストールスクリプトは、必要なパッケージと依存関係のインストールを処理します。
NorthStarアプリケーションHA環境には、次の3つのオプションがあります。
外部分析ノードを設定します。
外部分析クラスターを設定します。分析クラスターは、分析ノードに障害が発生した場合にバックアップノードを提供します。このクラスターは、ローカル(同じデータセンター内)または地理的に多様(分析、地理的HA)にすることができます。
NorthStar クラスターを構成するのと同じノードにデータコレクターをインストールします。このシナリオでは、NorthStarアプリケーションクラスターノードは分析クラスターノードでもあります。
分析プロセスの設定オプションは、/opt/northstar/data/northstar.cfgファイルから読み取られます。単一サーバーの導入では、コレクターの起動に必要なパラメーターがデフォルト構成の一部であるため、特別な変更は必要ありません。参考までに、 表1 は、分析プロセスがファイルから読み取る設定の一部を示しています。
設定 |
説明 |
|---|---|
mq_host |
メッセージングバスサービスを実行しているホスト(NorthStarアプリケーションノード)のIPアドレスまたは仮想IP(VIP)(複数のNorthStarノード展開の場合)を指します。存在しない場合、デフォルトは localhost です。 |
mq_username |
メッセージングバスへの接続に使用するユーザー名。デフォルトは northstarです。 |
mq_password_enc |
メッセージングバスへの接続に使用するパスワード。デフォルトはありません。これが設定されていない場合、サービスは開始できません。単一サーバーの導入では、パスワードは通常のアプリケーションインストールプロセス中に設定されます。 |
mq_port |
メッセージングバスで使用されるTCPポート番号。デフォルトは 5672です。 |
es_port |
Elasticsearchで使用されるTCPポート。デフォルトは 9200です。 |
es_クラスター名 |
HAシナリオでElasticsearchによってクラスターを形成するために使用します。同じクラスター内のノードは、同じクラスター名で設定する必要があります。デフォルトは NorthStarです。 |
さらに 2 つの設定はコレクター プロセスに関連していますが、northstar.cfg には含まれません。これらのパラメーターは分析ポート番号を設定し、NorthStar CLIを使用して設定できます。
ポート番号を変更した場合、変更を有効にするには、 supervisorctl restart analytics:logstash を使用してlogstashを再起動する必要があります。
rpm-statistics-port
RPM統計の結果を含むデバイスから生成されるsyslogメッセージを読み取るために使用されるポート。デフォルトは1514です。ポートを変更するには、NorthStar CLIコマンド set northstar analytics log-collector rpm-statistics-port port-numberを使用します。
JTIポート
コレクターがデバイスからのテレメトリパケットをリッスンするUDPポート番号。デフォルトは 3000です。ポートを変更するには、NorthStar CLIコマンド set northstar analytics log-collector jti-port port-numberを使用します。
NorthStar 4.3.0より前のリリースからNorthStarをアップグレードし、NorthStar analyticsを使用している場合は、「 4.3より前のNorthStar with Analyticsからのアップグレード」で説明されている手順を使用して、NorthStarを手動でアップグレードする必要があります。
NorthStar 6.0.0より前のリリースからNorthStarをアップグレードする場合は、NorthStarアプリケーションノードのアップグレード後に分析設定を再デプロイする必要があります。これは、このトピックで後述する Analytics Data Collector の構成設定メニューから実行します。これは、netflowdがcMGDと通信できるようにするためです(NorthStar CLIに必要)。
分析 Geo-HA
NorthStar Controller は、リリース 5.1.0 以降、分析 geo-HA をサポートしています。元の分析 HA はローカル クラスター (同じデータ センター) 用に設計されていましたが、geo-HA ではすべてのノードですべてのデータを利用できるようになり、ノードが地理的に離れた場所にあるネットワークにより良いサービスを提供します。これを実現するために、ローカルの RabbitMQ (メッセージングバス) が各分析 (ElasticSearch) ノードにインストールされます。これにより、遅延に対する許容度が向上し、リモートノードが同期しなくなる傾向を補うのに役立ちます。
リモートElasticSearchノードは、JTI logstashを使用して、他のElasticSearchノードからデータを取得して処理します。レプリケーションパイプラインは、各リモートサーバー上に名前付きキューを作成します。キューは永続的であるため、ElasticSearch ノードがダウンした場合、リモート キューにプッシュされたデータの処理を再開することで回復できます。 図1 は、ノード内およびノード間の相互作用を示しています。
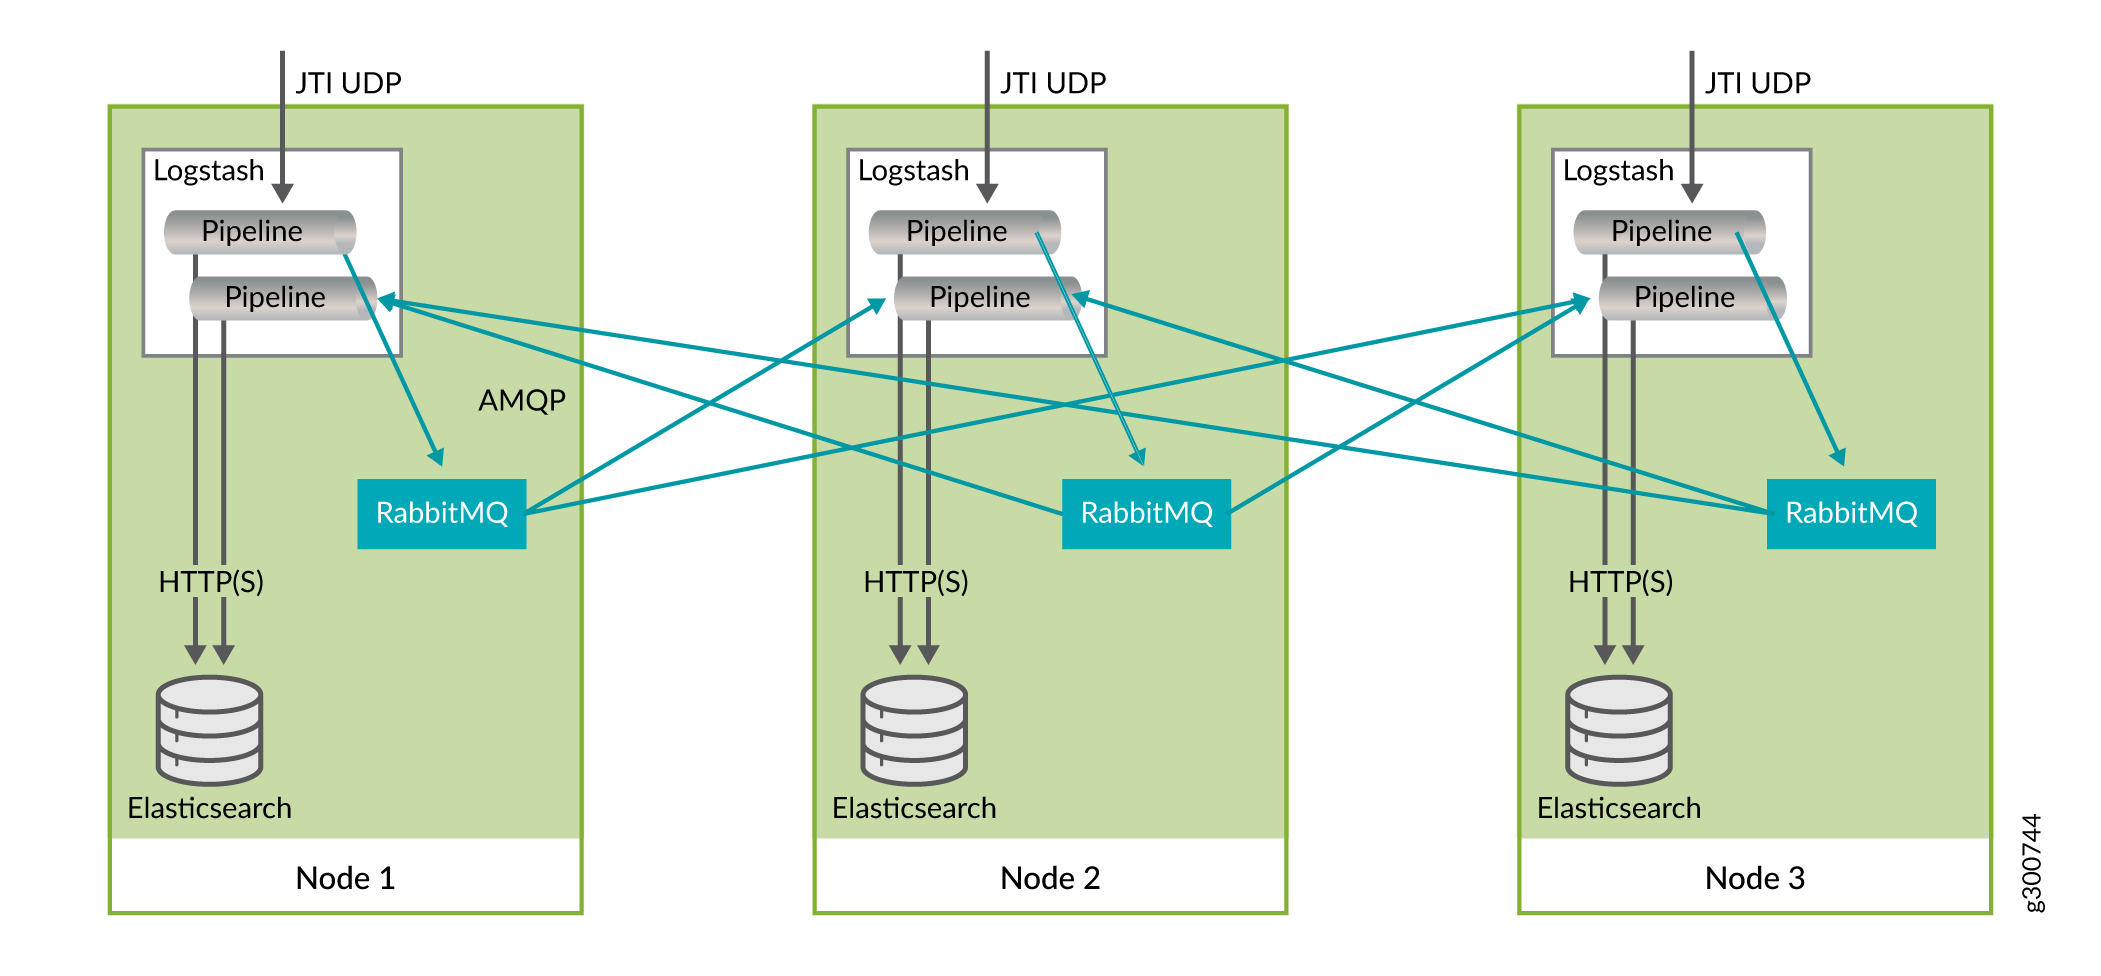
net_setup.pyスクリプト内の Analytics Collector 構成設定メニューには、Geo-HAを準備して展開するオプションがあります。
単一サーバー導入 – NorthStar HAなし
シングルサーバー導入(NorthStar HAなし)でNorthStarアプリケーションと一緒にデータコレクタをインストールするには、以下の手順を使用します。
NorthStarアプリケーションノードで、install.sh スクリプトを使用してNorthStar Controllerバンドルをインストールします。「 NorthStar Controllerのインストール」を参照してください。
同じノードで、install-analytics.sh スクリプトを実行します。
[root@ns ~]# cd /opt/northstar/northstar_bundle_x.x.x/
[root@ns northstar_bundle_x.x.x]# ./install-analytics.sh
groupadd: group 'pcs' already exists
package NorthStar-libUtils is not installed
Loaded plugins: fastestmirror
Setting up Install Process
Loading mirror speeds from cached hostfile
northstar_bundle                 | 2.9 kB     00:00 ...
Resolving Dependencies
--> Running transaction check
---> Package NorthStar-libUtils.x86_64 0:3.1.0-20161127_68470_213 will be installed
--> Finished Dependency Resolution

Dependencies Resolved
.
.
.
PC サーバーで supervisorctl status を実行して、3 つの分析プロセスがインストールされ、実行されていることを確認します。
[root@ns ~]# supervisorctl status
analytics:elasticsearch          RUNNING   pid 7073, uptime 21:57:29
analytics:esauthproxy            RUNNING   pid 7072, uptime 21:57:29
analytics:logstash               RUNNING   pid 7231, uptime 21:57:26
外部分析ノード – NorthStar HAなし
図2 は、1つのNorthStarアプリケーションノードと、分析クラスターを構成する3つの分析ノードを使用した構成例を示しています。すべてのノードは、eth1インターフェイスを介して同じイーサネットネットワークに接続します。オプションで、分析クラスターを作成するのではなく、単一の分析ノードを使用することもできます。このセクションの手順では、単一の外部分析ノードと外部分析クラスターの両方を対象としています。
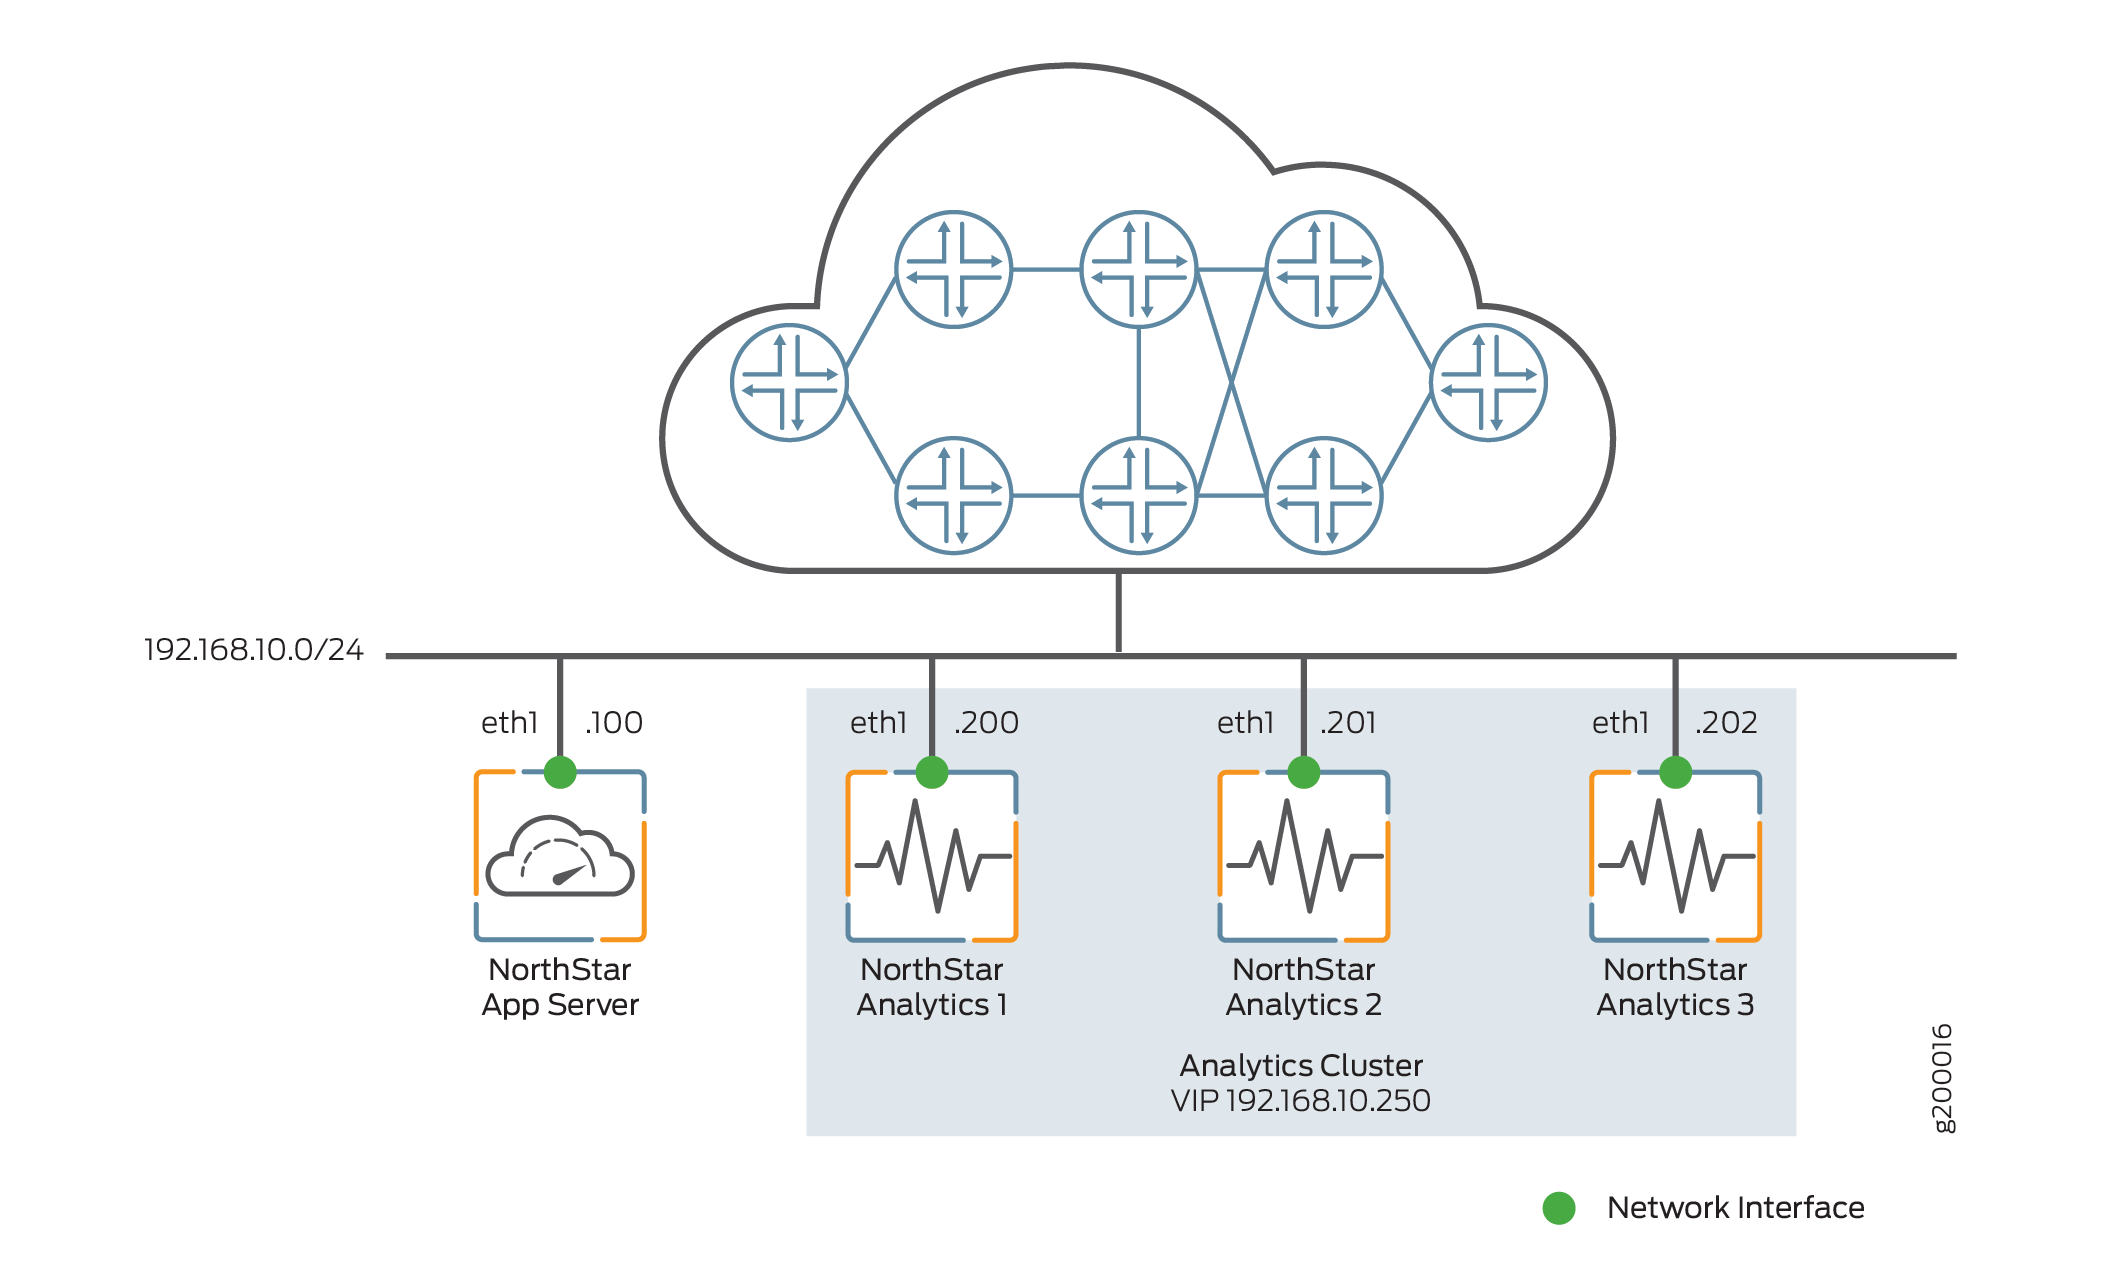
1つまたは外部分析ノードのクラスターをインストールするには、以下の手順を使用します。
NorthStarアプリケーションノードで、install.sh スクリプトを使用してNorthStar Controllerアプリケーションをインストールします。「 NorthStar Controllerのインストール」を参照してください。
各分析ノードに northstar_bundle.rpm をインストールしますが、install.sh スクリプトは実行しません。代わりに、install-analytics.sh スクリプトを実行します。スクリプトは、NorthStar-JDK、NorthStar-Python など、必要なすべての依存関係をインストールします。NorthStar Analytics1では、次のようになります。
[root@NorthStarAnalytics1]# rpm -Uvh <rpm-filename>
[root@NorthStarAnalytics1]# cd /opt/northstar/northstar_bundle_x.x.x/
[root@NorthStarAnalytics1 northstar_bundle_x.x.x]# ./install-analytics.sh
groupadd: group 'pcs' already exists
package NorthStar-PCS is not installed
Loaded plugins: fastestmirror
Setting up Update Process
Loading mirror speeds from cached hostfile
northstar_bundle            | 2.9 kB     00:00 ...
No Packages marked for Update
Loaded plugins: fastestmirror
Setting up Update Process
Loading mirror speeds from cached hostfile
No Packages marked for Update
Loaded plugins: fastestmirror
Setting up Update Process
.
.
.
次の設定手順では、net_setup.pyスクリプトを実行して、NorthStarノードと分析ノードが相互に接続できるように設定する必要があります。ただし、その前に、net_setup.pyスクリプトが実行されるノードの公開SSHキーを他のすべてのノードにコピーすることをお勧めします。net_setup.pyスクリプトは、NorthStarアプリケーションノードまたは分析ノードのいずれかで実行して、すべてのノードを設定できます。これは必須のステップではありませんが、後でスクリプトが設定を展開したり、異なるノードへの接続をテストしたりする際に、すべてのシステムのパスワードを入力する手間が省けます。
[root@NorthStarAnalytics1 network-scripts]# ssh-copy-id root@192.168.10.200
root@192.168.10.200's password:
ssh root@192.168.10.200を使用してマシンにログインし、.ssh/authorized_keysでチェックインしてみてください。すべてのノード(この例では 192.168.10.100、192.168.10.200、192.168.10.201、192.168.10.202)に対してこのプロセスを繰り返します。
NorthStarアプリケーションノードまたは分析ノードの1つでnet_setup.pyを実行します。メインメニューが表示されます。
Main Menu:
    .............................................
    A.) Host Setting
    .............................................
    B.) JunosVM Setting
    .............................................
    C.) Check Network Setting
    .............................................
    D.) Maintenance & Troubleshooting
    .............................................
    E.) HA Setting
    .............................................
    F.) Collect Trace/Log
    .............................................
    G.) Analytics Data Collector Setting
      (External standalone/cluster analytics server)
    .............................................
    H.) Setup SSH Key for external JunosVM  setup
    .............................................
    I.) Internal Analytics Setting (HA)
    .............................................
    X.) Exit
    .............................................
Please select a letter to execute.
分析データコレクター設定 G を選択します。データコレクターの設定メニューが表示されます。
    Analytics Data Collector Configuration Settings:
        (External standalone/cluster analytics server)
    ********************************************************
    Note: This configuration only applicable for data collector
    installation in separate server
    ********************************************************
    .........................................................

        NorthStar App #1
             Hostname                                 :
             Interface
                  Name                                : external0
                  IPv4                                :
    .........................................................
        Analytics Collector #1
             Hostname                                 :
             Priority                                 : 0
             Interface
                  Name                                : external0
                  IPv4                                :

    1. ) Add NorthStar App
    2. ) Add analytics data collector
    3. ) Modify NorthStar App
    4. ) Modify analytics data collector
    5A.) Remove NorthStar App
    5B.) Delete NorthStar App data
    6A.) Remove analytics data collector
    6B.) Delete analytics data collector data
    ..........................................................
    7A.) Virtual IP for Northstar App                  :
    7B.) Delete Virtual IP for Northstar App
    8A.) Virtual IP for Analytics Collector                      :
    8B.) Delete Virtual IP for Analytics Collector
    ..........................................................
    9. ) Test Analytics Data Collector Connectivity
    A. ) Prepare and Deploy SINGLE Data Collector Setting
    B. ) Prepare and Deploy HA Analytics Data Collector Setting
    C. ) Prepare and Deploy GEO-HA Analytics Data Collector Setting
    D. ) Copy Collector setting to other nodes
    E. ) Add a new Collector node to existing cluster
    F. ) Sync Config with NorthStar App
    ..........................................................

    Please select a number to modify.
    [<CR>=return to main menu]:
データコレクターの構成設定メニューからオプションを選択して、以下の構成を変更します。
3を選択して、NorthStarアプリケーションノード設定を変更し、NorthStarサーバー名とIPアドレスを設定します。次に例を示します。
Please select a number to modify.
[CR=return to main menu]:
3
NorthStar App ID : 1

current NorthStar App #1 hostname (without domain name) :
new NorthStar App #1 hostname (without domain name) : NorthStarAppServer

current NorthStar App #1 interface name : external0
new NorthStar App #1 interface name : eth1

current NorthStar App #1 interface IPv4 address :
new NorthStar App #1 interface IPv4 address : 192.168.10.100


Press any key to return to menu
4を選択して、分析ノードのIPアドレスを変更します。次に例を示します。
Please select a number to modify.
[CR=return to main menu]:
4
Collector ID : 1

current collector #1 hostname (without domain name) :
new collector #1 hostname (without domain name) : NorthStarAnalytics1

current collector #1 node priority : 0
new collector #1 node priority : 10

current collector #1 interface name : external0
new collector #1 interface name : eth1

current collector #1 interface IPv4 address :
new collector #1 interface IPv4 address : 192.168.10.200


Press any key to return to menu
必要に応じて分析ノードを追加するには、 2 を選択します。分析クラスターの例では、さらに 2 つの分析ノードが追加されます。
Please select a number to modify.
[CR=return to main menu]:
2
New collector ID : 2

current collector #2 hostname (without domain name) :
new collector #2 hostname (without domain name) : NorthStarAnalytics2

current collector #2 node priority : 0
new collector #2 node priority : 20

current collector #2 interface name : external0
new collector #2 interface name : eth1

current collector #2 interface IPv4 address :
new collector #2 interface IPv4 address : 192.168.10.201


Press any key to return to menu

Please select a number to modify.
[CR=return to main menu]:
2
New collector ID : 3

current collector #3 hostname (without domain name) :
new collector #3 hostname (without domain name) : NorthStarAnalytics3

current collector #3 node priority : 0
new collector #3 node priority : 30

current collector #3 interface name : external0
new collector #3 interface name : eth1

current collector #3 interface IPv4 address :
new collector #3 interface IPv4 address : 192.168.10.202


Press any key to return to menu
8Aを選択して、分析ノードクラスターのVIPアドレスを設定します。これは、分析クラスターがある場合に必要です。外部分析ノードが 1 つだけ(クラスターではない)場合は、この手順をスキップできます。
Please select a number to modify.
[CR=return to main menu]:
8A
current Virtual IP for Collector :
new Virtual IP for Collector : 192.168.10.250

Press any key to return to menu
このVIPには2つの目的があります。
これにより、NorthStarサーバーは単一のエンドポイントにクエリを送信できます。VIP は分析ノードの 1 つでアクティブになり、障害 (フル ノード障害、または分析ノードで実行されているプロセスのいずれかの障害) が発生した場合に切り替わります。
デバイスはテレメトリ データを VIP に送信できるため、分析ノードに障害が発生した場合でも、故障していないノードが VIP の所有権を取得するテレメトリ データを処理できます。
分析クラスターの例の構成は次のようになります。
    Analytics Data Collector Configuration Settings:
    (External standalone/cluster analytics server)
    ********************************************************
    Note: This configuration only applicable for analytics
    data collector installation in separate server
    ********************************************************
    .........................................................
        NorthStar App #1
             Hostname                                 : NorthStarAppServer
             Interface
                  Name                                : eth1
                  IPv4                                : 192.168.10.100
    .........................................................
        Analytics Collector #1
             Hostname                                 : NorthStarAnalytics1
             Priority                                 : 10
             Interface
                  Name                                : eth1
                  IPv4                                : 192.168.10.200
        Analytics Collector #2
             Hostname                                 : NorthStarAnalytics2
             Priority                                 : 20
             Interface
                  Name                                : eth1
                  IPv4                                : 192.168.10.201
        Analytics Collector #3
             Hostname                                 : NorthStarAnalytics3
             Priority                                 : 30
             Interface
                  Name                                : eth1
                  IPv4                                : 192.168.10.202

    1. ) Add NorthStar App
    2. ) Add analytics data collector
    3. ) Modify NorthStar App
    4. ) Modify analytics data collector
    5A.) Remove NorthStar App
    5B.) Delete NorthStar App data
    6A.) Remove analytics data collector
    6B.) Delete analytics data collector data
    ..........................................................
    7A.) Virtual IP for Northstar App                  :
    7B.) Delete Virtual IP for Northstar App
    8A.) Virtual IP for Analytics Collector            : 192.168.10.250
    8B.) Delete Virtual IP for Analytics Collector
    ..........................................................
    9. ) Test Analytics Data Collector Connectivity
    A. ) Prepare and Deploy SINGLE Data Collector Setting
    B. ) Prepare and Deploy HA Analytics Data Collector Setting
    C. ) Prepare and Deploy GEO-HA Analytics Data Collector Setting
    D. ) Copy Collector setting to other nodes
    E. ) Add a new Collector node to existing cluster
    F. ) Sync Config with NorthStar App
    ..........................................................

    Please select a number to modify.
    [<CR>=return to main menu]:
ノード間の接続をテストするには、 9 を選択します。これは、外部分析ノードが 1 つだけであっても、そのクラスターであっても、常に適用されます。次に例を示します。
Please select a number to modify.
[CR=return to main menu]:
9
Validate NorthStar App configuration interface
Validate Collector configuration interface

Verifying the NorthStar version on each NorthStar App node:
NorthStar App #1 NorthStarAppServer: NorthStar-Bundle-3.1.0-20170517_195239_70090_547.x86_64

Collector #1 NorthStarAnalytics1 :
NorthStar-Bundle-3.1.0-20170517_195239_70090_547.x86_64
Collector #2 NorthStarAnalytics2 :
NorthStar-Bundle-3.1.0-20170517_195239_70090_547.x86_64
Collector #3 NorthStarAnalytics3 :
NorthStar-Bundle-3.1.0-20170517_195239_70090_547.x86_64

Checking NorthStar App connectivity...
NorthStar App #1 interface name eth1 ip 192.168.10.100: OK

Checking collector connectivity...
Collector #1 interface name eth1 ip 192.168.10.200: OK
Collector #2 interface name eth1 ip 192.168.10.201: OK
Collector #3 interface name eth1 ip 192.168.10.202: OK
Press any key to return to menu
A (単一の分析ノードの場合)、B (分析クラスターの場合)、または分析地理HAのCを選択して、デプロイ用にノードを構成します。
注:このオプションは、NorthStarアプリケーションノードのWebプロセスを再起動します。
この例では、 Bを選択します。
Please select a number to modify.
[CR=return to main menu]:
B
Setup mode set to "cluster"

Validate NorthStar App configuration interface
Validate Collector configuration interface

Verifying the NorthStar version on each NorthStar App node:
NorthStar App #1 NorthStarAppServer: NorthStar-Bundle-3.1.0-20170517_195239_70090_547.x86_64

Verifying the NorthStar version on each Collector node:
Collector #1 NorthStarCollector1 :
NorthStar-Bundle-3.1.0-20170517_195239_70090_547.x86_64
Collector #2 NorthStarCollector2 :
NorthStar-Bundle-3.1.0-20170517_195239_70090_547.x86_64
Collector #3 NorthStarCollector3 :
NorthStar-Bundle-3.1.0-20170517_195239_70090_547.x86_64

WARNING !
The selected menu will restart nodejs process in Northstar App node
Type YES to continue...

YES
Checking NorthStar App connectivity...
NorthStar App #1 interface name eth1 ip 192.168.10.100: OK

Checking collector connectivity...
Collector #1 interface name eth1 ip 192.168.10.200: OK
Collector #2 interface name eth1 ip 192.168.10.201: OK
Collector #3 interface name eth1 ip 192.168.10.202: OK

Checking analytics process in NorthStar App node ...
Detected analytics is not in NorthStar App node #1: OK

Checking analytics process in collector node ...
Detected analytics in collector node #1: OK
Detected analytics in collector node #2: OK
Detected analytics in collector node #3: OK

External data collector set to "yes"

Sync configuration for NorthStar App #1: OK

Sync configuration for Collector #1: OK

Sync configuration for Collector #2: OK

Sync configuration for Collector #3: OK

Preparing collector #1 basic configuration ..

Uploading config files to collector01

Preparing collector #2 basic configuration ..

Uploading config files to collector02

Preparing collector #3 basic configuration ..

Uploading config files to collector03

Applying data collector config files

Applying data collector config files at NorthStar App
Deploying NorthStar App #1 collector configuration ...

Applying data collector config files at collector
Deploying collector #1 collector configuration ...
Deploying collector #2 collector configuration ...
Deploying collector #3 collector configuration ...

Deploying collector #1 zookeeper configuration ...
Wait 2 minutes before adding new node
...10 seconds
...20 seconds
...30 seconds
...40 seconds
...50 seconds
...60 seconds
...70 seconds
...80 seconds
...90 seconds
...100 seconds
...110 seconds

Deploying collector #2 zookeeper configuration ...
Wait 2 minutes before adding new node
...10 seconds
...20 seconds
...30 seconds
...40 seconds
...50 seconds
...60 seconds
...70 seconds
...80 seconds
...90 seconds
...100 seconds
...110 seconds

Deploying collector #3 zookeeper configuration ...


Restart ZooKeeper at collector #1 collector01

Restart ZooKeeper at collector #2 collector02

Restart ZooKeeper at collector #3 collector03


Restart Analytics at collector #1 collector01

Restart Analytics at collector #2 collector02

Restart Analytics at collector #3 collector03


Restart HA Agent at collector #1 collector01
Please wait for HA Agent process initialization
...10 seconds
...20 seconds

Restart HA Agent at collector #2 collector02
Please wait for HA Agent process initialization
...10 seconds
...20 seconds

Restart HA Agent at collector #3 collector03
Please wait for HA Agent process initialization
...10 seconds
...20 seconds


Restart Nodejs at Northstar App #1 pcs


Collector configurations has been applied successfully

Press any key to return to menu
これでインストールは完了し、分析VIPを介してテレメトリデータを分析ノードに送信できるようになります。
注:分析クラスターの VIP を使用する代わりに、テレメトリ データを個々のノードに送信することを選択し、そのノードがダウンした場合、ノードへのストリームは失われます。VIP を使用する分析クラスターではなく、分析ノードを 1 つだけインストールすることを選択した場合も、同じリスクが生じます。
外部分析ノード–NorthStar HAを使用
図3 は、3つのノードと3つの分析ノードで構成されるNorthStar HAクラスターと、分析クラスターを構成する3つの分析ノード、合計6つのノードで構成される構成例を示しています。すべてのノードは、eth1インターフェイスを介して同じイーサネットネットワークに接続します。NorthStar HA環境では、1つの分析ノード(合計4つのノード)を選択することもできますが、分析ノードに障害が発生した場合に分析収集は保護されません。
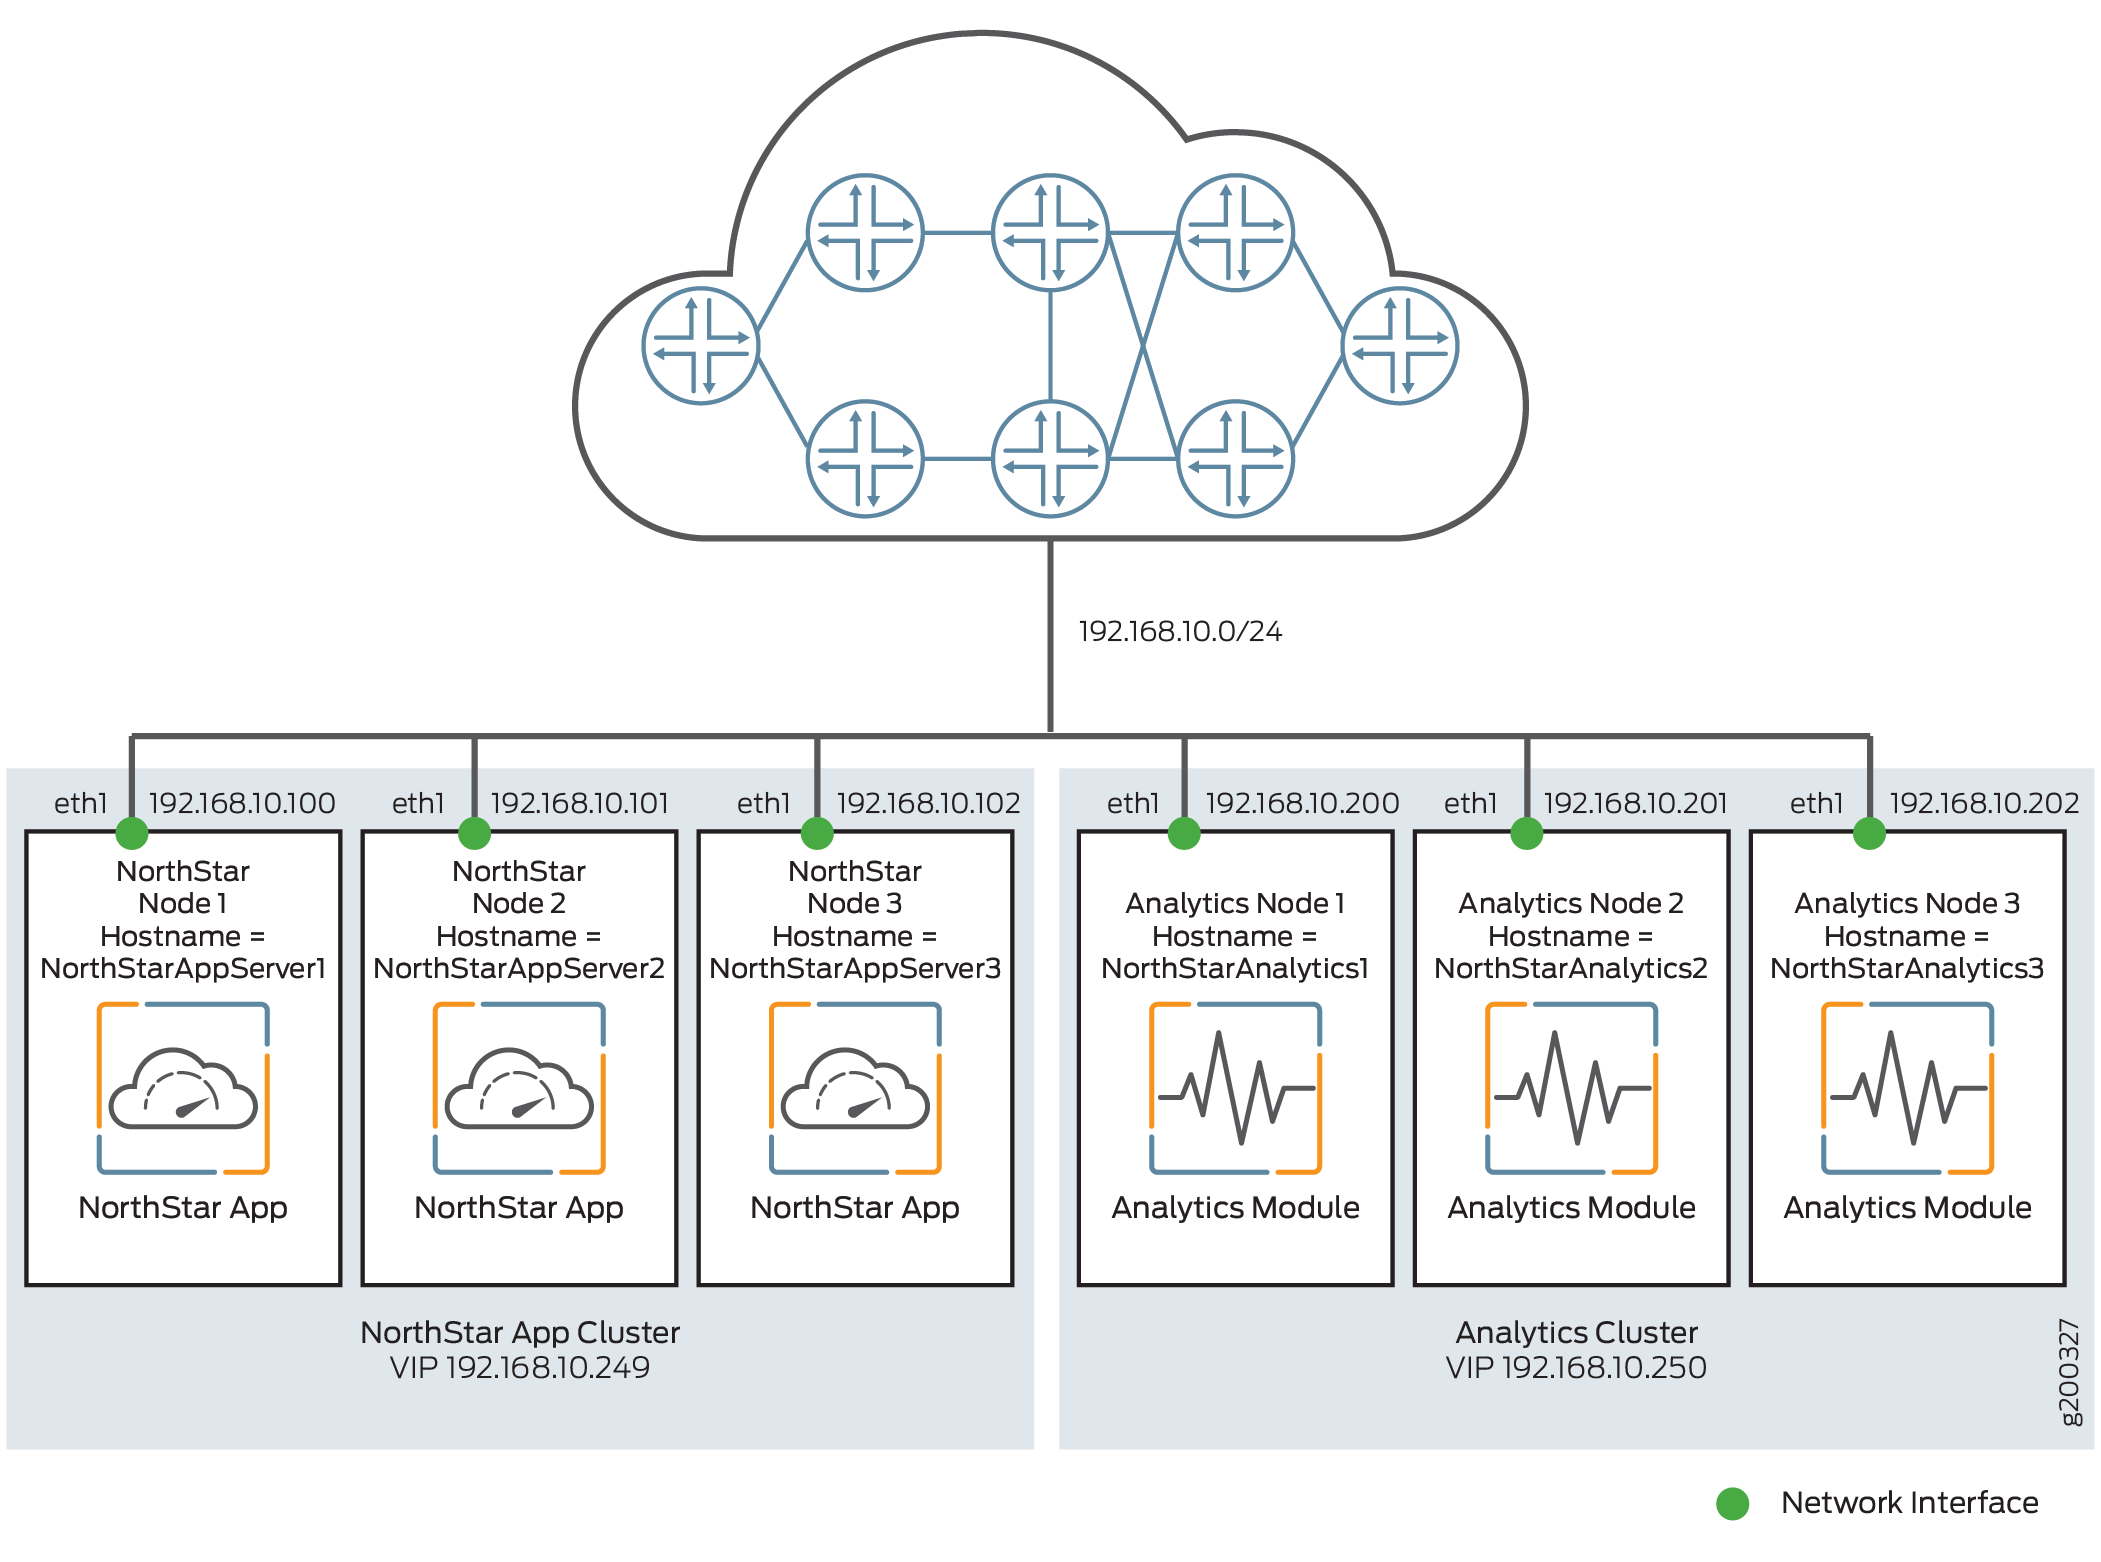
このシナリオでは、まず、 高可用性のための NorthStar クラスターの構成の手順に従って、NorthStar アプリケーションの HA クラスターを構成します。
NorthStar HAクラスターを設定したら、外部分析クラスターを設定します。外部分析クラスターの設定手順は、前のセクション「 外部分析ノード - NorthStar HAなし」とまったく同じです。完了すると、設定は次のようになります。
    Analytics Data Collector Configuration Settings:
    (External standalone/cluster analytics server)
    ********************************************************
    Note: This configuration only applicable for analytics
    data collector installation in separate server
    ********************************************************
    .........................................................
        NorthStar App #1
             Hostname                                 : NorthStarAppServer1
             Interface
                  Name                                : eth1
                  IPv4                                : 192.168.10.100
        NorthStar App #2
             Hostname                                 : NorthStarAppServer2
             Interface
                  Name                                : eth1
                  IPv4                                : 192.168.10.101
        NorthStar App #3
             Hostname                                 : NorthStarAppServer3
             Interface
                  Name                                : eth1
                  IPv4                                : 192.168.10.102
    .........................................................
        Analytics Collector #1
             Hostname                                 : NorthStarAnalytics1
             Priority                                 : 10
             Interface
                  Name                                : eth1
                  IPv4                                : 192.168.10.200
        Analytics Collector #2
             Hostname                                 : NorthStarAnalytics2
             Priority                                 : 20
             Interface
                  Name                                : eth1
                  IPv4                                : 192.168.10.201
        Analytics Collector #3
             Hostname                                 : NorthStarAnalytics3
             Priority                                 : 30
             Interface
                  Name                                : eth1
                  IPv4                                : 192.168.10.202

    1. ) Add NorthStar App
    2. ) Add analytics data collector
    3. ) Modify NorthStar App
    4. ) Modify analytics data collector
    5A.) Remove NorthStar App
    5B.) Delete NorthStar App data
    6A.) Remove analytics data collector
    6B.) Delete analytics data collector data
    ..........................................................
    7A.) Virtual IP for Northstar App                  : 192.168.10.249
    7B.) Delete Virtual IP for Northstar App
    8A.) Virtual IP for Analytics Collector            : 192.168.10.250
    8B.) Delete Virtual IP for Analytics Collector
    ..........................................................
    9. ) Test Analytics Data Collector Connectivity
    A. ) Prepare and Deploy SINGLE Data Collector Setting
    B. ) Prepare and Deploy HA Analytics Data Collector Setting
    C. ) Prepare and Deploy GEO-HA Analytics Data Collector Setting
    D. ) Copy Collector setting to other nodes
    E. ) Add a new Collector node to existing cluster
    F. ) Sync Config with NorthStar App
    ..........................................................

    Please select a number to modify.
    [<CR>=return to main menu]:
メニューから [ 9 ] を選択して、ノード間の接続をテストします。
HA分析の場合は B を選択し、地域HA分析の場合は C を選択して、デプロイするノードを構成します。これにより、NorthStarアプリケーションノードのWebプロセスが再起動されます。
外部分析ノードがある場合のデータ収集の検証
すべてのサービスが実行されていることを確認して、データ収集が機能していることを確認します。関連するプロセスのみを以下に示します。
[root@NorthStarAnalytics1 ~]# supervisorctl status
analytics:elasticsearch          RUNNING   pid 4406, uptime 0:02:06
analytics:esauthproxy            RUNNING   pid 4405, uptime 0:02:06
analytics:logstash               RUNNING   pid 4407, uptime 0:02:06
infra:ha_agent                   RUNNING   pid 4583, uptime 0:00:19
infra:healthmonitor              RUNNING   pid 3491, uptime 1:01:09
infra:zookeeper                  RUNNING   pid 4324, uptime 0:03:16
listener1:listener1_00           RUNNING   pid 4325, uptime 0:03:16
分析ノードは、ネットワークからのすべてのレコードの処理を開始し、RabbitMQ を介して統計情報を NorthStar ノードにプッシュする必要があります。NorthStarノードのpcs.logをチェックして、PCサーバーにプッシュされている統計情報を確認します。次に例を示します。
11-28T13:18:02.174126 30749 PCServer  [NorthStar][PCServer][<-AMQP] msg=0x00004018 routing_key = ns_tunnel_traffic
11-28T13:18:02.174280 30749 PCServer  [NorthStar][PCServer][Traffic] msg=0x00005004  EF1-PE1-PE2@PE1 111094
11-28T13:18:02.174429 30749 PCServer  [NorthStar][PCServer][Traffic] msg=0x00005004  EF1-PE1-PE3@PE1 824
11-28T13:18:02.174764 30749 PCServer  [NorthStar][PCServer][Traffic] msg=0x00005004  CS1-PE3-PE3@PE3 0
11-28T13:18:02.174930 30749 PCServer  [NorthStar][PCServer][Traffic] msg=0x00005004  CS2-PE3-PE2@PE3 0
11-28T13:18:02.175067 30749 PCServer  [NorthStar][PCServer][Traffic] msg=0x00005004  EF2-PE3-PE3@PE3 0
11-28T13:18:02.175434 30749 PCServer  [NorthStar][PCServer][Traffic] msg=0x00005004  EF2-PE3-PE1@PE3 0
11-28T13:18:02.175614 30749 PCServer  [NorthStar][PCServer][Traffic] msg=0x00005004  EF1-PE3-PE1@PE3 0
11-28T13:18:02.175749 30749 PCServer  [NorthStar][PCServer][Traffic] msg=0x00005004  CS2-PE3-PE3@PE3 0
11-28T13:18:02.175873 30749 PCServer  [NorthStar][PCServer][Traffic] msg=0x00005004  CS1-PE3-PE1@PE3 0
11-28T13:18:02.175989 30749 PCServer  [NorthStar][PCServer][Traffic] msg=0x00005004  CS1-PE3-PE2@PE3 0
11-28T13:18:02.176128 30749 PCServer  [NorthStar][PCServer][Traffic] msg=0x00005004  CS2-PE3-PE1@PE3 824
11-28T13:18:02.176256 30749 PCServer  [NorthStar][PCServer][Traffic] msg=0x00005004  EF1-PE3-PE3@PE3 0
11-28T13:18:02.176393 30749 PCServer  [NorthStar][PCServer][Traffic] msg=0x00005004  EF1-PE2-PE1@PE2 112552
11-28T13:18:02.176650 30749 PCServer  [NorthStar][PCServer][Traffic] msg=0x00005004  AF1-PE2-PE1@PE2 0
11-28T13:18:02.176894 30749 PCServer  [NorthStar][PCServer][Traffic] msg=0x00005004  AF2-PE2-PE1@PE2 0
11-28T13:18:02.177059 30749 PCServer  [NorthStar][PCServer][Traffic] msg=0x00005004  EF12-PE2-PE1@PE2 0
REST API を使用して、集計された統計情報を取得することもできます。これにより、クライアントからnodejs、Elasticsearchへのパスがテストされます。
curl --insecure -X POST -H "Authorization: Bearer 7IEvYhvABrae6m1AgI+zi4V0n7UiJNA2HqliK7PfGhY=" -H "Content-Type: application/json" -d '{
"endTime": "now",
"startTime": "now-1h",
"aggregation": "avg",
"counter": "interface_stats.egress_stats.if_bps"
}' "https://localhost:8443/NorthStar/API/v2/tenant/1/statistics/device/top"
[
{
"id": {
"statisticType": "device",
"name": "vmx105",
"node": {
"topoObjectType": "node",
"hostName": "vmx105"
}
},
"interface_stats.egress_stats.if_bps": 525088
},
{
"id": {
"statisticType": "device",
"name": "PE1",
"node": {
"topoObjectType": "node",
"hostName": "PE1"
}
},
"interface_stats.egress_stats.if_bps": 228114
},
{
"id": {
"statisticType": "device",
"name": "PE2",
"node": {
"topoObjectType": "node",
"hostName": "PE2"
}
},
"interface_stats.egress_stats.if_bps": 227747
},
{
"id": {
"statisticType": "device",
"name": "PE3",
"node": {
"topoObjectType": "node",
"hostName": "PE3"
}
},
"interface_stats.egress_stats.if_bps": 6641
},
{
"id": {
"statisticType": "device",
"name": "PE4",
"node": {
"topoObjectType": "node",
"hostName": "PE4"
}
},
"interface_stats.egress_stats.if_bps": 5930
}
]
外部分析クラスター内の障害が発生したノードの置き換え
データ・コレクターの構成設定メニューで、障害が発生したノードを物理的に置き換えるときにオプションDおよびEを使用できます。これにより、クラスター全体を再デプロイすることなくノードを置き換えることができます。
3 ノード クラスターでノードが置き換えられている間、分析データ用の HA は保証されません。
ネットワーク内の物理ノードを交換し、交換ノードに northstar_bundle.rpm をインストールします。この例では、置き換えノードは NorthStarAnalytics3 です。
install-analytics.sh スクリプトを実行して、NorthStar-JDK、NorthStar-Pythonなど、必要なすべての依存関係をインストールします。NorthStarAnalytics3の場合、次のようになります。
[root@NorthStarAnalytics3]# rpm -Uvh <rpm-filename>
[root@NorthStarAnalytics3]# cd /opt/northstar/northstar_bundle_x.x.x/
[root@NorthStarAnalytics3 northstar_bundle_x.x.x]# ./install-analytics.sh
groupadd: group 'pcs' already exists
package NorthStar-PCS is not installed
Loaded plugins: fastestmirror
Setting up Update Process
Loading mirror speeds from cached hostfile
northstar_bundle            | 2.9 kB     00:00 ...
No Packages marked for Update
Loaded plugins: fastestmirror
Setting up Update Process
Loading mirror speeds from cached hostfile
No Packages marked for Update
Loaded plugins: fastestmirror
Setting up Update Process
.
.
.
アンカーノードから交換ノードへのSSHキーを設定します。アンカーノードは、NorthStarアプリケーションノードまたは分析クラスターノードの1つ(交換ノード以外)にすることができます。公開SSHキーをアンカーノードから交換ノードに、交換ノードから他のノード(NorthStarアプリケーションノードと分析クラスターノード)に、他のノード(NorthStarアプリケーションノードと分析クラスターノード)から交換ノードにコピーします。
次に例を示します。
[root@NorthStarAnalytics1 network-scripts]# ssh-copy-id root@192.168.10.202
root@192.168.10.202's password:
ssh root@192.168.10.202を使用してマシンにログインし、.ssh/authorized_keysでチェックインしてみてください。選択したノードでnet_setup.pyを実行します。メインメニューが表示されます。
Main Menu:
    .............................................
    A.) Host Setting
    .............................................
    B.) JunosVM Setting
    .............................................
    C.) Check Network Setting
    .............................................
    D.) Maintenance & Troubleshooting
    .............................................
    E.) HA Setting
    .............................................
    F.) Collect Trace/Log
    .............................................
    G.) Analytics Data Collector Setting
      (External standalone/cluster analytics server)
    .............................................
    H.) Setup SSH Key for external JunosVM  setup
    .............................................
    I.) Internal Analytics Setting (HA)
    .............................................
    X.) Exit
    .............................................
Please select a letter to execute.
データコレクター設定 G 選択します。データコレクターの設定メニューが表示されます。
    Analytics Data Collector Configuration Settings:
         (External standalone/cluster analytics server)
    ********************************************************
    Note: This configuration only applicable for analytics
    data collector installation in separate server
    ********************************************************
    .........................................................
        NorthStar App #1
             Hostname                                 : NorthStarAppServer1
             Interface
                  Name                                : eth1
                  IPv4                                : 192.168.10.100
    .........................................................
        NorthStar App #2
             Hostname                                 : NorthStarAppServer2
             Interface
                  Name                                : eth1
                  IPv4                                : 192.168.10.101
    .........................................................
        NorthStar App #3
             Hostname                                 : NorthStarAppServer3
             Interface
                  Name                                : eth1
                  IPv4                                : 192.168.10.102
    .........................................................
        Analytics Collector #1
             Hostname                                 : NorthStarAnalytics1
             Priority                                 : 10
             Interface
                  Name                                : eth1
                  IPv4                                : 192.168.10.200
    .........................................................
        Analytics Collector #2
             Hostname                                 : NorthStarAnalytics2
             Priority                                 : 20
             Interface
                  Name                                : eth1
                  IPv4                                : 192.168.10.201
    .........................................................
        Analytics Collector #3
             Hostname                                 : NorthStarAnalytics3
             Priority                                 : 30
             Interface
                  Name                                : eth1
                  IPv4                                : 192.168.10.202

    1. ) Add NorthStar App
    2. ) Add analytics data collector
    3. ) Modify NorthStar App
    4. ) Modify analytics data collector
    5A.) Remove NorthStar App
    5B.) Delete NorthStar App data
    6A.) Remove analytics data collector
    6B.) Delete analytics data collector data
    ..........................................................
    7A.) Virtual IP for Northstar App                  : 192.168.10.249
    7B.) Delete Virtual IP for Northstar App
    8A.) Virtual IP for Collector                      : 192.168.10.250
    8B.) Delete Virtual IP for Analytics Collector
    ..........................................................
    9. ) Test Analytics Data Collector Connectivity
    A. ) Prepare and Deploy SINGLE Data Collector Setting
    B. ) Prepare and Deploy HA Analytics Data Collector Setting
    C. ) Prepare and Deploy GEO-HA Analytics Data Collector Setting
    D. ) Copy Collector setting to other nodes
    E. ) Add a new Collector node to existing cluster
    F. ) Sync Config with NorthStar App
    ..........................................................
    Please select a number to modify.
    [<CR>=return to main menu]:
オプション 9 を選択して、すべてのNorthStarアプリケーションノードと分析クラスターノードへの接続をテストします。
Checking NorthStar App connectivity...
NorthStar App #1 interface name eth1 ip 192.168.10.100: OK
NorthStar App #2 interface name eth1 ip 192.168.10.101: OK
NorthStar App #3 interface name eth1 ip 192.168.10.102: OK

Checking collector connectivity...
Collector #1 interface name eth1 ip 192.168.10.200: OK
Collector #2 interface name eth1 ip 192.168.10.201: OK
Collector #3 interface name eth1 ip 192.168.10.202: OK
オプション D を選択して、分析設定を他のノードにコピーします。
Validate NorthStar App configuration interface
Validate Collector configuration interface

Verifying the NorthStar version on each NorthStar App node:
NorthStar App #1 NorthStarAppServer1 : NorthStar-Bundle-3.1.0-20170517_195239_70090_547.x86_64
NorthStar App #2 NorthStarAppServer2 : NorthStar-Bundle-3.1.0-20170517_195239_70090_547.x86_64
NorthStar App #3 NorthStarAppServer3 : NorthStar-Bundle-3.1.0-20170517_195239_70090_547.x86_64

Verifying the NorthStar version on each Collector node:
Collector #1 NorthStarAnalytics1 : NorthStar-Bundle-3.1.0-20170517_195239_70090_547.x86_64
Collector #2 NorthStarAnalytics2 : NorthStar-Bundle-3.1.0-20170517_195239_70090_547.x86_64
Collector #3 NorthStarAnalytics3 : NorthStar-Bundle-3.1.0-20170517_195239_70090_547.x86_64

Checking NorthStar App connectivity...
NorthStar App #1 interface name eth1 ip 192.168.10.100: OK
NorthStar App #2 interface name eth1 ip 192.168.10.101: OK
NorthStar App #3 interface name eth1 ip 192.168.10.102: OK

Checking collector connectivity...
Collector #1 interface name eth1 ip 192.168.10.200: OK
Collector #2 interface name eth1 ip 192.168.10.201: OK
Collector #3 interface name eth1 ip 192.168.10.202: OK

Sync configuration for NorthStar App #1: OK
Sync configuration for NorthStar App #2: OK
Sync configuration for NorthStar App #3: OK

Sync configuration for Collector #1: OK
Sync configuration for Collector #2: OK
Sync configuration for Collector #3: OK
オプション E を選択して、交換ノードをクラスターに追加します。交換ノードのノードIDを指定します。
任意の分析クラスターノードで、次のコマンドを使用してElasticsearchクラスターの状態を確認します。ステータスが「グリーン」であり、ノード数が正しいことを確認します。
[root@NorthStarAnalytics1]# curl -XGET 'localhost:9200/_cluster/health?pretty'
{
"cluster_name" : "NorthStar",
"status" : "green",
"timed_out" : false,
"number_of_nodes" : 3,
"number_of_data_nodes" : 3,
"active_primary_shards" : 10,
"active_shards" : 10,
"relocating_shards" : 0,
"initializing_shards" : 0,
"unassigned_shards" : 0,
"delayed_unassigned_shards" : 0,
"number_of_pending_tasks" : 0,
"number_of_in_flight_fetch" : 0,
"task_max_waiting_in_queue_millis" : 0,
"active_shards_percent_as_number" : 100.0
}
NorthStar HAクラスターノードにインストールされたコレクター
NorthStar HA環境では、NorthStarクラスター内の各ノードを分析ノードとしても機能するように設定することで、NorthStarアプリケーションと分析のフェイルオーバー保護を同時に実現できます。NorthStar クラスターの外部には何もないため、ノードの合計数は NorthStar クラスター内の数(最小 3 つ)になります。 図4 は、このインストールシナリオを示しています。
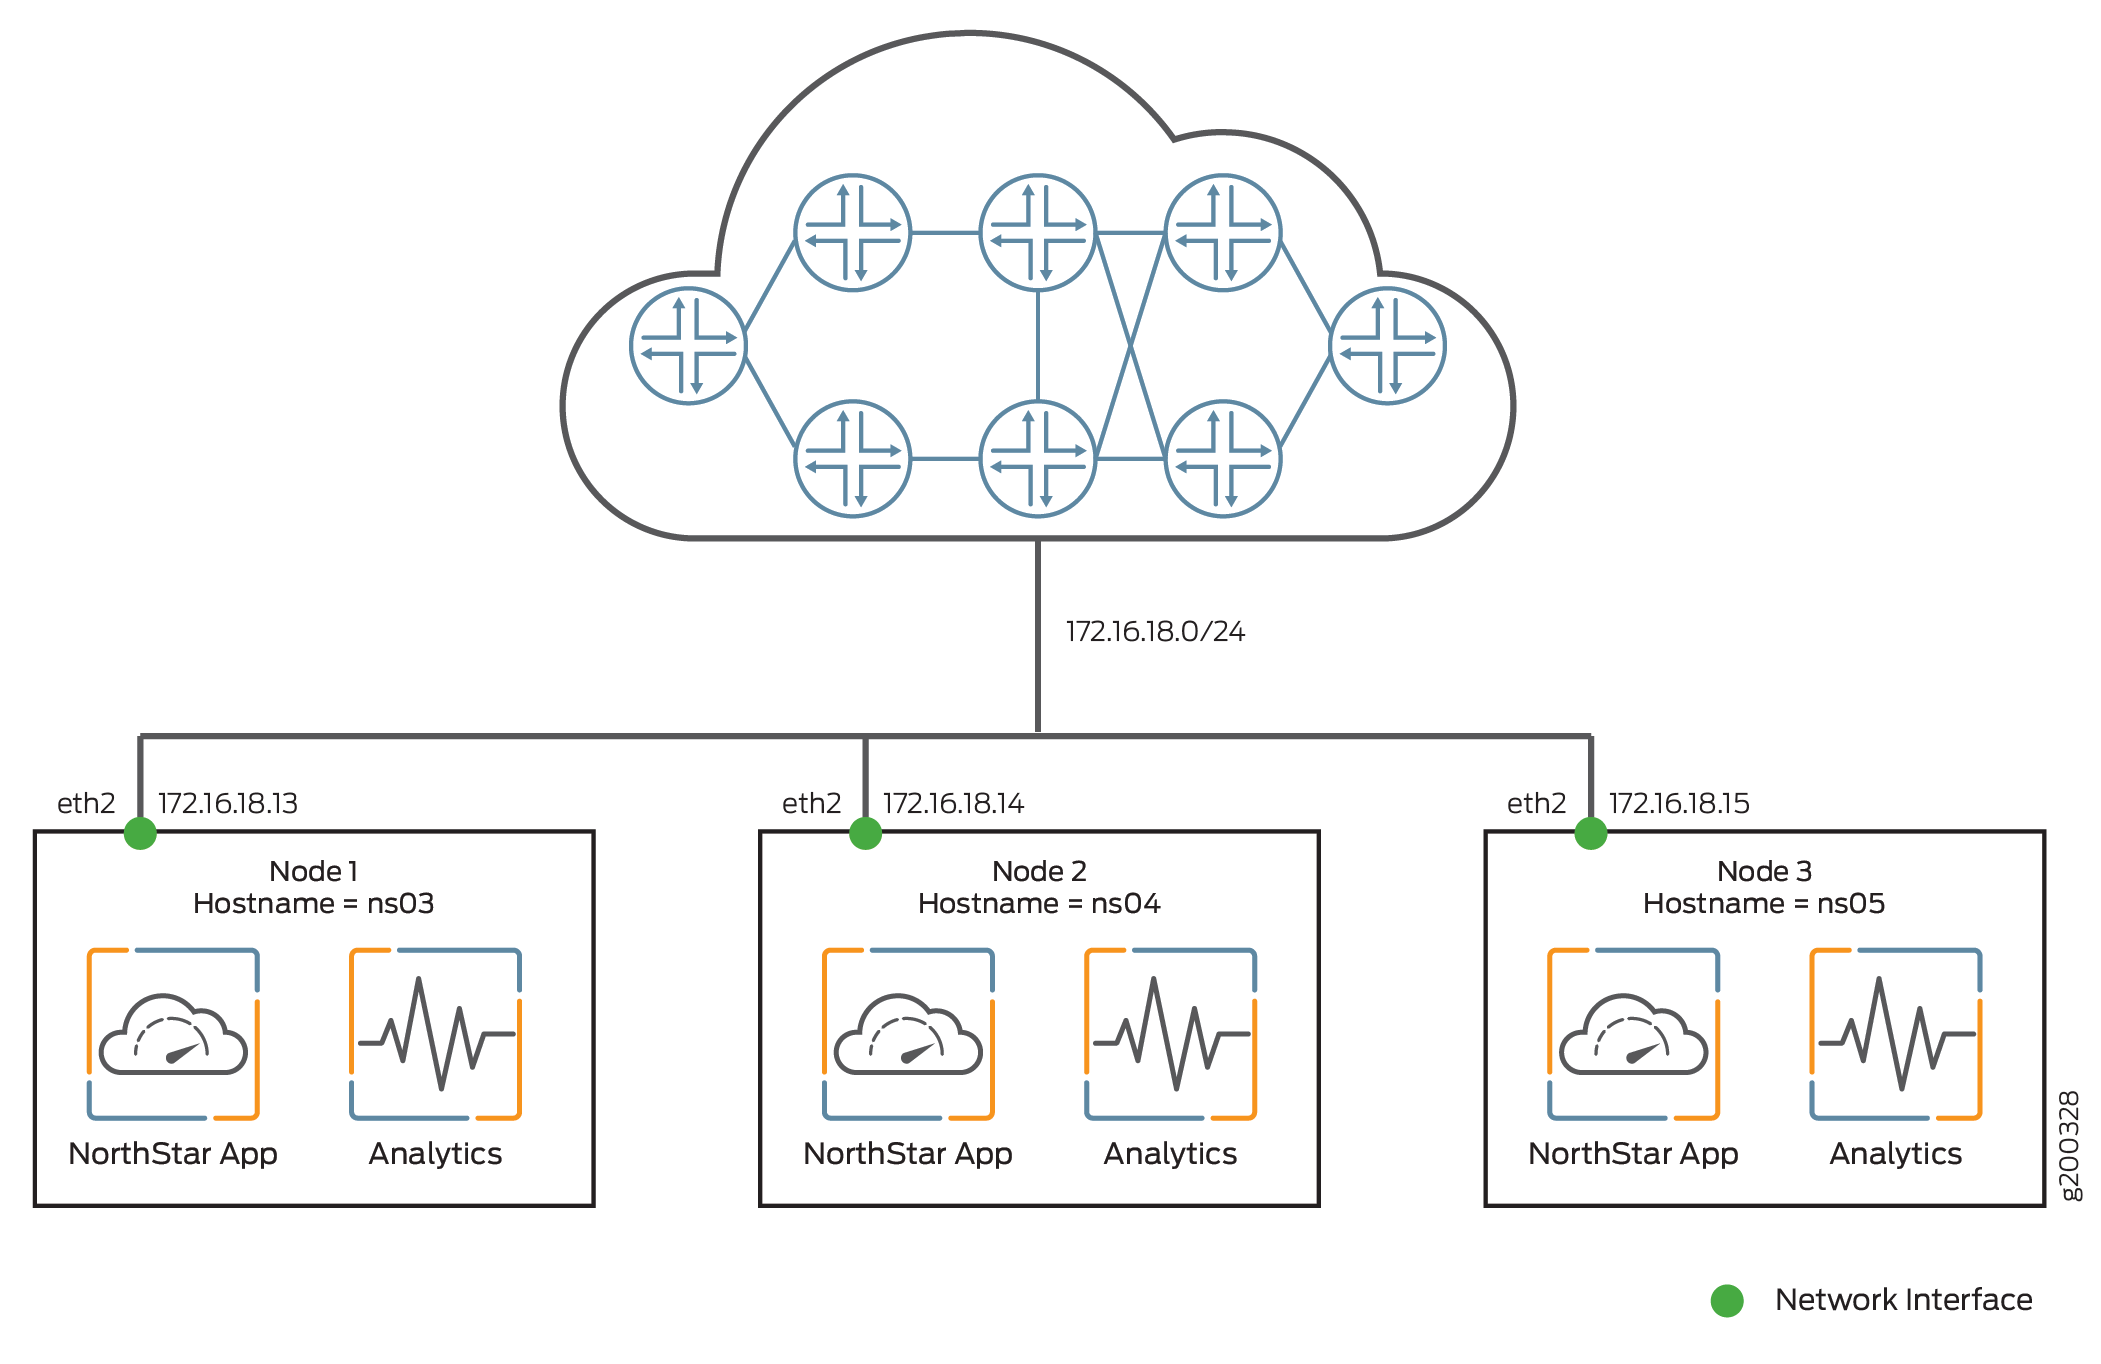
このシナリオを設定するには、まず各スタンドアロンノードにNorthStarアプリケーションと分析の両方をインストールし、ノードをHAクラスターとして設定し、最後にノードを分析クラスターとして設定します。次の手順を実行します:
各NorthStarアプリケーションノードで、install.sh スクリプトを使用してNorthStar Controllerアプリケーションをインストールします。「 NorthStar Controllerのインストール」を参照してください。
各ノードに northstar_bundle.rpm をインストールし、install-analytics.sh スクリプトを実行します。スクリプトは、NorthStar-JDK、NorthStar-Python など、必要なすべての依存関係をインストールします。例のノードns03の場合、次のようになります。
[root@ns03]# rpm -Uvh <rpm-filename>
[root@ns03]# cd /opt/northstar/northstar_bundle_x.x.x/
[root@ns03 northstar_bundle_x.x.x]# ./install-analytics.sh
groupadd: group 'pcs' already exists
package NorthStar-PCS is not installed
Loaded plugins: fastestmirror
Setting up Update Process
Loading mirror speeds from cached hostfile
northstar_bundle            | 2.9 kB     00:00 ...
No Packages marked for Update
Loaded plugins: fastestmirror
Setting up Update Process
Loading mirror speeds from cached hostfile
No Packages marked for Update
Loaded plugins: fastestmirror
Setting up Update Process
.
.
.
各ノードで次のコマンドを使用して、3つの分析プロセスがインストールされ、実行されていることを確認します。
[root@ns03 ~]# supervisorctl status | grep analytics:*
analytics:elasticsearch          RUNNING   pid 16238, uptime 20:58:37
analytics:esauthproxy            RUNNING   pid 16237, uptime 20:58:37
analytics:logstash               RUNNING   pid 3643, uptime 20:13:08
NorthStarクラスターの高可用性の設定の手順に従って、NorthStar HAのノードを設定します。これには、net_setup.pyユーティリティを実行し、Eを選択してHAセットアップメニューにアクセスし、そのメニューを使用してHAセットアップ手順を実行することが含まれます。
HA設定メニューから、 Enter を押してメインnet_setup.pyメニューに戻ります。メインメニューが表示されます。
Main Menu: ............................................. A.) Host Setting ............................................. B.) JunosVM Setting ............................................. C.) Check Network Setting ............................................. D.) Maintenance & Troubleshooting ............................................. E.) HA Setting ............................................. F.) Collect Trace/Log ............................................. G.) Data Collector Setting (External standalone/cluster analytics server) ............................................. H.) Setup SSH Key for external JunosVM setup ............................................. I.) Internal Analytics Setting (HA) ............................................. X.) Exit ............................................. Please select a letter to execute.Iを選択して続行します。このメニューオプションは、NorthStar HAクラスターにすでに設定した設定を適用するため、変更する必要はありません。
Internal Analytics Configuration HA Settings: ******************************************************** Note: This configuration only applicable for analytics installation in the same server ******************************************************** .......................................................... Node #1 Hostname : ns03 Priority : 10 Cluster Communication Interface : eth2 Cluster Communication IP : 172.16.18.13 Interfaces Interface #1 Name : eth2 IPv4 : 172.16.18.13 Switchover : yes Interface #2 Name : mgmt0 IPv4 : Switchover : yes Interface #3 Interface #4 Interface #5 Node #2 Hostname : ns04 Priority : 20 Cluster Communication Interface : eth2 Cluster Communication IP : 172.16.18.14 Interfaces Interface #1 Name : eth2 IPv4 : 172.16.18.14 Switchover : yes Interface #2 Name : mgmt0 IPv4 : Switchover : yes Interface #3 Interface #4 Interface #5 Node #3 Hostname : ns05 Priority : 30 Cluster Communication Interface : eth2 Cluster Communication IP : 172.16.18.15 Interfaces Interface #1 Name : eth2 IPv4 : 172.16.18.15 Switchover : yes Interface #2 Name : mgmt0 IPv4 : Switchover : yes Interface #3 Interface #4 Interface #5 .......................................................... 1.) Prepare and Deploy Internal Analytics HA configs .......................................................... Please select a number to modify. [<CR>=return to main menu]:注:ノードの地理的な場所によっては、内部分析を設定する代わりに、分析 geo-HA を使用することもできます。その場合は、 I を選択する代わりに、 G を選択して Analytics Data Collector の構成設定にアクセスします。これらの設定を更新した後、 C (GEO-HA 分析データ コレクターの設定を準備して展開する) を選択します。以下のステップ7は適用されません。
1を選択して、分析用にNorthStar HAクラスターを設定します。
WARNING !
The selected menu will restart analytics processes in each cluster member
Type YES to continue...
YES

Checking connectivity of cluster_communication_interface...
Cluster communications status for node ns03 cluster interface eth2 ip 172.16.18.13: OK
Cluster communications status for node ns04 cluster interface eth2 ip 172.16.18.14: OK
Cluster communications status for node ns05 cluster interface eth2 ip 172.16.18.15: OK


Verifying the NorthStar version on each node:
ns03 : NorthStar-Bundle-18.1.0-20180412_071430_72952_187.x86_64
ns04 : NorthStar-Bundle-18.1.0-20180412_071430_72952_187.x86_64
ns05 : NorthStar-Bundle-18.1.0-20180412_071430_72952_187.x86_64

Checking analytics process in each node ...
Detected analytics in node #1 ns03: OK
Detected analytics in node #2 ns04: OK
Detected analytics in node #3 ns05: OK

Applying analytics config files
Deploying analytics configuration in node #1 ns03
Deploying analytics configuration in node #2 ns04
Deploying analytics configuration in node #3 ns05


Restart Analytics at node #1 ns03

Restart Analytics at node #2 ns04

Restart Analytics at node #3 ns05


Internal analytics configurations has been applied successfully

Press any key to return to menu
任意の分析ノードで、次のコマンドを使用して Elasticsearch クラスターのステータスを確認します。ステータスが「グリーン」であり、ノード数が正しいことを確認します。
[root@ns03 ~]# curl -XGET 'localhost:9200/_cluster/health?pretty'
{
  "cluster_name" : "NorthStar",
  "status" : "green",
  "timed_out" : false,
  "number_of_nodes" : 3,
  "number_of_data_nodes" : 3,
  "active_primary_shards" : 10,
  "active_shards" : 10,
  "relocating_shards" : 0,
  "initializing_shards" : 0,
  "unassigned_shards" : 0,
  "delayed_unassigned_shards" : 0,
  "number_of_pending_tasks" : 0,
  "number_of_in_flight_fetch" : 0,
  "task_max_waiting_in_queue_millis" : 0,
  "active_shards_percent_as_number" : 100.0
}
ログのトラブルシューティング
以下のログは、トラブルシューティングに役立ちます。
/opt/northstar/logs/elasticsearch.msg
/opt/northstar/logs/logstash.msg
/opt/northstar/logs/logstash.log
詳細については、『NorthStar Controllerユーザーガイド』の「ログ」を参照してください。