WLANゲストポータルオプションの比較
ゲストがインターネットにアクセスできるようにするには、WLAN ゲスト ポータルを設定して、直接アクセスを許可するか、簡単なサインイン フォームを有効にするか、ゲストを外部サインイン フォームに転送するか、ID プロバイダーのシングル サインオンを有効にします。
ゲストポータルのオプションは、WLAN 設定で設定できます。デフォルト設定のままにしてゲストがインターネットに直接アクセスできるようにするか、他のオプションから選択します。
このトピックでは、[WLANの編集/作成(Edit/Create WLAN)] ウィンドウのゲスト ポータル オプションについて説明します。または、RADIUSサーバー経由でゲストアクセスを設定することもできます。 MAC認証バイパスを備えたRADIUSサーバーを使用したゲストアクセスを参照してください。
| オプション |
形容 |
セットアップ |
|---|---|---|
| 直接アクセス(ポータルなし) |
ゲストは、認証なしですぐにインターネットにアクセスできます。 これは、セキュリティを強化するビジネス ニーズがある場合や、ゲストに関する情報を収集する場合を除いて、最も簡単なオプションです。 |
アクションは必要ありません。これは、WLAN 設定のデフォルトのゲスト ポータル オプションです。 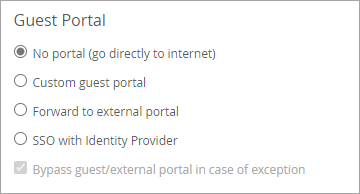 |
| カスタムゲストポータル |
ゲストは、Juniper Mist™ で設定した簡単なサインイン フォームに記入することで、インターネットにアクセスできるようになります。 これは、ゲストから情報を収集できる、設定が簡単なアプローチです。 必要に応じて、認証コード、スポンサード ゲスト アクセス、ソーシャル ログインなどのオプションを有効にすることができます。 |
WLAN 設定で [カスタム ゲスト ポータル ] を選択します。デフォルト設定をそのまま使用するか、[ ポータルの構成 ] をクリックして、背景画像、フォーム フィールド、テキスト、認証方法などの機能を変更します。 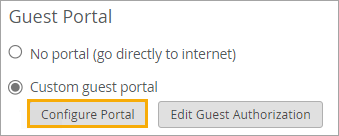 詳細については、 WLAN へのカスタム ゲスト ポータルの追加を参照してください。 |
| 外部ポータル |
ゲストは、Juniper Mist の外部で開発したサインイン ポータルにアクセスしてインターネットにアクセスできます。 このオプションでは、Web 開発者がビジネスとユース ケース用に特別に設計したサインイン ポータルを使用します。 |
WLAN 設定で [外部ポータルに転送 ] を選択します。次に、ポータルの URL を入力し、その他のオプション設定を構成します。 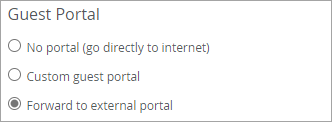 詳細については、「 ゲスト アクセスに外部ポータルを使用する」を参照してください。 |
| アイデンティティプロバイダによるシングルサインオン(SSO) |
ゲストは、ID プロバイダーのサインイン ページを使用してインターネットにアクセスできます。(いくつかの例としては、Okta、Microsoft Azure、OneLoginなどがありますが、ほとんどのIdPがサポートされています。 |
WLAN 設定で [ SSO with Identity Provider ] を選択します。次に、IdP の設定を入力します。 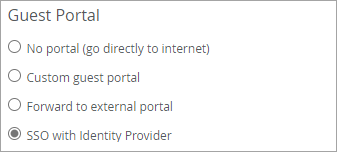 詳細については、「 ゲスト アクセスに ID プロバイダーを使用する」を参照してください。 |