MACベース認証とMAB(MAC認証バイパス)の設定
MACアドレスに基づいてデバイスを認証するように有線デバイスを設定するには、次の手順に従います。
MAC 認証は、セキュリティの追加レイヤーとして、証明書ベースまたはクレデンシャルベースの認証と共に使用できます。
Juniper Mist Access AssuranceはMAB(MAC認証バイパス)をサポートしており、有線/無線ネットワーク全体で統一されたアクセス制御を実現します。このトピックでは、有線デバイスの MAB を設定する例を示します。
この例では、証明書ベースの EAP-TLS 認証に加えて、有線デバイスに対して MAC 認証を作成する方法を示します。このタスクには、dot 1xをサポートしていない有線側のデバイス(Phillipsハブなど)の認証ポリシーを作成する手順も含まれています。
前提 条件
-
証明書ベースの認証があらかじめ設定されている必要があります。「ワイヤレス ネットワークの証明書ベース (EAP-TLS) 認証を構成する」を参照してください。
-
ジュニパーネットワークスEXシリーズスイッチ。
有線デバイスのMACベース認証を設定する
次のビデオを見て、有線デバイスのMACベース認証を構成および検証する方法を学びます。
Well, what about wired devices? How do we authenticate an authorized wired client? Well, it turns out we could do it right here in the same place. So we could create a couple of more rules. So we can say OK, if we look at wired devices that are using certificates to authenticate , we could just call this rule wired certificate authentication. We can effectively apply the same matching criteria as for wireless. There's no difference whatsoever here.
On the right-hand side, we'll decide where we want to move these devices after authentication and the right policy match. And finally, what about non-.1x capable devices on the wired side? So for example, I have here a Phillips hub that does not support .1x. How can I authenticate a Phillips app? So I could create a label for the Phillips device. The label will be client list. And I'll just say approved Phillips app. And I'll just put the MAC address of that device in. Oh. And you could put a list of MAC addresses. You can put the list of Mac OUIs. And remember that all of these labels that I'm creating in the UI - they're all available through the REST API. So there is always an endless possibility of integration with existing, say, inventory management systems that can just put all the new device MAC addresses in those lists for authentication and authorization.
So we'll just click Create. Create this label. And we'll create a rule. We'll call it approved Phillips devices. And here we are matching on wired devices that are doing MAC address authentication bypass that are part of this client list label. And in this case, we will move them to - well, I don't want to move them to Corp VLAN. That's not what I want. I will create an IoT VLAN. And in our case, that's going to be VLAN 3000. And I'm going to add this to an IoT VLAN. And now, we have our authentication policies configuration done.
OK, so how do we validate, right? So we've connected a couple of clients to the switch. One is a laptop that's doing .1x using certificate. Another one is the Phillips Hue app. That doesn't do any .1x, and just doing MAC authentication. So we could see those two clients are connected.
Let's take a look at the laptop one. So we could click on the port. We see that there is a client with a username flashing up. Let's take a look at the wired client insights. And what we can see here is that the user has been authenticated. You could see the port up and down events from the switch side. We see all the authentication phases, same as we saw in the wireless side. The client trusts the server. The server trusts the client certificate. We get all the metadata here. We then are saying client access is allowed. And voila. We matched the same authentication policy rule. Great. So now, we know that this part is working.
Now, we go to switch back. And let's look at the Philips device. That device is not doing any form of .1x authentication. So let's just take a look at the wired client insights. Yeah, and we are seeing that here the user is authenticated. And there is a client access allowed event here as well. And in this case, the authentication type is Mac address bypass - the MAC address that we've added to the client list. And voila. We are matching the right approved Phillips device rule.
Juniper Mist ポータルを使用してネットワークで MAC ベースの認証を設定するには、以下の手順を使用します。
- 認証ポリシーを作成します。
- Juniper Mist ポータルの左側のメニューから、 [Organization > Access > Auth Policies](認証ポリシー) を選択します。
有効な証明書を持つクライアントへのアクセスを提供する新しいルールを作成します。 「認証ポリシーの構成」を参照してください。図1:有線クライアント
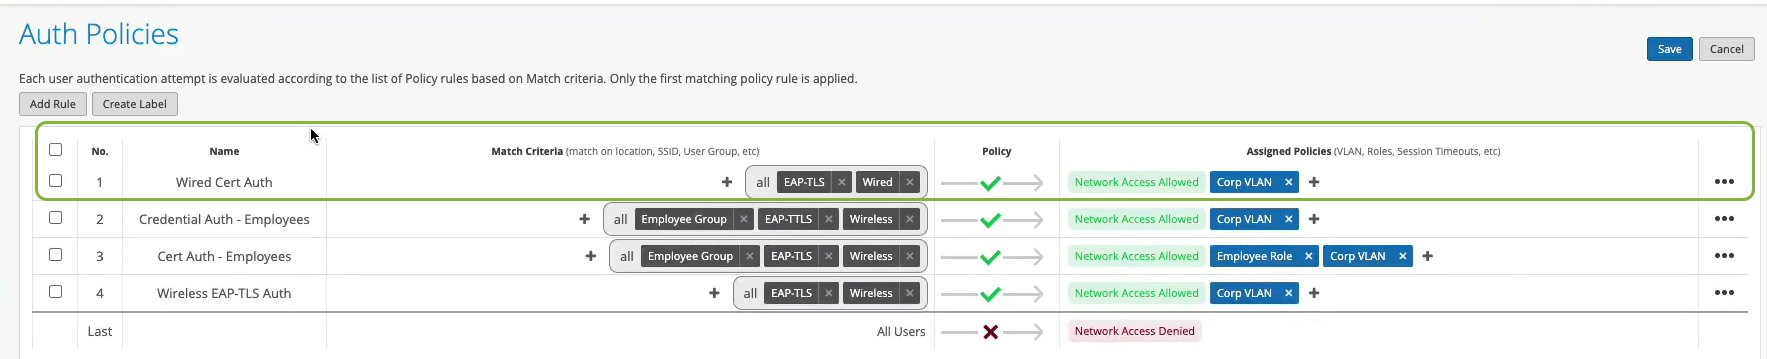 の認証ポリシーの作成
次の詳細を使用して認証ポリシーを定義します。
の認証ポリシーの作成
次の詳細を使用して認証ポリシーを定義します。- [Name]:ポリシーの名前を入力します(例:Wired Cert Auth)
- [一致条件(Match Criteria)]: [EAP-TLS と 有線(Wired)] を選択します。
- [ポリシー(Policy)]:[許可(Allowed)] を選択します
- ポリシー アクション - ネットワーク アクセスが許可されます
- 割り当てられた VLAN - Corp VLAN
- Juniper Mist ポータルの左側のメニューから、 [Organization > Access > Auth Policies](認証ポリシー) を選択します。
- LAN側でdot1.x以外のデバイスに認証を提供するには、新しいポリシーラベルを作成します。
- 「認証ポリシー」ページで、「ラベルの作成」を選択し、詳細を入力します。
図2:非Dot1xデバイス
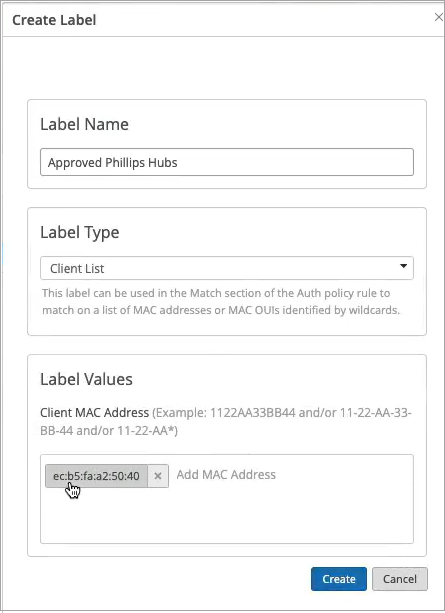 のラベル
それぞれのフィールドに次の情報を入力します。
のラベル
それぞれのフィールドに次の情報を入力します。- [ラベル名(Label Name)]:ラベル名を入力します(例:Approved Phillips Hubs)
- [ラベル タイプ(Label Type)]:タイプとして [クライアント リスト(Client List)] を選択します
- [ラベル値(Label Values)]:デバイスの MAC アドレスを入力します
- 「認証ポリシー」ページで、「ラベルの作成」を選択し、詳細を入力します。
- 新しい認証ポリシーを作成します。
- [ルールの追加] をクリックして、新しいルールを作成します。
このルールでは、dot1x 以外のデバイスに対して前の手順で作成したラベルを使用します。このルールでは、dot1x 以外のデバイスに対して前の手順で作成したラベルを使用します。図 3:非 Dot1X デバイスの認証ポリシー
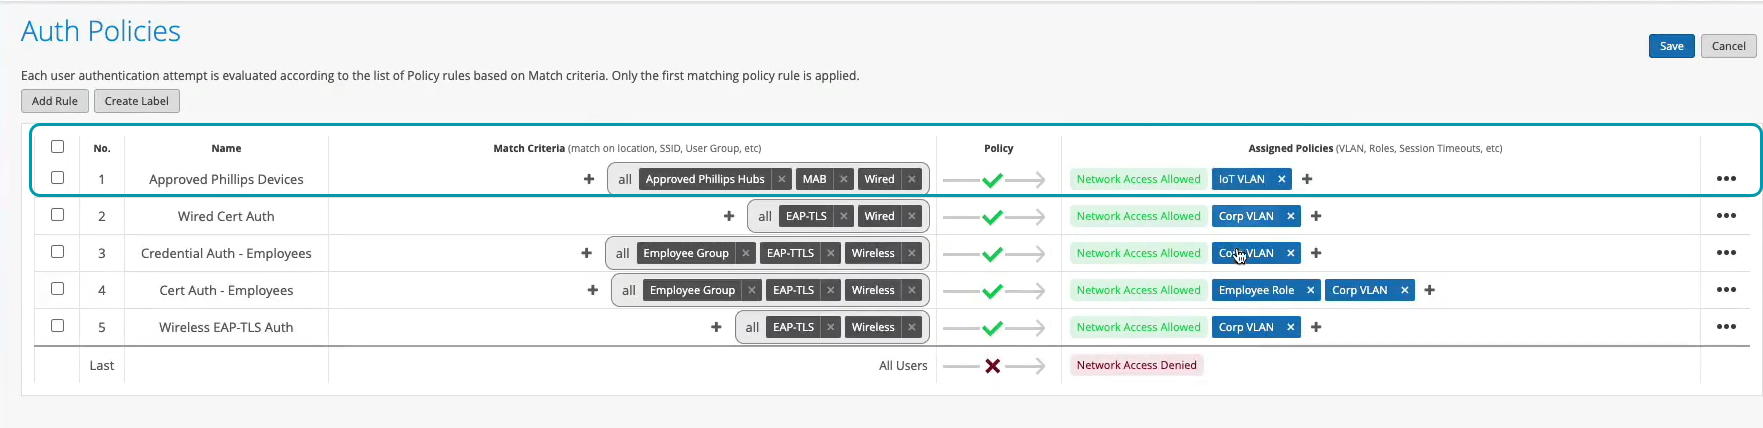 それぞれのフィールドに次の情報を入力します。
- [名前(Name)]: 名前を入力します。例: 承認された Phillips デバイス。
- 一致条件 - [Approved Phillips Hubs]、[ MAB(MAC Authentication Bypass)]、および [Wired] を選択します。
- [ポリシー(Policy)]:[ 許可(Allowed)] を選択します。
- ポリシー アクション - [ ネットワーク アクセスの許可(Network Access Allowed)] を選択します。
- [Assigned Policies]: [IoT VLAN] を選択します。
これで、dot1X以外のデバイスを認証するポリシーが作成されました。
- [ルールの追加] をクリックして、新しいルールを作成します。
- 認証を実行するようにスイッチを設定します。
- [Port Profile] セクションまで下にスクロールし、詳細を入力します。
図 4: ポート プロファイル オプション必要な情報を入力するか、次のフィールドで必要なオプションを選択します。
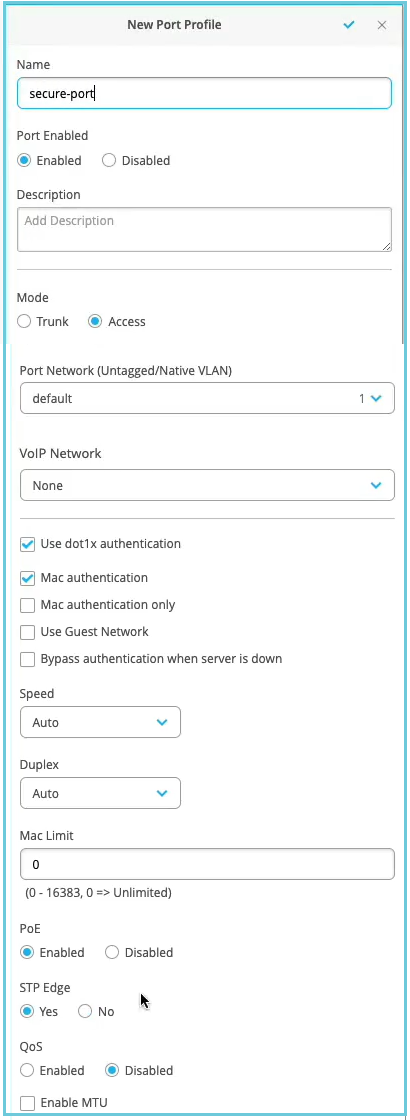
- [名前(Name)]:名前を入力します(例: secure-port)。
- [モード(Mode)]: [アクセス(Access)] を選択します。
- [ Use dot1x authentication ] オプションと [Use MAC authentication ] オプションを有効にします。クライアント デバイスが 802.1X をサポートしている場合、スイッチ ポートは 802.1X 認証を実行します。クライアント デバイスが 802.1X をサポートしていない場合、スイッチ ポートは MAC 認証を実行します。
- [STP エッジ(STP Edge)]:ポートをスパニング ツリー プロトコル(STP)エッジ ポートとして設定するには、[ はい(Yes)] を選択します。この設定により、ポートがエッジ ポートとして扱われるようになります。
この例では、残りのフィールドにデフォルト値を使用します。
- 接続された有線クライアントがネットワークアクセスを必要とするスイッチの各ポートにポートプロファイルを割り当てます。
[Select Switches Configuration] セクションの [Port Config] タブで、[ Add Port Range ] をクリックして、ポート プロファイルをポートに関連付けます。
図 5:スイッチ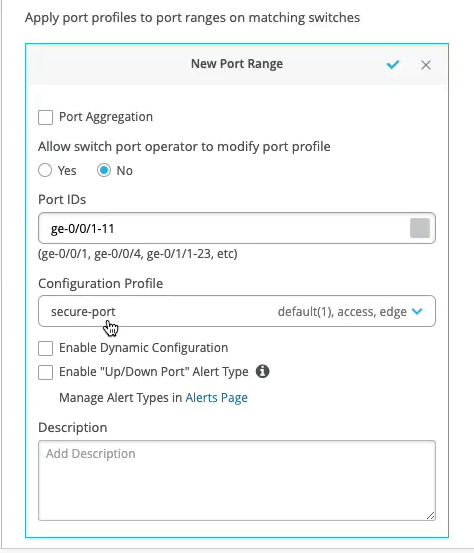 のポート範囲へのポート プロファイルの割り当て
ポート ID を入力し、前の手順で作成した構成プロファイルを選択します。
- [Port Profile] セクションまで下にスクロールし、詳細を入力します。
これで、ネットワークでクライアントを安全に認証する準備が整いました。Juniper Mistクラウドは、クライアント証明書を検証し、認証ポリシー構成に基づいてアクセスと許可を許可します。
関連付けられたクライアントは、Juniper Mist ポータルで確認できます。
- クライアントの詳細を表示するには 、[クライアント>有線クライアント] を選択します
- [Monitor > Service Levels > Insights ]を選択して、クライアントイベントを表示します。