
Google Workspace を ID プロバイダとして統合する
次の手順に従って、Google WorkspaceポータルにMistをクライアントとして追加し、証明書をダウンロードして、IDプロバイダーをジュニパーMist組織に追加します。
ジュニパー Mist Access Assurance を使用すると、ID プロバイダ(IdP)として Google Workspace と統合し、以下のユースケースでセキュアな Lightweight Directory Access Protocol over SSL(LDAPS)コネクタを活用できます。
- 証明書ベース(EAP-TLSまたはEAP-TTLS)認証の場合:
- このユーザーIDに基づく認証ポリシーをサポートするために、ユーザーグループのメンバーシップ情報を取得します
- ユーザーアカウントのステータス(アクティブまたは中断)を取得します
-
PAPを使用したEAP-TTLS
- GoogleのIDプロバイダによる認証のためにユーザー名とパスワードを確認します
このドキュメントに含まれるスクリーンショットの一部は、サードパーティのアプリケーションから取得したものです。これらのスクリーンショットは時間の経過とともに変更される可能性があり、アプリケーションの現在のバージョンと必ずしも一致するとは限らないことに注意してください。
Google Workspaceでの設定
次の手順は、ジュニパーMistを使用してGoogle WorkspaceをIDプロバイダ(IdP)として設定する方法を示しています。
サードパーティ製アプリケーションのスクリーンショットは、公開時点のものです。スクリーンショットがいつ、または将来正確になるかを知る方法はありません。これらの画面の変更や関連するワークフローのガイダンスについては、サードパーティーのWebサイトを参照してください。
- LDAPクライアントを作成します。
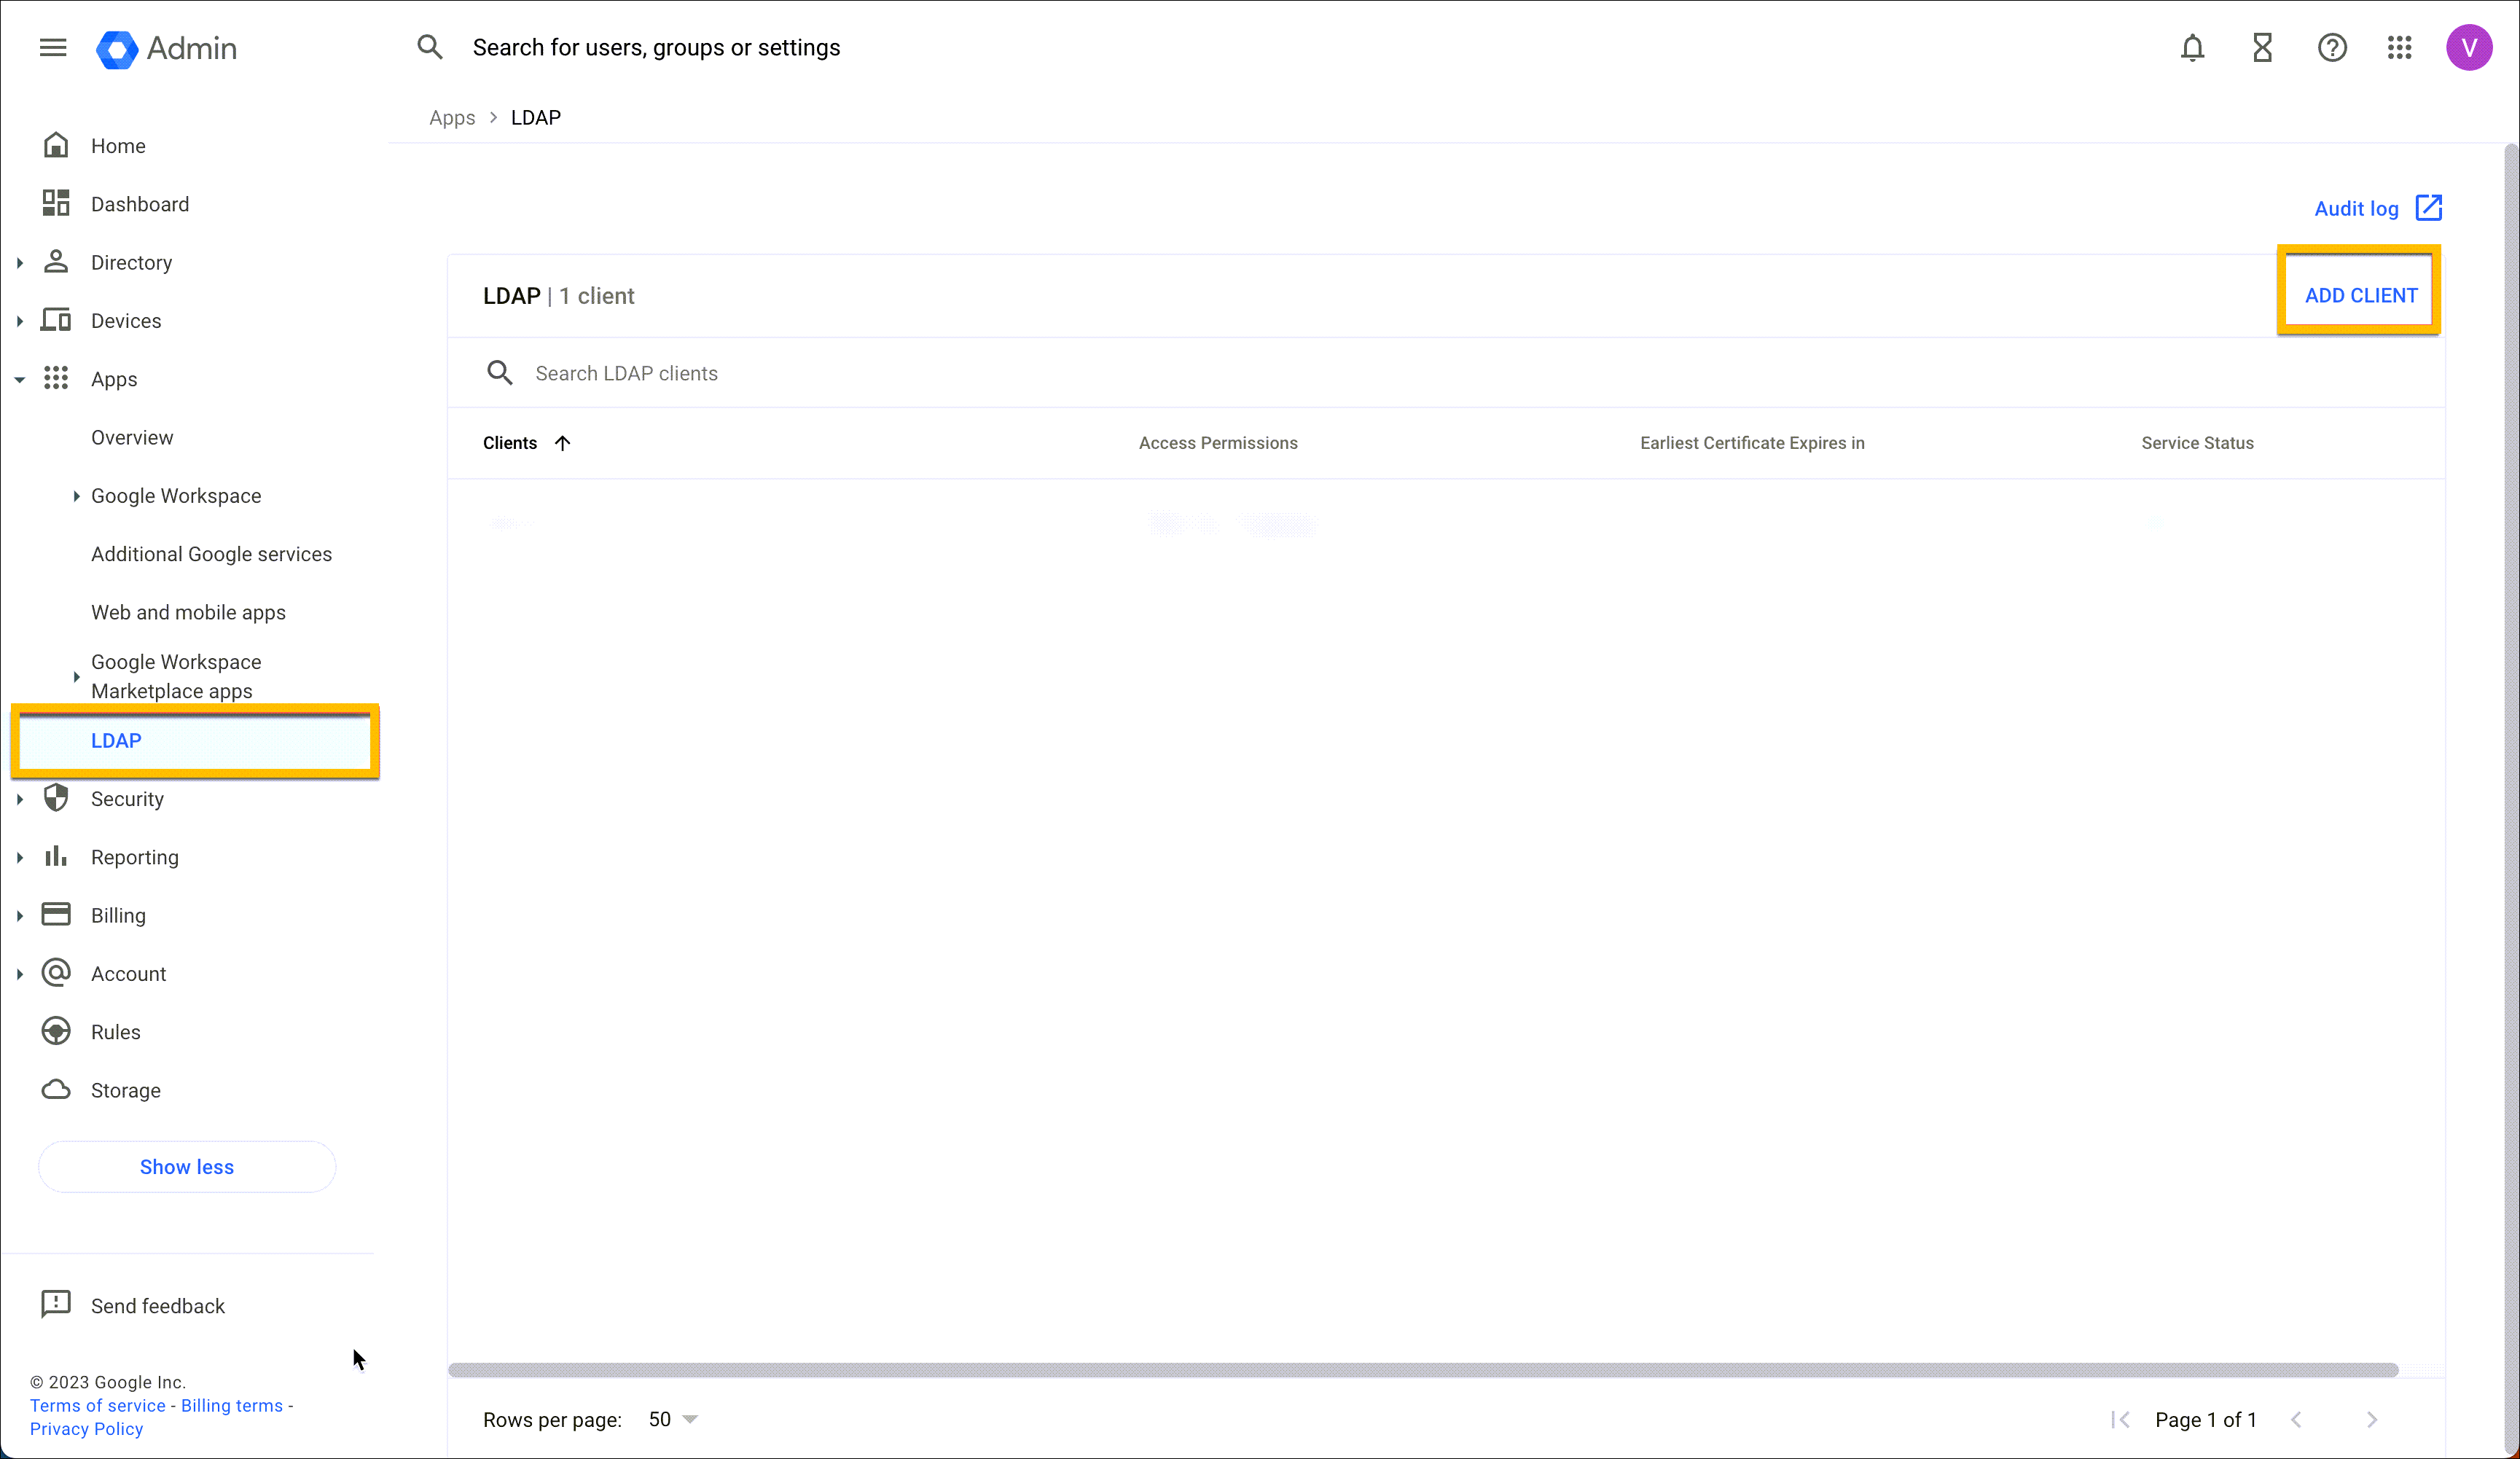
- Google 管理コンソールの左側のナビゲーション バーで [ アプリ] > [LDAP ] に移動し、[ クライアントを追加] をクリックします。
- LDAPクライアント名とオプションの説明を入力し、続行をクリックします。
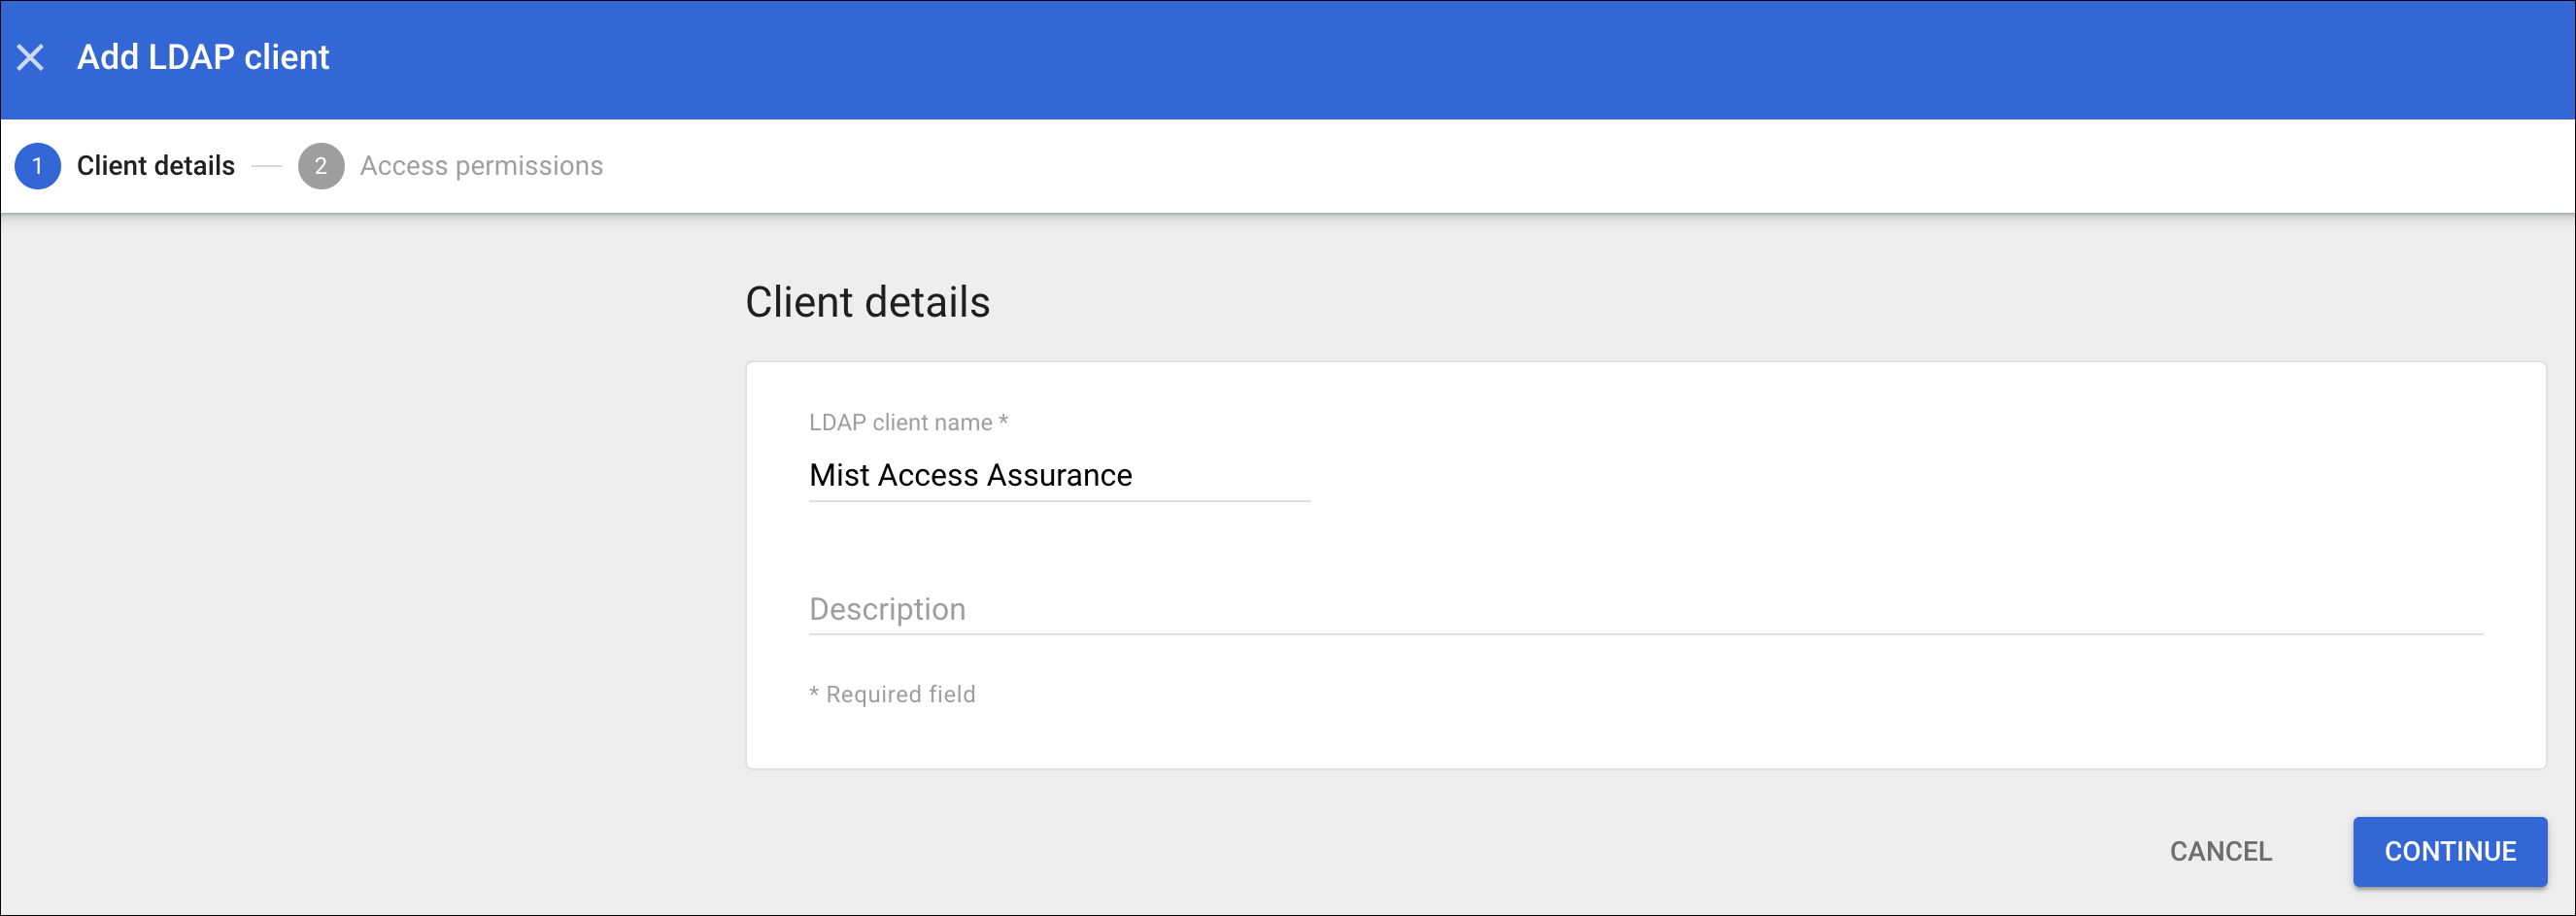
LDAPクライアントを追加すると、 アクセス許可 ページが表示されます。
- Google 管理コンソールの左側のナビゲーション バーで [ アプリ] > [LDAP ] に移動し、[ クライアントを追加] をクリックします。
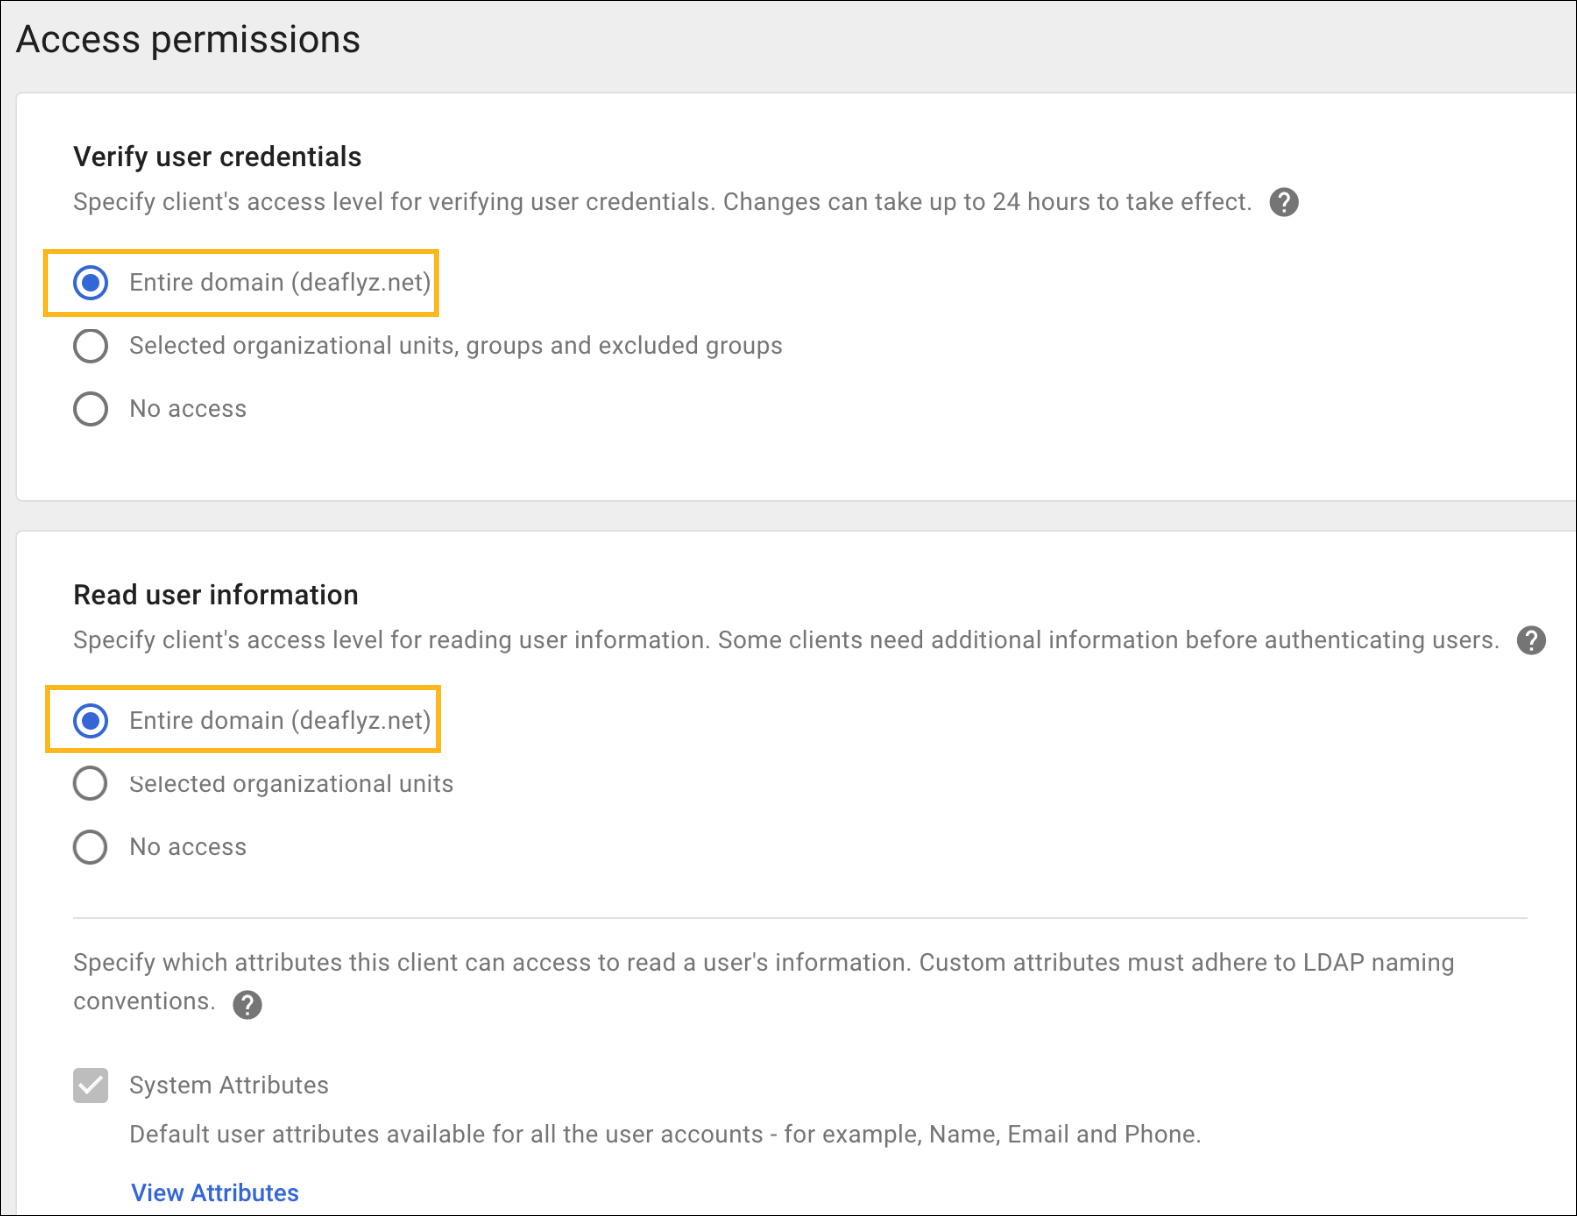
- ユーザーの資格情報を検証するためのアクセス許可を設定します。
以下のオプションがあります。
- ユーザー資格情報の検証—EAP-TTLS/PAPを使用したユーザー資格認証を許可します。この設定は、LDAPクライアントがユーザーの認証情報を検証するためにアクセスできる組織グループを指定します。
- ユーザー情報の読み取り—基本的なユーザー情報を読み取ることができます。この設定では、LDAPクライアントが追加のユーザー情報を取得するためにアクセスできる組織部門とグループを指定します。
- 特定の組織が必要ない場合は、両方のオプションで ドメイン全体を選択します 。
- グループ情報を読み取るまで下にスクロールします。この設定は、LDAPクライアントがグループの詳細を読み取り、ユーザーのグループメンバーシップを確認できるかどうかを指定します。
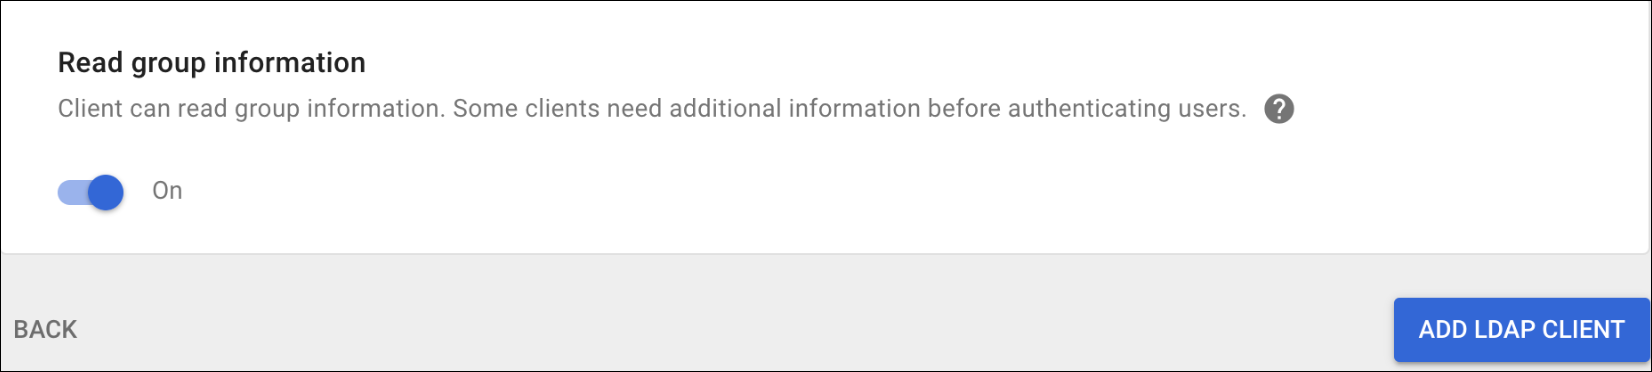
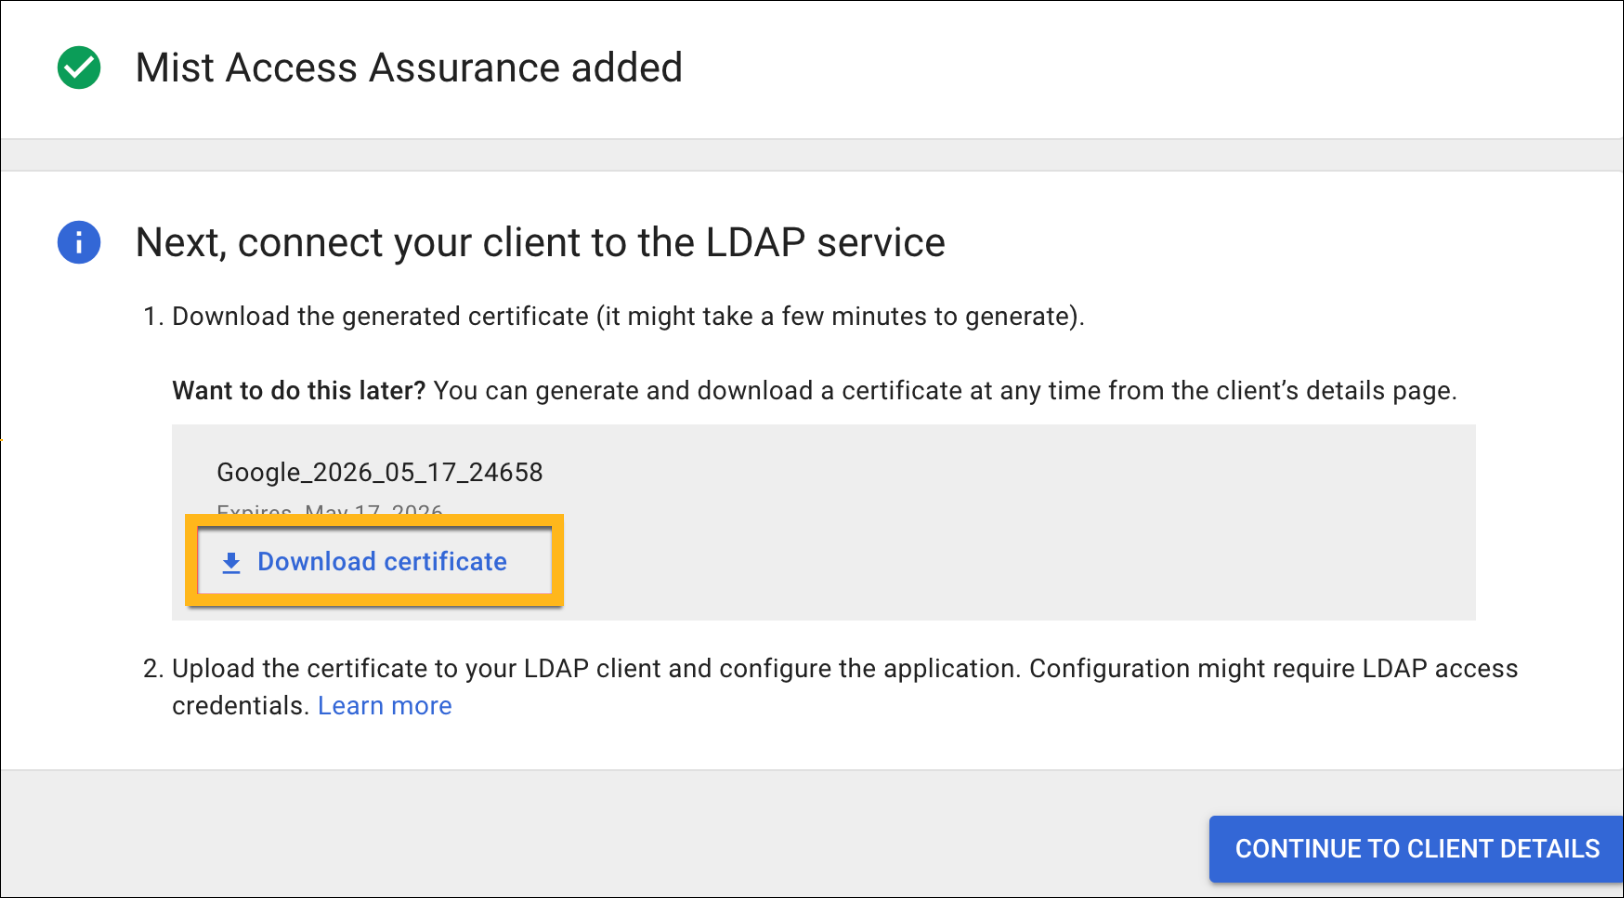
アクセス許可の設定とLDAPクライアントの追加が完了すると、同じページに証明書が自動的に生成されます。
- 生成されたLDAPSクライアント証明書をダウンロードします。
- 証明書のダウンロードをクリックし、ダウンロードした証明書を安全な場所に保存します。この証明書は、ジュニパー MistポータルでIdPを設定するときに必要になります。
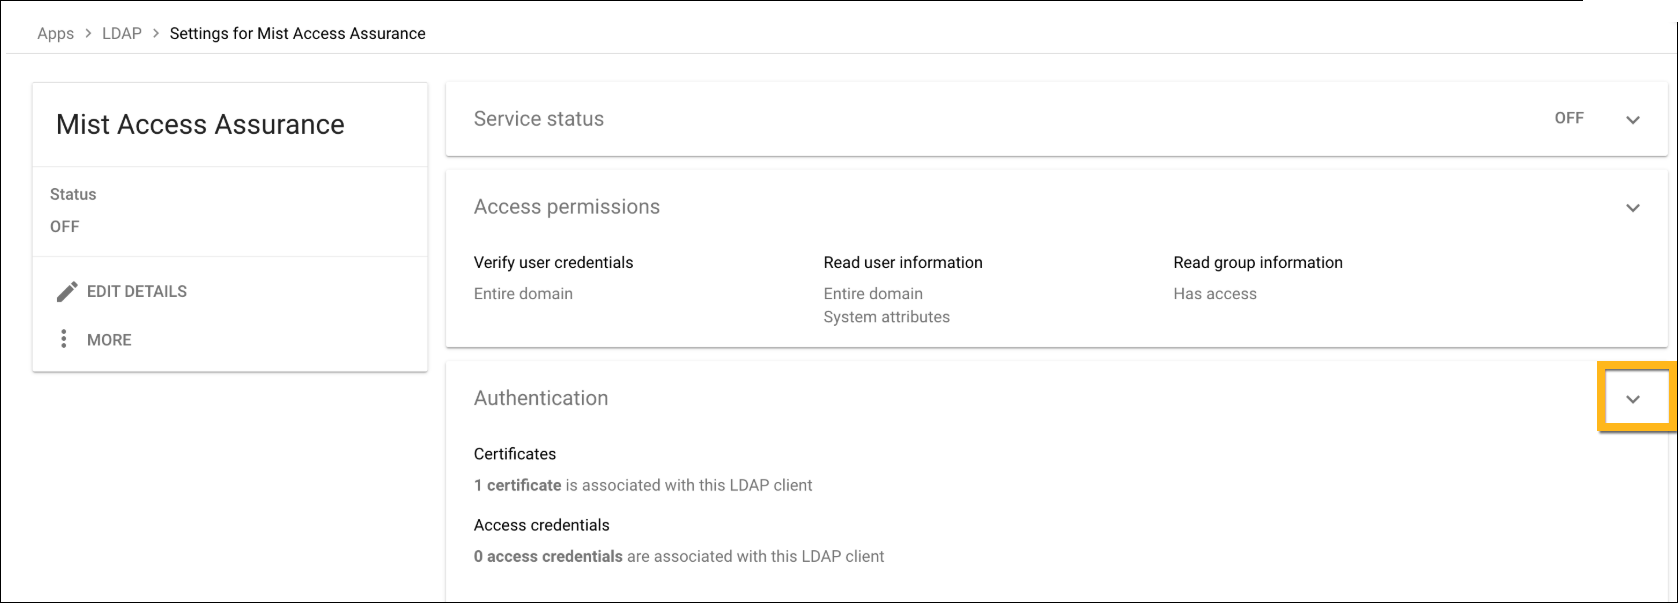
- 認証セクションを展開します。
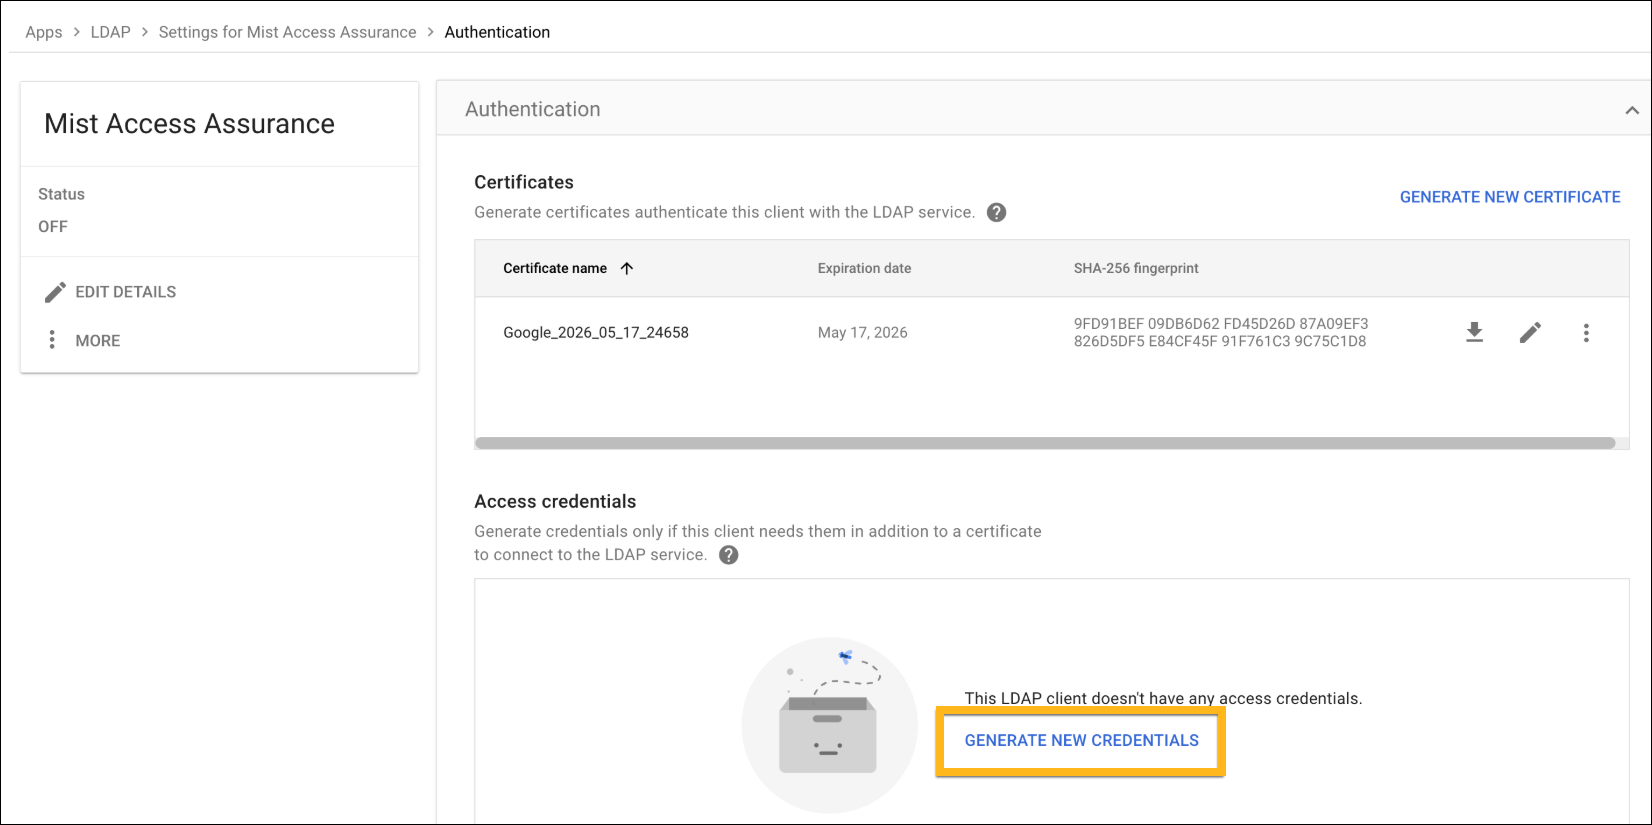
- アクセス資格情報で、新しい資格情報を生成をクリックします。
ユーザー名とパスワードは、 アクセス資格情報 ページで確認できます。
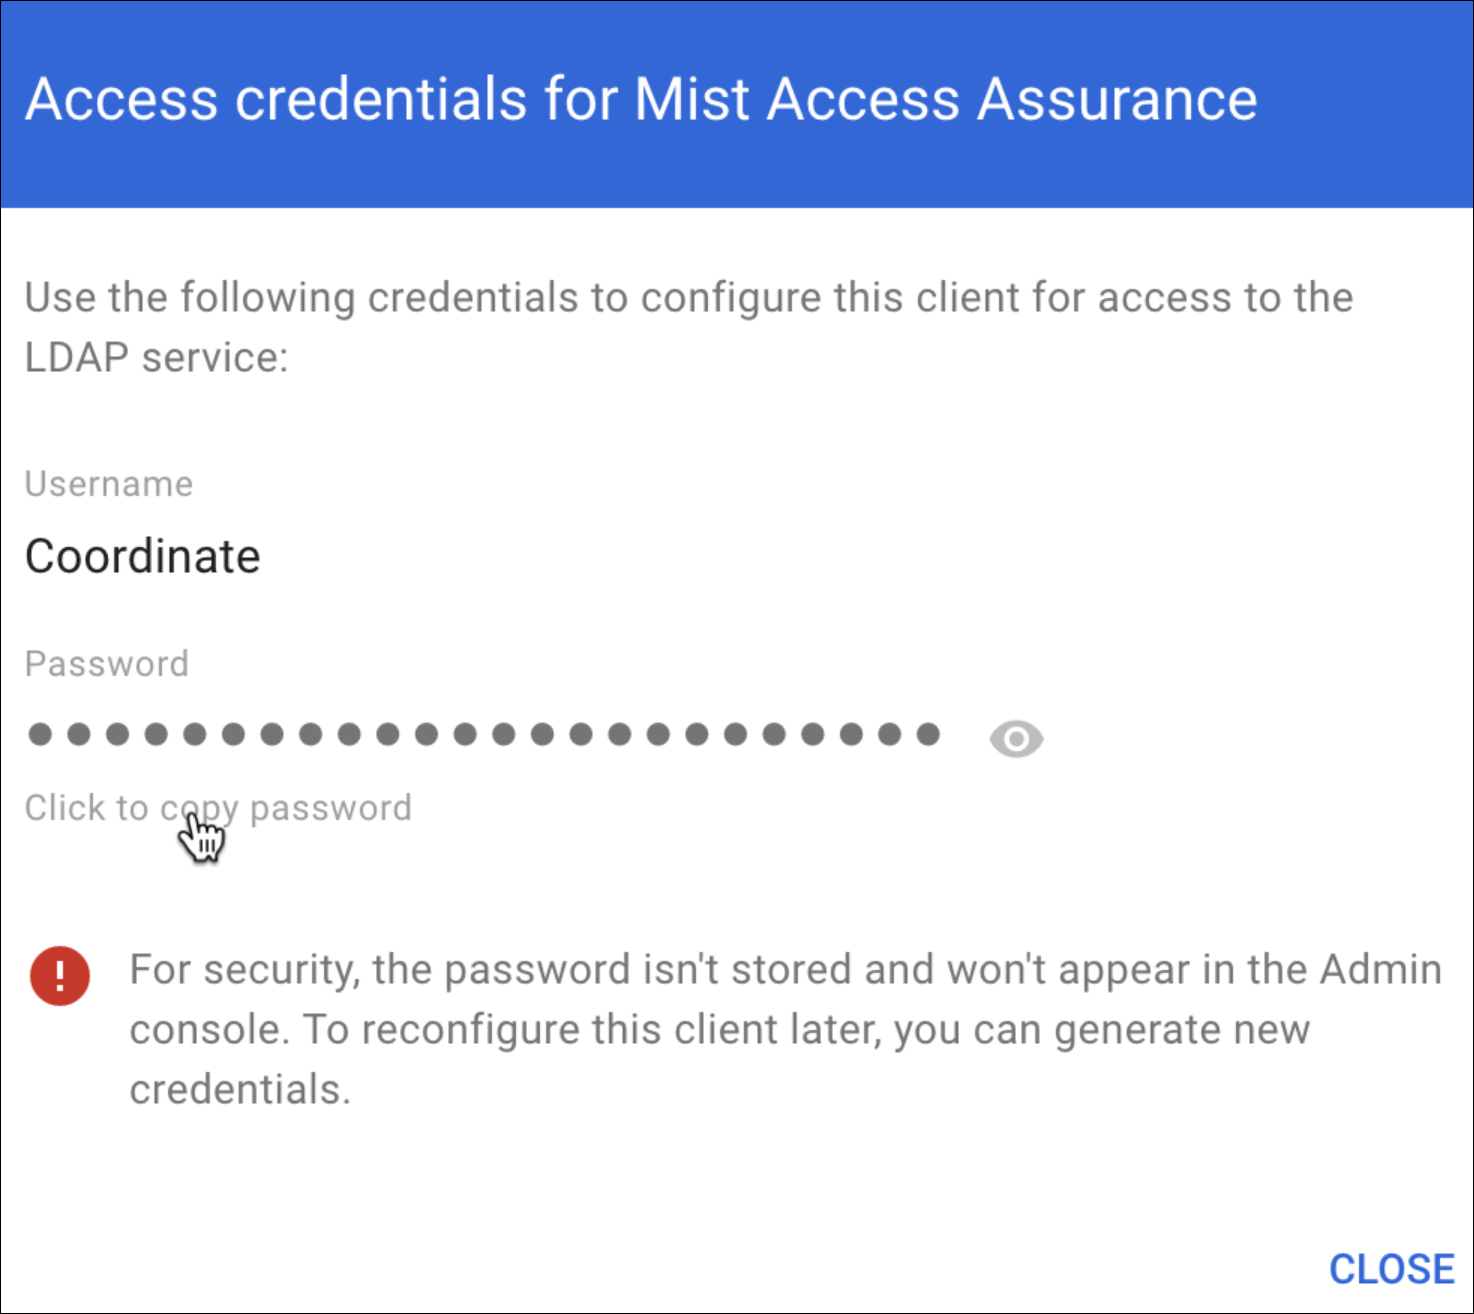
ユーザー名とパスワードをコピーして保存します。ジュニパーMistクラウドポータルのLDAPSクライアント設定には、これらの詳細が必要です。
- 証明書のダウンロードをクリックし、ダウンロードした証明書を安全な場所に保存します。この証明書は、ジュニパー MistポータルでIdPを設定するときに必要になります。
- LDAPクライアントのサービスステータスを オン に変更して、LDAPクライアントサービスを有効にします。この手順により、セキュアLDAPサービスを使用してクライアントをセットアップできます。
- Google 管理コンソールから [ アプリ] > [LDAP] に移動します。クライアントを選択し、 サービスステータスをクリックします。
ページ右上に表示されるサービスステータスは、最初は OFFに設定されています。
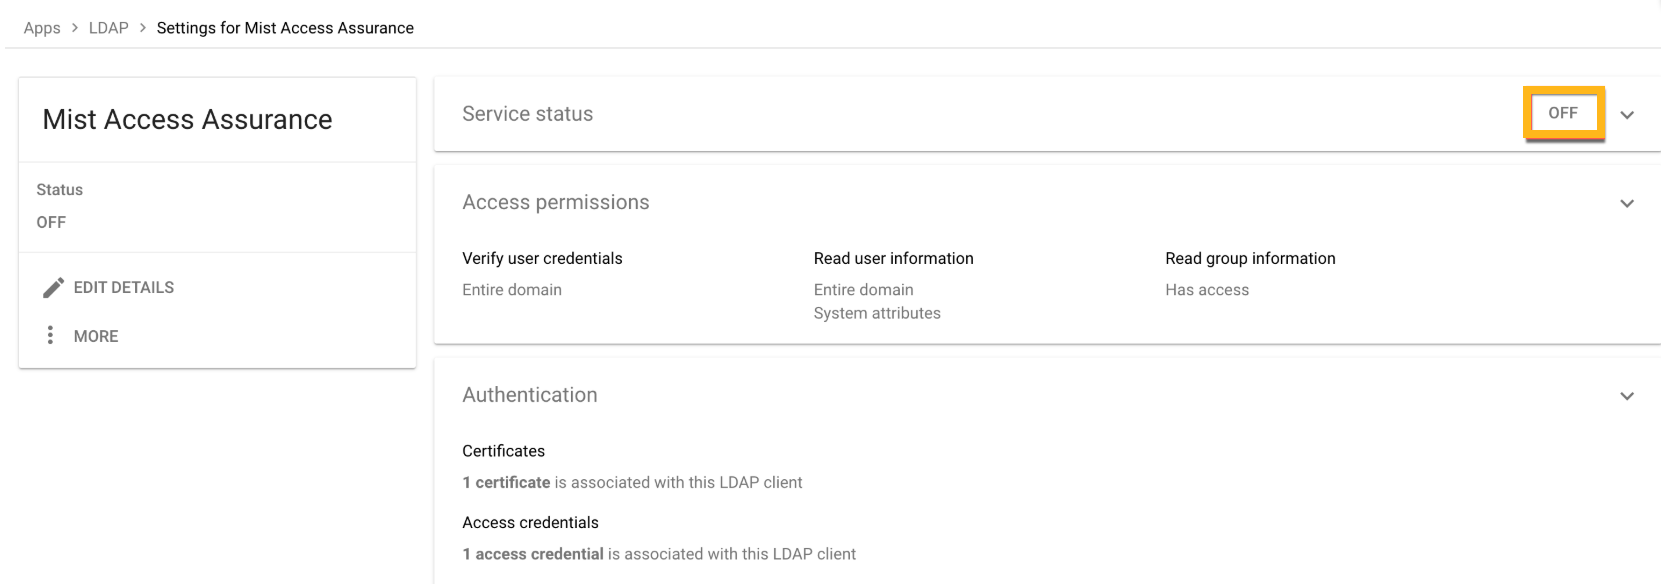
[ すべてのユーザーにオン] を選択して、サービスをオンにします。変更がGoogle側に適用されるまでしばらくお待ちください。
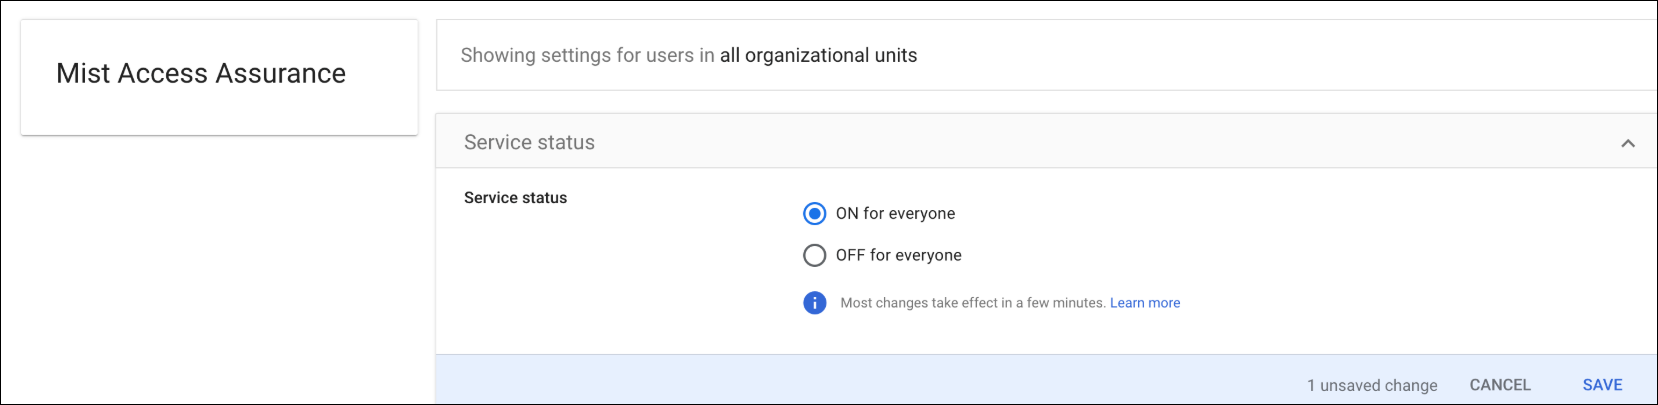
- Google 管理コンソールから [ アプリ] > [LDAP] に移動します。クライアントを選択し、 サービスステータスをクリックします。
Juniper Mistダッシュボード上の設定
- ジュニパー Mistポータルの左側のメニューから、組織>アクセス>IDプロバイダーを選択します。
IDプロバイダーページには、設定されているIDプロバイダーが表示されます。
図1:IDプロバイダーページ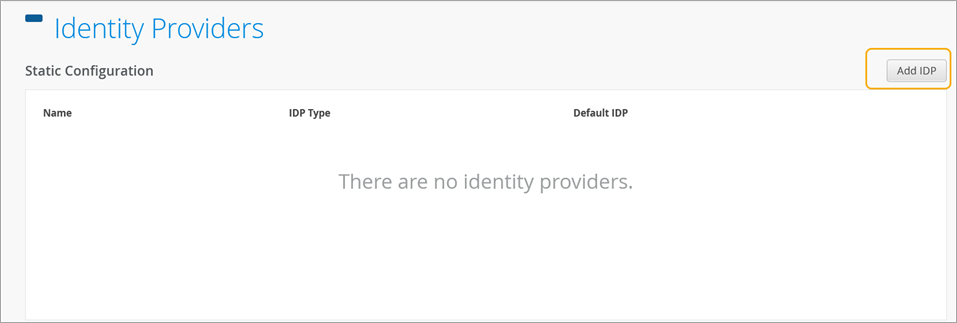
- 新しいIDプロバイダーページで、Google Workspaceと統合するために必要な情報を入力します。
図2:IDプロバイダーの詳細を更新する
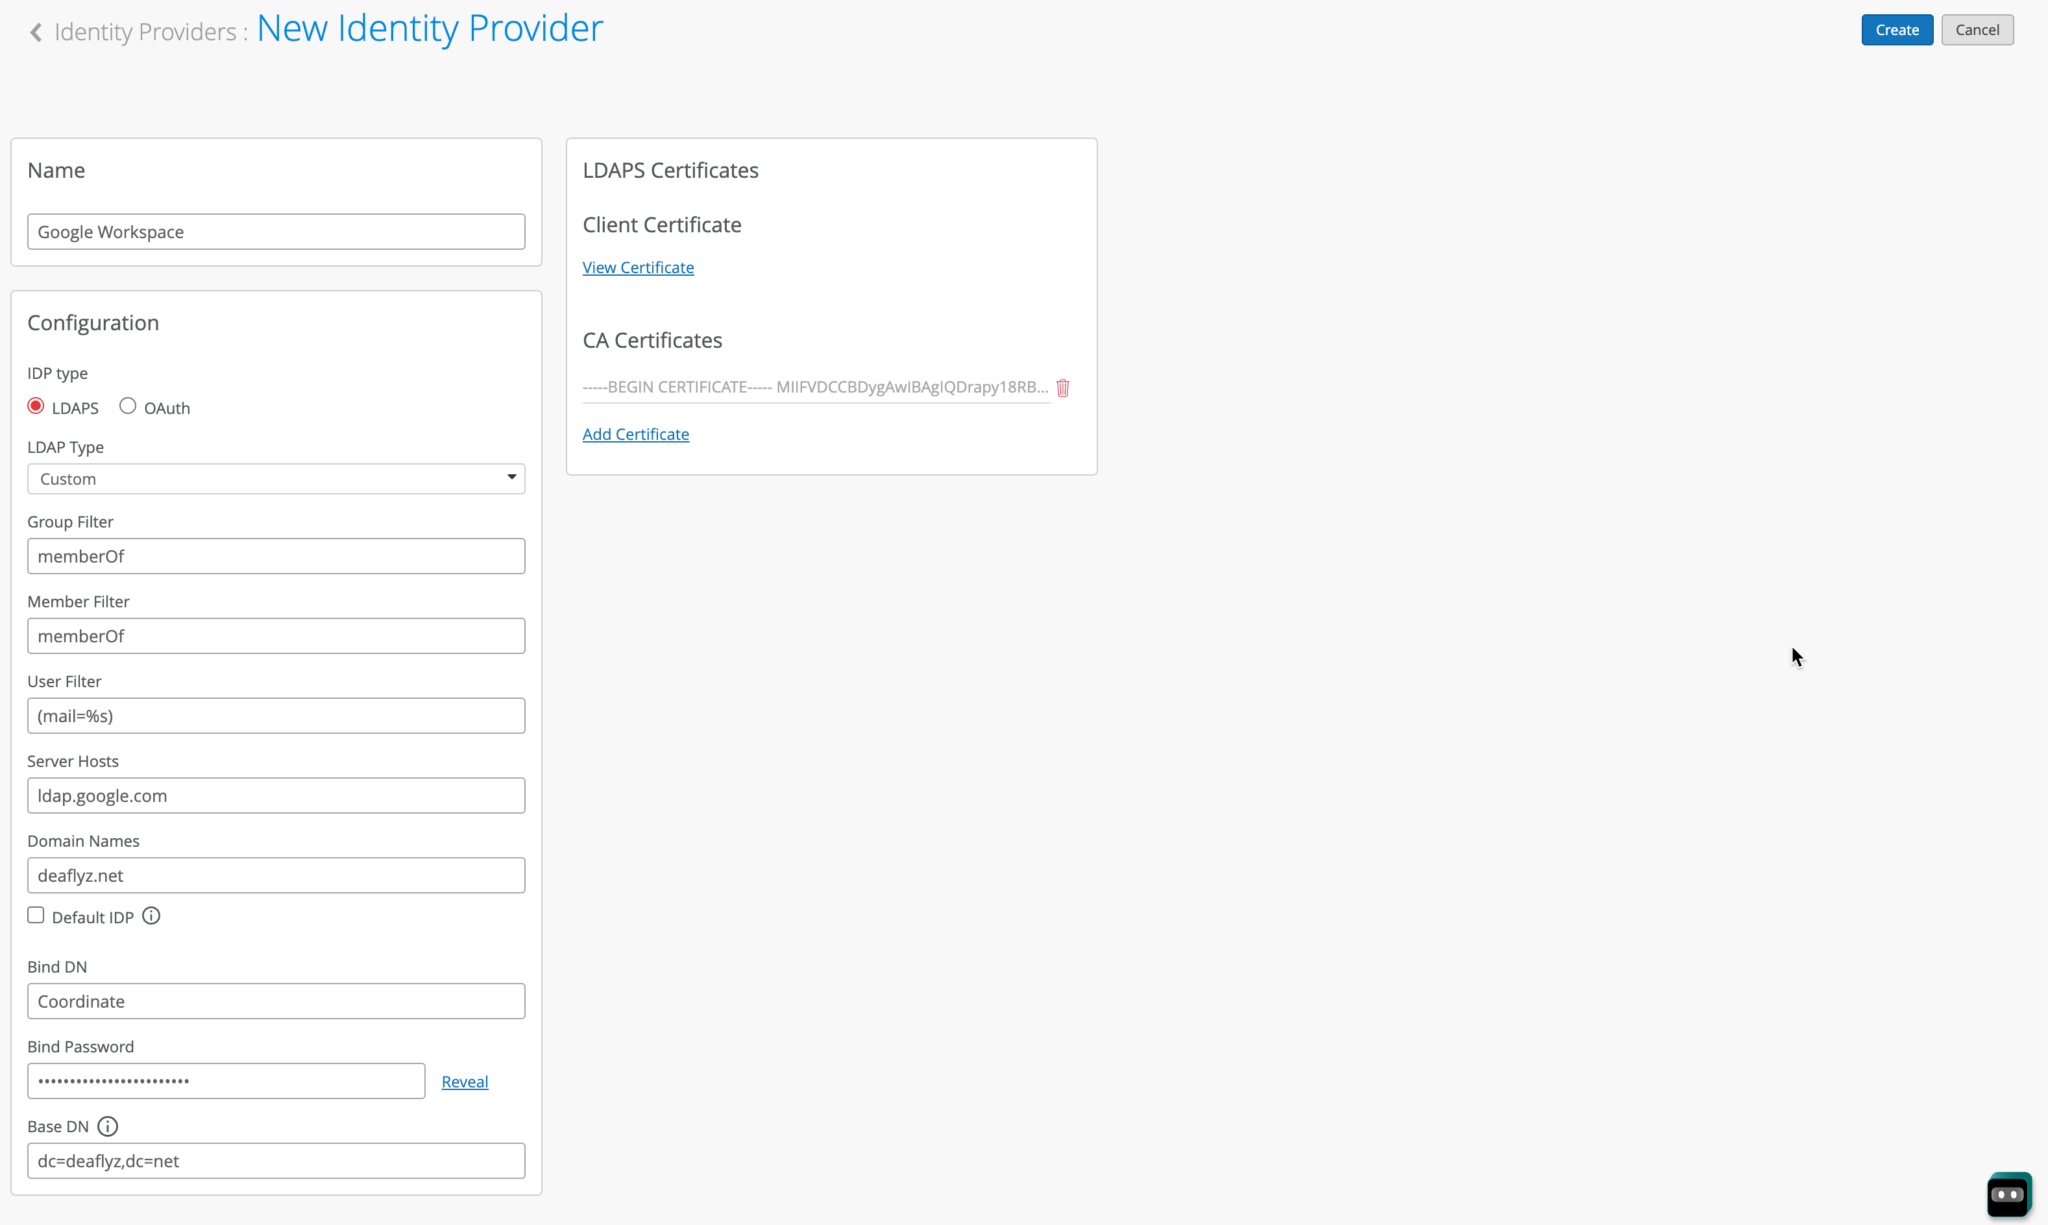
次に、Google Workspace LDAP エンドポイントと統合するように LDAPS コネクタを構成します。
- 名前—IdP名を入力します。(この例では、 Google Workspaceと入力します。)
- IDPタイプ— LDAPSを選択します。
- LDAPタイプ— カスタムを選択します。
- グループフィルター— memberOfを選択します。このオプションは、 グループ属性からグループメンバーシップを取得するために必要です。
- メンバーフィルター— memberOfを選択します。
- ユーザーフィルター— (mail=%s)を入力します。
- サーバーホスト— ldap.google.comを入力します。
- ドメイン名—Google Workspaceドメイン名を入力します。例: abc.com。
- DNのバインド—前のステップでGoogleから提供されたユーザー名を使用します。
- バインドパスワード—上記のユーザー名のパスワードを入力します。
- ベースDN—Google Workspaceドメインに一致するベースDNを設定します。たとえば、ドメインが abc.com の場合、ベースDNは dc=abc,dc=comです。
- CA証明書セクションで、 証明書を追加 をクリックし、次の2つの証明書を貼り付けます。
図3:証明書
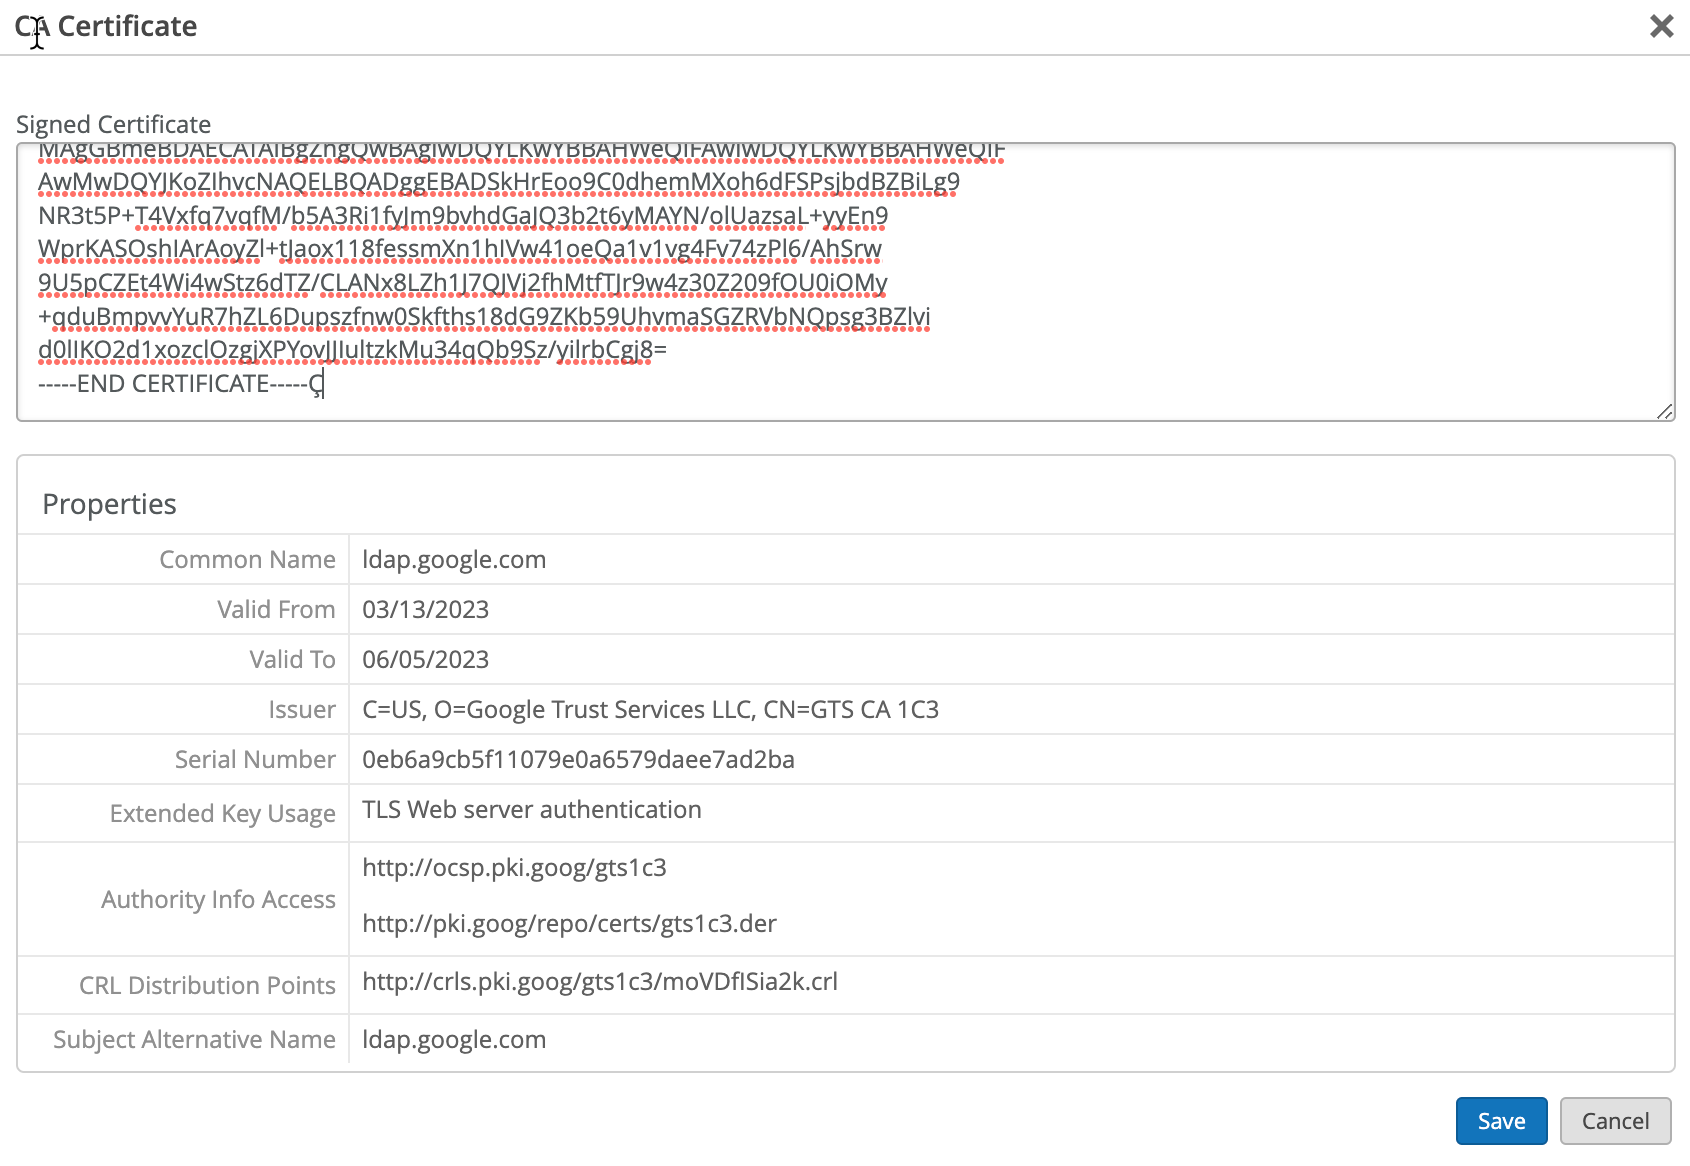 CAを追加する
-----BEGIN CERTIFICATE-----
MIIFljCCA36gAwIBAgINAgO8U1lrNMcY9QFQZjANBgkqhkiG9w0BAQsFADBHMQsw
CQYDVQQGEwJVUzEiMCAGA1UEChMZR29vZ2xlIFRydXN0IFNlcnZpY2VzIExMQzEU
MBIGA1UEAxMLR1RTIFJvb3QgUjEwHhcNMjAwODEzMDAwMDQyWhcNMjcwOTMwMDAw
MDQyWjBGMQswCQYDVQQGEwJVUzEiMCAGA1UEChMZR29vZ2xlIFRydXN0IFNlcnZp
Y2VzIExMQzETMBEGA1UEAxMKR1RTIENBIDFDMzCCASIwDQYJKoZIhvcNAQEBBQAD
ggEPADCCAQoCggEBAPWI3+dijB43+DdCkH9sh9D7ZYIl/ejLa6T/belaI+KZ9hzp
kgOZE3wJCor6QtZeViSqejOEH9Hpabu5dOxXTGZok3c3VVP+ORBNtzS7XyV3NzsX
lOo85Z3VvMO0Q+sup0fvsEQRY9i0QYXdQTBIkxu/t/bgRQIh4JZCF8/ZK2VWNAcm
BA2o/X3KLu/qSHw3TT8An4Pf73WELnlXXPxXbhqW//yMmqaZviXZf5YsBvcRKgKA
gOtjGDxQSYflispfGStZloEAoPtR28p3CwvJlk/vcEnHXG0g/Zm0tOLKLnf9LdwL
tmsTDIwZKxeWmLnwi/agJ7u2441Rj72ux5uxiZ0CAwEAAaOCAYAwggF8MA4GA1Ud
DwEB/wQEAwIBhjAdBgNVHSUEFjAUBggrBgEFBQcDAQYIKwYBBQUHAwIwEgYDVR0T
AQH/BAgwBgEB/wIBADAdBgNVHQ4EFgQUinR/r4XN7pXNPZzQ4kYU83E1HScwHwYD
VR0jBBgwFoAU5K8rJnEaK0gnhS9SZizv8IkTcT4waAYIKwYBBQUHAQEEXDBaMCYG
CCsGAQUFBzABhhpodHRwOi8vb2NzcC5wa2kuZ29vZy9ndHNyMTAwBggrBgEFBQcw
AoYkaHR0cDovL3BraS5nb29nL3JlcG8vY2VydHMvZ3RzcjEuZGVyMDQGA1UdHwQt
MCswKaAnoCWGI2h0dHA6Ly9jcmwucGtpLmdvb2cvZ3RzcjEvZ3RzcjEuY3JsMFcG
A1UdIARQME4wOAYKKwYBBAHWeQIFAzAqMCgGCCsGAQUFBwIBFhxodHRwczovL3Br
aS5nb29nL3JlcG9zaXRvcnkvMAgGBmeBDAECATAIBgZngQwBAgIwDQYJKoZIhvcN
AQELBQADggIBAIl9rCBcDDy+mqhXlRu0rvqrpXJxtDaV/d9AEQNMwkYUuxQkq/BQ
cSLbrcRuf8/xam/IgxvYzolfh2yHuKkMo5uhYpSTld9brmYZCwKWnvy15xBpPnrL
RklfRuFBsdeYTWU0AIAaP0+fbH9JAIFTQaSSIYKCGvGjRFsqUBITTcFTNvNCCK9U
+o53UxtkOCcXCb1YyRt8OS1b887U7ZfbFAO/CVMkH8IMBHmYJvJh8VNS/UKMG2Yr
PxWhu//2m+OBmgEGcYk1KCTd4b3rGS3hSMs9WYNRtHTGnXzGsYZbr8w0xNPM1IER
lQCh9BIiAfq0g3GvjLeMcySsN1PCAJA/Ef5c7TaUEDu9Ka7ixzpiO2xj2YC/WXGs
Yye5TBeg2vZzFb8q3o/zpWwygTMD0IZRcZk0upONXbVRWPeyk+gB9lm+cZv9TSjO
z23HFtz30dZGm6fKa+l3D/2gthsjgx0QGtkJAITgRNOidSOzNIb2ILCkXhAd4FJG
AJ2xDx8hcFH1mt0G/FX0Kw4zd8NLQsLxdxP8c4CU6x+7Nz/OAipmsHMdMqUybDKw
juDEI/9bfU1lcKwrmz3O2+BtjjKAvpafkmO8l7tdufThcV4q5O8DIrGKZTqPwJNl
1IXNDw9bg1kWRxYtnCQ6yICmJhSFm/Y3m6xv+cXDBlHz4n/FsRC6UfTd
-----END CERTIFICATE-----
-----BEGIN CERTIFICATE-----
MIIFYjCCBEqgAwIBAgIQd70NbNs2+RrqIQ/E8FjTDTANBgkqhkiG9w0BAQsFADBX
MQswCQYDVQQGEwJCRTEZMBcGA1UEChMQR2xvYmFsU2lnbiBudi1zYTEQMA4GA1UE
CxMHUm9vdCBDQTEbMBkGA1UEAxMSR2xvYmFsU2lnbiBSb290IENBMB4XDTIwMDYx
OTAwMDA0MloXDTI4MDEyODAwMDA0MlowRzELMAkGA1UEBhMCVVMxIjAgBgNVBAoT
GUdvb2dsZSBUcnVzdCBTZXJ2aWNlcyBMTEMxFDASBgNVBAMTC0dUUyBSb290IFIx
MIICIjANBgkqhkiG9w0BAQEFAAOCAg8AMIICCgKCAgEAthECix7joXebO9y/lD63
ladAPKH9gvl9MgaCcfb2jH/76Nu8ai6Xl6OMS/kr9rH5zoQdsfnFl97vufKj6bwS
iV6nqlKr+CMny6SxnGPb15l+8Ape62im9MZaRw1NEDPjTrETo8gYbEvs/AmQ351k
KSUjB6G00j0uYODP0gmHu81I8E3CwnqIiru6z1kZ1q+PsAewnjHxgsHA3y6mbWwZ
DrXYfiYaRQM9sHmklCitD38m5agI/pboPGiUU+6DOogrFZYJsuB6jC511pzrp1Zk
j5ZPaK49l8KEj8C8QMALXL32h7M1bKwYUH+E4EzNktMg6TO8UpmvMrUpsyUqtEj5
cuHKZPfmghCN6J3Cioj6OGaK/GP5Afl4/Xtcd/p2h/rs37EOeZVXtL0m79YB0esW
CruOC7XFxYpVq9Os6pFLKcwZpDIlTirxZUTQAs6qzkm06p98g7BAe+dDq6dso499
iYH6TKX/1Y7DzkvgtdizjkXPdsDtQCv9Uw+wp9U7DbGKogPeMa3Md+pvez7W35Ei
Eua++tgy/BBjFFFy3l3WFpO9KWgz7zpm7AeKJt8T11dleCfeXkkUAKIAf5qoIbap
sZWwpbkNFhHax2xIPEDgfg1azVY80ZcFuctL7TlLnMQ/0lUTbiSw1nH69MG6zO0b
9f6BQdgAmD06yK56mDcYBZUCAwEAAaOCATgwggE0MA4GA1UdDwEB/wQEAwIBhjAP
BgNVHRMBAf8EBTADAQH/MB0GA1UdDgQWBBTkrysmcRorSCeFL1JmLO/wiRNxPjAf
BgNVHSMEGDAWgBRge2YaRQ2XyolQL30EzTSo//z9SzBgBggrBgEFBQcBAQRUMFIw
JQYIKwYBBQUHMAGGGWh0dHA6Ly9vY3NwLnBraS5nb29nL2dzcjEwKQYIKwYBBQUH
MAKGHWh0dHA6Ly9wa2kuZ29vZy9nc3IxL2dzcjEuY3J0MDIGA1UdHwQrMCkwJ6Al
oCOGIWh0dHA6Ly9jcmwucGtpLmdvb2cvZ3NyMS9nc3IxLmNybDA7BgNVHSAENDAy
MAgGBmeBDAECATAIBgZngQwBAgIwDQYLKwYBBAHWeQIFAwIwDQYLKwYBBAHWeQIF
AwMwDQYJKoZIhvcNAQELBQADggEBADSkHrEoo9C0dhemMXoh6dFSPsjbdBZBiLg9
NR3t5P+T4Vxfq7vqfM/b5A3Ri1fyJm9bvhdGaJQ3b2t6yMAYN/olUazsaL+yyEn9
WprKASOshIArAoyZl+tJaox118fessmXn1hIVw41oeQa1v1vg4Fv74zPl6/AhSrw
9U5pCZEt4Wi4wStz6dTZ/CLANx8LZh1J7QJVj2fhMtfTJr9w4z30Z209fOU0iOMy
+qduBmpvvYuR7hZL6Dupszfnw0Skfths18dG9ZKb59UhvmaSGZRVbNQpsg3BZlvi
d0lIKO2d1xozclOzgjXPYovJJIultzkMu34qQb9Sz/yilrbCgj8=
-----END CERTIFICATE-----
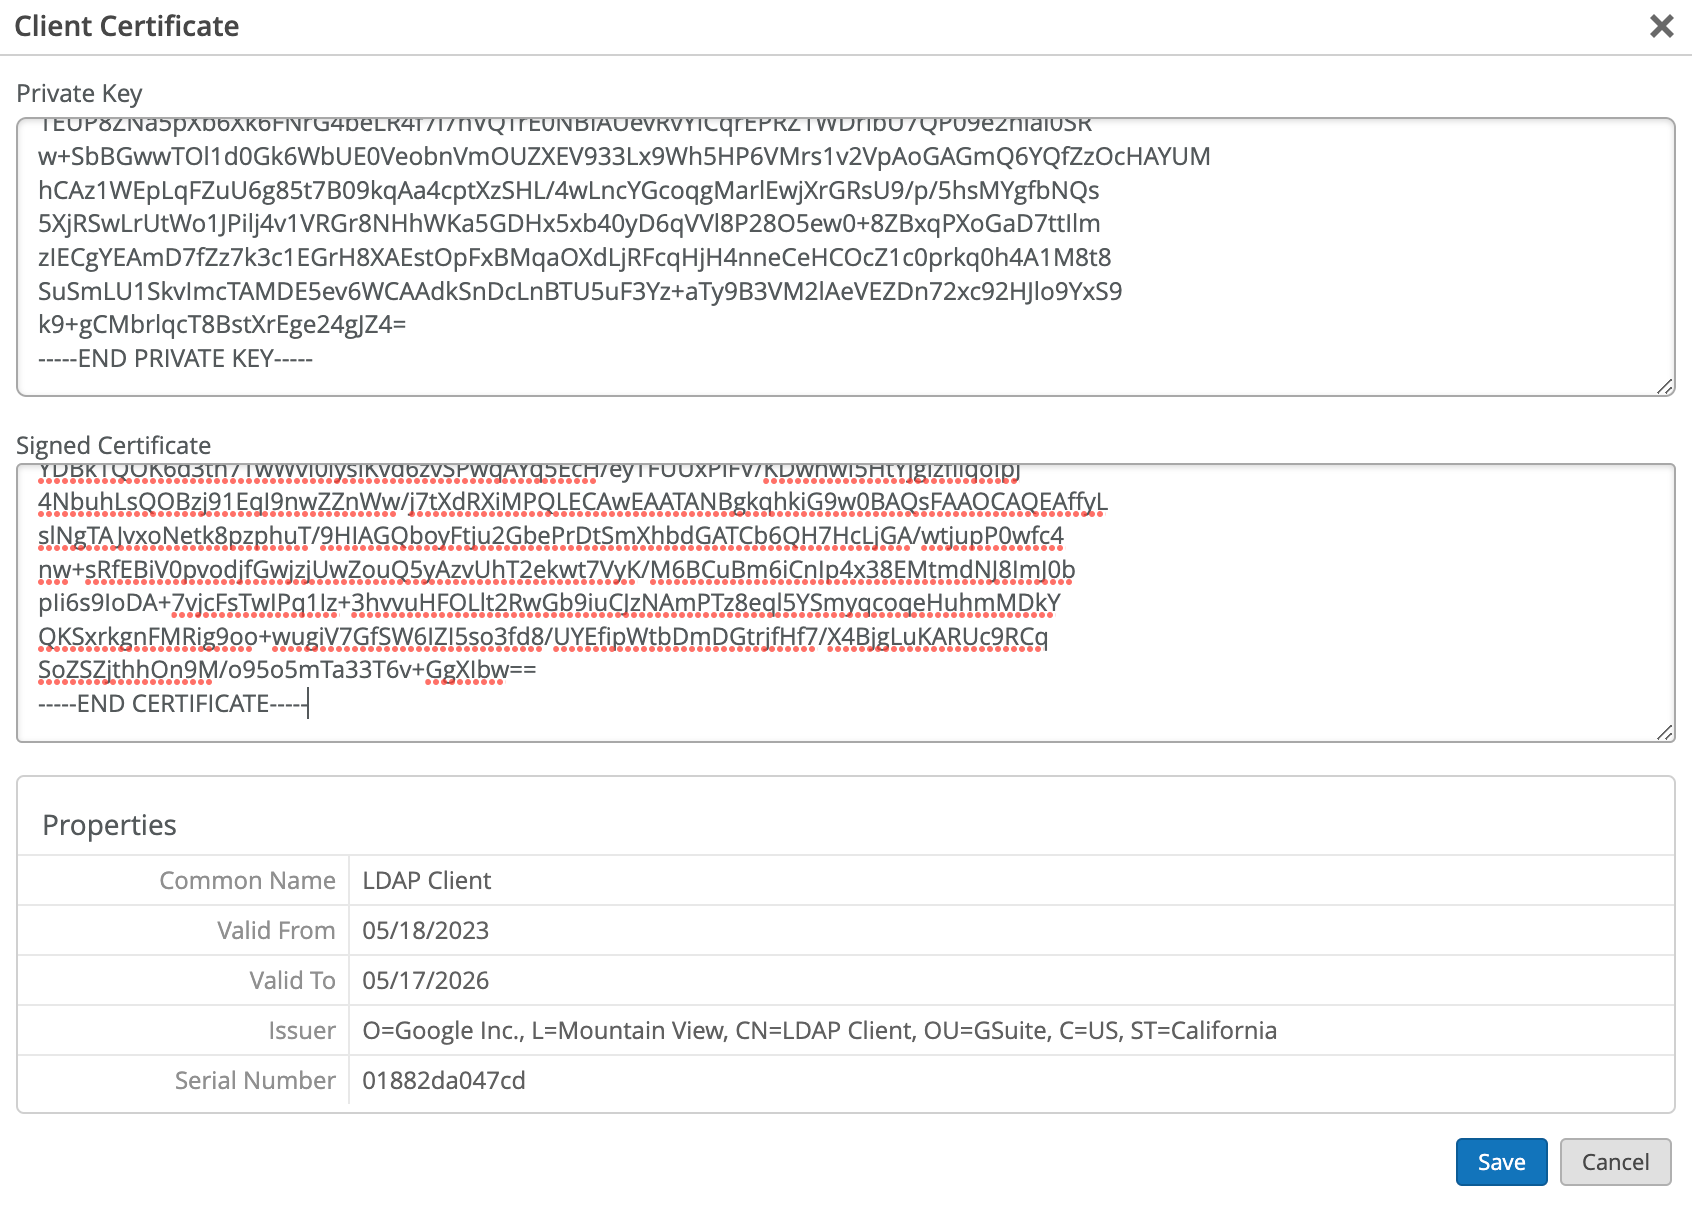
- [クライアント証明書]で、Googleからダウンロードしたクライアント証明書を追加します。次の例に示すように、.keyで終わるファイルをプライベートキーに、.crtで終わるファイルを署名付き証明書の下に配置します。
図4:クライアント証明書の追加
「保存」をクリックします。
ジュニパー Mistポータルで、 > インサイト > クライアントイベントの監視に移動します。
ユーザーがEAP-TTLSを使用して認証すると、ユーザーグループのメンバーシップ情報を取得する NAC IDP認証成功 イベントと NAC IDPグループルックアップ成功 イベントを確認できます。
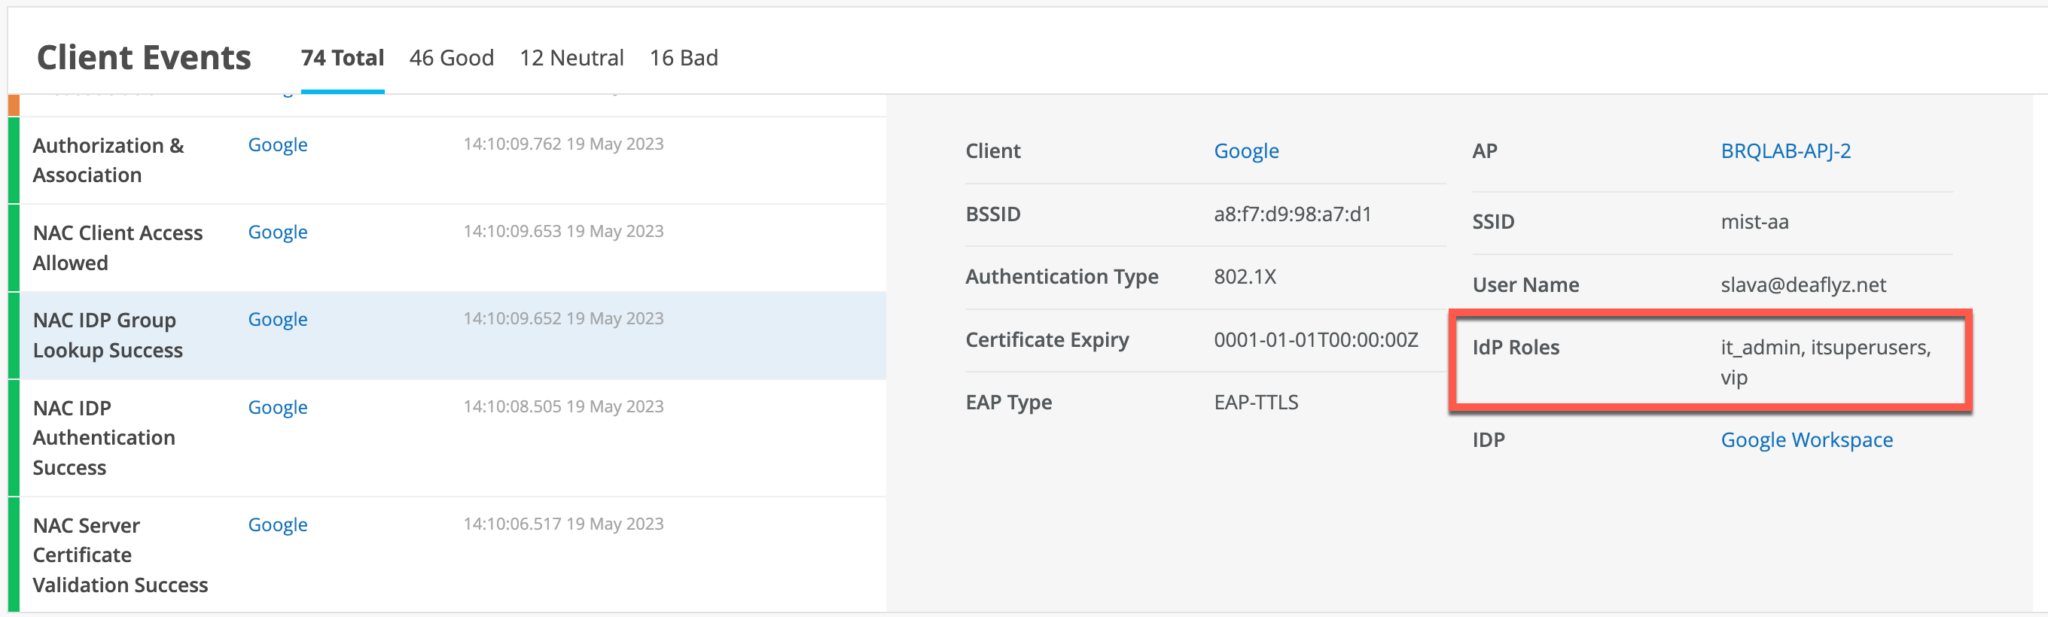
EAP-TTLS認証の場合は、 NAC IDP認証成功 イベントを確認できます。このイベントは、Google Workspace がユーザーの認証情報を検証したことを示します。
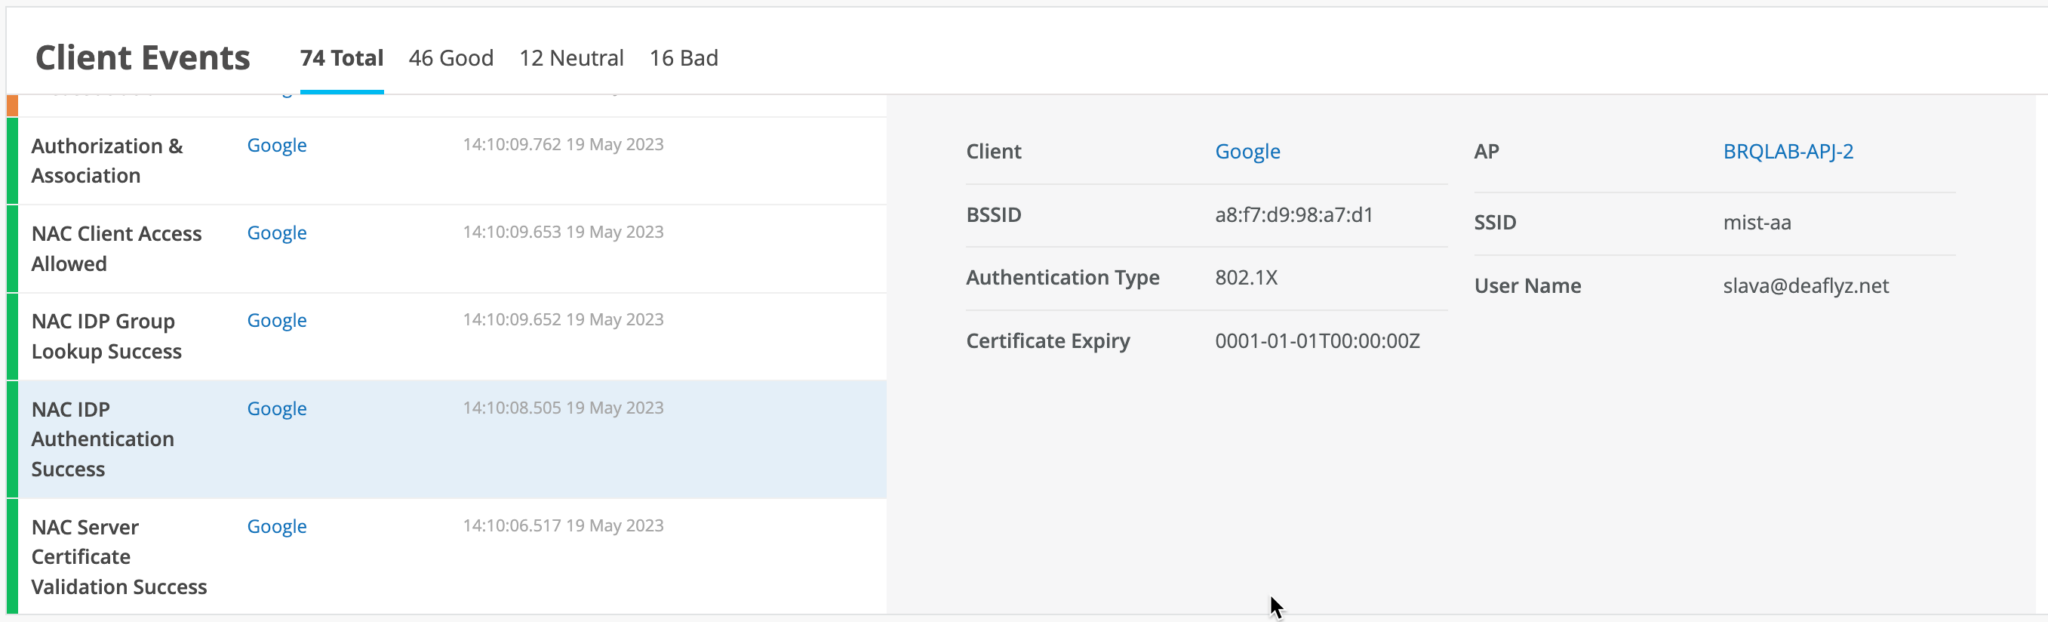
認証ポリシールールでGoogle WorkspaceのIDPロールを活用し、ユーザーロールに基づいてネットワークセグメンテーションを実行できます。
ROPC を使用した EAP-TTLS と Azure AD について
拡張認証プロトコル-トンネル化されたTLS(EAP-TTLS)は、Azure ADでのLDAPS OAuthフローを利用してユーザー認証を実行します。これは、MFA なしでユーザー名とパスワードを使用するレガシー認証の使用を意味します。この方法を採用する際には、考慮すべき要素がいくつかあります:
- GPOまたはMDMから、正しいWi-Fiプロファイルを使用してクライアントデバイスを設定します。 ログイン プロンプトでユーザー名とパスワードのみを指定しても、一部のオペレーティング システムでは機能しません。
- ユーザーは、ユーザー名を入力する際に、Google Email ID(username@domain)ユーザー名形式を使用する必要があります。
- サーバー証明書を信頼するようにクライアントを設定します。 デジタル証明書の使用を参照してください。