Help us improve your experience.

Let us know what you think.

Do you have time for a two-minute survey?


Microsoft Intune マネージド デバイスのオンボード CA と SCEP の統合

ジュニパーのオンボード CA 構成 Mist Access Assurance は、Intune と直接統合してクライアント証明書の自動配布を行うクラウドネイティブの SCEP サービスを提供します。これにより、外部PKIが不要になり、EAP-TLS認証によりセキュアなWi-Fiオンボーディングが簡素化されます。

ジュニパー Mist Access Assuranceは、オンボード認証機関(CA)構成を提供し、完全に管理されたSCEP(簡易証明書登録プロトコル)インフラストラクチャを提供します。オンボード CA が有効になっている場合、Access アシュアランスによって Intune SCEP URL が自動的にプロビジョニングされます。この URL を使用すると、ユーザーは、外部 PKI やオンプレミスの SCEP サービスを展開または維持することなく、Intune を Mist Access Assurance と統合できます。その後、Access アシュアランスによって提供されるオンボード CA 証明書を使用して Intune 内で SCEP プロファイルを構成し、登録済みデバイスへのセキュリティで保護されたクライアント証明書の発行が可能になります。

Access アシュアランス SCEP インフラストラクチャを利用することで、Intune で管理されるエンドポイントへのクライアント証明書の配布を自動化し、EAP-TLS 認証用の Wi-Fi プロファイルにバインドできます。この機能により、ネットワークに接続するすべてのデバイスが、ジュニパー Mist Access Assurance クラウドから完全に管理されたまま、強力な証明書ベースの信頼を通じて認証されます。

注:Intuneでデバイスが非アクティブまたは削除としてマークされた場合は、ジュニパー Mistポータルからクライアント証明書を手動で取り消す必要があります。

Intune でクライアント証明書配布の SCEP インフラストラクチャとしてジュニパー Mist Access Assurance を活用できるようにするには、次の手順に従います。

オンボード CA 設定を有効にする

オンボード CA 設定を有効にするには:

  1. ジュニパー Mistポータルの左側のメニューから、組織>アクセス>証明書を選択します。

    認証局ページが表示されます。

  2. ページの右上隅にある設定アイコンをクリックし、オン ボードCA設定を選択します。
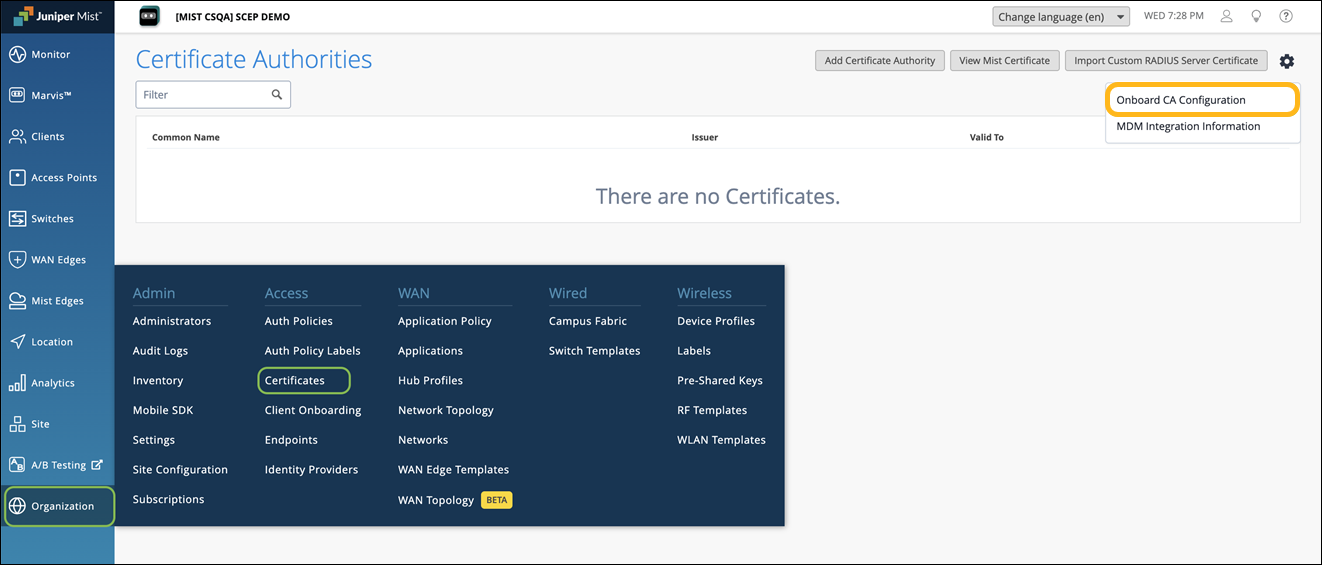
    Juniper Mist dashboard showing Certificate Authorities section with empty table for Common Name and Issuer, buttons for Add Certificate Authority, View Mist Certificate, and Import Custom RADIUS Server Certificate, gear icon dropdown with Onboard CA Configuration highlighted, navigation menu on left, and Certificates highlighted under Access in Organization menu.

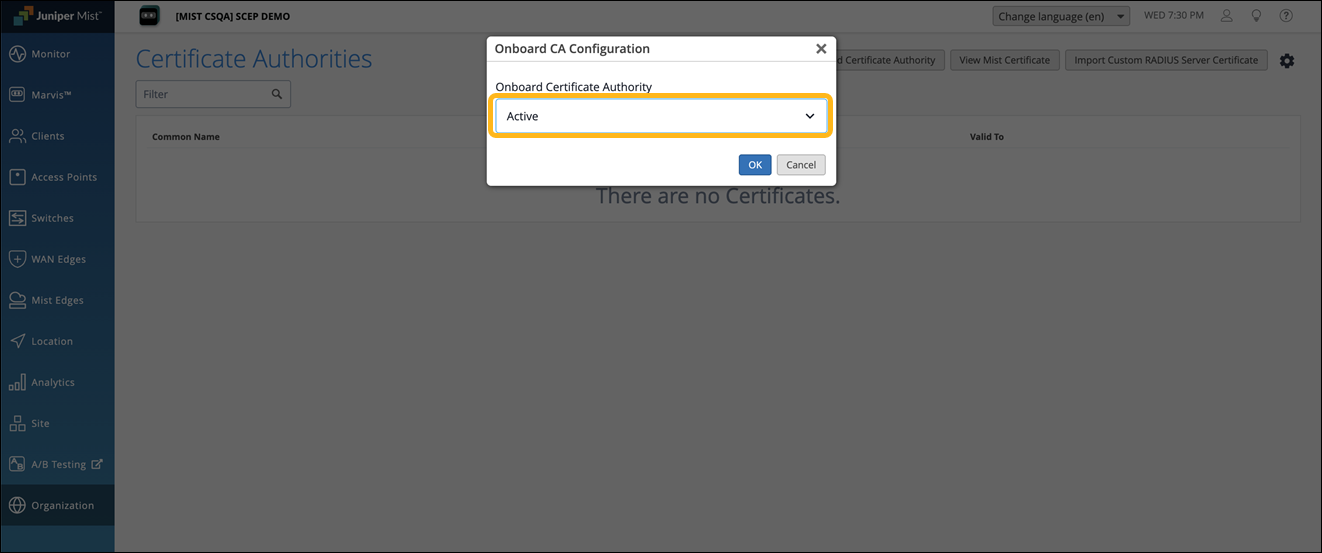
  3. アクティブを選択し、OKをクリックします。

    Onboard CA Configuration pop-up with Active selected in Onboard Certificate Authority dropdown, OK and Cancel buttons, and background message There are no Certificates in the Certificate Authorities section.

    オンボード認証機関サービスが有効になり、MDMごとにそれぞれのSCEPエンドポイントが生成されます。

    オンボード CA 設定がアクティブになると、次のタブが表示されます。

    • 外部—外部CAの詳細を表示します。

    • 内部—NACポータルまたはMDMを介して組み込みのCAによって発行されたクライアント証明書の詳細を表示します。

  4. ページの右上隅にある設定アイコンをもう一度クリックし、 MDM統合情報を選択します。
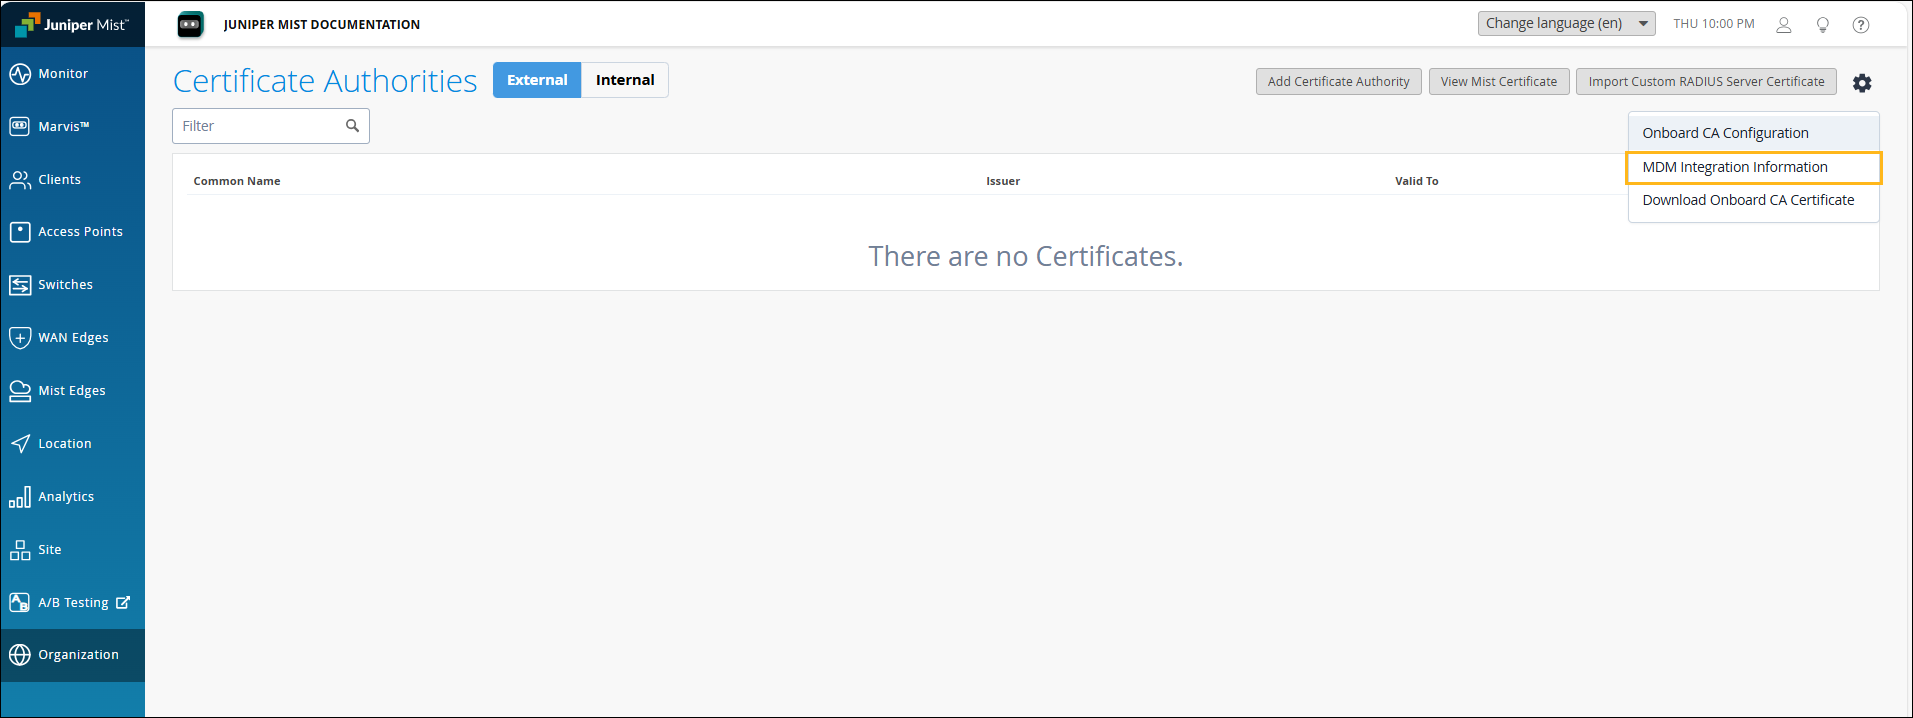
    Certificate Authorities section of Juniper Mist interface displaying options to add certificates, view Mist certificates, and import custom RADIUS server certificates, with no certificates listed. Navigation sidebar includes Monitor, Marvis, Clients, Access Points, Switches, WAN Edges, Mist Edges, Location, Analytics, Site, A/B Testing, and Organization.

  5. Intune に一覧表示されている Intune SCEP URL をコピーします。Intune SCEP プロファイルでこの URL を使用する必要があります。
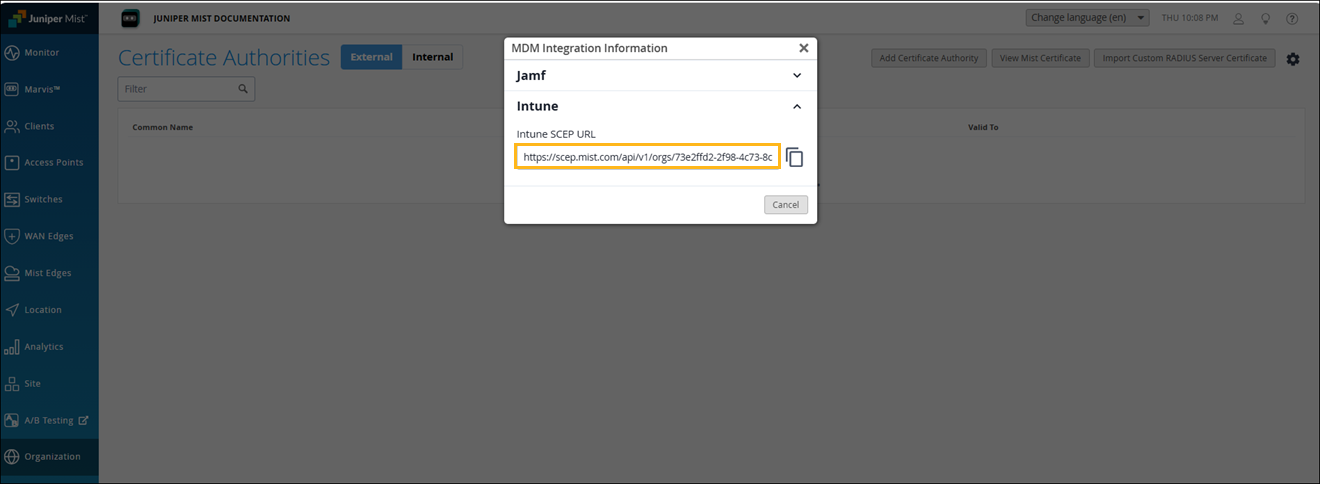
    Certificate Authorities section in Juniper Mist platform with tabs for External and Internal certificates. MDM Integration Information pop-up open, showing Jamf and Intune options. Intune section expanded with Intune SCEP URL highlighted, and buttons to copy URL or cancel. Navigation menu on the left and certificate management options at the top.

オンボードCAおよびMist組織のCA証明書をダウンロードします

Mist Org CA 証明書は、Intune マネージド クライアントが Mist Access Assurance サービスの RADIUS サーバー証明書を信頼するように構成するために必要です。Intune で SCEP プロファイルを構成するには、オンボード CA 証明書が必要です。

  1. 証明書ページの右上隅にある設定アイコンをクリックし、 オンボードCA証明書のダウンロードを選択します。この証明書は、Intune の SCEP 証明書として使用されます。
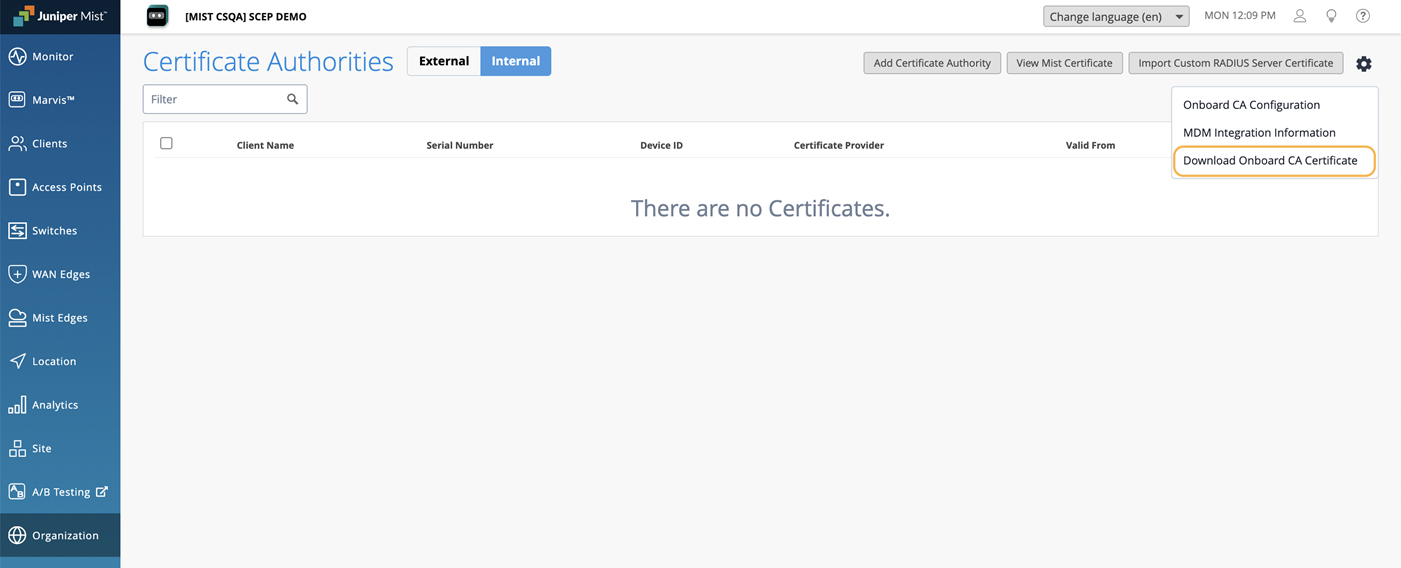
    Juniper Mist dashboard showing Certificate Authorities section with no certificates listed and settings menu open on the right.

  2. Organization>Access>Certificatesに移動します。Mist証明書を表示をクリックし、ダウンロードをクリックします。この証明書は、Intune のルート証明書として使用されます。
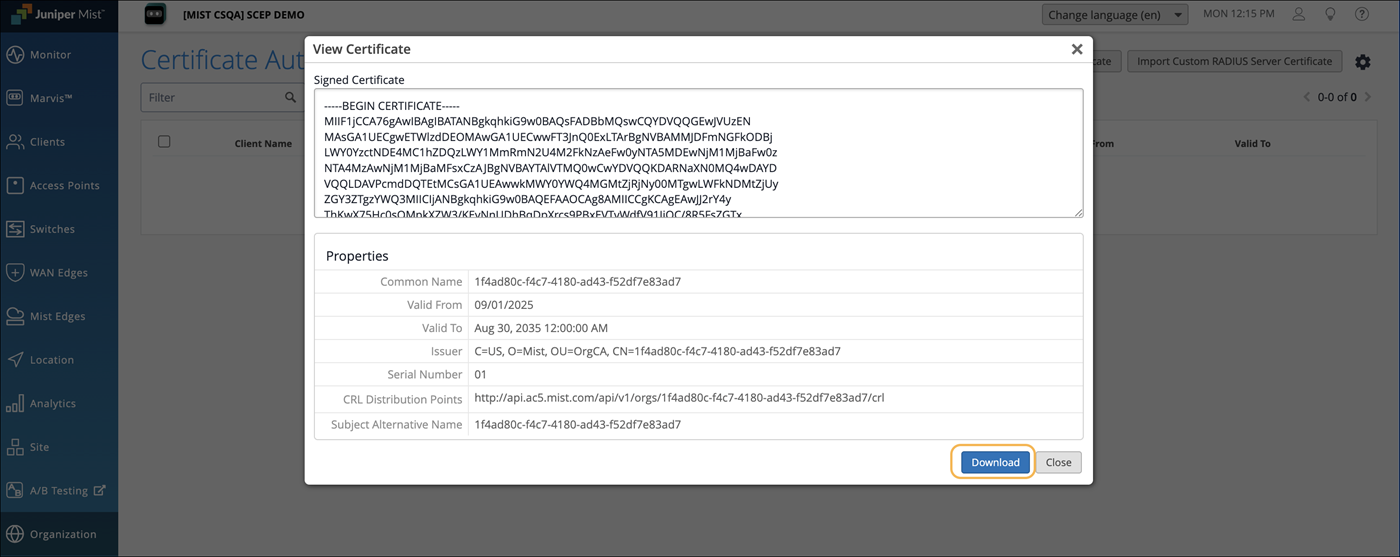
    View Certificate interface showing PEM format certificate details, including common name, validity period, issuer, and serial number. Left panel has navigation options, and an orange Download button is visible.

    注:カスタムRADIUSサーバー証明書を使用している場合、Mist組織CA証明書は必要ありません。カスタム RADIUS サーバー証明書発行者のルート CA 証明書が必要です。

IntuneをMistポータルにリンクする

Intune アカウントをジュニパー Mist にリンクします。「 Mist ポータルへの Intune の追加」を参照してください。

注:

サードパーティ製アプリケーションのスクリーンショットは、公開時点のものです。スクリーンショットがいつ、または将来正確になるかを知る方法はありません。これらの画面の変更や関連するワークフローのガイダンスについては、サードパーティーのWebサイトを参照してください。
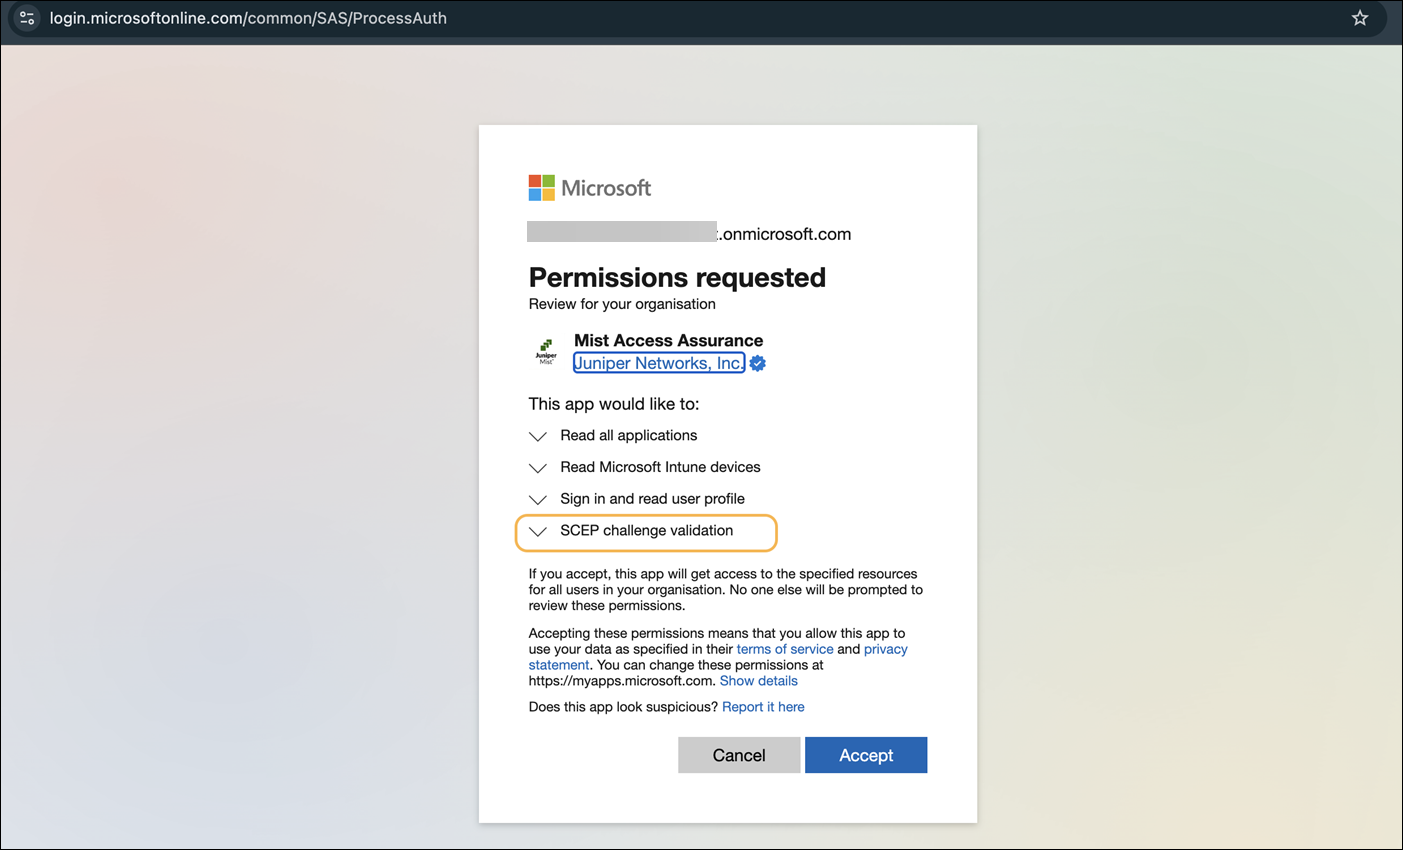
注:Intune アカウントが既に組織にリンクされている場合は、MDM アカウントを再リンクする必要があります。これにより、Mist Access Assuranceは、オンボードCA操作に必要な最新の権限セットを確実に受け取ることができます。

Microsoft login screen requesting permissions for Mist Access Assurance by Juniper Networks Inc to read applications, Intune devices, user profile, and validate SCEP challenge. Options: Cancel or Accept.

設定プロファイルの作成

Intune で OS 固有の構成プロファイルを作成します。

信頼できる証明書プロファイルの作成

登録する予定のOSタイプごとに、Mist Org CA証明書用とMist Onboard CA証明書用の2つの信頼できる証明書プロファイルを作成します。

  1. Devices>Configurationに移動し、Create>New Policyをクリックします。
  2. プラットフォームを選択します。この例では、Windows 10 以降を使用しました。

  3. プロファイルタイプとして テンプレート を選択します。

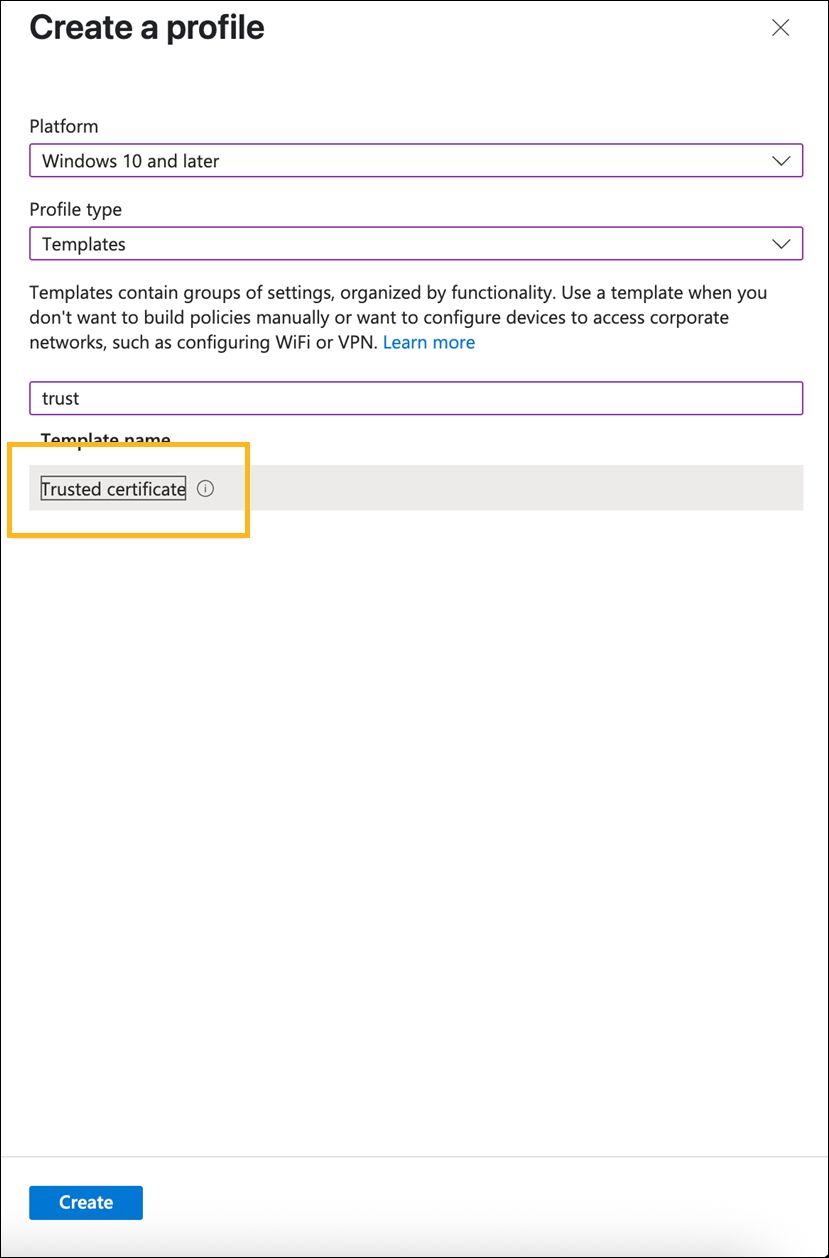
  4. テンプレートリストから 信頼 を選択し、 作成をクリックします。

    Create a profile interface showing fields for Platform set to Windows 10 and later, Profile type set to Templates, Template name with trust entered, Trusted certificate selected, and a blue Create button to finalize.

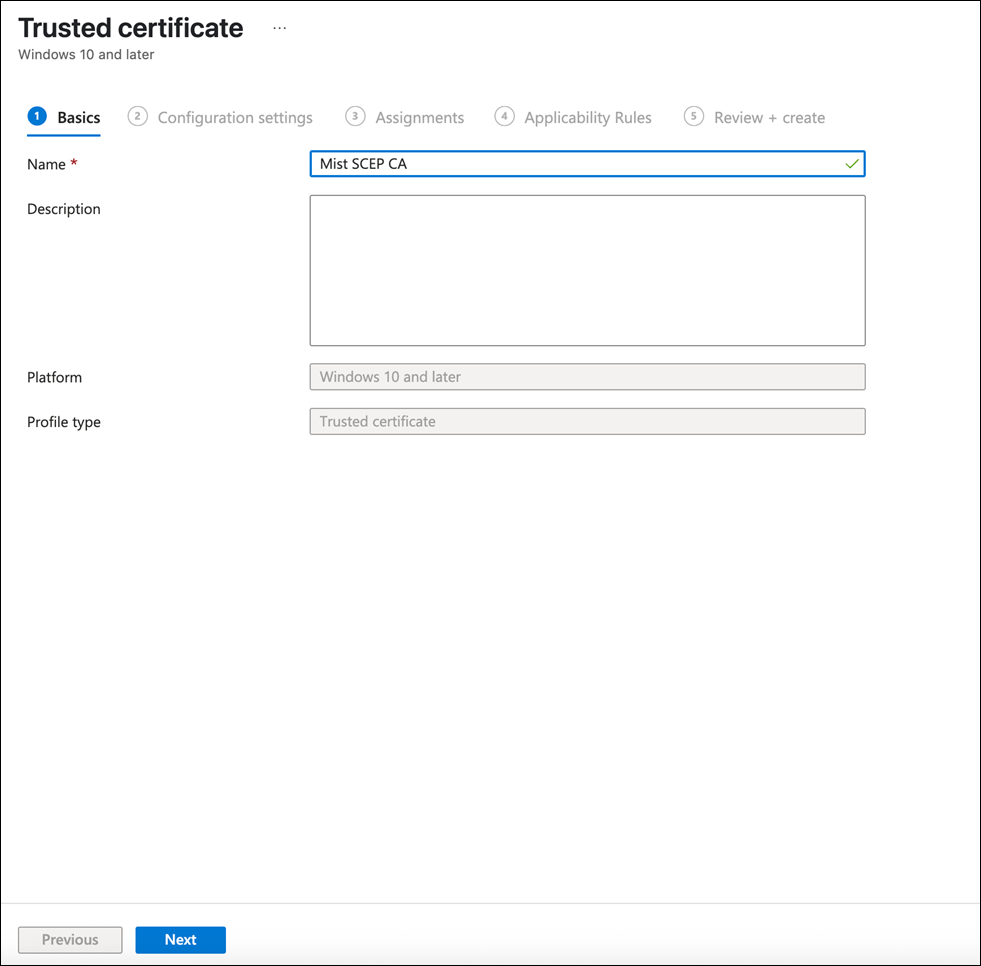
  5. Mist組織のCA信頼証明書の名前を入力し、 次へをクリックします。

  6. 先ほどダウンロードしたMist Org CA証明書をアップロードします。

    カスタムRADIUSサーバー証明書を使用している場合、Mist組織CA証明書は必要ありません。カスタム RADIUS サーバー証明書発行者のルート CA 証明書が必要です。
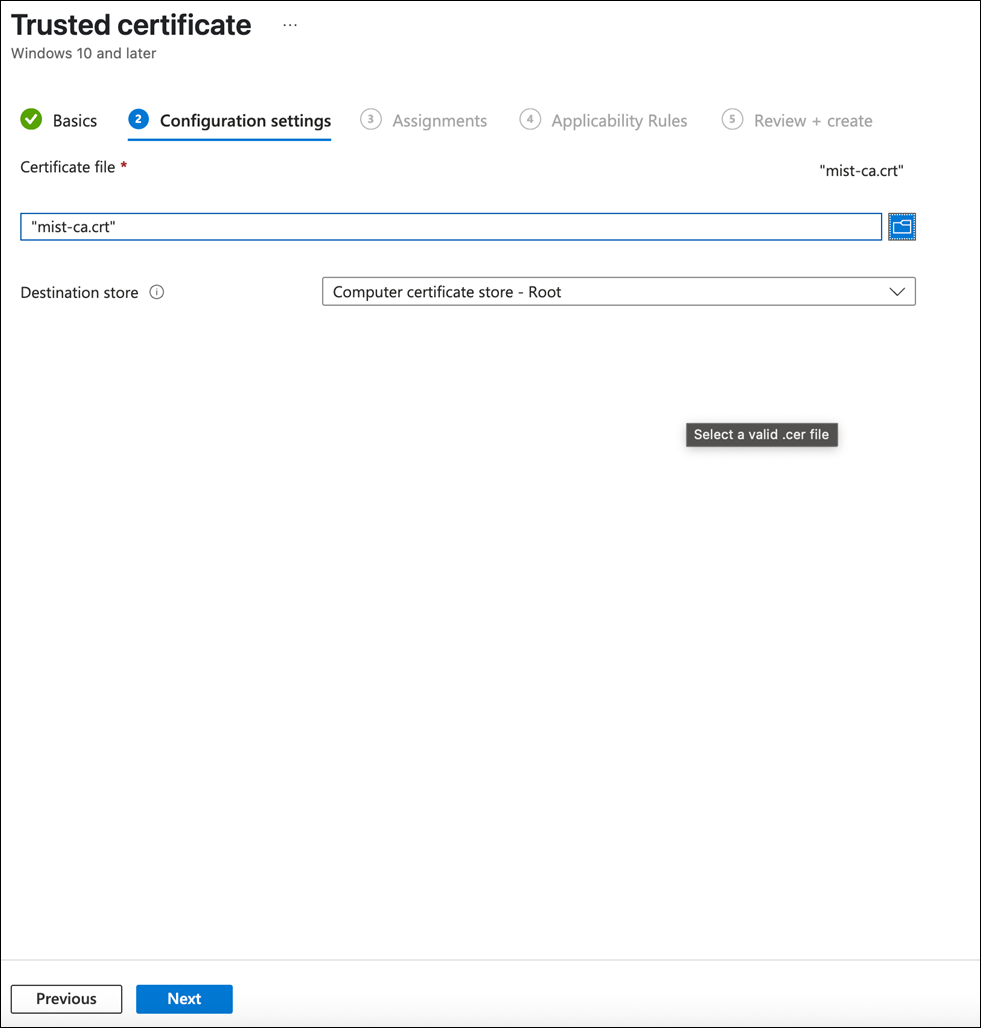
    Trusted certificate configuration screen on Step 2. Specifies certificate file mist-ca.crt and destination store Computer certificate store - Root. Includes navigation buttons and progress indicator showing Step 2 of 5.

  7. このプロファイルを特定のユーザーグループまたはすべてのデバイスに割り当てます。
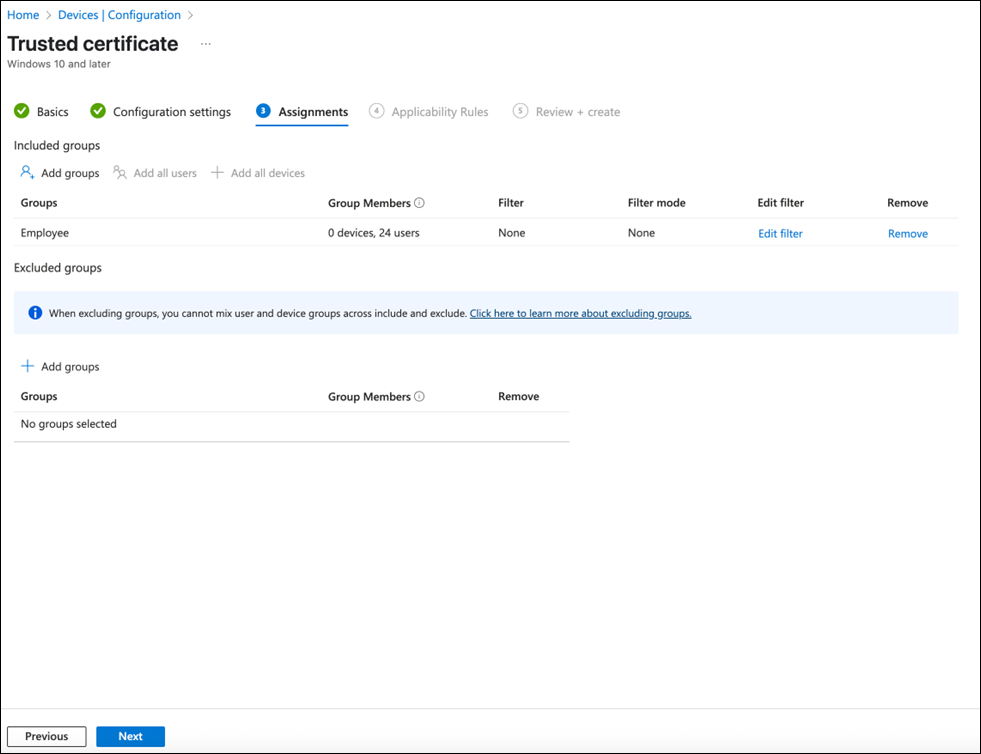
    Assigning trusted certificate in device management system. Included group Employee has 0 devices and 24 users. No groups excluded. Options to add, edit, or remove groups available. Navigation buttons for previous and next steps present.

  8. 次へをクリックし、作成をクリックします。

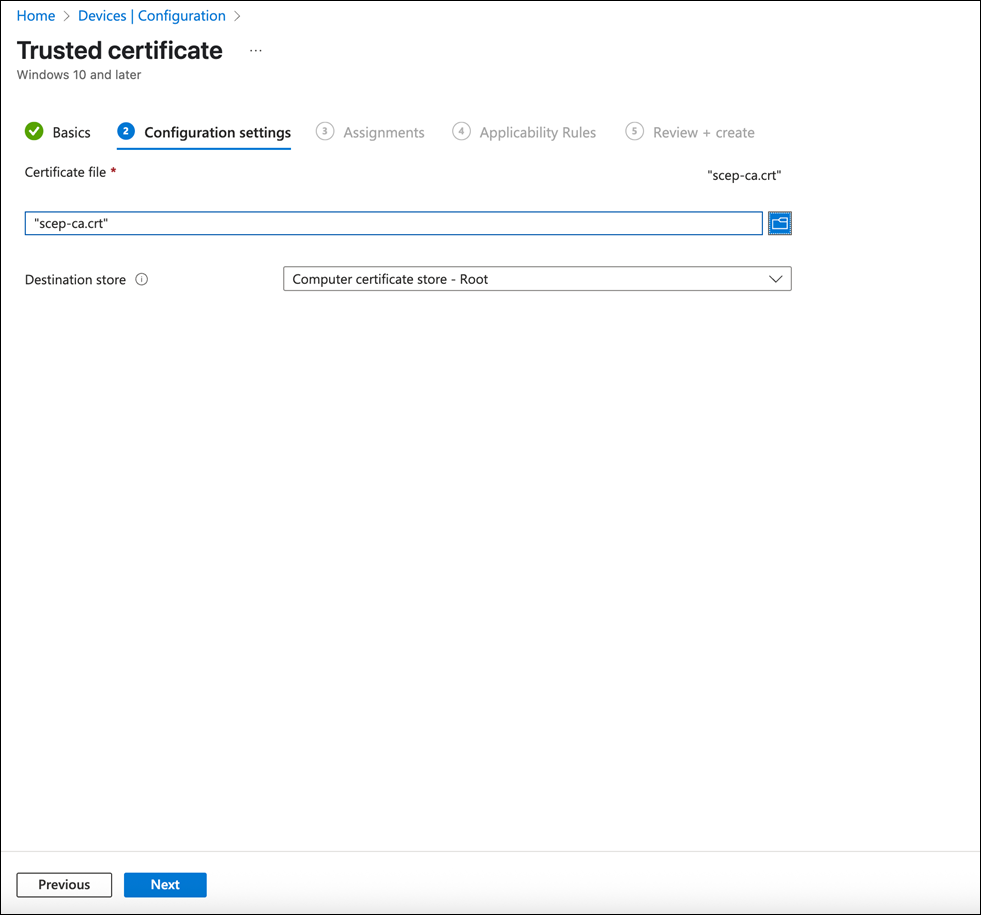
  9. Mist Onboard CA証明書を取得する手順1から8を繰り返します。
    Configuration screen for setting up a Trusted certificate in the Basics step with fields for Name, Description, Platform, and Profile type. Navigation buttons Next and Previous are visible. Progress bar shows setup steps: Basics, Configuration settings, Assignments, Applicability Rules, and Review plus create.

    Trusted certificate configuration screen for Windows 10 and later devices showing step 2 of 5, Configuration settings, with scep-ca.crt uploaded to the Computer certificate store - Root. Includes Previous and Next navigation buttons.

SCEP証明書プロファイルの作成

SCEP証明書プロファイルは、Mist SCEPサービスからクライアント証明書を取得するようにクライアントに指示します。この例ではユーザー証明書タイプを使用しますが、デバイス証明書についても同じ手順に従うことができます。

  1. Devices>Configurationに移動し、Create>New Policyをクリックします。
  2. プラットフォームを選択します。この例では、Windows 10 以降を使用しました。

  3. プロファイルタイプとして テンプレート を選択します。

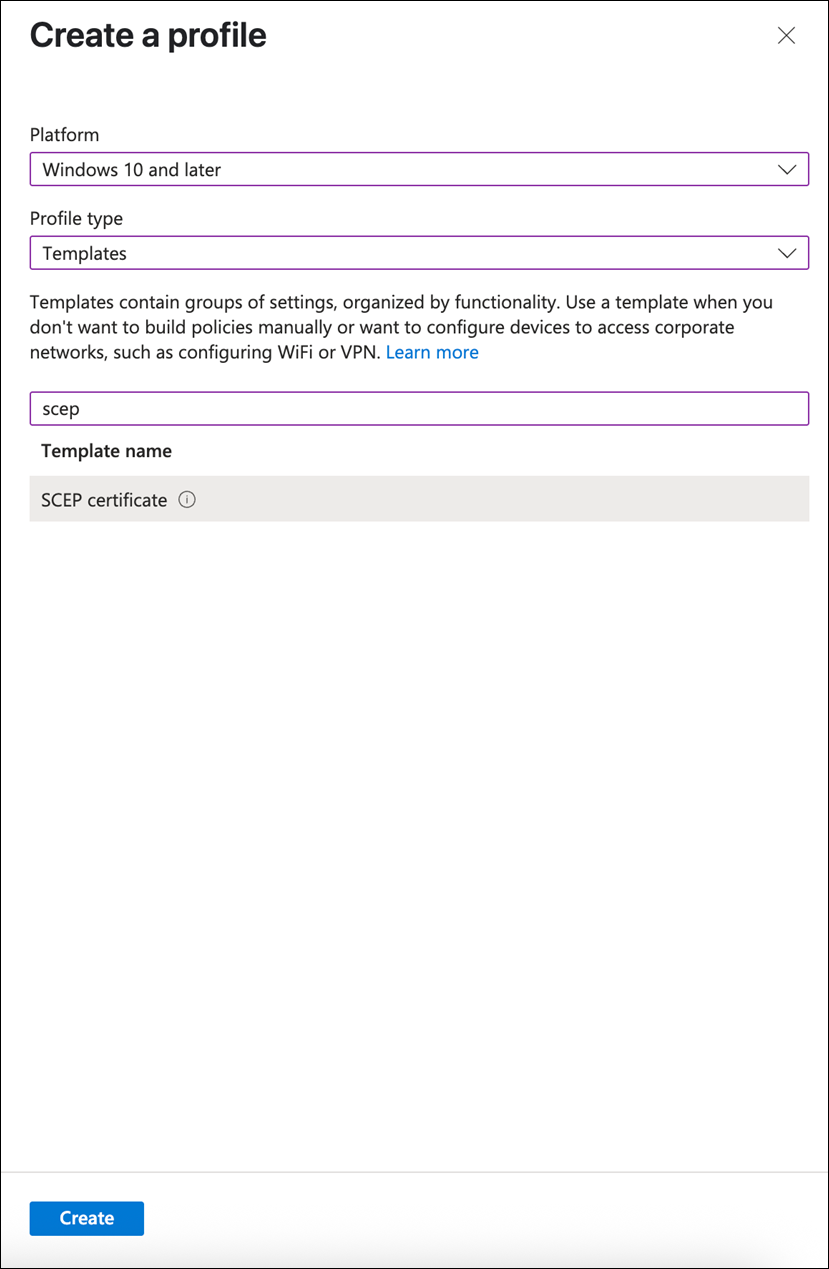
  4. テンプレートリストから SCEP を選択し、 作成をクリックします。

    Create a profile interface showing platform set to Windows 10 and later, profile type set to Templates, SCEP certificate selected from template search results, and a Create button to proceed.

  5. 証明書の名前を入力し、 次へをクリックします。

  6. 次の例に示すように設定を入力します。 SCEPサーバーURLフィールドにSCEP URLを追加します。

    ユーザーまたはデバイスに関する追加情報をエンコードしてポリシー評価に使用できるように、証明書の最適な形式を指定します。この例では、Intune デバイス ID が SAN:DNS フィールドにエンコードされているため、デバイスのコンプライアンスを定期的にチェックできます。完全なユーザー プリンシパル名は SAN:UPN フィールドにエンコードされ、Entra ID に対するグループ メンバーシップのルックアップが可能になります。

    クライアントには、MistオンボードCA証明書を信頼するように指示されます。

    注:

    NACがデバイスの識別とコンプライアンスチェックにこの値を使用するため、SAN:DNSフィールドにデバイスIDを含めることは必須です。
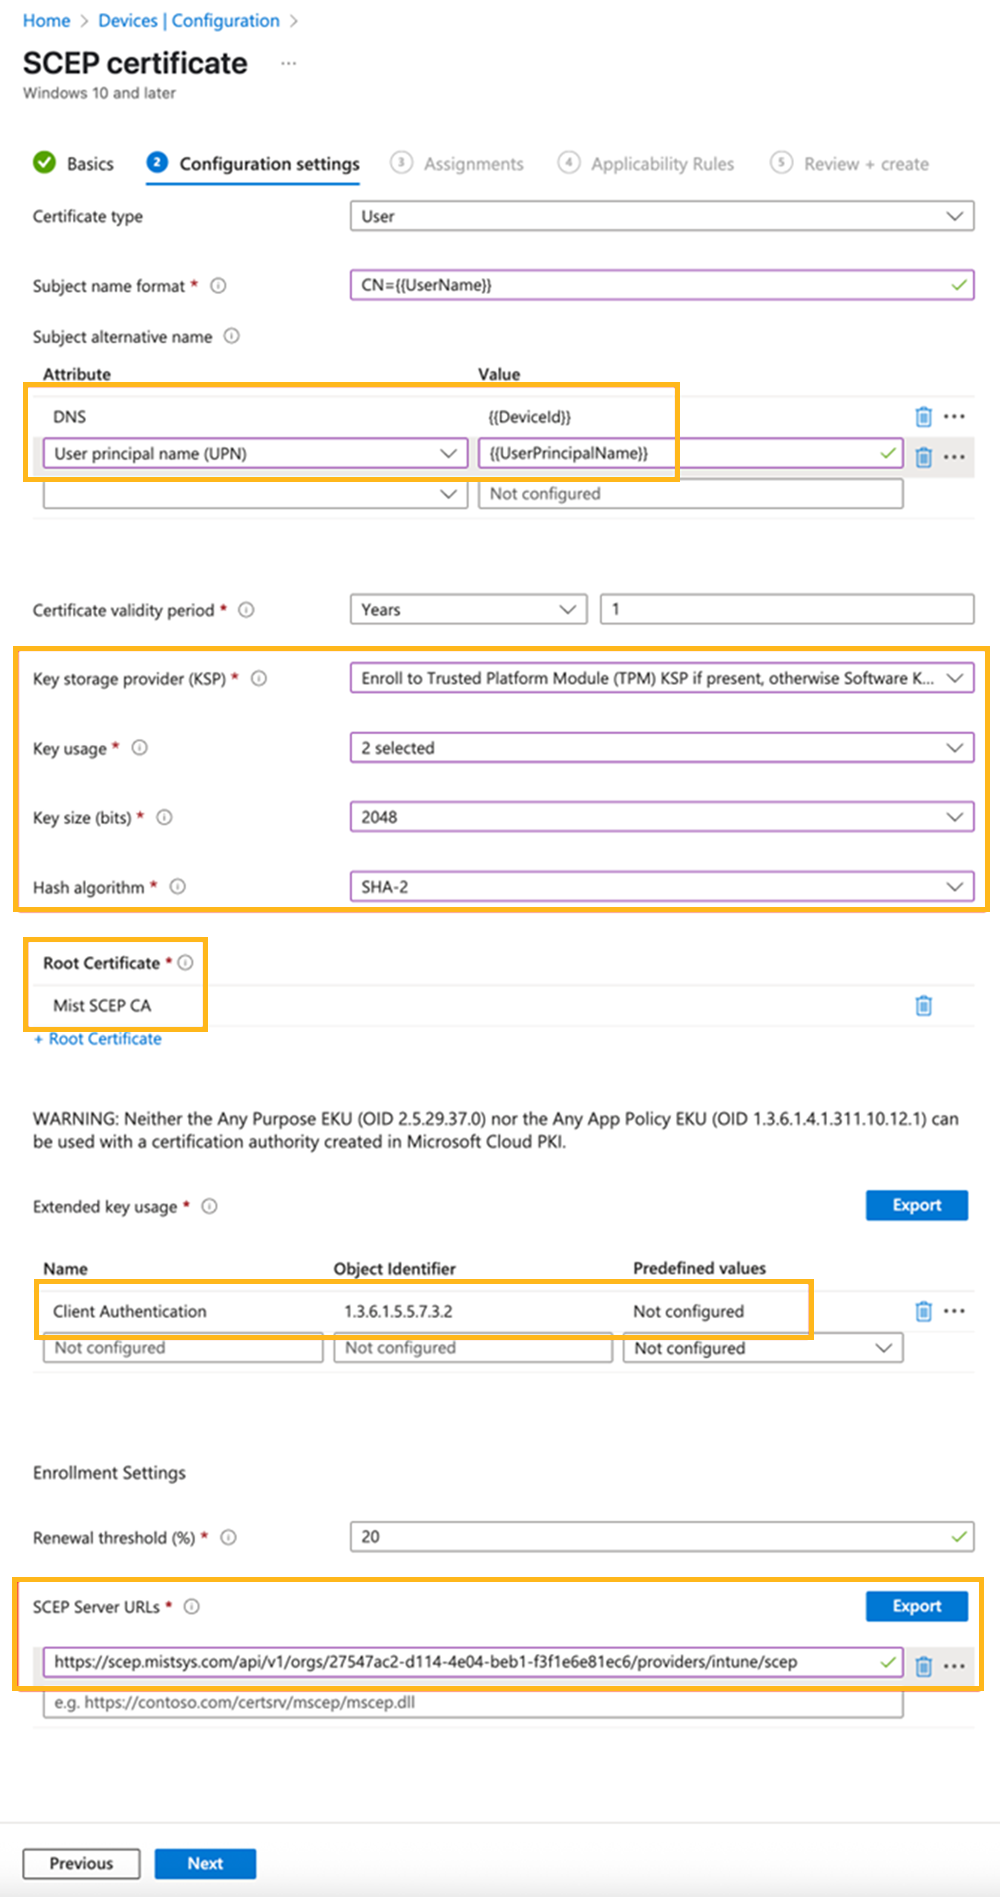
    SCEP certificate configuration screen in device management system showing settings like certificate type as User, subject name format as CN equals UserName, SAN with DNS and UPN, validity period of 1 year, TPM KSP preference, key usage, size of 2048 bits, SHA-2 hash algorithm, Mist SCEP CA root certificate, client authentication EKU, and SCEP server URL.

  7. このプロファイルを特定のユーザーグループまたはすべてのデバイスに割り当てます。

  8. 次へをクリックし、作成をクリックします。

プロファイルが Windows クライアントにプッシュされると、[個人ユーザー証明書のストレージ] の下に新しいクライアント証明書が発行されます。
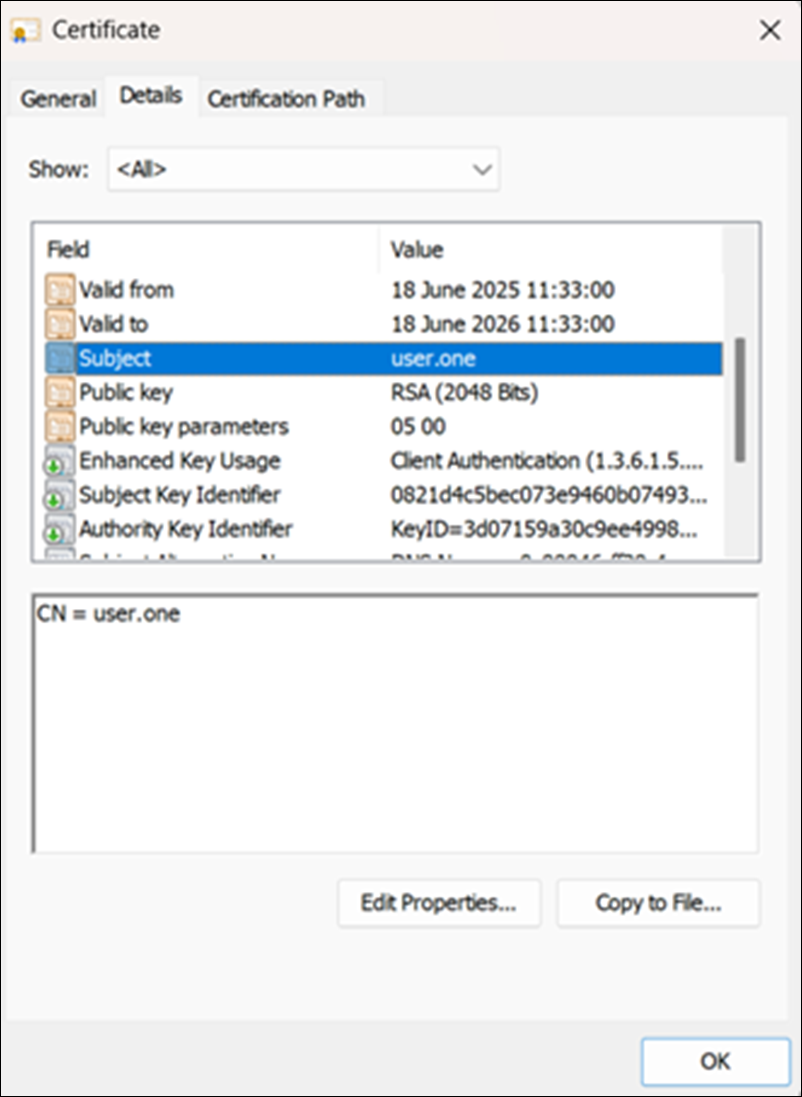
Digital certificate details showing validity from 18 June 2025 to 18 June 2026, subject user.one, RSA public key 2048 Bits, client authentication usage, and key identifiers. Buttons for editing properties and copying to file available.

ジュニパー Mistポータルに切り替え、証明書>内部でクライアント証明書が発行されていることを確認します。
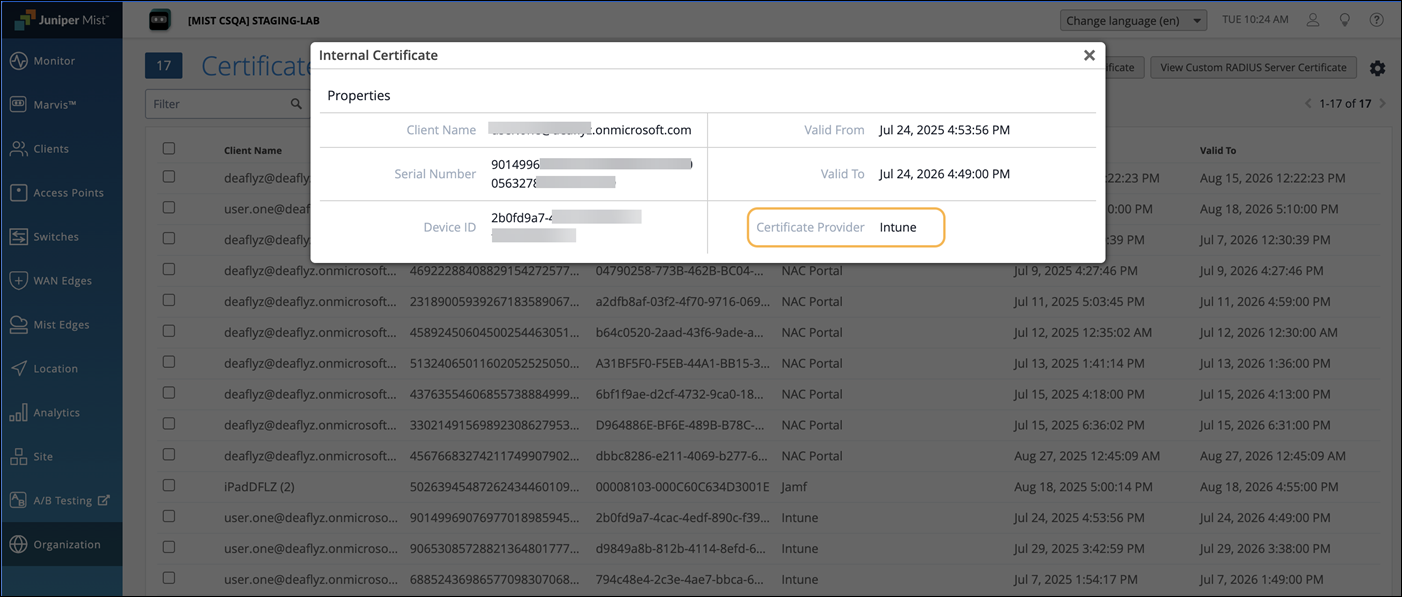
Internal Certificate pop-up displaying certificate properties including client email address, serial number, device ID, validity dates, and provider Intune, with Juniper Mist interface in the background.

Wi-Fiプロファイルの作成

  1. Devices>Configurationに移動し、Create>New Policyをクリックします。
  2. プラットフォームを選択します。この例では、Windows 10 以降を使用しました。

  3. プロファイルタイプとして テンプレート を選択します。

  4. テンプレートリストから Wi-Fi を選択します。

  5. 証明書の名前を入力し、 次へをクリックします。

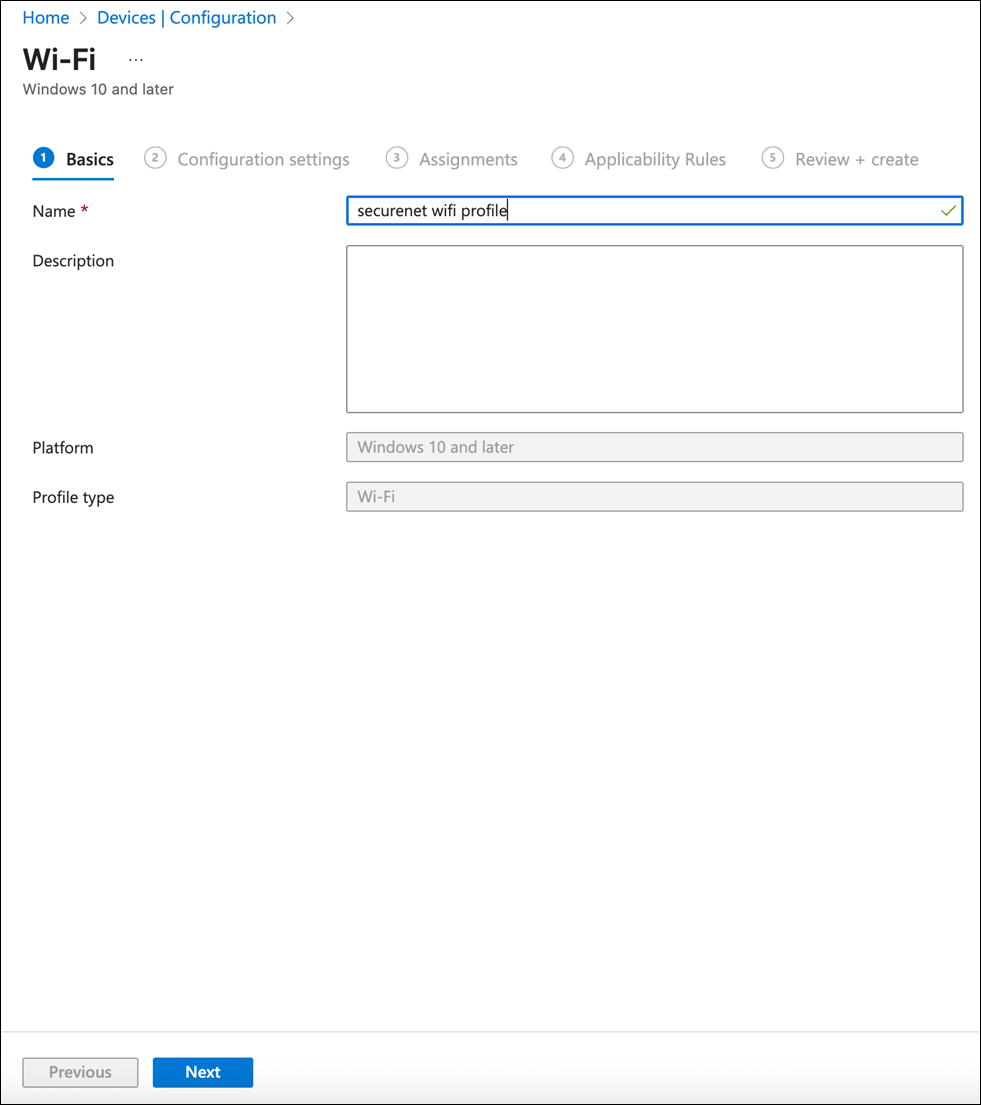
    Wi-Fi configuration screen for creating a profile in a device management system with fields for name, description, platform, and profile type.

  6. 次の例に示すように設定を入力します。

    • セキュリティタイプとして エンタープライズ を選択します。

    • SSID名を入力します。

    • クライアントに提供するSCEP証明書の種類に基づいて、正しい認証モード(ユーザーとコンピューター、ユーザー、またはコンピューター)を設定します。

    • サーバー(RADIUS)検証用のルート証明書としてMist組織のCA証明書を追加します。

    • クライアント認証用のクライアント証明書としてSCEPプロファイルを追加します。
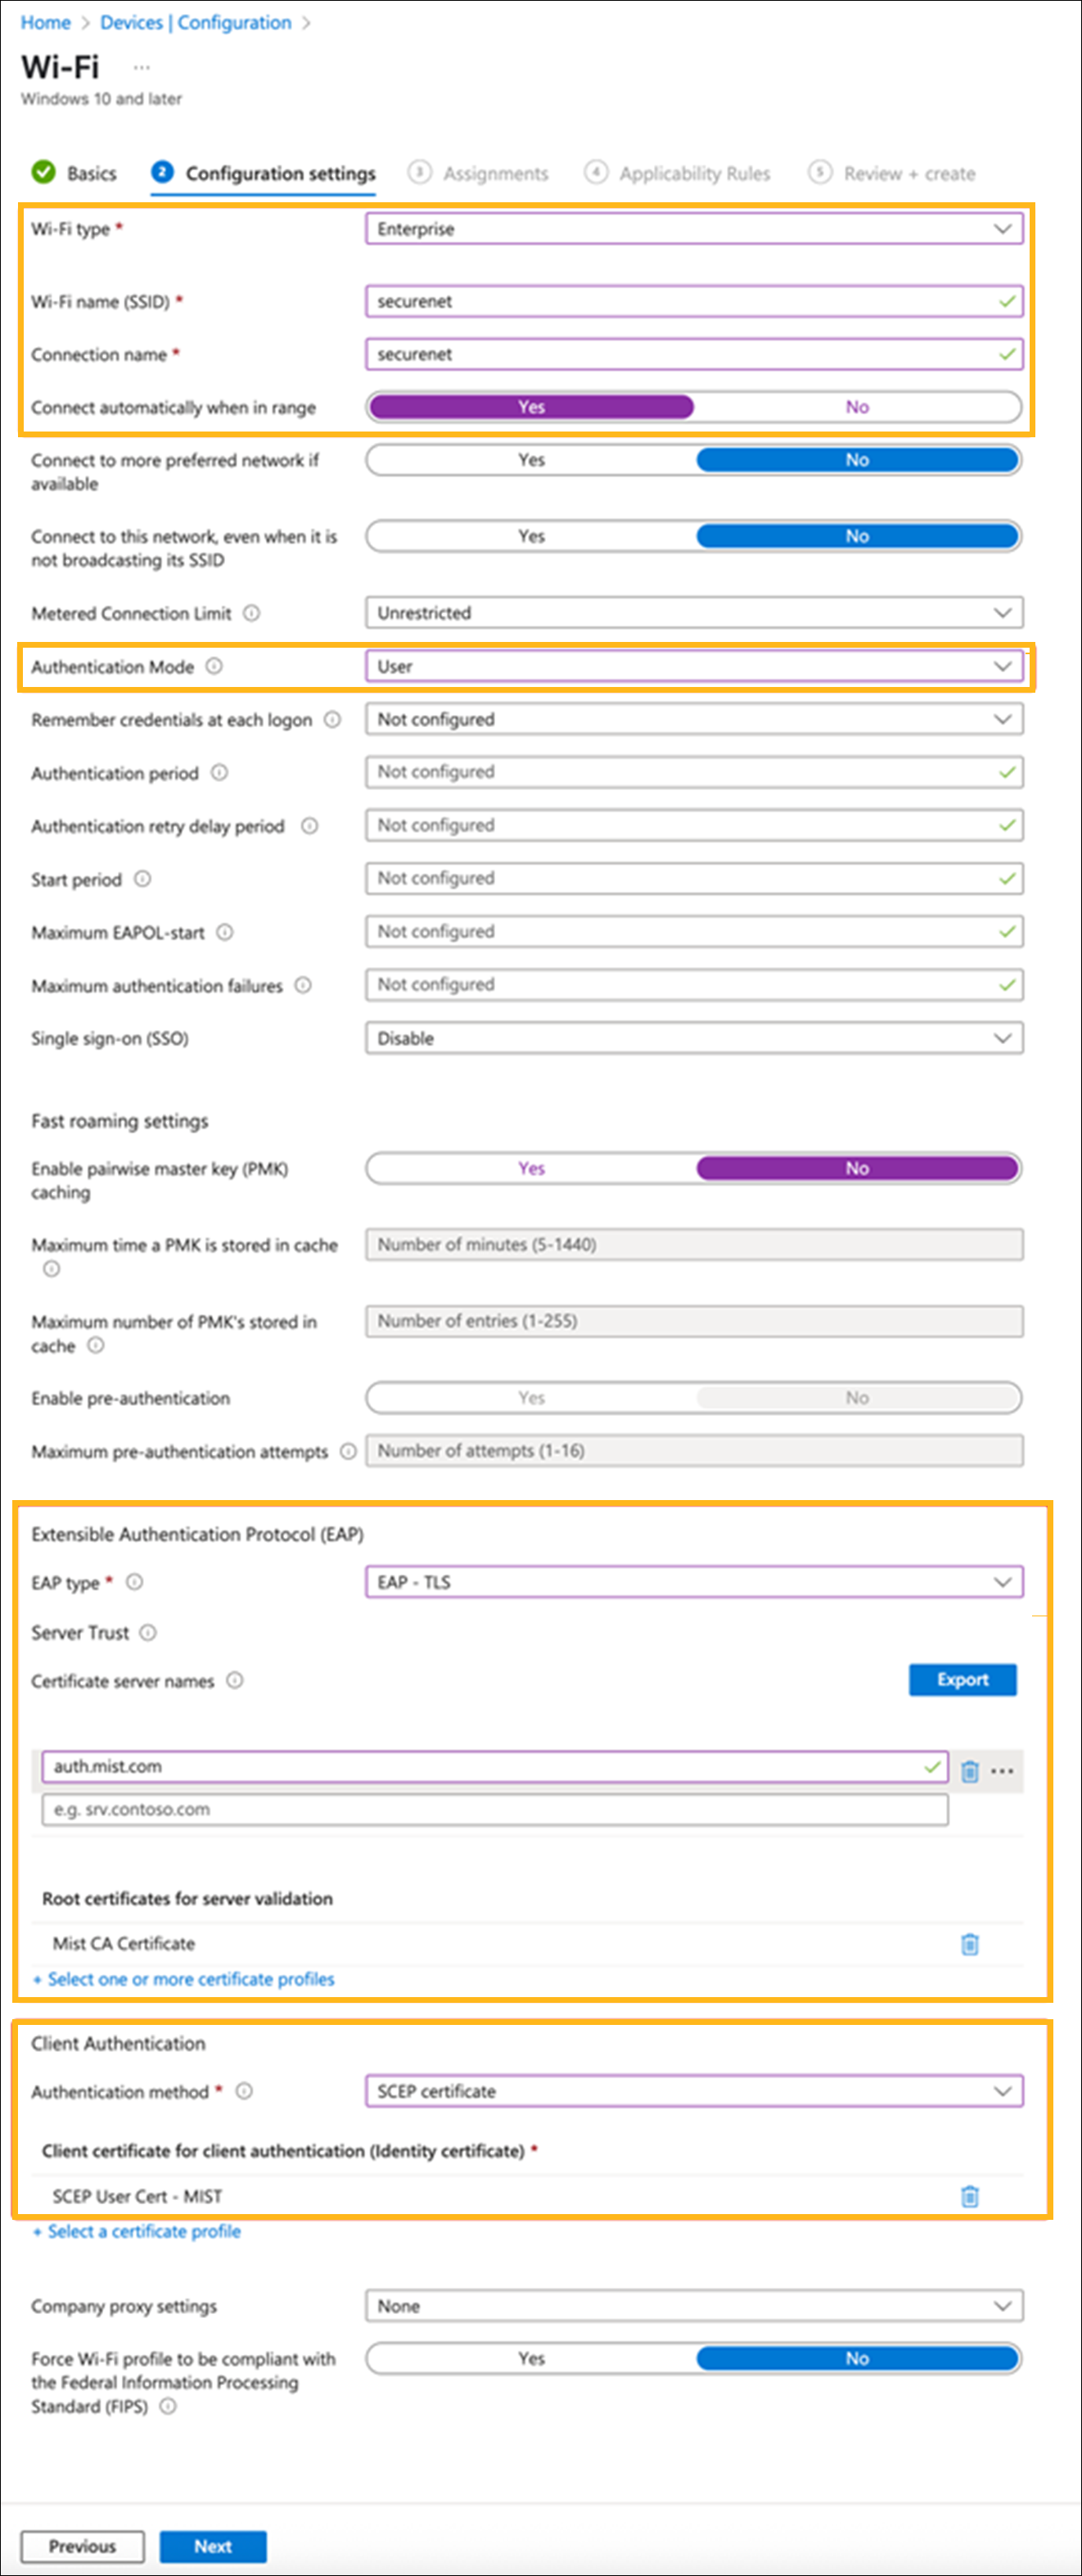
    Configuration screen for setting up a secure enterprise Wi-Fi profile in a device management system with EAP-TLS authentication, SCEP certificate, and server validation options.

デバイスが最新のプロファイル更新プログラムを取得できるように、Intune からデバイスの同期を開始します。クライアントデバイスは、デジタル証明書を自動的に取得できます。

Mist SCEP for Intuneでカスタムクライアント証明書の有効性を設定する

デフォルトでは、Mist SCEPを使用してMicrosoft Intuneを通じて発行されたクライアント証明書は、1年間有効です。カスタム証明書の有効期間を設定するには、証明書プロファイルの サブジェクトの代替名(SAN) フィールドにURIエントリーを含めます。以下の情報を提供する必要があります。

  • DNS—{{DeviceId}}値を追加します

  • URI—以下を入力します。

    tag:juniper.net,CertValidity:<validity-In-days>

    例: tag:juniper.net,CertValidity:730。この例では、クライアント証明書の有効期間は、デフォルトの1年ではなく、証明書発行日から2年間有効です。
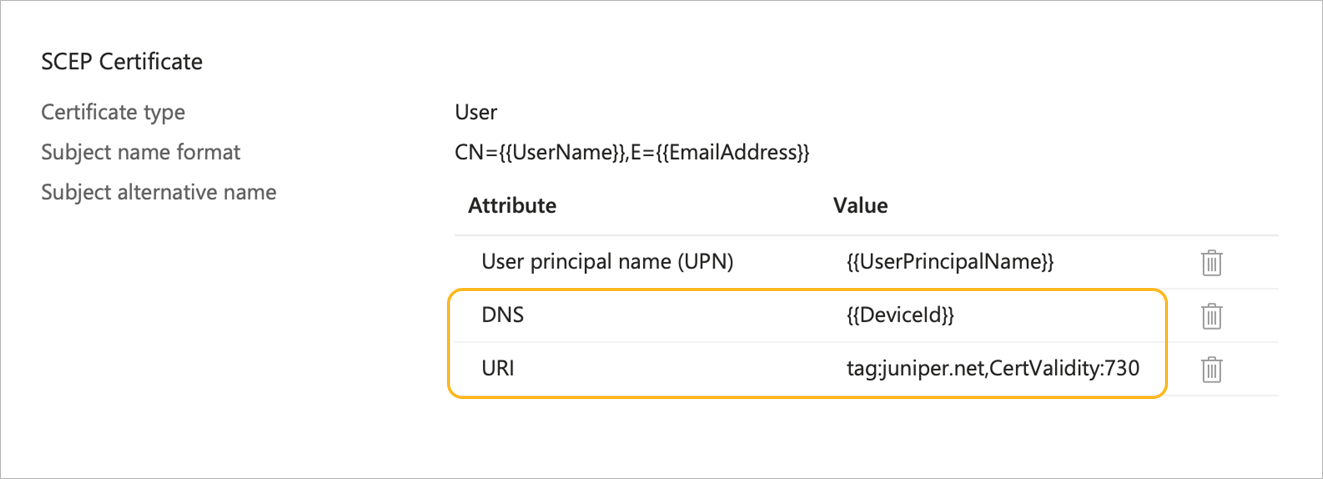
    Configuration for an SCEP certificate showing certificate type as User, subject name format with CN and EmailAddress, and subject alternative name with attributes UserPrincipalName, DNS, and URI. DNS and URI are highlighted in orange, with trash icons indicating deletable entries.