オンデバイスAviraアンチウィルス
このトピックを読み、Avira Antivirusを使用してアプリケーショントラフィックをスキャンし、ネットワークへのウイルスの侵入を防ぐ方法を理解してください。
また、 ビデオ「SRXシリーズファイアウォール上のAviraアンチウィルスソリューション 」を視聴して、セキュリティデバイスへのAviraアンチウィルスをインストールして使用する方法について理解することもできます。
Avira アンチウイルスの概要
Junos OSコンテンツセキュリティは、Aviraのアンチウィルス機能と統合し、完全なファイルベースのスキャンエンジンを提供します。このアンチウィルス保護は、アプリケーション層のトラフィックをスキャンすることでデバイスを保護し、感染したファイル、トロイの木馬、ワーム、スパイウェア、その他の悪意のあるデータなどの有害なコンテンツをブロックします。
Avira Antivirusは、ウイルスパターンデータベースにアクセスしてネットワークトラフィックをスキャンし、ウイルスを特定します。Avira Antivirus は感染したファイルを削除し、ユーザーに通知します。
表1は 、Aviraアンチウイルスのコンポーネントとライセンスの詳細を示しています。
コンポーネント |
詳細情報 |
|---|---|
ウイルスパターンデータベース |
Avira Antivirusは、ウイルスシグネチャデータベースをチェックしてシグネチャを特定してから削除します。 デフォルトでは、デバイスはパターンデータベースの更新をダウンロードします。自動ダウンロードオプションをスケジュールするには、 Aviraアンチウイルススキャンオプションの設定 を参照してください。 |
Avira アンチウイルス スキャン エンジン |
Avira Antivirusは、ファイルをリアルタイムで既知のウイルスがないか調べるスキャンエンジンを提供します。デバイスにAvira Antivirusスキャンエンジンをインストールしてアクティブ化する必要があります。Avira Antivirusスキャンエンジンをインストールしてアクティブ化する手順については 、例:Avira Antivirusを設定するを参照してください 。 Avira アンチウイルス スキャン エンジンは、ウイルス検出をスキャンする前にファイルを解凍します。詳細については、 decompress-layer-limitを参照してください。 以下のシナリオでは、デバイス上のAviraアンチウイルススキャンエンジンはアプリケーショントラフィックをスキャンしません。
|
ライセンスの詳細 |
Avira アンチウイルス スキャン エンジンは、ライセンスされたサブスクリプション サービスです。 このライセンスでは、完全なファイルベースのリアルタイムのAviraアンチウイルススキャン機能を使用できます。アンチウィルス機能は、最新の更新されたウイルスシグネチャデータベースを使用します。 ライセンスの有効期限が切れても、ローカルに保存されたアンチウィルスシグネチャをアップデートなしで引き続き使用できます。ローカルデータベースを削除すると、アンチウイルススキャンを実行できません。 ライセンスの詳細については、「 SRXシリーズのライセンス」を参照してください。 |
利点
デバイスを保護し、ウイルス、トロイの木馬、ルートキット、その他の種類の悪意のあるコードからネットワークを保護します。
ウイルスシグネチャデータベースとAviraアンチウイルススキャンエンジンがデバイス上にローカルに存在するため、スキャンパフォーマンスが向上します。
関連項目
補足プラットフォーム情報
機能エクスプローラーを使用して、特定の機能のプラットフォームとリリースのサポートを確認します。追加のプラットフォームがサポートされる場合があります。
| プラットフォーム | ウイルスパターンデータベース |
|---|---|
| デフォルトのウイルスパターンデータベース |
|
| SRX4100、SRX4200、SRX4600シリーズファイアウォール |
|
| SRX5K-SPC3ファイアウォール |
|
| vSRX仮想ファイアウォール |
例:Avira アンチウイルスの設定
この例では、セキュリティデバイスでAviraアンチウィルスを設定する方法を学習します。このトピックでは、デフォルトのアンチウィルスプロファイルとカスタマイズされたアンチウィルスプロファイルを使用して、感染したファイル、トロイの木馬、ワーム、スパイウェア、その他の悪意のあるデータなどの有害なコンテンツからデバイスを保護する方法について詳しく説明します。
要件
始める前に:
Aviraアンチウィルスライセンスがあることを確認します。デバイスのライセンスを確認する方法については、「 SRXシリーズファイアウォールのライセンスについて」を参照してください。
Junos OSリリース18.4R1以降を搭載したデバイス。
-
vSRX仮想ファイアウォールの場合、最小要件は4つのCPUコアと4GBのメモリです。
この例では、Junos OSリリース18.4R1を搭載したSRX1500デバイスを使用してテストしました。
概要
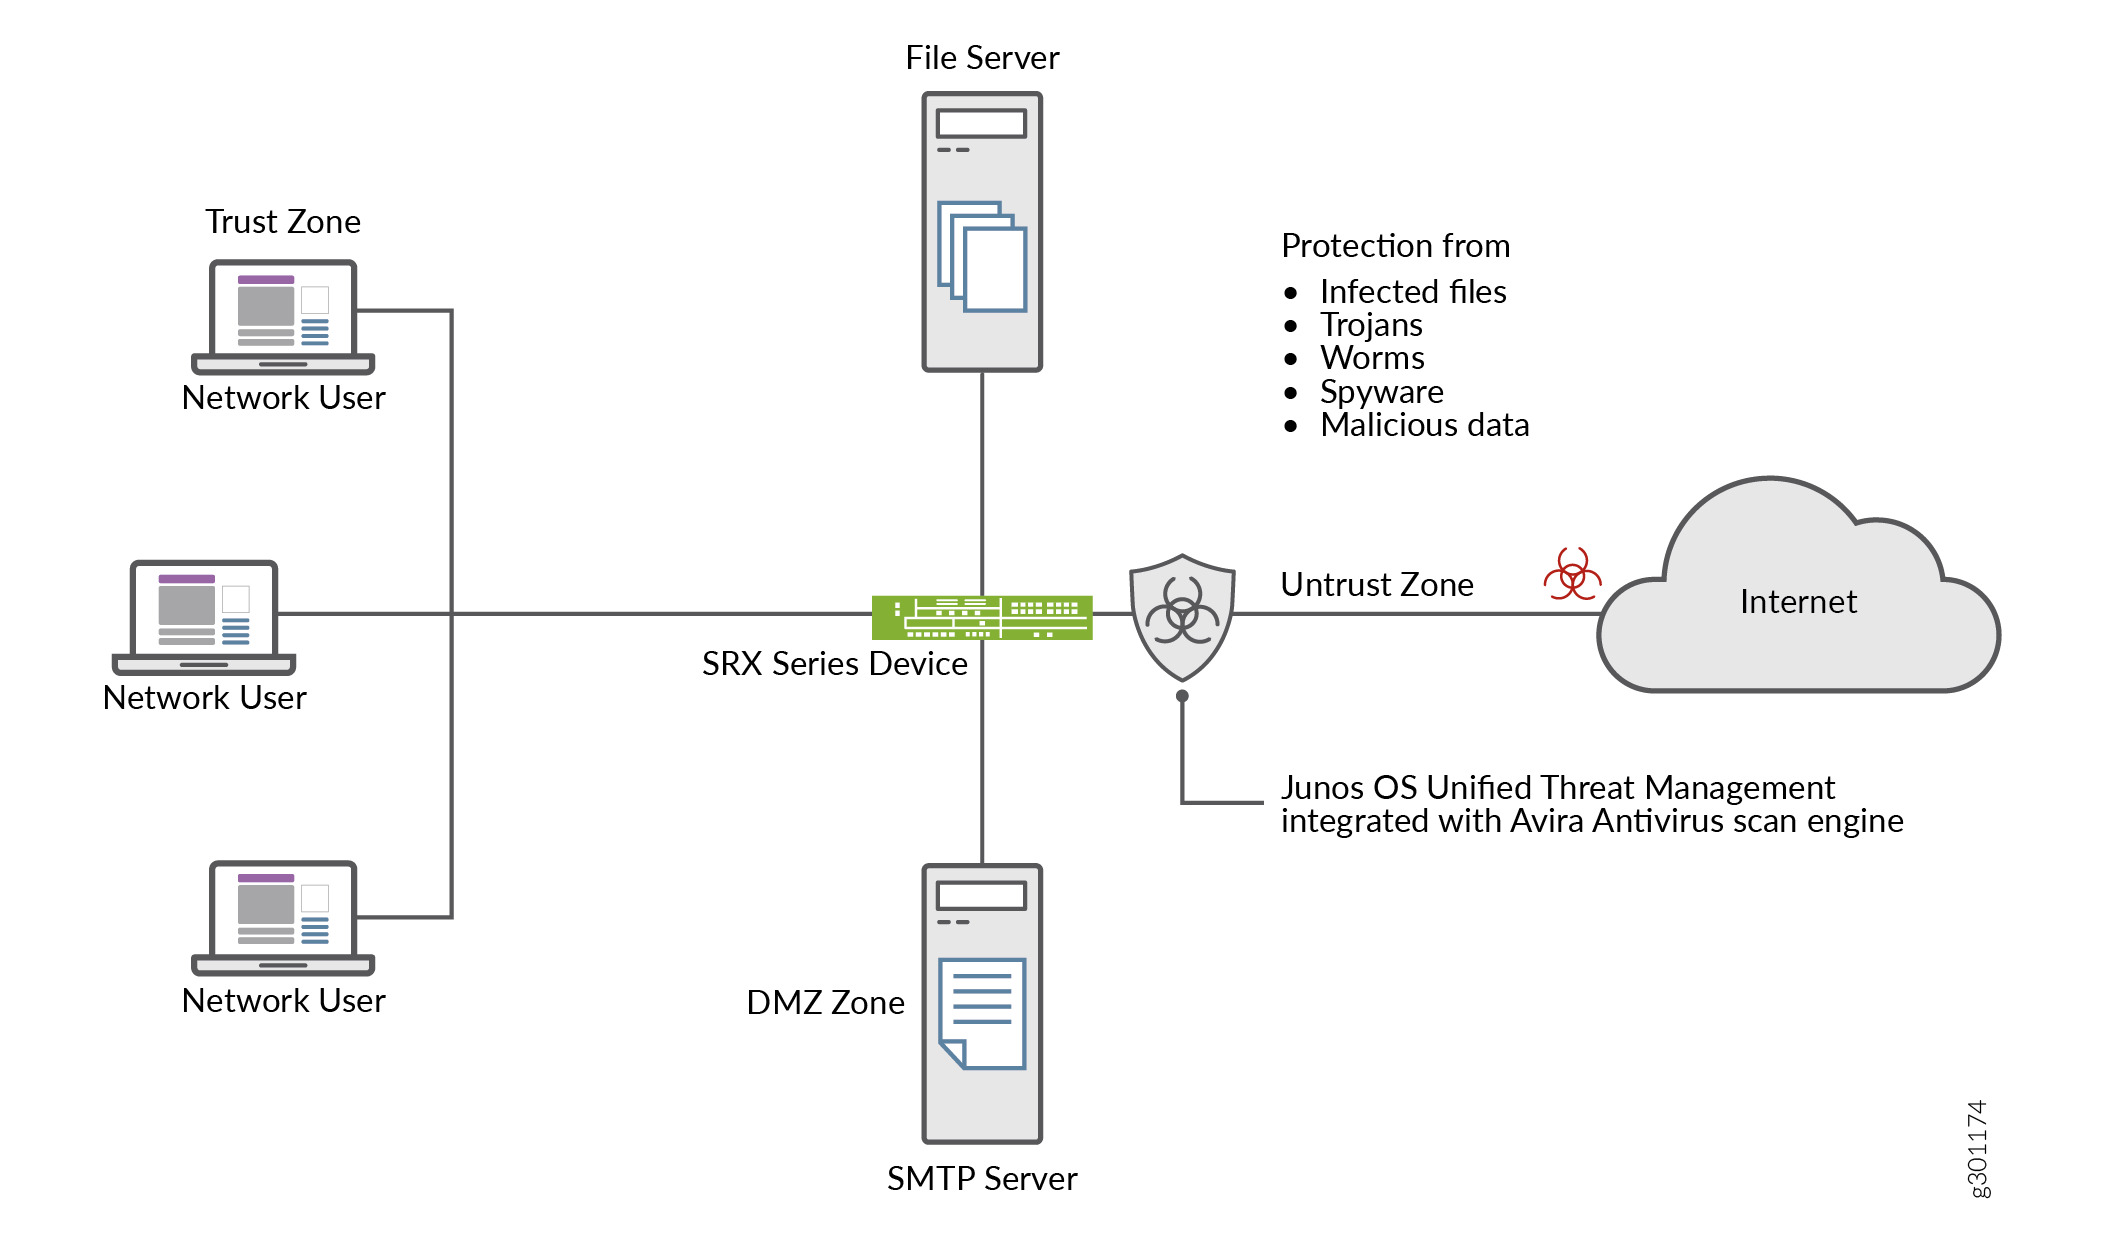
典型的なエンタープライズネットワークを見てみましょう。エンドユーザーが知らず知らずのうちに侵害されたWebサイトにアクセスし、悪意のあるコンテンツをダウンロードしてしまう。このアクションにより、エンドポイントが侵害されます。エンドポイント上の有害なコンテンツは、ネットワーク内の他のホストにとっても脅威になります。悪意のあるコンテンツのダウンロードを防ぐことが重要です。
Aviraアンチウィルスがインストールされたデバイスを使用して、ユーザーをウイルス攻撃から保護し、システム内のウイルスの拡散を防ぐために、Aviraアンチウィルスはネットワークトラフィックをスキャンしてウイルス、トロイの木馬、ルートキット、およびその他のタイプの悪意のあるコードがないか、検出された時点で悪意のあるコンテンツをブロックします。
図1 は、Aviraアンチウィルスの使用例を示しています。
この例では、セキュリティデバイスでAviraアンチウィルスを設定する方法を学習します。以下のオプションがあります。
デフォルトのAviraアンチウィルスオプションを使用して開始するには、「 デフォルトのアンチウィルスプロファイルを使用してアンチウィルススキャンを開始する」を参照してください。
要件に応じてアンチウイルスオプションをカスタマイズするには、「 Aviraアンチウイルススキャンオプションの設定 」を参照してください。
アンチウイルススキャンオプションを設定するには、「 カスタムプロファイルを使用したAviraアンチウイルススキャンの設定 」を参照してください。
設定
ジュニパーネットワークスが事前設定したアンチウイルスプロファイルを有効にできます。デフォルトのアンチウィルス機能プロファイルオプションを使用する場合、追加のパラメータを設定する必要はありません。この手順では、すべてのプロトコルに対してデフォルトのアンチウィルスプロファイルを持つコンテンツセキュリティポリシーを作成し、許可されたトラフィックに対してセキュリティポリシーにコンテンツセキュリティポリシーを適用します。
- デフォルトのアンチウイルスプロファイルを使用してアンチウイルススキャンを開始します
- Aviraアンチウイルススキャンオプションを設定する
- カスタムプロファイルでAviraアンチウイルススキャンを設定する
- 結果
デフォルトのアンチウイルスプロファイルを使用してアンチウイルススキャンを開始します
ステップバイステップの手順
デフォルトのアンチウイルスプロファイルを使用するには、以下の手順を実行します。
-
セキュリティデバイスでAviraアンチウィルススキャンを有効にします。
user@host#set security utm default-configuration anti-virus type avira-engineアンチウイルスタイプとしてAviraを設定した後、新しいスキャンエンジンを有効にするにはデバイスを再起動します。
-
HTTP、FTP、SMTP、POP3、IMAPプロトコルのデフォルトのアンチウィルスプロファイルを選択します。
[edit]user@host#set security utm default-configuration anti-virus type avirauser@host#set security utm utm-policy P1 anti-virus http-profile junos-av-defaultsuser@host#set security utm utm-policy P1 anti-virus ftp upload-profile junos-av-defaultsuser@host#set security utm utm-policy P1 anti-virus ftp download-profile junos-av-defaultsuser@host#set security utm utm-policy P1 anti-virus smtp-profile junos-av-defaultsuser@host#set security utm utm-policy P1 anti-virus pop3-profile junos-av-defaultsuser@host#set security utm utm-policy P1 anti-virus imap-profile junos-av-defaults -
コンテンツセキュリティポリシーをセキュリティポリシーに適用します。
[edit]user@host#set security policies from-zone trust to-zone untrust policy POLICY-1 match source-address anyuser@host#set security policies from-zone trust to-zone untrust policy POLICY-1 match destination-address anyuser@host#set security policies from-zone trust to-zone untrust policy POLICY-1 match application anyuser@host#set security policies from-zone trust to-zone untrust policy POLICY-1 then permit application-services utm-policy P1 -
設定をコミットします。
[edit]user@host#commit
また、 ビデオ「SRXシリーズファイアウォール上のAviraアンチウィルスソリューション 」を視聴して、セキュリティデバイスへのAviraアンチウィルスをインストールして使用する方法について理解することもできます。
Aviraアンチウイルススキャンオプションを設定する
ステップバイステップの手順
この手順では、Avira アンチウィルスを使用するためにセキュリティデバイスを準備するためのオプションの手順を実行します。
-
ウイルスシグネチャデータベースを手動で更新し、データベースサーバーのURLを指定します。URLを指定しない場合、デフォルトのURL https://update.juniper-updates.net/avira が提供されます。デフォルトでは、セキュリティデバイスは https://update.juniper-updates.net/avira からパターンアップデートをダウンロードします。ウイルスパターンデータベースの場所は、デバイスのモードによって異なります。詳細については 、表1 をご覧ください。
[edit]user@host#set security utm default-configuration anti-virus avira-engine pattern-update url http://www.example.net/このステップでは、指定したURLからパターンファイルとエンジンファイルをダウンロードします。
-
アンチウイルスパターンアップデートを定期的にダウンロードする間隔を設定します。
[edit]user@host#set security utm default-configuration anti-virus avira-engine pattern-update interval 2880このステップでは、デフォルトを24時間ごとから48時間ごとに変更します。デフォルトのアンチウイルスパターンの更新間隔は1440分(24時間ごと)です。
-
パターンの更新が完了したら、電子メール通知を送信します。
[edit]user@host#set security utm default-configuration anti-virus avira-engine pattern-update email-notify admin-email admin@email.net custom-message “Avira antivirus data file was updated” custom-message-subject “AV data file updated” -
(オプション)プロキシプロファイルからパターン更新を設定します。
プロキシホストのIPアドレスとポート番号を次のように入力して、プロキシプロファイルを設定します。
user@host# set services proxy profile proxy-profile protocol http host x.x.x.x port xxxx
ユーザー名とパスワードを設定して、プロキシプロファイル内でプロキシ認証を構成します。
[edit]
user@host# set services proxy profile proxy-profile protocol http username <username>
user@host# set services proxy profile proxy-profile protocol http password <password>
パターン更新プロセスにプロキシプロファイルを使用します。
[edit]user@host# set security utm default-configuration anti-virus avira-engine pattern-update proxy-profile <proxy-profile>
-
(オプション)オンボックスアンチウイルスをヘビーモードに設定します。
[edit]user@host# set chassis onbox-av-load-flavor heavyこのステップでは、パフォーマンスを向上させるために追加のリソースを割り当てます。
ライトモードでアンチウイルススキャンを使用するには、 delete chassis onbox-av-load-flavor heavy コマンドを使用します。モードを変更したら、デバイスを再起動します。
-
(オプション)動作モードをデフォルトの継続的配信機能(CDF)から保留モードに変更します。保留モードに変更すると、システムは最終結果が得られるまですべてのパケットを保留します。
[edit]user@host# set security utm default-configuration anti-virus forwarding-mode holdCDFモードとインラインタップモードの詳細については、 forwarding-modeを参照してください。
カスタムプロファイルでAviraアンチウイルススキャンを設定する
表2の手順を完了して、セキュリティデバイスでカスタムオプションを使用してAviraアンチウイルスを設定する必要があります。
| ステップ |
詳細 |
|---|---|
| ステップ 1: カスタム オブジェクトを定義する |
このステップでは、アンチウィルススキャンオプションを定義します。
または、デフォルトリストのjunos-default-bypass-mimeを使用することもできます。 |
| 手順 2: ウイルス対策機能プロファイルを作成する |
|
| ステップ3:コンテンツセキュリティポリシーを作成する |
ステップ2で作成したアンチウイルスプロファイルを、FTP、HTTP、POP3、SMTP、IMAPトラフィックに関連付けます。コンテンツセキュリティポリシーは、アンチウィルススキャンエンジンに送信されるプロトコルトラフィックを制御します。 |
| ステップ4:コンテンツセキュリティポリシーをセキュリティポリシーに適用する |
セキュリティポリシーでアプリケーションサービスとしてコンテンツセキュリティポリシーを指定します。コンテンツセキュリティアンチウィルス設定は、セキュリティポリシールールに一致するトラフィックに適用されます。 |
アンチウイルス機能で使用できるスキャン設定パラメータについては、 スキャンオプション と トリクル を参照してください。
CLIクイックコンフィグレーション
この例のセクションを迅速に設定するには、以下のコマンドをコピーしてテキストファイルに貼り付け、改行を削除し、ネットワーク設定に一致させる必要がある詳細情報を変更し、コマンドを [edit] 階層レベルでCLIにコピーアンドペーストして、設定モードから commit を入力します。
set security utm default-configuration anti-virus type avira-engine
set security utm custom-objects mime-pattern Mime_1 value video/
set security utm custom-objects mime-pattern Mime_exception value video/x-shockwave-flash
set security utm custom-objects url-pattern Pattern_List_1 value www.juniper.net
set security utm custom-objects custom-url-category Cust_URL_Cat value Pattern_List_1
set security utm feature-profile anti-virus profile Avira-AV-Profile fallback-options default log-and-permit
set security utm feature-profile anti-virus profile Avira-AV-Profile fallback-options content-size block
set security utm feature-profile anti-virus profile Avira-AV-Profile fallback-options engine-not-ready log-and-permit
set security utm feature-profile anti-virus profile Avira-AV-Profile fallback-options timeout log-and-permit
set security utm feature-profile anti-virus profile Avira-AV-Profile fallback-options out-of-resources log-and-permit
set security utm feature-profile anti-virus profile Avira-AV-Profile fallback-options too-many-requests log-and-permit
set security utm feature-profile anti-virus profile Avira-AV-Profile notification-options fallback-block type protocol-only
set security utm feature-profile anti-virus profile Avira-AV-Profile notification-options fallback-block notify-mail-sender
set security utm feature-profile anti-virus profile Avira-AV-Profile notification-options fallback-block custom-message " fallback block action occured “
set security utm feature-profile anti-virus profile Avira-AV-Profile notification-options fallback-block custom-message-subject " Antivirus Fallback Alert "
set security utm feature-profile anti-virus profile Avira-AV-Profile mime-whitelist list Mime_1
set security utm feature-profile anti-virus profile Avira-AV-Profile url-whitelist Cust_URL_Cat
set security utm feature-profile anti-virus profile Avira-AV-Profile mime-whitelist list Mime_exception
set security utm utm-policy UTM-AV-Policy anti-virus http-profile Avira-AV-Profile
set security utm utm-policy UTM-AV-Policy anti-virus ftp upload-profile Avira-AV-Profile
set security utm utm-policy UTM-AV-Policy anti-virus ftp download-profile Avira-AV-Profile
set security utm utm-policy UTM-AV-Policy anti-virus smtp-profile Avira-AV-Profile
set security utm utm-policy UTM-AV-Policy anti-virus pop3-profile Avira-AV-Profile
set security utm utm-policy UTM-AV-Policy anti-virus imap-profile Avira-AV-Profile
set security policies from-zone trust to-zone untrust policy POLICY-1 match source-address any
set security policies from-zone trust to-zone untrust policy POLICY-1 match destination-address any
set security policies from-zone trust to-zone untrust policy POLICY-1 match application any
set security policies from-zone trust to-zone untrust policy POLICY-1 then permit application-services utm-policy UTM-AV-Policy
[edit security utm feature-profile]階層レベルは、リリース18.2R1 Junos OS非推奨になりました。詳細については、「コンテンツセキュリティの概要」を参照してください。
ステップバイステップの手順
CLIを使用してオンデバイスアンチウィルス機能プロファイルを設定するには:
-
セキュリティデバイスでAviraアンチウィルススキャンを有効にしていない場合は、有効にしてください。
[edit]user@host#set security utm default-configuration anti-virus type avira-engineアンチウイルスタイプとしてAviraを設定した後、新しいスキャンエンジンを有効にするにはデバイスを再起動します。
-
カスタムオブジェクトを作成します。
[edit]user@host#set security utm custom-objects mime-pattern Mime_1 value video/user@host#set security utm custom-objects mime-pattern Mime_exception value video/x-shockwave-flashuser@host#set security utm custom-objects url-pattern Pattern_List_1 value www.juniper.netuser@host#set security utm custom-objects custom-url-category Cust_URL_Cat value Pattern_List_1 -
アンチウイルスプロファイルを作成します。
[edit]user@host#set security utm feature-profile anti-virus profile Avira-AV-Profile -
フォールバックオプションのリストを設定します。
[edit]user@host#set security utm feature-profile anti-virus profile Avira-AV-Profile fallback-options default log-and-permituser@host#set security utm feature-profile anti-virus profile Avira-AV-Profile fallback-options content-size blockuser@host#set security utm feature-profile anti-virus profile Avira-AV-Profile fallback-options engine-not-ready log-and-permituser@host#set security utm feature-profile anti-virus profile Avira-AV-Profile fallback-options timeout log-and-permituser@host#set security utm feature-profile anti-virus profile Avira-AV-Profile fallback-options out-of-resources log-and-permituser@host#set security utm feature-profile anti-virus profile Avira-AV-Profile fallback-options too-many-requests log-and-permitフォールバックオプションは、トラフィックをスキャンできない場合に実行するアクションを指定します。
-
フォールバックブロックアクションの通知オプションを設定します。
[edit]user@host#set security utm feature-profile anti-virus profile Avira-AV-Profile notification-options fallback-block type protocol-onlyuser@host#set security utm feature-profile anti-virus profile Avira-AV-Profile notification-options fallback-block notify-mail-senderuser@host#set security utm feature-profile anti-virus profile Avira-AV-Profile notification-options fallback-block custom-message " fallback block action occured “user@host#set security utm feature-profile anti-virus profile Avira-AV-Profile notification-options fallback-block custom-message-subject " Antivirus Fallback Alert " -
MIMEバイパスリストと例外リストを使用するようにアンチウィルスモジュールを設定します。
[edit]user@host#set security utm feature-profile anti-virus profile Avira-AV-Profile mime-whitelist list Mime_exception -
URLバイパスリストを使用するようにアンチウィルスモジュールを設定します。URL許可リストは、HTTPトラフィックに対してのみ有効です。この例では、前に設定したリストを使用します。
[edit]user@host#set security utm feature-profile anti-virus profile Avira-AV-Profile mime-whitelist list Mime_1user@host#set security utm feature-profile anti-virus profile Avira-AV-Profile url-whitelist Cust_URL_Cat -
コンテンツセキュリティポリシーを設定し、アンチウィルス機能プロファイルAvira-AV-Profileを添付します。
[edit]user@host#set security utm utm-policy UTM-AV-Policy anti-virus http-profile Avira-AV-Profileuser@host#set security utm utm-policy UTM-AV-Policy anti-virus ftp upload-profile Avira-AV-Profileuser@host#set security utm utm-policy UTM-AV-Policy anti-virus ftp download-profile Avira-AV-Profileuser@host#set security utm utm-policy UTM-AV-Policy anti-virus smtp-profile Avira-AV-Profileuser@host#set security utm utm-policy UTM-AV-Policy anti-virus pop3-profile Avira-AV-Profileuser@host#set security utm utm-policy UTM-AV-Policy anti-virus imap-profile Avira-AV-Profile -
セキュリティポリシーを設定し、許可されたトラフィックのアプリケーションサービスとして
UTM-AV-Policyコンテンツセキュリティポリシーを適用します。[edit]user@host#set security policies from-zone trust to-zone untrust policy POLICY-1 match source-address anyuser@host#set security policies from-zone trust to-zone untrust policy POLICY-1 match destination-address anyuser@host#set security policies from-zone trust to-zone untrust policy POLICY-1 match application anyuser@host#set security policies from-zone trust to-zone untrust policy POLICY-1 then permit application-services utm-policy UTM-AV-Policy
結果
設定モードから、 show security utm、 show services、 show security policies コマンドを入力して設定を確認します。出力に意図した設定が表示されない場合は、この例の設定手順を繰り返して修正します。
user@host# show security utm
custom-objects {
    mime-pattern {
        Mime_1 {
            value video/;
        }
        Mime_exception {
            value video/x-shockwave-flash;
        }
    }
    url-pattern {
        Pattern_List_1 {
            value www.juniper.net;
        }
    }
    custom-url-category {
        Cust_URL_Cat {
            value Pattern_List_1;
        }
    }
}
feature-profile {
    anti-virus {
        profile Avira-AV-Profile {
            fallback-options {
                default log-and-permit;
                content-size block;
                engine-not-ready log-and-permit;
                timeout log-and-permit;
                out-of-resources log-and-permit;
                too-many-requests log-and-permit;
            }
            notification-options {
                fallback-block {
                    type protocol-only;
                    notify-mail-sender;
                    custom-message " fallback block action occured ";
                    custom-message-subject " Antivirus Fallback Alert ";
                }
            }
            mime-whitelist {
                list Mime_1;
            }
            url-whitelist Cust_URL_Cat;
        }
    }
}
utm-policy P1 {
    anti-virus {
        http-profile junos-av-defaults;
        ftp {
            upload-profile junos-av-defaults;
            download-profile junos-av-defaults;
        }
        smtp-profile junos-av-defaults;
        pop3-profile junos-av-defaults;
        imap-profile junos-av-defaults;
    }
}
utm-policy UTM-AV-Policy {
    anti-virus {
        http-profile Avira-AV-Profile;
        ftp {
            upload-profile Avira-AV-Profile;
            download-profile Avira-AV-Profile;
        }
        smtp-profile Avira-AV-Profile;
        pop3-profile Avira-AV-Profile;
        imap-profile Avira-AV-Profile;
    }
}
[edit]
user@host# show security policies
    from-zone untrust to-zone trust {
        policy  POLICY-1 {
            match {
                source-address any;
                destination-address any;
                application any;
            }
            then {
                permit {
                    application-services {
                        utm-policy UTM-AV-Policy;
                    }
                }
            }
        }
    }
デバイスの設定が完了したら、設定モードから commit を入力します。
検証
設定が正常に機能していることを確認するには、以下の手順を使用します。
現在のアンチウィルスステータスに関する情報の取得
目的
アクション
動作モードから、 show security utm anti-virus status コマンドを入力してアンチウィルスステータスを表示します。
出力例
コマンド名
user@host>show security utm anti-virus status
UTM anti-virus status:
  Update server: https://update.example-juniper.net/avira
           Interval: 360 minutes
           Pattern update status: next update in 236 minutes
           Last result: Downloading certs failed
    Scan engine type: avira-engine
    Scan engine information: 8.3.52.102
    Anti-virus signature version: 8.15.11.42
    Onbox AV load flavor: running heavy, configure heavy
意味
アンチウィルスキーの有効期限—ライセンスキーの有効期限。
更新サーバー—データファイル更新サーバーのURL。
間隔—デバイスがアップデートサーバーからデータファイルを更新する期間(分単位)。
パターン更新ステータス—データファイルが次に更新される日時(数分以内)
最終結果—最終更新の結果。
アンチウイルスシグネチャバージョン—現在のデータファイルのバージョン。
スキャンエンジンタイプ—現在実行されているアンチウィルスエンジンタイプ。
スキャンエンジン情報—スキャンエンジンのバージョン。