セキュリティ デバイスのセキュア ワイヤ
セキュリティ デバイスのセキュア ワイヤについて
特定のインターフェイスに到着したトラフィックは、別のインターフェイスを介して変更せずに転送できます。この セキュアワイヤと呼ばれるインターフェイスのマッピングにより、ルーティングテーブルの変更や隣接デバイスの再設定を必要とせずに、ネットワークトラフィックのパスにSRXシリーズを導入できます。 図1 は、セキュアワイヤを使用したSRXシリーズの典型的なインパス導入を示しています。
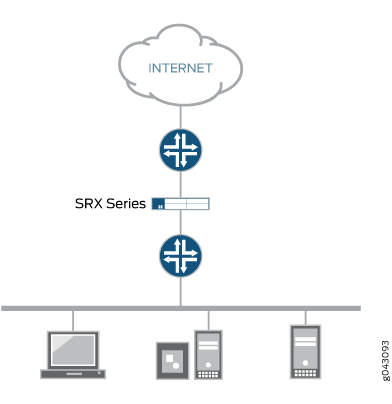 を使用したSRXシリーズインパス導入
セキュアワイヤーは、2つのピアインターフェイスをマッピングします。透過モードやルートモードとは異なり、転送トラフィックに対するスイッチングやルーティングのルックアップはありません。トラフィックがセキュリティポリシーで許可されている限り、一方のピアインターフェイスに到着したパケットは、他方のピアインターフェイスから変更されずに直ちに転送されます。パケットに対してルーティングまたはスイッチングの決定は行われません。戻りトラフィックも変更されずに転送されます。
セキュアワイヤマッピングは、[edit security forwarding-options]階層レベルのsecure-wireステートメントで設定します。2つのイーサネット論理インターフェイスを指定する必要があります。イーサネット論理インターフェイスはfamily ethernet-switchingで設定する必要があり、インターフェイスの各ペアはVLANに属している必要があります。インターフェイスはセキュリティゾーンにバインドされ、ゾーン間のトラフィックを許可するようにセキュリティポリシーが設定されている必要があります。
スイッチング環境でのセキュアなワイヤ展開では、セキュリティのデフォルトを維持しながらレイヤー2転送の柔軟性を高めるために、 ethernet-switching CLIに以下のフラグを設定します。
:この設定では、IPベース ではない すべてのレイヤー2トラフィックがファイアウォールを停止せずに通過することを許可します。bypass-non-ip-unicast
:この設定は、ファイアウォールがBPDUを処理する方法を制御します。BPDUメッセージは、デバイス全体ではなく、属するVLAN内のBPDUメッセージのみをフラッディングします。bpdu-vlan-flooding
ethernet-switching {
    block-non-ip-all;
    bpdu-vlan-flooding;
    bypass-non-ip-unicast;
    no-packet-flooding {
        no-trace-route;
    }
}
この機能は、イーサネット論理インターフェイスでのみ使用できます。IPv4とIPv6の両方のトラフィックがサポートされます。アクセス モードまたはトランクモード用にインターフェイスを設定できます。セキュアワイヤーは、シャーシクラスターの冗長イーサネットインターフェイスをサポートします。この機能は、NAT や IPsec VPN など、透過モードでサポートされていないセキュリティ機能をサポートしていません。
Secure Wireは、AppSecure、SSLプロキシ、コンテンツセキュリティ、IPS/IDPなどのレイヤー7機能をサポートします。
セキュアワイヤーは、ポイントツーポイント接続を提供するSRXシリーズファイアウォール上のレイヤー2透過モードの特殊なケースです。つまり、セキュアワイヤの2つのインターフェイスは、理想的にはルーターやホストなどのレイヤー3エンティティに直接接続されている必要があります。セキュアワイヤーインターフェイスはスイッチに接続できます。ただし、セキュアなワイヤーインターフェイスは、トラフィックがセキュリティポリシーで許可されている場合にのみ、到着するすべてのトラフィックをピアインターフェイスに転送することに注意してください。
セキュアワイヤは、レイヤー3モードと共存できます。レイヤー 2 インターフェイスとレイヤー 3 インターフェイスを同時に設定することはできますが、トラフィック転送はレイヤー 2 インターフェイスとレイヤー 3 インターフェイスで独立して行われます。
セキュアワイヤは、レイヤー2透過モードと共存できます。両方の機能が同じSRXシリーズファイアウォール上に存在する場合は、異なるVLANで設定する必要があります。
IRB(統合型ルーティングおよびブリッジング)インターフェイスは、セキュア ワイヤではサポートされていません。
関連項目
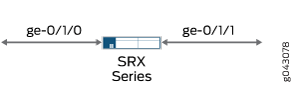
例:アクセスモードインターフェイス上のセキュアワイヤーにより、SRXシリーズファイアウォール導入を簡素化
SRXシリーズファイアウォールを他のネットワークデバイスに接続する場合、セキュアワイヤを使用してネットワークへのデバイスの導入を簡素化できます。SRXシリーズファイアウォール上のルーティングテーブルや転送テーブルを変更したり、隣接するデバイスを再設定したりする必要はありません。セキュアなワイヤーにより、セキュリティポリシーまたはその他のセキュリティ機能で許可されている限り、SRXシリーズファイアウォール上の指定されたアクセスモードインターフェイス間でトラフィックを変更せずに転送できます。アクセスモードインターフェイスを介してSRXシリーズファイアウォールを他のネットワークデバイスに接続する場合、この例に従います。
この例では、2つのアクセスモードインターフェイスにセキュアワイヤマッピングを設定する方法を示しています。この設定は、ユーザートラフィックにVLANタグが付けられていないシナリオに適用されます。
要件
この機能を設定する前に、デバイスの初期化以外の特別な設定を行う必要はありません。
概要
この例では、インターフェイスge-0/0/3.0をインターフェイスge-0/0/4.0にマッピングするセキュアワイヤaccess-swを設定します。2つのピアインターフェイスは、アクセスモード用に設定されています。VLAN ID 10 は、vlan-10 およびアクセス モード インターフェイス用に設定されます。
VLAN には特定の VLAN ID を設定する必要があります。

設定
手順
CLIクイックコンフィグレーション
Junos OSリリース15.1X49-D10およびJunos OSリリース17.3R1以降、一部のレイヤー2 CLI設定ステートメントが拡張され、一部のコマンドが変更されています。変更された階層の詳細については、 を参照してください。/example/../topic-map/layer-2-understanding.html#id-enhanced-layer-2-cli-configuration-statement-and-command-changes-for-security-devices。
以下に示す設定ステートメントは、Junos OSリリース15.1X49-D10以降およびJunos OSリリース17.3R1用です。
この例を迅速に設定するには、以下のコマンドをコピーしてテキストファイルに貼り付け、改行を削除し、ネットワーク設定に一致させる必要がある詳細情報を変更し、コマンドを [edit] 階層レベルでCLIにコピーアンドペーストして、設定モードから commit を入力します。
スイッチングモードでは、イーサネットスイッチングインターフェイスがセキュリティゾーン内にあってはなりません。 グローバルモード(プロトコル) コマンドを使用して、セキュリティゾーンで許可されるイーサネットスイッチングインターフェイスの透過モードを有効にする必要があります。
set vlans vlan-10 vlan-id 10
set interfaces ge-0/0/3 unit 0 family ethernet-switching interface-mode access
set interfaces ge-0/0/3 unit 0 family ethernet-switching vlan members 10
set interfaces ge-0/0/4 unit 0 family ethernet-switching interface-mode access
set interfaces ge-0/0/4 unit 0 family ethernet-switching vlan members 10
set security forwarding-options secure-wire access-sw interface [ge-0/0/3.0 ge-0/0/4.0]
set security zones security-zone trust interfaces ge-0/0/3.0
set security zones security-zone untrust interfaces ge-0/0/4.0
set security address-book book1 address mail-untrust 203.0.113.1
set security address-book book1 attach zone untrust
set security address-book book2 address mail-trust 192.168.1.1
set security address-book book2 attach zone trust
set security policies from-zone trust to-zone untrust policy permit-mail match source-address mail-trust
set security policies from-zone trust to-zone untrust policy permit-mail match destination-address mail-untrust
set security policies from-zone trust to-zone untrust policy permit-mail match application junos-mail
set security policies from-zone trust to-zone untrust policy permit-mail then permit
ステップバイステップの手順
次の例では、設定階層のさまざまなレベルに移動する必要があります。その方法の詳細については、『CLIユーザーガイド』の「構成モードでのCLIエディターの使用」を参照してください。
アクセス モード インターフェイスにセキュア ワイヤ マッピングを設定するには:
VLANを設定します。
[edit vlans vlan-10]
user@host# set vlan-id 10
アクセス モード インターフェイスを設定します。
[edit interfaces ]
user@host# set ge-0/0/3 unit 0 family ethernet-switching interface-mode access
user@host# set ge-0/0/4 unit 0 family ethernet-switching interface-mode access
user@host# set ge-0/0/3 unit 0 family ethernet-switching vlan members 10
user@host# set ge-0/0/4 unit 0 family ethernet-switching vlan members 10
セキュアワイヤマッピングを設定します。
[edit security forwarding-options]
user@host# set secure-wire access-sw interface [ge-0/0/3.0 ge-0/0/4.0]
セキュリティゾーンを設定します。
[edit security zones]
user@host# set security-zone trust interfaces ge-0/0/3.0
user@host# set security-zone untrust interfaces ge-0/0/4.0
アドレス帳エントリを作成します。アドレス帳にセキュリティゾーンを取り付けます。
[edit security address-book book1]
user@host# set address mail-untrust 203.0.113.1
user@host# set attach zone untrust
[edit security address-book book1]
user@host# set address mail-trust 192.168.1.1
user@host# set attach zone trust
メールトラフィックを許可するセキュリティポリシーを設定します。
[edit security policies from-zone trust to-zone untrust]
user@host# set policy permit-mail match source-address mail-trust
user@host# set policy permit-mail match destination-address mail-untrust
user@host# set policy permit-mail match application junos-mail
user@host# set policy permit-mail then permit
結果
設定モードから、 show vlans、 show interfaces、 show security forwarding-options、 show security zones コマンドを入力して設定を確認します。出力に意図した設定が表示されない場合は、この例の手順を繰り返して設定を修正します。
user@host# show vlans
    vlan-10 {
        vlan-id 10;
    }
    user@host# show interfaces
    ge-0/0/3 {
        unit 0 {
            family ethernet-switching {
                interface-mode access;
                vlan {
                    members 10;
                }
            }
        }
    }
    ge-0/0/4 {
        unit 0 {
            family ethernet-switching {
                interface-mode access;
                vlan {
                    members 10;
                }
            }
        }
    }
    user@host# show security forwarding-options
    secure-wire {
        access-sw {
            interface [ ge-0/0/3.0 ge-0/0/4.0 ];
        }
    }
user@host# show security zones
    security-zone trust {
        interfaces {
            ge-0/0/3.0;
        }
    }
    security-zone untrust {
        interfaces {
            ge-0/0/4.0;
        }
    }
user@host# show security policies
from-zone trust to-zone untrust {
    policy permit-mail {
        match {
            source-address mail-trust;
            destination-address mail-untrust;
            application junos-mail;
        }
        then {
            permit;
        }
    }
}
デバイスの設定が完了したら、設定モードから commit を入力します。
検証
設定が正常に機能していることを確認します。
セキュアワイヤマッピングの検証
目的
セキュアワイヤマッピングを確認します。
アクション
動作モードから、 show security forwarding-options secure-wire コマンドを入力します。
user@host> show security forward-options secure-wire
Secure wire                       Interface       Link   Interface       Link
access-sw                         ge-0/0/3.0      down   ge-0/0/4.0      down
Total secure wires: 1
VLAN の検証
目的
VLAN を検証します。
アクション
動作モードから、 show vlans vlan-10 コマンドを入力します。
user@host> show vlans vlan-10
Routing instance        VLAN name            Tag     Interfaces
default-switch          vlan-10               10          ge-0/0/3.0
                                                          ge-0/0/4.0
ポリシー設定の検証
目的
セキュリティポリシーに関する情報を確認します。
アクション
動作モードから、 show security policies detail コマンドを入力します。
user@host> show security policies detail
Default policy: deny-all
Pre ID default policy: permit-all
Policy: permit-mail, action-type: permit, State: enabled, Index: 4, Scope Policy: 0
  Policy Type: Configured
  Sequence number: 1
  From zone: trust, To zone: untrust
  Source vrf group:
    any
  Destination vrf group:
    any
  Source addresses:
    mail-trust(book2): 192.168.1.1/32
  Destination addresses:
    mail-untrust(book1): 203.0.113.1/32
  Application: junos-mail
    IP protocol: tcp, ALG: 0, Inactivity timeout: 1800
      Source port range: [0-0]
      Destination ports: 25
  Per policy TCP Options: SYN check: No, SEQ check: No, Window scale: No
例:トランクモードインターフェイス上のセキュアワイヤーにより、SRXシリーズファイアウォール導入を簡素化
SRXシリーズファイアウォールを他のネットワークデバイスに接続する場合、セキュアワイヤを使用してネットワークへのデバイスの導入を簡素化できます。SRXシリーズファイアウォール上のルーティングテーブルや転送テーブルを変更したり、隣接するデバイスを再設定したりする必要はありません。セキュアワイヤーにより、セキュリティポリシーまたはその他のセキュリティ機能で許可されている限り、SRXシリーズファイアウォール上の指定されたトランクモードインターフェイス間でトラフィックを変更せずに転送できます。トランクモードインターフェイスを介してSRXシリーズファイアウォールを他のネットワークデバイスに接続する場合、この例に従います。
要件
この機能を設定する前に、デバイスの初期化以外の特別な設定を行う必要はありません。
概要
この例では、インターフェイスge-0/1/0.0をインターフェイスge-0/1/1.0にマッピングするセキュアワイヤーtrunk-swを設定します。2つのピアインターフェイスはトランクモード用に設定されており、100〜102のVLAN IDでタグ付きユーザートラフィックを伝送します。VLAN ID リスト 100-102 は、VLAN vlan-100 およびトランクモード インターフェイス用に設定されています。
VLAN には特定の VLAN ID を設定する必要があります。
設定
手順
CLIクイックコンフィグレーション
この例をすばやく設定するには、以下のコマンドをコピーしてテキスト ファイルに貼り付け、改行を削除し、ネットワーク設定に一致させる必要がある詳細情報を変更し、コマンドを [edit] 階層レベルでCLIにコピー アンド ペーストして、設定モードから commit を入力します。
set vlans vlan-100 vlan members 100-102
set interfaces ge-0/1/0 unit 0 family ethernet-switching interface-mode trunk vlan members 100-102
set interfaces ge-0/1/1 unit 0 family ethernet-switching interface-mode trunk vlan members 100-102
set security forwarding-options secure-wire trunk-sw interface [ge-0/1/0.0 ge-0/1/1.0]
set security zones security-zone trust interfaces ge-0/1/0.0
set security zones security-zone untrust interfaces ge-0/1/1.0
set security policies default-policy permit-all
ステップバイステップの手順
次の例では、設定階層のさまざまなレベルに移動する必要があります。その方法の詳細については、『CLIユーザーガイド』の「構成モードでのCLIエディターの使用」を参照してください。
トランクモードインターフェイスのセキュアワイヤマッピングを設定するには:
VLANを設定します。
[edit vlans vlan-100]
user@host# set vlan members 100-102
トランクモード インターフェイスを設定します。
[edit interfaces]
user@host# set ge-0/1/0 unit 0 family ethernet-switching interface-mode trunk vlan members 100-102
user@host# set ge-0/1/1 unit 0 family ethernet-switching interface-mode trunk vlan members 100-102
セキュアワイヤマッピングを設定します。
[edit security forwarding-options]
user@host# set secure-wire trunk-sw interface [ge-0/1/0.0 ge-0/1/1.0]
セキュリティゾーンを設定します。
[edit security zones]
user@host# set security-zone trust interfaces ge-0/1/0.0
user@host# set security-zone untrust interfaces ge-0/1/1.0
トラフィックを許可するセキュリティポリシーを設定します。
[edit security policies]
user@host# set default-policy permit-all
結果
設定モードから、 show vlans、 show interfaces、 show security forwarding-options、 show security zones コマンドを入力して設定を確認します。出力に意図した設定が表示されない場合は、この例の手順を繰り返して設定を修正します。
user@host# show vlans
    vlan-100 {
        vlan members 100-102;
    }
    user@host# show interfaces
    ge-0/1/0 {
        unit 0 {
            family ethernet-switching {
                interface-mode trunk;
                vlan members 100-102;
            }
        }
    }
    ge-0/1/1 {
        unit 0 {
            family ethernet-switching {
                interface-mode trunk;
                vlan members 100-102;
            }
        }
    }
    user@host# show security forwarding-options
    secure-wire trunk-sw {
        interfaces [ge-0/1/0.0 ge-0/1/1.0];
    }
user@host# show security zones
    security-zone trust {
        interfaces {
            ge-0/1/0.0;
        }
    }
    security-zone untrust {
        interfaces {
            ge-0/1/1.0;
        }
    }
デバイスの設定が完了したら、設定モードから commit を入力します。
検証
設定が正常に機能していることを確認します。
セキュアワイヤマッピングの検証
目的
セキュアワイヤマッピングを確認します。
アクション
動作モードから、 show security forwarding-options secure-wire コマンドを入力します。
user@host> show security forward-options secure-wire
Secure wire                       Interface       Link   Interface       Link
trunk-sw                          ge-0/1/0.0      up     ge-0/1/1.0      up
Total secure wires: 1
VLAN の検証
目的
VLAN を検証します。
アクション
動作モードから、 show vlans コマンドを入力します。
user@host> show vlans
Routing instance        VLAN name            VLAN ID     Interfaces
default-switch          vlan-100-vlan-0100          100         ge-0/1/0.0
                                                             ge-0/1/1.0
default-switch          vlan-100-vlan-0101          101         ge-0/1/0.0
                                                             ge-0/1/1.0
default-switch          vlan-100-vlan-0102          102         ge-0/1/0.0
                                                             ge-0/1/1.0
VLAN は自動的に拡張され、VLAN ID リスト内の VLAN ID ごとに 1 つの VLAN になります。
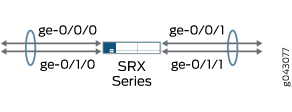
例:集約されたインターフェイスメンバーリンク上のセキュアなワイヤーにより、SRXシリーズファイアウォール導入を簡素化
SRXシリーズファイアウォールを他のネットワークデバイスに接続する場合、セキュアワイヤを使用してネットワークへのデバイスの導入を簡素化できます。SRXシリーズファイアウォール上のルーティングテーブルや転送テーブルを変更したり、隣接するデバイスを再設定したりする必要はありません。セキュアワイヤーにより、セキュリティポリシーまたはその他のセキュリティ機能で許可されている限り、SRXシリーズファイアウォール上の指定された集約されたインターフェイスメンバーリンク間で、トラフィックを変更せずに転送できます。集約されたインターフェイスメンバーリンクを介してSRXシリーズファイアウォールを他のネットワークデバイスに接続する場合、この例に従います。
LACPは個々のセキュアワイヤインターフェイスではサポートされていませんが、正しく設定すればセキュアワイヤトランクインターフェイスではサポートされます。セキュアワイヤを介したVLANトランキングでLACPを使用する場合、トランクインターフェイスにネイティブVLANを設定する必要があります。このネイティブVLANは、 VLAN 設定で定義し、すべてのデバイスのトランクにVLANメンバーとして含める必要があります。これにより、LACP PDU を送信し、LACP 接続を確立できます。
set vlans v100 vlan-id 100
set vlans v200 vlan-id 200
set interfaces ge-0/0/1 native-vlan-id 100
set interfaces ge-0/0/1 unit 0 family ethernet-switching interface-mode trunk
set interfaces ge-0/0/1 unit 0 family ethernet-switching vlan members v100
set interfaces ge-0/0/1 unit 0 family ethernet-switching vlan members v200
SRX210、SRX220、SRX240、SRX300、SRX320、SRX340、SRX345、SRX550、SRX650のデバイスで、2つ以上のポートを持つ集約インターフェイスを作成し、ファミリーをイーサネットスイッチングに設定した場合、バンドル内のリンクがダウンした場合、同じリンクを介して転送されたトラフィックは2秒後に再ルーティングされます。これにより、再ルートが完了するまで、リンクに送信されているトラフィックが停止します。
要件
この機能を設定する前に、デバイスの初期化以外の特別な設定を行う必要はありません。
概要
この例では、それぞれ2つのリンクを持つ2つの集合型イーサネットインターフェイスリンクバンドルにセキュアワイヤを設定します。2本の別々のセキュアワイヤae-link1とae-link2は、各集約されたイーサネットリンクバンドルから1つのリンクを使用して設定されます。この静的マッピングでは、2つのリンクバンドルのリンク数が同じである必要があります。
リンクバンドルの場合、セキュアワイヤマッピングのすべての論理インターフェイスが同じVLANに属している必要があります。VLAN ID 10 は、VLAN vlan-10 と論理インターフェイス用に設定されます。リンクバンドルのすべての論理インターフェイスは、同じセキュリティゾーンに属している必要があります。
VLANに対しては、特定のVLAN IDまたはVLAN IDリストを設定する必要があります。
設定
手順
CLIクイックコンフィグレーション
この例をすばやく設定するには、以下のコマンドをコピーしてテキスト ファイルに貼り付け、改行を削除し、ネットワーク設定に一致させる必要がある詳細情報を変更し、コマンドを [edit] 階層レベルでCLIにコピー アンド ペーストして、設定モードから commit を入力します。
set vlans vlan-10 vlan-id 10
set interfaces ge-0/0/0 unit 0 family ethernet-switching interface-mode access vlan-id 10
set interfaces ge-0/0/1 unit 0 family ethernet-switching interface-mode access vlan-id 10
set interfaces ge-0/1/0 unit 0 family ethernet-switching interface-mode access vlan-id 10
set interfaces ge-0/1/1 unit 0 family ethernet-switching interface-mode access vlan-id 10
set security forwarding-options secure-wire ae-link1-sw interface [ge-0/1/0.0 ge-0/1/1.0]
set security forwarding-options secure-wire ae-link2-sw interface [ge-0/0/0.0 ge-0/0/1.0]
set security zones security-zone trust interfaces ge-0/0/0.0
set security zones security-zone trust interfaces ge-0/1/0.0
set security zones security-zone untrust interfaces ge-0/0/1.0
set security zones security-zone untrust interfaces ge-0/1/1.0
set security policies default-policy permit-all
ステップバイステップの手順
次の例では、設定階層のさまざまなレベルに移動する必要があります。その方法の詳細については、『CLIユーザーガイド』の「構成モードでのCLIエディターの使用」を参照してください。
集合型インターフェイスメンバーリンクにセキュアワイヤマッピングを設定するには:
VLANを設定します。
[edit vlans vlan-10]
user@host# set vlan-id10
インターフェイスを設定します。
[edit interfaces ]
user@host# set ge-0/0/0 unit 0 family ethernet-switching interface-mode access vlan-id 10
user@host# set ge-0/0/1 unit 0 family ethernet-switching interface-mode access vlan-id 10
user@host# set ge-0/1/0 unit 0 family ethernet-switching interface-mode access vlan-id 10
user@host# set ge-0/1/1 unit 0 family ethernet-switching interface-mode access vlan-id 10
セキュアワイヤマッピングを設定します。
[edit security forwarding-options]
user@host# set secure-wire ae-link1-sw interface [ ge-0/1/0.0 ge-0/1/1.0 ]
user@host# set secure-wire ae-link2-sw interface [ ge-0/0/0.0 ge-0/0/1.0 ]
セキュリティゾーンを設定します。
[edit security zones]
user@host# set security-zone trust interfaces ge-0/0/0.0
user@host# set security-zone trust interfaces ge-0/1/0.0
user@host# set security-zone untrust interfaces ge-0/0/1.0
user@host# set security-zone untrust interfaces ge-0/1/1.0
トラフィックを許可するセキュリティポリシーを設定します。
[edit security policies]
user@host# set default-policy permit-all
結果
設定モードから、 show vlans、 show interfaces、 show security forwarding-options、 show security zones コマンドを入力して設定を確認します。出力に意図した設定が表示されない場合は、この例の手順を繰り返して設定を修正します。
user@host# show vlans
    vlan-10 {
        vlan-id 10;
    }
    user@host# show interfaces
    ge-0/0/0 {
        unit 0 {
            family ethernet-switching {
                interface-mode access;
                vlan-id 10;
            }
        }
    }
    ge-0/0/1 {
        unit 0 {
            family ethernet-switching {
                interface-mode access;
                vlan-id 10;
            }
        }
    }
    ge-0/1/0 {
        unit 0 {
            family ethernet-switching {
                interface-mode access;
                vlan-id 10;
            }
        }
    }
    ge-0/1/1{
        unit 0 {
            family ethernet-switching {
                interface-mode access;
                vlan-id 10;
            }
        }
    }
    user@host# show security forwarding-options
    secure-wire ae-link1-sw {
        interfaces [ge-0/1/0.0 ge-0/1/1.0];
    }
    secure-wire ae-link2-sw {
        interfaces [ge-0/0/0.0 ge-0/0/1.0];
    }
user@host# show security zones
    security-zone trust {
        interfaces {
            ge-0/0/0.0;
            ge-0/1/0.0;
        }
    }
    security-zone untrust {
        interfaces {
            ge-0/0/1.0;
            ge-0/1/1.0;
        }
    }
デバイスの設定が完了したら、設定モードから commit を入力します。
検証
設定が正常に機能していることを確認します。
セキュアワイヤマッピングの検証
目的
セキュアワイヤマッピングを確認します。
アクション
動作モードから、 show security forwarding-options secure-wire コマンドを入力します。
user@host> show security forward-options secure-wire
Secure wire                       Interface       Link   Interface       Link
ae-link1-sw                       ge-0/1/0.0      up     ge-0/1/1.0      up
ae-link2-sw                       ge-0/0/0.0      up     ge-0/0/1.0      up
Total secure wires: 2
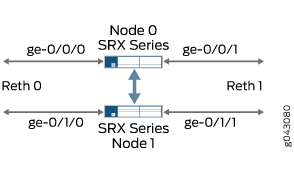
例:冗長イーサネットインターフェイス上のセキュアワイヤーを使用したシャーシクラスター導入の簡素化
SRXシリーズシャーシクラスターを他のネットワークデバイスに接続する場合、セキュアワイヤを使用してネットワークへのクラスター導入を簡略化できます。クラスター上のルーティングテーブルや転送テーブルを変更したり、隣接するデバイスを再設定したりする必要はありません。セキュアワイヤにより、セキュリティポリシーまたはその他のセキュリティ機能で許可されている限り、SRXシリーズシャーシクラスター上の指定された冗長イーサネットインターフェイス間でトラフィックを変更せずに転送できます。冗長イーサネットインターフェイスを介してSRXシリーズシャーシクラスターを他のネットワークデバイスに接続する場合、この例に従います。
要件
始める前に:
シャーシクラスター内の同じSRXシリーズファイアウォールのペアを接続します。
シャーシクラスターノードIDとクラスターIDを設定します。
シャーシクラスター内の冗長イーサネットインターフェイスの数を設定します。
シャーシ クラスター ファブリックを設定します。
シャーシクラスターの冗長性グループを設定します(この例では冗長性グループ1が使用されています)。
詳細については、 『SRXシリーズ デバイス向けシャーシ クラスタ ユーザーガイド』を参照してください。
概要
セキュアワイヤは、シャーシクラスター内の冗長イーサネットインターフェイス上でサポートされています。2つの冗長イーサネットインターフェイスは、同じ冗長性グループ内に設定する必要があります。フェイルオーバーが発生した場合、両方の冗長イーサネットインターフェイスを一緒にフェイルオーバーする必要があります。
冗長イーサネットLAG(リンクアグリゲーショングループ)のセキュアなワイヤマッピングはサポートされていません。LACPはサポートされていません。
この例では、イングレスインターフェイスreth0.0をエグレスインターフェイスreth1.0にマッピングするセキュアワイヤーreth-swを設定します。各冗長イーサネットインターフェイスは、シャーシクラスターの各ノードに1つずつ、2つの子インターフェイスで構成されています。2つの冗長イーサネットインターフェイスは、アクセスモード用に設定されています。VLAN ID 10 は、VLAN vlan-10 および冗長イーサネットインターフェイス用に設定されます。
VLANに対しては、特定のVLAN IDまたはVLAN IDリストを設定する必要があります。
設定
手順
CLIクイックコンフィグレーション
この例をすばやく設定するには、以下のコマンドをコピーしてテキスト ファイルに貼り付け、改行を削除し、ネットワーク設定に一致させる必要がある詳細情報を変更し、コマンドを [edit] 階層レベルでCLIにコピー アンド ペーストして、設定モードから commit を入力します。
set vlans vlan-10 vlan-id 10
set interfaces ge-0/0/0 gigether-options redundant-parent reth0
set interfaces ge-0/0/1 gigether-options redundant-parent reth1
set interfaces ge-0/1/0 gigether-options redundant-parent reth0
set interfaces ge-0/1/1 gigether-options redundant-parent reth1
set interfaces reth0 unit 0 family ethernet-switching interface-mode access vlan-id 10
set interfaces reth1 unit 0 family ethernet-switching interface-mode access vlan-id 10
set interfaces reth0 redundant-ether-options redundancy-group 1
set interfaces reth1 redundant-ether-options redundancy-group 1
set security forwarding-options secure-wire reth-sw interface [reth0.0 reth1.0]
set security zones security-zone trust interfaces reth0.0
set security zones security-zone untrust interfaces reth1.0
set security policies default-policy permit-all
ステップバイステップの手順
次の例では、設定階層のさまざまなレベルに移動する必要があります。その方法の詳細については、『CLIユーザーガイド』の「構成モードでのCLIエディターの使用」を参照してください。
シャーシ クラスターの冗長イーサネット インターフェイスにセキュア ワイヤ マッピングを設定するには:
VLANを設定します。
[edit vlans vlan-10]
user@host# set vlan-id 10
冗長イーサネットインターフェイスを設定します。
[edit interfaces ]
user@host# set ge-0/0/0 gigether-options redundant-parent reth0
user@host# set ge-0/0/1 gigether-options redundant-parent reth1
user@host# set ge-0/1/0 gigether-options redundant-parent reth0
user@host# set ge-0/1/1 gigether-options redundant-parent reth1
user@host#set reth0 unit 0 family ethernet-switching interface-mode access vlan-id 10
user@host#set reth1 unit 0 family ethernet-switching interface-mode access vlan-id 10
user@host# set reth0 redundant-ether-options redundancy-group 1
user@host# set reth1 redundant-ether-options redundancy-group 1
セキュアワイヤマッピングを設定します。
[edit security forwarding-options]
user@host# set secure-wire reth-sw interface [reth0.0 reth1.0]
セキュリティゾーンを設定します。
[edit security zones]
user@host# set security-zone trust interfaces reth0.0
user@host# set security-zone untrust interfaces reth1.0
トラフィックを許可するセキュリティポリシーを設定します。
[edit security policies]
user@host# set default-policy permit-all
結果
設定モードから、 show vlans、 show interfaces、 show security forwarding-options、 show security zones コマンドを入力して設定を確認します。出力に意図した設定が表示されない場合は、この例の手順を繰り返して設定を修正します。
user@host# show vlans
    vlan-10 {
        vlan-id 10;
    }
    user@host# show interfaces
    ge-0/0/0 {
        gigether-options {
            redundant-parent reth0;
        }
    }
    ge-0/0/1 {
        gigether-options {
            redundant-parent reth1;
        }
    }
    ge-0/1/0 {
        gigether-options {
            redundant-parent reth0;
        }
    }
    ge-0/1/1 {
        gigether-options {
            redundant-parent reth1;
        }
    }
    reth0 {
        redundant-ether-options {
            redundancy-group 1;
        }
        unit 0 {
            family ethernet-switching {
                interface-mode access;
                vlan-id 10;
            }
        }
    }
    reth1 {
        redundant-ether-options {
            redundancy-group 1;
        }
        unit 0 {
            family ethernet-switching {
                interface-mode access;
                vlan-id 10;
            }
        }
    }
    user@host# show security forwarding-options
    secure-wire reth-sw {
        interfaces [reth0.0 reth1.0];
    }
user@host# show security zones
    security-zone trust {
        interfaces {
            reth0.0;
        }
    }
    security-zone untrust {
        interfaces {
            reth1.0;
        }
    }
デバイスの設定が完了したら、設定モードから commit を入力します。
検証
設定が正常に機能していることを確認します。
セキュアワイヤマッピングの検証
目的
セキュアワイヤマッピングを確認します。
アクション
動作モードから、 show security forwarding-options secure-wire コマンドを入力します。
user@host> show security forward-options secure-wire
node0:
--------------------------------------------------------------------------
Secure wire                       Interface       Link   Interface       Link
reth-sw                           reth0.0         up     reth1.0         up

Total secure wires: 1

node1:
--------------------------------------------------------------------------
Secure wire                       Interface       Link   Interface       Link
reth-sw                           reth0.0         up     reth1.0         up

Total secure wires: 1
例:集合型冗長イーサネットインターフェイス上のセキュアワイヤーを使用したシャーシクラスター導入の簡素化
SRXシリーズシャーシクラスターを他のネットワークデバイスに接続する場合、セキュアワイヤを使用してネットワークへのクラスター導入を簡略化できます。クラスター上のルーティングテーブルや転送テーブルを変更したり、隣接するデバイスを再設定したりする必要はありません。セキュアワイヤにより、セキュリティポリシーまたはその他のセキュリティ機能で許可されている限り、SRXシリーズシャーシクラスター上の指定された冗長イーサネットインターフェイス間でトラフィックを変更せずに転送できます。SRXシリーズのシャーシクラスターを、集合型冗長イーサネットインターフェイスを介して他のネットワークデバイスに接続する場合、この例に従います。
冗長イーサネットインターフェイスLAG(リンクアグリゲーショングループ)にセキュアワイヤを設定することはできません。この例で示すセキュアワイヤマッピングでは、SRXシリーズシャーシクラスターにLAG設定はありません。各冗長イーサネットインターフェイスは、シャーシクラスターの各ノードに1つずつ、2つの子インターフェイスで構成されています。SRXシリーズクラスターに接続されたアップストリームまたはダウンストリームのデバイス上のユーザーは、LAG内の冗長イーサネットインターフェイスの子リンクを設定できます。
要件
始める前に:
シャーシクラスター内の同じSRXシリーズファイアウォールのペアを接続します。
シャーシクラスターノードIDとクラスターIDを設定します。
シャーシクラスター内の冗長イーサネットインターフェイスの数を設定します。
シャーシ クラスター ファブリックを設定します。
シャーシクラスターの冗長性グループを設定します(この例では、冗長性グループ1を使用しています)。
詳細については、 『SRXシリーズ デバイス向けシャーシ クラスタ ユーザーガイド』を参照してください。
概要
この例では、4つの冗長イーサネットインターフェイス(reth0、reth1、reth2、およびreth3)のセキュアワイヤを設定します。各冗長イーサネットインターフェイスは、シャーシクラスターの各ノードに1つずつ、2つの子インターフェイスで構成されています。4つの冗長イーサネットインターフェイスはすべて同じVLAN内にある必要があります。この例では、VLANはvlan-0です。冗長イーサネットインターフェイスのうちの2つのreth0.0とreth2.0はtrustゾーンに割り当てられ、他の2つのインターフェイスreth1.0とreth3.0はuntrustゾーンに割り当てられます。
この例では、次のセキュアワイヤを設定します。
reth-sw1は、インターフェイスreth0.0をインターフェイスreth1.0にマッピングします
reth-sw2は、インターフェイスreth2.0をreth3.0にマッピングします
すべての冗長イーサネットインターフェイスがアクセスモードに設定されています。VLAN ID 10は、VLAN vlan-0および冗長イーサネットインターフェイス用に設定されています。
VLANに対しては、特定のVLAN IDまたはVLAN IDリストを設定する必要があります。
トポロジー
図6 は、セキュアワイヤ設定reth-sw1およびreth-sw2でマッピングされた冗長イーサネットインターフェイスの子リンクを示しています。各冗長イーサネットインターフェイスは、シャーシクラスターの各ノードに1つずつ、2つの子インターフェイスで構成されています。
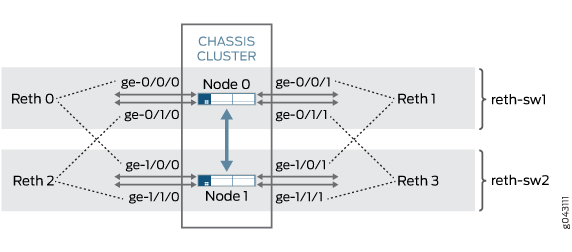
SRXシリーズクラスターに接続されたアップストリームまたはダウンストリームデバイスのユーザーは、LAGがシャーシクラスターノードにまたがらない限り、LAGに冗長イーサネットインターフェイスの子リンクを設定できます。例えば、ノード0のge-0/0/0、ge-0/1/0、ge-0/0/1、ge-0/1/1は、接続されたデバイス上でLAGとして設定できます。同様に、ノード1のge-1/0/0、ge-1/1/0、ge-1/0/1、ge-1/1/1/1は、接続されたデバイス上でLAGとして設定できます。
設定
手順
CLIクイックコンフィグレーション
この例をすばやく設定するには、以下のコマンドをコピーしてテキスト ファイルに貼り付け、改行を削除し、ネットワーク設定に一致させる必要がある詳細情報を変更し、コマンドを [edit] 階層レベルでCLIにコピー アンド ペーストして、設定モードから commit を入力します。
set vlans vlan-0 vlan-id 10
set interfaces ge-0/0/0 gigether-options redundant-parent reth0
set interfaces ge-0/0/1 gigether-options redundant-parent reth1
set interfaces ge-0/1/0 gigether-options redundant-parent reth2
set interfaces ge-0/1/1 gigether-options redundant-parent reth3
set interfaces ge-1/0/0 gigether-options redundant-parent reth0
set interfaces ge-1/0/1 gigether-options redundant-parent reth1
set interfaces ge-1/1/0 gigether-options redundant-parent reth2
set interfaces ge-1/1/1 gigether-options redundant-parent reth3
set interfaces reth0 unit 0 family ethernet-switching interface-mode access vlan-id 10
set interfaces reth1 unit 0 family ethernet-switching interface-mode access vlan-id 10
set interfaces reth2 unit 0 family ethernet-switching interface-mode access vlan-id 10
set interfaces reth3 unit 0 family ethernet-switching interface-mode access vlan-id 10
set interfaces reth0 redundant-ether-options redundancy-group 1
set interfaces reth1 redundant-ether-options redundancy-group 1
set interfaces reth2 redundant-ether-options redundancy-group 1
set interfaces reth3 redundant-ether-options redundancy-group 1
set security forwarding-options secure-wire reth-sw1 interface [reth0.0 reth1.0]
set security forwarding-options secure-wire reth-sw2 interface [reth2.0 reth3.0]
set security zones security-zone trust interfaces reth0.0
set security zones security-zone trust interfaces reth2.0
set security zones security-zone untrust interfaces reth1.0
set security zones security-zone untrust interfaces reth3.0
set security policies default-policy permit-all
ステップバイステップの手順
次の例では、設定階層のさまざまなレベルに移動する必要があります。その方法の詳細については、『CLIユーザーガイド』の「構成モードでのCLIエディターの使用」を参照してください。
集合型インターフェイスメンバーリンクにセキュアワイヤマッピングを設定するには:
VLANを設定します。
[edit vlans vlan-0]
user@host# set vlan-id 10
冗長イーサネットインターフェイスを設定します。
[edit interfaces ]
user@host# set ge-0/0/0 gigether-options redundant-parent reth0
user@host# set ge-0/0/1 gigether-options redundant-parent reth1
user@host# set ge-0/1/0 gigether-options redundant-parent reth2
user@host# set ge-0/1/1 gigether-options redundant-parent reth3
user@host# set ge-1/0/0 gigether-options redundant-parent reth0
user@host# set ge-1/0/1 gigether-options redundant-parent reth1
user@host# set ge-1/1/0 gigether-options redundant-parent reth2
user@host# set ge-1/1/1 gigether-options redundant-parent reth3
user@host# set reth0 unit 0 family ethernet-switching interface-mode access vlan-id 10
user@host# set reth1 unit 0 family ethernet-switching interface-mode access vlan-id 10
user@host# set reth2 unit 0 family ethernet-switching interface-mode access vlan-id 10
user@host# set reth3 unit 0 family ethernet-switching interface-mode access vlan-id 10
user@host# set reth0 redundant-ether-options redundancy-group 1
user@host# set reth1 redundant-ether-options redundancy-group 1
user@host# set reth2 redundant-ether-options redundancy-group 1
user@host# set reth3 redundant-ether-options redundancy-group 1
セキュアワイヤマッピングを設定します。
[edit security forwarding-options]
user@host# set secure-wire reth-sw1 interface [reth0.0 reth1.0]
user@host# set secure-wire reth-sw2 interface [reth2.0 reth3.0]
セキュリティゾーンを設定します。
[edit security zones]
user@host# set security-zone trust interfaces reth0.0
user@host# set security-zone trust interfaces reth2.0
user@host# set security-zone untrust interfaces reth1.0
user@host# set security-zone untrust interfaces reth3.0
トラフィックを許可するセキュリティポリシーを設定します。
[edit security policies]
user@host# set default-policy permit-all
結果
設定モードから、 show vlans、 show interfaces、 show security forwarding-options、 show security zones コマンドを入力して設定を確認します。出力に意図した設定が表示されない場合は、この例の手順を繰り返して設定を修正します。
user@host# show vlans
    vlan-0 {
        vlan-id 10;
    }
    user@host# show interfaces
    ge-0/0/0 {
        gigether-options {
            redundant-parent reth0;
        }
    }
    ge-0/0/1 {
        gigether-options {
            redundant-parent reth1;
        }
    }
    ge-0/1/0 {
        gigether-options {
            redundant-parent reth2;
        }
    }
    ge-0/1/1 {
        gigether-options {
            redundant-parent reth3;
        }
    }
    ge-1/0/0 {
        gigether-options {
            redundant-parent reth0;
        }
    }
    ge-1/0/1 {
        gigether-options {
            redundant-parent reth1;
        }
    }
    ge-1/1/0 {
        gigether-options {
            redundant-parent reth2;
        }
    }
    ge-1/1/1 {
        gigether-options {
            redundant-parent reth3;
        }
    }
    reth0 {
        redundant-ether-options {
            redundancy-group 1;
        }
        unit 0 {
            family ethernet-switching {
                interface-mode access;
                vlan-id 10;
            }
        }
    }
    reth1 {
        redundant-ether-options {
            redundancy-group 1;
        }
        unit 0 {
            family ethernet-switching {
                interface-mode access;
                vlan-id 10;
            }
        }
    }
    reth2 {
        redundant-ether-options {
            redundancy-group 1;
        }
        unit 0 {
            family ethernet-switching {
                interface-mode access;
                vlan-id 10;
            }
        }
    }
    reth3 {
        redundant-ether-options {
            redundancy-group 1;
        }
        unit 0 {
            family ethernet-switching {
                interface-mode access;
                vlan-id 10;
            }
        }
    }
    user@host# show security forwarding-options
    secure-wire reth-sw1 {
        interfaces [reth0.0 reth1.0];
    }
    secure-wire reth-sw2 {
        interfaces [reth2.0 reth3.0];
    }
user@host# show security zones
    security-zone trust {
        interfaces {
            reth0.0;
            reth2.0;
        }
    }
    security-zone untrust {
        interfaces {
            reth1.0;
            reth3.0;
        }
    }
デバイスの設定が完了したら、設定モードから commit を入力します。
検証
設定が正常に機能していることを確認します。
セキュアワイヤマッピングの検証
目的
セキュアワイヤマッピングを確認します。
アクション
動作モードから、 show security forwarding-options secure-wire コマンドを入力します。
user@host> show security forward-options secure-wire
node0:
--------------------------------------------------------------------------
Secure wire                       Interface       Link   Interface       Link
reth-sw1                          reth0.0         up     reth1.0         up
reth-sw2                          reth2.0         up     reth3.0         up

Total secure wires: 2

node1:
--------------------------------------------------------------------------
Secure wire                       Interface       Link   Interface       Link
reth-sw1                          reth0.0         up     reth1.0         up
reth-sw2                          reth2.0         up     reth3.0         up

Total secure wires: 2