BFDの設定
以下の例を使用して、デバイス上で双方向フォワーディング検出(BFD)を設定します。
例:ネットワーク障害検出を高速化するための静的ルート用BFDの設定
この例では、スタティック ルートに対して双方向フォワーディング検出(BFD)を設定する方法を示します。
要件
この例では、デバイスの初期化以上の特別な設定は必要ありません。
概要
スタティックルートには、実用的なアプリケーションが数多くあります。スタティックルーティングは、スタブネットワークへの接続をサポートするためにネットワークエッジでよく使用されます。スタブネットワークは、エントリーとエグレスが単一のポイントであることを考えると、スタティックルートのシンプルさに適しています。Junos OSでは、静的ルートのグローバルプリファレンス度は5です。スタティックルートは、指定されたネクストホップに到達可能な場合にアクティブになります。
この例では、ネクストホップアドレス172.16.1.2を使用して、プロバイダネットワークからカスタマーネットワークへのスタティックルート192.168.47.0/24を設定します。また、ネクストホップアドレス172.16.1.1を使用して、お客様のネットワークからプロバイダネットワークへの0.0.0.0/0の静的デフォルトルートを設定します。
デモンストレーションのために、いくつかのループバック インターフェイスがデバイス B とデバイス D に設定されています。これらのループバックインターフェイスは、pingするためのアドレスを提供し、静的ルートが機能していることを検証します。
図1 は、サンプルネットワークを示しています。
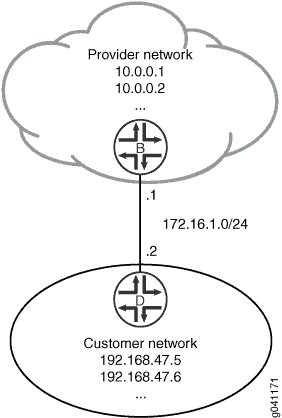 に接続されたカスタマールート
トポロジー
設定
CLIクイックコンフィグレーション
この例を簡単に設定するには、以下のコマンドをコピーしてテキストファイルに貼り付け、改行を削除して、ネットワーク構成に合わせて必要な詳細を変更し、コマンドを [edit] 階層レベルのCLIにコピー&ペーストしてください。
デバイスB
set interfaces ge-1/2/0 unit 0 description B->D
set interfaces ge-1/2/0 unit 0 family inet address 172.16.1.1/24
set interfaces lo0 unit 57 family inet address 10.0.0.1/32
set interfaces lo0 unit 57 family inet address 10.0.0.2/32
set routing-options static route 192.168.47.0/24 next-hop 172.16.1.2
set routing-options static route 192.168.47.0/24 bfd-liveness-detection minimum-interval 1000
set routing-options static route 192.168.47.0/24 bfd-liveness-detection description Site-xxx
set protocols bfd traceoptions file bfd-trace
set protocols bfd traceoptions flag all
デバイスD
set interfaces ge-1/2/0 unit 1 description D->B
set interfaces ge-1/2/0 unit 1 family inet address 172.16.1.2/24
set interfaces lo0 unit 2 family inet address 192.168.47.5/32
set interfaces lo0 unit 2 family inet address 192.168.47.6/32
set routing-options static route 0.0.0.0/0 next-hop 172.16.1.1
set routing-options static route 0.0.0.0/0 bfd-liveness-detection minimum-interval 1000
set protocols bfd traceoptions file bfd-trace
set protocols bfd traceoptions flag all
手順
ステップバイステップの手順
次の例では、設定階層内のさまざまなレベルに移動する必要があります。CLIのナビゲーションについては、『Junos OS CLIユーザーガイド』の「設定モードでのCLIエディターの使用」を参照してください。
スタティックルートにBFDを設定するには:
デバイスBで、インターフェイスを設定します。
[edit interfaces]
user@B# set ge-1/2/0 unit 0 description B->D
user@B# set ge-1/2/0 unit 0 family inet address 172.16.1.1/24
user@B# set lo0 unit 57 family inet address 10.0.0.1/32
user@B# set lo0 unit 57 family inet address 10.0.0.2/32
デバイスBで、スタティックルートを作成し、ネクストホップアドレスを設定します。
[edit routing-options]
user@B# set static route 192.168.47.0/24 next-hop 172.16.1.2
デバイスBで、スタティックルートにBFDを設定します。
[edit routing-options]
user@B# set static route 192.168.47.0/24 bfd-liveness-detection minimum-interval 1000
set routing-options static route 192.168.47.0/24 bfd-liveness-detection description Site-xxx
デバイスBで、BFDのトレース操作を設定します。
[edit protocols]
user@B# set bfd traceoptions file bfd-trace
user@B# set bfd traceoptions flag all
デバイス B の設定が完了したら、設定をコミットします。
[edit]
user@B# commit
デバイスDで、インターフェイスを設定します。
[edit interfaces]
user@D# set ge-1/2/0 unit 1 description D->B
user@D# set ge-1/2/0 unit 1 family inet address 172.16.1.2/24
user@D# set lo0 unit 2 family inet address 192.168.47.5/32
user@D# set lo0 unit 2 family inet address 192.168.47.6/32
デバイスDで、スタティックルートを作成し、ネクストホップアドレスを設定します。
[edit routing-options]
user@D# set static route 0.0.0.0/0 next-hop 172.16.1.1
デバイス D で、スタティック ルートに BFD を設定します。
[edit routing-options]
user@D# set static route 0.0.0.0/0 bfd-liveness-detection minimum-interval 1000
デバイス D で、BFD のトレース操作を設定します。
[edit protocols]
user@D# set bfd traceoptions file bfd-trace
user@D# set bfd traceoptions flag all
デバイス D の設定が完了したら、設定をコミットします。
[edit]
user@D# commit
結果
show interfaces、show protocols、show routing-optionsコマンドを発行して、設定を確認します。出力に意図した設定が表示されない場合は、この例の手順を繰り返して設定を修正します。
デバイスB
user@B# show interfaces
ge-1/2/0 {
    unit 0 {
        description B->D;
        family inet {
            address 172.16.1.1/24;
        }
    }
}
lo0 {
    unit 57 {
        family inet {
            address 10.0.0.1/32;
            address 10.0.0.2/32;
        }
    }
}
user@D# show protocols
bfd {
    traceoptions {
        file bfd-trace;
        flag all;
    }
}
user@B# show routing-options
static {
    route 192.168.47.0/24 {
        next-hop 172.16.1.2;
        bfd-liveness-detection {
            description Site- xxx;
            minimum-interval 1000;
        }
    }
}
デバイスD
user@D# show interfaces
ge-1/2/0 {
    unit 1 {
        description D->B;
        family inet {
            address 172.16.1.2/24;
        }
    }
}
lo0 {
    unit 2 {
        family inet {
            address 192.168.47.5/32;
            address 192.168.47.6/32;
        }
    }
}
user@D# show routing-options
static {
    route 0.0.0.0/0 {
        next-hop 172.16.1.1;
        bfd-liveness-detection {
            description Site - xxx;
            minimum-interval 1000;
        }
    }
}
検証
設定が正常に機能していることを確認します。
BFDセッションが稼働していることの確認
目的
BFDセッションが稼働していることを確認し、BFDセッションの詳細を表示します。
アクション
動作モードから、 show bfd session extensive コマンドを入力します。
user@B> show bfd session extensive
                                                  Detect   Transmit
Address                  State     Interface      Time     Interval  Multiplier
172.16.1.2               Up        lt-1/2/0.0     3.000     1.000        3
 Client Static, description Site-xxx, TX interval 1.000, RX interval 1.000
 Session up time 00:14:30
 Local diagnostic None, remote diagnostic None
 Remote state Up, version 1
 Replicated, routing table index 172
 Min async interval 1.000, min slow interval 1.000
 Adaptive async TX interval 1.000, RX interval 1.000
 Local min TX interval 1.000, minimum RX interval 1.000, multiplier 3
 Remote min TX interval 1.000, min RX interval 1.000, multiplier 3
 Local discriminator 2, remote discriminator 1
 Echo mode disabled/inactive

1 sessions, 1 clients
Cumulative transmit rate 1.0 pps, cumulative receive rate 1.0 pps
この description Site- <xxx> は、SRXシリーズファイアウォールでのみサポートされています。
各クライアントに複数の説明フィールドがある場合は、最初の説明フィールドとともに「and more」と表示されます。
user@D> show bfd session extensive
                                                  Detect   Transmit
Address                  State     Interface      Time     Interval  Multiplier
172.16.1.1               Up        lt-1/2/0.1     3.000     1.000        3
 Client Static, TX interval 1.000, RX interval 1.000
 Session up time 00:14:35
 Local diagnostic None, remote diagnostic None
 Remote state Up, version 1
 Replicated, routing table index 170
 Min async interval 1.000, min slow interval 1.000
 Adaptive async TX interval 1.000, RX interval 1.000
 Local min TX interval 1.000, minimum RX interval 1.000, multiplier 3
 Remote min TX interval 1.000, min RX interval 1.000, multiplier 3
 Local discriminator 1, remote discriminator 2
 Echo mode disabled/inactive

1 sessions, 1 clients
Cumulative transmit rate 1.0 pps, cumulative receive rate 1.0 pps
意味
TX interval 1.000, RX interval 1.000出力は、minimum-intervalステートメントで構成された設定を表しています。その他の出力はすべて、BFDのデフォルト設定を表しています。デフォルト設定を変更するには、bfd-liveness-detectionステートメントの下にオプションのステートメントを含めます。
BFDイベントの詳細の表示
目的
BFDトレースファイルの内容を表示し、必要に応じてトラブルシューティングに役立てることができます。
アクション
動作モードから、 file show /var/log/bfd-trace コマンドを入力します。
user@B> file show /var/log/bfd-trace
Nov 23 14:26:55    Data (9) len 35: (hex) 42 46 44 20 70 65 72 69 6f 64 69 63 20 78 6d 69 74 20 72
Nov 23 14:26:55 PPM Trace: BFD periodic xmit rt tbl index 172
Nov 23 14:26:55 Received Downstream TraceMsg (22) len 108:
Nov 23 14:26:55    IfIndex (3) len 4: 0
Nov 23 14:26:55    Protocol (1) len 1: BFD
Nov 23 14:26:55    Data (9) len 83: (hex) 70 70 6d 64 5f 62 66 64 5f 73 65 6e 64 6d 73 67 20 3a 20
Nov 23 14:26:55 PPM Trace: ppmd_bfd_sendmsg : socket 12 len 24, ifl 78 src 172.16.1.1 dst 172.16.1.2 errno 65
Nov 23 14:26:55 Received Downstream TraceMsg (22) len 93:
Nov 23 14:26:55    IfIndex (3) len 4: 0
Nov 23 14:26:55    Protocol (1) len 1: BFD
Nov 23 14:26:55    Data (9) len 68: (hex) 42 46 44 20 70 65 72 69 6f 64 69 63 20 78 6d 69 74 20 74
意味
BFDメッセージがトレースファイルに書き込まれています。
例:内部 BGP ピア セッションでの BFD の設定
この例では、双方向フォワーディング検出(BFD)プロトコルを使用して内部 BGP(IBGP)ピア セッションを設定し、ネットワーク内の障害を検出する方法を示します。
要件
この例を設定する前に、デバイスの初期化以外の特別な設定は必要ありません。
概要
IBGP セッションで BFD を有効にするための最小設定は、BFD セッションに参加するすべてのネイバーのBGP設定に bfd-liveness-detection minimum-interval ステートメントを含めることです。 minimum-interval ステートメントは、障害検出のための最小の送受信間隔を指定します。具体的には、この値は、ローカル ルーティング デバイスが hello パケットを送信するまでの最小間隔と、ルーティング デバイスが BFD セッションを確立したネイバーから応答を受信すると予想される最小間隔を表します。1〜255,000ミリ秒の値を設定できます。
オプションで、 transmit-interval minimum-interval ステートメントと minimum-receive-interval ステートメントを使用して、最小の送信間隔と受信間隔を個別に指定できます。これらおよびその他のオプションのBFD設定ステートメントについては、 bfd-liveness-detectionを参照してください。
ネットワーク環境によっては、以下の追加推奨事項が適用される場合があります。
一般的なルーティングエンジンスイッチオーバーイベント中にBFDフラッピングを防ぐには、ルーティングエンジンベースのセッションに5000ミリ秒の最小間隔を指定します。この最小値が必要なのは、一般的なルーティングエンジンスイッチオーバーイベント中に、RPD、MIBD、SNMPDなどのプロセスが、指定されたしきい値を超えてCPUリソースを使用するためです。したがって、このCPUリソースの不足により、BFDの処理とスケジューリングが影響を受けます。
デュアルシャーシクラスター制御リンクのシナリオで、最初の制御リンクに障害が発生した場合、BFDセッションが稼働し続けるようにするには、ルーティングエンジンベースのセッションのセカンダリノードでLACPがフラッピングしないように、最小間隔を6000ミリ秒に指定します。
多数のBFDセッションを伴う大規模なネットワーク導入の場合、最小間隔をルーティングエンジンベースのセッションで300ミリ秒、分散BFDセッションで100ミリ秒に指定します。
多数のBFDセッションを伴う非常に大規模なネットワーク展開については、詳細についてジュニパーネットワークスのカスタマーサポートにお問い合わせください。
ノンストップアクティブルーティング(NSR)が設定されているときに、ルーティングエンジンスイッチオーバーイベント中にBFDセッションが稼働し続けるようにするには、ルーティングエンジンベースのセッションに最小間隔を2500ミリ秒に指定します。NSRが設定された分散BFDセッションの場合、最小間隔の推奨事項は変更されず、ネットワークの導入にのみ依存します。
BFDは、デフォルトのルーティングインスタンス(メインルーター)、ルーティングインスタンス、論理システムでサポートされています。この例では、論理システム上の BFD を示しています。
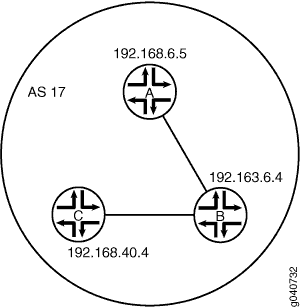
図2 は、内部ピアセッションを持つ典型的なネットワークを示しています。
 を持つ典型的なネットワーク
設定
CLIクイックコンフィグレーション
この例をすばやく設定するには、以下のコマンドをコピーしてテキスト ファイルに貼り付け、改行を削除して、ネットワーク構成に合わせて必要な詳細を変更し、 [edit] 階層レベルのCLIにコマンドをコピー アンド ペーストします。
デバイスA
set logical-systems A interfaces lt-1/2/0 unit 1 description to-B
set logical-systems A interfaces lt-1/2/0 unit 1 encapsulation ethernet
set logical-systems A interfaces lt-1/2/0 unit 1 peer-unit 2
set logical-systems A interfaces lt-1/2/0 unit 1 family inet address 10.10.10.1/30
set logical-systems A interfaces lo0 unit 1 family inet address 192.168.6.5/32
set logical-systems A protocols bgp group internal-peers type internal
set logical-systems A protocols bgp group internal-peers traceoptions file bgp-bfd
set logical-systems A protocols bgp group internal-peers traceoptions flag bfd detail
set logical-systems A protocols bgp group internal-peers local-address 192.168.6.5
set logical-systems A protocols bgp group internal-peers export send-direct
set logical-systems A protocols bgp group internal-peers bfd-liveness-detection minimum-interval 1000
set logical-systems A protocols bgp group internal-peers neighbor 192.163.6.4
set logical-systems A protocols bgp group internal-peers neighbor 192.168.40.4
set logical-systems A protocols ospf area 0.0.0.0 interface lo0.1 passive
set logical-systems A protocols ospf area 0.0.0.0 interface lt-1/2/0.1
set logical-systems A policy-options policy-statement send-direct term 2 from protocol direct
set logical-systems A policy-options policy-statement send-direct term 2 then accept
set logical-systems A routing-options router-id 192.168.6.5
set logical-systems A routing-options autonomous-system 17
デバイスB
set logical-systems B interfaces lt-1/2/0 unit 2 description to-A
set logical-systems B interfaces lt-1/2/0 unit 2 encapsulation ethernet
set logical-systems B interfaces lt-1/2/0 unit 2 peer-unit 1
set logical-systems B interfaces lt-1/2/0 unit 2 family inet address 10.10.10.2/30
set logical-systems B interfaces lt-1/2/0 unit 5 description to-C
set logical-systems B interfaces lt-1/2/0 unit 5 encapsulation ethernet
set logical-systems B interfaces lt-1/2/0 unit 5 peer-unit 6
set logical-systems B interfaces lt-1/2/0 unit 5 family inet address 10.10.10.5/30
set logical-systems B interfaces lo0 unit 2 family inet address 192.163.6.4/32
set logical-systems B protocols bgp group internal-peers type internal
set logical-systems B protocols bgp group internal-peers local-address 192.163.6.4
set logical-systems B protocols bgp group internal-peers export send-direct
set logical-systems B protocols bgp group internal-peers bfd-liveness-detection minimum-interval 1000
set logical-systems B protocols bgp group internal-peers neighbor 192.168.40.4
set logical-systems B protocols bgp group internal-peers neighbor 192.168.6.5
set logical-systems B protocols ospf area 0.0.0.0 interface lo0.2 passive
set logical-systems B protocols ospf area 0.0.0.0 interface lt-1/2/0.2
set logical-systems B protocols ospf area 0.0.0.0 interface lt-1/2/0.5
set logical-systems B policy-options policy-statement send-direct term 2 from protocol direct
set logical-systems B policy-options policy-statement send-direct term 2 then accept
set logical-systems B routing-options router-id 192.163.6.4
set logical-systems B routing-options autonomous-system 17
デバイスC
set logical-systems C interfaces lt-1/2/0 unit 6 description to-B
set logical-systems C interfaces lt-1/2/0 unit 6 encapsulation ethernet
set logical-systems C interfaces lt-1/2/0 unit 6 peer-unit 5
set logical-systems C interfaces lt-1/2/0 unit 6 family inet address 10.10.10.6/30
set logical-systems C interfaces lo0 unit 3 family inet address 192.168.40.4/32
set logical-systems C protocols bgp group internal-peers type internal
set logical-systems C protocols bgp group internal-peers local-address 192.168.40.4
set logical-systems C protocols bgp group internal-peers export send-direct
set logical-systems C protocols bgp group internal-peers bfd-liveness-detection minimum-interval 1000
set logical-systems C protocols bgp group internal-peers neighbor 192.163.6.4
set logical-systems C protocols bgp group internal-peers neighbor 192.168.6.5
set logical-systems C protocols ospf area 0.0.0.0 interface lo0.3 passive
set logical-systems C protocols ospf area 0.0.0.0 interface lt-1/2/0.6
set logical-systems C policy-options policy-statement send-direct term 2 from protocol direct
set logical-systems C policy-options policy-statement send-direct term 2 then accept
set logical-systems C routing-options router-id 192.168.40.4
set logical-systems C routing-options autonomous-system 17
デバイスAの設定
ステップバイステップの手順
次の例では、設定階層内のさまざまなレベルに移動する必要があります。CLIのナビゲーションについては、『CLIユーザーガイド』の「設定モードでのCLIエディターの使用」を参照してください。
デバイスAを設定するには:
CLIを論理システムAに設定します。
user@host> set cli logical-system A
インターフェイスを設定します。
[edit interfaces lt-1/2/0 unit 1]
user@host:A# set description to-B
user@host:A# set encapsulation ethernet
user@host:A# set peer-unit 2
user@host:A# set family inet address 10.10.10.1/30
[edit interfaces lo0 unit 1]
user@host:A# set family inet address 192.168.6.5/32
BGPを設定します。
デバイスAと機器Cが直接接続されていないにもかかわらず、
neighborステートメントは機器Bと機器Cの両方に含まれています。[edit protocols bgp group internal-peers] user@host:A# set type internal user@host:A# set local-address 192.168.6.5 user@host:A# set export send-direct user@host:A# set neighbor 192.163.6.4 user@host:A# set neighbor 192.168.40.4
BFDを設定します。
[edit protocols bgp group internal-peers]
user@host:A# set bfd-liveness-detection minimum-interval 1000
接続ピアでも同じ最小間隔を設定する必要があります。
(オプション)BFDトレースを設定します。
[edit protocols bgp group internal-peers]
user@host:A# set traceoptions file bgp-bfd
user@host:A# set traceoptions flag bfd detail
OSPFを設定します。
[edit protocols ospf area 0.0.0.0]
user@host:A# set interface lo0.1 passive
user@host:A# set interface lt-1/2/0.1
直接ルートを受け入れるポリシーを設定します。
このシナリオの他の有用なオプションは、OSPFまたはローカルルートで学習したルートを受け入れることかもしれません。
[edit policy-options policy-statement send-direct term 2]
user@host:A# set from protocol direct
user@host:A# set then accept
ルーターIDと自律システム(AS)番号を設定します。
[edit routing-options]
user@host:A# set router-id 192.168.6.5
user@host:A# set autonomous-system 17
デバイスの設定が完了したら、設定モードから
commitを入力します。 これらの手順を繰り返して、デバイス B とデバイス C を設定します。
結果
設定モードから、 show interfaces、 show policy-options、 show protocols、および show routing-options コマンドを入力して設定を確認します。出力に意図した設定が表示されない場合は、この例の手順を繰り返して設定を修正します。
user@host:A# show interfaces
lt-1/2/0 {
    unit 1 {
        description to-B;
        encapsulation ethernet;
        peer-unit 2;
        family inet {
            address 10.10.10.1/30;
        }
    }
}
lo0 {
    unit 1 {
        family inet {
            address 192.168.6.5/32;
        }
    }
}
user@host:A# show policy-options
policy-statement send-direct {
    term 2 {
        from protocol direct;
        then accept;
    }
}
user@host:A# show protocols
bgp {
    group internal-peers {
        type internal;
        traceoptions {
            file bgp-bfd;
            flag bfd detail;
        }
        local-address 192.168.6.5;
        export send-direct;
        bfd-liveness-detection {
            minimum-interval 1000;
        }
        neighbor 192.163.6.4;
        neighbor 192.168.40.4;
    }
}
ospf {
    area 0.0.0.0 {
        interface lo0.1 {
            passive;
        }
        interface lt-1/2/0.1;
    }
}
user@host:A# show routing-options
router-id 192.168.6.5;
autonomous-system 17;
検証
設定が正常に機能していることを確認します。
BFDが有効になっていることの確認
目的
IBGPピア間でBFDが有効になっていることを確認します。
アクション
動作モードから、 show bgp neighbor コマンドを入力します。 | match bfd フィルターを使用して、出力を絞り込むことができます。
user@host:A> show bgp neighbor | match bfd
Options: <BfdEnabled>
  BFD: enabled, up
  Trace file: /var/log/A/bgp-bfd size 131072 files 10
  Options: <BfdEnabled>
  BFD: enabled, up
  Trace file: /var/log/A/bgp-bfd size 131072 files 10
意味
出力は、論理システムAにBFDが有効な2つのネイバーがあることを示しています。BFDが有効になっていない場合、出力には BFD: disabled, downが表示され、 <BfdEnabled> オプションはありません。BFDが有効で、セッションがダウンしている場合、出力は BFD: enabled, downと表示されます。また、トレース操作が設定されているため、BFD 関連のイベントがログ ファイルに書き込まれていることも、出力は示しています。
BFDセッションが稼働していることの確認
目的
BFDセッションが稼働していることを確認し、BFDセッションの詳細を表示します。
アクション
動作モードから、 show bfd session extensive コマンドを入力します。
user@host:A> show bfd session extensive
                                                  Detect   Transmit
Address                  State     Interface      Time     Interval  Multiplier
192.163.6.4              Up                       3.000     1.000        3
 Client BGP, TX interval 1.000, RX interval 1.000
 Session up time 00:54:40
 Local diagnostic None, remote diagnostic None
 Remote state Up, version 1
 Logical system 12, routing table index 25
 Min async interval 1.000, min slow interval 1.000
 Adaptive async TX interval 1.000, RX interval 1.000
 Local min TX interval 1.000, minimum RX interval 1.000, multiplier 3
 Remote min TX interval 1.000, min RX interval 1.000, multiplier 3
 Local discriminator 10, remote discriminator 9
 Echo mode disabled/inactive
 Multi-hop route table 25, local-address 192.168.6.5

                                                  Detect   Transmit
Address                  State     Interface      Time     Interval  Multiplier
192.168.40.4             Up                       3.000     1.000        3
 Client BGP, TX interval 1.000, RX interval 1.000
 Session up time 00:48:03
 Local diagnostic None, remote diagnostic None
 Remote state Up, version 1
 Logical system 12, routing table index 25
 Min async interval 1.000, min slow interval 1.000
 Adaptive async TX interval 1.000, RX interval 1.000
 Local min TX interval 1.000, minimum RX interval 1.000, multiplier 3
 Remote min TX interval 1.000, min RX interval 1.000, multiplier 3
 Local discriminator 14, remote discriminator 13
 Echo mode disabled/inactive
 Multi-hop route table 25, local-address 192.168.6.5

2 sessions, 2 clients
Cumulative transmit rate 2.0 pps, cumulative receive rate 2.0 pps
意味
TX interval 1.000, RX interval 1.000出力は、minimum-intervalステートメントで設定された設定を表しています。その他の出力はすべて、BFDのデフォルト設定を表しています。デフォルト設定を変更するには、bfd-liveness-detectionステートメントの下にオプションのステートメントを含めます。
BFDイベントの詳細の表示
目的
BFDトレースファイルの内容を表示し、必要に応じてトラブルシューティングに役立てることができます。
アクション
動作モードから、 file show /var/log/A/bgp-bfd コマンドを入力します。
user@host:A> file show /var/log/A/bgp-bfd
Aug 15 17:07:25 trace_on: Tracing to "/var/log/A/bgp-bfd" started
Aug 15 17:07:26.492190 bgp_peer_init: BGP peer 192.163.6.4 (Internal AS 17) local address 192.168.6.5 not found.  Leaving peer idled
Aug 15 17:07:26.493176 bgp_peer_init: BGP peer 192.168.40.4 (Internal AS 17) local address 192.168.6.5 not found.  Leaving peer idled
Aug 15 17:07:32.597979 task_connect: task BGP_17.192.163.6.4+179 addr 192.163.6.4+179: No route to host
Aug 15 17:07:32.599623 bgp_connect_start: connect 192.163.6.4 (Internal AS 17): No route to host
Aug 15 17:07:36.869394 task_connect: task BGP_17.192.168.40.4+179 addr 192.168.40.4+179: No route to host
Aug 15 17:07:36.870624 bgp_connect_start: connect 192.168.40.4 (Internal AS 17): No route to host
Aug 15 17:08:04.599220 task_connect: task BGP_17.192.163.6.4+179 addr 192.163.6.4+179: No route to host
Aug 15 17:08:04.601135 bgp_connect_start: connect 192.163.6.4 (Internal AS 17): No route to host
Aug 15 17:08:08.869717 task_connect: task BGP_17.192.168.40.4+179 addr 192.168.40.4+179: No route to host
Aug 15 17:08:08.869934 bgp_connect_start: connect 192.168.40.4 (Internal AS 17): No route to host
Aug 15 17:08:36.603544 advertising receiving-speaker only capabilty to neighbor 192.163.6.4 (Internal AS 17)
Aug 15 17:08:36.606726 bgp_read_message: 192.163.6.4 (Internal AS 17): 0 bytes buffered
Aug 15 17:08:36.609119 Initiated BFD session to peer 192.163.6.4 (Internal AS 17): address=192.163.6.4 ifindex=0 ifname=(none) txivl=1000 rxivl=1000 mult=3 ver=255
Aug 15 17:08:36.734033 advertising receiving-speaker only capabilty to neighbor 192.168.40.4 (Internal AS 17)
Aug 15 17:08:36.738436 Initiated BFD session to peer 192.168.40.4 (Internal AS 17): address=192.168.40.4 ifindex=0 ifname=(none) txivl=1000 rxivl=1000 mult=3 ver=255
Aug 15 17:08:40.537552 BFD session to peer 192.163.6.4 (Internal AS 17) up
Aug 15 17:08:40.694410 BFD session to peer 192.168.40.4 (Internal AS 17) up
意味
ルートが確立される前に、 No route to host メッセージが出力に表示されます。ルートが確立された後、最後の2行は両方のBFDセッションが立ち上がっていることを示しています。
ループバックインターフェイスの無効化および再活性化後の詳細なBFDイベントの表示
目的
ルーターまたはスイッチをダウンさせてから、元に戻した後の動作を確認します。ルーターまたはスイッチの停止をシミュレートするには、論理システム B のループバック インターフェイスを無効にします。
アクション
設定モードから、
deactivate logical-systems B interfaces lo0 unit 2 family inetコマンドを入力します。user@host:A# deactivate logical-systems B interfaces lo0 unit 2 family inet user@host:A# commit
動作モードから、
file show /var/log/A/bgp-bfdコマンドを入力します。user@host:A> file show /var/log/A/bgp-bfd ... Aug 15 17:20:55.995648 bgp_read_v4_message:9747: NOTIFICATION received from 192.163.6.4 (Internal AS 17): code 6 (Cease) subcode 6 (Other Configuration Change) Aug 15 17:20:56.004508 Terminated BFD session to peer 192.163.6.4 (Internal AS 17) Aug 15 17:21:28.007755 task_connect: task BGP_17.192.163.6.4+179 addr 192.163.6.4+179: No route to host Aug 15 17:21:28.008597 bgp_connect_start: connect 192.163.6.4 (Internal AS 17): No route to host
設定モードから、
activate logical-systems B interfaces lo0 unit 2 family inetコマンドを入力します。user@host:A# activate logical-systems B interfaces lo0 unit 2 family inet user@host:A# commit
動作モードから、
file show /var/log/A/bgp-bfdコマンドを入力します。user@host:A> file show /var/log/A/bgp-bfd ... Aug 15 17:25:53.623743 advertising receiving-speaker only capabilty to neighbor 192.163.6.4 (Internal AS 17) Aug 15 17:25:53.631314 Initiated BFD session to peer 192.163.6.4 (Internal AS 17): address=192.163.6.4 ifindex=0 ifname=(none) txivl=1000 rxivl=1000 mult=3 ver=255 Aug 15 17:25:57.570932 BFD session to peer 192.163.6.4 (Internal AS 17) up
例:OSPF に BFD を設定する
この例では、OSPFに双方向フォワーディング検出(BFD)プロトコルを設定する方法を示します。
要件
始める前に:
デバイスインターフェイスを設定します。 ルーティングデバイス用Junos OSネットワークインターフェイスライブラリを参照してください。
OSPFネットワーク内のデバイスのルーター識別子を設定します。 例:OSPFルーター識別子の設定を参照してください。
OSPF 指定ルーター選出を制御します。 例:OSPF指定ルーター選出の制御を参照してください。
単一エリア OSPF ネットワークを設定します。 例:単一エリア OSPF ネットワークの設定を参照してください。
マルチエリア OSPF ネットワークを設定します。 例:マルチエリア OSPF ネットワークの設定を参照してください。
マルチエリア OSPF ネットワークを設定します。 例:マルチエリア OSPF ネットワークの設定を参照してください。
概要
ルートコンバージェンスを高めるためにOSPFのhello間隔とdead間隔の設定を調整する代わりに、BFDを設定することもできます。BFDプロトコルは、ネットワーク内の障害を検出するための単純なhelloメカニズムです。BFD 障害検出タイマーは、OSPF 障害検出メカニズムよりもタイマー制限が短いため、検出が高速化されます。
BFDは、イーサネットインターフェイスなど、障害を迅速に検出できないインターフェイスで有効です。SONETインターフェイスなどの他のインターフェイスには、すでに障害検出機能が組み込まれています。これらのインターフェイスにBFDを設定する必要はありません。
BFDは、隣接するOSPFインターフェイスのペアで設定します。OSPF hello間隔およびdead間隔の設定とは異なり、OSPFエリア内のすべてのインターフェイスでBFDを有効にする必要はありません。
この例では、エリア0.0.0.0のネイバー OSPFインターフェイスfe-0/1/0にbfd-liveness-detectionステートメントを含め、BFDパケット交換間隔を300ミリ秒に設定することで障害検出を有効にし、発信元インターフェイスがダウンと宣言される原因となる見逃しhelloパケットの数として4を設定し、以下の設定を含めることで、完全なネイバー隣接関係を持つOSPFネイバーに対してのみBFDセッションを設定します。
full-neighbors-only—Junos OSリリース9.5以降では、完全なネイバー隣接関係を持つOSPFネイバーに対してのみBFDセッションを確立するようにBFDプロトコルを設定します。デフォルトの動作は、すべての OSPF ネイバーに対して BFD セッションを確立することです。
minimum-interval—ローカルルーティングデバイスがhelloパケットを送信するまでの最小間隔(ミリ秒単位)と、ルーティングデバイスがBFDセッションを確立したネイバーから応答を受信すると予想される最小間隔を設定します。1〜255,000ミリ秒の範囲で数値を設定できます。 また、transmit-interval、minimum-interval 、および
minimum-receive-intervalステートメントを使用して、最小の送信間隔と受信間隔を個別に指定することもできます。注:ネットワーク環境によっては、以下の追加推奨事項が適用される場合があります。
-
多数のBFDセッションを伴う大規模なネットワーク導入の場合、500ミリ秒以上の最小間隔を指定します。不安定な問題を回避するために、1000ミリ秒の間隔を推奨します。
注:-
bfddプロセスでは、検出時間間隔が300ミリ秒未満に設定されています。システム上で ppmd などの優先度の高いプロセスが実行されている場合、CPU は bfdd プロセスではなく ppmd プロセスに時間を費やす可能性があります。
-
支社/拠点のSRXシリーズファイアウォールでは、BFDパケットの最小キープアライブ時間間隔として1000ミリ秒を推奨します。
-
vSRX 3.0では、BFDパケットの最小キープアライブ時間間隔として300ミリ秒を推奨します。
-
-
多数のBFDセッションを伴う非常に大規模なネットワーク展開については、詳細についてジュニパーネットワークスのカスタマーサポートにお問い合わせください。
-
ノンストップアクティブルーティング(NSR)が設定されているときに、ルーティングエンジンスイッチオーバーイベント中にBFDセッションが稼働し続けるようにするには、ルーティングエンジンベースのセッションに最小間隔を2500ミリ秒に指定します。NSRが設定された分散BFDセッションの場合、最小間隔の推奨事項は変更されず、ネットワークの導入にのみ依存します。
-
乗数—発信元インターフェイスがダウンを宣言する原因となる、ネイバーが受信しないHelloパケットの数を設定します。デフォルトでは、3つのHelloパケットが逃されると、発信元インターフェイスがダウンと宣言されます。1から255の範囲で値を設定できます。
トポロジー
設定
手順
CLIクイックコンフィグレーション
OSPF用BFDプロトコルを素早く設定するには、以下のコマンドをコピーしてテキストファイルに貼り付け、改行を削除し、ネットワーク設定に合わせて必要な詳細を変更し、[edit]階層レベルでコマンドをコピーしてCLIに貼り付け、設定モードから commit を入力してください。
[edit]
set protocols ospf area 0.0.0.0 interface fe-0/0/1 bfd-liveness-detection minimum-interval 300
set protocols ospf area 0.0.0.0 interface fe-0/0/1 bfd-liveness-detection multiplier 4
set protocols ospf area 0.0.0.0 interface fe-0/0/1 bfd-liveness-detection full-neighbors-only
ステップバイステップの手順
隣接する 1 つのインターフェイスで OSPF の BFD プロトコルを設定するには:
OSPFエリアを作成します。
注:OSPFv3を指定するには、
[edit protocols]階層レベルにospf3ステートメントを含めます。[edit] user@host# edit protocols ospf area 0.0.0.0
インターフェイスを指定します。
[edit protocols ospf area 0.0.0.0]
user@host# set interface fe-0/0/1
最小の送受信間隔を指定します。
[edit protocols ospf area 0.0.0.0 ]
user@host# set interface fe-0/0/1 bfd-liveness-detection minimum-interval 300
送信元インターフェイスがダウンと宣言される原因となる、見逃した hello パケットの数を設定します。
[edit protocols ospf area 0.0.0.0 ]
user@host# set interface fe-0/0/1 bfd-liveness-detection multiplier 4
BFD セッションは、完全なネイバー隣接関係を持つ OSPF ネイバーに対してのみ設定します。
[edit protocols ospf area 0.0.0.0 ]
user@host# set interface fe-0/0/1 bfd-liveness-detection full-neighbors-only
デバイスの設定が完了したら、設定をコミットします。
[edit protocols ospf area 0.0.0.0 ]
user@host# commit
注:この設定全体を、もう一方の隣接するインターフェイスで繰り返します。
結果
show protocols ospfコマンドを入力して、設定を確認します。出力に意図した設定が表示されない場合は、この例の手順を繰り返して設定を修正します。
user@host# show protocols ospf
area 0.0.0.0 {
    interface fe-0/0/1.0 {
        bfd-liveness-detection {
            minimum-interval 300;
            multiplier 4;
            full-neighbors-only;
        }
    }
}
OSPFv3の設定を確認するために、 show protocols ospf3 コマンドを入力します。
検証
設定が正常に機能していることを確認します。
BFD セッションの検証
目的
OSPFインターフェイスにアクティブなBFDセッションがあり、セッションコンポーネントが正しく設定されていることを確認します。
アクション
動作モードから、 show bfd session detail コマンドを入力します。
意味
出力には、BFD セッションに関する情報が表示されます。
アドレスフィールドには、ネイバーのIPアドレスが表示されます。
インターフェイスフィールドには、BFD用に設定したインターフェイスが表示されます。
[状態(State)] フィールドにはネイバーの状態が表示され、設定した完全なネイバー隣接関係が反映されるように [Full] と表示されます。
送信間隔フィールドには、BFDパケットを送信するために設定した時間間隔が表示されます。
乗数フィールドには、設定した乗数が表示されます。
例:IS-IS の BFD の設定
この例では、IS-ISネットワークの障害を検出するために、双方向フォワーディング検出(BFD)プロトコルを設定する方法を説明します。
BFDは、QFX10000シリーズスイッチのIPV6向けIS-ISではサポートされていません。
要件
開始する前に、両方のルーターで IS-IS を設定します。必要な IS-IS 設定については、例:IS-IS の設定 を参照してください。
IS-ISの設定については、CLIクイック設定セクションで説明しますが、IS-ISの設定についてはステップバイステップでは説明しません。
この例では、以下のハードウェアおよびソフトウェアコンポーネントを使用しています。
-
Junos OS リリース 7.3 以降
-
Junos OSリリース22.4を使用して更新および再検証
-
-
M Series、MXシリーズ、およびT Seriesルーター
概要
この例では、2台のルーターが相互に接続されている様子を示しています。ループバック インターフェイスは、各ルーターに設定されます。IS-ISおよびBFDプロトコルは、両方のルーターで設定されています。

設定
CLIクイックコンフィグレーション
この例を簡単に設定するには、以下のコマンドをコピーしてテキストファイルに貼り付け、改行を削除して、ネットワーク構成に合わせて必要な詳細を変更し、コマンドを [edit] 階層レベルのCLIにコピー&ペーストしてください。
ルーターR1
set interfaces ge-0/0/0 unit 0 family inet address 10.0.0.1/30
set interfaces ge-0/0/0 unit 0 family iso
set interfaces lo0 unit 0 family inet address 10.0.255.1/32
set interfaces lo0 unit 0 family iso address 49.0001.0010.0255.0001.00
set protocols isis interface ge-0/0/0.0 family inet bfd-liveness-detection version automatic
set protocols isis interface ge-0/0/0.0 family inet bfd-liveness-detection minimum-interval 200
set protocols isis interface ge-0/0/0.0 family inet bfd-liveness-detection minimum-receive-interval 100
set protocols isis interface ge-0/0/0.0 family inet bfd-liveness-detection multiplier 2
set protocols isis interface ge-0/0/0.0 family inet bfd-liveness-detection no-adaptation
set protocols isis interface ge-0/0/0.0 family inet bfd-liveness-detection transmit-interval minimum-interval 100
set protocols isis interface ge-0/0/0.0 family inet bfd-liveness-detection transmit-interval threshold 300
set protocols isis interface ge-0/0/0.0 family inet bfd-liveness-detection detection-time threshold 500
set protocols isis interface lo0.0
ルーターR2
set interfaces ge-0/0/0 unit 0 family inet address 10.0.0.2/30
set interfaces ge-0/0/0 unit 0 family iso
set interfaces lo0 unit 0 family inet address 10.0.255.2/32
set interfaces lo0 unit 0 family iso address 49.0001.0010.0255.0002.00
set protocols isis interface ge-0/0/0.0 family inet bfd-liveness-detection version automatic
set protocols isis interface ge-0/0/0.0 family inet bfd-liveness-detection minimum-interval 200
set protocols isis interface ge-0/0/0.0 family inet bfd-liveness-detection minimum-receive-interval 100
set protocols isis interface ge-0/0/0.0 family inet bfd-liveness-detection multiplier 2
set protocols isis interface ge-0/0/0.0 family inet bfd-liveness-detection no-adaptation
set protocols isis interface ge-0/0/0.0 family inet bfd-liveness-detection transmit-interval minimum-interval 100
set protocols isis interface ge-0/0/0.0 family inet bfd-liveness-detection transmit-interval threshold 300
set protocols isis interface ge-0/0/0.0 family inet bfd-liveness-detection detection-time threshold 500
set protocols isis interface lo0.0
手順
ステップバイステップの手順
次の例では、設定階層のさまざまなレベルに移動する必要があります。CLIのナビゲーションについては、 設定モードでのCLIエディターの使用を参照してください。
IS-IS用にBFDを設定するには、 minimum-interval ステートメントのみが必要です。BFDプロトコルは、パラメーターを指定せずに bfd-liveness-detection ステートメントを使用する場合、他のすべての設定ステートメントのデフォルトパラメーターを選択します。
既存のセッションを停止または再起動することなく、いつでもパラメーターを変更できます。BFDは自動的に新しいパラメータ値に調整します。ただし、値が各BFDピアと再同期するまで、BFDパラメーターの変更は行われません。
ルーターR1およびR2でIS-ISにBFDを設定するには、以下を行います。
ここでは R1 の手順のみを示しています。
-
検出時間の適応のためのしきい値を設定します。これは、乗数に最小間隔を掛けた値よりも大きくなければなりません。
[edit protocols isis interface ge-0/0/0.0 family inet bfd-liveness-detection]
user@R1# set detection-time threshold 500
-
障害検出のための最小の送信および受信間隔を設定します。
[edit protocols isis interface ge-0/0/0.0 family inet bfd-liveness-detection]
user@R1# set minimum-interval 200
-
障害検知のための最小受信間隔のみを設定します。
[edit protocols isis interface ge-0/0/0.0 family inet bfd-liveness-detection]
user@R1# set minimum-receive-interval 100
-
BFD適応を無効にします。
[edit protocols isis interface ge-0/0/0.0 family inet bfd-liveness-detection]
user@R1# set no-adaptation
-
送信間隔のしきい値を設定します。これは、最小送信間隔よりも大きくなければなりません。
[edit protocols isis interface ge-0/0/0.0 family inet bfd-liveness-detection]
user@R1# set transmit-interval threshold 300
-
障害検出のための最小送信間隔を設定します。
[edit protocols isis interface ge-0/0/0.0 family inet bfd-liveness-detection]
user@R1# set transmit-interval minimum-interval 100
-
乗数を設定します。これは、ネイバーが受信しなかったhelloパケットの数であり、発信元インターフェイスがダウンを宣言する原因となります。
[edit protocols isis interface ge-0/0/0.0 family inet bfd-liveness-detection]
user@R1# set multiplier 2
-
検出に使用するBFDバージョンを設定します。
デフォルトでは、バージョンが自動的に検出されます。
[edit protocols isis interface ge-0/0/0.0 family inet bfd-liveness-detection]
user@R1# set version automatic
結果
設定モードから、 show protocols isis interface コマンドを発行して設定を確認します。出力に意図した設定が表示されない場合は、この例の手順を繰り返して設定を修正します。
user@R1# show protocols isis interface ge-0/0/0.0 family inet
bfd-liveness-detection {
    version automatic;
    minimum-interval 200;
    minimum-receive-interval 100;
    multiplier 2;
    no-adaptation;
    transmit-interval {
        minimum-interval 100;
        threshold 300;
    }
    detection-time {
        threshold 500;
    }
}
検証
設定が正常に機能していることを確認します。
ルーターR1とR2間の接続の検証
目的
ルーターR1とR2が互いに到達できることを確認します。
アクション
もう一方のルーターに ping を送信し、ネットワーク トポロジーに従って 2 つのルーター間の接続を確認します。
user@R1> ping 10.0.0.2 count 2
PING 10.0.0.2 (10.0.0.2): 56 data bytes
64 bytes from 10.0.0.2: icmp_seq=0 ttl=64 time=2.148 ms
64 bytes from 10.0.0.2: icmp_seq=1 ttl=64 time=1.923 ms

--- 10.0.0.2 ping statistics ---
2 packets transmitted, 2 packets received, 0% packet loss
round-trip min/avg/max/stddev = 1.923/2.035/2.148/0.113 ms
意味
ルーターR1とR2は互いにpingを実行できます。
IS-IS が設定されていることの確認
目的
両方のルーターで IS-IS インスタンスが実行されていることを確認します。
アクション
show isis databaseステートメントを使用して、IS-ISインスタンスがR1とR2の両方のルーターで実行されているかどうかを確認します。
user@R1> show isis database
IS-IS level 1 link-state database:
LSP ID                      Sequence Checksum Lifetime Attributes
R1.00-00                        0x1b   0xa2d5      552 L1 L2
R1.02-00                        0x2b   0x8da3      545 L1 L2
R2.00-00                        0x1a   0x628d      543 L1 L2
  3 LSPs

IS-IS level 2 link-state database:
LSP ID                      Sequence Checksum Lifetime Attributes
R1.00-00                        0x1e   0xb9ba      552 L1 L2
R1.02-00                        0x2b   0x8da3      545 L1 L2
R2.00-00                        0x1d   0x877e      543 L1 L2
  3 LSPs
意味
IS-ISは、R1とR2の両方のルーターで設定されています。
BFDが設定されていることの確認
目的
BFDインスタンスがR1とR2の両方のルーターで実行されていることを確認します。
アクション
show bfd session detailステートメントを使用して、ルーターでBFDインスタンスが実行されているかどうかを確認します。
user@R1> show bfd session detail
                                                  Detect   Transmit
Address                  State     Interface      Time     Interval  Multiplier
10.0.0.2                 Up        ge-0/0/0.0     0.200     0.100        2
 Client ISIS L1, TX interval 0.100, RX interval 0.100
 Client ISIS L2, TX interval 0.100, RX interval 0.100
 Session up time 00:02:41, previous down time 00:00:09
 Local diagnostic None, remote diagnostic None
 Remote state Up, version 1
 Session type: Single hop BFD

1 sessions, 2 clients
Cumulative transmit rate 10.0 pps, cumulative receive rate 10.0 pps
意味
BFDは、IS-ISネットワークの障害を検出するためにルーターR1およびR2に設定されています。
例:RIP 用に BFD を設定する
この例では、RIP ネットワークに BFD(双方向転送検出)を設定する方法を示します。
要件
この例を設定する前に、デバイスの初期化以外の特別な設定を行う必要はありません。
概要
障害検知を有効にするには、 bfd-liveness-detection ステートメントを含めます。
bfd-liveness-detection {
    detection-time {
        threshold milliseconds;
    }
    minimum-interval milliseconds;
    minimum-receive-interval milliseconds;
    multiplier number;
    no-adaptation;
    transmit-interval {
        threshold milliseconds;
        minimum-interval milliseconds;
    }
    version (1 | automatic);
}
オプションで、 threshold ステートメントを含めることで、検出時間の適応のためのしきい値を指定できます。BFDセッション検出時間がしきい値と同じかそれ以上の値に適応すると、単一のトラップとシステムログメッセージが送信されます。
障害検知のための最小の送受信間隔を指定するには、 minimum-interval ステートメントを含めます。この値は、ローカル ルーティング デバイスが hello パケットを送信する最小間隔と、ルーティング デバイスが BFD セッションを確立したネイバーから応答を受信すると予想される最小間隔を表します。1〜255,000ミリ秒の範囲で値を設定できます。この例では、最小間隔を600ミリ秒に設定しています。
ネットワーク環境によっては、以下の追加推奨事項が適用される場合があります。
分散 BFD の推奨最小間隔は 100 ミリ秒、
multiplierは 3 です。多数のBFDセッションを伴う非常に大規模なネットワーク展開については、詳細についてジュニパーネットワークスのカスタマーサポートにお問い合わせください。
ノンストップアクティブルーティング(NSR)が設定されているときに、ルーティングエンジンスイッチオーバーイベント中にBFDセッションが稼働し続けるようにするには、ルーティングエンジンベースのセッションに最小間隔を2500ミリ秒に指定します。ノンストップアクティブルーティングが設定された分散型BFDセッションの場合、最小間隔の推奨事項は変更されず、ネットワークの導入にのみ依存します。
オプションで、最小の送信間隔と受信間隔を個別に指定できます。
障害検知の最小受信間隔のみを指定するには、 minimum-receive-interval ステートメントを含めます。この値は、ローカルルーティングデバイスがBFDセッションを確立したネイバーから応答を受信すると予想される最小間隔を表します。1〜255.00ミリ秒の範囲で値を設定できます。
障害検知の最小送信間隔のみを指定するには、 transmit-interval minimum-interval ステートメントを含めます。この値は、ローカルルーティングデバイスが、BFDセッションを確立したネイバーにhelloパケットを送信する最小間隔を表します。1〜255,000ミリ秒の範囲で値を設定できます。
発信元インターフェイスがダウンを宣言する原因となるネイバーが受信していないhelloパケットの数を指定するには、 multiplier ステートメントを含めます。デフォルトは3で、1から255の範囲で値を設定できます。
送信間隔の適応を検出するためのしきい値を指定するには、 transmit-interval threshold ステートメントを含めます。しきい値は、送信間隔よりも大きくなければなりません。
検出に使用するBFDバージョンを指定するには、 version ステートメントを含めます。デフォルトでは、バージョンが自動的に検出されます。
[edit protocols bfd]階層レベルでtraceoptionsステートメントを含めることで、BFD動作を追跡できます。
Junos OSリリース9.0以降では、変化するネットワーク条件に適応しないようにBFDセッションを設定できます。BFD適応を無効にするには、 no-adaptation ステートメントを含めます。ネットワークでBFD適応を有効にしないことが望ましい場合を除き、BFD適応を無効にしないことをお勧めします。
図4 は、この例で使用されているトポロジーを示しています。
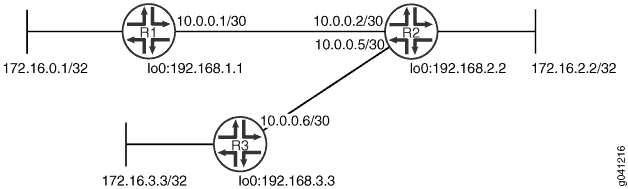
CLIクイックコンフィグレーション は、 図4に示すすべてのデバイスの構成を示しています。「 手順の手順」 では、デバイスR1の手順について説明します。
トポロジー
設定
手順
CLIクイックコンフィグレーション
この例を簡単に設定するには、以下のコマンドをコピーしてテキストファイルに貼り付け、改行を削除して、ネットワーク構成に合わせて必要な詳細を変更し、コマンドを [edit] 階層レベルのCLIにコピー&ペーストしてください。
デバイスR1
set interfaces fe-1/2/0 unit 1 family inet address 10.0.0.1/30
set protocols bfd traceoptions file bfd-trace
set protocols bfd traceoptions flag all
set protocols rip group rip-group export advertise-routes-through-rip
set protocols rip group rip-group neighbor fe-1/2/0.1
set protocols rip group rip-group bfd-liveness-detection minimum-interval 600
set policy-options policy-statement advertise-routes-through-rip term 1 from protocol direct
set policy-options policy-statement advertise-routes-through-rip term 1 from protocol rip
set policy-options policy-statement advertise-routes-through-rip term 1 then accept
デバイスR2
set interfaces fe-1/2/0 unit 2 family inet address 10.0.0.2/30
set interfaces fe-1/2/1 unit 5 family inet address 10.0.0.5/30
set protocols rip group rip-group export advertise-routes-through-rip
set protocols rip group rip-group neighbor fe-1/2/0.2
set protocols rip group rip-group neighbor fe-1/2/1.5
set protocols rip group rip-group bfd-liveness-detection minimum-interval 600
set policy-options policy-statement advertise-routes-through-rip term 1 from protocol direct
set policy-options policy-statement advertise-routes-through-rip term 1 from protocol rip
set policy-options policy-statement advertise-routes-through-rip term 1 then accept
デバイスR3
set interfaces fe-1/2/0 unit 6 family inet address 10.0.0.6/30
set protocols rip group rip-group export advertise-routes-through-rip
set protocols rip group rip-group neighbor fe-1/2/0.6
set protocols rip group rip-group bfd-liveness-detection minimum-interval 600
set policy-options policy-statement advertise-routes-through-rip term 1 from protocol direct
set policy-options policy-statement advertise-routes-through-rip term 1 from protocol rip
set policy-options policy-statement advertise-routes-through-rip term 1 then accept
ステップバイステップの手順
次の例では、設定階層のさまざまなレベルに移動する必要があります。CLIのナビゲーションについては、『CLIユーザーガイド』の「設定モードでのCLIエディターの使用」を参照してください。
RIP ネットワークに BFD を設定するには:
-
ネットワークインターフェイスを設定します。
[edit interfaces]
user@R1# set fe-1/2/0 unit 1 family inet address 10.0.0.1/30
-
RIPグループを作成し、インターフェイスを追加します。
Junos OSでRIPを設定するには、RIPが有効になっているインターフェイスを含むグループを設定する必要があります。ループバックインターフェイスでRIPを有効にする必要はありません。
[edit protocols rip group rip-group]
user@R1# set neighbor fe-1/2/0.1
-
直接ルートとRIPで学習したルートの両方をアドバタイズするルーティングポリシーを作成します。
[edit policy-options policy-statement advertise-routes-through-rip term 1]
user@R1# set from protocol direct
user@R1# set from protocol rip
user@R1# set then accept
-
ルーティングポリシーを適用します。
Junos OSでは、RIPエクスポートポリシーはグループレベルでのみ適用できます。
[edit protocols rip group rip-group]
user@R1# set export advertise-routes-through-rip
-
BFDを有効にします。
[edit protocols rip group rip-group]
user@R1# set bfd-liveness-detection minimum-interval 600
-
BFDメッセージを追跡するためのトレース操作を設定します。
[edit protocols bfd traceoptions]
user@R1# set file bfd-trace
user@R1# set flag all
結果
設定モードから、 show interfaces、 show protocols、 show policy-options コマンドを入力して設定を確認します。出力に意図した設定が表示されない場合は、この例の設定手順を繰り返して修正します。
user@R1# show interfaces
fe-1/2/0 {
    unit 1 {
        family inet {
            address 10.0.0.1/30;
        }
    }
}
user@R1# show protocols
bfd {
    traceoptions {
        file bfd-trace;
        flag all;
    }
}
rip {
    group rip-group {
        export advertise-routes-through-rip;
        bfd-liveness-detection {
            minimum-interval 600;
        }
        neighbor fe-1/2/0.1;
    }
}
user@R1# show policy-options
policy-statement advertise-routes-through-rip {
    term 1 {
        from protocol [ direct rip ];
        then accept;
    }
}
デバイスの設定が完了したら、設定モードから コミット を入力します。
検証
設定が正常に機能していることを確認します。
BFDセッションが稼働していることの確認
目的
BFD セッションが動作していることを確認します。
アクション
動作モードから、 show bfd session コマンドを入力します。
user@R1> show bfd session
                                                  Detect   Transmit
Address                  State     Interface      Time     Interval  Multiplier
10.0.0.2                 Up        fe-1/2/0.1     1.800     0.600        3

1 sessions, 1 clients
Cumulative transmit rate 1.7 pps, cumulative receive rate 1.7 pps
意味
この出力は、認証の失敗がないことを示しています。
BFD トレース ファイルの確認
目的
トレース操作を使用して、BFD パケットが交換されていることを検証します。
アクション
動作モードから、 show log コマンドを入力します。
user@R1> show log bfd-trace
Feb 16 10:26:32 PPM Trace: BFD periodic xmit to 10.0.0.2 (IFL 124, rtbl 53, single-hop port)
Feb 16 10:26:32 Received Downstream TraceMsg (24) len 86:
Feb 16 10:26:32    IfIndex (3) len 4: 0
Feb 16 10:26:32    Protocol (1) len 1: BFD
Feb 16 10:26:32    Data (9) len 61: (hex) 42 46 44 20 70 61 63 6b 65 74 20 66 72 6f 6d 20 31 30 2e
Feb 16 10:26:32 PPM Trace: BFD packet from 10.0.0.1 (IFL 73, rtbl 56, ttl 255) absorbed
Feb 16 10:26:32 Received Downstream TraceMsg (24) len 60:
Feb 16 10:26:32    IfIndex (3) len 4: 0
Feb 16 10:26:32    Protocol (1) len 1: BFD
Feb 16 10:26:32    Data (9) len 35: (hex) 42 46 44 20 70 65 72 69 6f 64 69 63 20 78 6d 69 74 20 6f
...
意味
出力は、BFDの正常な機能を示しています。
LAG用マイクロBFDセッションの設定
双方向フォワーディング検出(BFD)プロトコルは、転送経路の障害を迅速に検出するシンプルな検出プロトコルです。リンクアグリゲーショングループ(LAG)は、ポイントツーポイント接続のデバイス間の複数のリンクを結合することで、帯域幅の増加、信頼性の提供、ロードバランシングの実現を可能にします。LAGインターフェイスでBFDセッションを実行するには、LAGバンドル内のすべてのLAGメンバーリンクに独立した非同期モードのBFDセッションを設定します。単一のBFDセッションがUDPポートのステータスを監視する代わりに、独立したマイクロBFDセッションが個々のメンバーリンクのステータスを監視します。
Junos OS Evolvedリリース20.1R1以降、独立したマイクロ双方向フォワーディング検出(BFD)セッションが、リンクアグリゲーショングループ(LAG)バンドルのメンバーリンクごとに有効になります。
集合型イーサネットインターフェイスの障害検出を有効にするには:
versionオプションはQFXシリーズではサポートされていません。Junos OSリリース17.2R1以降、このコマンドを使用しようとすると警告が表示されます。この機能は、両方のデバイスがBFDをサポートしている場合に機能します。BFDがLAGの片側にのみ設定されている場合、この機能は機能しません。
例:LAG用の独立したマイクロBFDセッションの設定
この例では、集合型イーサネットインターフェイスに対して独立したマイクロBFDセッションを設定する方法を示します。
要件
この例では、以下のハードウェアおよびソフトウェアコンポーネントを使用しています。
-
MXシリーズルーター(Junos Trioチップセット搭載)
注:AFTベースのTrioラインカード(MPC10以降)は、異なるハードウェア設計を採用しています。マイクロBFDがインターフェイスでアクティブ化されている場合、受信したパケットはAEインターフェイスのインターフェイスグループの一部ではなく、lo0.0のフィルター条件とインターフェイスグループと一致しません。条件を一致させるために、ポート6784を使用してlo0.0に別のフィルターを設定します。 Type 4 FPCまたはType 5 FPC搭載のT Seriesルーター
LAG用BFDは、T Seriesの以下のPICタイプでサポートされています。
PC-1XGE-XENPAK(Type 3 FPC)、
PD-4XGE-XFP(Type 4 FPC)、
PD-5-10XGE-SFPP(Type 4 FPC)、
24x10GE(LAN/WAN)SFPP、12x10GE(LAN/WAN)SFPP、1X100GEタイプ5 PIC
24X10GE(LAN/WAN)SFPP搭載のPTXシリーズルーター
すべてのデバイスで実行されている Junos OS リリース 13.3 以降
概要
この例では、直接接続されている2台のルーターが含まれています。IPv4接続用のAE0とIPv6接続用のAE1という2つの集合型イーサネットインターフェイスを設定します。両方のルーターでローカルおよびネイバーエンドポイントとしてIPv4アドレスを使用して、AE0バンドル上にマイクロBFDセッションを設定します。両方のルーターでローカルおよびネイバーエンドポイントとしてIPv6アドレスを使用して、AE1バンドル上にマイクロBFDセッションを設定します。この例では、独立したマイクロBFDセッションが出力でアクティブであることを検証します。

設定
CLIクイックコンフィグレーション
この例をすばやく設定するには、以下のコマンドをコピーしてテキストファイルに貼り付け、改行を削除して、ネットワーク構成に合わせて必要な詳細を変更してから、コマンドを [edit] 階層レベルのCLIにコピー&ペーストします。
ルーターR0
set interfaces ge-1/0/1 unit 0 family inet address 20.20.20.1/30
set interfaces ge-1/0/1 unit 0 family inet6 address 3ffe::1:1/126
set interfaces xe-4/0/0 gigether-options 802.3ad ae0
set interfaces xe-4/0/1 gigether-options 802.3ad ae0
set interfaces xe-4/1/0 gigether-options 802.3ad ae1
set interfaces xe-4/1/1 gigether-options 802.3ad ae1
set interfaces lo0 unit 0 family inet address 10.255.106.107/32
set interfaces lo0 unit 0 family inet6 address 201:DB8:251::aa:aa:1/126
set interfaces ae0 aggregated-ether-options bfd-liveness-detection minimum-interval 100
set interfaces ae0 aggregated-ether-options bfd-liveness-detection neighbor 10.255.106.102
set interfaces ae0 aggregated-ether-options bfd-liveness-detection local-address 10.255.106.107
set interfaces ae0 aggregated-ether-options minimum-links 1
set interfaces ae0 aggregated-ether-options link-speed 10g
set interfaces ae0 aggregated-ether-options lacp active
set interfaces ae0 unit 0 family inet address 10.0.0.1/30
set interfaces ae1 aggregated-ether-options bfd-liveness-detection minimum-interval 100
set interfaces ae1 aggregated-ether-options bfd-liveness-detection multiplier 3
set interfaces ae1 aggregated-ether-options bfd-liveness-detection neighbor 201:DB8:251::bb:bb:1
set interfaces ae1 aggregated-ether-options bfd-liveness-detection local-address 201:DB8:251::aa:aa:1
set interfaces ae1 aggregated-ether-options minimum-links 1
set interfaces ae1 aggregated-ether-options link-speed 10g
set interfaces ae1 aggregated-ether-options lacp active
set interfaces ae1 unit 0 family inet6 address 5555::1/126
set interface ae1 unit 0 family inet6 dad-disable
set routing-options nonstop-routing
set routing-options static route 30.30.30.0/30 next-hop 10.0.0.2
set routing-options rib inet6.0 static route 3ffe::1:2/126 next-hop 5555::2
set protocols bfd traceoptions file bfd
set protocols bfd traceoptions file size 100m
set protocols bfd traceoptions file files 10
set protocols bfd traceoptions flag all
ルーターR1
set interfaces ge-1/1/8 unit 0 family inet address 30.30.30.1/30
set interfaces ge-1/1/8 unit 0 family inet6 address 3ffe::1:2/126
set interfaces xe-0/0/0 gigether-options 802.3ad ae0
set interfaces xe-0/0/1 gigether-options 802.3ad ae0
set interfaces xe-0/0/2 gigether-options 802.3ad ae1
set interfaces xe-0/0/3 gigether-options 802.3ad ae1
set interfaces lo0 unit 0 family inet address 10.255.106.102/32
set interfaces lo0 unit 0 family inet6 address 201:DB8:251::bb:bb:1/126
set interfaces ae0 aggregated-ether-options bfd-liveness-detection minimum-interval 150
set interfaces ae0 aggregated-ether-options bfd-liveness-detection multiplier 3
set interfaces ae0 aggregated-ether-options bfd-liveness-detection neighbor 10.255.106.107
set interfaces ae0 aggregated-ether-options bfd-liveness-detection local-address 10.255.106.102
set interfaces ae0 aggregated-ether-options minimum-links 1
set interfaces ae0 aggregated-ether-options link-speed 10g
set interfaces ae0 aggregated-ether-options lacp passive
set interfaces ae0 unit 0 family inet address 10.0.0.2/30
set interfaces ae1 aggregated-ether-options bfd-liveness-detection minimum-interval 200
set interfaces ae1 aggregated-ether-options bfd-liveness-detection multiplier 3
set interfaces ae1 aggregated-ether-options bfd-liveness-detection neighbor 201:DB8:251::aa:aa:1
set interfaces ae1 aggregated-ether-options bfd-liveness-detection local-address 201:DB8:251::bb:bb:1
set interfaces ae1 aggregated-ether-options minimum-links 1
set interfaces ae1 aggregated-ether-options link-speed 10g
set interfaces ae1 aggregated-ether-options lacp passive
set interfaces ae1 unit 0 family inet6 address 5555::2/126
set routing-options static route 20.20.20.0/30 next-hop 10.0.0.1
set routing-options rib inet6.0 static route 3ffe::1:1/126 next-hop 5555::1
集合型イーサネットインターフェイスのマイクロBFDセッションの設定
ステップバイステップの手順
次の例では、設定階層内のさまざまなレベルに移動する必要があります。CLIのナビゲーションについては、『CLIユーザーガイド』の「構成モードでのCLIエディターの使用」を参照してください。
この手順をルーターR1でも繰り返し、各ルーターの適切なインターフェイス名、アドレス、およびその他のパラメータを変更します。
ルーターR0で集合型イーサネットインターフェイス用のマイクロBFDセッションを設定するには:
物理インターフェイスを設定します。
[edit interfaces]
user@R0# set ge-1/0/1 unit 0 family inet address 20.20.20.1/30
user@R0# set ge-1/0/1 unit 0 family inet6 address 3ffe::1:1/126
user@R0# set xe-4/0/0 gigether-options 802.3ad ae0
user@R0# set xe-4/0/1 gigether-options 802.3ad ae0
user@R0# set xe-4/1/0 gigether-options 802.3ad ae1
user@R0# set xe-4/1/1 gigether-options 802.3ad ae1
ループバックインターフェイスを設定します。
[edit interfaces]
user@R0# set lo0 unit 0 family inet address 10.255.106.107/32
user@R0# set lo0 unit 0 family inet6 address 201:DB8:251::aa:aa:1/128
ネットワークの要件に応じて、IPv4またはIPv6アドレスで集合型イーサネットインターフェイスae0にIPアドレスを設定します。
[edit interfaces]
user@R0# set ae0 unit 0 family inet address 10.0.0.1/30
ルーティングオプションを設定し、スタティックルートを作成し、ネクストホップアドレスを設定します。
注:ネットワークの要件に応じて、IPv4またはIPv6の静的ルートを設定することができます。
[edit routing-options]
user@R0# set nonstop-routing
user@R0# set static route 30.30.30.0/30 next-hop 10.0.0.2
user@R0# set rib inet6.0 static route 3ffe::1:2/126 next-hop 5555::2
リンクアグリゲーション制御プロトコル(LACP)を設定します。
[edit interfaces]
user@R0# set ae0 aggregated-ether-options lacp active
集合型イーサネットインターフェイスae0にBFDを設定し、最小間隔、ローカルIPアドレス、およびネイバーIPアドレスを指定します。
[edit interfaces]
user@R0# set ae0 aggregated-ether-options bfd-liveness-detection minimum-interval 100
user@R0# set ae0 aggregated-ether-options bfd-liveness-detection multiplier 3
user@R0# set ae0 aggregated-ether-options bfd-liveness-detection neighbor 10.255.106.102
user@R0# set ae0 aggregated-ether-options bfd-liveness-detection local-address 10.255.106.107
user@R0# set ae0 aggregated-ether-options minimum-links 1
user@R0# set ae0 aggregated-ether-options link-speed 10g
集合型イーサネットインターフェイスae1にIPアドレスを設定します。
ネットワークの要件に応じて、IPv4またはIPv6アドレスを割り当てることができます。
[edit interfaces]
user@R0# set ae1 unit 0 family inet6 address 5555::1/126
集合型イーサネットインターフェイスae1のBFDを設定します。
[edit interfaces]
user@R0# set ae1 aggregated-ether-options bfd-liveness-detection minimum-interval 100
user@R0# set ae1 aggregated-ether-options bfd-liveness-detection multiplier 3
user@R0# set ae1 aggregated-ether-options bfd-liveness-detection neighbor 201:DB8:251::bb:bb:1
user@R0# set ae1 aggregated-ether-options bfd-liveness-detection local-address 201:DB8:251::aa:aa:1
user@R0# set ae1 aggregated-ether-options minimum-links 1
user@R0# set ae1 aggregated-ether-options link-speed 10g
注:Junos OSリリース16.1以降では、マイクロBFDセッションのローカルアドレスとしてAEインターフェイスアドレスを使用してこの機能を設定することもできます。
リリース16.1R2以降、Junos OSは設定したマイクロBFD
local-addressを、設定コミット前にインターフェイスまたはループバックIPアドレスと照合し、検証します。Junos OS は、IPv4 と IPv6 の両方のマイクロ BFD アドレス構成に対してこのチェックを実行し、一致しない場合はコミットに失敗します。トラブルシューティングのためのBFDのトレースオプションを設定します。
[edit protocols]
user@R0# set bfd traceoptions file bfd
user@R0# set bfd traceoptions file size 100m
user@R0# set bfd traceoptions file files 10
user@R0# set bfd traceoptions flag all
結果
設定モードから、 show interfaces、 show protocols、 show routing-options コマンドを入力し、設定を確認します。出力に意図した設定が表示されない場合は、この例の手順を繰り返して設定を修正します。
user@R0> show interfaces
traceoptions {
    flag bfd-events;
}
ge-1/0/1 {
    unit 0 {
        family inet {
            address 20.20.20.1/30;
        }
        family inet6 {
            address 3ffe::1:1/126;
        }
    }
}
xe-4/0/0 {
    enable;
    gigether-options {
        802.3ad ae0;
    }
}
xe-4/0/1 {
    gigether-options {
        802.3ad ae0;
    }
}
xe-4/1/0 {
    enable;
    gigether-options {
        802.3ad ae1;
    }
}
xe-4/1/1 {
    gigether-options {
        802.3ad ae1;
    }
}
lo0 {
    unit 0 {
        family inet {
            address 10.255.106.107/32;
        }
        family inet6 {
            address  201:DB8:251::aa:aa:1/128;
        }
    }
}
ae0 {
    aggregated-ether-options {
        bfd-liveness-detection {
            minimum-interval 100;
            neighbor 10.255.106.102;
            local-address 10.255.106.107;
        }
        minimum-links 1;
        link-speed 10g;
        lacp {
            active;
        }
    }
    unit 0 {
        family inet {
            address 10.0.0.1/30;
        }
    }
}
ae1 {
    aggregated-ether-options {
        bfd-liveness-detection {
            minimum-interval 100;
            multiplier 3;
            neighbor 201:DB8:251::bb:bb:1;
            local-address 201:DB8:251::aa:aa:1;
        }
        minimum-links 1
        link-speed 10g;
    }
    unit 0 {
        family inet6 {
            address 5555::1/126;
        }
    }
}
user@R0> show protocols
bfd {
    traceoptions {
        file bfd size 100m files 10;
        flag all;
    }
}
user@R0> show routing-options
nonstop-routing ;
    rib inet6.0 {
    static {
        route 3ffe:1:2/126 {
            next-hop 5555::2;
        }
    }
}
static {
    route 30.30.30.0/30 {
        next-hop 10.0.0.2;
    }
}
デバイスの設定が完了したら、設定をコミットします。
user@R0# commit
検証
設定が正常に機能していることを確認します。
独立したBFDセッションが立ち上がっていることの確認
目的
マイクロBFDセッションが稼働していることを確認し、BFDセッションの詳細を表示します。
アクション
動作モードから、 show bfd session extensive コマンドを入力します。
user@R0> show bfd session extensive
                                                  Detect   Transmit
Address                  State     Interface      Time     Interval  Multiplier
10.255.106.102           Up        xe-4/0/0       9.000     3.000        3
 Client LACPD, TX interval 0.100, RX interval 0.100
 Session up time 4d 23:13, previous down time 00:00:06
 Local diagnostic None, remote diagnostic None
 Remote heard, hears us, version 1
 Replicated
 Session type: Micro BFD
 Min async interval 0.100, min slow interval 1.000
 Adaptive async TX interval 0.100, RX interval 0.100
 Local min TX interval 0.100, minimum RX interval 0.100, multiplier 3
 Remote min TX interval 3.000, min RX interval 3.000, multiplier 3
 Local discriminator 21, remote discriminator 75
 Echo mode disabled/inactive
 Remote is control-plane independent
  Session ID: 0x0

                                                  Detect   Transmit
Address                  State     Interface      Time     Interval  Multiplier
10.255.106.102           Up        xe-4/0/1       9.000     3.000        3
 Client LACPD, TX interval 0.100, RX interval 0.100
 Session up time 4d 23:13, previous down time 00:00:07
 Local diagnostic None, remote diagnostic None
 Remote heard, hears us, version 1
 Replicated
 Session type: Micro BFD
 Min async interval 0.100, min slow interval 1.000
 Adaptive async TX interval 0.100, RX interval 0.100
 Local min TX interval 0.100, minimum RX interval 0.100, multiplier 3
 Remote min TX interval 3.000, min RX interval 3.000, multiplier 3
 Local discriminator 19, remote discriminator 74
 Echo mode disabled/inactive
 Remote is control-plane independent
  Session ID: 0x0

                                                  Detect   Transmit
Address                  State     Interface      Time     Interval  Multiplier
201:DB8:251::bb:bb:1     Up        xe-4/1/1       9.000     3.000        3
 Client LACPD, TX interval 0.100, RX interval 0.100
 Session up time 4d 23:13
 Local diagnostic None, remote diagnostic None
 Remote not heard, hears us, version 1
 Replicated
 Session type: Micro BFD
 Min async interval 0.100, min slow interval 1.000
 Adaptive async TX interval 0.100, RX interval 0.100
 Local min TX interval 1.000, minimum RX interval 0.100, multiplier 3
 Remote min TX interval 3.000, min RX interval 3.000, multiplier 3
 Local discriminator 17, remote discriminator 67
 Echo mode disabled/inactive, no-absorb, no-refresh
 Remote is control-plane independent
  Session ID: 0x0

                                                  Detect   Transmit
Address                  State     Interface      Time     Interval  Multiplier
201:DB8:251::bb:bb:1     UP        xe-4/1/0       9.000     3.000        3
 Client LACPD, TX interval 0.100, RX interval 0.100
 Session up time 4d 23:13
 Local diagnostic None, remote diagnostic None
 Remote not heard, hears us, version 1
 Replicated
 Session type: Micro BFD
 Min async interval 0.100, min slow interval 1.000
 Adaptive async TX interval 0.100, RX interval 0.100
 Local min TX interval 1.000, minimum RX interval 0.100, multiplier 3
 Remote min TX interval 3.000, min RX interval 3.000, multiplier 3
 Local discriminator 16, remote discriminator 66
 Echo mode disabled/inactive, no-absorb, no-refresh
 Remote is control-plane independent
  Session ID: 0x0

4 sessions, 4 clients
Cumulative transmit rate 2.0 pps, cumulative receive rate 1.7 pps
意味
マイクロBFDフィールドは、LAG内のリンクで実行されている独立したマイクロBFDセッションを表します。TXインターバル item、RXインターバル item 出力は、 minimum-interval ステートメントで設定された設定を表しています。その他の出力はすべて、BFDのデフォルト設定を表しています。デフォルト設定を変更するには、ステートメントの下にオプション bfd-liveness-detection ステートメントを含めます。
BFDイベントの詳細の表示
目的
BFDトレースファイルの内容を表示し、必要に応じてトラブルシューティングに役立てることができます。
アクション
動作モードから、 file show /var/log/bfd コマンドを入力します。
user@R0> file show /var/log/bfd
Jun  5 00:48:59    Protocol (1) len 1: BFD
Jun  5 00:48:59    Data (9) len 41: (hex) 42 46 44 20 6e 65 69 67 68 62 6f 72 20 31 30 2e 30 2e 30
Jun  5 00:48:59 PPM Trace: BFD neighbor 10.255.106.102 (IFL 349) set, 9 0
Jun  5 00:48:59 Received Downstream RcvPkt (19) len 108:
Jun  5 00:48:59    IfIndex (3) len 4: 329
Jun  5 00:48:59    Protocol (1) len 1: BFD
Jun  5 00:48:59    SrcAddr (5) len 8: 10.255.106.102
Jun  5 00:48:59    Data (9) len 24: (hex) 00 88 03 18 00 00 00 4b 00 00 00 15 00 2d c6 c0 00 2d c6
Jun  5 00:48:59    PktError (26) len 4: 0
Jun  5 00:48:59    RtblIdx (24) len 4: 0
Jun  5 00:48:59    MultiHop (64) len 1: (hex) 00
Jun  5 00:48:59    Unknown (168) len 1: (hex) 01
Jun  5 00:48:59    Unknown (171) len 2: (hex) 02 3d
Jun  5 00:48:59    Unknown (172) len 6: (hex) 80 71 1f c7 81 c0
Jun  5 00:48:59    Authenticated (121) len 1: (hex) 01
Jun  5 00:48:59 BFD packet from 10.0.0.2 (IFL 329), len 24
Jun  5 00:48:59    Ver 0, diag 0, mult 3, len 24
Jun  5 00:48:59    Flags: IHU Fate
Jun  5 00:48:59    My discr 0x0000004b, your discr 0x00000015
Jun  5 00:48:59    Tx ivl 3000000, rx ivl 3000000, echo rx ivl 0
Jun  5 00:48:59 [THROTTLE]bfdd_rate_limit_can_accept_pkt: session 10.255.106.102 is up or already in program thread
Jun  5 00:48:59 Replicate: marked session (discr 21) for update
意味
BFDメッセージが指定されたトレースファイルに書き込まれています。
PIM用BFDの設定
双方向フォワーディング検出(BFD)プロトコルは、ネットワーク内の障害を検出する単純なhelloメカニズムです。BFDは、さまざまなネットワーク環境とトポロジーで動作します。1対のルーティングデバイスがBFDパケットを交換します。Helloパケットは、指定された、定期的な間隔で送信されます。ルーティングデバイスが一定時間経過した後に応答を受信しなくなった場合に、ネイバー障害が検出されます。BFDの障害検出タイマーは、PIM(プロトコル独立マルチキャスト)helloホールド時間よりも制限時間が短いため、より高速に検出できます。
BFDの障害検出タイマーは適応型であり、速くしたり遅くしたりすることができます。BFDの障害検出タイマー値が低いほど、障害検出は速くなり、その逆も同様です。例えば、隣接関係に障害が発生した場合(つまり、タイマーが障害を検出する速度が遅くなった場合)、タイマーはより高い値に適応できます。または、ネイバーが設定された値よりも高い値のタイマーをネゴシエートできます。BFDセッションのフラップが15秒間に3回以上発生すると、タイマーはより高い値に適応します。バックオフアルゴリズムは、ローカルBFDインスタンスがセッションフラップの原因である場合に、受信(Rx)の間隔を2つ増加させます。リモートBFDインスタンスがセッションフラップの原因である場合、送信(Tx)間隔は2つ増加します。 clear bfd adaptation コマンドを使用すると、BFD間隔タイマーを設定した値に戻すことができます。 clear bfd adaptation コマンドはヒットレスであり、コマンドがルーティングデバイスのトラフィックフローに影響を与えないことを意味します。
PIM で BFD を有効にするには、最小の送信間隔と最小受信間隔を指定する必要があります。
障害検出を有効にするには:
SRXシリーズファイアウォールでの専用かつリアルタイムBFDの有効化
デフォルトでは、SRXシリーズファイアウォールは集中型BFDモードで動作します。また、分散BFD、専用BFD、リアルタイムBFDもサポートしています。
専用BFD
専用BFDを有効にすると、データプレーン処理から1つのCPUコアが削除されるため、トラフィックのスループットに影響を与えます。
SRX300、SRX320、SRX340、SRX345、SRX380、SRX1500、vSRX、vSRX3.0デバイスで専用BFDを有効にするには:
-
[edit chassis]階層レベルにdedicated-ukern-cpuステートメントを含め、設定をコミットします。-
[edit] -
user@host# set chassis dedicated-ukern-cpu
user@host# commit
設定をコミットすると、システムの再起動に関する以下の警告メッセージが表示されます。
warning: Packet processing throughput may be impacted in dedicated-ukernel-cpu mode. warning: A reboot is required for dedicated-ukernel-cpu mode to be enabled. Please use "request system reboot" to reboot the system. commit complete
-
-
デバイスを再起動して設定を有効にします。
-
user@host> request system reboot
-
-
専用BFDが有効になっていることを確認します。
user@host> show chassis dedicated-ukern-cpu
Dedicated Ukern CPU Status: Enabled
リアルタイムBFD
リアルタイムBFDを有効にしても、データプレーンのパフォーマンスには影響しません。分散モードでBFDを処理するパケット転送エンジンプロセスに高い優先度が与えられます。これは、BFDセッションの最大数の半分以下が使用されているシナリオに適しています。SRXデバイスあたりでサポートされるBFDセッションの最大数については 、このリスト を参照してください。
分散モードのBFDの詳細については、「 BFDがネットワーク障害を検出する方法を理解する」を参照してください。
SRX300、SRX320、SRX340、SRX345デバイスでリアルタイムBFDを有効にするには:
-
[edit chassis]階層レベルにrealtime-ukern-threadステートメントを含め、設定をコミットします。-
[編集]
-
user@host# set chassis realtime-ukern-thread
user@host# commit
設定をコミットすると、システムの再起動に関する以下の警告メッセージが表示されます。
WARNING: realtime-ukern-thread is enable. Please use the command request system reboot.
-
-
デバイスを再起動して設定を有効にします。
-
user@host> request system reboot
-
-
リアルタイムBFDが有効になっていることを確認します。
user@host> show chassis realtime-ukern-thread
realtime Ukern thread Status: Enabled
SRXプラットフォームによるBFDサポート
SRXシリーズファイアウォールは、以下の最大BFDセッション数をサポートします。
-
SRX300およびSRX320デバイスで最大4つのセッション。
-
SRX340、SRX345、SRX380デバイスで最大50セッション。
-
SRX1500デバイスで最大120セッション。
すべてのSRXシリーズファイアウォールで、CPUを多用するコマンドやSNMPウォークなどの理由でCPU使用率が高くなると、大規模なBGP更新の処理中にBFDプロトコルがフラップします。(プラットフォームのサポートは、インストールされた Junos OS リリースによって異なります)。
シャーシクラスターモードで動作するSRXシリーズファイアウォールは、BFD集中モードのみをサポートします。
以下の表は、各SRXシリーズファイアウォールでサポートされているBFDモードを示しています。
| SRXシリーズファイアウォール |
集中型BFDモード |
分散型BFD |
リアルタイムBFD |
専用コア |
|---|---|---|---|---|
| SRX300 |
デフォルト |
設定 |
設定(オプション) |
未対応 |
| SRX320 |
デフォルト |
設定 |
設定(オプション) |
未対応 |
| SRX340 |
デフォルト |
設定 |
設定 |
設定(オプション) |
| SRX345 |
デフォルト |
設定 |
設定 |
設定(オプション) |
| SRX380 |
デフォルト |
設定 |
設定 |
設定(オプション) |
| SRX1500 | BFD 障害検出時間 >= 500 ミリ秒、専用モードが有効になっていない | BFDの障害検出時間<500ミリ秒で、専用モードが有効になっていません | 未対応 | 設定 |
| SRX4100 | BFD 障害検出時間 >= 500 ミリ秒 | BFDの障害検出時間<500ミリ秒 | 未対応 | 未対応 |
| SRX4200 | BFD 障害検出時間 >= 500 ミリ秒 | BFDの障害検出時間<500ミリ秒 | 未対応 | 未対応 |
| SRX4600 | BFD 障害検出時間 >= 500 ミリ秒 | BFDの障害検出時間<500ミリ秒 | 未対応 | 未対応 |
| SPC2カード搭載のSRX5000シリーズデバイス |
デフォルト |
未対応 |
未対応 |
未対応 |
| SPC3カード搭載のSRX5000シリーズデバイス |
BFD 障害検出時間 >= 500 ミリ秒 |
BFDの障害検出時間<500ミリ秒 |
未対応 |
未対応 |
| vSRX 3.0 |
BFDの障害検出時間>500ms | BFDの障害検出時間<= 500ms |
未対応 |
設定 |