このページの内容
クラスターノードを準備する
このトピックでは、Routing Director のデプロイ クラスター ノードをデプロイ用に準備するために実行する必要がある手順について説明します。
ESXi 8.0、KVM、およびProxmox VEハイパーバイザーに展開するクラスターノードを準備するには、次の手順を実行します。
-
作成方法は、クラスターをデプロイするベアメタルハイパーバイザーによって異なります。
OVAファイルをダウンロードする
OVAファイルをダウンロードして整合性を確認します。
Juniper Routing DirectorソフトウェアのダウンロードサイトからRouting DirectorインストールOVAファイルをダウンロードします。OVA は、ノード VM の作成とクラスターのデプロイに使用されます。
実際のファイル名には、 routing-director-2.7.0-build.ovaなどのリリース日が含まれていることに注意してください。
ファイルのサイズが大きいため、ファイルをダウンロードしてからコンピューターから VM を作成するのにかなりの時間がかかる場合があります。そのため、Routing Directorをインストールするのと同じサーバーまたは別のサーバーのいずれかに、基本的なUbuntuデスクトップVMであるローカルインストーラーVMを作成することをお勧めします。OVA ファイルをこのローカル インストーラ VM にダウンロードでき、ファイルを保存するのに十分なスペースが VM に必要です。 図1に示すように、サーバーの管理IPアドレスへの接続を設定します。
図1:OVA/OVFファイルをダウンロードするためのローカルインストーラVM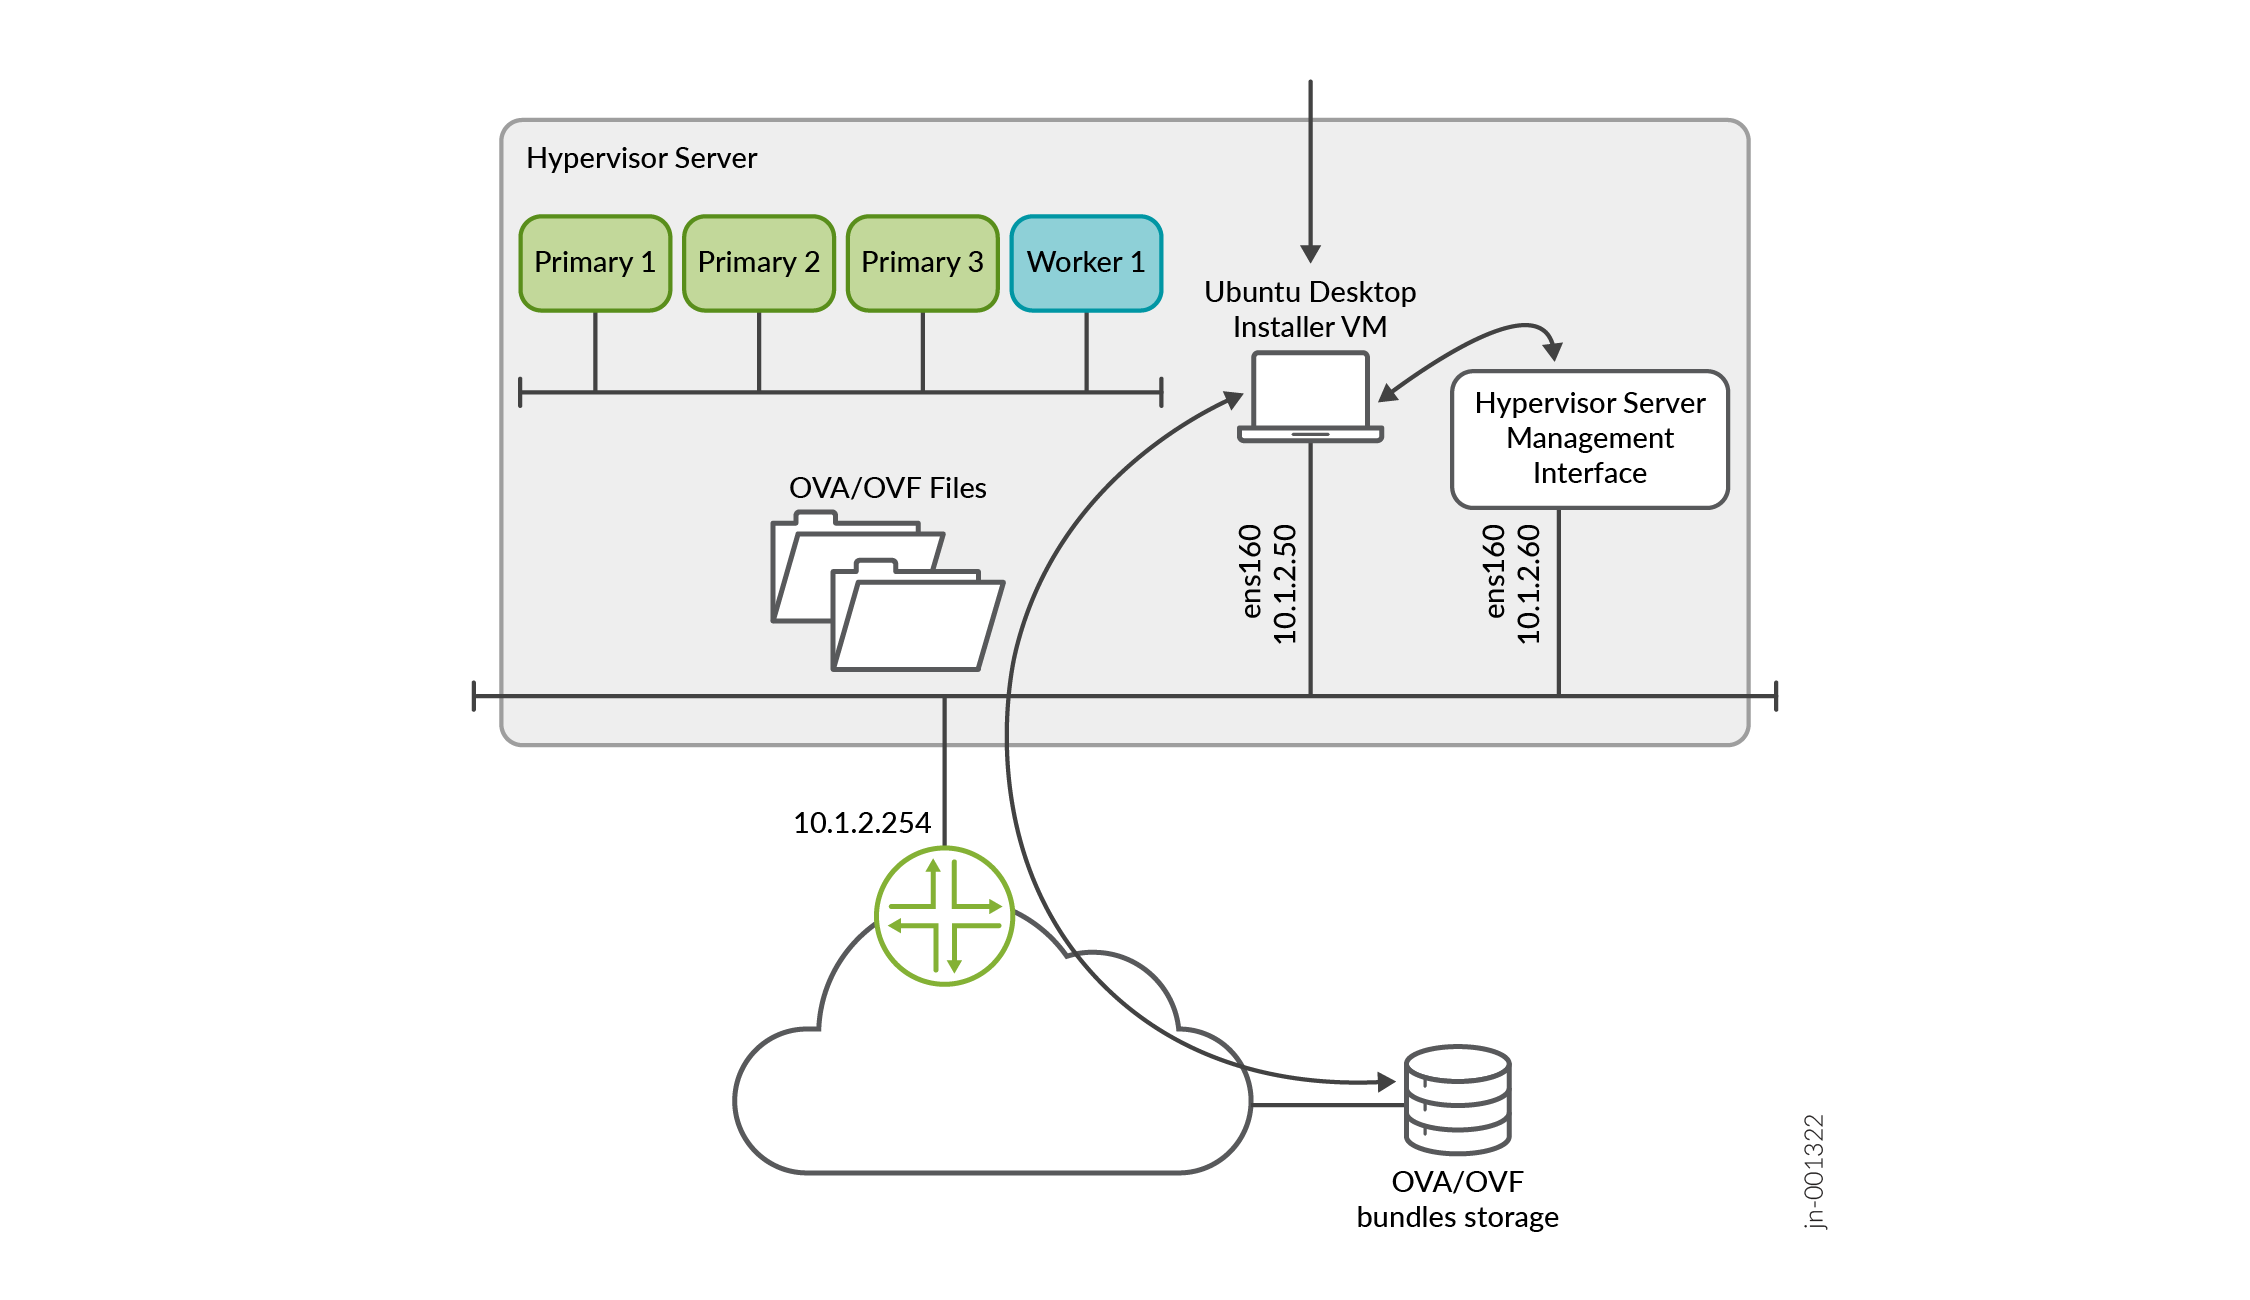
または、
wget "http://cdn.juniper.net/software/file-download-url/routing-director-2.7.0-build.ova"コマンドを使用して、OVAをハイパーバイザーに直接ダウンロードすることもできます。(オプション)OVA ファイルの整合性を検証します。Ubuntuデスクトップを使用している場合は、次のコマンドを使用します。
root@ubuntu:~$ sha512sum routing-director-2.7.0-build.ova
7deda68aae8ba6399aa95d5365a659a8d579c5562811ebe588972cf0c5107337628370d78dcbdb56ab8ea97e73b7597f3a5ff06e9f501706bd8954b7454b86d2 routing-director-2.7.0-build.ova
画面に表示されている番号が、Juniper Routing Director ソフトウェアダウンロードサイトで入手できるSHA512チェックサム番号と同じであることを確認します。 チェックサム をクリックすると、有効なSHA512チェックサムが表示されます。
ESXi 8.0の場合
ESXi 8.0 を使用している場合は、OVA を使用して VM を直接作成できます。
また、OVA から OVF ファイルと .vmdk ファイルを抽出して使用し、VM を作成することもできます。ファイルを抽出するには、次のコマンドを使用します。
root@ubuntu:# tar -xvf routing-director-2.7.0-build.ova
routing-director-2.7.0-build-disk1.vmdk
routing-director.-2.7.0-disk2.vmdk
routing-director-2.7.0.mf
routing-director-2.7.0.ovf
インストールデスクトップがWindowsを実行している場合は、 https://gnuwin32.sourceforge.net/packages/gtar.htm からtarユーティリティをダウンロードして使用し、ファイルを抽出できます。
注:vCenterなしでスタンドアロンのESXi 8.0サーバを使用している場合、VMwareホストクライアントの制限により、大きなOVAファイルをクライアントにアップロードすることはできません。このような場合は、OVF ファイルと .vmdk ファイルを抽出して使用し、VM を作成する必要があります。
KVMおよびProxmox VEの場合
KVMを使用している場合は、
tar -xvf routing-director-2.7.0-build.ovaコマンドを使用してOVAから.vmdkファイルを抽出する必要があります。このドキュメントの残りの部分では、OVA が単一の KVM サーバーにダウンロードされていることを前提としています。複数のサーバーがある場合は、すべてのサーバーにファイルをダウンロードします。このドキュメントで説明する手順は、CLI導入方法を使用してVMを作成するための一般的なガイドラインです。また、GUIベースの導入を使用し、ハイパーバイザーの要件に合わせて手順を変更することもできます。ハイパーバイザーのネットワーク設定は、このドキュメントの範囲外です。
これで、ノードVMを作成できます。
ノードVMの作成
OVAファイルの整合性を確認したら、ノードVMを作成します。以下のいずれかの方法を使用して、クラスターを導入するハイパーバイザーに基づいてノードVMを作成します。
ESXi 8.0の場合
ESXi 8.0 ハイパーバイザーで次の手順を実行します。
Webブラウザから、Routing DirectorをインストールするVMware ESXi 8.0サーバーに接続してログインします。
ローカル インストーラ VM を使用している場合は、VM 内のブラウザを使用して VMware ESXi サーバーに接続します。
ノードVMを作成します。
VMを作成するには、次の手順を実行します。
ホストアイコンを右クリックし、VMの作成/登録を選択します。
新しい仮想マシンウィザードが表示されます。
作成タイプの選択ページで、 OVFまたはOVAファイルから仮想マシンをデプロイを選択します。
次へをクリックします。
[ OVF ファイルと VMDK ファイルの選択 ] ページで、ノード VM の名前を入力します。
クリックしてOVAファイル(またはOVFファイルと .vmdk ファイル)をアップロードまたはドラッグアンドドロップします。
アップロードするファイルのリストを確認し、 次へをクリックします。
[ストレージの選択] ページで、ノード仮想マシンに 512 GB SSD を収容できる適切なデータストアを選択します。SSDは必須であることに注意してください。
次へをクリックします。ファイルの抽出には数分かかります。
[展開オプション] ページで、次の操作を行います。
ノードVMを接続する仮想ネットワークを選択します。
[ シック ディスクプロビジョニング]オプションを選択します。
VMの電源を自動的にオンにします。
次へをクリックします。
[完了の準備完了] ページで、VM 設定を確認します。
完了 をクリックして ノードVMを作成します。
プライマリーディスクと Ceph ストレージディスクのサイズを増やします。インベントリページで新しく作成されたVMを右クリックし、 仮想ハードウェア>設定の編集をクリックします。プライマリーディスクであるハードディスク 1 に 400-GB を入力し、Ceph ストレージディスクであるハードディスク 2 に 100-GB を入力します。
VMの電源を入れるには、インベントリページで新しく作成されたVMを右クリックし、 電源>電源オンをクリックします。
残りのノードVMについて、手順 2.a から 2.h を繰り返します。
または、VMware vCenterを使用している場合は、VMを右クリックし、[ Clone > Clone to Virtual Machine] オプションをクリックして、新しく作成したVMを複製できます。VM を 3 回複製して、残りのノード VM を作成します。
プロンプトが表示されたら、適切なVM名を入力します。
(オプション)ページの下部にある [最近のタスク] セクションで VM 作成の進行状況を確認します。VM が作成されると、VMware Host Client インベントリの [仮想マシン] に表示されます。
すべてのVMが作成されたら、VMの仕様が正しく、電源がオンになっていることを確認します。
ノードの準備手順を完了し、すべてのVMを作成しました。これで、クラスターを設定して展開する準備ができました。 クラスターのデプロイに移動します。
KVMについて
Ubuntu 22.04.05およびRHEL 8.10ホストOSを搭載したKVMハイパーバイザーで、以下の手順を実行します。
この例では、次の場所と命名パラメーターを使用して、別のハイパーバイザーサーバーにクラスターをデプロイしています。
-
別々のハイパーバイザーで、以下のデータの場所(SSD)にそれぞれ1つのVMを作成します。
-
/data/routing-director1/VM1用
-
VM2の/data/routing-director2/
-
VM3用/data/routing-director3/
-
VM4用/data/routing-director4/
ここで、VM1、VM2、VM3、VM4 は 4 つのクラスター ノード VM です。
3 つのノードを持つクラスターを作成する場合は、VM4 の設定に対応するすべての手順をスキップします。
-
-
VM1の名前はrouting-director1、VM2の名前はrouting-director2、VM3の名前はrouting-director3、VM4の名前はrouting-director4です。
-
各VMの2つのディスクイメージの名前は、routing-director-disk1.imgとrouting-director-disk2.imgです。各VMの両方のディスクイメージは、対応するrouting-directorxディレクトリにあります。ここで、xはVM番号(1から4)です。
-
すべての VM について、4 ノード クラスターでは、CPU = 16、RAM = 32-GB、モード = ホスト CPU です。
すべての VM について、3 ノード クラスターでは、CPU = 24、RAM = 48-GB、モード = ホスト CPU です。
これらは、各ノード VM に必要な 最小限 のハードウェア リソースです。
-
VM は、
br-exブリッジされたネットワークに接続されます。
ノードVMを作成するには、次の手順を実行します。
KVMハイパーバイザーCLIにログインします。
必要な libvirt、libvirt-daemon-kvm、qemu-kvm、bridge-utils、および qemu-kvm パッケージがインストールされていることを確認します。
dnf updateコマンドとdnf install libvirt libvirt-daemon-kvm qemu-kvm bridge-utilsコマンドを使用してパッケージをインストールします。-
.vmdkファイルをRAW形式に変換します。root@kvm1:~/routing-director# qemu-img convert -O raw routing-director-2.7.0-build-disk1.vmdk routing-director-disk1.img root@kvm1:~/routing-director# qemu-img convert -O raw routing-director-2.7.0-disk2.vmdk routing-director-disk2.img root@kvm1:~/routing-director# ls -l total 111327724 -rw-r--r-- 1 root root 268435456000 Feb 13 16:23 routing-director-disk1.img -rw-r--r-- 1 root root 53687091200 Feb 13 16:23 routing-director-disk2.img -rw-r--r-- 1 64 64 34630534656 Feb 5 10:08 routing-director-2.7.0-build-disk1.vmdk -rw-r--r-- 1 64 64 74240 Feb 5 10:08 routing-director-2.7.0-disk2.vmdk -rw-r--r-- 1 64 64 394 Feb 5 09:26 routing-director-2.7.0.mf -rw-r--r-- 1 root root 34679057408 Feb 5 10:08 routing-director-2.7.0-build.ova -rw-r--r-- 1 64 64 10866 Feb 5 09:26 routing-director-2.7.0.ovf
ディスクサイズを調整して拡張します。
root@kvm1:~/routing-director# qemu-img resize -f raw  routing-director-disk1.img 400G
Image resized.
root@kvm1:~/routing-director# qemu-img resize -f raw  routing-director-disk2.img 100G
Image resized.
root@kvm1:~/routing-director# ls -l
total 111327724
-rw-r--r-- 1 root root 322122547200 Feb 13 16:23 routing-director-disk1.img
-rw-r--r-- 1 root root  80530636800 Feb 13 16:23 routing-director-disk2.img
-rw-r--r-- 1   64   64  34630534656 Feb  5 10:08 routing-director-2.7.0-build-disk1.vmdk
-rw-r--r-- 1   64   64        74240 Feb  5 10:08 routing-director-2.7.0-disk2.vmdk
-rw-r--r-- 1   64   64          394 Feb  5 09:26 routing-director-2.7.0.mf
-rw-r--r-- 1 root root  34679057408 Feb  5 10:08 routing-director-2.7.0-build.ova
-rw-r--r-- 1   64   64        10866 Feb  5 09:26 routing-director-2.7.0.ovf
VMファイルを配置するフォルダーを作成します。
たとえば、VM1の場合は /data/routing-director1/ です。
別のハイパーバイザーにログインして、クラスターの残りのノードVMに対して手順 1 から 5 を繰り返します。VM ごとに適切なフォルダーを作成します。次に例を示します。
VM2の/data/routing-director2/
VM3用/data/routing-director3/
VM4用/data/routing-director4/
3ノードクラスターを作成する場合は、このフォルダーをスキップします。
cpcopyコマンドを使用して、routing-director-disk1.imgとrouting-director-disk2.imgの両方のローディスクイメージを各VMの場所にコピーします。例えば、root@kvm1:~/routing-director# cp routing-director-disk1.img /data/routing-director1/です。すべてのファイルがコピーされると、フォルダーとファイル構造は次のようになります。
root@kvm1:~/routing-director# ls -l /data/routing-director1
total 39852200
-rw-r--r-- 1 root root 322122547200 Feb 28 05:45 routing-director-disk1.img
-rw-r--r-- 1 root root  80530636800 Feb 13 16:30 routing-director-disk2.img
root@kvm2:~/routing-director# ls -l /data/routing-director2
total 39852200
-rw-r--r-- 1 root root 322122547200 Feb 28 05:45 routing-director-disk1.img
-rw-r--r-- 1 root root  80530636800 Feb 13 16:30 routing-director-disk2.img
root@kvm3:~/routing-director# ls -l /data/routing-director3
total 39852200
-rw-r--r-- 1 root root 322122547200 Feb 28 05:45 routing-director-disk1.img
-rw-r--r-- 1 root root  80530636800 Feb 13 16:30 routing-director-disk2.img
root@kvm4:~/routing-director# ls -l /data/routing-director4
total 39852200
-rw-r--r-- 1 root root 322122547200 Feb 28 05:45 routing-director-disk1.img
-rw-r--r-- 1 root root  80530636800 Feb 13 16:30 routing-director-disk2.img
各VMを設定するためのXMLファイルを生成してカスタマイズします。Ubuntu と RHEL 用に異なる XML ファイルを作成する必要があります。ホストOSに基づくXMLファイルの顕著な違いは以下の通りです。
Ubuntu 22.04.05の場合—マシンタイプは
pc-q35-jammy、エミュレーターバイナリは/usr/bin/qemu-system-x86_64RHEL 8.10 の場合 - マシンタイプは
q35で、エミュレーターバイナリは/usr/libexec/qemu-kvm
ここでは、4 ノード クラスター内のノード用の Ubuntu のサンプル XML ファイルについて説明します。
<domain type='kvm'>

  <!-- Specify VM name here -->
  <name>routing-director1</name>

  <!-- Specify VM RAM size here -->
  <memory unit='KiB'>33554432</memory>
  <currentMemory unit='KiB'>33554432</currentMemory>

  <!-- Specify number of vcpu for the VM here -->
  <vcpu placement='static'>16</vcpu>

  <!--
  For Ubuntu 22.04 KVM use pc-q35-jammy as machine type
  For RHEL 8.10 KVM use q53 as machine type
  -->
  <os>
    <type arch='x86_64' machine='pc-q35-jammy'>hvm</type>
  </os>

  <features>
    <acpi/>
    <apic/>
    <vmport state='off'/>
  </features>
  <cpu mode='host-passthrough' check='none' migratable='on'/>
  <clock offset='utc'>
    <timer name='rtc' tickpolicy='catchup'/>
    <timer name='pit' tickpolicy='delay'/>
    <timer name='hpet' present='no'/>
  </clock>
  <on_poweroff>destroy</on_poweroff>
  <on_reboot>restart</on_reboot>
  <on_crash>destroy</on_crash>
  <pm>
    <suspend-to-mem enabled='no'/>
    <suspend-to-disk enabled='no'/>
  </pm>
  <devices>

    <!--
    For Ubuntu 22.04 KVM use /usr/bin/qemu-system-x86_64 as emulator
    For RHEL 8.10 KVM use /usr/libexec/qemu-kvm as emulator
    -->
    <emulator>/usr/bin/qemu-system-x86_64</emulator>

    <disk type='file' device='disk'>
      <driver name='qemu' type='raw' cache='none' discard='ignore'/>
      <!-- Specify the path to the 1st virtual disk for the main disk -->
      <source file='/data/routing-director1/routing-director-disk1.img'/>
      <target dev='vda' bus='virtio'/>
      <boot order='1'/>
      <address type='pci' domain='0x0000' bus='0x05' slot='0x00' function='0x0'/>
    </disk>
    <disk type='file' device='disk'>
      <driver name='qemu' type='raw' cache='none' discard='ignore'/>
      <!-- Specify the path to the 2nd virtual disk for the CEPH OSD disk -->
      <source file='/data/routing-director1/routing-director-disk2.img'/>
      <target dev='vdb' bus='virtio'/>
      <address type='pci' domain='0x0000' bus='0x06' slot='0x00' function='0x0'/>
    </disk>
    <controller type='usb' index='0' model='qemu-xhci' ports='15'>
      <address type='pci' domain='0x0000' bus='0x02' slot='0x00' function='0x0'/>
    </controller>
    <controller type='scsi' index='0' model='virtio-scsi'>
      <address type='pci' domain='0x0000' bus='0x03' slot='0x00' function='0x0'/>
    </controller>
    <controller type='sata' index='0'>
      <address type='pci' domain='0x0000' bus='0x00' slot='0x1f' function='0x2'/>
    </controller>
    <controller type='virtio-serial' index='0'>
      <address type='pci' domain='0x0000' bus='0x04' slot='0x00' function='0x0'/>
    </controller>
    <interface type='bridge'>
      <!-- Specify the linux bridge name for the VM to attach to -->
      <source bridge='br-ex'/>
      <model type='virtio'/>
      <address type='pci' domain='0x0000' bus='0x01' slot='0x00' function='0x0'/>
    </interface>
    <serial type='pty'>
      <target type='isa-serial' port='0'>
        <model name='isa-serial'/>
      </target>
    </serial>
    <console type='pty'>
      <target type='serial' port='0'/>
    </console>
    <channel type='unix'>
      <target type='virtio' name='org.qemu.guest_agent.0'/>
      <address type='virtio-serial' controller='0' bus='0' port='1'/>
    </channel>
    <input type='keyboard' bus='ps2'/>

    <!--
    Specify the TCP port for VNC access for GUI console access
    The port number should be uniq and unused TCP port.
    KVM can also allocate dynamic port by setting port='' and autoport='yes'
    -->
    <graphics type='vnc' port='5911' autoport='no' listen='0.0.0.0'>
      <listen type='address' address='0.0.0.0'/>
    </graphics>

    <video>
      <model type='qxl' ram='65536' vram='65536' vgamem='16384' heads='1' primary='yes'/>
      <address type='pci' domain='0x0000' bus='0x00' slot='0x01' function='0x0'/>
    </video>
    <memballoon model='virtio'>
      <address type='pci' domain='0x0000' bus='0x07' slot='0x00' function='0x0'/>
    </memballoon>
    <rng model='virtio'>
      <backend model='random'>/dev/urandom</backend>
      <address type='pci' domain='0x0000' bus='0x08' slot='0x00' function='0x0'/>
    </rng>
  </devices>
</domain>
このファイルを /root/routing-director/routing-director1.xmlとして保存します。この例では:
VM1はrouting-director1に対応します。
これは 4 ノード クラスターであるため、VM1 CPU = 16、VM1 RAM = 32-GB、VM1 モード = ホスト CPU。3ノードクラスターの場合は、これらの値をCPU = 24、RAM = 48-GBに変更します。
VM1には、/data/routing-director1/routing-director-disk1.imgと/data/routing-director1/routing-director-disk2.imgに2つのイメージディスクイメージがあります。
VM は、名前
br-exでブリッジされたネットワークに接続されています。グラフィカルコンソールのVNCポートは、ポート5911でリッスンしています。ポートを動的に割り当てる場合は、
autoport='yes'を設定します。
4 ノードクラスター内のノード用の RHEL 8.10 のサンプル XML ファイルを以下に説明します。
<domain type='kvm'>

  <!-- Specify VM name here -->
  <name>routing-director1</name>

  <!-- Specify VM RAM size here -->
  <memory unit='KiB'>33554432</memory>
  <currentMemory unit='KiB'>33554432</currentMemory>

  <!-- Specify number of vcpu for the VM here -->
  <vcpu placement='static'>16</vcpu>

  <!--
  For Ubuntu 22.04 KVM use pc-q35-jammy as machine type
  For RHEL 8.10 KVM use q53 as machine type
  -->
  <os>
    <type arch='x86_64' machine='q35'>hvm</type>
  </os>

  <features>
    <acpi/>
    <apic/>
    <vmport state='off'/>
  </features>
  <cpu mode='host-passthrough' check='none' migratable='on'/>
  <clock offset='utc'>
    <timer name='rtc' tickpolicy='catchup'/>
    <timer name='pit' tickpolicy='delay'/>
    <timer name='hpet' present='no'/>
  </clock>
  <on_poweroff>destroy</on_poweroff>
  <on_reboot>restart</on_reboot>
  <on_crash>destroy</on_crash>
  <pm>
    <suspend-to-mem enabled='no'/>
    <suspend-to-disk enabled='no'/>
  </pm>
  <devices>

    <!--
    For Ubuntu 22.04 KVM use /usr/bin/qemu-system-x86_64 as emulator
    For RHEL 8.10 KVM use /usr/libexec/qemu-kvm as emulator
    -->
    <emulator>/usr/libexec/qemu-kvm</emulator>

    <disk type='file' device='disk'>
      <driver name='qemu' type='raw' cache='none' discard='ignore'/>
      <!-- Specify the path to the 1st virtual disk for the main disk -->
      <source file='/data/routing-director1/routing-director-disk1.img'/>
      <target dev='vda' bus='virtio'/>
      <boot order='1'/>
      <address type='pci' domain='0x0000' bus='0x05' slot='0x00' function='0x0'/>
    </disk>
    <disk type='file' device='disk'>
      <driver name='qemu' type='raw' cache='none' discard='ignore'/>
      <!-- Specify the path to the 2nd virtual disk for the CEPH OSD disk -->
      <source file='/data/routing-director1/routing-director-disk2.img'/>
      <target dev='vdb' bus='virtio'/>
      <address type='pci' domain='0x0000' bus='0x06' slot='0x00' function='0x0'/>
    </disk>
    <controller type='usb' index='0' model='qemu-xhci' ports='15'>
      <address type='pci' domain='0x0000' bus='0x02' slot='0x00' function='0x0'/>
    </controller>
    <controller type='scsi' index='0' model='virtio-scsi'>
      <address type='pci' domain='0x0000' bus='0x03' slot='0x00' function='0x0'/>
    </controller>
    <controller type='sata' index='0'>
      <address type='pci' domain='0x0000' bus='0x00' slot='0x1f' function='0x2'/>
    </controller>
    <controller type='virtio-serial' index='0'>
      <address type='pci' domain='0x0000' bus='0x04' slot='0x00' function='0x0'/>
    </controller>
    <interface type='bridge'>
      <!-- Specify the linux bridge name for the VM to attach to -->
      <source bridge='br-ex'/>
      <model type='virtio'/>
      <address type='pci' domain='0x0000' bus='0x01' slot='0x00' function='0x0'/>
    </interface>
    <serial type='pty'>
      <target type='isa-serial' port='0'>
        <model name='isa-serial'/>
      </target>
    </serial>
    <console type='pty'>
      <target type='serial' port='0'/>
    </console>
    <channel type='unix'>
      <target type='virtio' name='org.qemu.guest_agent.0'/>
      <address type='virtio-serial' controller='0' bus='0' port='1'/>
    </channel>
    <input type='keyboard' bus='ps2'/>

    <!--
    Specify the TCP port for VNC access for GUI console access
    The port number should be uniq and unused TCP port.
    KVM can also allocate dynamic port by setting port='' and autoport='yes'
    -->
    <graphics type='vnc' port='5911' autoport='no' listen='0.0.0.0'>
      <listen type='address' address='0.0.0.0'/>
    </graphics>

    <video>
      <model type='qxl' ram='65536' vram='65536' vgamem='16384' heads='1' primary='yes'/>
      <address type='pci' domain='0x0000' bus='0x00' slot='0x01' function='0x0'/>
    </video>
    <memballoon model='virtio'>
      <address type='pci' domain='0x0000' bus='0x07' slot='0x00' function='0x0'/>
    </memballoon>
    <rng model='virtio'>
      <backend model='random'>/dev/urandom</backend>
      <address type='pci' domain='0x0000' bus='0x08' slot='0x00' function='0x0'/>
    </rng>
  </devices>
</domain>
このファイルを /root/routing-director/routing-director1.xmlとして保存します。この例では:
VM1はrouting-director1に対応します。
これは 4 ノード クラスターであるため、VM1 CPU = 16、VM1 RAM = 32-GB、VM1 モード = ホスト CPU。3ノードクラスターの場合は、これらの値をCPU = 24、RAM = 48-GBに変更します。
VM1には、/data/routing-director1/routing-director-disk1.imgと/data/routing-director1/routing-director-disk2.imgに2つのイメージディスクイメージがあります。
VM は、名前
br-exでブリッジされたネットワークに接続されています。グラフィカルコンソールのVNCポートは、ポート5911でリッスンしています。ポートを動的に割り当てる場合は、
autoport='yes'を設定します。
XMLファイルを使用してVMを定義します。
root@kvm1:~/routing-director# virsh define routing-director1.xml
Domain 'routing-director1' defined from routing-director1.xml
VM が登録されていることを確認します。
root@kvm1:~/routing-director# virsh list --all
 Id   Name                State
-----------------------------------
 -    routing-director1   shut off
KVMが再起動した場合にVMを
autostartに設定します。root@kvm1:~/routing-director# virsh autostart routing-director1 Domain 'routing-director1' marked as autostarted
VMの電源を入れます。
root@kvm1:~/routing-director# virsh start routing-director1
Domain 'routing-director1' started
次のいずれかの方法でVMコンソールに接続します。
シリアルコンソールの使用。
シリアルコンソールを使用してVMに接続します。
root@kvm1:~/routing-director# virsh console routing-director1
Connected to domain 'routing-director1'
Escape character is ^] (Ctrl + ])
  OK  ] Listening on Journal Socket.
[    6.635248] systemd[1]: Listening on Network Service Netlink Socket.
[  OK  ] Listening on Network Service Netlink Socket.
[    6.640195] systemd[1]: Listening on udev Control Socket.
[  OK  ] Listening on udev Control Socket.
[    6.646190] systemd[1]: Listening on udev Kernel Socket.
[  OK  ] Listening on udev Kernel Socket.
[    6.651480] systemd[1]: Mounting Huge Pages File System...
...
...
[  OK  ] Reached target Login Prompts.
[  OK  ] Reached target Multi-User System.
[  OK  ] Reached target Graphical Interface.
         Starting Record Runlevel Change in UTMP...
[  OK  ] Finished Record Runlevel Change in UTMP.

epic login:
VNCクライアントを使用します。
任意のVNC互換クライアントを使用して
kvm-ip::5911に接続します。ファイアウォールがコンピューターと VM 間の通信にポート 5911 を許可していることを確認します。
残りの VM について、手順 8 から 13 を繰り返します。
残りの VM の XML ファイルを作成する場合は、必要に応じて VM 名とディスクの場所を変更します。また、各 VM のグラフィカル コンソール ポート番号を変更します。
(オプション)クラスターが正常にデプロイされたら、ハイパーバイザーから .vmdk ファイルと .ova ファイルを削除して、スペースを解放できます。
ノードの準備手順を完了し、すべてのVMを作成しました。これで、クラスターを設定して展開する準備ができました。 クラスターのデプロイに移動します。
Proxmox VEで
Proxmox VEハイパーバイザーで次の手順を実行します。
この例では、data0、data1、data2の3つのデータストアがプロビジョニングされた単一のサーバーにRouting Directorをインストールします。data0はOVAファイルの保存に使用し、data1は最初のディスクイメージを保存し、data2は2番目のディスクイメージを保存するために使用されます。VM の名前は、VM1、VM2、VM3、VM4 です。また、クラスターの導入に必要な最低限のハードウェアリソースも構成しています。
システムにディスクが 1 つしかない場合は、data0、data1、data2 などの標準の推奨ファイルシステム/ディレクトリではなく、LVM を使用する必要があります。ディスク上の importdisk コマンドと qm set コマンドは、ストレージの違いにより、以下に示すものとは見た目が異なります。
次に例を示します。
-
qm importdisk 100 routing-director-2.7.0-disk1.vmdk local-lvm -
qm set 100 -virtio0 local-lvm:vm-404-disk-0,backup=0,replicate=no,discard=on,iothread=on -
qm set 100 -virtio0 local-lvm:vm-404-disk-1,backup=0,replicate=no,discard=on,iothread=on
ノードVMを作成するには、次の手順を実行します。
Proxmox VEサーバーCLIにログインします。
directoryメソッドを使用して、data0、data1、data2のデータストアを作成します。
XFS または EXT4 のいずれかを使用できます。EXT4 の方がパフォーマンスがわずかに優れ、予定外の再起動にも耐えられるため、EXT4 の使用をお勧めします。
OVA を data0 データストアにコピーし、 .vmdk ファイルを抽出します。
この例では、data0に ova というフォルダを作成し、 routing-director-2.7.0-build.ova ファイルを ova フォルダにコピーし、
tar -xvf routing-director-2.7.0-build.ovaコマンドを使用してファイルを抽出します。VirtIO ネットワーク インターフェイス(net0)を使用して最初の VM を作成し、VM 名、ID、メモリを構成します。
root@proxmox:# qm create 100 --memory 32768 --name VM1 --net0 virtio,bridge=vmbr0
ここでは、VM ID は 100、VM 名は
VM1、VM メモリは 4 ノード クラスターで 32 GB です。3ノードクラスター用にメモリを48GBに変更します。VM ID が一意の識別子であり、同じサーバーまたは同じ Proxmox クラスター内の他の VM と共有されていないことを確認します。
4ノードクラスターでは、vCPUの総数を16に設定します。クラスターに 3 つのノードがある場合は、24 個の vCPU を構成します。
root@proxmox# qm set 100 --sockets 2
update VM 100: -sockets 2
root@proxmox# qm set 100 --cores 8
update VM 100: -cores 8
VM のストレージを構成します。
root@proxmox# qm set 100 -scsihw virtio-scsi-single
update VM 100: -scsihw virtio-scsi-single
CPUタイプをホストとして設定します。
root@proxmox# qm set 100 --cpu cputype=host
update VM 100: -cpu cputype=host
data0/ovaフォルダに移動します。
ディスク1をローイメージとしてVMにインポートします。ここで、 routing-director-2.7.0-build-disk1.vmdk ファイルをdata1データストアにインポートします。
root@proxmox:/mnt/pve/data0/ova# qm importdisk 100 routing-director-2.7.0-build-disk1.vmdk data1
importing disk 'routing-director-2.7.0-build-disk1.vmdk' to VM 100 ...
Formatting '/mnt/pve/data1/images/100/vm-100-disk-0.raw', fmt=raw size=268435456000 preallocation=off
transferred 0.0 B of 250.0 GiB (0.00%)
transferred 2.5 GiB of 250.0 GiB (1.00%)
transferred 5.0 GiB of 250.0 GiB (2.00%)
transferred 7.5 GiB of 250.0 GiB (3.00%)

...
<output snipped>
...

transferred 250.0 GiB of 250.0 GiB (100.00%)
unused0: successfully imported disk 'data1:100/vm-100-disk-0.raw'
ディスク2をローイメージとしてVMにインポートします。ここで、 routing-director-2.7.0-disk2.vmdk ファイルをdata2データストアにインポートします。
root@proxmox:/mnt/pve/data0/ova# qm importdisk 100 routing-director-2.7.0-disk2.vmdk data2
importing disk 'routing-director-2.7.0-build-.vmdk' to VM 100 ...
Formatting '/mnt/pve/data2/images/100/vm-100-disk-0.raw', fmt=raw size=53687091200 preallocation=off
transferred 0.0 B of 50.0 GiB (0.00%)
transferred 50.0 GiB of 50.0 GiB (100.00%)

unused1: successfully imported disk 'data2:100/vm-100-disk-0.raw'
ローディスクを virtio0 と virtio1 に割り当て、IO スレッド、バックアップ、破棄、レプリケーションオプションを図のように設定します。
ディスクが同じデータストアにある場合は、disk-0 と disk-1 になります。data1 や data2 などの複数のデータストアを使用している場合は、その特定のデータストアで ID 100 に割り当てられた最初のディスクとなるため、両方のディスクが disk-0 になります。
root@proxmox:/mnt/pve/data0/ova# qm set 100 -virtio0 data1:100/vm-100-disk-0.raw,backup=0,replicate=no,discard=on,iothread=on
update VM 100: -virtio0 data1:100/vm-100-disk-0.raw,backup=0,replicate=no,discard=on,iothread=on
root@proxmox:/mnt/pve/data0/ova# qm set 100 -virtio1 data2:100/vm-100-disk-0.raw,backup=0,replicate=no,discard=on,iothread=on
update VM 100: -virtio1 data2:100/vm-100-disk-0.raw,backup=0,replicate=no,discard=on,iothread=on
VM のブート デバイスを割り当てます。
root@proxmox:/mnt/pve/data0/ova# qm set 100 --boot c --bootdisk virtio0
update VM 100: -boot c -bootdisk virtio0
ディスク 1 はプライマリーブートデバイスであり、ディスク 2 は Ceph ストレージに使用されます。
(オプション)VMを非バルーンデバイスになるように設定します。
root@proxmox:/mnt/pve/data0/ova# qm set 100 --balloon 0
update VM 100: -balloon 0
(オプション)OSにGUIを使用していない場合は、タブレットを0に設定してCPUとメモリを節約します。
root@proxmox:/mnt/pve/data0/ova# qm set 100 --tablet 0
update VM 100: -tablet 0
(オプション)表示オプションを標準VGAに設定すると、CPUとメモリを節約できます。
root@proxmox:/mnt/pve/data0/ova# qm set 100 --vga std
update VM 100: -vga std
(オプション)CLIを使用してVMコンソールに接続する場合は、ソケットを使用してシリアル端末を設定します。
root@proxmox:/mnt/pve/data0/ova# qm set 100 --serial0 socket
update vm 100: -serial0 socket
プライマリーブートディスクと Ceph ディスクの両方のディスクサイズを設定します。
Proxmox VE GUI にログインします。
VM1を選択し、 ハードウェアをクリックします。
ハードディスク(virtio0)を選択し、 ディスクアクション>サイズ変更をクリックします。
ディスクのサイズを400GBに変更します。現在、ディスクサイズは250GB(サイズ=250G)である必要があります。サイズを合計400GBに増やすには、 サイズ増分(GiB) に150と入力し、 ディスクのサイズ変更をクリックします。
ハードディスク(virtio1)を選択し、 ディスクアクション>サイズ変更をクリックします。
ディスクのサイズを100GBに変更します。現在、ディスクサイズは50GB(サイズ=50G)である必要があります。サイズを合計100GBに増やすには、 サイズ増分(GiB) に50と入力し、 ディスクのサイズ変更をクリックします。
VMの電源を入れます。
root@proxmox:/mnt/pve/data0/ova# qm start 100
VMコンソールを起動します。
CLIの使用—シリアル端末を設定している場合は、次のコマンドを使用してCLIを介してVMコンソールにアクセスできます。
root@proxmox:/mnt/pve/data0/ova# qm terminal 100
VMコンソールが表示されます。
GUIを使用して—Proxmox VE GUIにログインします。電源がオンになっているVM1を選択し、>_コンソールをクリックします。VMコンソールが表示されます。
ノードの準備手順を完了し、すべてのVMを作成しました。これで、クラスターを設定して展開する準備ができました。 クラスターのデプロイに移動します。