Implement Threat Policy on VMWare NSX-T
VMWare NSX-T Integration with Policy Enforcer and Juniper ATP Cloud Overview
Juniper Networks Advanced Threat Prevention Cloud (Juniper ATP Cloud) identifies the infected virtual machines (VMs) running on VMWare NSX-T and tags these VMs as infected. This is based on a malware file exchange from the infected VMs and/or based on the Command and Control communication with known botnet sites on the internet.
Based on this identification of infected or compromised hosts, you can take one of the following actions:
Enable additional security features such as Layer-7 Application Firewall and Intrusion Prevention (IPS) leveraging vSRX
Enforce Layer-2 to Layer-4 controls using NSX Distributed Firewall
Leverage NSX integration with Host-Based security vendors (https://www.vmware.com/products/nsx/technology-partners.html) to take host-based security actions such as running antivirus or anti malware features on the infected VMs.
Policy Enforcer provides a set of Connector APIs for the third-party adaptors. The NSX Connector integrates with the Policy Enforcer using these APIs to enable enforcement of the infected hosts policy on Secure Fabric. For NSX connectors, the NSX-T Manager, its associated vCenter, and an edge firewall form the Secure Fabric.
The following topology shows how NSX Manager and the edge firewall create a Secure Fabric with Policy Enforcer.
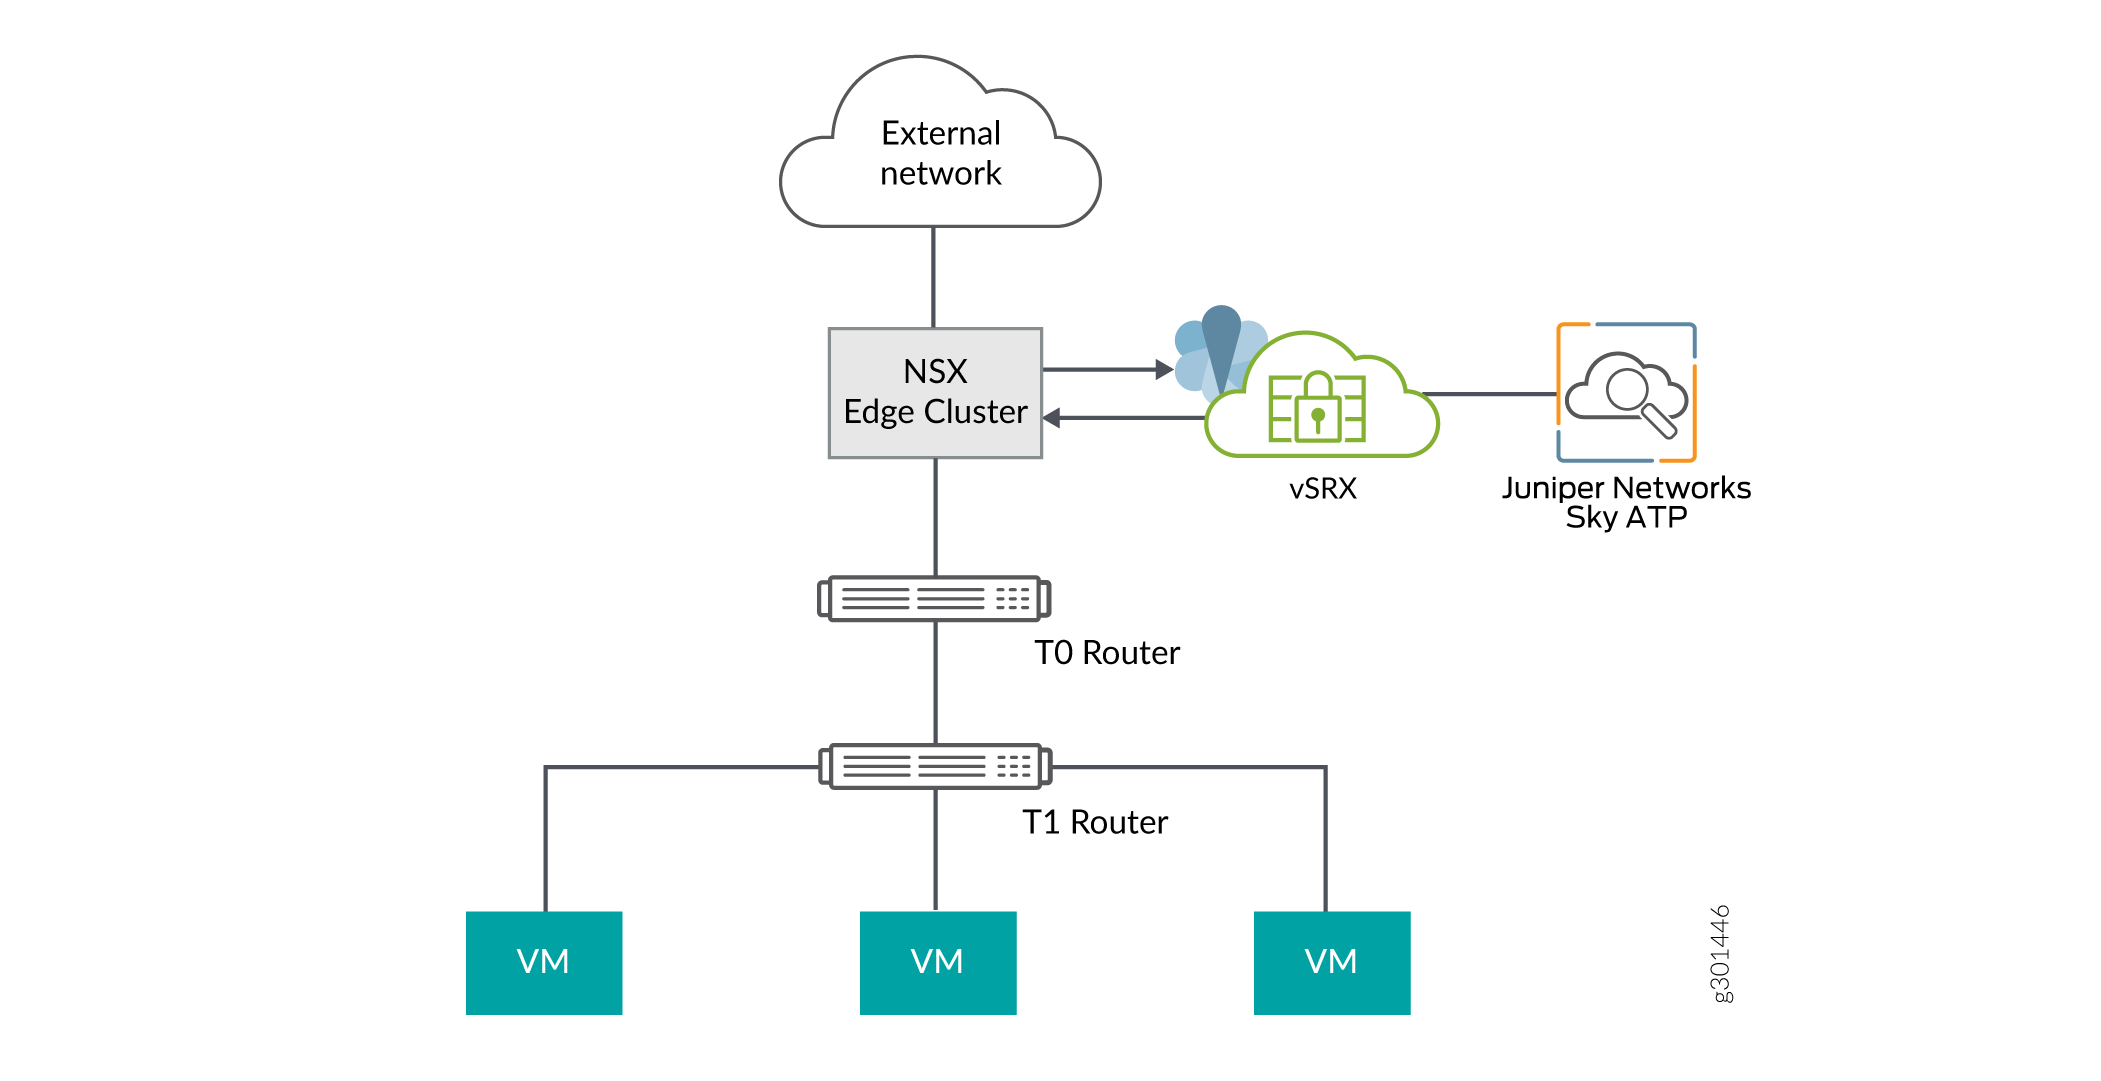
The service which is deployed in Tier 0 gateway in VMware NSX-T is enrolled into Juniper ATP Cloud and acts as an edge firewall.
You can register the NSX-T Manager with Security Director only when the Policy Enforcer is configured. The NSX micro service is bundled with the Policy Enforcer VM. However, the NSX micro service is packaged as a standalone rpm, so that the NSX micro service upgrade and patches can be performed independent of the Policy Enforcer VM.
Implementation of Infected Hosts Policy Overview
The vSRX or SRX Series devices running as an edge firewall is enrolled to send all the suspected traffic to Juniper ATP Cloud.
The following steps explain the high-level workflow:
If an infection is detected, Juniper ATP Cloud notifies the Policy Enforcer about the infected IP addresses
If the infected IP address belongs to Secure Fabric associated with the NSX domain, Policy Enforcer calls the NSX plugin APIs to notify the NSX Connector about the list of infected IP addresses
NSX service will then retrieve the VM corresponding to the IP addresses sent and then calls the NSX API to tag to an appropriate VM with a security tag, SDSN_BLOCK.
You can then create a policy to block the infected hosts using the SDSN_BLOCK tag by creating gateway specific rules. The block policy consists of two rules for ingress block and egress block. The ingress block rule applies to any traffic originating from a security group composed of VMs tagged with a block tag to any destination. Similarly, the egress block rule applies to any traffic destined to security group composed of VMs tagged with block tag from any source.
The creation of security groups associated with the SDSN_BLOCK tag, creation of ingress and egress block rules, and the action to take on the matching packets must be configured by the VMWare administrators. The NSX Connector will simply apply the SDSN_BLOCK tag on the infected VM.
Register NSX Micro Service as Policy Enforcer Connector Instance Overview
The integration of each NSX-T Manager discovered in Security Director with Policy Enforcer is triggered automatically.
The automatic registration of a connector instance involves the following steps:
- Discovering the NSX-T Manager in Security Director. This triggers an auto creation of the Policy Enforcer connector instance.
- Secure Fabric is created to manage the discovered NSX-T Manager.
- Creation of threat prevention policy requires the knowledge of Juniper ATP Cloud realm and the edge firewall device. These are taken as inputs from the user.
Before You Begin
Before you begin to configure NSX with Policy Enforcer, configure the infected hosts workflow in VMWare NSX-T Manager.
Infected Hosts Workflow in VMware NSX-T
To block the infected hosts:
- Log in to VMware NSX-T Manager.
- Select Inventory > Tags.
The Tags page is displayed.
- Click ADD TAG and enter the tag name as SDSN_BLOCK.
- Click Set Virtual Machines to select Virtual
Machines where the tag should be applied.
The Select Virtual Machines page is displayed.
- Select the virtual machine and click Apply.
- Click SAVE to add the tag.
On successful creation of the tag, it will be displayed on the Tags page as shown in Figure 2.
Figure 2: Tags Page 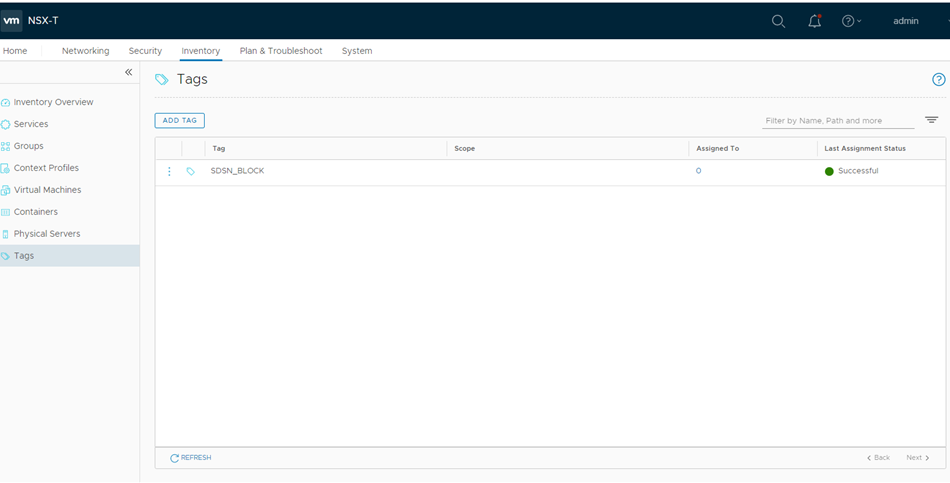
- Select Inventory > Groups and then
click ADD GROUP.
The security administrator can create the security group based on the security tag.
- Enter a name of the security group.
- Click Set Members.
The Select Members page is displayed, where you can define or add members for the security group.
- On the Membership Criteria tab, click ADD CRITERIA.
- Define the criteria that an object must meet for it to
be added to the security group you are creating.
In the Criteria row, select the Virtual Machine and select the tag from the list and then select the SDSN_BLOCK tag name, as shown in Figure 3.
Figure 3: Membership Criteria 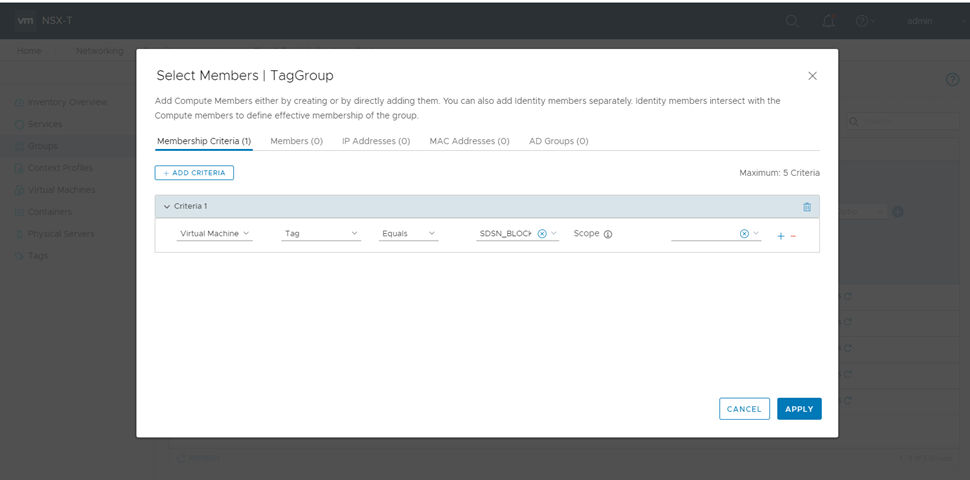
Click Apply.
- On the Groups page, click SAVE to add the group.
You can see that the security group has been created and the Virtual Machine with the security tag is assigned to the security group.
Configure VMware NSX-T with Policy Enforcer
The following steps explain configuring VMWare NSX-T with Policy Enforcer:
- Add the NSX-T Manager to the Security Director database,
as shown in Figure 4. To know more about
adding a NSX Manager, see Add the NSX Manager.
Figure 4: Add NSX Manager Page 
- After discovering the NSX-T Manager in Security Director,
use the Guided Setup workflow to configure the following parameters:
Secure Fabric
Policy Enforcement Group (PEG)
Juniper ATP Cloud Realm
Threat policies for the following threat types:
Command and Control (C&C) Server
Infected Hosts
Malware
- Select Configuration > Guided Setup > Threat Prevention.
The Threat Prevention Policy Setup page appears.
- Click Stat Setup.
The Threat Prevention Policy Setup page appears, as shown in Figure 5. Some of the resources are already configured as you discover the NSX-T Manager.
Figure 5: Threat Prevention Policy Setup Page 
- In the Secure Fabric page, the site is already created.
For that site, one enforcement point is also added.
To create a secure fabric site in Policy Enforcer for NSX based environment, you require two parts : NSX Manager and edge firewall. In the Add Enforcement Points page, add vSRX, as shown in the topology, as a edge firewall. Select the vSRX device listed under the Available column and move it to the Selected column. You now have two enforcement points within the Secure Fabric.
Click Next.
- In the Policy Enforcement Groups page, the policy enforcement
group is already created based on the Location Group Type. The location
points to the Secure Fabric site created for NSX.
Click. Next.
- In the ATP Cloud Realm page, associate the Secure Fabric
with ATP Cloud realm.
If the ATP Cloud realm is already created, click Assign Sites in the Sites Assigned column and chose the Secure Fabric site. The ATP Cloud realm and Secure Fabric are now associated.
Click. Next.
- In the Policies page, create a threat prevention policy
by choosing the profile types depending on the type of threat prevention
this policy provides (C&C Server, Infected Host, Malware) and
an action for the profile. The DDoS profile is not supported by the
NSX Connector. Once configured, you apply policies to PEGs.
Click Assign groups in the Policy Enforcement Group column to associate the policy enforcement group with the policy.
Security Director takes the snapshot of the firewall by performing the rule analysis and threat remediation rules are pushed into the edge firewall.
Click Finish.
Note The GeoIP feeds are not used with the NSX Connectors.
- The last page is a summary of the items you have configured using quick setup. Click OK to be taken to the Policies page under Configure > Threat Prevention > Policies and your policy is listed there.
Example: Create a Firewall Rule in VMware NSX-T Using SDSN_BLOCK Tag
The following example shows the firewall rule creation using the SDSN_BLOCK security tag:
- Log in to VMware NSX-T Manager.
- Select Security > Gateway Firewall.
The GATEWAY FIREWALL page appears. Gateway firewall represents rules applied at the perimeter firewall.
- Select GATEWAY SPECIFIC RULES tab and then select a gateway.
- Click Add Policy.
- Enter the policy name for the new security policy.
- Select a policy and then select Add Rule to create a new firewall rule and then enter the firewall rule name.
- Select the source as the security group with SDSN_BLOCK tag and click Apply.
- In the Applied To column, select the interface to which the rule should be applied.
- In the Action field, select the Drop option.
- In the Destination field, select Any.
Figure 6: Gateway Firewall 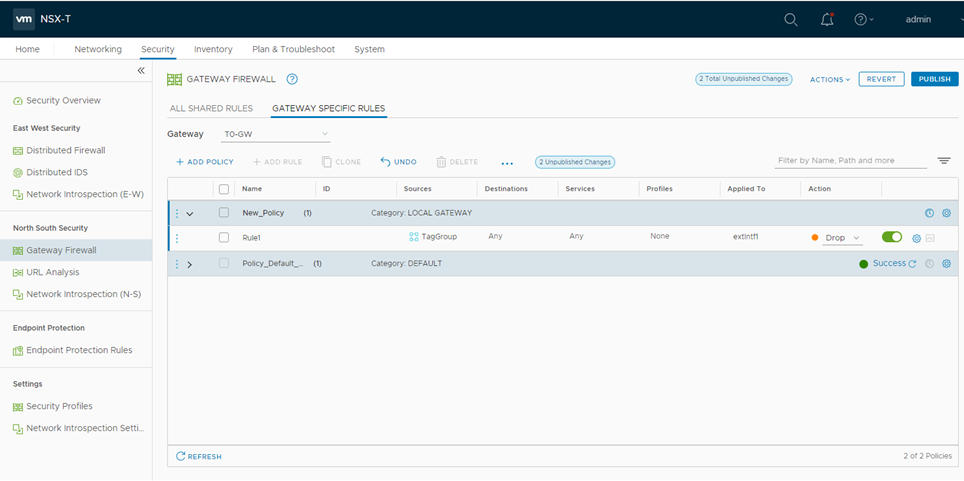
- Click PUBLISH.
Now security administrator can block the traffic coming from the infected hosts.