Moving From Spotlight Secure to Policy Enforcer
The Spotlight Secure Threat Intelligence Platform aggregates threat feeds from multiple sources to deliver open, consolidated, actionable intelligence to SRX Series Devices across an organization. This product is now superseded by the Juniper Connected Security Policy Enforcer. The Juniper Connected Security framework delivers enhanced security from external as well as internal attacks by leveraging both security as well as network devices as a coherent security system.
Policy Enforcer is an orchestration solution that orchestrates user intent policy enforcement for threat remediation as well as micro-segmentation across the entire network. This document talks about the logistics of migrating from Spotlight Secure to Policy Enforcer.
Spotlight Secure and Policy Enforcer with Juniper ATP Cloud are two different platforms and therefore a direct migration of threat policies from Spotlight Secure to Policy Enforcer is not supported. Instead it is recommended that you remove Spotlight Connector from your Space Fabric and remove threat related configurations on Security Director before you install Policy Enforcer. Then you will need to reconfigure your data and threat feeds. The following sections provide an overview of the transition process from Spotlight Secure to Policy Enforcer with Juniper ATP Cloud.
Spotlight Secure and Policy Enforcer Deployment Comparison
The function of Spotlight Secure connector, to bring together all the available threat intelligence and make it available to security policies, is now done via Policy Enforcer with Juniper ATP Cloud. In addition, Policy enforcer is a key part of the Juniper Connected Security Solution.
Spotlight Secure was installed to a separate virtual machine and then added as a specialized node to the Junos Space Fabric on Junos Space until version 15.1. Policy Enforcer is shipped as a virtual machine that is deployed independently. Instead of adding the new VM as a Junos Space node, the configuration has been simplified with a workflow using the Security Director user interface.
Spotlight Secure supported a HA deployment. The current version of Policy Enforcer is supported only as a single stand-alone deployment.
License Requirements
For existing Spotlight Secure customers, no new additional license is needed. If you have a Spot-CC license, it can be used with Policy Enforcer and Juniper ATP Cloud as well. A Policy Enforcer license would only be needed if you want to use the complete set of Juniper Connected Security features with Juniper ATP Cloud. Juniper Connected Security/Policy Enforcer features includes all threat prevention types: C&C, infected hosts, malware, GeoIP, and policy management and deployment features such as secure fabric and threat prevention policies. See Features By Juniper ATP Cloud Configuration Type for more details.
Juniper ATP Cloud and Spotlight Secure Comparison Table
The following table provides a product comparison:
Table 1: Juniper ATP Cloud and Spotlight support Quick Summary
Feature | Support in Spotlight Secure | Support with Policy Enforcer and Juniper ATP Cloud | Workflow using Juniper ATP Cloud, Security Director and Policy Enforcer |
|---|---|---|---|
Command and Control Feed | Fully Supported | Fully Supported |
|
Custom Feeds | Blocklist, Allowlist and Dynamic Address features are fully supported. | Blocklist, Allowlist, Infected Host, and Dynamic Address features are fully supported |
|
Infected Host | Not directly supported by Spotlight. You must create custom feeds | Juniper ATP Cloud supports an Infected Host feed, natively integrated with Policy Enforcer and Security Director. | Juniper ATP Cloud supports an Infected Host feed, natively integrated with Policy Enforcer and Security Director. |
Infected Host Remediation at the Access Network level | Not supported using Spotlight and Security Director | Juniper ATP Cloud supports an Infected Host feed which is natively integrated with Policy Enforcer. Policy Enforcer can take block/quarantine actions at the access network level. Note: This requires a Policy Enforcer license and does not come with a SPOT_CC license. | Juniper ATP Cloud supports an Infected Host feed which is natively integrated with Policy Enforcer. Policy Enforcer can take block/quarantine actions at the switch port level. |
Migrating Spotlight Secure to a Policy Enforcer Configuration Overview
In this section, there is a side by side comparison of feature configuration for Spotlight Secure on Security Director 15.1 and Policy Enforcer on Security Director 16.1 and higher to aid in re-configuring your threat policies.
This is an overview of the tasks needed to migrate:
- Document the current data and feed configuration from current version of Security Director.
- Remove Spotlight Connector from your Junos Space Fabric and remove the threat prevention configuration.
- Upgrade to the latest versions of Junos Space and Security
Director.
Note Since the underlying operation system is upgraded to Centos6.8 on Junos Space version 16.1, first upgrade Junos Space and applications to 15.2R2 and then follow the documentation to restore the database before deploying 16.1 or higher. Please refer to the Junos Space 16.1 release notes
- Deploy the Policy Enforcer virtual machine. See instructions in the following section.
- Deploy Security Director and install Policy Enforcer to Security Director.
- Configure a Juniper ATP Cloud realm and enroll SRX Series devices into the realm. For all deployment models, it is necessary to configure ATP Cloud Realm and enroll firewalls.
- Configure feeds and threat policies.
Installing Policy Enforcer
Policy Enforcer provides centralized, integrated management of all your security devices (both physical and virtual), allowing you to combine threat intelligence from different solutions and act on that intelligence from one management point. Using Policy Enforcer and the intelligence feeds it offers through Juniper ATP Cloud, you can create threat prevention policies that provide monitoring and actionable intelligence for threat types such as known malware, command and control servers, infected hosts, and Geo IP-based server data.
Policy enforcer is shipped as a OVA file that should be deployed over VMware ESX.
- Download the Policy Enforcer virtual machine OVA image
from the Juniper Networks software download page. It is recommended to deploy Policy Enforcer on the same ESX server
as Junos Space.
Note Do not change the name of the Policy Enforcer virtual machine image file that you download from the Juniper Networks support site. If you change the name of the image file, the creation of the Policy Enforcer virtual machine can fail.
Figure 1: Deploy Policy Enforcer OVF File 1 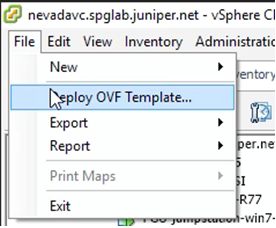
Figure 2: Deploy Policy Enforcer OVF File 2 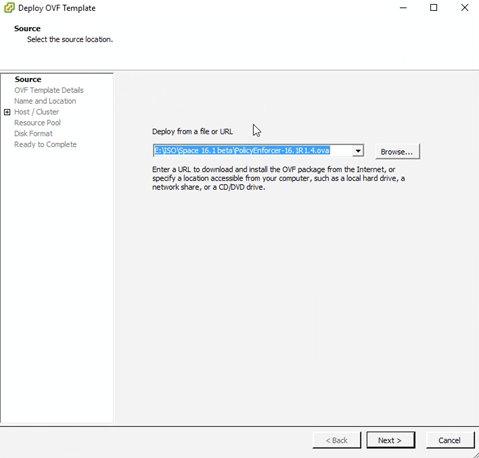
Note See Deploying and Configuring the Policy Enforcer with OVA files for the complete Policy Enforcer installation documentation.
- Initial configuration is done through the console. In
addition to network and host configuration, you must set a customer
ID and reset the root password. The default login to Policy Enforcer
is Username: root,Password: abc123
Figure 3: Policy Enforcer Configuration Summary 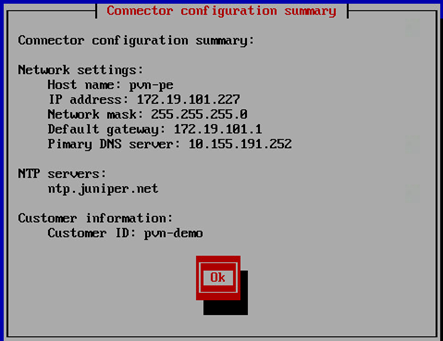
- Once Policy Enforcer is deployed, it must be added to
Security Director via Security Director User Interface. From the Security
Director UI, navigate to Administration > Policy Enforcer > Settings.
Note Unlike Spotlight Secure, Policy Enforcer does not need to be added to Junos Space Fabric. The addition is done only through the Security Director UI.
- On the Settings page, there three ATP Cloud Configuration
Types to choose from.
ATP Cloud with Juniper Connected Security—All Policy Enforcer features and threat prevention types are available
ATP Cloud—All threat prevention types are available: Command and control server, Geo IP, and Infected hosts.
Cloud feeds only—Command and control server and Geo IP are the only threat prevention types available.
No selection (No ATP Cloud)—You can choose to make no selection. When you make no selection, there are no feeds available from Juniper ATP Cloud, but the benefits of Secure Fabric, Policy Enforcement Groups, and Threat Prevention policies provided by Policy Enforcer are available. Infected hosts is the only prevention type available
Note You can switch from Cloud feeds only to ATP Cloud, or ATP Cloud to ATP Cloud with Juniper Connected Security, but the reverse is not supported.
Note If you upgrade from Cloud feeds only to ATP Cloud, you cannot roll back again. Upgrading resets all devices previously participating in threat prevention, and you must re-enroll them with ATP Cloud. This is true for upgrading from ATP Cloud to ATP Cloud with Juniper Connected Security. “ATP Cloud with Juniper Connected Security” is for the Juniper Connected Security solution and not covered in this section.
Note See Juniper ATP Cloud Configuration Type Overview for the Policy Enforcer documentation on this topic.
Policy Enforcer with ATP Cloud does not support a workflow for removing Policy Enforcer. To switch to a different Policy Enforcer, replace the IP and login information in the Policy Enforcer settings page.
Configuring Advanced Threat Prevention Features: Spotlight Secure/Policy Enforcer Comparison
The following section is a side by side comparison of how advanced threat prevention features were configured on Spotlight Secure compared to how they are configured with Policy Enforcer.
Configuring Command and Control and Infected Host
Spotlight Secure: C&C and Infected Host
This is how C&C and infected host feeds were configured on Security Director 15.1 with Spotlight Secure:
- Under Security intelligence > Information
Source, click + to add a new information source.
Select Spotlight Secure Cloud as source.
Figure 4: Spotlight Secure: Add Information Source 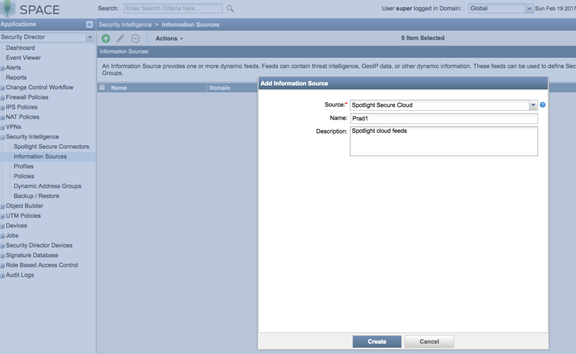
- Create a Security Intelligence profile from Security
intelligence > Profiles . Choose Command and
Control as the feed category and set the Blocking threshold.
Configure Block Options and Logging.
Figure 5: Spotlight Secure: Create Security Intelligence Profile 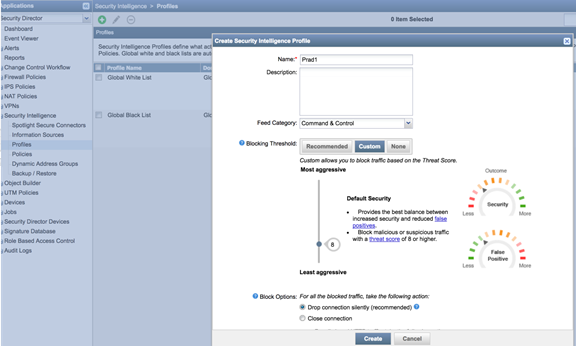
- Complete the workflow to create a profile.
Figure 6: Spotlight Secure: Create Profile 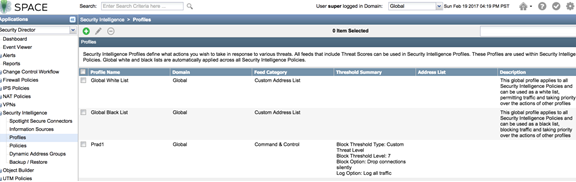
- Create a security intelligence policy.
Figure 7: Spotlight Secure: Create Security Intelligence Policy 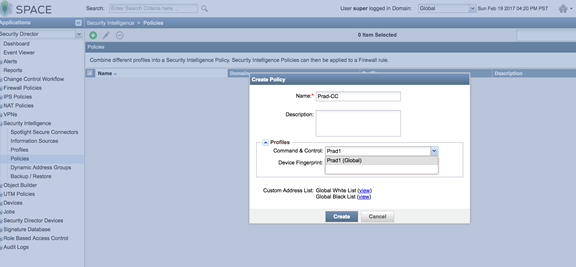
- Apply the security intelligence policy to a firewall policy.
Figure 8: Spotlight Secure: Apply Security Intelligence Policy to Firewall Policy 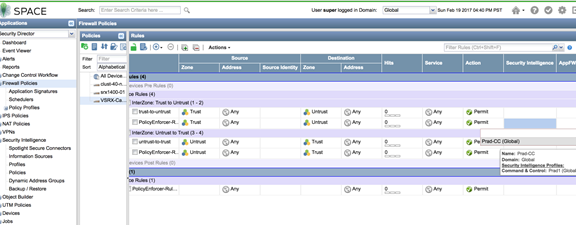
Policy Enforcer with ATP Cloud: C&C and Infected Host
This is how C&C and infected host feeds are configured on Security Director 16.1 and higher with Policy Enforcer:
Policy Enforcer can be configured with Juniper ATP Cloud or Cloud feeds only to enable Command and Control feeds. The following instructions are for Cloud feeds only.
In addition to the instructions provided here, Threat Prevention Guided Setup under Configuration > Guided Setup > Threat Prevention can be leveraged for a wizard driven workflow.
- Configure a Juniper ATP Cloud Realm by navigating to Configure > Threat Prevention > ATP Cloud Realms. Click + to create a realm.
(You must have a Juniper ATP Cloud account to configure a realm. If you do not have an account please click on the link provided in the Juniper ATP Cloud Realm window to create one at the Juniper ATP Cloud account page. See Creating Juniper ATP Cloud Realms and Enrolling Devices or Associating Sites for details).
Note You do not need a Juniper ATP Cloud premium license to create an account or realm.
- Once the ATP Cloud realm is created, add a policy by navigating
to Configure > Threat Prevention > Policies. Click + to create a policy. Enable the check box to Include C&C profile in policy and set threat score thresholds,
actions, and logging.
Figure 9: Policy Enforcer: Create Threat Prevention Policy 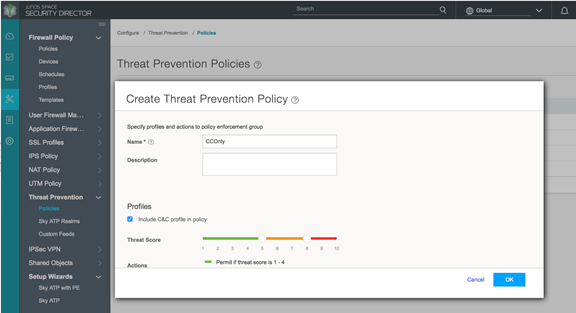
Figure 10: Policy Enforcer: Create Threat Prevention Policy, Select Threat Score and Logging 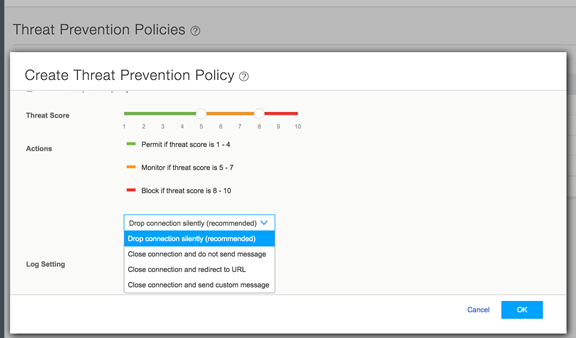
- Apply the threat prevention policy to a firewall policy.
Figure 11: Policy Enforcer: Apply Threat Prevention Policy to Firewall Policy 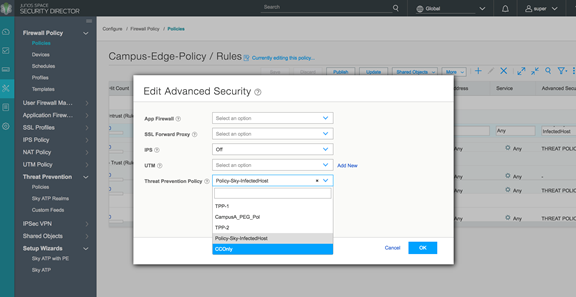
- Publish, verify the configuration and update to the firewall.
Figure 12: Policy Enforcer: Update Firewall Policy 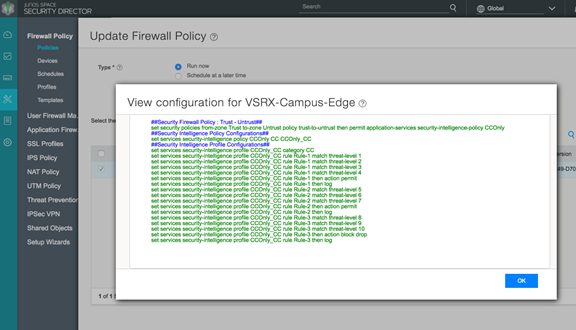
Note If ATP Cloud is chosen as the ATP Cloud Configuration Type under Administration > Policy Enforcer > Settings, the workflow remains the same, but additional parameters become available for configuring anti-malware.
Configuring Custom Feeds
Spotlight Secure: Custom Feeds
This is how custom feeds were configured on Security Director 15.1 with Spotlight Secure:
- Create an information source by navigating to Security
Intelligence > Information Source . Click + to add a source. (Note that WebApp Secure is no longer supported.)
Figure 13: Spotlight Secure: Add Information Source 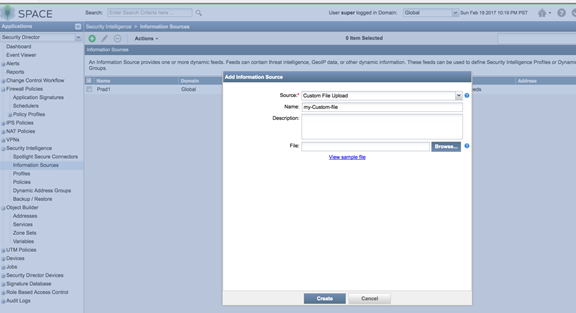
- Upload from a custom file. Select Source as Custom File Upload and point to a local file.
Figure 14: Spotlight Secure: Configure Custom File Upload 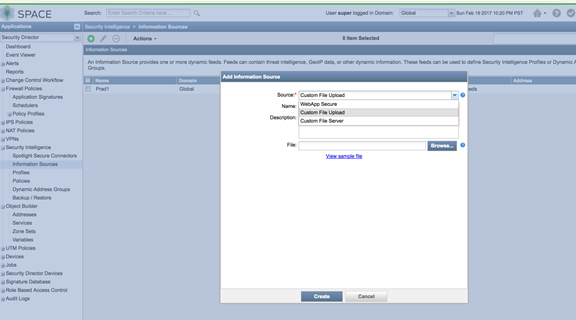
- Configure a periodic upload from a remote file server.
Provide the full URL to the plain text file you want to poll and enter
server login information, Username and Password.
Figure 15: Spotlight Secure: Enter Server Login for Custom File Upload 
- Create a dynamic object by navigating to Security
Intelligence > Dynamic Address Group. Configure the
feed as the custom feed that was created in the previous step.
Figure 16: Spotlight Secure: Select Custom Feed in Dynamic Address Group 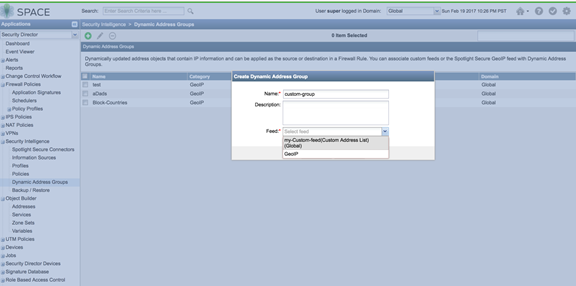
- Use the dynamic object in a security policy.
Figure 17: Spotlight Secure: Select Dynamic Address in Security Policy 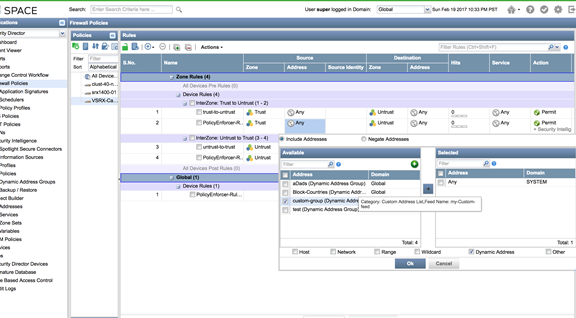
- Configure a custom feed as an allowlist or blocklist by navigating to Security Intelligence > Profiles. Edit Global Allow List or Global Back List to add a custom feed created in the previous steps.
Policy Enforcer with ATP Cloud: Custom Feeds
This is how custom feeds are configured on Security Director 16.1 and higher with Policy Enforcer:
In addition to the instructions provided here, Threat Prevention Guided Setup under Configuration > Guided Setup > Threat Prevention can be leveraged for a wizard driven workflow.
Policy Enforcer supports manually adding or uploading custom feed information from a file server. The custom feed can be a dynamic object, infected hosts list, allowlist or blocklist which can then be used within the match criteria of a firewall rule.
- Create Custom Feeds by navigating to Configure > Threat Prevention > Custom Feeds. Click + to create a new feed.
- Provide a Name and Description for the custom feed and choose the tab for the type of feed: Dynamic Address, Blocklist, Allowlist or Infected Host.
- Manually configure the IP list or upload it from a local
file. The IP list can be defined as individual IP addresses, IP address
ranges, or subnets. See Creating Custom Feeds for complete details.
Note Dynamic objects can be used within a firewall policy to match criteria as a source or destination address object.
Note Policy Enforcer supports only cloud based C&C feeds and not custom C&C feeds. Policy Enforcer APIs can be used to extend this functionality.
- Upload a local file. Select the Upload file option in the right corner of the page.
- If you have configured an allowlist, downloads from those
IP addresses are considered trusted. For blocklists, all downloads
from those IP addresses are blocked. Dynamic objects can be used within
a firewall policy match criteria as a source or destination address
object.
Figure 18: Policy Enforcer: Use Dynamic Addresses in Firewall Policy 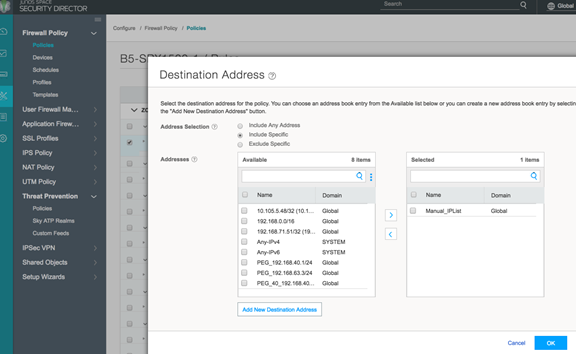
Configuring Geo IP
Spotlight Secure: Geo IP
This is how Geo IP feeds were configured on Security Director 15.1 with Spotlight Secure:
- Create a GeoIP object under dynamic object by navigating
to Security Intelligence > Dynamic Address Group. Select the feed as GeoIP and pick the countries from
the drop down list.
Figure 19: Spotlight Secure: Create Geo IP with Dynamic Address Group 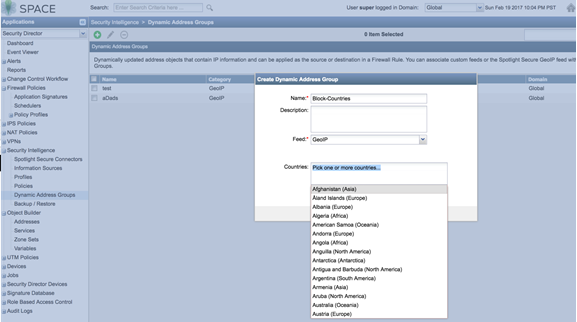
- Use the Geo IP object in a firewall policy.
Figure 20: Spotlight Secure: Use Geo IP in Firewall Policy 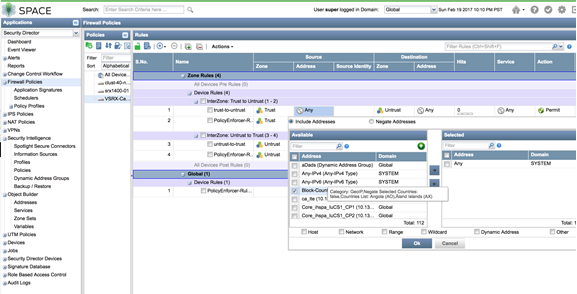
Policy Enforcer with ATP Cloud: Geo IP
This is how Geo IP feeds are configured on Security Director 16.1 and higher with Policy Enforcer:
- Define GeoIP objects that can then be used within the
match criteria of a firewall policy by navigating to Configure > Shared Objects > Geo IP. Create a Geo IP
feed and choose countries to include from the list.(This feature requires
a SecIntel or Juniper ATP Cloud license.)
Figure 21: Policy Enforcer: Create Geo IP 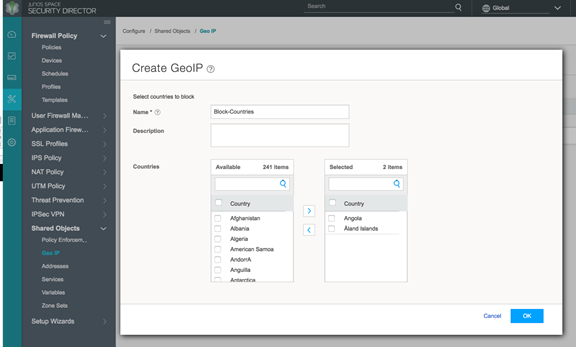
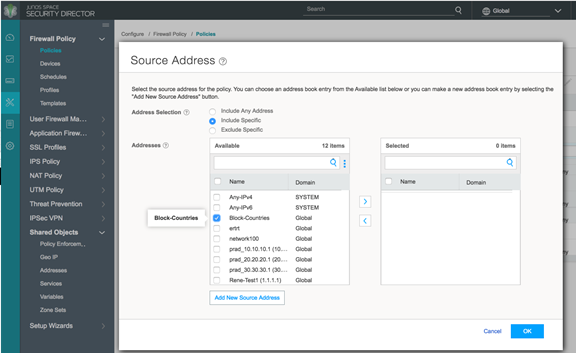
- Use the Geo IP feed you created as the source or destination
address in a firewall policy.
Figure 22: Policy Enforcer: Use Geo IP in the Firewall Policy