ON THIS PAGE
Configuring RPKI: Resource Public Key Infrastructure
In Introducing Routing Security chapter you saw how the RPKI provides routing security by validating announcements of prefixes from their AS. You should also have created ROAs for your own IP prefix(es). Now it’s time to log in to your router and set up RPKI! This chapter creates a machine running an RPKI validator and configures your network to talk to it, making sure that your routers can use RPKI to validate prefix announcements.
Install the RPKI Validator
Your router does not actually perform the cryptographic checking of the certificates. Instead, you run this on a machine in your own network that downloads the ROAs from the trust anchors and provides a service for your routers to talk to. The story starts by installing a validator somewhere inside your own network.
At the time of this writing, there are two production-ready RPKI validators available. As more and more networks implement RPKI, it is likely that more validators will appear in the future. To help you get started we’ll cover one of the validators, the one developed and maintained by the RIPE NCC.
The other production-grade validator has been developed and is maintained by NLnet Labs. Further information on this validator is available at: https://nlnetlabs.nl/projects/rpki/routinator/. (It’s not the intention of the authors to push you into one of the two directions – we just had to pick one validator for the example.)
The RIPE RPKI Validator is written in Java and it requires a machine (physical or virtual) with at least 2 GB RAM, 1 CPU, and OpenJDK 8 installed. Make sure the machine can reach the Internet (for syncing the ROAs with the trust anchors) and that the machine is reachable from your routers.
For security reasons you should enforce separate and strict security rules in your firewall to make sure only the right parts of the machine are reachable, especially the Internet-facing side, which obviously needs special attention.
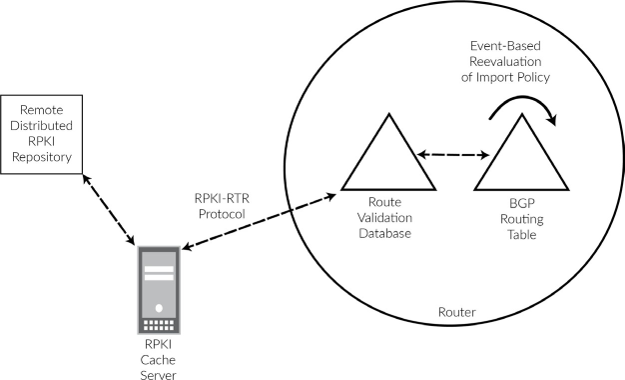
The RIPE RPKI Validator project consists of two separately deployable units:
The RPKI validator itself: this downloads and processes all objects like certificates, manifests, CRLs, ROAs, router certificates, and ghostbuster records; it caches the RPKI data, and it has a (web) user interface for troubleshooting and allow listing.
The RPKI-RTR server: this is what your routers actually connect to.
The RPKI-RTR server is set up as a separate instance because not everyone needs to run this, and, more importantly, if you do need to run this, then the separate daemon allows you to run more than one instance for redundancy (it keeps state even when the validator is down).
Running redundant validators in your network is, just as running redundant routers, a good strategy. As there are multiple validators available, running a multi-vendor setup is also possible. The good thing is that if no validator is available all routes in your routing table will be marked unknown so you will only loose validation state and no actual routing information.
Schematically, this is how communication flows:
To install the RIPE NCC Validator v3, follow the installation instructions at: https://github.com/RIPE-NCC/rpki-validator-3/wiki/RIPE-NCC-RPKI-Validator-3-Production.
By default, the validator will listen on localhost only. In order to be able to reach the web interface (where you can check the status of routes, as well as apply allowlist entries), edit the validator configuration file:
# vi /etc/rpki-validator-3/application.properties
And make sure to uncomment and change the server.address line to:
server.address= <ip address>
This makes your validator web site globally available on your server’s public IP address, which may not be what you want. Therefore, you could use iptables to close down access by making sure you have the following lines in the config:
iptables -A INPUT -s <management-prefix> -p tcp -m tcp --dport 8080 -j ACCEPT
iptables -A INPUT -p tcp -m tcp --dport 8080 -j REJECT --reject-with icmp-port-unreachable
Replace <management-prefix> with
a prefix that is allowed to reach the web interface.
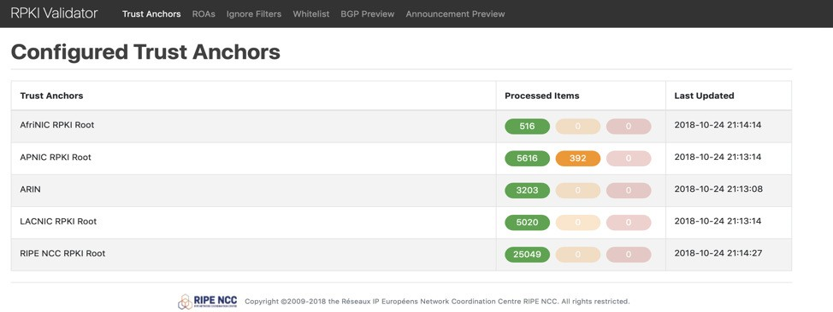
The Trust Anchor Locator (TAL) of all RIRs is included in the software distribution, with one exception: ARIN. Unfortunately, some cumbersome extra steps must be taken to include their Trust Anchor in your verification process. In order to obtain the ARIN TAL, go to their web page at https://www.arin.net/resources/rpki/tal.html, make sure you agree with the stated terms, and download the TAL in RIPE NCC validator format. Place the TAL file in your home directory on the validator server.
Finally, use the upload-tal.sh script
to upload the ARIN TAL to the validator:
# /usr/bin/upload-tal.sh arin-ripevalidator.tal http://localhost:8080/
Then, restart the validator:
# systemctl restart rpki-validator-3
Now you can browse to the public IP address of your validator, port 8080, and you will see a web page listing the configured Trust Anchors as shown in Figure 2.
The same exercise now needs to be done for the RPKI-RTR software.
This is the part that talks to your routers and enables them to create
their validation database. After installation, edit /etc/rpki-rtr-server/application.properties to uncomment the lines that tells the application what IP address
to listen on for the (future) web interface and the RTR service:
server.address=
rtr.server.address=<your server’s public IP>
Finally, if you use iptables to limit access to ports 8081 (RTR web interface) and 8323 (RTR service), the access to the web interface should probably be the same as for the validator software just discussed; access to the RTR service should be limited to the IP addresses from which your routers will be accessing the validator (this will usually be the lo0 address or the address on the interface that is “closest” to the server, and therefore used for outgoing traffic to the server):
iptables -A INPUT -s <management-prefix> -p tcp -m tcp --dport 8081 -j ACCEPT
iptables -A INPUT -p tcp -m tcp --dport 8081 -j REJECT --reject-with icmp-port-unreachable iptables -A INPUT -s <router-prefix> -p tcp -m tcp --dport 8323 -j ACCEPT
iptables -A INPUT -p tcp -m tcp --dport 8323 -j REJECT --reject-with icmp-port-unreachable
Restart the RPKI-RTR server:
# systemctl restart rpki-rtr-server
Connect Your Routers to the Validator
The first step for using origin validation data within your Juniper Networks router is to set up communication with the validator. In this example, the validator has IPv6 address 2001:db8::f00:baa and the routers address is 2001:db8::1. This will work using IPv4 as well.
Obviously, both don’t have to be on the same subnet. But they must be able to communicate with each other on the RTR port (in the standard configuration, that is, TCP port 8323). Make sure you have opened this port on any firewalls in between, and don’t forget to adjust the firewall filter on your router’s loopback interface to allow communication with the validator. The terms cache and validator are used; the cache is part of the validator and holds the ROA information. In this context we use the term validator to identify both, and we will not distinguish between the cache and the validator:
The commands to achieve this configuration are:
After committing the candidate configuration, your router will set up a validation session. You can see the session status using:
user@router> show validation session
Session	State Flaps Uptime #IPv4/IPv6 records
2001:db8::f00:baa		Up	0	00:00:47 0/0
If the session does not come up, troubleshoot connectivity between the router and the machine running the validator. Remember to adjust the routers loopback firewall filter and/or any iptables or firewall in the path, or a firewall on the validator. Be sure to take the source address used on your router into account.
Configure Your Routers to Tag RPKI Valid Routes
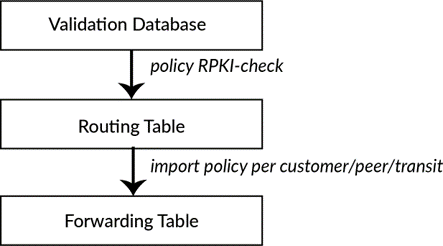
The validation database is a separate entity in your router’s memory. Entries in the validation database do not automatically make it into the routing table (let alone into the forwarding table). Making RPKI work for your network means that you have to configure a policy that will look at the state of each prefix and tag the corresponding route in the routing table. Now the RPKI status of the routes in your routing table will be attached to those routes. The final step is to use the RPKI status to accept or reject routes (or take other ac- tion on them as required) as shown in Figure 3.
Accepting and Rejecting RPKI Checked Advertisements
As the RPKI validator has been installed and is made available on your routers, nothing has yet happened to your routing table. Now it’s time to update your routing policies and actually do something with the RPKI information!
The validation database contains prefixes, prefix lengths, and autonomous system numbers. Your routing policy uses this information to decide which routes to take from the routing information base (RIB) and install into the forwarding information base (FIB).
There are three possible RPKI states in the validation database: valid, invalid, and unknown. As most networks in the world are only in the starting phase of RPKI implementation, most routes will be of unknown state. Your task is to accept the valid and unknown routes, and reject the invalid routes. In addition, add a BGP community – a flag that each route carries with it. This will make troubleshooting easier and will enable your customers to see your RPKI information as well.
In the configuration snippet below, we created a policy that you can call from other routing policies. It takes the RPKI state in the validation database and then sets the corresponding validation state as the route goes to the RIB. In addition, the policy sets a BGP community as a flag that shows the RPKI status of the prefix. Note that none of the terms in this policy actually accept or reject the route; the policy is purely there to tag the prefixes going to the RIB.
You can enter this policy by cutting and pasting the following lines:
In addition, define the communities used:
These communities are well-known, large communities for tagging routes with their RPKI status as seen from your network. The communities for RPKI valid and RPKI unknown routes are added just for informa- tional purposes. However, you will use the community for RPKI invalid routes later on to actively reject these RPKI invalid routes.
The policy RPKI-CHECK does not actually
accept or reject routes. It just looks at the validation database
for each route that passes it, and sets the RPKI status on these routes
in the RIB, as well as adding the informational BGP community.
You will now add the policy RPKI-CHECK to the very beginning of every import policy on your network, meaning on the BGP sessions with:
transit providers
peers
customers
Best practices are to add the RPKI-CHECK stanza to all your import policies. For example you should add to the beginning of every import policy on your router:
Again, note that this does not actually reject RPKI invalid routes. Therefore the last step to an RPKI-secured routing table is to add (somewhere after the term RPKI-CHECK) the term:
If you commit these changes now, you’ll start rejecting RPKI invalid routes. At the time of this writing (early 2019) that’s about 6000 invalid prefixes that will not be present in your routing table! You can verify the routes using commands such as:
None of the invalid routes should be active in your routing table.
If you’re unsure how the policies all fit together in the grand scheme of things, keep reading. In Configuring Routing Policies chapter we’ll present a unified import policy that is the basis of your secure routing table.
Router Vendor’s Support for RPKI
This book, being part of Juniper’s Day One Series, discusses techniques and recipes for deploying RPKI on Juniper routers. However, in order for RPKI validation to work, all your (edge) routers will need to implement it. All routes you learn from other parties (customers, peers, transits) will have to be validated. In case your (edge) routers do not support RPKI, they will still accept invalid routes and install them in your network’s routing table.
To make it easier for you to find out how successful your RPKI implementation will be, we compiled a list of routing software that supports RPKI:
Juniper Networks has supported the routing software listed below since Junos OS version 12.2 (it is advised to take into account PR1309944).
Cisco:
XR 4.2.1 (CRS-x, ASR9000, c12K) / XR 5.1.1 (NCS6000, XRv)
XE 3.5 (C7200, c7600, ASR1K, CSR1Kv, ASR9k, ME3600…)
IOS15.2(1)S
Alcatel Lucent has had support since SR-OS 12.0 R4.
Nokia (R12.0R4):
7210 SAS
7750 SR
7950 XRS
VSR
Quagga has support through BGP-SrX or RTRLib.
BIRD has support for ROA and supports RPKI-RTR from version 2.0 or via RTRLib
GoBGP
FRRouting
OpenBGPD
Conclusion
You have now set up an RPKI validator, and your router is talking to it. Your router now has a validation database and for each prefix, it knows whether it is valid, invalid, or unverified. This information has made it into the routing table and RPKI invalid routes are rejected. In case this is all that you wanted to achieve, congratulations, and you can skip Chapter 4 and turn straight to Chapter 5 where we discuss troubleshooting RPKI. However, we hope you will just keep reading!
In Configuring Routing Policies chapter, you’ll continue on the security quest and apply routing policies to the routes you’ve learned from transits, peers, and customers.