Creating a CentOS 7 Virtual Machine
Before you begin:
Make sure that vSphere client is installed on your workstation.
Note Within vSphere, there are numerous ways to perform a particular task. The following example illustrates one such method. You can use the procedure that suits your network deployment effectively.
To create a new CentOS 7 STIG’d VM instance of CTPView server on an ESXi Server:
- Copy the CentOS 7 ISO file (centOS-7-x86_64-DVD-1804.iso) to the ESXi datastore. The CentOS 7 ISO can be downloaded from http://vault.centos.org/7.5.1804/isos/x86_64/.
- Start the vSphere client and enter the ESXi server IP address and your login credentials.
- Start the wizard to create a new virtual machine. Select File > New > Virtual Machine.
- Select the configuration as Typical and click Next.
- Enter a name for the VM. For example, CTPView_9.1R1.
- Select the datastore (with at least 80 GB free space) and click Next.
- Select Guest OS as Linux and version as Other Linux (64-bit), and then click Next.
- Select the number of NICs as 2 and adapter type as E1000, and then click Next.
- Select the virtual disk size as 80 GB and select Thick Provision Lazy Zeroed.
- Select the Edit the virtual machine settings before completion check box and click Continue.
- Click the Hardware tab and select memory size as 4 GB.
- In the Hardware tab, select CPU. Then, select the number of virtual sockets as 2 and number of cores per socket as 1 (you can select up to 4 cores).
- In the Hardware tab, select CD/DVD. Then, select the device type as Datastore ISO File and browse to CentOS 7 ISO file. Select the Connect at power on check box under Device Status.
- Click Finish.
- Select your created virtual machine in the left panel of vSphere > Inventory.
- In the Getting Started tab, select Power on the virtual machine.
- Switch to the Console tab and click inside the terminal emulator.
- Select the Install CentOS Linux 7 option with the Up Arrow key and press Enter.
- Press the Enter key to begin the installation process.
- Select the language and your desired country time zone (if necessary) and then click Continue.
- Click the SOFTWARE SELECTION option.

- In the Basic Environment section,
select the Basic Web Server radio button.
In the Add-Ons for Selected Environment section, select PHP Support and Perl for Web check boxes and click Done.
- Click INSTALLATION DESTINATION and verify that the VMware Virtual disk (80 GB) is selected.
- In the Other Storage Options section, select the I will configure a partitioning option button.
- Click Done. The MANUAL PARTITIONING page appears.
- Click the + button. The ADD A NEW MOUNT POINT dialog box appears.
- To create a partition for /boot, enter /boot in the Mount Point field and enter 1014 MB in the Desired Capacity field. Then, click Add mount point.
- Select Standard Partition from the Device Type list and select ext3 from the File System list. Enter LABEL=/boot in the Label field and then click Update Settings.
- Similarly, repeat the steps 26 through 28 to create
partitions for the following mount points with the provided settings.
Table 1: Mount Points and Their Settings
Mount Point
Desired Capacity
Device Type
File System
Label
/tmp
9.5 GB
Standard Partition
ext3
LABEL=/tmp
/
8 GB
Standard Partition
ext3
LABEL=/
/var/log
3.8 GB
Standard Partition
ext3
LABEL=/var/log
/var
3.8 GB
Standard Partition
ext3
LABEL=/var
/var/log/audit
1.9 GB
Standard Partition
ext3
LABEL=/var/log/a
/home
1.9 GB
Standard Partition
ext3
LABEL=/home
/var/www
9.4 GB
Standard Partition
ext3
LABEL=/var/www
- Click Done twice and then click Accept Changes.
- Click NETWORK & HOST NAME.
- Select an Ethernet option (for example, Ethernet (ens32)),
enter the hostname (for example, ctpview) in the Host
name field, and then click Apply.
- Click Configure. Then, click
the IPv4 Settings tab.
- Select Manual from the Method list and click Add.
- Enter values for Address, Netmask, and Gateway fields, and then click Save.
- Click the toggle button in the right-top corner to bring the configured Ethernet up and running, and then click Done.
- Click SECURITY POLICY.
- Select the DISA STIG for CentOS Linux 7 Server option and click Select Profile. Then,
click Done.
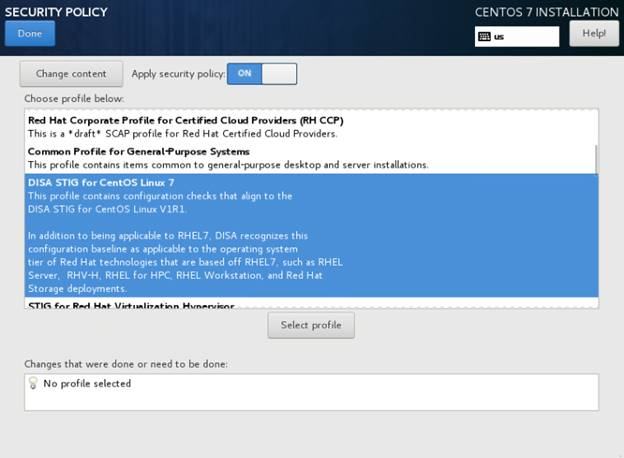
Note Skip this step, if you are creating a non-STIG’d VM.
- Click Begin Installation. The USER SETTINGS page appears.
- Click USER CREATION, enter
the username as “admin”, and enter a password.
- Select the Make this user administrator check box and click Done.
- In the USER SETTINGS page,
click ROOT PASSWORD, enter the password
as “CTPView-2-2” and click Done.
- After the installation process is completed, click Reboot.