Konfigurieren der MAC-basierten Authentifizierung und des MAC Authentication Bypass (MAB)
Führen Sie die folgenden Schritte aus, um ein kabelgebundenes Gerät so zu konfigurieren, dass Geräte basierend auf ihren MAC-Adressen authentifiziert werden.
Sie können die MAC-Authentifizierung zusammen mit der zertifikatsbasierten oder auf Nachweisen basierenden Authentifizierung als zusätzliche Sicherheitsebene verwenden.
Juniper Mist Access Assurance unterstützt MAC Authentication Bypass (MAB) für eine einheitliche Zugriffskontrolle in kabelgebundenen und drahtlosen Netzwerken. Dieses Thema enthält ein Beispiel für die Konfiguration von MAB für ein kabelgebundenes Gerät.
Das Beispiel zeigt, wie Sie zusätzlich zur zertifikatbasierten EAP-TLS-Authentifizierung eine MAC-Authentifizierung für ein kabelgebundenes Gerät erstellen. Die Aufgabe umfasst auch die Schritte zum Erstellen einer Authentifizierungsrichtlinie für ein kabelgebundenes Gerät, das dot 1x nicht unterstützt (z. B. ein Phillips-Hub).
Voraussetzungen
-
Sie müssen die zertifikatbasierte Authentifizierung bereits konfiguriert haben. Siehe Konfigurieren der zertifikatsbasierten Authentifizierung (EAP-TLS) für drahtlose Netzwerke
-
Ein Switch der EX-Serie von Juniper Networks.
Konfigurieren der MAC-basierten Authentifizierung für kabelgebundene Geräte
In den folgenden Videos erfahren Sie, wie Sie die MAC-basierte Authentifizierung für kabelgebundene Geräte konfigurieren und validieren:
Well, what about wired devices? How do we authenticate an authorized wired client? Well, it turns out we could do it right here in the same place. So we could create a couple of more rules. So we can say OK, if we look at wired devices that are using certificates to authenticate , we could just call this rule wired certificate authentication. We can effectively apply the same matching criteria as for wireless. There's no difference whatsoever here.
On the right-hand side, we'll decide where we want to move these devices after authentication and the right policy match. And finally, what about non-.1x capable devices on the wired side? So for example, I have here a Phillips hub that does not support .1x. How can I authenticate a Phillips app? So I could create a label for the Phillips device. The label will be client list. And I'll just say approved Phillips app. And I'll just put the MAC address of that device in. Oh. And you could put a list of MAC addresses. You can put the list of Mac OUIs. And remember that all of these labels that I'm creating in the UI - they're all available through the REST API. So there is always an endless possibility of integration with existing, say, inventory management systems that can just put all the new device MAC addresses in those lists for authentication and authorization.
So we'll just click Create. Create this label. And we'll create a rule. We'll call it approved Phillips devices. And here we are matching on wired devices that are doing MAC address authentication bypass that are part of this client list label. And in this case, we will move them to - well, I don't want to move them to Corp VLAN. That's not what I want. I will create an IoT VLAN. And in our case, that's going to be VLAN 3000. And I'm going to add this to an IoT VLAN. And now, we have our authentication policies configuration done.
OK, so how do we validate, right? So we've connected a couple of clients to the switch. One is a laptop that's doing .1x using certificate. Another one is the Phillips Hue app. That doesn't do any .1x, and just doing MAC authentication. So we could see those two clients are connected.
Let's take a look at the laptop one. So we could click on the port. We see that there is a client with a username flashing up. Let's take a look at the wired client insights. And what we can see here is that the user has been authenticated. You could see the port up and down events from the switch side. We see all the authentication phases, same as we saw in the wireless side. The client trusts the server. The server trusts the client certificate. We get all the metadata here. We then are saying client access is allowed. And voila. We matched the same authentication policy rule. Great. So now, we know that this part is working.
Now, we go to switch back. And let's look at the Philips device. That device is not doing any form of .1x authentication. So let's just take a look at the wired client insights. Yeah, and we are seeing that here the user is authenticated. And there is a client access allowed event here as well. And in this case, the authentication type is Mac address bypass - the MAC address that we've added to the client list. And voila. We are matching the right approved Phillips device rule.
Führen Sie die folgenden Schritte aus, um die MAC-basierte Authentifizierung in einem Netzwerk mit dem Portal von Juniper Mist Systems einzurichten:
- Erstellen Sie Authentifizierungsrichtlinien.
- Wählen Sie im linken Menü des Juniper Mist Systems-Portals die Option Organisations- > Zugriffs- > Authentifizierungsrichtlinien aus.
Erstellen Sie eine neue Regel, um Clients mit gültigen Zertifikaten Zugriff zu gewähren. Siehe Konfigurieren der Authentifizierungsrichtlinie.Abbildung 1: Erstellen einer Authentifizierungsrichtlinie für kabelgebundenen Client
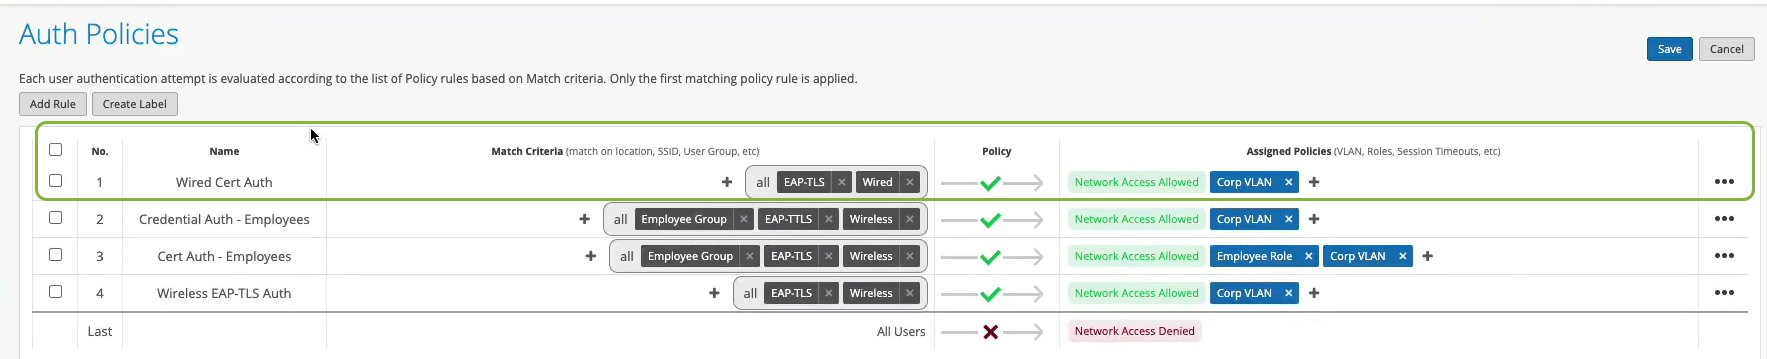 Definieren Sie eine Authentifizierungsrichtlinie mit den folgenden Details:
- Name: Geben Sie den Namen für die Richtlinie ein (z. B. Wired Cert Auth).
- Übereinstimmungskriterien: Wählen Sie EAP-TLS und Wired aus.
- Richtlinie: Wählen Sie Zulässig aus.
- Richtlinienmaßnahme – Netzwerkzugriff erlaubt
- Zugewiesenes VLAN – Corp VLAN
- Wählen Sie im linken Menü des Juniper Mist Systems-Portals die Option Organisations- > Zugriffs- > Authentifizierungsrichtlinien aus.
- Um die Authentifizierung für ein Nicht-dot1.x-Gerät auf der LAN-Seite bereitzustellen, erstellen Sie eine neue Richtlinienbezeichnung.
- Wählen Sie auf der Seite Authentifizierungsrichtlinien die Option Label erstellen aus, und geben Sie die Details ein.
Abbildung 2: Etikett für Nicht-Dot1x-Gerät
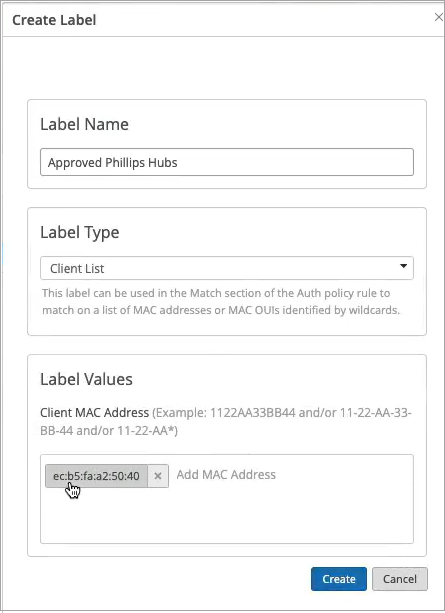 Tragen Sie folgende Informationen in die jeweiligen Felder ein:
- Labelname: Geben Sie den Labelnamen ein (Beispiel: Genehmigte Phillips Hubs).
- Beschriftungstyp: Wählen Sie den Typ "Client-Liste" aus.
- Label-Werte: Geben Sie die MAC-Adresse des Geräts ein
- Wählen Sie auf der Seite Authentifizierungsrichtlinien die Option Label erstellen aus, und geben Sie die Details ein.
- Erstellen Sie eine neue Authentifizierungsrichtlinie.
- Klicken Sie auf Regel hinzufügen, um eine neue Regel zu erstellen.
Verwenden Sie in dieser Regel die Bezeichnung, die Sie im vorherigen Schritt für ein Nicht-dot1x-Gerät erstellt haben.Abbildung 3: Authentifizierungsrichtlinie für Nicht-Dot1X-Geräte
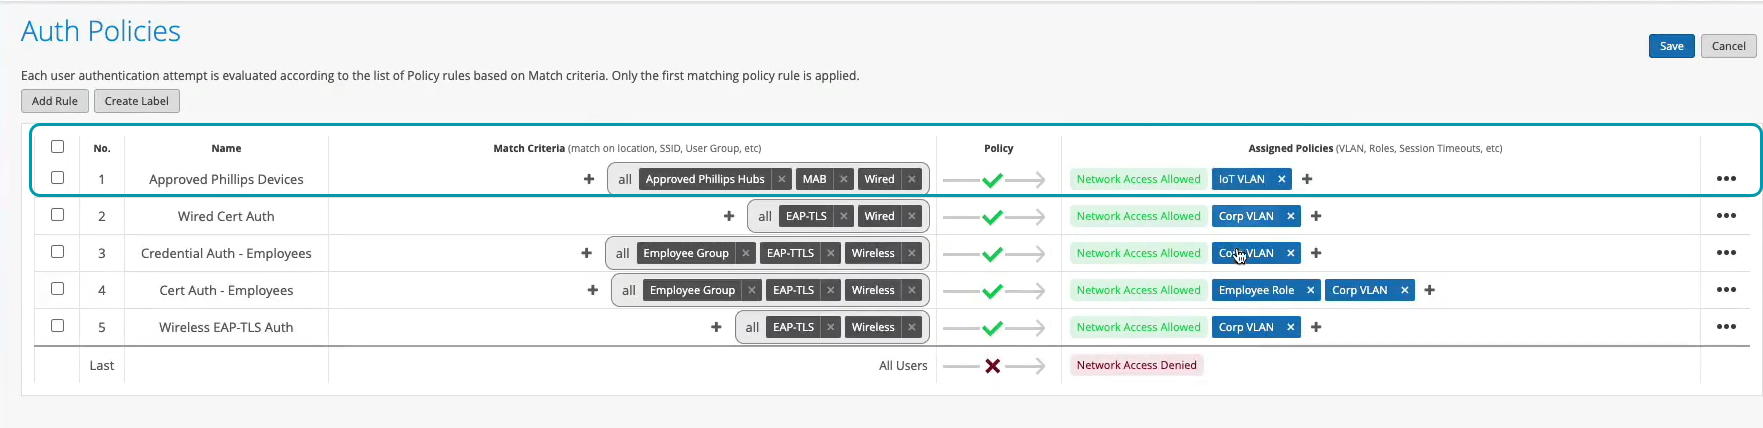 Tragen Sie folgende Informationen in die jeweiligen Felder ein:
- Name: Geben Sie Name ein. Beispiel: Zugelassene Phillips-Geräte.
- Übereinstimmungskriterien: Wählen Sie genehmigte Phillips-Hubs, MAB (Umgehung der MAC-Authentifizierung) und Wired aus.
- Richtlinie: Wählen Sie Zugelassen aus.
- Richtlinienaktion: Wählen Sie Netzwerkzugriff zulässig aus.
- Zugewiesene Richtlinien: Wählen Sie IoT-VLAN aus.
Jetzt haben Sie eine Richtlinie zur Authentifizierung von Nicht-dot1X-Geräten erstellt.
- Klicken Sie auf Regel hinzufügen, um eine neue Regel zu erstellen.
- Konfigurieren Sie den Switch so, dass die Authentifizierung durchgeführt wird.
- Scrollen Sie nach unten zum Abschnitt Portprofil und geben Sie die Details ein.
Abbildung 4: PortprofiloptionenGeben Sie die erforderlichen Informationen ein oder wählen Sie die erforderlichen Optionen in den folgenden Feldern aus:
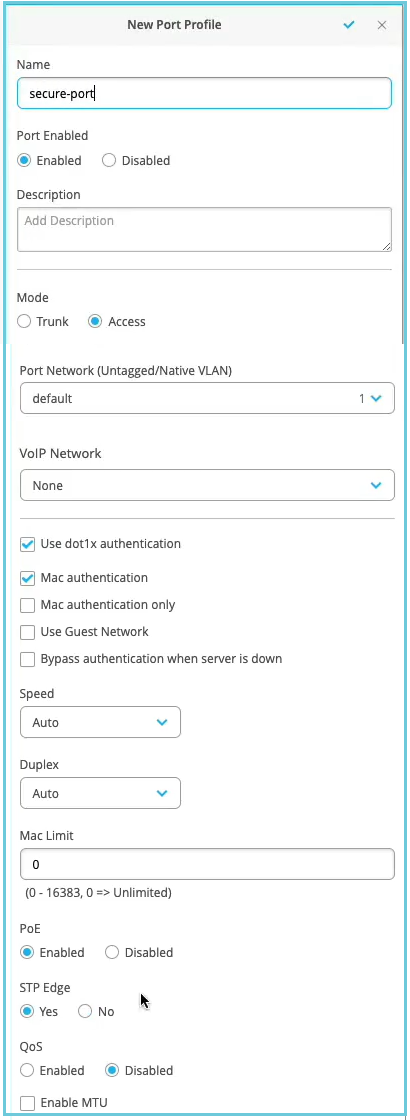
- Name: Geben Sie einen Namen ein (z. B.: secure-port).
- Modus: Wählen Sie Zugriff aus.
- Aktivieren Sie die Optionen dot1x-Authentifizierung verwenden und MAC-Authentifizierung verwenden . Wenn das Client-Gerät 802.1X unterstützt, führt der Switch-Port eine 802.1X-Authentifizierung durch. Wenn das Clientgerät 802.1X nicht unterstützt, führt der Switch-Port eine MAC-Authentifizierung durch.
- STP-Edge: Wählen Sie Jaaus, um den Port als STP-Edgeport (Spanning Tree Protocol) zu konfigurieren. Diese Einstellung stellt sicher, dass der Port als Edge-Port behandelt wird.
In diesem Beispiel werden die Standardwerte für die verbleibenden Felder verwendet.
- Weisen Sie jedem Port des Switches, auf den die verbundenen kabelgebundenen Clients Netzwerkzugriff benötigen, ein Portprofil zu.
Klicken Sie im Abschnitt Select Switches Configuration auf der Registerkarte Port Config auf Port Range hinzufügen , um einem Port ein Portprofil zuzuordnen.
Abbildung 5: Zuweisen eines Portprofils zu Portbereichen auf einem Switch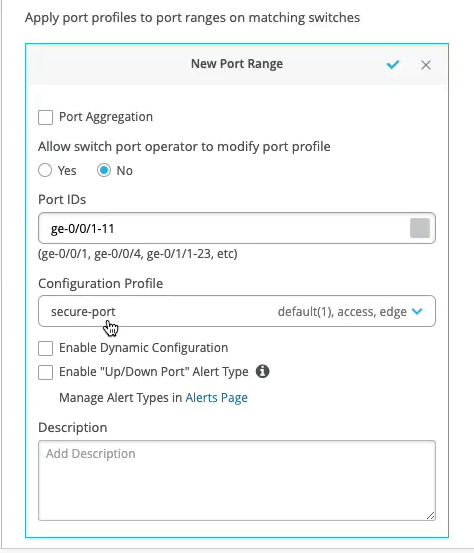
Geben Sie eine Port-ID ein und wählen Sie das Konfigurationsprofil aus, das Sie im vorherigen Schritt erstellt haben.
- Scrollen Sie nach unten zum Abschnitt Portprofil und geben Sie die Details ein.
Jetzt ist Ihr Netzwerk bereit für die sichere Authentifizierung von Clients. Die Cloud von Juniper Mist Systems verifiziert die Client-Zertifikate und gewährt Zugriff und Autorisierung auf der Grundlage der Konfiguration der Authentifizierungsrichtlinie.
Sie können die zugehörigen Clients im Portal von Juniper Mist Systems anzeigen.
- Wählen Sie Clients > Kabelgebundene Clients aus, um Clientdetails anzuzeigen
- Wählen Sie > Servicelevel überwachen > Einblicke aus, um Clientereignisse anzuzeigen.