从 Azure CLI 部署 vMX
本部分中的部署脚本和示例配置文件简化了 vMX 在 Microsoft Azure 虚拟网络中的部署。配置文件包含用于自定义 vMX VM 部署的参数,例如登录用户名和网络接口 (NIC)。
建议使用本部分所述的 Azure CLI 方法部署 vMX VM,而不是使用 Azure 门户手动部署 vMX。
下一步
在使用 Azure CLI 部署 vMX 之前
从 Azure CLI 开始部署 vMX 之前:
获取 Microsoft Azure 的帐户和订阅。请参阅 Microsoft Azure。
使用你的 Microsoft 帐户用户名和密码登录到 Microsoft Azure 门户。本部分稍后将使用 Azure 门户来验证 Azure CLI 方法是否部署了 vMX。
安装最新版本的 Azure 命令行界面 (Azure CLI)。
购买 vMX 许可证或申请评估许可证。可以从 瞻博网络许可证管理系统 (LMS) 获取许可证。
有关 vMX 评估许可证的信息,请参阅 https://www.juniper.net/us/en/dm/free-vmx-trial/。
注意:在 Microsoft Azure 中,可以将服务器和服务托管在云上,作为即用即付 (PAYG) 或自带许可证 (BYOL) 服务。PAYG 映像不需要瞻博网络许可证。
必须先运行以下 Azure CLI 命令,才能接受要部署的特定 BYOL 或 PAYG vMX 映像的最终用户许可协议 (EULA) 条款。否则,在本节后面讨论的部署脚本的 VM 创建阶段,你将遇到 MarketplacePurchaseEligibilityFailed 错误。
只需对要部署的 PAYG 或 BYOL 映像类型运行一次以下 CLI 命令。
az vm image terms accept --urn juniper-networks:vmx-services-gateway-byol:vmx-services-gateway-byol:18.3.2
vMX for Azure 部署脚本是用 shell 和最新版本的 Azure CLI 命令编写的。不支持 Azure CLI 的 2.x 之前版本。
将 vMX 部署到 Microsoft Azure 不支持从 Microsoft Windows 使用 Azure CLI,因为用作部署过程一部分的 shell 脚本只能从 Linux 或 Mac OS CLI 运行。
从 Azure CLI 部署 vMX
使用以下过程从 Azure CLI 在 Microsoft Azure 虚拟网络中部署和配置 vMX。
- 使用 Microsoft Azure CLI
- 使用 vMX 部署工具
- 修改 vMX 部署配置参数
- 使用 shell 脚本部署 vMX
- 验证 vMX 到 Microsoft Azure 的部署
- 登录 vMX 实例
- vMX 的初始配置
使用 Microsoft Azure CLI
若要运行提供的 Azure CLI 脚本,可以在服务器上安装 Azure CLI。
为您选择的方法执行以下任务之一:
安装 Azure CLI
若要安装并登录到 Azure CLI,请执行以下作:
使用 vMX 部署工具
瞻博网络提供了一组脚本和配置文件。这些工具旨在帮助简化使用 Azure CLI 时将 vMX 部署到 Azure 的过程。
azure.config 配置文件
azure_vmx_deploy.sh shell 脚本
azure_vmx_deploy.sh 使用 azure.config 配置文件中的参数,分别自动部署 vMX 虚拟机 (VM) 和虚拟网络。 azure_vmx_deploy.sh shell 脚本可创建网络接口、虚拟网络、虚拟子网和 VM。
若要复制 azure_vmx_deploy.sh 和 azure.config 文件,请执行以下作:
保存文件后,可以修改配置的 azure.config 文件并运行 azure_vmx_deploy.sh 脚本。
azure.config 文件
#
# Sample VMX deployment settings for Microsoft Azure
#

# Account config

account="12345bf4b32bf-1234-5678-aaaa-4b348978e06a"
grpname="vmxcloudv2"
location="westus"

# VM config
vmname="vmx183-x3"
admin="azuser"
vmximagename="juniper-networks:vmx-services-gateway-byol:vmx-services-gateway-byol:18.3.2"

# Network Config
number_of_nics=4
addressprefix="30.0.0.0/16"
PrivateIpAddress="30.0.0.10"
PrivateIpAddress2="30.0.1.10"
subnet_prefixes=( 30.0.0.0/24 30.0.1.0/24 30.0.2.0/24 30.0.3.0/24 )
azure_vmx_deploy.sh 文件
#!/bin/sh
# Copyright (c) 2020, Juniper Networks, Inc.
# All rights reserved.
#
#
# Sample deployment script for vMX on Microsoft Azure
#

source ./azure.config

stor="stor"
cont="cont"
vm="_image"

vnet=$grpname-vnet1
base_subnet=$vnet-vsubnet
base_nic=$vmname-wan-nic
mdisk="_Managed_Disk"
storageacc=$grpname$stor
STORAGE_CONT=$grpname$cont

az account set -s $account
echo "Creating resource group"
az group create -n $grpname -l $location -o table
echo "Created group $grpname"

echo "Creating storage account"
# Create storage account
az storage account create --sku Standard_LRS --location $location --kind Storage --resource-group $grpname --name $storageacc --output table
echo "Created storage account $storageacc"

# Get connection string for the storage account
KEY1=`az storage account keys list --account-name $storageacc --resource-group $grpname  | grep -m 1 \"value\": | awk '{print $2}'`

# Create storage container
az storage container create --account-name $storageacc --name $STORAGE_CONT --account-key $KEY1 --output table
echo "Created container $STORAGE_CONT"

count=$(( $number_of_nics - 1 ))
while [ $count -ge 0 ]
do
    subnet_names[$count]=$base_subnet"$count"
    nic_names[$count]=$base_nic"$count"
    count=$(( $count - 1 ))
done

skip=1
az network vnet show -g $grpname  --name  $vnet > /dev/null 2>&1
if [ $? -eq 0 ]; then
        skip=2
        echo "Vnet \"$vnet\" already exists, skipping vnet and subnet creation"
fi

if [ $skip -eq 1 ]; then
    # Create VNET
    echo "Creating Azure virtual network $vnet...."
    az network vnet create \
        --resource-group $grpname \
        --name $vnet \
        --address-prefix $addressprefix \
        --location $location \
        --output table

    echo "Done creating Azure virtual network $vnet"

    # Create as many subnets as there are NICs
    i=0
    for prefix in "${subnet_prefixes[@]}"
    do
        echo "Creating virtual subnet ${subnet_names[$i]} $prefix.."
        az network vnet subnet create \
            --address-prefix $prefix \
            --name ${subnet_names[$i]} \
            --resource-group $grpname \
            --vnet-name $vnet \
            --output table
        echo "Done creating subnet ${subnet_names[$i]} with prefix $prefix"
        let i++
    done
fi

#
# Creating routing tables for vMX WAN ports (add tables as needed for more than 2 wan ports)
#
echo "Creating routing tables..."

az network route-table create --name $grpname-rt-to-subnet2 --resource-group $grpname --location $location --output table
az network route-table create --name $grpname-rt-to-subnet3 --resource-group $grpname --location $location --output table

az network vnet subnet update --resource-group $grpname --vnet-name $vnet --name $vnet-vsubnet2 --route-table $grpname-rt-to-subnet3 --output table
az network vnet subnet update --resource-group $grpname --vnet-name $vnet --name $vnet-vsubnet3 --route-table $grpname-rt-to-subnet2  --output table
#
# Create all NICs
#

echo "Creating public IP addresses and NICs..."

i=0
for nic in "${nic_names[@]}"
do
    if [ $i -eq 0 ]; then
        # Create Public IP for first NIC:
        ip=$vmname-vfp-public-ip
        az network public-ip create \
            --name $ip \
            --allocation-method Static \
            --resource-group $grpname \
            --location $location \
            --output table

        # Create 1st NIC
	nic=$vmname-vfp-nic
        allnics="$allnics ""$nic"
        az network nic create \
            --resource-group $grpname \
            --location $location \
            --name $nic \
            --vnet-name $vnet \
            --subnet ${subnet_names[$i]} \
            --public-ip-address $ip \
            --private-ip-address $PrivateIpAddress \
            --output table
        echo "Created NIC $nic with public IP..."

    elif [ $i -eq 1 ]; then
        # Create Public IP for first NIC:
        ip2=$vmname-vcp-public-ip
        az network public-ip create \
            --name $ip2 \
            --allocation-method Static \
            --resource-group $grpname \
            --location $location \
            --output table

        # Create 2nd NIC
	nic=$vmname-vcp-nic
        allnics="$allnics ""$nic"
        az network nic create \
            --resource-group $grpname \
            --location $location \
            --name $nic \
            --vnet-name $vnet \
            --subnet ${subnet_names[$i]} \
            --public-ip-address $ip2 \
            --private-ip-address $PrivateIpAddress2 \
            --output table
        echo "Created NIC $nic with public IP..."
      else
        allnics="$allnics ""$nic"
        az network nic create \
            --resource-group $grpname \
            --location $location \
	    --accelerated-networking true \
            --name $nic \
            --vnet-name $vnet \
            --subnet ${subnet_names[$i]} \
            --output table
        echo "Created NIC $nic..."
    fi
    let i++
done

#
# Add routes to route tables
#
echo "Adding routes to routing tables"

ip=`az network nic show -g $grpname --name $base_nic"2"|grep privateIpAddress\"|awk '{print $2}'|sed -e  s/\"//g -e s/\,//`
az network route-table route create -g $grpname --route-table-name $grpname-rt-to-subnet3 --next-hop-type VirtualAppliance --name ToSubnet3 --next-hop-ip-address $ip --address-prefix ${subnet_prefixes[3]} --output table
ip=`az network nic show -g $grpname --name $base_nic"3"|grep privateIpAddress\"|awk '{print $2}'|sed -e  s/\"//g -e s/\,//`
az network route-table route create -g $grpname --route-table-name $grpname-rt-to-subnet2 --next-hop-type VirtualAppliance --name ToSubnet2 --next-hop-ip-address $ip --address-prefix ${subnet_prefixes[2]}  --output table

#
# Create vMX VM
#
echo "Creating vMX VM..."

az vm create \
    --name $vmname \
    --size Standard_F8  \
    --image $vmximagename \
    --nics $allnics \
    --resource-group $grpname \
    --location $location \
    --authentication-type ssh \
    --admin-username $admin \
    --generate-ssh-keys \
    --storage-sku Standard_LRS  \
    --boot-diagnostics-storage ${grpname}stor \
    --output table
echo "vMX deployment complete"
修改 vMX 部署配置参数
要部署 vMX,您可能需要通过执行以下作来修改配置参数:
更改 Azure 配置参数
在 azure.config 文件中,设置以下参数:
account=”account subscription id”- 这是 Microsoft Azure 帐户订阅 ID。grpname="group-name"- 资源组名称。输入现有资源组。资源组名称可以包含字母数字字符、句点 (.)、下划线 (_)、连字符 (-) 和括号 (),但名称不能以句点结尾。location="region"- 资源组位置。选择要从中部署 VM 的 Microsoft Azure 数据中心的位置。指定大部分资源的驻留位置。通常,选择离您的实际位置最近的位置。vmname="vm-name"- vMX 虚拟机名称。VM 名称不能包含非 ASCII 或特殊字符。admin="admin-username"- 使用 SSH 登录到 VM 的用户的名称。用户名不能包含大写字符或特殊字符,也不能以美元符号 ($) 或连字符 (-) 开头。vmximagename="image-name"- vMX 映像的名称。number_of_nics=number-of-interfaces- 接口数量,包括 VFP (eth0)、VCP (fxp0) 和任何 WAN 端口(WAN 端口在 vMX 上显示为 ge-x/x/x )。此数字必须介于 3 和 8 之间。addressprefix="address-prefix"- 地址空间。以 CIDR 表示法输入虚拟网络的地址范围。默认情况下,地址范围为 30.0.0.0/16。注意:确保地址空间不与现有网络重叠
PrivateIpAddress="ip-address"—VFP (eth0) 管理端口的专用 IP 地址。它必须包含在参数中addressprefix定义的虚拟网络的地址空间中。PrivateIpAddress2="ip-address"—VCP (fxp0) 管理端口的专用 IP 地址。它必须包含在参数中addressprefix定义的虚拟网络的地址空间中。subnet_prefixes=(subnet-prefix0 subnet-prefix1 subnet-prefix2 subnet-prefix3 )- 虚拟网络下每个子网的子网地址范围数组。以 CIDR 表示法输入每个网络子网地址范围。它必须包含在参数中addressprefix定义的虚拟网络的地址空间中。子网地址范围不能相互重叠。子网是虚拟网络中用于隔离 VM 的一系列 IP 地址。 公共子网有权访问 Internet 网关,但专用子网无法访问。
在数组中输入与接口数一样多的子网数。每个 NIC 都将在此数组中定义相应的子网。例如,如果
number_of_nics为 4,则数组中subnet_prefixes将有四个条目。vMX VM 需要为每个单独的实例组提供两个公共子网以及一个或多个公共或专用子网。VFP (eth0) 和 VCP (fxp0) 的管理接口使用公有子网,收入(数据)接口可以使用公有子网或专用子网。连接到其他 vMX 接口的专用子网可确保专用子网上的应用与 Internet 之间的所有流量都必须通过 vMX 实例。
例如,如果一个虚拟网络为将要创建的四个 NIC 提供了四个子网,则具有以下设置:
subnet_prefixes=( 30.0.0.0/24 30.0.1.0/24 30.0.2.0/24 30.0.3.0/24)。
例如, azure.config 文件可能类似于以下内容:
grpname="vmxcloudv2"
location="westus"

# VM config
vmname="vmxv2"
admin="azuser"
vmximagename="juniper-networks:vmx-services-gateway-byol:vmx-services-gateway-byol:18.3.2"
number_of_nics=4

# Network Config
addressprefix="30.0.0.0/16"
PrivateIpAddress="30.0.0.1"
PrivateIpAddress2=”30.0.1.10”
subnet_prefixes=( 30.0.0.0/24 30.0.1.0/24 30.0.2.0/24 30.0.3.0/24 )
您可以使用以下命令获取 vMX 映像详细信息:
az vm image list --all --publisher juniper-networks
将 NIC 添加到配置中
Standard_F8 CPU 类型总共支持 8 个端口。每个 vMX 都需要在 Azure 上有两个管理端口,最多留有 6 个 WAN 端口。
vMX 实例包含两个独立的虚拟机 (VM),一个用于虚拟转发平面 VMX FPC (VFP),另一个用于虚拟控制平面 (VCP)
VFP 具有映射到 vMX 的 <vm-name>-vfp-nic 的专用管理端口 (eth0)。
VCP 具有映射到 vMX 的 <vm-name>-vcp-nic 的专用管理端口 (fxp0)。
在 -vcp-nic 的 vMX 资源组>资源组中配置>的 vmname公共 IP 地址。 vMX 名称是用于使用 SSH 连接到 VMX RE (VCP) FPC 的 IP 地址。
要更改网络接口 (NIC) 的数量,请执行以下作:
使用 shell 脚本部署 vMX
azure_vmx_deploy.sh shell 脚本将 vMX 虚拟机 (VM) 部署在基于 Azure 云地理位置的资源组中。
若要将 vMX 部署到 Azure 虚拟网络,请运行 azure_vmx_deploy.sh 脚本以创建虚拟网络子网、NIC 和 VM。 azure.config 配置文件中定义的参数用于部署 vMX。
例如,如果 azure.config 文件包含以下参数:
grpname="vmxcloudv2"
location="westus"

# VM config
vmname="vmxv2"
admin="user"
vmximagename="juniper-networks:vmx-services-gateway-byol:vmx-services-gateway-byol:18.3.2"
number_of_nics=4

# Network Config
addressprefix="30.0.0.0/16"
PrivateIpAddress="30.0.0.10"
subnet_prefixes=( 30.0.0.0/24 30.0.1.0/24 30.0.2.0/24 30.0.3.0/24 )
运行 azure_vmx_deploy.sh 脚本将生成以下输出。
$ ./azure_vmx_deploy.sh
Creating resource group
Location    Name
----------  -----------
westus      vmxcloudv2
Created group vmxcloudv2
Creating storage account
CreationTime                      EnableHttpsTrafficOnly    Kind     Location    Name             PrimaryLocation    ProvisioningState    ResourceGroup    StatusOfPrimary
--------------------------------  ------------------------  -------  ----------  ---------------  -----------------  -------------------  ---------------  -----------------
2020-03-11T00:12:55.943835+00:00  True                      Storage  westus      vmxcloudv2stor  westus             Succeeded            vmxcloudv2      available
Created storage account vmxcloudv2stor
Created
---------
False
Created container vmxcloudv2cont
Creating Azure virtual network vmxcloudv2-vnet1....

Done creating Azure virtual network vmxcloudv2-vnet1
Creating virtual subnet vmxcloudv2-vnet1-vsubnet0 30.0.0.0/24..
AddressPrefix    Name                        PrivateEndpointNetworkPolicies    PrivateLinkServiceNetworkPolicies    ProvisioningState    ResourceGroup
---------------  --------------------------  --------------------------------  -----------------------------------  -------------------  ---------------
30.0.0.0/24      vmxcloudv2-vnet1-vsubnet0  Enabled                           Enabled                              Succeeded            vmxcloudv2
Done creating subnet vmxcloudv2-vnet1-vsubnet0 with prefix 30.0.0.0/24
Creating virtual subnet vmxcloudv2-vnet1-vsubnet1 30.0.1.0/24..
AddressPrefix    Name                        PrivateEndpointNetworkPolicies    PrivateLinkServiceNetworkPolicies    ProvisioningState    ResourceGroup
---------------  --------------------------  --------------------------------  -----------------------------------  -------------------  ---------------
30.0.1.0/24      vmxcloudv2-vnet1-vsubnet1  Enabled                           Enabled                              Succeeded            vmxcloudv2
Done creating subnet vmxcloudv2-vnet1-vsubnet1 with prefix 30.0.1.0/24
Creating virtual subnet vmxcloudv2-vnet1-vsubnet2 30.0.2.0/24..
AddressPrefix    Name                        PrivateEndpointNetworkPolicies    PrivateLinkServiceNetworkPolicies    ProvisioningState    ResourceGroup
---------------  --------------------------  --------------------------------  -----------------------------------  -------------------  ---------------
30.0.2.0/24      vmxcloudv2-vnet1-vsubnet2  Enabled                           Enabled                              Succeeded            vmxcloudv2
Done creating subnet vmxcloudv2-vnet1-vsubnet2 with prefix 30.0.2.0/24
Creating virtual subnet vmxcloudv2-vnet1-vsubnet3 30.0.3.0/24..
AddressPrefix    Name                        PrivateEndpointNetworkPolicies    PrivateLinkServiceNetworkPolicies    ProvisioningState    ResourceGroup
---------------  --------------------------  --------------------------------  -----------------------------------  -------------------  ---------------
30.0.3.0/24      vmxcloudv2-vnet1-vsubnet3  Enabled                           Enabled                              Succeeded            vmxcloudv2
Done creating subnet vmxcloudv2-vnet1-vsubnet3 with prefix 30.0.3.0/24
Creating routing tables...
DisableBgpRoutePropagation    Location    Name                       ProvisioningState    ResourceGroup
----------------------------  ----------  -------------------------  -------------------  ---------------
False                         westus      vmxcloudv2-rt-to-subnet2  Succeeded            vmxcloudv2
DisableBgpRoutePropagation    Location    Name                       ProvisioningState    ResourceGroup
----------------------------  ----------  -------------------------  -------------------  ---------------
False                         westus      vmxcloudv2-rt-to-subnet3  Succeeded            vmxcloudv2
AddressPrefix    Name                        PrivateEndpointNetworkPolicies    PrivateLinkServiceNetworkPolicies    ProvisioningState    ResourceGroup
---------------  --------------------------  --------------------------------  -----------------------------------  -------------------  ---------------
30.0.2.0/24      vmxcloudv2-vnet1-vsubnet2  Enabled                           Enabled                              Succeeded            vmxcloudv2
AddressPrefix    Name                        PrivateEndpointNetworkPolicies    PrivateLinkServiceNetworkPolicies    ProvisioningState    ResourceGroup
---------------  --------------------------  --------------------------------  -----------------------------------  -------------------  ---------------
30.0.3.0/24      vmxcloudv2-vnet1-vsubnet3  Enabled                           Enabled                              Succeeded            vmxcloudv2
Creating public IP addresses and NICs...


Created NIC vmx183-x3-vfp-nic with public IP...


Created NIC vmx183-x3-vcp-nic with public IP...

Created NIC vmx183-x3-wan-nic2...

Created NIC vmx183-x3-wan-nic3...
Adding routes to routing tables
AddressPrefix    Name       NextHopIpAddress    NextHopType       ProvisioningState    ResourceGroup
---------------  ---------  ------------------  ----------------  -------------------  ---------------
30.0.3.0/24      ToSubnet3  30.0.2.4            VirtualAppliance  Succeeded            vmxcloudv2
AddressPrefix    Name       NextHopIpAddress    NextHopType       ProvisioningState    ResourceGroup
---------------  ---------  ------------------  ----------------  -------------------  ---------------
30.0.2.0/24      ToSubnet2  30.0.3.4            VirtualAppliance  Succeeded            vmxcloudv2
Creating vMX VM...
ResourceGroup    PowerState    PublicIpAddress           Fqdns    PrivateIpAddress                       MacAddress                                                               Location    Zones
---------------  ------------  ------------------------  -------  -------------------------------------  -----------------------------------------------------------------------  ----------  -------
vmxcloudv2      VM running    52.160.86.48,40.83.167.5           30.0.0.10,30.0.1.10,30.0.2.4,30.0.3.4  00-0D-3A-5C-0B-1D,00-0D-3A-5C-08-9C,00-0D-3A-5C-09-83,00-0D-3A-5C-0E-D8  westus
vMX deployment complete
验证 vMX 到 Microsoft Azure 的部署

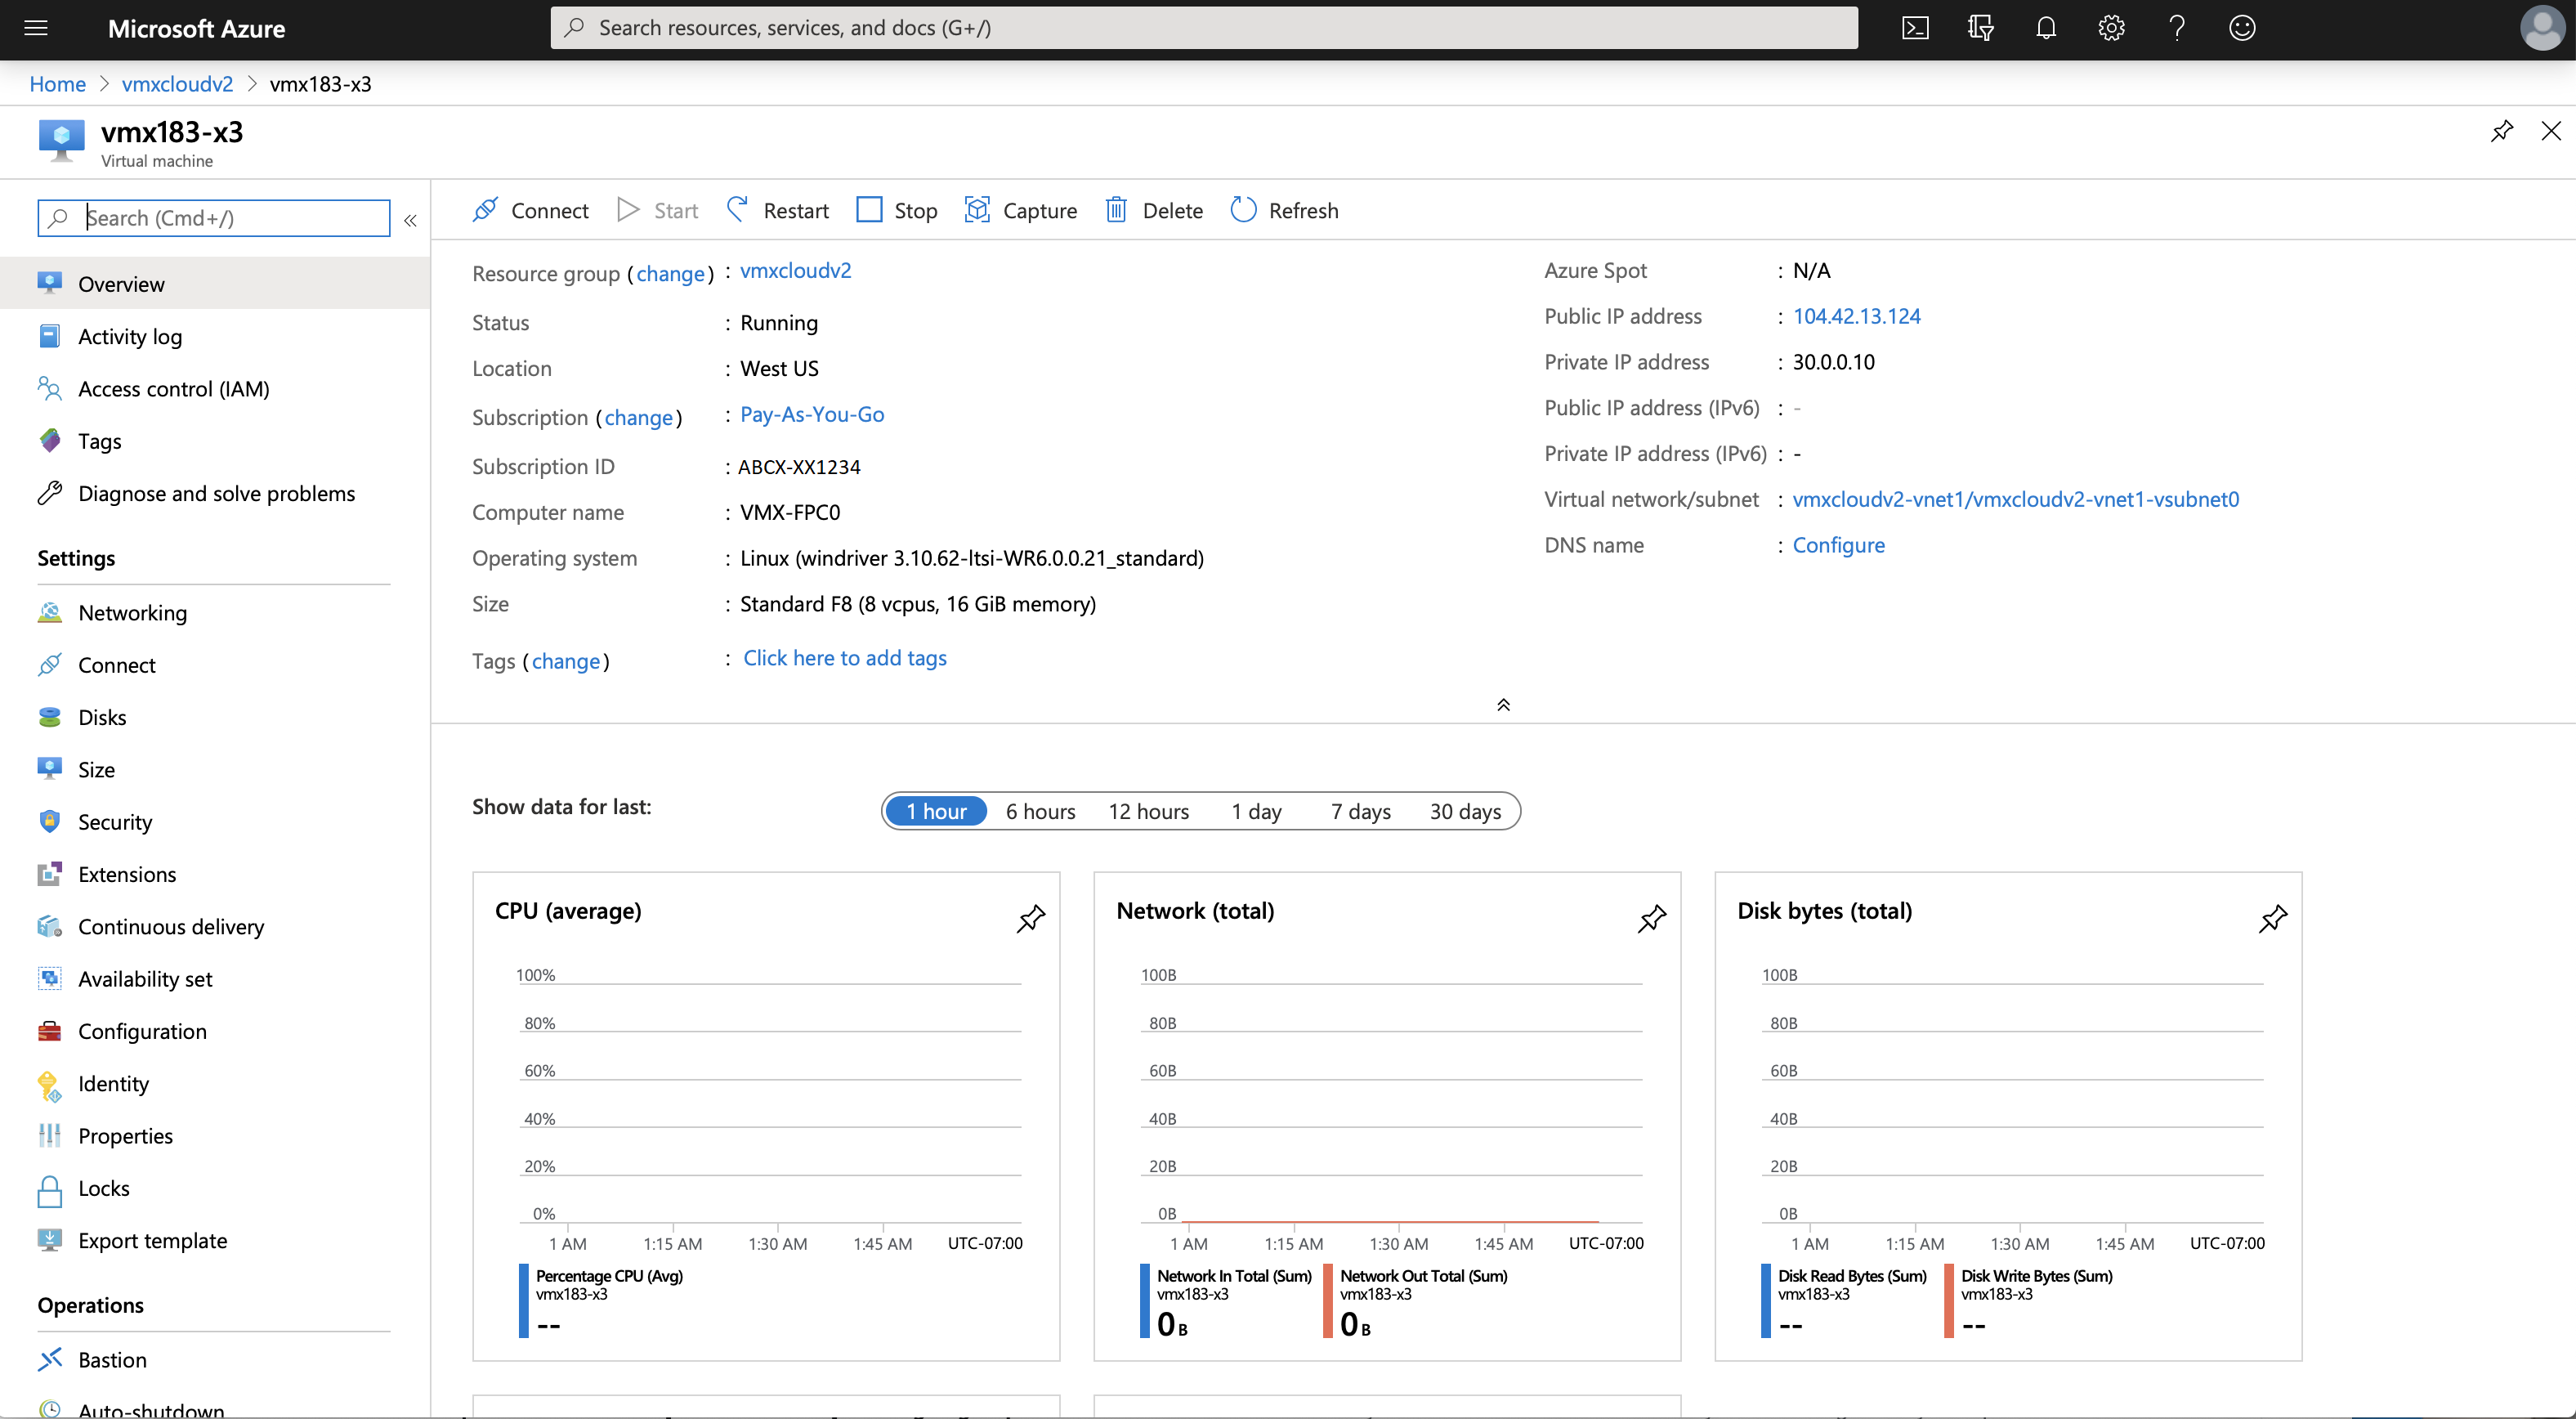
登录 vMX 实例
vMX 部署完成后,vMX 实例会自动开机并启动。此时,您可以使用 SSH 客户端登录到 vMX 实例。
vMX 可能需要 15 分钟或更长时间才能完成部署并准备好通过 SSH 登录。
要登录到 vMX VM,请执行以下步骤:
vMX 的初始配置
登录 vMX 后,您必须至少执行以下初始 Junos OS 配置任务: