配置基于证书的 (EAP-TLS) 身份验证
请按照以下适当过程和视频演示为无线或有线网络配置基于证书的 EAP-TLS 身份验证。
设置无线或有线连接时,一个重要的步骤是配置安全的网络访问。借助瞻博网络 Mist Access Assurance,您可以使用 802.1X 设置身份验证方法。
可扩展身份验证协议 - 传输层安全性 (EAP-TLS) 是支持 802.1X 身份验证的协议之一,可在通信路径的每个点验证客户端和服务器证书。此身份验证方法使用可信数字证书来验证用户并提供无缝网络访问。
先决条件
-
您必须从证书颁发机构 (CA)(受信任的第三方)获取数字证书(即源 X.509 证书)或在内部生成证书。
-
您必须将客户端设备配置为请求方,RADIUS 服务器可以使用 802.1X 进行身份验证。通常,在生产部署中使用移动设备管理 (MDM) 或组策略来配置客户端。
-
您的网络必须配备瞻博网络®系列高性能接入点,才能执行无线客户端身份验证。
-
配置云 RADIUS 服务器将使用的公共或私有企业 TLS 服务器证书。
- 熟悉以下过程:
为无线网络配置基于证书的 (EAP-TLS) 身份验证
要使用瞻博网络 Mist 门户在无线网络中设置基于证书的身份验证:
以下视频演示如何为无线网络配置基于证书 (EAP-TLS) 的身份验证。
Let's start it with Mist Access Assurance and we'll start by looking at various 802.1x authentication use cases. There's both wireless and wired but the first very simple use case we'll look at the wireless certificate-based or EAP-TLS authentication. What do we need to get this up and running? So objective is allow you know our clients to authenticate to the network and allow them on the network if they're presenting trusted digital certificates.
Prerequisites we need client certificates installed on client devices. We have a separate video how you can create your own certificate authority and sign client certificates if you don't have any PKI and you just want to do your lab testing for example. That's a there is a good video covering that.
In production environment in production deployments the client certificates are typically distributed automatically by MDM solutions or mobile device management or group policies if you're in the Windows environment or any other onboarding solutions. But we are assuming that in for our exercise client certificates are already in there. Before we go into configuration I just want to review the authentication flow.
What's actually going to happen when client is trying to access the network? So we have a wireless client, we have a Mist AP, we have access assurance service that's configured. So client will try to associate to the AP which advertises 802.1x enabled SSID. The client the AP will ask about the IP identity.
In other words, what's your what's your username? Client will send the IP identity response. At this point, the Mist Access Assurance will present its server certificate that's to provide the mutual authentication.
So client will need to trust the Mist access assurance certificate to say okay I'm actually trusting this service to pass authentication credentials. Then after the client validates the service certificate and client can either truly validate the certificate or it can bypass that service certificate validation that there is a setting that you can configure. Not a great practice, actually, a horrible practice from a security point of view, but for testing in lab purposes, would be a good option.
Now after the client validated the server certificate in a TLS scenario, client is presenting its own client certificate, or in other words, called client hello and sends it over through the AP to the Mist access assurance service. At this point, access assurance will look at the client certificate and validate it against the trusted certificate authority list that that it has configured. In other words it will look at okay so which certificate authorities do I trust in my configuration? Is any of those trusted CA's signed the client certificate? And if yes, great the certificate is validated right, and at this point, we can look through authentication policy rules and make sure that we are matching a configured authentication policy rule and at this point we declare success.
If configured, we can also send a VLAN. We can send a role to the AP so it can assign the client into the right network and at this point we're good to go. Now let's look at the actual setup procedure - what do we need to configure this? So right now, we have an organization, the test organization. We'll be using for this tutorial that has one test AP connected, one switch connected with virtually no config on it whatsoever.
So we will start by configuring the access assurance for our use case to authenticate clients using EAP-TLS only validating certificates all we need to do is to go to Organization > access certificates. We'll need to import our certificate authority. If you have your own PKI infrastructure then you would import your root certificate authority typically also your intermediate CA so it's going to be a couple of certs that you will need to to import only the public certificate you would need to import obviously not the private keys. So we just we are just telling access assurance which certificates to trust based on this trust chain.
In our case, we're using our lab certificates that we've created in in another video so I'm going to open up this lab Mist CA that we've created in a different video I'm going to copy the certificate contents paste it in here so it will now decode my CA common name it will see okay it's valid until this at this date it's actually a CA cert because it's self-issued we can hit save. So now we've imported the certificate authority at this point we are trusting any client certificates have been issued by the CA right very very simple and remember in in the in this step where the client is validating the server certificate how do you know which server certificate to trust so by default Mist access assurance will get its own cert signed by your organization CA. So this is an automatically generated certificate authority for your Mist organization that is signing the certificate for access assurance authentication service.
You can optionally import your own certificate if you want to if you want clients to trust certificates issued by your organization right. For now, we will just use default search. Now the next step for us to complete our basic scenario we can go to organization auth policies by default you could see there is there no policies configured all the authentication requests will be implicitly denied so we'll need to create a rule to allow valid clients to connect. So click on add rule. We'll just say this is wireless EAP-TLS authentication and all we need is to say on the left hand side we are matching on certain criteria. User labels on the right hand side we're deciding what we want to do with this types of users. So here, we are saying we want to look at wireless users. These are predefined labels that that we have in access assurance by default and we want to match on the authentication type EAP-TLS meaning clients will use certificates at this point, that's really all you need to do.
The initial testing right your your policy says allow clients to connect if they match these two criterias and you know technically you would you would have been also able to assign VLANs. We can actually do that here as welL. So we want to assign a VLAN, how do we do that? We can create a label. We can create a label and let's say we want to assign a VLAN 750 let's just say it's going to be our corp VLAN the label type will be AAA attribute okay and the label value would be VLAN. So in this case, you want to assign VLAN 750 and now we if we click here oh now we have our new label showing up so what what this rule is going to do is if a client has a valid cert and it's a wireless client we will allow them to connect and we will assign them to VLAN 750. Very simple very easy let's say.
The next step is to configure our SSID, right? We'll go to Organization > WLAN Templates. We'll create a template we'll call it mist-secure-net i don't know create add WLAN. I'm going to use the same SSID name i'm going to configure it as 8.1x security actually we can also use WPA3 we can then scroll down under authentication service list. We don't need to configure radio servers anymore none of that all we have to do is say our authentication server is Mist Auth. That's it.
The last step is if we are doing dynamic VLAN assignment which we do in in our scenario we want to enable dynamic VLANs we'll say the VLAN type is standard and we'll just say that for now we will only allow VLAN 750 and if no VLAN is sent back from from access assurance, we'll just call it we'll just assign the client into default VLAN 1, that's it just enabling some filters as best practices. Click create our SSID is ready. The last thing for us is to assign this to our org so the template will get advertised on our app. We only have one side, so we can assign it to the org, otherwise you could have assigned the template to the side of your choosing. Hit save. Now our configuration is ready and we can now go ahead and test with a real client.
Create the authentication policies with Mist Access Assurance considering the same exact scenario with TLS users authenticating using certificates and TLS users authenticating using credentials. The first thing that we will do is we will import the root CA certificate so we can trust the certificates on our client signed by that CA. So we'll go to organization > access certificates and I'll click on add certificate authority.
I will go to my folder where I have all the pre-configured items ready. I'm going to copy my root CA cert, import it in here. It's the same cert we used with the other two vendors. It's now imported, it's decoded, we're good to go and good to proceed. We'll then go to organization authentication policies. Actually we go to identity providers first.
We need to configure an identity provider in here and unlike with ClearPass and ICE, we don't need to have a local AD on-prem. We would actually be able to talk to Okta as our identity provider to fetch the user group information to authenticate users and provide them with network access. So I will click on add IDP.
I will select this connector type as auth since we will use native API connector to talk to Okta. I will open my setup instructions since my Okta app has been pre-created. Same as AD for other providers so I'm going to take tenants. I'm going to select the auth type as Okta, paste the tenant ID. I'll take the client ID, paste it in here. I'll take the private key so we can authenticate ourselves to Okta.
Add it right there and finally I'll configure the ROPC API ID for TTLS authentication and it's secret. The last thing I will do is I will configure the domain name. So the domain name would actually tell us based on the user realm like when the user signs in as user at like in this case lab.mystify.com. We'll take that domain based on the domain. We'll talk to a respective IDP in our configuration so just give it a name called Okta. Click create. We have our IDP configured now.
The last step is to go to access authentication policies and create the two policies that we need based on our requirements. First, we will create a rule for certificate authentication. What we'll then do is in the match criteria on the left hand side we will use labels to match in certain conditions.
In our case, we need to match on wireless users that are using certificates or TTLS to authenticate and we also need it to match on the group employee that we will take from IDP. But as you can see by default we are not having any label associated with the group so what we can do is we can create a label right from that same place. We'll call it employee group.
We will select label type as directory attribute and the label value will be group and the actual value will be employee. Click create. We can now select this label on the left hand side. It shows up here as the directory attribute. Now we are matching on all these three conditions. Then on the right hand side we are deciding what we want to do with these types of users. By default we will allow access to the network but we also want to assign VLAN 750 and role corp. Again we need to create labels for that. So we'll go and create first corp VLAN label.
The label type will be AAA attribute and the value would be VLAN. I'll configure it as 750. I'll then create corp role attribute and I'll just configure it as corp. And then I'm going to create also labels for BYD VLAN and BYD role. So 751 and finally BYD role. Good to go.
So we can select corp VLAN and corp role. Now we'll create one more rule for our users that are doing TTLS based authentication. So we'll call it credential authentication and we'll match on wireless users that are doing TTLS and that they're also part of the same employee group.
And on the right hand side we'll assign them BYD VLAN and BYD role. At this point we can hit save and our authentication policy setup is done. The last thing is to create the actual WLAN template. So I'm going to go to WLAN templates. I'm going to create a new one. I'm going to call it MIST 802.1X. I'm going to click create.
Add a WLAN. Select security as 802.1X. And in this case we don't need to configure radio servers one by one. We don't need to add APs as radio clients. None of that is required. We'll just go and select MIST authentication as our authentication service. That's it. We'll then just go on and configure dynamic VLANs. It's the same two VLANs that we will be sending. So 750.751. Click create and just assign this template to the org.
Click save. At this point we should be able to test with our client devices. We have one laptop that's connected using a certificate. It got the role corp. We have a mobile device that connected using TTLS using username and password and got the role BYD. And now let's take a look deeper and look at the client insights.
What can we see with MIST access assurance here? So what you could see is in addition to the all the client events that are coming from the access point and that are showing the user experience, from the network perspective, you also see all the events coming from the NAC side of things as the client goes through the authentication and authorization process. So, first event is, okay, we're seeing the client certificate. We are grabbing all the metadata about the user certificate.
We see that the client trusted our server cert that's provided by the MIST authentication service. We'll then did a IDP lookup against Okta. And we got all the user group information from Okta. So we know now this user is part of all these user groups. And we see one of these groups is actually employee, which we needed to match on. And finally, when we look at the NAC client allowed access event, we're saying, okay, this client is good to go. It's allowed in the network. This is the VLAN that we are assigning from a NAC perspective. This is the user role that we are assigning from the NAC perspective.
And this is the authentication rule that hit during that process. So if we click on that link, it will actually go and highlight, this is the rule that this particular user hit during the auth process, right? Similarly, if we look at the mobile device, if we look at the client insights, we're now seeing that in this case, client trusted the service certificate, but instead of showing the client certificate, it actually did the IDP authentication using username and password credentials against Okta. Finally, we got the user role and group information from Okta.
And we've allowed client to access the network, assign a different VLAN 751 and different user group. But in this case, we are hitting a different authentication rule in our policy. So again, if we click on it, we're saying that particular user went through a different role.
现在,您的网络已准备好使用 EAP-TLS 对客户端进行安全身份验证。瞻博网络 Mist 云会验证客户端证书,并根据身份验证策略配置授予访问和授权。
您可以在瞻博网络 Mist 门户上查看关联的客户端:
- 选择 客户端>有线客户端 以查看客户端详细信息
- 选择 “监控>服务级别”>“见解 ”以查看客户端事件。
为有线网络配置基于证书的 (EAP-TLS) 身份验证
要使用瞻博网络 Mist 门户为有线网络设置基于证书的身份验证:
- 导入受信任的根证书颁发机构 (证书颁发机构)。瞻博网络Mist使用证书颁发机构生成的证书作为服务器证书。有关详细信息,请参阅使用数字证书。
- 创建身份验证策略。
- 配置交换机。
- 将 端口配置文件分配给交换机上连接的有线客户端需要访问网络的每个端口。
在 Port Configuration 选项卡的 Select 交换机配置 部分中,单击 Add Port Range ,将端口配置文件与端口相关联。
图 1:将端口配置文件分配给交换机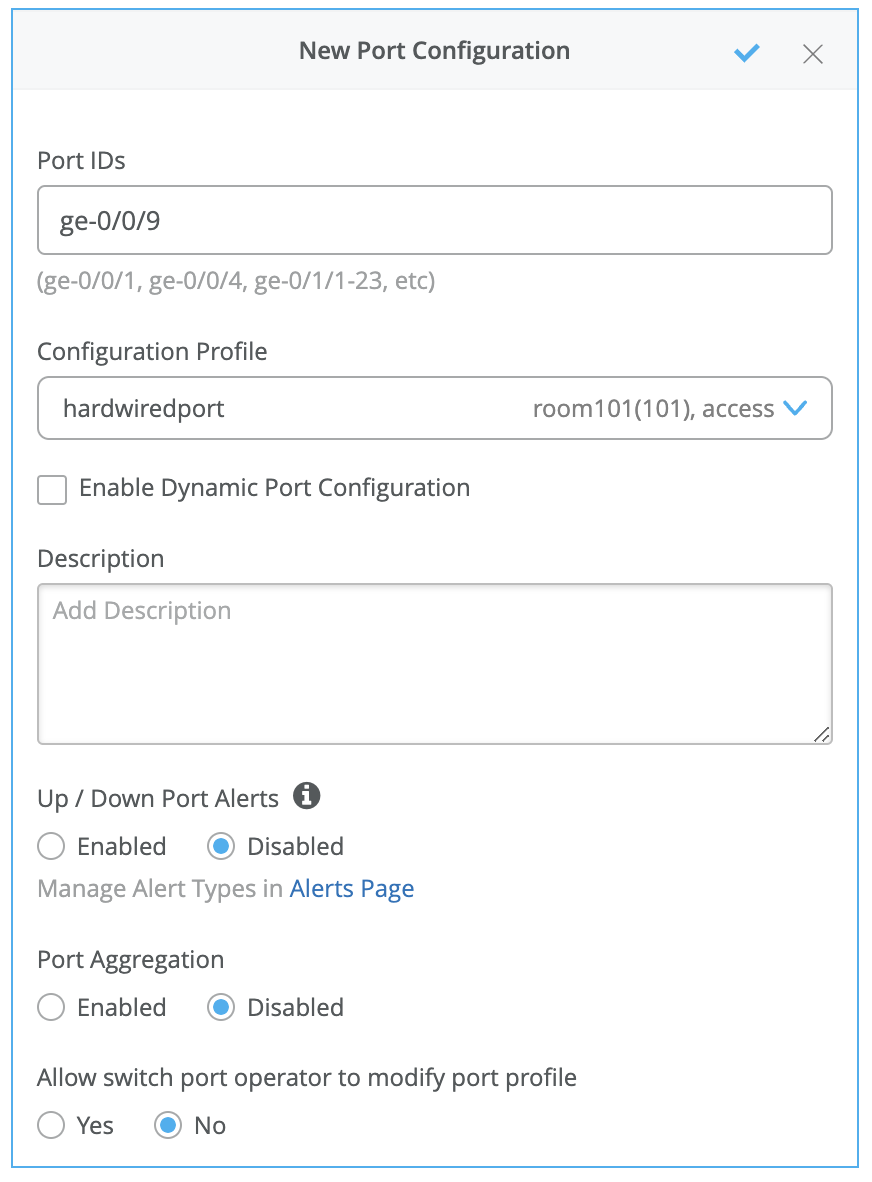 上的端口范围
- 将 端口配置文件分配给交换机上连接的有线客户端需要访问网络的每个端口。
有关利用证书属性创建身份验证策略的过程,请观看以下视频:
Authentication policies a little bit. How can we use them in combination with certificates alone? What we will do is we'll create another example, right? So far we've just authenticated the user that used the test certificate we've created before. What if we want to differentiate between different types of users just by looking at certificates? So what I have done is I've created another test user certificate that has a different common name, that has different attributes in the subject that we will use to differentiate between our original test user and the new one.
So what I will do is I will create a label matching on certificate attribute and I will call this my new user one cert because our test user, where is it, the common name is different on the certificate. It's user one at different domain name, right? So we'll take a look at the certificate attribute and we'll match on the common name of this certificate. So in this case, we want to do a full match and just let's say we want to say if this certificate is being used, then we want to assign these users or this user into a different VLAN.
Let's just say other VLAN. So label value VLAN, let's say VLAN one. So I'm going to create another rule. I'm going to say special user or special cert, I should say, select wireless, select TLS. But in this case, we are also going to match on the certificate attribute that we've just configured. So all three conditions here must match in order for this specific policy to hit, right? And when it hits, we will assign the user into a different VLAN.
So we're going to hit save. Now we have two policy rules. Now let's connect the device. I've already configured my iPad with this new certificate. Okay. Now the iPad is connected to a different VLAN. Okay. We see that this is a new user, a different username connected to the same SSID, just assigned to a different VLAN ID. So if we click on it, we'll look at the insights. Let's see if we have new events in there just coming in. Okay. Now we are seeing the new set of events coming in.
We're seeing the new certificate. With a different common name in assert, this is the attribute we've been matching on. And now we see the new rule hit. And in this case, this specific user, this specific client went and hit a different rule. This is how we can make policies just by looking at the certificate with nothing else at our hands. And this is just an example. You could look at part of the subject in the certificate. You could look at the issuers if you have different CAs issuing certificates for other users. You could look at virtually any certificate attribute that you want to look at and use that as the differentiation factor in your access policies.
现在,您的网络可以使用 EAP-TLS 来安全地验证客户端。瞻博网络 Mist 云会验证客户端证书,并根据身份验证策略配置授予访问和授权。
您可以在瞻博网络 Mist 门户上查看关联的客户端。
- 选择 客户端>有线客户端 以查看客户端详细信息
- 选择 “监控>服务级别>见解 ”以查看客户端事件。
观看以下视频,了解如何配置 Windows 客户端设备以进行 EAP-TLS 身份验证以供测试或实验室使用:
Configure a Windows device to use a certificate to authenticate-- again, still talking about the lab use cases where you need to man ually install a certificate, manually connect a device to the network . So we have our test lab client certificate with the CA cert embedded. We have our Mist certificate we've exported from the Mist dashboard previously.
So we're going to take those two files. We're going to copy them. We'll move over to our Windows machine. We're just going to paste those two files. So now we will install the client certificate. It is going to be installed as a user certificate. Click Next, put in the import password, confirm installation, and then install the Mist certificate as the trusted certification authority. So we could do-- here, we're going to install it as a trusted certification authority. Next click Finish. And we have installed our CA cert.
Now the next step is to configu re a profile on the Windows device to connect to our SSID using EAP-TLS using our client certificates. So now - by the way, if we want to validate that the client certificate has installed, we could sea rch for certificate manager, go to personal certificates. We now have our test certificate installed that we've created in th e previous step, assigned by our lab CA. You could see it right there.
So now we will create a manual network profile. So we'll go to Control Panel. We'll go to Network and Sharing Center. We'll click on Setup a new connection or network. We'll select Manually connect to a wireless network. We'll put in our SSID name. Security type will be WPA3 enterprise, right? Don't start this connection automatically just yet.
Let's click Next. Change connection settings, that's important. We'll then go to Security. So we'll change the default PIP for smart card or other cert EAP-TLS. We'll go to Settings. We'll then select the Mist certificate we've just imported. This is for the client to trust the Mist authentication service. Again, this is about the mutual authentication piece. We will then click OK. We'll go to Advanced Settings. And we'll use user authentication, because we have a user certificate, in our case. Click OK. Click OK. Click Close. We'll go select Turn on Wi-Fi. We'll connect to our Mist securenet SSID. We'll select our certificate. That's the certificate we've imported. Click OK. And our client device is connected.
观看以下视频,了解如何配置 Android 客户端设备以进行 EAP-TLS 身份验证以供测试或实验室使用:
Let's take a look how we configure an Android device, in this particular case this is a Pixel 7 device, with our certificate. So we have the same two certs that we need to copy over to the Android device, either through USB or any other way. You'll then go to Settings. You'll then go to Security and Privacy. You'll then need to install those certificates. We will go to encryption and credentials. Install a certificate. Always select Wi-Fi certificate.
First, select the mist certificate. Just call it mistcert. Click OK. Then install the user certificate, the test-lab-client that we have created before. That is the client - oh, that's the password. Should have read that. Desktop client. Installed as well, great.
Final step is to go to Netw ork settings. Go to internet. We will find our SSID we are trying to connect to. We'll select the EAP method as TLS. CA certificate will be mistcert, right there. Now, Domain is the name of the server common name. In the case of Mist default cert, that's off auth.mist.com. The user certificate will be test-lab-client. And identity is your common name of the certificate, basically, your username. In my case, that's my email address. I'm going to click Connect. And now you see my client disconnected using a certificate that we'll just load it.
示例:使用站点变量配置身份验证策略
您可以在身份验证策略中使用站点变量来分配特定于站点的 VLAN。在跨不同位置创建和管理身份验证策略时,这种灵活性特别有用。通过利用站点变量,您可以简化配置身份验证策略的过程并确保不同站点之间的一致性。
- 创建站点变量。
- 在瞻博网络Mist云门户中,单击 组织>管理员>站点配置。
- 选择要为其配置站点变量的站点。
- 向下滚动到 站点变量 窗格,然后单击 添加变量 按钮。
- 在出现的弹出屏幕中,键入变量的名称并指定它所表示的值。
图 2:创建站点变量下表显示了此示例中使用的变量列表。
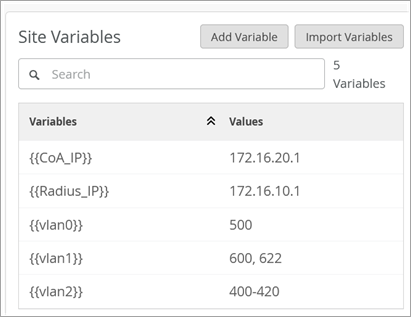
表 1:站点变量示例 站点 变量 值 站点-1 {{vlan0}} 100 {{vlan1}} 200,222 {{vlan2}} 20-30 {{Radius_IP}} 172.16.20.1 {{CoA_IP}} 172.16.10.1 Site-2 {{vlan0}} 500 {{vlan1}} 600,622 {{vlan2}} 400-420 {{Radius_IP}} 172.16.40.1 {{CoA_IP}} 172.16.30.1 - 点击保存。
- 创建身份验证策略标签。
从 瞻博网络 Mist 门户的左侧菜单中,选择 组织 > 访问 > 身份验证策略标签。
图 3:创建标签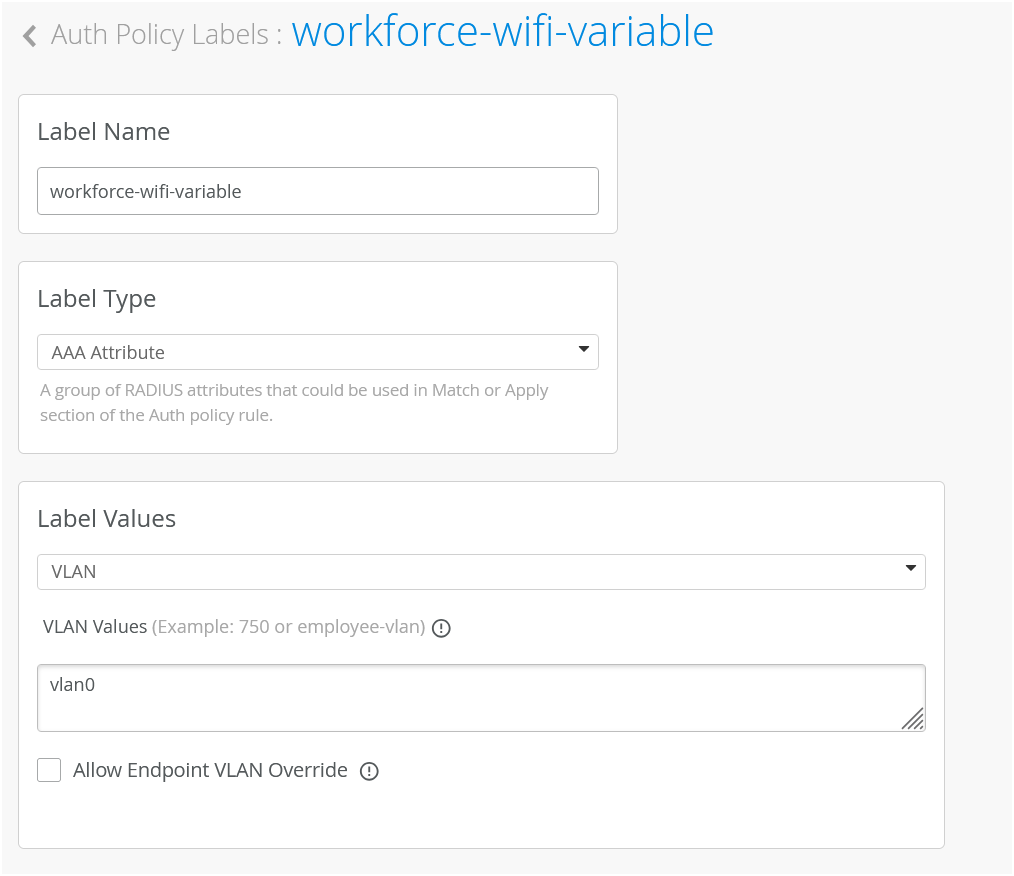
- 标签名称 - 输入标签名称(例如:workforce-wifi-variable)。
- 标签类型 (Label Type) — 将类型选择为 AAA 属性。
- 标签值 — 输入客户端标签。在此示例中,将标签值输入为 vlan0。这是您在上一个过程中创建的站点变量。
- 单击 “创建”。
- 创建身份验证策略。
从 瞻博网络 Mist 门户的左侧菜单中,选择 组织 > 访问 > 身份验证策略。
在“身份验证策略”页面中,添加新策略:
单击 “添加规则” 以创建规则。在此规则中,使用您在上一步中创建的标签。
图 4:创建身份验证策略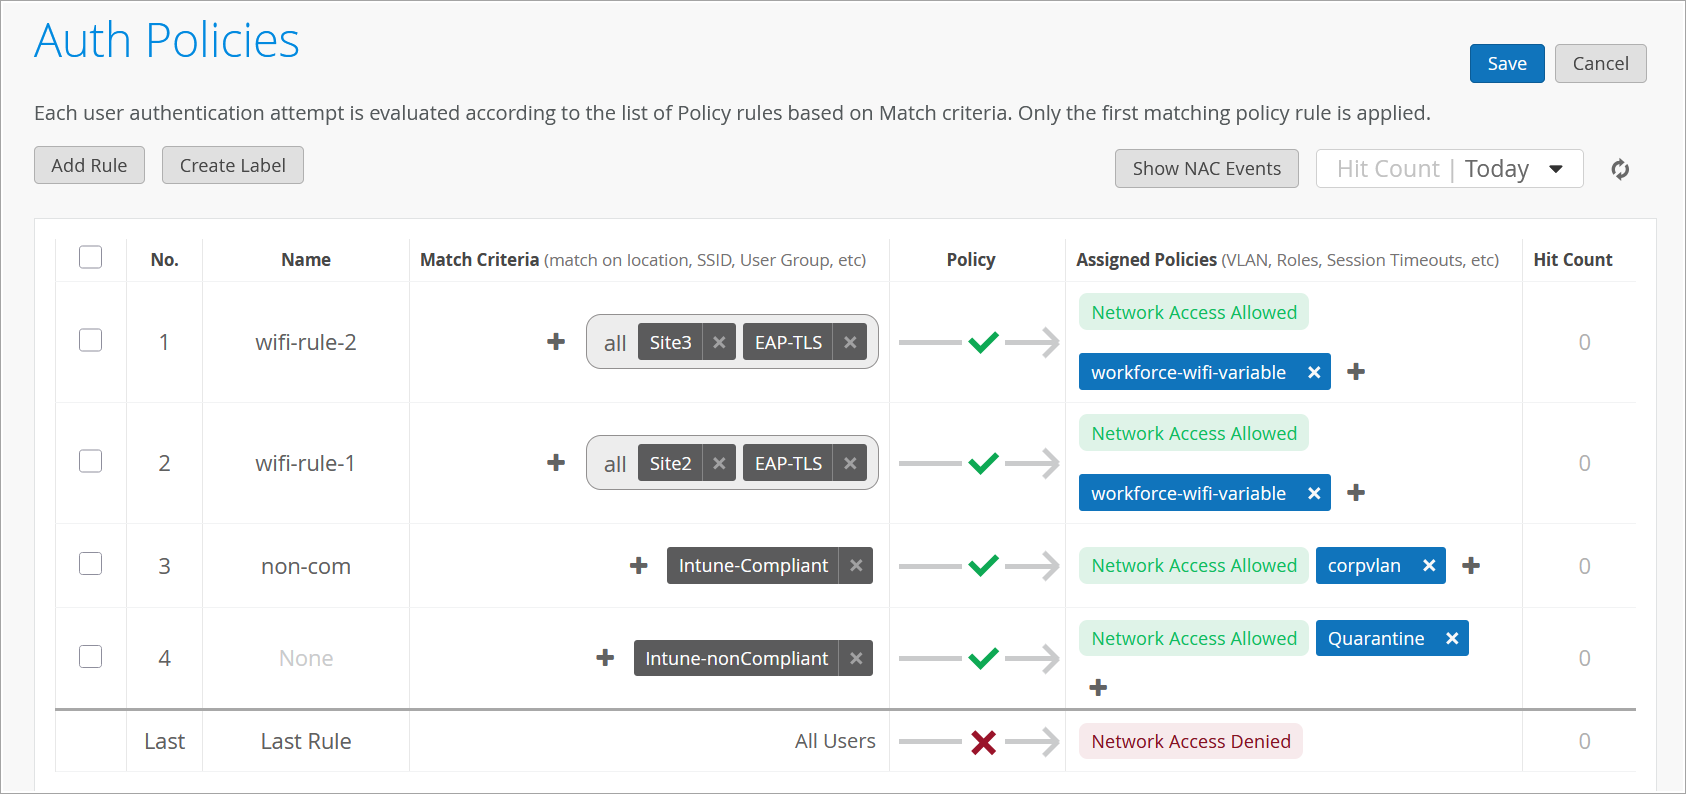
- 名称 - 输入策略的名称。
- 匹配标准 — 选择匹配标准(如站点)和身份验证类型(如 EAP-TLS)。
- 策略 - 选择允许。
- 策略作 - 选择允许网络访问。
- 分配的策略 — 在AAA属性下选择在上一个过程中创建的标签。
- 配置 SSID。
无线 LAN (WLAN) 是模块化元素,每个 WLAN 都包含给定服务集标识符 (SSID) 的配置。
- 为以下每个字段选择一个选项:
- 安全性类型 - 选择 企业 (802.1X)。此外,选择 WPA2 或 WPA3。
- 认证服务器 — MIST 身份验证。
- VLAN - 选择动态。在 VLAN 类型中,选择已命名并输入为 VLAN 创建的站点变量。
图 5:在 WLAN 模板
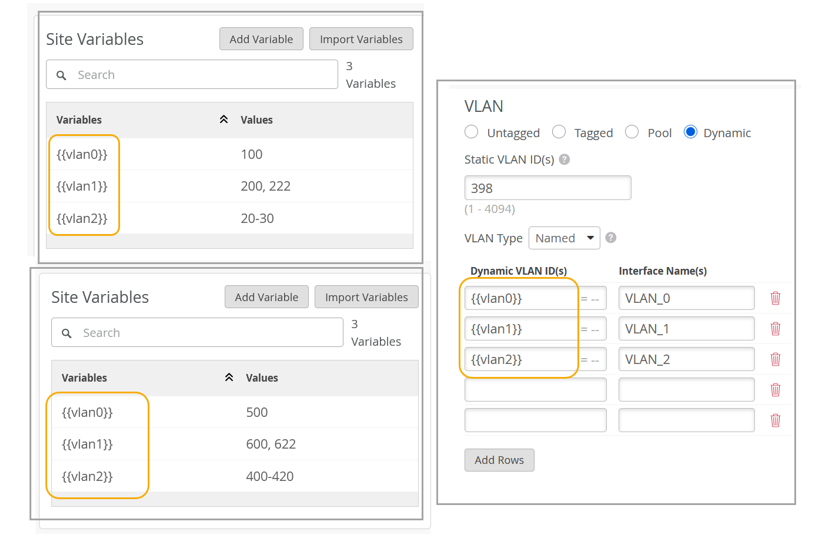 中配置 VLAN
至此,SSID 配置已完成。
- 如果您使用的是 RADIUS 身份验证服务器,请在 WLAN 模板页面中,转到身份验证服务器部分,然后从下拉框中选择 RADIUS。
图 6:配置 RADIUS 身份验证服务器
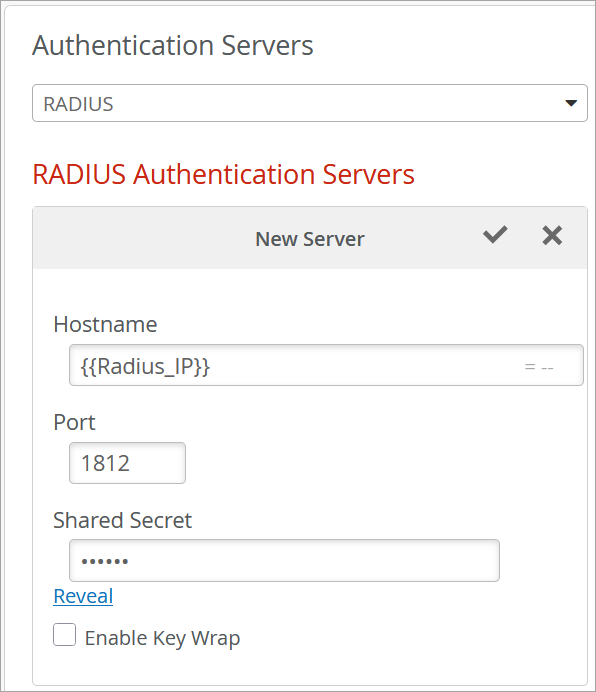
输入以下详细信息:
- 主机名 — RADIUS 服务器的 IP 地址或 FQDN。输入您在此处创建的变量。
- 端口 — 通常,默认 RADIUS 端口为 1812 用于身份验证,1813 用于记账,但这可能会因服务器配置而异。
- 共享密钥 — 用于向 RADIUS 服务器验证 Mist 接入点的共享密钥。
- (选答) 启用密钥换行 — 如果 RADIUS 服务器支持密钥换行,请启用此功能并输入必要的密钥详细信息。
- 您还可以 在 WLAN 创建过程中启用授权变更 (CoA) 或断开消息 (DM) 服务器。
向下滚动到 CoA/DM 服务器 部分,然后选中 已启用 框。
图 7:配置 CoA/DM 服务器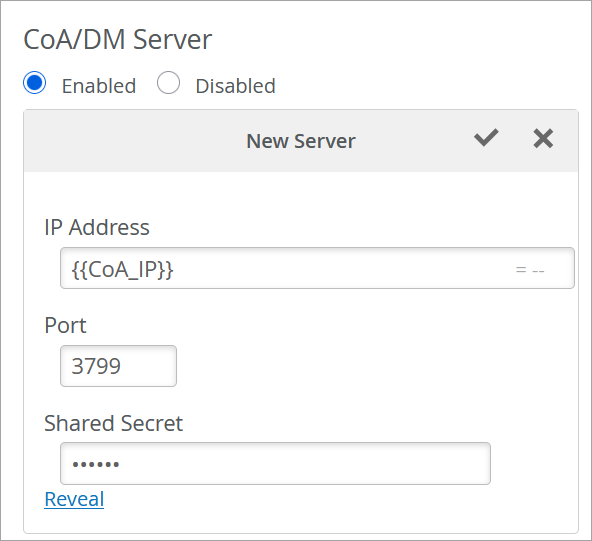
输入以下详细信息:
- 主机名 — CoA/DM 服务器的 IP 地址。输入您在此处创建的变量。
- 端口 — 保留默认端口为 3799
- 共享密钥 — 用于向您的服务器验证 Mist 接入点的共享密钥。
- 为以下每个字段选择一个选项:
配置完成后,身份验证策略将使用站点变量为站点 1 和站点 2 分配无线 VLAN。应用策略后,对于站点 1,系统会为值 100 分配 VLAN 0。与站点 2 类似,系统会为值 500 分配 VLAN 1。同样,对于站点1,将使用IP地址为172.16.20.1的Radius服务器和IP地址为172.16.10.1的CoA服务器,对于站点2,将使用IP地址为172.16.30.1的Radius服务器和IP地址为172.16.40.1的CoA服务器。