配置客户端设备以进行 EAP-TTLS 身份验证
使用 Juniper Mist Access Assurance 时,在对 Apple 设备使用 EAP-TTLS/PAP(基于凭据)身份验证时,您需要进行其他配置。对于此任务,您必须使用免费的 Apple 配置器工具创建配置文件。
- 下载瞻博网络 Mist 服务器证书。
为了使客户端设备信任 Mist Access Assurance 服务器证书,Mist 证书必须包含在 Wi-Fi 配置文件中。
- 在瞻博网络 Mist 门户上,转至组织>访问>证书。
此时将显示“证书颁发机构”页面。图1:查看并保存Mist服务器证书

- 在瞻博网络 Mist 门户上,转至组织>访问>证书。
- 在 Apple 客户端设备上创建新的配置文件。
- 在 Mac 电脑上,打开 Apple 配置器工具,然后单击“新建配置文件>文件”。
图 2:Apple 客户端
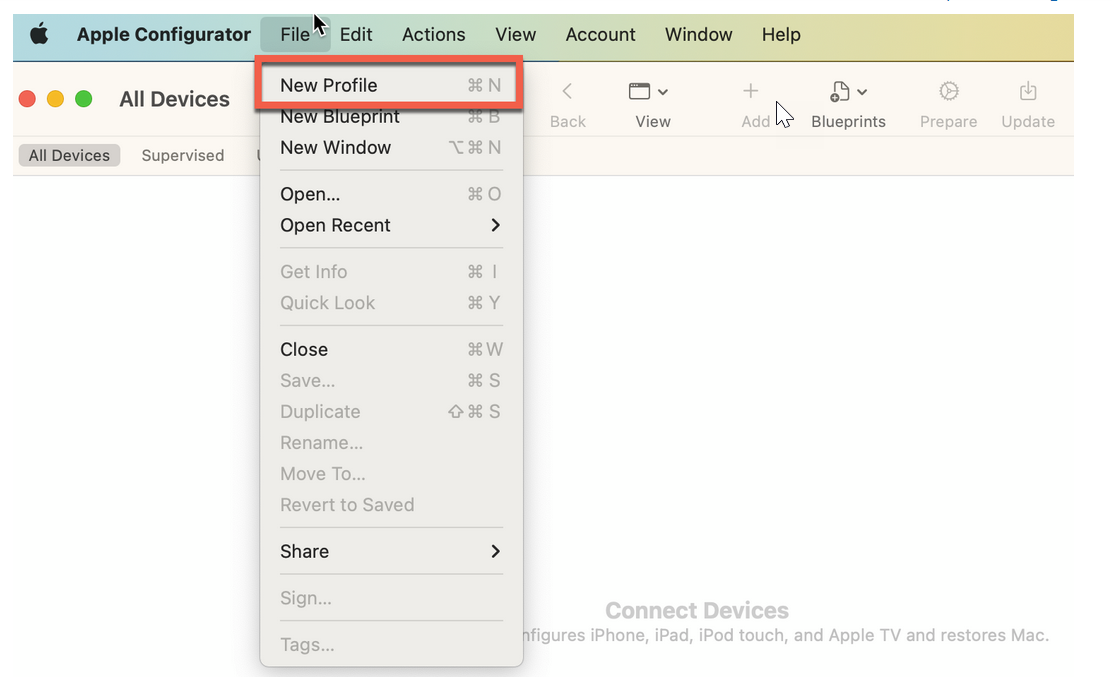 的 Wi-Fi 配置文件配置
将打开一个新的配置描述文件文档。
- 在 Apple 配置器工具的左侧导航栏上,单击证书>配置。
图 3:在 Apple 客户端的 Wi-Fi 配置文件配置中上传瞻博网络 Mist 服务器证书
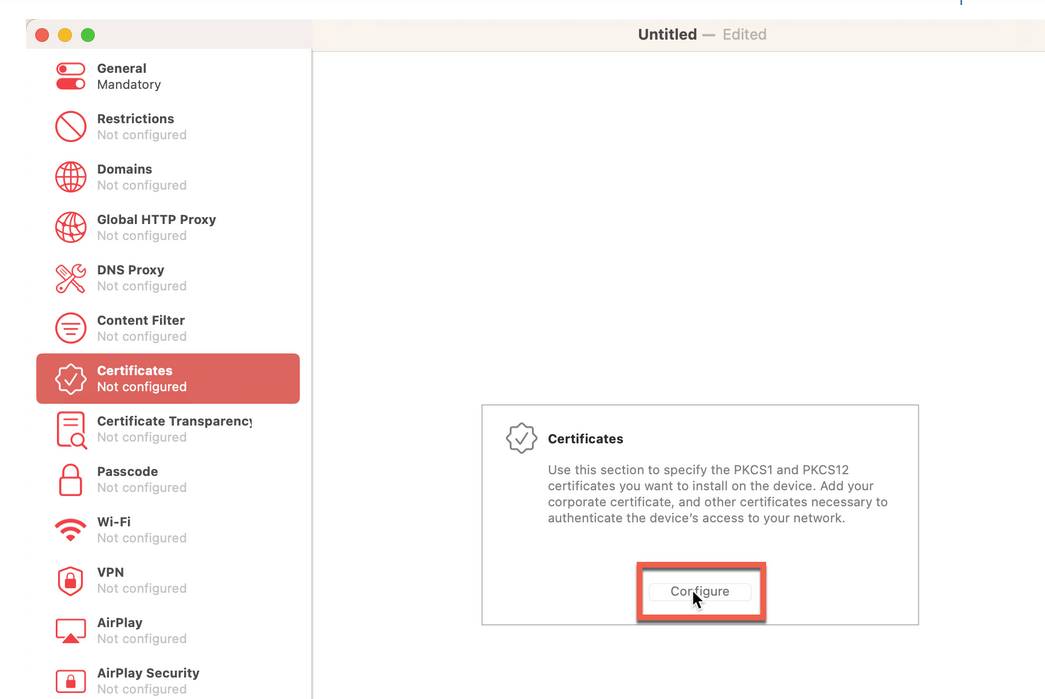 选择并上传在上一过程中下载的 Mist 证书。
 - 从 Apple 配置器工具的左侧导航栏中,选择 Wi-Fi,然后单击配置。
图 4:Apple 客户端
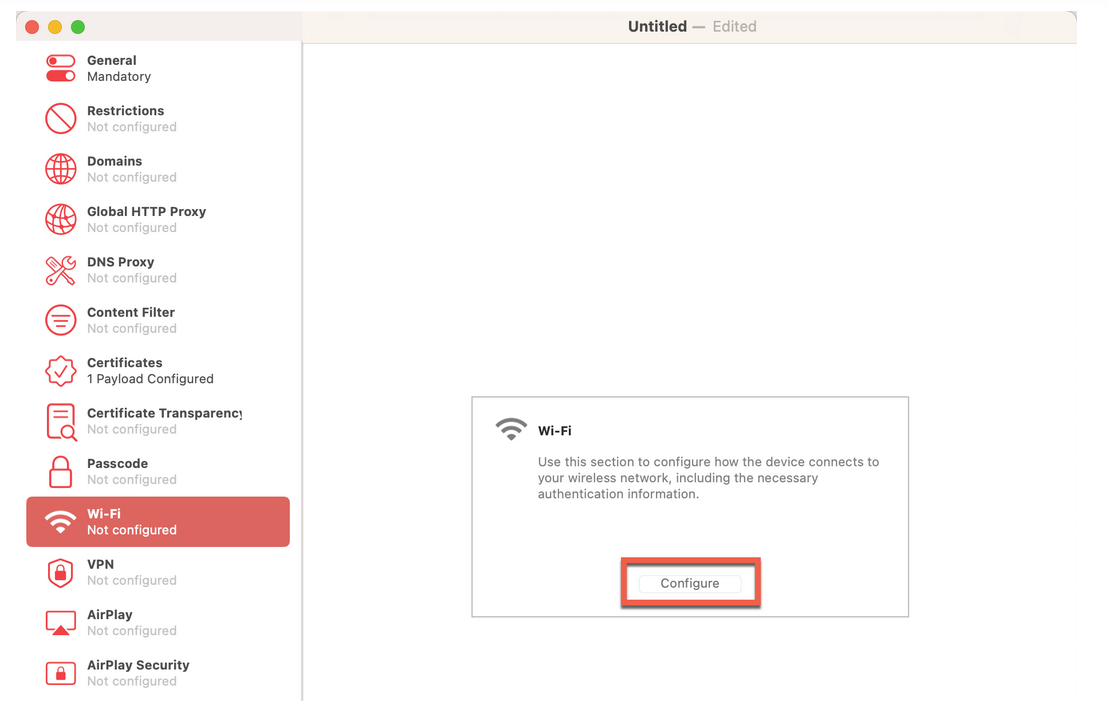 的 Wi-Fi 配置文件配置
为 Wi-Fi 设置输入以下选项:
图 5:Apple 客户端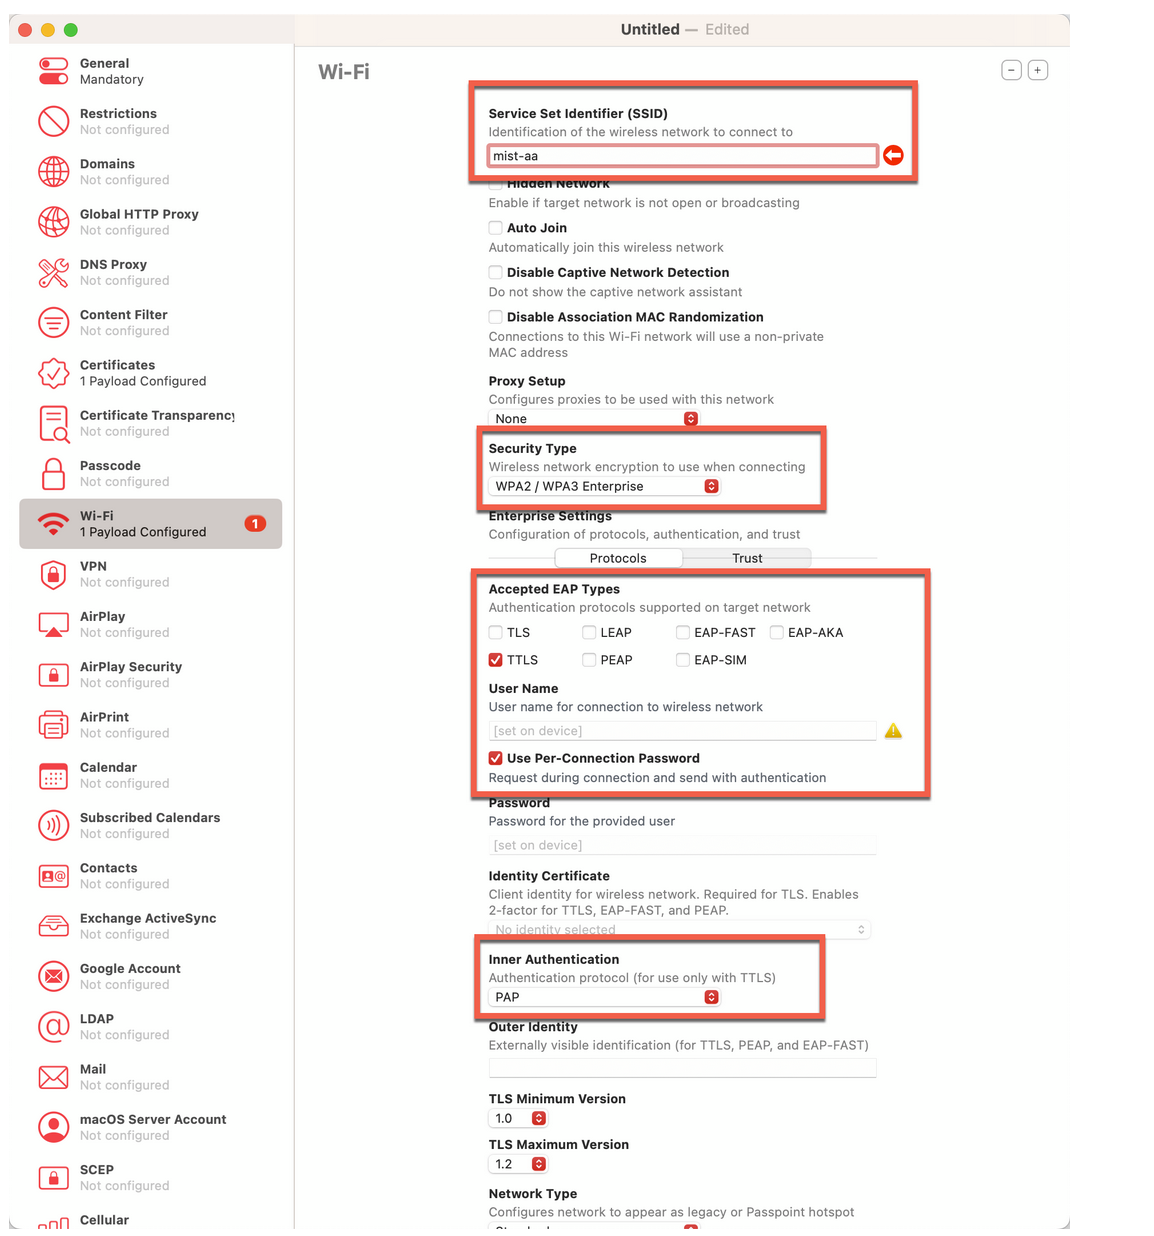 Wi-Fi 配置文件配置中的设置
- SSID — 您网络的 SSID。确保输入正确的 SSID,包括大写字母。
- 安全类型 — WPA2/WPA 3 企业版
- 接受的 EAP 类型 - TTLS 并选择 每连接密码。
- 内部身份验证 — PAP
- 在同一页上的“企业设置”下,单击“信任”。该页面将显示已上传证书的列表。
图 6:在 Apple 客户端的 Wi-Fi 配置文件配置中信任瞻博网络 Mist 服务器证书
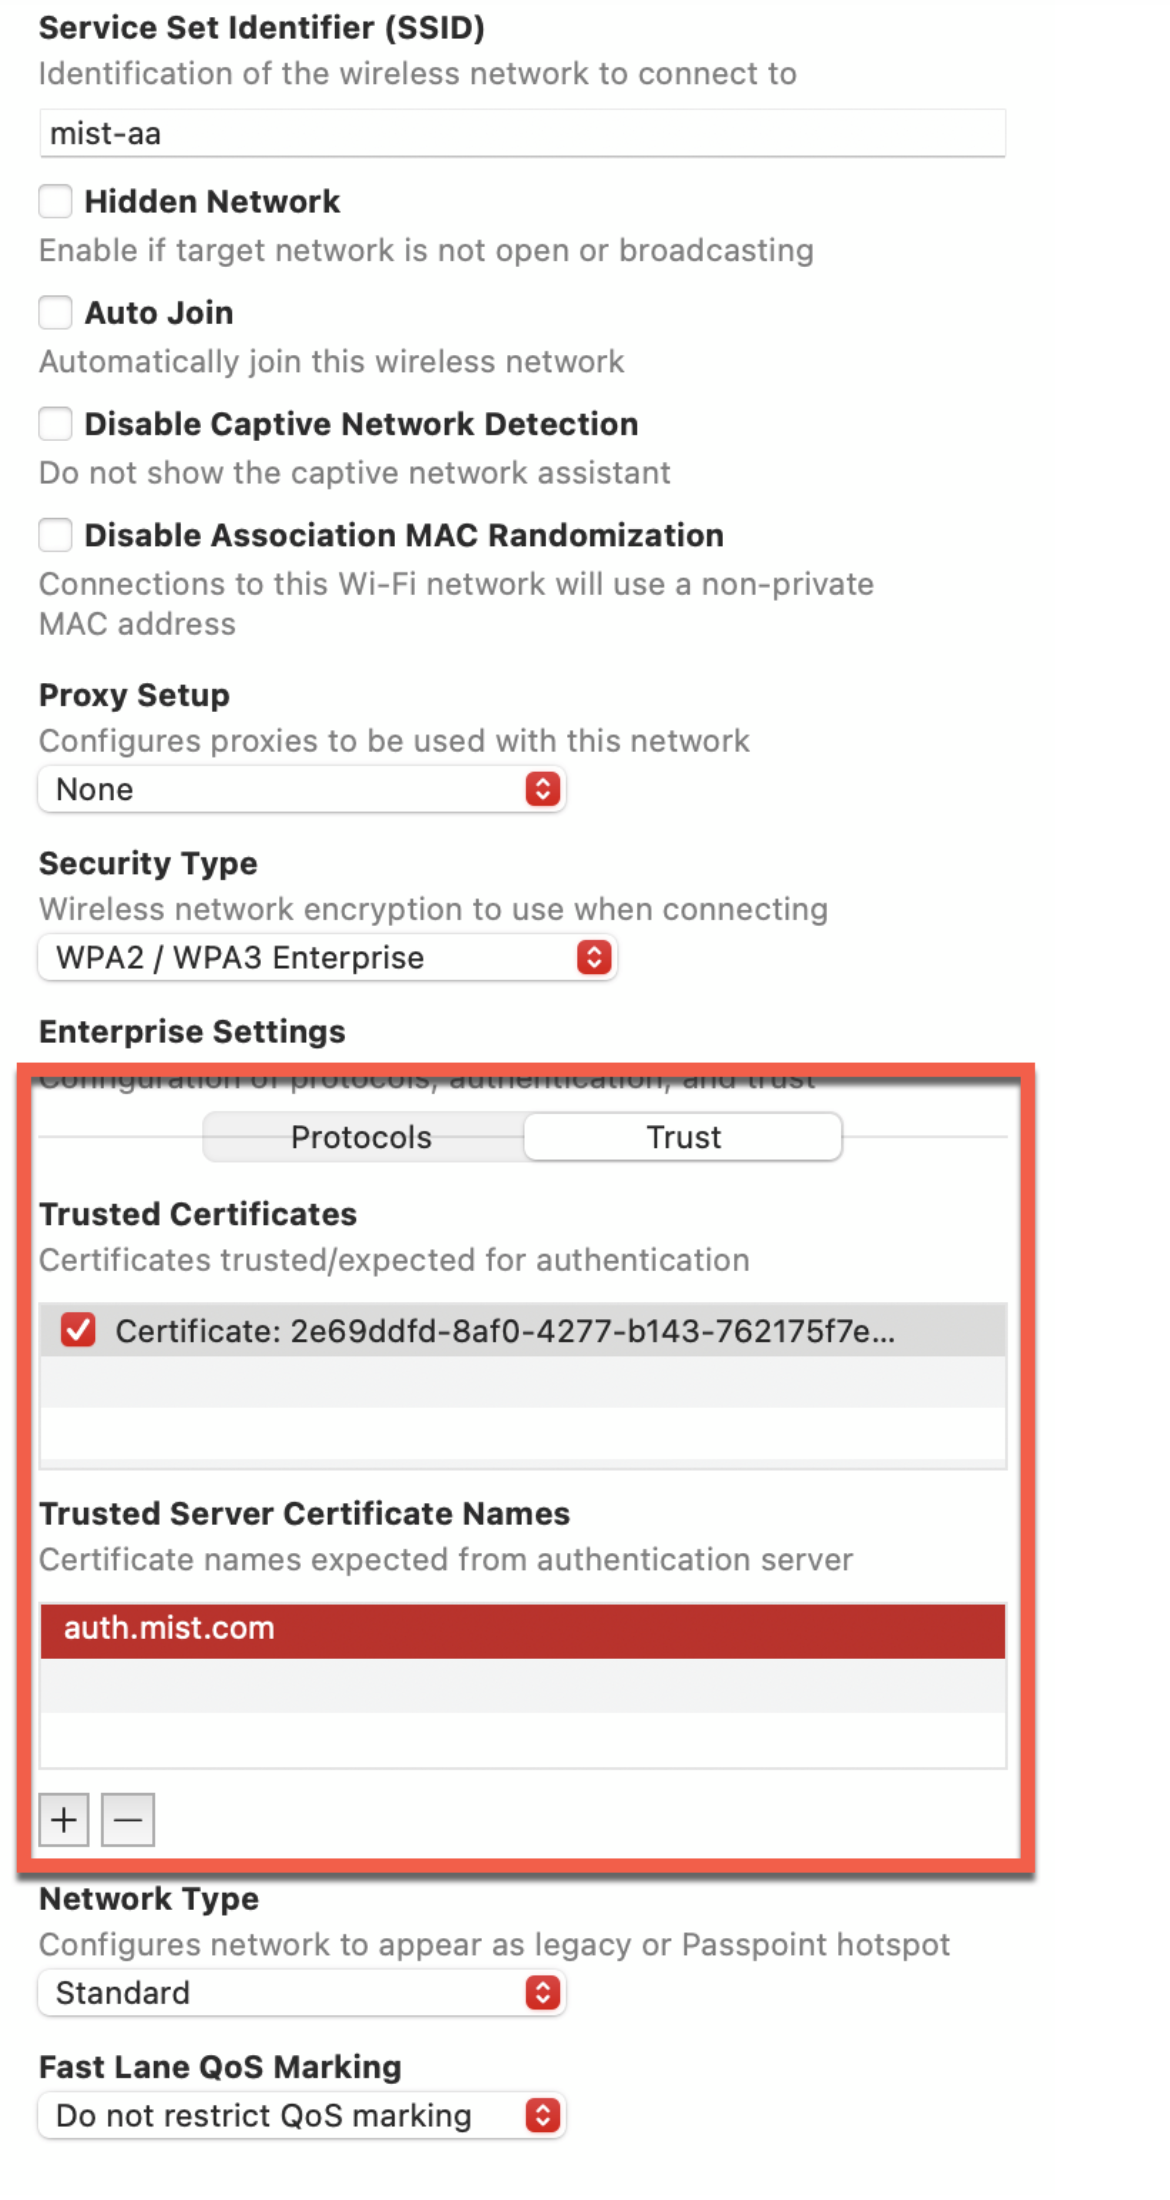 选择瞻博网络 Mist 证书。此步骤使客户端设备能够信任瞻博网络 Mist 服务器证书。
现在,您可以将其分发给您的Apple客户端。
- 保存您的配置。
图 7:保存 Wi-Fi 配置文件配置
 要对配置文件进行签名,您需要一个 Apple 受信任的证书。生产使用需要此步骤。
现在,您可以将证书分发给 Apple 客户端。 - 在 Mac 电脑上,打开 Apple 配置器工具,然后单击“新建配置文件>文件”。
观看以下视频,了解如何为 EAP-TLS 创建网络配置文件以供测试或实验室使用:
But how do you configure your client devices based on different operating systems? So you use certificates to authenticate to a Wi-Fi network.
Note that this video is only useful if you're doing lab testing, if you' re actually using your test certificates. And this is not designed for production environments. But in production environments, clients are typically configured by MDMs or group policies or any other onboarding solutions. And none of these steps are required in production. We are just talking about simple lab tests so you could repeat these steps in your testing environment.
So first platform we'll talk about is iOS, or actually iOS, MacOS, and iPadOS. The steps are identical for all the three platforms. So what we will need to do to configure test clients that are running Apple operating systems is the Apple Configurator utility that you can download from Apple directly. It only works on MacOS, obviously. But that's how you configure profiles manually.
So go to Apple Configurator. You'll create a new profile. And we'll just say this is our mist secure net profile. What we are interested in here is Certificate section. We'll need to import the client certificate we've generated in the previous step. So we're going to click Configure. I have my test lab client PFX th at we've exported from a different video.
We'll need to provide a password that we used during the export. I think it's "1234." Great. So our client certificate has been importe d. The other certificate we will need is actually the server certificate that we will display from mist access assurance when client will try to connect. This server certificate is actually available here. So we'll copy this. Save it as a text file. And then save it in the same folder. And we'll call it mist-certificate .crt. So now we'll go back to our profile. We'll import one more cert. And we'll import the Mist certificate in here. Now, the next step is to configure the Wi-Fi profile. So we'll config ure Wi-Fi profile. This is where we'll put our SSID name. And our SSID name was mist-securenet. Just make sure you're using the one you've configured. Under Security Type, we'll use WPA3 Enterprise. Unless you're using an older device, WPA3 is supported on all the Apple - recent Apple products, I should say.
Under Protocols, we'll select TLS because we want to use certific ates to authenticate. We'll then select the client certificate that we' ve imported in the previous step. We'll then go to Trust section. And this is where we are saying client will trust the mist certificate when it will try to authenticate to th e network. So we are doing this mutual trust in here. So in this phase, the client trust the server. The server, in this case, is mist access assurance. In this section, client presents its client certificate. And mist access assurance will have to trust the client cert. We'll then go ahead and save this profile. And this will be saved as .mobileconfig file. And now, how do we distribute this? Obviously, if you're on a Mac , you could go and double-click and install it. But we can also distribute this to our clients using AirDrop, for instance. Now, I will distribute this to my iPad through AirDrop.