NIC 上 RDMA 流量的 DCQCN 配置
Broadcom BCM57608用于 RDMA 流量的 Thor2 DCQCN 配置
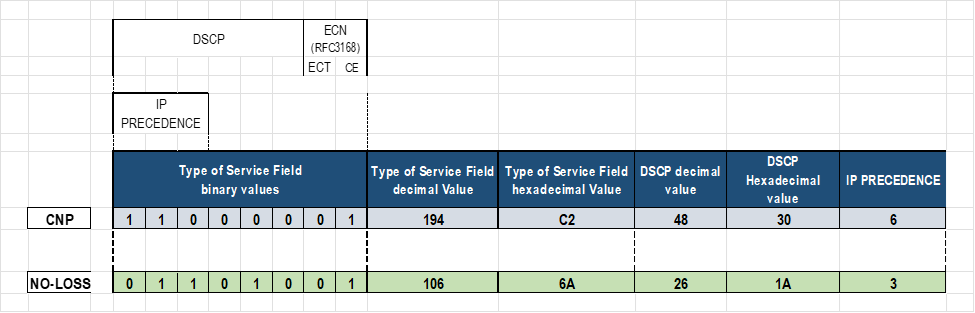
AMD 服务器中的默认 DCQN-ECN/PFC 属性。
网络接口适配器配置了以下用于 RoCE 流量的服务等级(包括 DCQCN-ECN)参数:
对于 Thor2 NIC 适配器:
- 启用 RoCEv2 (RDMA over IPv4)
- 启用拥塞控制 (ECN) 和 PFC
- 在优先级 3 上用 DSCP 26 标记的 RoCE 流量
- 使用 DSCP 48 和 PRIORITY 7 标记的 RoCE CNP 流量
映射 Broadcom 和逻辑接口名称,以配置 AMD 服务器中 RDMA 的 DCQN-ECN/PFC 和 TOS/DSCP 流量属性
需要在连接到GPU后端的接口上配置DCQCN、ECN、PFC和流量标记;仅在 GPU#_eth (#=0-7) 接口上。
在本文档的 更改NIC属性 部分中,我们确定服务器中的 gpu#_eth 接口是 Broadcom BCM97608(如下所示)NIC。
root@MI300X-01:/home/jnpr/SCRIPTS# cat devnames | grep gpu

gpu0_eth:Broadcom Inc. and subsidiaries BCM57608 25Gb/50Gb/100Gb/200Gb/400Gb Ethernet (rev 11)

gpu1_eth:Broadcom Inc. and subsidiaries BCM57608 25Gb/50Gb/100Gb/200Gb/400Gb Ethernet (rev 11)

gpu2_eth:Broadcom Inc. and subsidiaries BCM57608 25Gb/50Gb/100Gb/200Gb/400Gb Ethernet (rev 11)

gpu3_eth:Broadcom Inc. and subsidiaries BCM57608 25Gb/50Gb/100Gb/200Gb/400Gb Ethernet (rev 11)

gpu4_eth:Broadcom Inc. and subsidiaries BCM57608 25Gb/50Gb/100Gb/200Gb/400Gb Ethernet (rev 11)

gpu5_eth:Broadcom Inc. and subsidiaries BCM57608 25Gb/50Gb/100Gb/200Gb/400Gb Ethernet (rev 11)

gpu6_eth:Broadcom Inc. and subsidiaries BCM57608 25Gb/50Gb/100Gb/200Gb/400Gb Ethernet (rev 11)

gpu7_eth:Broadcom Inc. and subsidiaries BCM57608 25Gb/50Gb/100Gb/200Gb/400Gb Ethernet (rev 11)
本节中配置服务等级的所有步骤都将重点介绍这些 Broadcom 接口。
我们将结合使用 Linux 系统命令和 Broadcom 工具来启用、调整和监控 DCQCN ECN/PFC 操作和 RoCE 流量标记。对于其中一些命令,我们需要找到与每个 GPU 接口关联的 Broadcom 接口名称。请按照以下步骤查找这些映射:
- 使用以下逻辑查找每个 gpu#_eth 接口的 PCI 地址:
for iface in $(ls /sys/class/net | grep -E 'gpu[0-9]+_eth'); do

    pci_addr=$(readlink -f /sys/class/net/$iface/device | awk -F '/' '{print $NF}')

    echo "$iface => $pci_addr"

done1
示例:
root@MI300X-01:/home/jnpr/SCRIPTS# for iface in $(ls /sys/class/net | grep -E 'gpu[0-9]+_eth'); do pci_addr=$(readlink -f /sys/class/net/$iface/device | awk -F '/' '{print $NF}') echo "$iface => $pci_addr" done gpu0_eth => 0000:06:00.0 gpu1_eth => 0000:23:00.0 gpu2_eth => 0000:43:00.0 gpu3_eth => 0000:66:00.0 gpu4_eth => 0000:86:00.0 gpu5_eth => 0000:a3:00.0 gpu6_eth => 0000:c3:00.0 gpu7_eth => 0000:e6:00.0 - 使用以下逻辑查找与每个 PCI 地址对应的 bnxt_re# (#=0-7) 设备:
for pci in $(find /sys/class/infiniband -type l -exec basename {} \;); do

    pci_addr=$(readlink -f /sys/class/infiniband/$pci/device | awk -F '/' '{print $NF}')

    echo "$pci => $pci_addr" |grep bnxt

done
示例:
root@MI300X-01:/home/jnpr/SCRIPTS# for pci in $(find /sys/class/infiniband -type l -exec basename {} \;); do pci_addr=$(readlink -f /sys/class/infiniband/$pci/device | awk -F '/' '{print $NF}') echo "$pci => $pci_addr" |grep bnxt done bnxt_re5 => 0000:a3:00.0 bnxt_re3 => 0000:66:00.0 bnxt_re1 => 0000:23:00.0 bnxt_re6 => 0000:c3:00.0 bnxt_re4 => 0000:86:00.0 bnxt_re2 => 0000:43:00.0 bnxt_re0 => 0000:06:00.0 bnxt_re7 => 0000:e6:00.0 - 映射 GPU 接口 bnxt_re# 或 mlx5_# 接口名称。
组合步骤 1 和 2 的输出以创建从 gpu#_eth 到 bnxt_re# 或 mlx5_# 的完整映射。例如,您可以从输出中看到,gpu0_eth对应于 bnxt_re3 (0000:66:00.0)
您可以使用以下逻辑来简化该过程:
echo "GPU-to-NIC Mapping:"

for iface in $(ls /sys/class/net | grep -E 'gpu[0-9]+_eth'); do

    pci_addr=$(readlink -f /sys/class/net/$iface/device | awk -F '/' '{print $NF}')

    rdma_dev=$(find /sys/class/infiniband -type l -exec basename {} \; | while read rdma; do

        rdma_pci=$(readlink -f /sys/class/infiniband/$rdma/device | awk -F '/' '{print $NF}')

        if [[ "$pci_addr" == "$rdma_pci" ]]; then echo "$rdma"; fi

    done)

    echo "$iface => $pci_addr => $rdma_dev"

done
示例:
root@MI300X-01:/home/jnpr/SCRIPTS# echo "GPU-to-NIC Mapping:"

for iface in $(ls /sys/class/net | grep -E 'gpu[0-9]+_eth'); do

    pci_addr=$(readlink -f /sys/class/net/$iface/device | awk -F '/' '{print $NF}')

    rdma_dev=$(find /sys/class/infiniband -type l -exec basename {} \; | while read rdma; do

        rdma_pci=$(readlink -f /sys/class/infiniband/$rdma/device | awk -F '/' '{print $NF}')

        if [[ "$pci_addr" == "$rdma_pci" ]]; then echo "$rdma"; fi

    done)

    echo "$iface => $pci_addr => $rdma_dev"

done

GPU-to-NIC Mapping:

gpu0_eth => 0000:06:00.0 => bnxt_re0

gpu1_eth => 0000:23:00.0 => bnxt_re1

gpu2_eth => 0000:43:00.0 => bnxt_re2

gpu3_eth => 0000:66:00.0 => bnxt_re3

gpu4_eth => 0000:86:00.0 => bnxt_re4

gpu5_eth => 0000:a3:00.0 => bnxt_re5

gpu6_eth => 0000:c3:00.0 => bnxt_re6

gpu7_eth => 0000:e6:00.0 => bnxt_re7
为 AMD 服务器(Broadcom 接口)中的 RDMA 配置 DCQN-ECN/PFC 和 TOS/DSCP 流量属性
下表列出了与 DCQN-ECN/PFC 和 TOS/DSCP 相关的一些参数:
表 15.服务器 DCQCN 配置参数
| 参数 | 描述 | 默认 |
|---|---|---|
| cc_mode | 0 表示 确定性标记 (DCQCN-D) 1 用于 概率标记 (DCQCN-P) |
1 |
| cnp_ecn | 启用/禁用 ECN | 0x1(启用) |
| cnp_dscp | RoCE 拥塞通知数据包的 DSCP 值 | 48 |
| cnp_prio | RoCE 拥塞通知包的优先级 | 7 |
| cnp_ratio_th | 定义生成 CNP 的阈值比率。它决定了响应拥塞而发送 CNP 的速率,有助于控制反馈机制的攻击性。 | 0x0 |
| ecn_enable | 启用拥塞控制。 | 0x1(启用) |
| ecn_marking | 支持将数据包标记为支持 ECN。ECN = 01 | 0x1(启用) |
| default_roce_mode | 设置 RDMA 的默认 RoCE 模式 | RoCE v2 |
| default_roce_tos | 设置 RDMA 流量的默认 ToS 值 | 104 |
| roce_dscp | RoCE 数据包的 DSCP 值。 | 26 |
| roce_prio | RoCE 数据包的优先级。 | 3 |
| RTT | cnp 和传输数据包计数累积的时间段 (μs)。在 rtt 结束时,计算 CNP 和 TxPkts 之间的比率,并更新 CP。 | 40 微秒。 |
BCM95741X以太网网络适配器支持每个以太网端口的三个传输和接收队列:0、4 和 5。
BCM95750X以太网网络适配器支持每个以太网端口的八个传输和接收队列:0 到 7。
默认情况下,所有队列均配置为加权公平队列 (WFQ),优先级 0 的流量映射到队列 4。
加载 RoCE bnxt_re 驱动程序后,CoSQ 0 配置为无损流量,CoSQ 5 从 WFQ 更改为 CNP 处理的严格优先级 (SP)。
RoCE 和 CNP 流量可以使用不同的 DSCP 值进行标记,也可以改用 VLAN 标记。
默认情况下,ToS 字段设置为 104,这意味着 DSCP 设置为 48,ECN 位设置为 10(支持 ECN)。
这些参数可以使用三种不同的方法进行调整:
- 直接配置 DCQCN/RDMA 标记值
- 使用 Broadcom 工具(例如
niccli,或lldptool直接)配置 DCQCN/RDMA 标记值 - 使用实用程序配置
thebnxt_setupcc.shDCQCN/RDMA 标记值,该实用程序在后台使用或nicclilldptool(默认)。
以下部分将介绍使用这些不同选项进行更改的步骤。
set class-of-service classifiers dscp mydscp forwarding-class CNP loss-priority low code-points 110000

set class-of-service classifiers dscp mydscp forwarding-class NO-LOSS loss-priority low code-points 011010

set class-of-service forwarding-classes class NO-LOSS pfc-priority 3
直接为 RDMA 配置 DCQN-ECN/PFC 和 TOS/DSCP 流量属性
您可以通过直接编辑包含每个参数值的文件来更改 DCQCN 和流量标记。此方法是最简单的,不需要安装任何其他工具,但是,它不是 PFC 相关参数的选项,也不是所有类型的网络适配器都支持它。
要为特定接口完成这些更改,您必须在相应的接口目录中,按照以下步骤操作:
- 为 QoS 相关值创建接口目录
我们确定了 gpu#_eth 接口与相应的 Broadcom 接口名称之间的映射
GPU 到 NIC 映射:
gpu0_eth => 0000:06:00.0 => bnxt_re0
gpu1_eth => 0000:23:00.0 => bnxt_re1
gpu2_eth => 0000:43:00.0 => bnxt_re2
gpu3_eth => 0000:66:00.0 => bnxt_re3
gpu4_eth => 0000:86:00.0 => bnxt_re4
gpu5_eth => 0000:a3:00.0 => bnxt_re5
gpu6_eth => 0000:c3:00.0 => bnxt_re6
gpu7_eth => 0000:e6:00.0 => bnxt_re7
我们将使用 Broadcom 接口名称创建目录(rdma_cm 和 bnxt_re),其中 DCQCN 属性以及每个接口的其他参数和统计信息将在这里。
接口特定目录在使用以下命令创建之前不存在:
cd /sys/kernel/config

mkdir -p /rdma_cm/<Broadcom-interface-name>

mkdir -p /bnxt_re/<Broadcom-interface-name>
请注意,这两个目录必须存在。
root@MI300X-01:/# cd /sys/kernel/config/ls

bnxt_re  rdma_cm
例如,如果缺少rdma_cm目录,请尝试以下操作:
root@MI300X-01:/sys/kernel/config# sudo modprobe rdma_cm


root@MI300X-01:/sys/kernel/config# lsmod | grep rdma_cm

rdma_cm               147456  0

iw_cm                  61440  1 rdma_cm

ib_cm                 151552  1 rdma_cm

ib_core               507904  6 rdma_cm,iw_cm,bnxt_re,ib_uverbs,mlx5_ib,ib_cm
示例:
root@MI300X-01:/# cd /sys/kernel/config/bnxt_re

root@MI300X-01:/sys/kernel/config/bnxt_re#

(NO FILES LISTED)

root@MI300X-01:/# cd /sys/kernel/config/rdma_cm

root@MI300X-01:/sys/kernel/config/rdma_cm# ls

(NO FILES LISTED)


root@MI300X-01:/sys/kernel/config# mkdir -p rdma_cm/bnxt_re0

root@MI300X-01:/sys/kernel/config# mkdir -p bnxt_re/bnxt_re0

root@MI300X-01:/sys/kernel/config# ls rdma_cm

bnxt_re0

root@MI300X-01:/sys/kernel/config# ls bnxt_re

bnxt_re0

root@MI300X-01:/sys/kernel/config# mkdir -p rdma_cm/bnxt_re1

root@MI300X-01:/sys/kernel/config# mkdir -p bnxt_re/bnxt_re1

root@MI300X-01:/sys/kernel/config# ls rdma_cm

bnxt_re0 bnxt_re1

root@MI300X-01:/sys/kernel/config# ls bnxt_re

bnxt_re0 bnxt_re1
对所有 GPU 接口重复这些步骤。
注意:您必须是 root 用户才能进行这些更改。jnpr@MI300X-01:/sys/kernel/config/bnxt_re/bnxt_re0/ports/1/cc$ sudo echo -n 0x1 > ecn_enable -bash: ecn_enable: Permission denied. jnpr@MI300X-01:/sys/kernel/config/bnxt_re/bnxt_re0/ports/1/cc$ sudo bash root@MI300X-01:/sys/kernel/config/bnxt_re/bnxt_re0/ports/1/cc# sudo echo -n 0x1 > ecn_enable root@MI300X-01:/sys/kernel/config/bnxt_re/bnxt_re0/ports/1/cc#
新目录将包含与 ECN、ROCE 流量和其他功能相关的值:
root@MI300X-01:/sys/kernel/config# cd rdma_cm/bnxt_re0/ports/1

root@MI300X-01:/sys/kernel/config/rdma_cm/bnxt_re0/ports/1# ls

default_roce_mode  default_roce_tos

root@MI300X-01:/sys/kernel/config/rdma_cm/bnxt_re0/ports/1# cd /sys/kernel/config/bnxt_re/bnxt_re0/ports/1

root@MI300X-02:/sys/kernel/config/bnxt_re/bnxt_re0/ports/1$ ls

cc  tunables

root@MI300X-02:/sys/kernel/config/bnxt_re/bnxt_re0/ports/1$ ls tunables

acc_tx_path     cq_coal_en_ring_idle_mode       dbr_pacing_algo_threshold

en_qp_dbg       snapdump_dbg_lvl        user_dbr_drop_recov_timeout

cq_coal_buf_maxtime     cq_coal_normal_maxbuf           dbr_pacing_enable

gsi_qp_mode     stats_query_sec cq_coal_during_maxbuf

dbr_def_do_pacing       dbr_pacing_time min_tx_depth

user_dbr_drop_recov

root@MI300X-01:/sys/kernel/config/bnxt_re/bnxt_re0/ports/1/# ls cc

abs_max_quota   act_cr_factor   act_rel_cr_th   actual_cr_shift_correction_en

advanced        ai_rate_incr    ai_rtt_th1      ai_rtt_th2

apply   bw_avg_weight   cc_ack_bytes    cc_mode

cf_rtt_th       cnp_dscp        cnp_ecn cnp_prio

cnp_ratio_th    cp_bias cp_bias_en      cp_exp_update_th

cr_min_th       cr_prob_fac     cr_width        disable_prio_vlan_tx

ecn_enable      ecn_marking     exp_ai_rtts     exp_crcp_ratio

fair_cr_th      fr_num_rtts     g       inact_th

init_cp init_cr init_tr l64B_per_rtt

lbytes_per_usec max_cp_cr_th    max_quota       min_quota

min_time_bet_cnp        random_no_red_en        red_div red_rel_rtts_th

reduce_cf_rtt_th        reset_cc_cr_th  roce_dscp       roce_prio

rt_en   rtt     rtt_jitter_en   sc_cr_th1

sc_cr_th2       tr_lb   tr_prob_fac     tr_update_cyls

tr_update_mode
您可以在目录中找到
/sys/kernel/config/bnxt_re/bnxt_re0/ports/1/cc#其中一些参数的描述,以及它们的当前值cat apply。示例:
root@MI300X-01:/sys/kernel/config/bnxt_re/bnxt_re0/ports/1/cc# cat apply

ecn status (ecn_enable)                                 : Enabled

ecn marking (ecn_marking)                               : ECT(1)

congestion control mode (cc_mode)                       : DCQCN-P

send priority vlan (VLAN 0)                             : Disabled

running avg. weight(g)                                  : 8

inactivity threshold (inact_th)                         : 10000 usec

initial current rate (init_cr)                          : 0xc8

initial target rate (init_tr)                           : 0x320

cnp header ecn status (cnp_ecn)                         : ECT(1)

rtt jitter (rtt_jitter_en)                              : Enabled

link bytes per usec (lbytes_per_usec)                   : 0x7fff byte/usec

current rate width (cr_width)                           : 0xe bits

minimum quota period (min_quota)                        : 0x4

maximum quota period (max_quota)                        : 0x7

absolute maximum quota period(abs_max_quota)            : 0xff

64B transmitted in one rtt (l64B_per_rtt)               : 0xf460

roce prio (roce_prio)                                   : 3

roce dscp (roce_dscp)                                   : 26

cnp prio (cnp_prio)                                     : 7

cnp dscp (cnp_dscp)                                     : 48
- 启用 RoCEv2 操作。
即使 RoCEv2 应为默认模式,此处显示了启用 RoCEv2 的命令。
注意:此更改是在 rdma_cm 目录下进行的root@MI300X-01:/# cd /sys/kernel/config/rdma_cm/bnxt_re0/ports/1 root@MI300X-01:/sys/kernel/config/rdma_cm/bnxt_re0/ports/1# ls default_roce_mode default_roce_tos root@MI300X-01:/sys/kernel/config/rdma_cm/bnxt_re0/ports/1# echo RoCE v2 > default_roce_mode
注意:输入完全如图所示的值,包括空格:“RoCE v2”(区分大小写)。设置参数后,应用新值,如下所示:
echo -n 0x1 > apply
验证更改:
root@MI300X-01:/sys/kernel/config/rdma_cm/bnxt_re1/ports/1# cat default_roce_mode

RoCE v2
-
启用 ECN 响应和通知功能。
尽管默认情况下应启用 ECN,但此处显示了启用 ECN 的命令。root@MI300X-01:/# cd /sys/kernel/config/bnxt_re/bnxt_re0/ports/1/cc
root@MI300X-01:/sys/kernel/config/bnxt_re/bnxt_re0/ports/1/cc# echo -n 0x1 > ecn_enable
如果需要,您可以通过输入 echo -n 0x0 > ecn_enable 来禁用 ECN。
root@MI300X-01:/sys/kernel/config/bnxt_re/bnxt_re0/ports/1/cc# echo -n 0x1 > ecn_enable
在 Broadcom 接口上启用 ECN 后,它们将响应 CNP 数据包 (RP),并在收到带有 ECN 标记的接口 (NP) 时生成 CNP 数据包。
要禁用它,请输入 echo -n 0x0 > cnp_ecn 。
设置参数后,应用新值:
echo -n 0x1 > apply
验证更改:
root@MI300X-01:/sys/kernel/config/bnxt_re/bnxt_re0/ports/1/cc# cat ecn_enable

0x1
您还可以将 CNP 和 ROCE 数据包标记为符合 ECN 条件(这意味着,当发生拥塞时,这些数据包可以通过网络进行标记)。
root@MI300X-01:/sys/kernel/config/bnxt_re/bnxt_re0/ports/1/cc# cat cnp_ecn 0x1
总结这些属性:
| ecn_enable | 启用/禁用 ECN 的 RP(响应点)端。它使设备能够响应 CNP 数据包。默认值 = 1(启用) |
| cnp_ecn | 将标记为 CNP 数据包符合 ECN 条件。ECT 字段的值为 01 或 10。 |
| ecn_marking | 将 ROCE 数据包标记为 ECN 合格。ECT 字段的值为 01 或 10。 |
- 为 CNP 和 RoCEv2 数据包配置 DSCP 和 PRIO 值。
注意:并非所有类型的 Broadcom 接口卡都可以通过手动配置这些值(如下所示)。例如,对于BCM95741X设备,您可以使用此方法配置 ECN 和 RoCE 优先级值,但在 BCM95750X/BCM97608 设备上,您可以配置
roce_dscp, ecn_dscp。root@MI300X-01:/sys/kernel/config/bnxt_re/bnxt_re0/ports/1/cc# echo -n 0x30 > cnp_dscp # DSCP value as 48 (30 in HEX)
注意:这些更改是在 bnxt_re0 目录下进行的。echo -n 0x1a > roce_dscp # DSCP value as 26 (1a in HEX) echo -n 0x7 > cnp_prio echo -n 0x3 > roce_prio
注意:以下错误表示不支持直接更改此参数的值。如果是BCM97608 roce_prio,并且需要使用(后文所述)进行bnxt_setupcc.sh配置cnp_prio。root@MI300X-01:/sys/kernel/config/bnxt_re/bnxt_re0/ports/1/cc# echo -n 0x3 > roce_prio bash: echo: write error: Invalid argument
设置参数后,应用新值:
echo -n 0x1 > apply
验证更改:
root@MI300X-01:/sys/kernel/config/bnxt_re/bnxt_re0/ports/1/cc# cat cnp_dscp

0x30

root@MI300X-01:/sys/kernel/config/bnxt_re/bnxt_re0/ports/1/cc# cat cnp_dscp

0x1a


root@MI300X-01:/sys/kernel/config/bnxt_re/bnxt_re0/ports/1/cc# cat cnp_prio

0x7

root@MI300X-01:/sys/kernel/config/bnxt_re/bnxt_re0/ports/1/cc# cat cnp_prio

0x3
- 配置 DCQCN 算法(在 bnxt_re 目录下)。
Broadcom 以太网网络适配器中的默认 DCQCN 拥塞控制(cc 模式)算法是 DCQCN-P。可以使用以下命令更改模式:
注意:此更改是在 bnxt_re0 目录下进行的。要使用 DCQCN-P ,请配置:
cd /sys/kernel/config/bnxt_re/bnxt_re0/ports/1/cc/

echo -n 1 > cc_mode

echo -n 1 > apply

cat apply
要使用 DCQCN-D ,请配置:
root@MI300X-01:/

cd /sys/kernel/config/bnxt_re/bnxt_re0/ports/1/cc/

echo -n 0 > cc_mode

echo -n 1 > apply
- 检查已配置的所有属性。
以下命令显示所有接口参数:
root@MI300X-01:/

cd /sys/kernel/config/bnxt_re/bnxt_re0/ports/1/cc/

echo -n 1 > advanced

echo -n 1 > apply

cat apply
有关 Broadcom 以太网网络适配器中 DCQCN 算法的详细信息,请查看以下文档: 更改拥塞控制模式设置 和 RoCE 拥塞控制
示例:
我们强调了一些 ECN/CNP 相关参数:
root@MI300X-01:/sys/kernel/config#

cd /sys/kernel/config/bnxt_re/bnxt_re0/ports/1/cc/

echo -n 1 > advanced

echo -n 1 > apply

cat apply

ecn status (cnp_ecn)                                    : Enabled
              ecn marking (ecn_marking)                               : ECT(1)
              congestion control mode (cc_mode)                       : DCQCN-P

send priority vlan (VLAN 0)                             : Disabled

running avg. weight(g)                                  : 8

inactivity threshold (inact_th)                         : 10000 usec

initial current rate (init_cr)                          : 0xc8

initial target rate (init_tr)                           : 0x320

round trip time (rtt)                                   : 45 usec

cnp header ecn status (cnp_ecn)                         : ECT(1)

rtt jitter (rtt_jitter_en)                              : Enabled

link bytes per usec (lbytes_per_usec)                   : 0x7fff byte/usec

current rate width (cr_width)                           : 0xe bits

minimum quota period (min_quota)                        : 0x4

maximum quota period (max_quota)                        : 0x7

absolute maximum quota period(abs_max_quota)            : 0xff

64B transmitted in one rtt (l64B_per_rtt)               : 0xf460

minimum time between cnps (min_time_bet_cnp)            : 0x0 usec

initial congestion probability (init_cp)                : 0x3ff

target rate update mode (tr_update_mode)                : 1

target rate update cycle (tr_update_cyls)               : 0x0

fast recovery rtt (fr_num_rtts)                         : 0x5 rtts

active increase time quanta (ai_rate_incr)              : 0x1

reduc. relax rtt threshold (red_rel_rtts_th)            : 0x2 rtts

additional relax cr rtt (act_rel_cr_th)                 : 0x50 rtts

minimum current rate threshold (cr_min_th)              : 0x0

bandwidth weight (bw_avg_weight)                        : 0x5

actual current rate factor (act_cr_factor)              : 0x0

current rate level to max cp (max_cp_cr_th)             : 0x3ff

cp bias state (cp_bias_en)                              : Disabled

log of cr fraction added to cp (cp_bias)                : 0x3

cr threshold to reset cc (reset_cc_cr_th)               : 0x32a

target rate lower bound (tr_lb)                         : 0x1

current rate probability factor (cr_prob_fac)           : 0x3

target rate probability factor (tr_prob_fac)            : 0x5

current rate fairness threshold (fair_cr_th)            : 0x64

reduction divider (red_div)                             : 0x1

rate reduction threshold (cnp_ratio_th)                 : 0x0 cnps

extended no congestion rtts (exp_ai_rtts)               : 0x8 rtt

log of cp to cr ratio (exp_crcp_ratio)                  : 0x7

use lower rate table entries (rt_en)                    : Disabled

rtts to start cp track cr (cp_exp_update_th)            : 0x1a4 rtt

first threshold to rise ai (ai_rtt_th1)                 : 0x40 rtt

second threshold to rise ai (ai_rtt_th2)                : 0x80 rtt

actual rate base reduction threshold (cf_rtt_th)        : 0x15e rtt

first severe cong. cr threshold (sc_cr_th1)             : 0x0

second severe cong. cr threshold (sc_cr_th2)            : 0x0

cc ack bytes (cc_ack_bytes)                             : 0x44

reduce to init rtts threshold(reduce_cf_rtt_th)         : 0x3eb rtt

random no reduction of cr (random_no_red_en)            : Enabled

actual cr shift correction (actual_cr_shift_correction_en)              : Enabled

roce prio (roce_prio)                                   : 3

roce dscp (roce_dscp)                                   : 26

cnp prio (cnp_prio)                                     : 7
              cnp dscp (cnp_dscp)                                     : 0
使用 niccli 为 RDMA 配置 DCQN-ECN/PFC 和 TOS/DSCP 流量属性
您可以使用 NICCLI 配置实用程序对 DCQCN 和流量标记进行更改。
niccli是 Broadcom 以太网网络适配器的管理工具,可提供详细信息,包括类型、状态、序列号和固件版本。此外,它支持配置接口属性,如 DCQCN-ECN、PFC 和 TOS/DSCP,以优化 RDMA 流量。
root@MI300X-01:/$ which niccli

/usr/bin/niccli

root@MI300X-01:/usr/bin$ ls niccli -l

lrwxrwxrwx 1 18896 1381 18 Sep 25 18:52 niccli -> /opt/niccli/niccli
您可以使用以下示例所示获取可通过服务器 niccli listdev, or list-eth 上的 niccli 进行管理的接口适配器和以太网端口的摘要。
root@MI300X-01:/home/jnpr# niccli --listdev

1 ) Supermicro PCIe 400Gb Single port QSFP56-DD Ethernet Controller (Adp#1 Port#1)

     Device Interface Name     : gpu0_eth

     MAC Address               : 7C:C2:55:BD:75:D0

     PCI Address               : 0000:06:00.0

2 ) Supermicro PCIe 400Gb Single port QSFP56-DD Ethernet Controller (Adp#2 Port#1)

     Device Interface Name     : gpu1_eth

     MAC Address               : 7C:C2:55:BD:79:20

     PCI Address               : 0000:23:00.0

3 ) Supermicro PCIe 400Gb Single port QSFP56-DD Ethernet Controller (Adp#3 Port#1)

     Device Interface Name     : gpu2_eth

     MAC Address               : 7C:C2:55:BD:7D:F0

     PCI Address               : 0000:43:00.0

4 ) Supermicro PCIe 400Gb Single port QSFP56-DD Ethernet Controller (Adp#4 Port#1)

     Device Interface Name     : gpu3_eth

     MAC Address               : 7C:C2:55:BD:7E:20

     PCI Address               : 0000:66:00.0

5 ) Supermicro PCIe 400Gb Single port QSFP56-DD Ethernet Controller (Adp#5 Port#1)

     Device Interface Name     : gpu4_eth

     MAC Address               : 7C:C2:55:BD:75:10

     PCI Address               : 0000:86:00.0

6 ) Supermicro PCIe 400Gb Single port QSFP56-DD Ethernet Controller (Adp#6 Port#1)

     Device Interface Name     : gpu5_eth

     MAC Address               : 7C:C2:55:BD:7D:C0

     PCI Address               : 0000:A3:00.0

7 ) Supermicro PCIe 400Gb Single port QSFP56-DD Ethernet Controller (Adp#7 Port#1)

     Device Interface Name     : gpu6_eth

     MAC Address               : 7C:C2:55:BD:84:90

     PCI Address               : 0000:C3:00.0

8 ) Supermicro PCIe 400Gb Single port QSFP56-DD Ethernet Controller (Adp#8 Port#1)

     Device Interface Name     : gpu7_eth

     MAC Address               : 7C:C2:55:BD:83:10

     PCI Address               : 0000:E6:00.0

root@MI300X-01:/home/jnpr# niccli --list-eth

     BoardId      Interface       PCIAddr

  1) BCM57608     gpu0_eth        0000:06:00.0

  2) BCM57608     gpu1_eth        0000:23:00.0

  3) BCM57608     gpu2_eth        0000:43:00.0

  4) BCM57608     gpu3_eth        0000:66:00.0

  5) BCM57608     gpu4_eth        0000:86:00.0

  6) BCM57608     gpu5_eth        0000:A3:00.0

  7) BCM57608     gpu6_eth        0000:C3:00.0

  8) BCM57608     gpu7_eth        0000:E6:00.0
您可以在单行模式、交互模式或批处理模式下使用niccli。提供了niccli -h help这些模式的高级描述。在本节中,我们将展示一些示例,说明如何使用单线和交互模式进行 DCQCN-ECN、PFC 和 TOS/DSCP 配置。
root@MI300X-01:/sys/kernel/config/bnxt_re/bnxt_re0/ports/1/cc# niccli --help

-------------------------------------------------------------------------------

NIC CLI v231.2.63.0 - Broadcom Inc. (c) 2024 (Bld-94.52.34.117.16.0)

-------------------------------------------------------------------------------

NIC CLI - Help Option

--help / -h Displays the following help page.

Utility provides three modes of execution,

     1. Interactive Mode

         To launch in interactive mode :

             <NIC CLI executable> [-i <index of the target>] | -pci <NIC pci address>

         After launching in interactive mode, execute 'help' command to

         display the list of available commands.

     2. Oneline Mode

         To launch in Oneline mode :

             <NIC CLI executable> [-i <index of the target>] | -pci <NIC pci address> <command>

         To list available commands in Oneline mode :

             <NIC CLI executable> [-i <index of the target>] | -pci <NIC pci address> help

         Legacy Nic command syntax :

         To launch in Oneline mode :

             <NIC CLI executable> [-dev [<index of the target> | <mac addr> | <NIC pci address>]] <command>

         To list available commands in Oneline mode :

             <NIC CLI executable> [-dev [<index of the target> | <mac addr> | <NIC pci address>]] help

     3. Batch Mode

         To launch in batch mode :

             <NIC CLI executable> [-i <index of the target>] | -pci <NIC pci address> --batch <batch file>

         NOTE: Batch mode requires flat text file with utility supported commands.

         Commands have to be provided in ascii format with the valid parameters.

         Supported commands can be listed using One-Line mode or Interactive mode

         Upon failure of any commands, utility will exit without continuing with other commands

List available targets for Oneline or Batch mode

     <NIC CLI executable> --list

     <NIC CLI executable> --listdev
在没有选项的情况下进入允许您 niccli 在交互模式下工作,您可以在其中选择适配器/接口(按索引),然后选择适当的 <command> 适配器/接口(例如显示、get_qos、set_map)以获取信息或对所选界面进行更改。
您可以使用将 Broadcom 接口名称与逻辑接口名称进行映射 一节中所述的方法来识别与每个接口对应的接口索引。这将为您提供接口和 pcie 地址之间的映射,然后您可以将其与下面的输出 niccli 相关联。
确定后,输入接口索引(输出中的第一列),如以下示例所示。
示例:
root@MI300X-01:/sys/kernel/config/bnxt_re/bnxt_re0/ports/1/cc# niccli

-------------------------------------------------------------------------------

NIC CLI v231.2.63.0 - Broadcom Inc. (c) 2024 (Bld-94.52.34.117.16.0)

------------------------------------------------------------------------------

     BoardId     MAC Address        FwVersion    PCIAddr        Type   Mode

  1) BCM57608    7C:C2:55:BD:75:D0  230.2.49.0   0000:06:00.0   NIC    PCI

  2) BCM57608    7C:C2:55:BD:79:20  230.2.49.0   0000:23:00.0   NIC    PCI

  3) BCM57608    7C:C2:55:BD:7D:F0  230.2.49.0   0000:43:00.0   NIC    PCI

  4) BCM57608    7C:C2:55:BD:7E:20  230.2.49.0   0000:66:00.0   NIC    PCI

  5) BCM57608    7C:C2:55:BD:75:10  230.2.49.0   0000:86:00.0   NIC    PCI

  6) BCM57608    7C:C2:55:BD:7D:C0  230.2.49.0   0000:A3:00.0   NIC    PCI

  7) BCM57608    7C:C2:55:BD:84:90  230.2.49.0   0000:C3:00.0   NIC    PCI

  8) BCM57608    7C:C2:55:BD:83:10  230.2.49.0   0000:E6:00.0   NIC    PCI

Enter the target index to connect with : 1


BCM57608>


Once you are at the prompt for the selected NIC, you can enter commands such as show, device_health_check, listdev, and listeth)

BCM57608> show

NIC State                           : Up

Device Type                         : THOR2

PCI Vendor ID                       : 0x14E4

PCI Device ID                       : 0x1760

PCI Revision ID                     : 0x11

PCI Subsys Vendor ID                : 0x15D9

PCI Subsys Device ID                : 0x1D42

Device Interface Name               : gpu0_eth

MAC Address                         : 7C:C2:55:BD:75:D0

Base MAC Address                    : 7C:C2:55:BD:75:D0

Serial Number                       : OA248S074777

Part Number                         : AOC-S400G-B1C

PCI Address                         : 0000:06:00.0

Chip Number                         : BCM57608

Chip Name                           : THOR2

Description                         : Supermicro PCIe 400Gb Single port QSFP56-DD Ethernet Controller

---more---


BCM57608> devid

Device Interface Name               : gpu0_eth

PCI Vendor ID                       : 0x14E4

PCI Device ID                       : 0x1760

PCI Revision ID                     : 0x11

PCI Subsys Vendor ID                : 0x15D9

PCI Subsys Device ID                : 0x1D42

PCI Address                         : 0000:06:00.0

BCM57608> device_health_check

Device Health Information :

   SBI Mismatch Check               : OK

   SBI Booted Check                 : OK

   SRT Mismatch Check               : OK

   SRT Booted Check                 : OK

   CRT Mismatch Check               : OK

   CRT Booted Check                 : OK

   Second RT Image                  : CRT Image

   Second RT Image Redundancy       : Good

   Image Fastbooted Check           : OK

   Directory Header Booted Check    : OK

   Directory Header Mismatch Check  : OK

   MBR Corrupt Check                : OK

   NVM Configuration                : OK

   FRU Configuration                : OK

   ---------------------------------------------

   Overall Device Health            : Healthy

BCM57608> devid

Device Interface Name               : gpu0_eth

PCI Vendor ID                       : 0x14E4

PCI Device ID                       : 0x1760

PCI Revision ID                     : 0x11

PCI Subsys Vendor ID                : 0x15D9

PCI Subsys Device ID                : 0x1D42

PCI Address                         : 0000:06:00.0
niccli -i <interface-index>
<command>
niccli -list 命令可用于确定接口索引。
示例
root@MI300X-01:/sys/kernel/config/bnxt_re/bnxt_re0/ports/1/cc# niccli --list

-------------------------------------------------------------------------------

NIC CLI v231.2.63.0 - Broadcom Inc. (c) 2024 (Bld-94.52.34.117.16.0)

-------------------------------------------------------------------------------

     BoardId     MAC Address        FwVersion    PCIAddr        Type   Mode

  1) BCM57608    7C:C2:55:BD:75:D0  230.2.49.0   0000:06:00.0   NIC    PCI

  2) BCM57608    7C:C2:55:BD:79:20  230.2.49.0   0000:23:00.0   NIC    PCI

  3) BCM57608    7C:C2:55:BD:7D:F0  230.2.49.0   0000:43:00.0   NIC    PCI

  4) BCM57608    7C:C2:55:BD:7E:20  230.2.49.0   0000:66:00.0   NIC    PCI

  5) BCM57608    7C:C2:55:BD:75:10  230.2.49.0   0000:86:00.0   NIC    PCI

  6) BCM57608    7C:C2:55:BD:7D:C0  230.2.49.0   0000:A3:00.0   NIC    PCI

  7) BCM57608    7C:C2:55:BD:84:90  230.2.49.0   0000:C3:00.0   NIC    PCI

  8) BCM57608    7C:C2:55:BD:83:10  230.2.49.0   0000:E6:00.0   NIC    PCI
提供了 sudo niccli help 可用于交互式和单行模式的命令和选项的广泛列表。
root@MI300X-01:/home/jnpr# sudo niccli help

-------------------------------------------------------------------------------

NIC CLI v231.2.63.0 - Broadcom Inc. (c) 2024 (Bld-94.52.34.117.16.0)

-------------------------------------------------------------------------------

Commands sets - Generic/Offline

-------------------------------------------------------------------------------

list                      - Lists all the compatible devices

listdev                   - Lists all the compatible devices (NIC legacy syntax)

devid                     - Query Broadcom device id's.

pkgver                    - Display FW PKG version installed on the device.

verify                    - Verify FW packages & NVM

nvm-list                  - Display NVM components and its associated versions.

nvmview                   - View NVM directories data

list-eth                  - Lists all NIC devices with ethernet interface names

help                      - Lists the available commands

quit                      - Quits from the application

Commands for platform 'BCM57xxx Performance NIC' and interface 'Direct PCIe'

-------------------------------------------------------------------------------

show                      - Shows NIC specific device information

coredump                  - Retrieves coredump data from device.

snapdump                  - Retrieves snapdump data from device.

version                   - Display the current version of the application

txfir                     - Network Interface Card Transmission Finite

                          - Impulse Response

msixmv                    - Display and configure the number of MSIX max

                          - vectors values for VF's per each PF

scan                      - Scan PCI devices in the topology

pcie                      - Show/Execute pcie operation

nvm                       - NVRAM Option Management

pfalloc                   - Configure and Query for the number of PFs per PCIe

                          - endpoint

rfd                       - Restores NVM configuration to factory defaults

backuppowercfg            - Backup Power Configuration

tsio                      - TSIO function capability on the pin

ingressqos                - Query and configure the ingressqos parameters

egressqos                 - Query and configure the egressqos parameters

dutycycle                 - Set duty cycle on TSIO outgoing signal

dllsource                 - Set the DLL source for PHC

vf                        - Configure and Query for a trusted VF

rxportrlmt                - Configure the receive side port rate limit

rxrlmt                    - Query the configured receive side rate control parameters

rxeprlmt                  - Configure the receive side rate control parameters for a given endpoint

txpartitionrlmt           - Query and Configure the transmit side partition rate limit applies to traffic

                          - sent from a partition, which is one PF and all of its child VFs

txportrlmt                - Query and Configure the transmit side of port rate limit

txeprlmt                  - Query and Configure the PCIe endpoint transmit rate control

vf                        - Configure and Query for a trusted VF

pfc                       - Configure the priority-based flow control for a given priority

apptlv                    - Configure the priority for the AppTLV

tcrlmt                    - Configure the rate limit for each traffic class

ets                       - Configure the enhanced transmission selection, priority to traffic class and bandwidths

up2tc                     - Configure the user priorities to traffic classes

getqos                    - Query the configured enhanced transmission selection, priority to traffic class and bandwidths

listmap                   - List the priority to traffic class and queueid mapping

dscp2prio                 - Query the dscp to priority mapping

reset                     - Reset the device

synce                     - Configure the synchronous ethernet profile

dscdump                   - Retrieves dscdump for device

ptp                       - PTP extended parameters operation

prbs_test                 - Run PRBS loopback test

serdes                    - Plots the serdes pci and ethernet eye and prints the horizontal and vertical margin values


Legacy NVM commands :     - Query commands

---------------------     - ---------------

device_info               - Query Broadcom device information and default hardware

                          - resources profile version.

device_temperature        - Query the device temperature in Celsius.

get_backup_power_config   - Query backup power configuration of the device.

moduleinfo                - Query the PHY module information.

nvm_measurement           - Query the active NVM configuration.

get_ptp_extended          - Query the PTP extended parameters.

getoption                 - Query current NVM configuration option settings

                          - of a device.

pcie_counters             - Display the pcie counters.

saveoptions               - Save NVM configuration options on the device

                          - to a file.

get_sync_ethernet         - Get the synchronous ethernet frequency profile

get_txfir                 - Query the TX FIR settings.

cert_provision_state      - Query the imported certificate chain on the device.

read                      - Read the NVM item data and write its contents to a file.

mh_pf_alloc               - Query the number of PFs per PCIe endpoint.

                          - This command is supported only on Thor devices.

get_tsio_function_pin     - Query TSIO function capability on the pin.


Legacy NVM commands :     - Debug commands

---------------------     - ---------------

device_health_check       - Checks the device health.

backup                    - Backup NVM contents to a file


Legacy NVM commands :     - Configuration commands

---------------------     - ---------------

reset_ap                  - Reset management processor.

setoption                 - Configure NVM configuration option settings

                          -  of a device.

msix_max_vectors          - Configure the number of MSI-X max vectors per

                          - VF for each PF.

loopback                  - Query/perform loopback config.

add_ntuple_filter         - Add ntuple flow filter.

free_ntuple_filter        - Free ntuple flow filter.

cfgtunnel                 - query/config custom tunnel port/rss.

write                     - Create or overwrite NVM data item with a file.

set_txfir                 - Configures the TX FIR settings

set_ptp_extended          - Set PTP extended parameters

mh_pf_alloc               - Query/Configure the number of PFs per PCIe endpoint.

                          - This command is supported only on Thor devices.

restore_factory_defaults  - Restores NVM configuration to factory defaults

resmgmt                   - Query and Configure resources of the device.


Legacy NVM commands :     - FW update commands

---------------------     - ---------------

fw_sync                   - Synchronize primary & secondary FW images

livepatch                 - Query, Activate and Deactivate the patch in live

install                   - Install/Update FW


Legacy QoS Rx commands :  - Rx Qos commands

---------------------     - ---------------

rx_port_ratelimit         - The user can configure rx rate control that applies to all traffic in a rx CoS queue group.

rx_endpoint_ratelimit     - The user can configure endpoint rx rate control that applies to all traffic in a rx CoS queue group.

get_rx_ratelimits         - The user can query the rx rate limits.


Legacy QoS Tx commands :  - Tx Qos commands

---------------------     - ---------------

partition_tx_ratelimit    - This command is used to configure partition tx rate limit.

get_partition_tx_ratelimit - This command is used to query the partition rate limit configuration for a given partition.

get_tx_port_ratelimit     - This command is used to query the tx side of port rate limit.

tx_port_ratelimit         - This command is used to configure the tx side of port rate limit

tx_endpoint_ratelimit     - This command is used to configure PCIe endpoint tx rate limit.

get_tx_endpoint_ratelimits - This command is used to query the tx endpoint rate limits.


Legacy DCB commands :     - Data Center Bridging commands

---------------------     - ---------------

set_pfc                   - This command is used to enable PFC on a given priority

set_apptlv                - This command is used to configure the priority of the AppTLV.

ratelimit                 - This command is used to configure the rate limit for each traffic class.

set_ets                   - This command is used to configure the DCB parameters.

set_map                   - This command is used to configure the priority to traffic class.

get_qos                   - This command is used to query the DCB parameters.

dump                      - This command is used to dump the priority to cos mapping.

get_dscp2prio             - This command is used to query the dscp to priority mapping.
以下示例说明如何使用 niccli 来获取有关特定接口的信息。
- 检查接口状态。
提供
niccli -i <interface> show有关接口的详细信息,例如类型、MAC 地址、固件、序列号、设备运行状况、温度等。示例:
root@MI300X-01:/sys/kernel/config/bnxt_re/bnxt_re0/ports/1/cc# sudo niccli -i 1 show

-------------------------------------------------------------------------------

NIC CLI v231.2.63.0 - Broadcom Inc. (c) 2024 (Bld-94.52.34.117.16.0)

-------------------------------------------------------------------------------

NIC State                           : Up

Device Type                         : THOR2

PCI Vendor ID                       : 0x14E4

PCI Device ID                       : 0x1760

PCI Revision ID                     : 0x11

PCI Subsys Vendor ID                : 0x15D9

PCI Subsys Device ID                : 0x1D42

Device Interface Name               : gpu0_eth

MAC Address                         : 7C:C2:55:BD:75:D0

Base MAC Address                    : 7C:C2:55:BD:75:D0

Serial Number                       : OA248S074777

Part Number                         : AOC-S400G-B1C

PCI Address                         : 0000:06:00.0

Chip Number                         : BCM57608

Chip Name                           : THOR2

Description                         : Supermicro PCIe 400Gb Single port QSFP56-DD Ethernet Controller

Firmware Name                       : PRIMATE_FW

Firmware Version                    : 230.2.49.0

RoCE Firmware Version               : 230.2.49.0

HWRM Interface Spec                 : 1.10.3

Kong mailbox channel                : Not Applicable

Active Package Version              : 230.2.52.0

Package Version on NVM              : 230.2.52.0

Active NVM config version           : 0.0.5

NVM config version                  : 0.0.5

Reboot Required                     : No

Firmware Reset Counter              : 0

Error Recovery Counter              : 0

Crash Dump Timestamp                : Not Available

Secure Boot                         : Enabled

Secure Firmware Update              : Enabled

FW Image Status                     : Operational

Crash Dump Available in DDR         : No

Device Temperature                  : 57 Celsius

PHY Temperature                     : Not Available

Optical Module Temperature          : 65 Celsius

Device Health                       : Good
- 检查 QoS 设置
sudo niccli -i <interface-index> dscp2prio和sudo niccli -i 1 listmap -pri2cos命令显示 DSCP 和优先级值之间,以及优先级值、流量类 (TC) 和输出队列之间的映射。
root@MI300X-01:/home/jnpr# sudo niccli -i 1 dscp2prio

-------------------------------------------------------------------------------

NIC CLI v231.2.63.0 - Broadcom Inc. (c) 2024 (Bld-94.52.34.117.16.0)

-------------------------------------------------------------------------------

dscp2prio mapping:

          priority:7  dscp: 48

          priority:3  dscp: 26

root@MI300X-01:/home/jnpr# sudo niccli -i 2 listmap -pri2cos

-------------------------------------------------------------------------------

NIC CLI v231.2.63.0 - Broadcom Inc. (c) 2024 (Bld-94.52.34.117.16.0)

-------------------------------------------------------------------------------

Base Queue is 0 for port 0

----------------------------

Priority   TC   Queue ID

------------------------

 0         0    4

 1         0    4

 2         0    4

 3         1    0

 4         0    4

 5         0    4

 6         0    4

 7         2    5
示例中的输出显示以下默认设置:
- 队列状态。仅启用队列 0、1 和 2。
- 优先级到 DSCP 的映射:优先级 7 = > DSCP 48 和优先级 3 => DSCP 26。
- TC(流量类)和队列映射的优先级:优先级 7 => TC2(队列 0)=> DSCP 48 和优先级 3 => TC1(队列 5)=> DSCP 26。
该 sudo niccli -i <interface-index> get_qos 命令提供接口上 QoS 配置的摘要。
示例:
root@MI300X-01:/sys/kernel/config/bnxt_re/bnxt_re0/ports/1/cc# sudo niccli -i 1 get_qos

-------------------------------------------------------------------------------

NIC CLI v231.2.63.0 - Broadcom Inc. (c) 2024 (Bld-94.52.34.117.16.0)

-------------------------------------------------------------------------------

IEEE 8021QAZ ETS Configuration TLV:

         PRIO_MAP: 0:0 1:0 2:0 3:1 4:0 5:0 6:0 7:2

         TC Bandwidth: 50% 50% 0%

         TSA_MAP: 0:ets 1:ets 2:strict

IEEE 8021QAZ PFC TLV:

         PFC enabled: 3

IEEE 8021QAZ APP TLV:

         APP#0:

          Priority: 7

          Sel: 5

          DSCP: 48

         APP#1:

          Priority: 3

          Sel: 5

          DSCP: 26

         APP#2:

          Priority: 3

          Sel: 3

          UDP or DCCP: 4791

TC Rate Limit: 100% 100% 100% 0% 0% 0% 0% 0%
| IEEE 802.1Qaz ETS 配置 TLV:显示增强型传输选择 (ETS) 配置 | |
|---|---|
| PRIO_MAP:0:0 1:0 2:0 3:1 4:0 5:0 6:0 7:2 | 将优先级映射到流量类 (TC) 优先级 0、1、2、4、5、6 → TC 0 优先级 3 → TC 1 优先级 7 → TC 2 |
| TC 带宽:50% 50% 0% | 为流量类别分配带宽百分比。 TC 0:占总带宽的 50%。 TC 1:50%。 TC 2:0%。 |
| TSA_MAP:0:ets 1:ets 2:严格 | TSA_MAP 与 TC Bandwidth 一起为每个 TC 分配资源并定义服务优先级。相当于 Junos 中的调度器和调度器映射。 指定用于每个 TC 的传输选择算法 (TSA): TC 0 和 TC 1 使用 ETS(增强型传输选择) 并按 50/50 共享可用带宽 TC 2 使用严格优先级,这意味着 TC 2 流量将始终首先发送 |
| IEEE 802.1Qaz PFC TLV:使用 APP TLV(类型-长度-值)格式定义流量分类 | |
| 启用 PFC:3 | 指示在优先级 3 上启用 PFC。 其他优先级未启用 PFC。 PFC 可确保具有此优先级的流量可以暂停,而不是在拥塞期间被丢弃。 |
| IEEE 802.1Qaz APP TLV | |
| 应用#0: 优先级:7 选:5 DSCP:48 应用#1: 优先级:3 选:5 DSCP:26 应用#2: 优先级:3 选:3 UDP 或 DCCP:4791 |
将流量映射到流量类。等效于 Junos 中的多域分类器。 APP#0:标有 DSCP = 48 的流量映射到优先级 7 APP#1:标记为 DSCP = 48 的流量映射到优先级 3 APP#2:端口 = 4791 (RoCEv2) 的 UDP 或 DCCP 流量映射到优先级 3 |
| TC 速率限制:100% 100% 100% 0% 0% 0% 0% 0% | TC 0、TC 1 和 TC 2 最多可使用 100% 的带宽。 TC 3 到 TC 7 设置为 0%,表示当前未将其配置为传输流量。 |
如果需要,将优先级更改为流量类别映射或将应用更改为流量类别映射。
我们建议保留默认设置,并确保它们与 GPU 后端交换矩阵中叶节点上的服务等级配置一致。
[edit class-of-service classifiers]

jnpr@gpu-backend-rack1-001-leaf1# show

dscp mydscp {

    forwarding-class CNP {

        loss-priority low code-points 110000;  <= DSCP = 48

    }

    forwarding-class NO-LOSS {

        loss-priority low code-points 011010;  <= DSCP = 26

    }

 }

}

[edit class-of-service forwarding-classes]

jnpr@gpu-backend-rack1-001-leaf1# show

class CNP queue-num 3;

class NO-LOSS queue-num 4 no-loss pfc-priority 3;
如果需要更改流量类映射的优先级或流量类映射的应用程序,可以使用以下命令:
优先级到流量类映射
BCM57608> help up2tc

   DESCRIPTION :

     This command is used to set the user priorities to traffic classes.

   SYNTAX :

     up2tc      -p <priority[0-7]:tc>, ...>


-p: Comma separated list mapping user priorities to traffic classes.
示例:
BCM57608> sudo niccli -i 1 get_qos

-------------------------------------------------------------------------------

NIC CLI v231.2.63.0 - Broadcom Inc. (c) 2024 (Bld-94.52.34.117.16.0)

-------------------------------------------------------------------------------

IEEE 8021QAZ ETS Configuration TLV:

PRIO_MAP: 0:1 1:1 2:0 3:0 4:1 5:1 6:0 7:0   <= default

---more---

     BCM57608> up2tc -p 0:0,1:0,2:1,3:1,4:1,5:1,6:1,7:0

User priority to traffic classes are configured successfully.

BCM57608> sudo niccli -i 1 get_qos

-------------------------------------------------------------------------------

NIC CLI v231.2.63.0 - Broadcom Inc. (c) 2024 (Bld-94.52.34.117.16.0)

-------------------------------------------------------------------------------

IEEE 8021QAZ ETS Configuration TLV:

PRIO_MAP: 0:0 1:0 2:1 3:1 4:1 5:1 6:1 7:0

---more---
应用到流量类别的映射
BCM57608> help apptlv

   DESCRIPTION :

     This command is used to configure the priority of the AppTLV

   SYNTAX :

     apptlv -add -app <priority,selector,protocol>

     apptlv -del -app <priority,selector,protocol>
示例:
BCM57608> sudo niccli -i 1 get_qos

---more---

IEEE 8021QAZ APP TLV:

         APP#1:

          Priority: 7

          Sel: 5

          DSCP: 48


         APP#2:

          Priority: 3

          Sel: 5

          DSCP: 26


         APP#3:

          Priority: 3

          Sel: 3

          UDP or DCCP: 4791

BCM57608> apptlv -add -app 5,1,35093

AppTLV configured successfully.

BCM57608> sudo niccli -i 1 get_qos

---more---

IEEE 8021QAZ APP TLV:

         APP#0:

          Priority: 5

          Sel: 1

          Ethertype: 0x8915


         APP#1:

          Priority: 7

          Sel: 5

          DSCP: 48


         APP#2:

          Priority: 3

          Sel: 5

          DSCP: 26


         APP#3:

          Priority: 3

          Sel: 3

          UDP or DCCP: 4791

BCM57608> BCM57608> apptlv -del -app 5,1,35093

AppTLV deleted successfully.

BCM57608> sudo niccli -i 1 get_qos

---more---

IEEE 8021QAZ APP TLV:

         APP#0:

          Priority: 7

          Sel: 5

          DSCP: 48


         APP#1:

          Priority: 3

          Sel: 5

          DSCP: 26


         APP#2:

          Priority: 3

          Sel: 3

          UDP or DCCP: 4791

---more---
如果需要,更改 ETS 配置属性
我们建议保留默认设置,并确保它们与 GPU 后端交换矩阵中叶节点上的服务等级配置一致。
[edit class-of-service forwarding-classes]

jnpr@gpu-backend-rack1-001-leaf1# show

class CNP queue-num 3;

class NO-LOSS queue-num 4 no-loss pfc-priority 3;

BCM57608> help ets

   DESCRIPTION :

     This command is used to configure the enhanced transmission selection,

     priority to traffic class and traffic class bandwidths.

   SYNTAX :

     ets -tsa <tc[0-7]:[ets|strict], ...> -up2tc <priority[0-7]:tc>, ...> -tcbw <list>


        -tsa:   Transmission selection algorithm, sets a comma separated list of traffic classes to

        the corresponding selection algorithm. Valid algorithms include "ets" and "strict".

         -up2tc:        Comma separated list mapping user priorities to traffic classes.

         -tcbw: Comma separated list of bandwidths for each traffic class the first value

        being assigned to traffic class 0 and the second to traffic class 1 and so on.
示例:
BCM57608> sudo niccli -i 1 get_qos

NIC CLI v231.2.63.0 - Broadcom Inc. (c) 2024 (Bld-94.52.34.117.16.0)

-------------------------------------------------------------------------------

IEEE 8021QAZ ETS Configuration TLV:

         PRIO_MAP: 0:1 1:1 2:0 3:0 4:1 5:1 6:0 7:0

         TC Bandwidth: 50% 50% 0%

         TSA_MAP: 0:ets 1:ets 2:strict

IEEE 8021QAZ PFC TLV:

         PFC enabled: 3

---more---

BCM57608> ets -tsa 0:ets,1:ets,2:ets -up2tc 0:0,1:0,2:0,3:0,4:0,5:1,6:0,7:0 -tcbw 50,25,25

Enhanced transmission selection (ets) configured successfully.

BCM57608> sudo niccli -i 1 get_qos

NIC CLI v231.2.63.0 - Broadcom Inc. (c) 2024 (Bld-94.52.34.117.16.0)

-------------------------------------------------------------------------------

IEEE 8021QAZ ETS Configuration TLV:

         PRIO_MAP: 0:0 1:0 2:0 3:0 4:0 5:1 6:0 7:0

         TC Bandwidth: 50% 25% 25%

         TSA_MAP: 0:ets 1:ets 2:ets
如果需要,配置 PFC
BCM57608> help pfc

   DESCRIPTION :

     This command is used to enable priority-based flow control on a given priority.

   SYNTAX :

     pfc -enable <pfc list>

     The valid range is from 0 to 7. Where list is a comma-separated value for each pfc.

     To disable the pfc, user needs to provide a value of 0xFF.
示例:
BCM57608> sudo niccli -i 1 get_qos

---more---

IEEE 8021QAZ PFC TLV:

         PFC enabled: 3         <= default; PFC enabled for priority 3

---more---

BCM57608> pfc -enable 0xFF   <= disables pfc on all priorities.

pfc configured successfully.

BCM57608> sudo niccli -i 1 get_qos

---more---

IEEE 8021QAZ PFC TLV:

         PFC enabled: none      <= pfc disabled on all priorities.

---more---

BCM57608> pfc -enable 5

pfc configured successfully.

BCM57608> sudo niccli -i 1 get_qos

---more---

IEEE 8021QAZ PFC TLV:

         PFC enabled: 5         <= PFC enabled for priority 5

---more---
以下命令尝试在优先级 5 和 6 上启用 PFC,并演示只能将一个队列(一个优先级)配置为无损队列(支持 PFC)。
BCM57608> pfc -enable 5,6

ERROR: Hardware doesn't support more than 1 lossless queues to configure pfc.

ERROR: Failed to enable pfc.
使用 bnxt_setupcc.sh 配置 DCQCN 和 RoCE 流量标记值
使用 bnxt_setupcc.sh 可以简化流程的实用程序。
该 bnxt_setupcc.sh 实用程序可以简化启用或禁用 ECN 和 PFC,以及更改给定接口的 ROCE 和 CNP 数据包的 DSCP 和 PRIO 值。
在幕后,它使用 niccli (默认)或 lldptool 可以作为命令的一部分选择。
您需要按照 bnxt_setupcc.sh 帮助菜单中的说明输入,然后输入您选择的选项:
root@MI300X-01:/sys/kernel/config/bnxt_re/bnxt_re0/ports/1/cc# bnxt_setupcc.sh

Usage: bnxt_setupcc.sh [OPTION]...

  -d          RoCE Device Name (e.g. bnxt_re0, bnxt_re_bond0)

  -i          Ethernet Interface Name (e.g. p1p1 or for bond, specify slave interfaces like -i p6p1 -i p6p2)

  -m [1-3]    1 - PFC only

              2 - CC only

              3 - PFC + CC mode

  -v          1 - Enable priority vlan

  -r [0-7]    RoCE Packet Priority

  -s VALUE    RoCE Packet DSCP Value

  -c [0-7]    RoCE CNP Packet Priority

  -p VALUE    RoCE CNP Packet DSCP Value

  -b VALUE    RoCE Bandwidth percentage for ETS configuration - Default is 50%

  -t [2]      Default mode (Only RoCE v2 is supported - Input Ignored)

  -C VALUE    Set CNP Service Type

  -u [1-3]    Utility to configure QoS settings

              1 - Use bnxtqos utility. Will disable lldptool if enabled. (default)

              2 - Use lldptool

              3 - Use Broadcom niccli utility. Will disable lldptool if enabled.

  -h          display help
示例:
接口 gpu0 (bnxt_re0) 的 CNP 数据包的默认 DSCP 标记为 0,如下输出所示:
root@MI300X-01:/sys/kernel/config/bnxt_re/bnxt_re0/ports/1/cc# cat apply | grep cnp

ecn status (cnp_ecn)                                    : Enabled

cnp header ecn status (cnp_ecn)                         : ECT(1)

minimum time between cnps (min_time_bet_cnp)            : 0x0 usec

rate reduction threshold (cnp_ratio_th)                 : 0x0 cnps

cnp prio (cnp_prio)                                     : 7

cnp dscp (cnp_dscp)                                     : 0

root@MI300X-01:/sys/kernel/config/bnxt_re/bnxt_re0/ports/1/cc# cat apply | grep cc

congestion control mode (cc_mode)                       : DCQCN-P

cr threshold to reset cc (reset_cc_cr_th)               : 0x32a

cc ack bytes (cc_ack_bytes)                             : 0x44

root@MI300X-01:/sys/kernel/config/bnxt_re/bnxt_re0/ports/1/cc# cat cnp_prio

0x7

root@MI300X-01:/sys/kernel/config/bnxt_re/bnxt_re0/ports/1/cc# cat cnp_dscp

0x0
bnxt_setupcc.sh可用于将其更改为交换矩阵 (48) 的预期值,如下所示:
root@MI300X-01:/sys/kernel/config/bnxt_re/bnxt_re0/ports/1/cc#

bnxt_setupcc.sh -d bnxt_re0 -i gpu0_eth -u 3 -p 48 -c 6 -s 26 -r 5 -m 3

ENABLE_PFC = 1 ENABLE_CC = 1

ENABLE_DSCP = 1 ENABLE_DSCP_BASED_PFC = 1

L2 50 RoCE 50

Using Ethernet interface gpu0_eth   and RoCE interface bnxt_re0

Setting pfc/ets 0000:06:00.0

---more---

AppTLV configured successfully.
地点:
- -u 3:使用 Broadcom niccli 实用程序
- -p 48:将 CNP 数据包的 DSCP 值设置为 48 (0x30)
- -c:将 CNP 数据包的优先级配置为 6
- -s:将常规 RoCE 数据包的 DSCP 值定义为 26 (0x1a)
- -r:将常规 RoCE 数据包的优先级设置为 5
- -m 3:配置 PFC 和拥塞控制 (ECN)。
通过以下方法验证结果:
root@MI300X-01:/sys/kernel/config/bnxt_re/bnxt_re0/ports/1/cc# cat apply | grep cnp

ecn status (cnp_ecn)                                    : Enabled

cnp header ecn status (cnp_ecn)                         : ECT(1)

minimum time between cnps (min_time_bet_cnp)            : 0x0 usec

rate reduction threshold (cnp_ratio_th)                 : 0x0 cnps

cnp prio (cnp_prio)                                     : 6

cnp dscp (cnp_dscp)                                     : 48

root@MI300X-01:/sys/kernel/config/bnxt_re/bnxt_re0/ports/1/cc# cat apply | grep roce

roce prio (roce_prio)                                   : 5

roce dscp (roce_dscp)                                   : 26

root@MI300X-01:/sys/kernel/config/bnxt_re/bnxt_re0/ports/1/cc# cat cnp_prio

0x6

root@MI300X-01:/sys/kernel/config/bnxt_re/bnxt_re0/ports/1/cc# cat cnp_dscp

0x30    <= 48 is HEX

root@MI300X-01:/sys/kernel/config/bnxt_re/bnxt_re0/ports/1/cc# cat roce_dscp

0x1a    <= 26 is HEX

root@MI300X-01:/sys/kernel/config/bnxt_re/bnxt_re0/ports/1/cc# cat roce_prio

0x5
bnxt_setupcc.sh需要确保已安装和可执行,还需要确保至少安装了一个工具(
niccli
lldptool或 )。
以下示例显示了 和 niccli 已bnxt_setupcc.sh安装,但lldptool未安装。它还显示了安装和使用 lldptool.
root@MI300X-01:/# which bnxt_setupcc.sh

/usr/local/bin/bnxt_setupcc.sh

root@MI300X-01:/usr/local/bin# ls bnxt_setupcc.sh -l

-rwxr-xr-x 1 root root 14761 Jan 17 18:06 bnxt_setupcc.sh

root@MI300X-01:/$ which niccli

/usr/bin/niccli

root@MI300X-01:/usr/bin$ ls niccli -l

lrwxrwxrwx 1 18896 1381 18 Sep 25 18:52 niccli -> /opt/niccli/niccli

root@MI300X-01:/opt/niccli$ ls niccli -l

-rwxr-xr-x 1 18896 1381 609 Sep 25 18:52 niccli

root@MI300X-01:/$ which lldptool
用于 lldptool 检查或修改 LLDP(链路层发现协议)设置。要启用 LLDP,您需要安装 lldpad, 它也会自动安装 lldptool 。
要安装 lldpad 并 lldptool 执行以下步骤:
- 安装所需的依赖项。
在安装 lldpad 之前,请确保通过运行以下命令安装必要的库:
sudo apt install libconfig9 libnl-3-200- libconfig9 – 配置文件处理库。
- libnl-3-200 – 用于与 Linux Netlink 接互的库。
- 安装 lldpad。
通过运行以下命令安装 lldpad:
sudo apt install lldpad
此软件包可在系统上启用 LLDP,使其能够与其他设备交换网络拓扑信息。
- 启用 lldpad。
使用 systemctl 启用 lldp:
sudo systemctl enable lldpad
这会创建一个 systemd 服务,确保 lldpad 在重新启动后始终运行。
- 启动 lldpad 服务
使用 systemctl 激活 lldp:
sudo systemctl start lldpad
这会立即激活 lldpad,使其能够处理 LLDP 数据包。
注意:要手动重新启动 lldpad,请使用:sudo systemctl restart lldpad要禁用 lldpad 在启动时启动,请使用:sudo systemctl disable lldpad - 验证安装
使用 systemctl 检查服务状态
user@MI300X-01:/etc/apt$ sudo systemctl status lldpad

● lldpad.service - Link Layer Discovery Protocol Agent Daemon.

     Loaded: loaded (/usr/lib/systemd/system/lldpad.service; enabled; preset: enabled)

     Active: active (running) since Fri 2025-02-14 00:16:40 UTC; 2min 2s ago

TriggeredBy: ● lldpad.socket

       Docs: man:lldpad(8)

   Main PID: 695860 (lldpad)

      Tasks: 1 (limit: 629145)

     Memory: 1.3M (peak: 2.0M)

        CPU: 510ms

     CGroup: /system.slice/lldpad.service

             └─695860 /usr/sbin/lldpad -t

Feb 14 00:16:40 MI300X-01 systemd[1]: Started lldpad.service - Link Layer Discovery Protocol Agent Daemon..
这可确保工具已安装并可供使用。如果一切正常,您应该会看到“活动(正在运行)”状态。
您可以使用 lldptool 在接口上启用或禁用 LLDP,并检查 LLDP 状态和在该接口上发现的邻接方。lldptool -h 向您显示所有不同的选项:
user@MI300X-01:/etc/apt$ lldptool -h

Usage:

  lldptool <command> [options] [arg]   general command line usage format

  lldptool                             go into interactive mode

           <command> [options] [arg]   general interactive command format

Options:

  -i [ifname]                          network interface

  -V [tlvid]                           TLV identifier

                                       may be numeric or keyword (see below)

  -c <argument list>                   used with get TLV command to specify

                                       that the list of configuration elements

                                       should be retrieved

  -d                                   use to delete specified argument from

                                       the configuration.  (Currently

                                       implemented for DCBX App TLV settings)

  -n                                   "neighbor" option for command

  -r                                   show raw message

  -R                                   show only raw messages

  -g                                    destination agent (may be one of):

                                                - nearestbridge (nb) (default)

                                                - nearestcustomerbridge (ncb)

                                                - nearestnontpmrbridge (nntpmrb)

Commands:

  license                              show license information

  -h|help                              show command usage information

  -v|version                           show version

  -p|ping                              ping lldpad and query pid of lldpad

  -q|quit                              exit lldptool (interactive mode)

  -S|stats                             get LLDP statistics for ifname

  -t|get-tlv                           get TLVs from ifname

  -T|set-tlv                           set arg for tlvid to value

  -l|get-lldp                          get the LLDP parameters for ifname

  -L|set-lldp                          set the LLDP parameter for ifname

TLV identifiers:

   chassisID    : Chassis ID TLV

   portID       : Port ID TLV

   TTL          : Time to Live TLV

   portDesc     : Port Description TLV

   sysName      : System Name TLV

   sysDesc      : System Description TLV

   sysCap       : System Capabilities TLV

   mngAddr      : Management Address TLV

   macPhyCfg    : MAC/PHY Configuration Status TLV

   powerMdi     : Power via MDI TLV

   linkAgg      : Link Aggregation TLV

   MTU          : Maximum Frame Size TLV

   LLDP-MED     : LLDP-MED Settings

   medCap       : LLDP-MED Capabilities TLV

   medPolicy    : LLDP-MED Network Policy TLV

   medLoc       : LLDP-MED Location TLV

   medPower     : LLDP-MED Extended Power-via-MDI TLV

   medHwRev     : LLDP-MED Hardware Revision TLV

   medFwRev     : LLDP-MED Firmware Revision TLV

   medSwRev     : LLDP-MED Software Revision TLV

   medSerNum    : LLDP-MED Serial Number TLV

   medManuf     : LLDP-MED Manufacturer Name TLV

   medModel     : LLDP-MED Model Name TLV

   medAssetID   : LLDP-MED Asset ID TLV

   CIN-DCBX     : CIN DCBX TLV

   CEE-DCBX     : CEE DCBX TLV

   evb          : EVB Configuration TLV

   evbcfg       : EVB draft 0.2 Configuration TLV

   vdp          : VDP draft 0.2 protocol configuration

   IEEE-DCBX    : IEEE-DCBX Settings

   ETS-CFG      : IEEE 8021QAZ ETS Configuration TLV

   ETS-REC      : IEEE 8021QAZ ETS Recommendation TLV

   PFC          : IEEE 8021QAZ PFC TLV

   APP          : IEEE 8021QAZ APP TLV

   PVID         : Port VLAN ID TLV

   PPVID        : Port and Protocol VLAN ID TLV

   vlanName     : VLAN Name TLV

   ProtoID      : Protocol Identity TLV

   vidUsage     : VID Usage Digest TLV

   mgmtVID      : Management VID TLV

   linkAggr     : Link Aggregation TLV

   uPoE         : Cisco 4-wire Power-via-MDI TLV

user@MI300X-01:/etc/apt$ sudo lldptool -S -i gpu0_eth

Total Frames Transmitted        = 0

Total Discarded Frames Received = 0

Total Error Frames Received     = 0

Total Frames Received           = 92

Total Discarded TLVs            = 0

Total Unrecognized TLVs         = 8

Total Ageouts                   = 0

user@MI300X-01:/etc/apt$ sudo lldptool -L -i gpu0_eth AMDinStatus=rxtx

AMDinStatus = rxtx

user@MI300X-01:/etc/apt$ sudo lldptool -S -i gpu0_eth

Total Frames Transmitted        = 5

Total Discarded Frames Received = 0

Total Error Frames Received     = 0

Total Frames Received           = 94

Total Discarded TLVs            = 0

Total Unrecognized TLVs         = 8

Total Ageouts                   = 0

user@MI300X-01:/etc/apt$ sudo lldptool -t -i gpu0_eth

Chassis ID TLV

        MAC: 7c:c2:55:bd:75:d0

Port ID TLV

        MAC: 7c:c2:55:bd:75:d0

Time to Live TLV

        120

IEEE 8021QAZ ETS Configuration TLV

         Willing: yes

         CBS: not supported

         MAX_TCS: 3

         PRIO_MAP: 0:0 1:0 2:0 3:0 4:0 5:0 6:0 7:0

         TC Bandwidth: 0% 0% 0% 0% 0% 0% 0% 0%

         TSA_MAP: 0:strict 1:strict 2:strict 3:strict 4:strict 5:strict 6:strict 7:strict

IEEE 8021QAZ PFC TLV

         Willing: yes

         MACsec Bypass Capable: no

         PFC capable traffic classes: 1

         PFC enabled: none

End of LLDPDU TLV
有关更多详细信息,请查看 Broadcom 以太网网络适配器用户指南的手动安装和配置软件部分或安装 NICCLI 配置实用程序。
监控接口和 ECN/PFC 操作:
获得特定 GPU 的 Broadcom 名称后(如本部分开头所述),您就可以找到接口操作状态以及 RoCE 流量和拥塞控制统计信息所在的目录。
- 导航到相应的目录
/sys/class/infiniband/<Broadcom-interface-name>
示例:
对于gpu0_eth:
root@MI300X-01:/home/jnpr/SCRIPTS# cd /sys/class/infiniband/bnxt_re3

root@MI300X-01:/sys/class/infiniband/bnxt_re3# ls

device  fw_ver  hca_type        hw_rev  node_desc

node_guid       node_type ports power subsystem sys_image_guid  uevent

root@MI300X-01:/sys/class/infiniband/bnxt_re3# ls device/net/gpu3_eth/

addr_assign_type        address addr_len        broadcast       carrier

carrier_changes carrier_down_count      carrier_up_count        device  dev_id

dev_port        dormant duplex  flags   gro_flush_timeout

ifalias ifindex iflink  link_mode       mtu name_assign_type

napi_defer_hard_irqs    netdev_group    operstate       phys_port_id    phys_port_name

phys_switch_id  power   proto_down      queues  speed

statistics      subsystem       testing threaded        tx_queue_len

type    uevent
在这里,您可以检查操作状态、地址、mtu、速度和接口统计信息等属性(包括传输和接收的数据包、丢弃的数据包,以及 ECN 标记的数据包、接收的 CNP 数据包和传输的 CNP 数据包):
root@MI300X-01:/sys/class/infiniband/bnxt_re3# cat device/net/gpu3_eth/operstate

up

root@MI300X-01:/sys/class/infiniband/bnxt_re3# cat device/net/gpu3_eth/address

7c:c2:55:bd:7e:20

root@MI300X-01:/sys/class/infiniband/bnxt_re3# cat device/net/gpu3_eth/mtu

9000

root@MI300X-01:/sys/class/infiniband/bnxt_re3# cat device/net/gpu3_eth/speed

400000

root@MI300X-01:/sys/class/infiniband/bnxt_re3# ls device/net/gpu3_eth/statistics

collisions      multicast       rx_bytes        rx_compressed   rx_crc_errors

rx_dropped      rx_errors       rx_fifo_errors  rx_frame_errors rx_length_errors

rx_missed_errors        rx_nohandler    rx_over_errors  rx_packets      tx_aborted_errors

tx_bytes        tx_carrier_errors       tx_compressed   tx_dropped      tx_errors

tx_fifo_errors  tx_heartbeat_errors     tx_packets      tx_window_errors        tx_fifo_errors

rx_dropped      rx_frame_errors rx_nohandlertx_aborted_errors   tx_compressed   tx_window_errors

root@MI300X-01:/sys/class/infiniband/bnxt_re3# ls ports/1

cap_mask        cm_rx_duplicates        cm_rx_msgs      cm_tx_msgs      cm_tx_retries

counters        gid_attrs       gids    hw_counters     lid

lid_mask_count  link_layer      phys_state      pkeys   rate

sm_lid  sm_sl   state


root@MI300X-01:/sys/class/infiniband/bnxt_re3# ls ports/1/counters/ -m

excessive_buffer_overrun_errors link_downed     link_error_recovery

local_link_integrity_errors     port_rcv_constraint_errors      port_rcv_data

port_rcv_errors port_rcv_packets        port_rcv_remote_physical_errors

port_rcv_switch_relay_errors    port_xmit_constraint_errors     port_xmit_data

port_xmit_discards      port_xmit_packets       port_xmit_wait

symbol_error    VL15_dropped
要检查 ECN 统计信息,请检查特定接口的相关计数器:
root@MI300X-01:/sys/class/infiniband/bnxt_re3# ls ports/1/hw_counters/ -m

active_ahs      active_cqs      active_mrs      active_mws

active_pds      active_qps      active_rc_qps   active_srqs

active_ud_qps   bad_resp_err    db_fifo_register        dup_req

lifespan        local_protection_err    local_qp_op_err max_retry_exceeded

mem_mgmt_op_err missing_resp    oos_drop_count  pacing_alerts

pacing_complete pacing_reschedule       recoverable_errors      remote_access_err

remote_invalid_req_err  remote_op_err   res_cmp_err     res_cq_load_err

res_exceed_max  res_exceeds_wqe res_invalid_dup_rkey    res_irrq_oflow

resize_cq_cnt   res_length_mismatch     res_mem_err     res_opcode_err

res_rem_inv_err res_rx_domain_err       res_rx_invalid_rkey     res_rx_no_perm

res_rx_pci_err  res_rx_range_err        res_srq_err     res_srq_load_err

res_tx_domain_err       res_tx_invalid_rkey     res_tx_no_perm  res_tx_pci_err

res_tx_range_err        res_unaligned_atomic    res_unsup_opcode        res_wqe_format_err

rnr_naks_rcvd   rx_atomic_req   rx_bytes        rx_cnp_pkts

rx_ecn_marked_pkts      rx_good_bytes   rx_good_pkts    rx_out_of_buffer

rx_pkts rx_read_req     rx_read_resp    rx_roce_discards

rx_roce_errors  rx_roce_only_bytes      rx_roce_only_pkts       rx_send_req

rx_write_req    seq_err_naks_rcvd       to_retransmits  tx_atomic_req

tx_bytes        tx_cnp_pkts     tx_pkts tx_read_req

tx_read_resp    tx_roce_discards        tx_roce_errors  tx_roce_only_bytes

tx_roce_only_pkts       tx_send_req     tx_write_req    unrecoverable_err

watermark_ahs   watermark_cqs   watermark_mrs   watermark_mws

watermark_pds   watermark_qps   watermark_rc_qps        watermark_srqs

watermark_ud_qps

root@MI300X-01:/sys/class/infiniband#

for iface in /sys/class/infiniband/*/ports/1/hw_counters/rx_ecn_marked_pkts; do

    echo "$(basename $(dirname $(dirname $(dirname $(dirname "$iface"))))) : $(cat "$iface")"

done

bnxt_re0 : 0

bnxt_re1 : 1102

bnxt_re2 : 532

bnxt_re3 : 707

bnxt_re4 : 474

bnxt_re5 : 337

bnxt_re6 : 970

bnxt_re7 : 440

root@MI300X-01:/sys/class/infiniband#

for iface in /sys/class/infiniband/*/ports/1/hw_counters/tx_cnp_pkts; do

    echo "$(basename $(dirname $(dirname $(dirname $(dirname "$iface"))))) : $(cat "$iface")"

done

bnxt_re0 : 0

bnxt_re1 : 1102

bnxt_re2 : 532

bnxt_re3 : 707

bnxt_re4 : 474

bnxt_re5 : 337

bnxt_re6 : 970

bnxt_re7 : 440

root@MI300X-01:/sys/class/infiniband#

for iface in /sys/class/infiniband/*/ports/1/hw_counters/rx_cnp_pkts; do

    echo "$(basename $(dirname $(dirname $(dirname $(dirname "$iface"))))) : $(cat "$iface")"

done

bnxt_re0 : 0

bnxt_re1 : 830

bnxt_re2 : 0

bnxt_re3 : 375

bnxt_re4 : 734

bnxt_re5 : 23

bnxt_re6 : 2395

bnxt_re7 : 2291
ethtool -s <InterfaceIndex> |egrep "pfc_frames|roce_pause"|more
示例:
root@MI300X-01:/sys/class/infiniband# for iface in $(ls /sys/class/net/ | grep '^gpu'); do

    echo "$iface :"

    sudo ethtool -S "$iface" | egrep "pfc_frames|roce_pause"

done

gpu0_eth :

     rx_pfc_frames: 0

     tx_pfc_frames: 22598

     continuous_roce_pause_events: 0

     resume_roce_pause_events: 0

gpu1_eth :

     rx_pfc_frames: 0

     tx_pfc_frames: 194626

     continuous_roce_pause_events: 0

     resume_roce_pause_events: 0

gpu2_eth :

     rx_pfc_frames: 0

     tx_pfc_frames: 451620

     continuous_roce_pause_events: 0

     resume_roce_pause_events: 0

gpu3_eth :

     rx_pfc_frames: 0

     tx_pfc_frames: 492042

     continuous_roce_pause_events: 0

     resume_roce_pause_events: 0

gpu4_eth :

     rx_pfc_frames: 0

     tx_pfc_frames: 407113

     continuous_roce_pause_events: 0

     resume_roce_pause_events: 0

gpu5_eth :

     rx_pfc_frames: 0

     tx_pfc_frames: 290378

     continuous_roce_pause_events: 0

     resume_roce_pause_events: 0

gpu6_eth :

     rx_pfc_frames: 0

     tx_pfc_frames: 228918

     continuous_roce_pause_events: 0

     resume_roce_pause_events: 0

gpu7_eth :

     rx_pfc_frames: 0

     tx_pfc_frames: 477572

     continuous_roce_pause_events: 0

     resume_roce_pause_events: 0

root@MI300X-01:/sys/class/infiniband#

for iface in $(ls /sys/class/net/ | grep '^gpu'); do

    echo "$iface :"

    sudo ethtool -S "$iface" | grep cos | grep -v ": 0"

done

gpu0_eth :

     rx_bytes_cos0: 9529443988084

     rx_packets_cos0: 3319036491

     rx_bytes_cos4: 18230144638154

     rx_packets_cos4: 5955503873

     rx_discard_bytes_cos4: 3032625534

     rx_discard_packets_cos4: 736191

     tx_bytes_cos0: 27757371721830

     tx_packets_cos0: 9297694711

     tx_bytes_cos4: 604920

     tx_packets_cos4: 2628

gpu1_eth :

     rx_bytes_cos0: 27969554019118

     rx_packets_cos0: 9565740297

     rx_bytes_cos4: 4193860

     rx_packets_cos4: 47350

     tx_bytes_cos0: 27738638134736

     tx_packets_cos0: 9184463836

     tx_bytes_cos4: 619484

     tx_packets_cos4: 2686

     tx_bytes_cos5: 81548

     tx_packets_cos5: 1102

gpu2_eth :

     rx_bytes_cos0: 27961559203510

     rx_packets_cos0: 9438688373

     rx_bytes_cos4: 4134654

     rx_packets_cos4: 46526

     tx_bytes_cos0: 27177768852872

     tx_packets_cos0: 9028738664

     tx_bytes_cos4: 619444

     tx_packets_cos4: 2686

     tx_bytes_cos5: 39368

     tx_packets_cos5: 532

gpu3_eth :

     rx_bytes_cos0: 27886187894460

     rx_packets_cos0: 9394306658

     rx_bytes_cos4: 4161424

     rx_packets_cos4: 46910

     tx_bytes_cos0: 27963541263338

     tx_packets_cos0: 9314918707

     tx_bytes_cos4: 619624

     tx_packets_cos4: 2688

     tx_bytes_cos5: 52318

     tx_packets_cos5: 707

gpu4_eth :

     rx_bytes_cos0: 27760098268028

     rx_packets_cos0: 9493708902

     rx_bytes_cos4: 4190302

     rx_packets_cos4: 47275

     tx_bytes_cos0: 27943026331154

     tx_packets_cos0: 9175330615

     tx_bytes_cos4: 619068

     tx_packets_cos4: 2683

     tx_bytes_cos5: 35076

     tx_packets_cos5: 474

gpu5_eth :

     rx_bytes_cos0: 27742656661456

     rx_packets_cos0: 9603877462

     rx_bytes_cos4: 4136456

     rx_packets_cos4: 46558

     tx_bytes_cos0: 27862529155204

     tx_packets_cos0: 9053600792

     tx_bytes_cos4: 619318

     tx_packets_cos4: 2686

     tx_bytes_cos5: 24938

     tx_packets_cos5: 337

gpu6_eth :

     rx_bytes_cos0: 27204139187706

     rx_packets_cos0: 9417550449

     rx_bytes_cos4: 4309610

     rx_packets_cos4: 48912

     tx_bytes_cos0: 27939647032856

     tx_packets_cos0: 9122722262

     tx_bytes_cos4: 619248

     tx_packets_cos4: 2685

     tx_bytes_cos5: 71780

     tx_packets_cos5: 970

gpu7_eth :

     rx_bytes_cos0: 27985967658372

     rx_packets_cos0: 9636086344

     rx_bytes_cos4: 4303716

     rx_packets_cos4: 48823

     tx_bytes_cos0: 27949102839310

     tx_packets_cos0: 9149097911

     tx_bytes_cos4: 619138

     tx_packets_cos4: 2684

     tx_bytes_cos5: 32560

     tx_packets_cos5: 440

BCM57608> sudo niccli -i 2 listmap -pri2cos

-------------------------------------------------------------------------------

NIC CLI v231.2.63.0 - Broadcom Inc. (c) 2024 (Bld-94.52.34.117.16.0)

-------------------------------------------------------------------------------

Base Queue is 0 for port 0

----------------------------

Priority   TC   Queue ID

------------------------

 0         0    4

 1         0    4

 2         0    4

 3         1    0

 4         0    4

 5         0    4

 6         0    4

 7         2    5
将服务器配置为使用 RCCL 控制流量的管理接口:
ROCm 通信集体库 (RCCL) 创建 TCP 会话来协调进程并交换 RoCE 的队列对信息、GID(全局 ID)、本地和远程缓冲区地址、RDMA 密钥(用于内存访问权限的 RKEY)
这些 TCP 会话将在作业启动时创建,默认情况下使用其中一个 GPU 接口(用于 RoCEv2 流量的接口相同)。
示例:
jnpr@MI300X-01:~$ netstat -atn | grep 10.200 | grep "ESTABLISHED"

tcp        0      0 10.200.4.8:47932        10.200.4.2:43131        ESTABLISHED

tcp        0      0 10.200.4.8:46699        10.200.4.2:37236        ESTABLISHED

tcp        0      0 10.200.2.8:60502        10.200.13.2:35547       ESTABLISHED

tcp        0      0 10.200.4.8:37330        10.200.4.2:55355        ESTABLISHED

tcp        0      0 10.200.4.8:56438        10.200.4.2:53947        ESTABLISHED

---more---
建议使用连接到(前端交换矩阵)的管理接口。为此,请在启动作业时包含以下内容: export NCCL_SOCKET_IFNAME=“mgmt_eth”。 相同的环境变量同时适用于 NCCL 和 RCCL。
示例:
jnpr@MI300X-01:~$ netstat -atn | grep 10.10.1 | grep "ESTABLISHED"

tcp        0      0 10.10.1.0:44926         10.10.1.2:33149         ESTABLISHED

tcp        0      0 10.10.1.0:46705         10.10.1.0:40320         ESTABLISHED

tcp        0      0 10.10.1.0:54661         10.10.1.10:52452        ESTABLISHED

---more---
用于 RDMA 流量的 AMD Pollara DCQCN 配置
对于 AMD Pollara 验证,需要启用 DCQCN,并且必须在 AMD NIC 卡上应用 QOS。
- 使用脚本在 NIC 上配置 QOS。DSCP参数等同于表15中建议的值。服务器 DCQCN 配置参数。
jnpr@mi300-01:~$ cat /usr/local/bin/jnpr-setupqos.sh #!/bin/bash for i in $(sudo /usr/sbin/nicctl show port | grep Port | awk {'print $3'}); do sudo /usr/sbin/nicctl update port -p $i --pause-type pfc --rx-pause enable --tx-pause enable; done cts_dscp=48 cts_prio=2 data_dscp=26 data_prio=3 sudo nicctl update qos --classification-type dscp sudo nicctl update qos dscp-to-priority --dscp $cts_dscp --priority $cts_prio sudo nicctl update qos dscp-to-priority --dscp $data_dscp --priority $data_prio sudo nicctl update qos pfc --priority $cts_prio --no-drop enable sudo nicctl update qos pfc --priority $data_prio --no-drop enable sudo nicctl update qos dscp-to-purpose --dscp $cts_dscp --purpose xccl-cts - 使用 AMD
nicctl命令行实用程序,以下是配置的 QOS 参数:jnpr@mi300-01:~$ sudo nicctl show qos | more NIC : 42424650-4c32-3530-3130-313346000000 (0000:06:00.0) Port : 0490812b-9860-4242-4242-000011010000 Classification type : DSCP DSCP-to-priority : DSCP bitmap : 0xfffefffffbffffff ==> priority : 0 DSCP bitmap : 0x0001000000000000 ==> priority : 2 DSCP bitmap : 0x0000000004000000 ==> priority : 3 DSCP : 0-25, 27-47, 49-63 ==> priority : 0 DSCP : 48 ==> priority : 2 DSCP : 26 ==> priority : 3 DSCP-to-purpose : 48 ==> xccl-cts PFC : PFC priority bitmap : 0xc PFC no-drop priorities : 2,3 Scheduling : -------------------------------------------- Priority Scheduling Bandwidth Rate-limit Type (in %age) (in Gbps) -------------------------------------------- 0 DWRR 0 N/A 2 DWRR 0 N/A 3 DWRR 0 N/A NIC : 42424650-4c32-3530-3130-313844000000 (0000:23:00.0) Port : 0490812b-9fb0-4242-4242-000011010000 Classification type : DSCP DSCP-to-priority : DSCP bitmap : 0xfffefffffbffffff ==> priority : 0 DSCP bitmap : 0x0001000000000000 ==> priority : 2 DSCP bitmap : 0x0000000004000000 ==> priority : 3 DSCP : 0-25, 27-47, 49-63 ==> priority : 0 DSCP : 48 ==> priority : 2 DSCP : 26 ==> priority : 3 DSCP-to-purpose : 48 ==> xccl-cts PFC : PFC priority bitmap : 0xc PFC no-drop priorities : 2,3 --More-- - 该
rdma link命令可用于检查是否存在与 AMD Pollara NIC 卡的 roce-devices 关联。jnpr@mi300-01:~$ rdma link | grep gpu link rocep9s0/1 state ACTIVE physical_state LINK_UP netdev gpu0_eth link rocep38s0/1 state ACTIVE physical_state LINK_UP netdev gpu1_eth link rocep70s0/1 state ACTIVE physical_state LINK_UP netdev gpu2_eth link roceo1/1 state ACTIVE physical_state LINK_UP netdev gpu3_eth link rocep137s0/1 state ACTIVE physical_state LINK_UP netdev gpu4_eth link rocep166s0/1 state ACTIVE physical_state LINK_UP netdev gpu5_eth link rocep198s0/1 state ACTIVE physical_state LINK_UP netdev gpu6_eth link rocep233s0/1 state ACTIVE physical_state LINK_UP netdev gpu7_eth
roce-devices 在加载 ionic_rdma 内核模块时创建,应为每个 NIC 卡创建以下 roce-device 文件。
jnpr@mi300-01:/sys/class/infiniband$ find /sys/class/infiniband -type l

/sys/class/infiniband/rocep137s0

/sys/class/infiniband/rocep38s0

/sys/class/infiniband/rocep70s0

/sys/class/infiniband/roceo1

/sys/class/infiniband/rocep166s0

/sys/class/infiniband/rocep233s0

/sys/class/infiniband/rocep198s0

/sys/class/infiniband/rocep9s0
- 要在 AMD Pollara NIC 上配置 DCQCN,请使用适当的参数运行以下脚本。
jnpr @mi300-01:~$ cat /usr/local/bin/jnpr-enable-dcqcn.sh #!/bin/bash TOKEN_BUCKET_SIZE=800000 AI_RATE=160 ALPHA_UPDATE_INTERVAL=1 ALPHA_UPDATE_G=512 INITIAL_ALPHA_VALUE=64 RATE_INCREASE_BYTE_COUNT=431068 HAI_RATE=300 RATE_REDUCE_MONITOR_PERIOD=1 RATE_INCREASE_THRESHOLD=1 RATE_INCREASE_INTERVAL=1 CNP_DSCP=48 ROCE_DEVICES=$(rdma link | grep gpu | awk '{ print $2 }' | awk -F/ '{ print $1 }' | paste -sd " ") for roce_dev in $ROCE_DEVICES do sudo nicctl update dcqcn -r $roce_dev -i 1 \ --token-bucket-size $TOKEN_BUCKET_SIZE \ --ai-rate $AI_RATE \ --alpha-update-interval $ALPHA_UPDATE_INTERVAL \ --alpha-update-g $ALPHA_UPDATE_G \ --initial-alpha-value $INITIAL_ALPHA_VALUE \ --rate-increase-byte-count $RATE_INCREASE_BYTE_COUNT \ --hai-rate $HAI_RATE \ --rate-reduce-monitor-period $RATE_REDUCE_MONITOR_PERIOD \ --rate-increase-threshold $RATE_INCREASE_THRESHOLD \ --rate-increase-interval $RATE_INCREASE_INTERVAL \ --cnp-dscp $CNP_DSCP Done - 使用 nicctl 命令检查每个 roce 设备的 DCQCN 配置文件。
jnpr@mi300-01:~$ sudo nicctl show dcqcn --roce-device rocep137s0 | more

ROCE device : rocep137s0

  DCQCN profile id                         : 7

  Status                                   : Disabled

  Rate reduce monitor period               : 100

  Alpha update interval                    : 100

  Clamp target rate                        : 0

  Rate increase threshold                  : 1

  Rate increase byte count                 : 431068

  Rate increase in AI phase                : 200

  Alpha update G value                     : 50

  Minimum rate                             : 1

  Token bucket size                        : 4000000

  Rate increase interval                   : 10

  Rate increase in HAI phase               : 200

  Initial alpha value                      : 64

  DSCP value used for CNP                  : 48

  DCQCN profile id                         : 5

  Status                                   : Disabled

  Rate reduce monitor period               : 100

  Alpha update interval                    : 100

  Clamp target rate                        : 0

  Rate increase threshold                  : 1

  Rate increase byte count                 : 431068

  Rate increase in AI phase                : 200

  Alpha update G value                     : 50

  Minimum rate                             : 1

  Token bucket size                        : 4000000

  Rate increase interval                   : 10

  Rate increase in HAI phase               : 200

  Initial alpha value                      : 64

  DSCP value used for CNP                  : 48

  DCQCN profile id                         : 3

  Status                                   : Disabled

  Rate reduce monitor period               : 100

  Alpha update interval                    : 100

  Clamp target rate                        : 0

  Rate increase threshold                  : 1

  Rate increase byte count                 : 431068

  Rate increase in AI phase                : 200

  Alpha update G value                     : 50

  Minimum rate                             : 1

  Token bucket size                        : 4000000

  Rate increase interval                   : 10

  Rate increase in HAI phase               : 200

  Initial alpha value                      : 64

  DSCP value used for CNP                  : 48

--More—
- 最后,运行rccl_test.sh脚本,如下所示。下面的示例显示了为“全部减少”运行的测试。
jnpr@mi300-01:/mnt/nfsshare/source/aicluster/rccl-tests$ ./run-rccl.sh

Running all_reduce, channels 64, qps 1  ...

Num nodes: 2

+ tee --append /mnt/nfsshare/logs/rccl/MI300-RAILS-ALL/06062025_18_03_35/test.log

+ /opt/ompi/bin/mpirun --np 16 --allow-run-as-root -H MI300-01:8,MI300-02:8 --bind-to numa -x NCCL_IB_GID_INDEX=1 -x UCX_UNIFIED_MODE=y -x NCCL_IB_PCI_RELAXED_ORDERING=1 -x NCCL_GDR_FLUSH_DISABLE=1 -x RCCL_GDR_FLUSH_GPU_MEM_NO_RELAXED_ORDERING=0 -x PATH=/opt/ompi/bin:/opt/rocm/bin:/usr/local/sbin:/usr/local/bin:/usr/sbin:/usr/bin:/sbin:/bin:/usr/games:/usr/local/games:/snap/bin -x LD_LIBRARY_PATH=/home/dbarmann/pollara/rccl-7961624/build/release:/home/dbarmann/pollara/amd-anp-new/build:/opt/ompi/lib: -x UCX_NET_DEVICES=gpu0_eth,gpu1_eth,gpu2_eth,gpu3_eth,gpu4_eth,gpu5_eth,gpu6_eth,gpu7_eth -x NCCL_IB_HCA=rocep9s0,rocep38s0,rocep70s0,roceo1,rocep137s0,rocep166s0,rocep198s0,rocep233s0 --mca btl '^vader,openib' --mca btl_tcp_if_include mgmt_eth -x NCCL_MIN_NCHANNELS=64 -x NCCL_MAX_NCHANNELS=64 -x NCCL_IB_QPS_PER_CONNECTION=1 -x NCCL_TOPO_DUMP_FILE=/tmp/system_run2.txt -x HSA_NO_SCRATCH_RECLAIM=1 -x NCCL_GDRCOPY_ENABLE=0 -x NCCL_IB_TC=106 -x NCCL_IB_FIFO_TC=192 -x NCCL_IGNORE_CPU_AFFINITY=1 -x RCCL_LL128_FORCE_ENABLE=1 -x NCCL_PXN_DISABLE=0 -x NCCL_DEBUG=INFO -x NET_OPTIONAL_RECV_COMPLETION=1 -x NCCL_IB_USE_INLINE=1 -x NCCL_DEBUG_FILE=/mnt/nfsshare/logs/rccl/MI300-RAILS-ALL/06062025_18_03_35/nccl-debug.log -x 'LD_PRELOAD=/home/dbarmann/pollara/amd-anp-new/build/librccl-net.so /home/dbarmann/pollara/rccl-7961624/build/release/librccl.so' /mnt/nfsshare/source/aicluster/rccl-tests/build/all_reduce_perf -b 1024 -e 16G -f 2 -g 1 -n 20 -m 1 -c 1 -w 5_# nThread 1 nGpus 1 minBytes 1024 maxBytes 17179869184 step: 2(factor) warmup iters: 5 iters: 20 agg iters: 1 validation: 1 graph: 0_#

rccl-tests: Version develop:b0a3841+

# Using devices

#  Rank  0 Group  0 Pid  18335 on   mi300-01 device  0 [0000:05:00] AMD Instinct MI300X

#  Rank  1 Group  0 Pid  18336 on   mi300-01 device  1 [0000:29:00] AMD Instinct MI300X

#  Rank  2 Group  0 Pid  18337 on   mi300-01 device  2 [0000:49:00] AMD Instinct MI300X

#  Rank  3 Group  0 Pid  18340 on   mi300-01 device  3 [0000:65:00] AMD Instinct MI300X

#  Rank  4 Group  0 Pid  18338 on   mi300-01 device  4 [0000:85:00] AMD Instinct MI300X

#  Rank  5 Group  0 Pid  18341 on   mi300-01 device  5 [0000:a9:00] AMD Instinct MI300X

#  Rank  6 Group  0 Pid  18342 on   mi300-01 device  6 [0000:c9:00] AMD Instinct MI300X

#  Rank  7 Group  0 Pid  18339 on   mi300-01 device  7 [0000:e5:00] AMD Instinct MI300X

#  Rank  8 Group  0 Pid  16249 on   mi300-02 device  0 [0000:05:00] AMD Instinct MI300X

#  Rank  9 Group  0 Pid  16251 on   mi300-02 device  1 [0000:29:00] AMD Instinct MI300X

#  Rank 10 Group  0 Pid  16250 on   mi300-02 device  2 [0000:49:00] AMD Instinct MI300X

#  Rank 11 Group  0 Pid  16254 on   mi300-02 device  3 [0000:65:00] AMD Instinct MI300X

#  Rank 12 Group  0 Pid  16255 on   mi300-02 device  4 [0000:85:00] AMD Instinct MI300X

#  Rank 13 Group  0 Pid  16253 on   mi300-02 device  5 [0000:a9:00] AMD Instinct MI300X

#  Rank 14 Group  0 Pid  16252 on   mi300-02 device  6 [0000:c9:00] AMD Instinct MI300X

#  Rank 15 Group  0 Pid  16256 on   mi300-02 device  7 [0000:e5:00] AMD Instinct MI300X

#

#                                                              out-of-place                       in-place

#       size         count      type   redop    root     time   algbw   busbw #wrong     time   algbw   busbw #wrong

#        (B)    (elements)                               (us)  (GB/s)  (GB/s)            (us)  (GB/s)  (GB/s)

        1024           256     float     sum      -1    41.61    0.02    0.05      0    53.55    0.02    0.04      0

        2048           512     float     sum      -1    43.79    0.05    0.09      0    50.54    0.04    0.08      0

        4096          1024     float     sum      -1    45.75    0.09    0.17      0    45.21    0.09    0.17      0

        8192          2048     float     sum      -1    46.50    0.18    0.33      0    47.75    0.17    0.32      0

       16384          4096     float     sum      -1    60.52    0.27    0.51      0    48.90    0.34    0.63      0

       32768          8192     float     sum      -1    49.68    0.66    1.24      0    52.57    0.62    1.17      0

       65536         16384     float     sum      -1    53.75    1.22    2.29      0    52.74    1.24    2.33      0

      131072         32768     float     sum      -1    69.16    1.90    3.55      0    56.83    2.31    4.32      0

      262144         65536     float     sum      -1    69.31    3.78    7.09      0    63.17    4.15    7.78      0

      524288        131072     float     sum      -1    77.16    6.79   12.74      0    80.51    6.51   12.21      0

     1048576        262144     float     sum      -1    127.5    8.23   15.42      0    107.6    9.75   18.28      0

     2097152        524288     float     sum      -1    125.0   16.78   31.46      0    130.9   16.02   30.04      0

     4194304       1048576     float     sum      -1    149.5   28.06   52.61      0    148.4   28.26   52.99      0

     8388608       2097152     float     sum      -1    222.9   37.63   70.55      0    231.6   36.21   67.90      0

    16777216       4194304     float     sum      -1    321.3   52.21   97.90      0    326.2   51.43   96.43      0

    33554432       8388608     float     sum      -1    436.2   76.93  144.25      0    447.0   75.06  140.75      0

    67108864      16777216     float     sum      -1    678.9   98.85  185.35      0    684.6   98.02  183.79      0

   134217728      33554432     float     sum      -1   1164.6  115.25  216.10      0   1148.1  116.90  219.19      0

   268435456      67108864     float     sum      -1   1550.3  173.15  324.66      0   1563.9  171.65  321.84      0

   536870912     134217728     float     sum      -1   2979.9  180.16  337.81      0   2977.6  180.30  338.07      0

  1073741824     268435456     float     sum      -1   5824.8  184.34  345.64      0   5859.5  183.25  343.59      0

  2147483648     536870912     float     sum      -1    11596  185.20  347.25      0    11611  184.94  346.77      0

  4294967296    1073741824     float     sum      -1   520420    8.25   15.47      0    23190  185.21  347.27      0

  8589934592    2147483648     float     sum      -1    46157  186.10  348.94      0    46150  186.13  349.00      0

 17179869184    4294967296     float     sum      -1   568668   30.21   56.65      0    91823  187.10  350.81      0

# Errors with asterisks indicate errors that have exceeded the maximum threshold.

# Out of bounds values : 0 OK

# Avg bus bandwidth    : 117.077

#