设备上的 Avira 防病毒软件
阅读本主题,了解如何使用 Avira Antivirus 扫描应用流量并防止病毒进入您的网络。
您还可以观看视频 SRX 系列防火墙上的 Avira 防病毒解决方案 ,了解如何在您的安全设备上安装和使用 Avira 防病毒软件。
Avira 防病毒软件概述
Junos OS 内容安全性与 Avira 的防病毒功能集成,并提供基于文件的完整扫描引擎。此防病毒保护通过扫描应用程序层流量并阻止有害内容(例如受感染的文件、特洛伊木马、蠕虫、间谍软件和其他恶意数据)来保护您的设备。
Avira Antivirus 通过访问病毒模式数据库来扫描网络流量并识别病毒。Avira Antivirus 会丢弃受感染的文件并通知用户。
表 1 列出了 Avira Antivirus 的组件和许可证详细信息。
组件 |
详细信息 |
|---|---|
病毒模式数据库 |
Avira Antivirus 会检查病毒签名数据库以识别签名,然后删除签名。 缺省情况下,设备会下载模式数据库的更新。请参阅 配置 Avira 防病毒扫描选项 以计划自动下载选项。 |
Avira 防病毒软件扫描引擎 |
Avira Antivirus 提供实时检查文件中已知病毒的扫描引擎。您必须在设备上安装并激活 Avira 防病毒扫描引擎。有关安装和激活 Avira Antivirus 扫描引擎的步骤,请参阅 示例:配置 Avira Antivirus 。 Avira Antivirus 扫描引擎在扫描病毒检测之前解压缩文件。有关更多信息,请参阅 decompress-layer-limit。 在以下情况下,设备上的 Avira 防病毒扫描引擎不会扫描应用程序流量:
|
许可证详细信息 |
Avira 防病毒扫描引擎是一项获得许可的订阅服务。 有了此许可证,您可以使用完整的基于文件的实时 Avira Antivirus 扫描功能。防病毒功能使用最新更新的病毒签名数据库。 许可证到期后,您可以继续使用本地存储的防病毒签名,而无需进行任何更新。如果删除本地数据库,则无法运行防病毒扫描。 有关许可证的更多信息,请参阅 SRX 系列许可证。 |
优势
保护您的设备并保护您的网络免受病毒、木马、rootkit 和其他类型的恶意代码的侵害。
由于病毒签名数据库和 Avira 防病毒扫描引擎驻留在设备本地,因此可提供更好的扫描性能。
也可以看看
其他平台信息
使用 功能资源管理器 确认平台和版本对特定功能的支持。可能支持其他平台。
| 平台病毒 | 型数据库 |
|---|---|
| 默认病毒模式数据库 |
|
| SRX4100、SRX4200 和 SRX4600 系列防火墙 |
|
| SRX5K-SPC3 防火墙 |
|
| vSRX 虚拟防火墙 |
示例:配置 Avira 防病毒软件
在此示例中,您将了解如何在安全设备上配置 Avira 防病毒软件。本主题包含有关使用默认防病毒配置文件和自定义防病毒配置文件保护设备免受有害内容(如受感染的文件、特洛伊木马、蠕虫、间谍软件和其他恶意数据)侵害的详细信息。
要求
开始之前:
验证您是否拥有 Avira 防病毒许可证。有关如何验证设备上的许可证的详细信息,请参阅 了解 SRX 系列防火墙的许可证。
装有 Junos OS 18.4R1 或更高版本的设备。
-
对于 vSRX 虚拟防火墙,最低要求为 4 个 CPU 内核和 4 GB 内存。
我们使用运行 Junos OS 18.4R1 版的 SRX1500 设备对此示例进行了测试。
概述
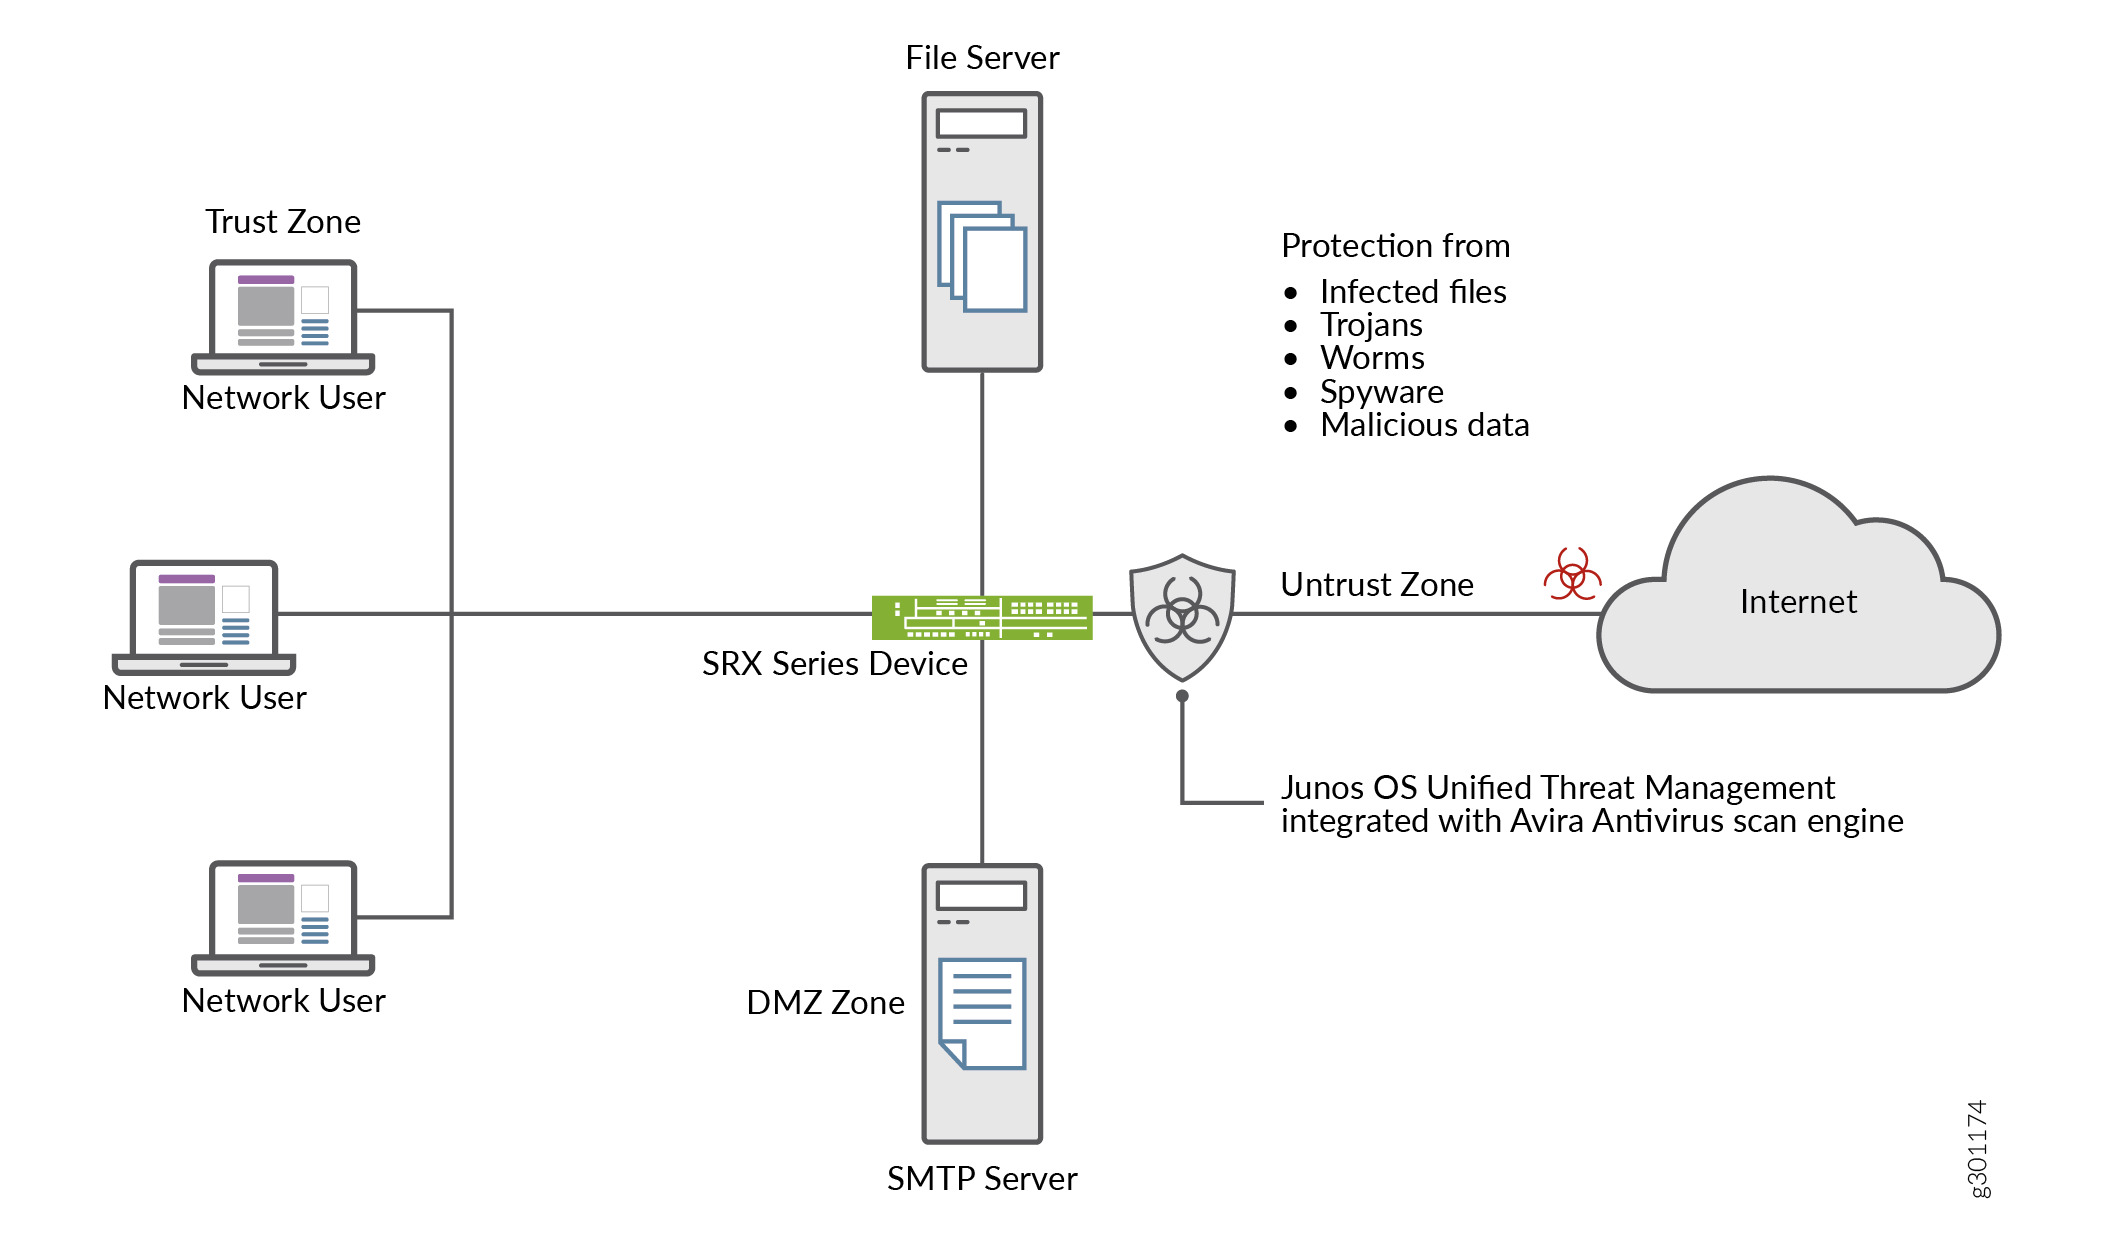
让我们看一个典型的企业网络。最终用户在不知不觉中访问了受感染的网站并下载了恶意内容。此作会导致端点受到损害。端点上的有害内容也会对网络中的其他主机构成威胁。防止下载恶意内容非常重要。
您可以使用装有 Avira 防病毒软件的设备来保护用户免受病毒攻击,并防止病毒在您的系统中传播,Avira 防病毒软件会扫描网络流量中的病毒、特洛伊木马、rootkit 和其他类型的恶意代码,并在检测到恶意内容时立即阻止。
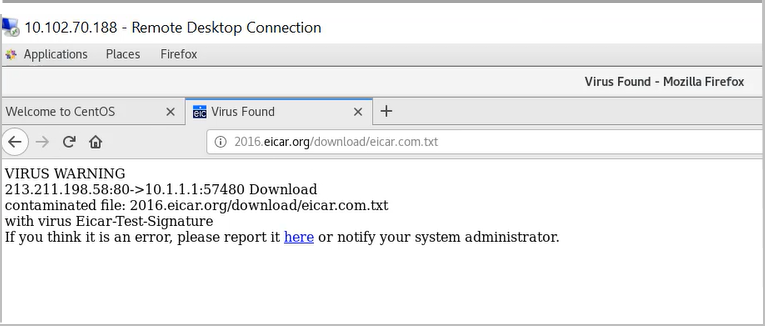
图 1 显示了 Avira 防病毒软件的使用示例。
 的 Avira 防病毒软件
在此示例中,您将了解如何在安全设备上配置 Avira 防病毒软件。您有以下选项。
要使用默认的 Avira 防病毒选项开始使用,请参阅 使用默认防病毒配置文件启动防病毒扫描。
要根据您的要求自定义防病毒选项,请参阅 配置 Avira 防病毒扫描选项 。
要设置防病毒扫描选项,请参阅 使用自定义配置文件配置 Avira 防病毒扫描 。
配置
您可以启用瞻博网络预配置的防病毒配置文件。使用默认防病毒功能配置文件选项时,无需配置其他参数。在此过程中,您将使用所有协议的默认防病毒配置文件创建内容安全性策略,并在允许的流量的安全策略中应用内容安全性策略。
使用默认防病毒配置文件启动防病毒扫描
分步程序
要使用默认防病毒配置文件,请完成以下步骤:
-
在您的安全设备上启用 Avira 防病毒扫描。
user@host#set security utm default-configuration anti-virus type avira-engine将 Avira 配置为防病毒类型后,重新启动设备以使新的扫描引擎生效。
-
为 HTTP、FTP、SMTP、POP3 和 IMAP 协议选择默认防病毒配置文件。
[edit]user@host#set security utm default-configuration anti-virus type avirauser@host#set security utm utm-policy P1 anti-virus http-profile junos-av-defaultsuser@host#set security utm utm-policy P1 anti-virus ftp upload-profile junos-av-defaultsuser@host#set security utm utm-policy P1 anti-virus ftp download-profile junos-av-defaultsuser@host#set security utm utm-policy P1 anti-virus smtp-profile junos-av-defaultsuser@host#set security utm utm-policy P1 anti-virus pop3-profile junos-av-defaultsuser@host#set security utm utm-policy P1 anti-virus imap-profile junos-av-defaults -
将内容安全性策略应用于安全策略。
[edit]user@host#set security policies from-zone trust to-zone untrust policy POLICY-1 match source-address anyuser@host#set security policies from-zone trust to-zone untrust policy POLICY-1 match destination-address anyuser@host#set security policies from-zone trust to-zone untrust policy POLICY-1 match application anyuser@host#set security policies from-zone trust to-zone untrust policy POLICY-1 then permit application-services utm-policy P1 -
提交配置。
[edit]user@host#commit
您还可以观看视频 SRX 系列防火墙上的 Avira 防病毒解决方案 ,了解如何在您的安全设备上安装和使用 Avira 防病毒软件。
配置 Avira 防病毒扫描选项
分步程序
在此过程中,您将执行可选步骤来准备您的安全设备以使用 Avira 防病毒软件。
-
手动更新病毒签名数据库,指定数据库服务器的 URL。如果未指定 URL,则会提供默认 URL https://update.juniper-updates.net/avira。缺省情况下,安全设备会从 https://update.juniper-updates.net/avira 下载模式更新。病毒模式数据库的位置取决于您的设备模式。有关详细信息,请参阅 表 1 。
[edit]user@host#set security utm default-configuration anti-virus avira-engine pattern-update url http://www.example.net/此步骤从指定的 URL 下载模式和引擎文件。
-
设置定期下载防病毒模式更新的时间间隔。
[edit]user@host#set security utm default-configuration anti-virus avira-engine pattern-update interval 2880在此步骤中,您将默认值从每 24 小时更改为每 48 小时一次。默认防病毒模式更新间隔为 1440 分钟(每 24 小时一次)。
-
模式更新完成后发送电子邮件通知。
[edit]user@host#set security utm default-configuration anti-virus avira-engine pattern-update email-notify admin-email admin@email.net custom-message “Avira antivirus data file was updated” custom-message-subject “AV data file updated” -
(选答)从代理配置文件配置模式更新。
通过输入代理主机 IP 地址和端口号来配置代理配置文件,如下所示:
user@host# set services proxy profile proxy-profile protocol http host x.x.x.x port xxxx
通过设置用户名和密码,在代理配置文件中配置代理身份验证。
[edit]
user@host# set services proxy profile proxy-profile protocol http username <username>
user@host# set services proxy profile proxy-profile protocol http password <password>
将代理配置文件用于模式更新过程。
[edit]user@host# set security utm default-configuration anti-virus avira-engine pattern-update proxy-profile <proxy-profile>
-
(选答)将本机防病毒软件配置为重度模式。
[edit]user@host# set chassis onbox-av-load-flavor heavy此步骤分配额外资源以提高性能。
要在浅色模式下使用防病毒扫描,请使用命令 delete chassis onbox-av-load-flavor heavy 。更改模式后,请重新启动设备。
-
(选答)将作模式从默认的持续交付功能 (CDF) 更改为保持模式。当您切换为保持模式时,系统将保留所有数据包,直到您得到最终结果。
[edit]user@host# set security utm default-configuration anti-virus forwarding-mode hold有关 CDF 模式和内联分流模式的更多详细信息,请参阅 转发模式。
使用自定义配置文件配置 Avira 防病毒扫描
您必须完成 表 2 中的步骤,才能在安全设备上使用自定义选项配置 Avira 防病毒软件。
| 步骤 |
详情 |
|---|---|
| 第 1 步:定义自定义对象 |
在此步骤中,您将定义防病毒扫描选项:
或者,您可以使用默认列表 junos-default-bypass-mime。 |
| 步骤 2:创建防病毒功能配置文件 |
|
| 步骤 3:创建内容安全性策略 |
将在步骤 2 中为 FTP、HTTP、POP3、SMTP 和 IMAP 流量创建的防病毒配置文件相关联。内容安全性策略控制将哪些协议流量发送到防病毒扫描引擎。 |
| 步骤 4:将内容安全性策略应用于安全策略 |
在安全策略中将内容安全性策略指定为应用服务。内容安全性防病毒设置将应用于与安全策略规则匹配的流量。 |
请参阅 扫描选项 和 涓流 ,了解可用于防病毒功能的扫描配置参数。
CLI 快速配置
要快速配置示例的此部分,请复制以下命令,将其粘贴到文本文件中,删除所有换行符,更改详细信息,以便与网络配置匹配,将命令复制并粘贴到层次结构级别的 [edit] CLI 中,然后从配置模式进入。commit
set security utm default-configuration anti-virus type avira-engine
set security utm custom-objects mime-pattern Mime_1 value video/
set security utm custom-objects mime-pattern Mime_exception value video/x-shockwave-flash
set security utm custom-objects url-pattern Pattern_List_1 value www.juniper.net
set security utm custom-objects custom-url-category Cust_URL_Cat value Pattern_List_1
set security utm feature-profile anti-virus profile Avira-AV-Profile fallback-options default log-and-permit
set security utm feature-profile anti-virus profile Avira-AV-Profile fallback-options content-size block
set security utm feature-profile anti-virus profile Avira-AV-Profile fallback-options engine-not-ready log-and-permit
set security utm feature-profile anti-virus profile Avira-AV-Profile fallback-options timeout log-and-permit
set security utm feature-profile anti-virus profile Avira-AV-Profile fallback-options out-of-resources log-and-permit
set security utm feature-profile anti-virus profile Avira-AV-Profile fallback-options too-many-requests log-and-permit
set security utm feature-profile anti-virus profile Avira-AV-Profile notification-options fallback-block type protocol-only
set security utm feature-profile anti-virus profile Avira-AV-Profile notification-options fallback-block notify-mail-sender
set security utm feature-profile anti-virus profile Avira-AV-Profile notification-options fallback-block custom-message " fallback block action occured “
set security utm feature-profile anti-virus profile Avira-AV-Profile notification-options fallback-block custom-message-subject " Antivirus Fallback Alert "
set security utm feature-profile anti-virus profile Avira-AV-Profile mime-whitelist list Mime_1
set security utm feature-profile anti-virus profile Avira-AV-Profile url-whitelist Cust_URL_Cat
set security utm feature-profile anti-virus profile Avira-AV-Profile mime-whitelist list Mime_exception
set security utm utm-policy UTM-AV-Policy anti-virus http-profile Avira-AV-Profile
set security utm utm-policy UTM-AV-Policy anti-virus ftp upload-profile Avira-AV-Profile
set security utm utm-policy UTM-AV-Policy anti-virus ftp download-profile Avira-AV-Profile
set security utm utm-policy UTM-AV-Policy anti-virus smtp-profile Avira-AV-Profile
set security utm utm-policy UTM-AV-Policy anti-virus pop3-profile Avira-AV-Profile
set security utm utm-policy UTM-AV-Policy anti-virus imap-profile Avira-AV-Profile
set security policies from-zone trust to-zone untrust policy POLICY-1 match source-address any
set security policies from-zone trust to-zone untrust policy POLICY-1 match destination-address any
set security policies from-zone trust to-zone untrust policy POLICY-1 match application any
set security policies from-zone trust to-zone untrust policy POLICY-1 then permit application-services utm-policy UTM-AV-Policy
[edit security utm feature-profile]该层级在 Junos OS 18.2R1 版中已被弃用。有关详细信息,请参阅内容安全性概述。
分步程序
要使用 CLI 配置设备上防病毒功能配置文件:
-
如果尚未启用,请在您的安全设备上启用 Avira 防病毒扫描。
[edit]user@host#set security utm default-configuration anti-virus type avira-engine将 Avira 配置为防病毒类型后,重新启动设备以使新的扫描引擎生效。
-
创建自定义对象。
[edit]user@host#set security utm custom-objects mime-pattern Mime_1 value video/user@host#set security utm custom-objects mime-pattern Mime_exception value video/x-shockwave-flashuser@host#set security utm custom-objects url-pattern Pattern_List_1 value www.juniper.netuser@host#set security utm custom-objects custom-url-category Cust_URL_Cat value Pattern_List_1 -
创建防病毒配置文件。
[edit]user@host#set security utm feature-profile anti-virus profile Avira-AV-Profile -
配置回退选项列表。
[edit]user@host#set security utm feature-profile anti-virus profile Avira-AV-Profile fallback-options default log-and-permituser@host#set security utm feature-profile anti-virus profile Avira-AV-Profile fallback-options content-size blockuser@host#set security utm feature-profile anti-virus profile Avira-AV-Profile fallback-options engine-not-ready log-and-permituser@host#set security utm feature-profile anti-virus profile Avira-AV-Profile fallback-options timeout log-and-permituser@host#set security utm feature-profile anti-virus profile Avira-AV-Profile fallback-options out-of-resources log-and-permituser@host#set security utm feature-profile anti-virus profile Avira-AV-Profile fallback-options too-many-requests log-and-permit回退选项指定在无法扫描流量时要执行的作。
-
为回退阻止作配置通知选项。
[edit]user@host#set security utm feature-profile anti-virus profile Avira-AV-Profile notification-options fallback-block type protocol-onlyuser@host#set security utm feature-profile anti-virus profile Avira-AV-Profile notification-options fallback-block notify-mail-senderuser@host#set security utm feature-profile anti-virus profile Avira-AV-Profile notification-options fallback-block custom-message " fallback block action occured “user@host#set security utm feature-profile anti-virus profile Avira-AV-Profile notification-options fallback-block custom-message-subject " Antivirus Fallback Alert " -
将防病毒模块配置为使用 MIME 旁路列表和例外列表。
[edit]user@host#set security utm feature-profile anti-virus profile Avira-AV-Profile mime-whitelist list Mime_exception -
将防病毒模块配置为使用 URL 绕过列表。URL 允许列表仅对 HTTP 流量有效。在此示例中,您将使用之前设置的列表。
[edit]user@host#set security utm feature-profile anti-virus profile Avira-AV-Profile mime-whitelist list Mime_1user@host#set security utm feature-profile anti-virus profile Avira-AV-Profile url-whitelist Cust_URL_Cat -
配置内容安全性策略,附加防病毒功能配置文件 Avira-AV-Profile。
[edit]user@host#set security utm utm-policy UTM-AV-Policy anti-virus http-profile Avira-AV-Profileuser@host#set security utm utm-policy UTM-AV-Policy anti-virus ftp upload-profile Avira-AV-Profileuser@host#set security utm utm-policy UTM-AV-Policy anti-virus ftp download-profile Avira-AV-Profileuser@host#set security utm utm-policy UTM-AV-Policy anti-virus smtp-profile Avira-AV-Profileuser@host#set security utm utm-policy UTM-AV-Policy anti-virus pop3-profile Avira-AV-Profileuser@host#set security utm utm-policy UTM-AV-Policy anti-virus imap-profile Avira-AV-Profile -
配置安全策略,并将内容安全性策略
UTM-AV-Policy应用为允许流量的应用程序服务。[edit]user@host#set security policies from-zone trust to-zone untrust policy POLICY-1 match source-address anyuser@host#set security policies from-zone trust to-zone untrust policy POLICY-1 match destination-address anyuser@host#set security policies from-zone trust to-zone untrust policy POLICY-1 match application anyuser@host#set security policies from-zone trust to-zone untrust policy POLICY-1 then permit application-services utm-policy UTM-AV-Policy
结果
在配置模式下,输入 show security utm、 show services和 show security policies 命令以确认您的配置。如果输出未显示预期的配置,请重复此示例中的配置说明进行更正。
user@host# show security utm
custom-objects {
    mime-pattern {
        Mime_1 {
            value video/;
        }
        Mime_exception {
            value video/x-shockwave-flash;
        }
    }
    url-pattern {
        Pattern_List_1 {
            value www.juniper.net;
        }
    }
    custom-url-category {
        Cust_URL_Cat {
            value Pattern_List_1;
        }
    }
}
feature-profile {
    anti-virus {
        profile Avira-AV-Profile {
            fallback-options {
                default log-and-permit;
                content-size block;
                engine-not-ready log-and-permit;
                timeout log-and-permit;
                out-of-resources log-and-permit;
                too-many-requests log-and-permit;
            }
            notification-options {
                fallback-block {
                    type protocol-only;
                    notify-mail-sender;
                    custom-message " fallback block action occured ";
                    custom-message-subject " Antivirus Fallback Alert ";
                }
            }
            mime-whitelist {
                list Mime_1;
            }
            url-whitelist Cust_URL_Cat;
        }
    }
}
utm-policy P1 {
    anti-virus {
        http-profile junos-av-defaults;
        ftp {
            upload-profile junos-av-defaults;
            download-profile junos-av-defaults;
        }
        smtp-profile junos-av-defaults;
        pop3-profile junos-av-defaults;
        imap-profile junos-av-defaults;
    }
}
utm-policy UTM-AV-Policy {
    anti-virus {
        http-profile Avira-AV-Profile;
        ftp {
            upload-profile Avira-AV-Profile;
            download-profile Avira-AV-Profile;
        }
        smtp-profile Avira-AV-Profile;
        pop3-profile Avira-AV-Profile;
        imap-profile Avira-AV-Profile;
    }
}
[edit]
user@host# show security policies
    from-zone untrust to-zone trust {
        policy  POLICY-1 {
            match {
                source-address any;
                destination-address any;
                application any;
            }
            then {
                permit {
                    application-services {
                        utm-policy UTM-AV-Policy;
                    }
                }
            }
        }
    }
如果完成设备配置,请从配置模式进入。commit
验证
要验证配置是否工作正常,请使用以下步骤:
获取有关当前防病毒状态的信息
目的
行动
在作模式下,输入命令 show security utm anti-virus status 以查看防病毒状态。
示例输出
命令名称
user@host>show security utm anti-virus status
UTM anti-virus status:
  Update server: https://update.example-juniper.net/avira
           Interval: 360 minutes
           Pattern update status: next update in 236 minutes
           Last result: Downloading certs failed
    Scan engine type: avira-engine
    Scan engine information: 8.3.52.102
    Anti-virus signature version: 8.15.11.42
    Onbox AV load flavor: running heavy, configure heavy
意义
防病毒密钥到期日期 — 许可证密钥到期日期。
更新服务器 - 数据文件更新服务器的 URL。
间隔 — 设备从更新服务器更新数据文件的时间段(以分钟为单位)。
阵列更新状态 (Pattern update status) - 下次更新数据文件的时间,以分钟为单位显示。
上次结果 - 上次更新的结果。
防病毒签名版本 — 当前数据文件的版本。
扫描引擎类型 - 当前正在运行的防病毒引擎类型。
扫描引擎信息 - 扫描引擎的版本。