示例:在 NFX350 设备上配置通过第三方 VNF 的 LAN 到 WAN 路由的服务链
此示例说明如何在 NFX350 设备上通过第三方 VNF 为 LAN 到 WAN 路由配置服务链。
要求
此示例使用运行 Junos OS 19.4R1 版的 NFX350 设备。
概述
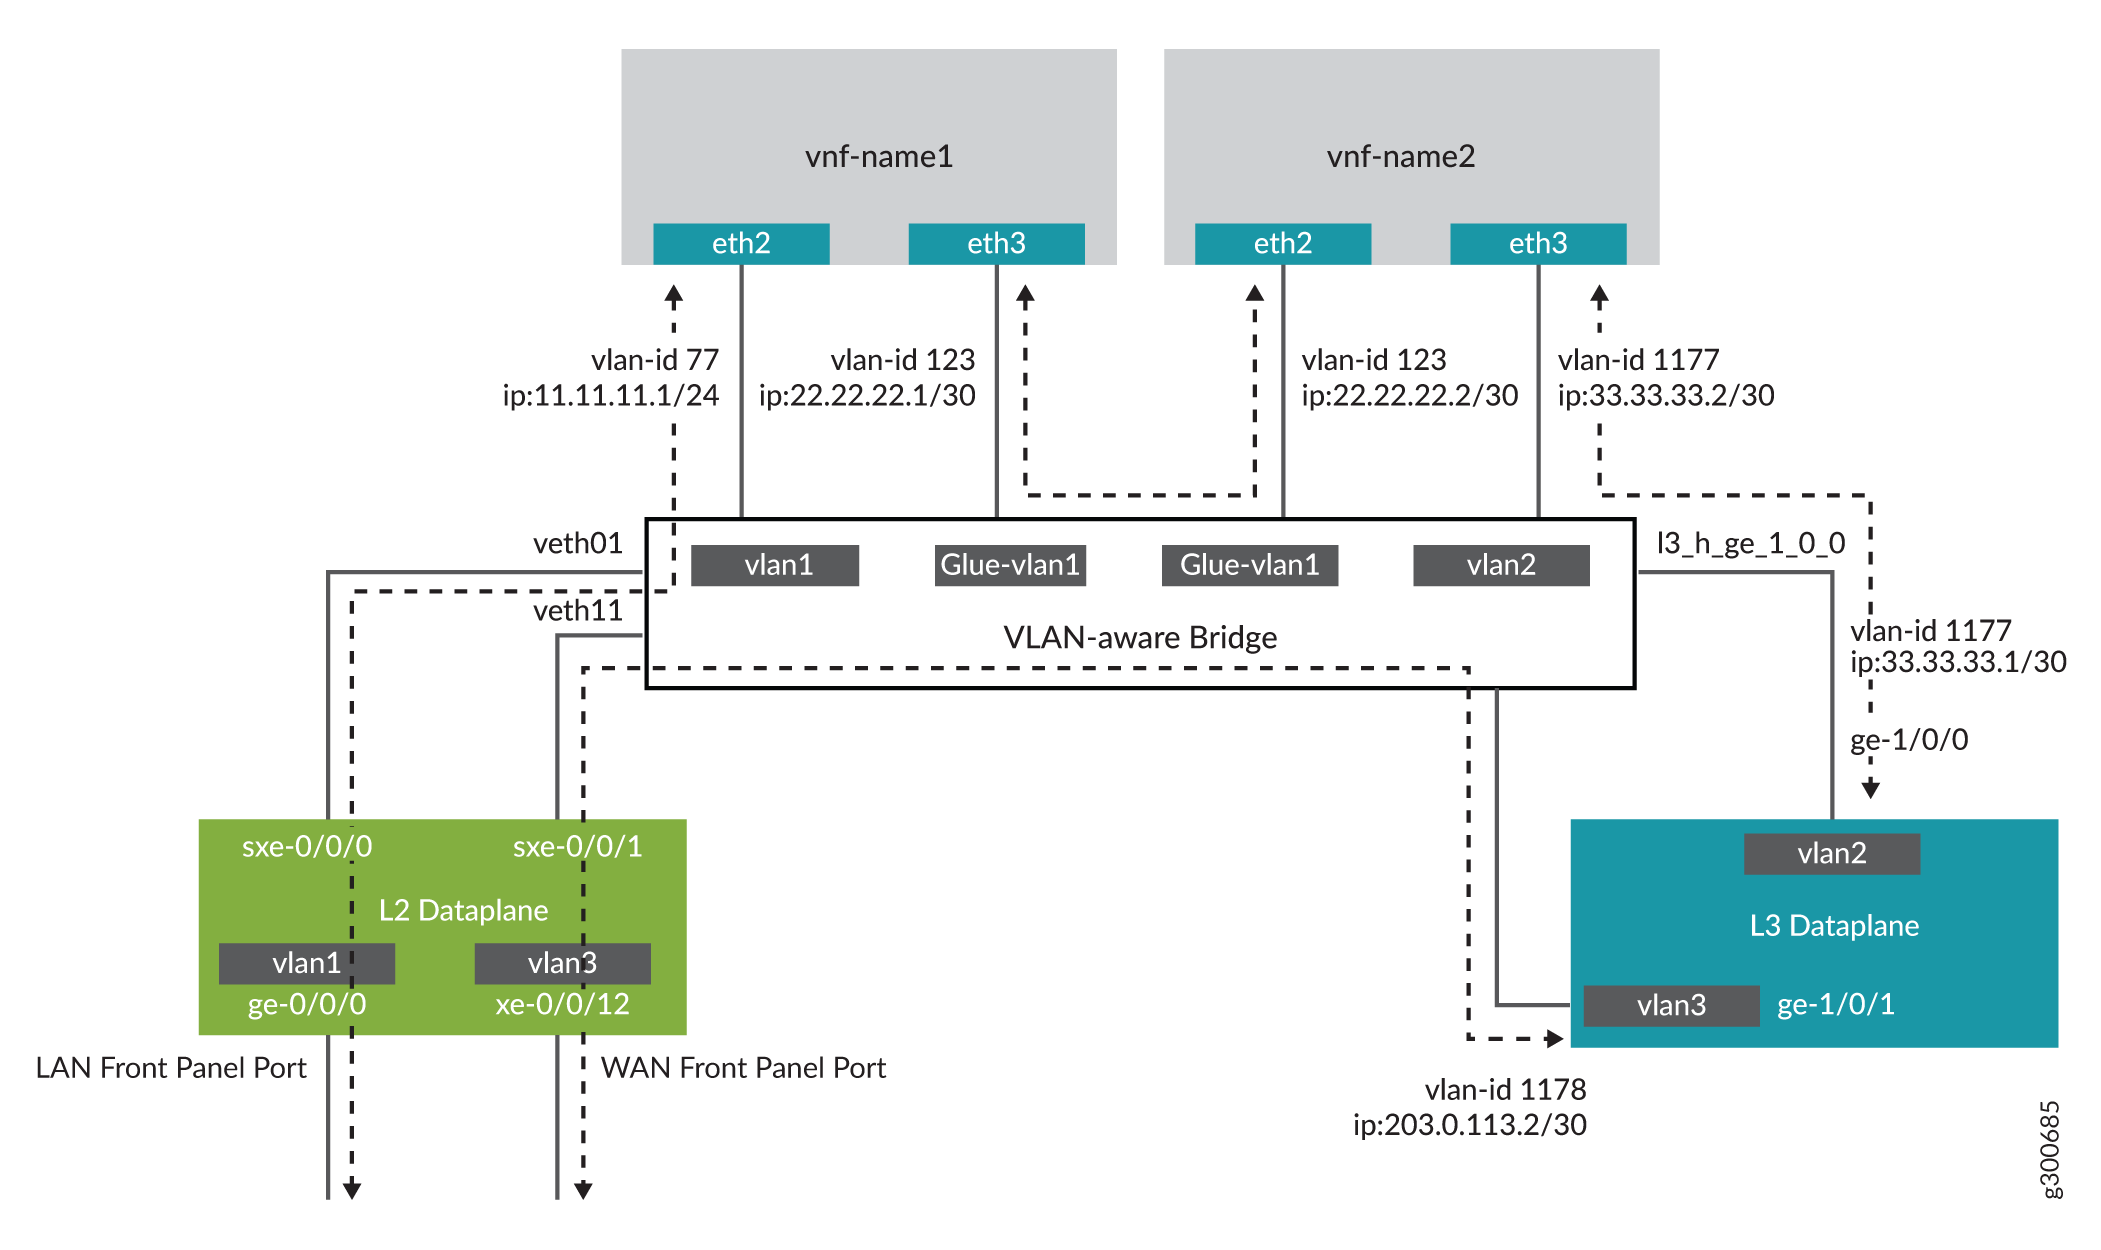
此示例说明如何配置设备的各个层,以使来自 LAN 网络的流量能够进入设备,流经 OVS 网桥和第三方 VNF,退出设备并进入 WAN 网络。
配置
- 配置第 2 层数据通路(JCP LAN 接口)
- 验证 NFX350 设备的性能模式
- 为 VNF 配置巨页
- 配置 VNF
- 配置第 3 层数据路径(WAN 接口)
- 配置用于创建服务链的 VNF 接口
- 在 NFX350 中配置安全性
- 在 vSRX 虚拟防火墙 VNF 中配置安全性
配置第 2 层数据通路(JCP LAN 接口)
分步过程
连接到 JCP。
user@host:~ # cli
user@host>
user@host> configure
[edit]
user@host#
为 LAN 端接口配置 VLAN。
user@host# set vlans vlan1 vlan-id 77
配置 LAN 端前面板端口并将其添加到 LAN 端 VLAN。LAN 端端口通常是接入端口,如果需要,也可以是中继端口
user@host# set interfaces ge-0/0/0.0 family ethernet-switching vlan members vlan1
将面向内部的接口 sxe-0/0/0 配置为中继端口,并将其添加到 LAN 端 VLAN。面向内部的接口通常是中继端口,因为它们必须支持来自多个前面板端口和 VLAN 的流量。
user@host# set interfaces sxe-0/0/0.0 family ethernet-switching interface-mode trunk
user@host# set interfaces sxe-0/0/0.0 family ethernet-switching vlan members vlan1
验证 NFX350 设备的性能模式
目的
验证 NFX350 设备的性能模式并检查 CPU 可用性。如果 NFX350 设备在吞吐量模式下运行,则必须使用 request vmhost mode 命令将其更改为计算模式或混合模式。
有关设备性能模式的详细信息,请参阅 NFX350 概述。
行动
user@host> show vmhost mode | no-more
Mode:
--------
Current Mode: compute

CPU Allocations:
Name                                 Configured                               Used
----------------------------------------------------------------------------------------------------------------------
Junos Control Plane                  16                                       16,6
Juniper Device Manager               16                                       16
LTE                                  16                                       -
NFV Backplane Control Path           16                                       16
NFV Backplane Data Path              1,2,3                                    1,2,3
Layer 2 Control Path                 -                                        -
Layer 2 Data Path                    -                                        -
Layer 3 Control Path                 0                                        0
Layer 3 Data Path                    4,5                                      4,5
CPUs available for VNFs              6,7,8,9,10,11,12,13,14,15,22,23,24,25,26,27,28,29,30,31 -
CPUs turned off                      17,18,19,20,21                           -

Memory Allocations:
Name                                 Configured                               Used
----------------------------------------------------------------------------------------------------------------------
Junos Control Plane (mB)             2048                                     2002
NFV Backplane 1G hugepages           12                                       18
NFV Backplane 2M hugepages           -                                        0
Layer 2 1G hugepages                 -                                        -
Layer 2 2M hugepages                 -                                        -
Layer 3 1G hugepages                 6                                        6
Layer 3 2M hugepages                 20481                                    20481
为 VNF 配置巨页
分步过程
如果未分配配置的 hugepages 数量,建议重新启动设备。
检查内存可用性:
user@host> show system visibility memory | no-more
Memory Information
------------------

Virtual Memory:
---------------
Total       (KiB): 131042784
Used        (KiB): 67141828
Available   (KiB): 66151972
Free        (KiB): 63900956
Percent Used     : 49.5

Huge Pages:
------------
Total 1GiB Huge Pages:      18
Free 1GiB Huge Pages:       0
Configured 1GiB Huge Pages: 0
Total 2MiB Huge Pages:      20481
Free 2MiB Huge Pages:       0
Configured 2MiB Huge Pages: 0
配置 hugepages:
user@host> configure
[edit]
user@host#
user@host# set system memory hugepages page-size 1024 page-count 10
user@host# commit
验证是否配置了 hugepages:
user@host# run show system visibility memory | no-more
Memory Information
------------------

Virtual Memory:
---------------
Total       (KiB): 131042784
Used        (KiB): 77624220
Available   (KiB): 55670868
Free        (KiB): 53418564
Percent Used     : 57.5

Huge Pages:
------------
Total 1GiB Huge Pages:      28
Free 1GiB Huge Pages:       10
Configured 1GiB Huge Pages: 10
Total 2MiB Huge Pages:      20481
Free 2MiB Huge Pages:       0
Configured 2MiB Huge Pages: 0

Hugepages Usage:
----------------------------------------------------------------------------------------------------------
Name                              Type                               Used 1G Hugepages  Used 2M Hugepages
--------------------------------- ---------------------------------- ------------------ ------------------
ovs-vswitchd                      other process                      18                 0
srxpfe                            other process                      6                  20481
配置 VNF
分步过程
配置 VNF-1:
从远程位置加载设备上的 VNF 映像:
注意:如果您最多使用两个 VNF,则可以将 VNF 映像保存在 /var/public 目录中。如果您使用两个以上的 VNF,请将文件保存在外部 SSD 上。如果您将外部 SSD 用于 VNF,请确保初始化 SSD 并将其添加到设备。有关详细信息,请参阅 在 NFX350 设备上配置固态磁盘。
user@host> file copy source-address /var/public/vnf-1_junos-vsrx3-x86-64-19.1R1-S1.3.qcow2
启动 VNF:
user@host> set virtual-network-functions VNF-1 image /var/public/vnf-1_junos-vsrx3-x86-64-19.1R1-S1.3.qcow2
将虚拟 CPU 连接到物理 CPU:
user@host> set virtual-network-functions VNF-1 virtual-cpu 0 physical-cpu 6
user@host> set virtual-network-functions VNF-1 virtual-cpu 1 physical-cpu 7
指定 VNF 所需的 CPU 数量:
user@host> set virtual-network-functions VNF-1 virtual-cpu count 2
为 VNF CPU 启用硬件虚拟化或硬件加速:
user@host> set virtual-network-functions VNF-1 virtual-cpu features hardware-virtualization
将 VNF 接口配置为中继端口,并将其添加到 LAN 端 VLAN:
user@host> set virtual-network-functions VNF-1 interfaces eth2 mapping vlan mode trunk
user@host> set virtual-network-functions VNF-1 interfaces eth2 mapping vlan members vlan1
user@host> set virtual-network-functions VNF-1 interfaces eth3 mapping vlan mode trunk
user@host> set virtual-network-functions VNF-1 interfaces eth3 mapping vlan members glue-vlan1
指定 VNF 的内存分配:
user@host> set virtual-network-functions VNF-1 memory size 4194304
user@host> set virtual-network-functions VNF-1 memory features hugepages
分步过程
配置 VNF-2:
从远程位置加载设备上的 VNF 映像:
user@host> file copy source-address /var/public/vnf-2-junos-vsrx3-x86-64-19.1R1-S1.3.qcow2
启动 VNF:
user@host> set virtual-network-functions VNF-2 image /var/public/vnf-2-junos-vsrx3-x86-64-19.1R1-S1.3.qcow2
将虚拟 CPU 连接到物理 CPU:
user@host> set virtual-network-functions VNF-2 virtual-cpu 0 physical-cpu 8
user@host> set virtual-network-functions VNF-2 virtual-cpu 1 physical-cpu 9
指定 VNF 所需的 CPU 数量:
user@host> set virtual-network-functions VNF-2 virtual-cpu count 2
为 VNF CPU 启用硬件虚拟化或硬件加速:
user@host> set virtual-network-functions VNF-2 virtual-cpu features hardware-virtualization
将 VNF 接口配置为中继端口,并将其添加到 LAN 端 VLAN:
user@host> set virtual-network-functions VNF-2 interfaces eth2 mapping vlan mode trunk
user@host> set virtual-network-functions VNF-2 interfaces eth2 mapping vlan members glue-vlan1
user@host> set virtual-network-functions VNF-2 interfaces eth3 mapping vlan mode trunk
user@host> set virtual-network-functions VNF-2 interfaces eth3 mapping vlan members vlan2
指定 VNF 的内存分配:
user@host> set virtual-network-functions VNF-2 memory size 4194304
user@host> set virtual-network-functions VNF-2 memory features hugepages
配置第 3 层数据路径(WAN 接口)
分步过程
将面向内部的 L3 数据平面接口配置为 VLAN 标记接口并为其分配 IP 地址:
user@host# set interfaces ge-1/0/0 vlan-tagging
user@host# set interfaces ge-1/0/0.0 vlan-id 1177
user@host# set interfaces ge-1/0/0.0 family inet address 33.33.33.1/30
将第 3 层接口映射到 Open vSwitch (OVS) 并提交配置:
user@host# set vmhost virtualization-options interfaces ge-1/0/1
user@host# commit
将面向外部的 L3 数据平面接口配置为 VLAN 标记的接口并为其分配 IP 地址:
user@host# set interfaces ge-1/0/1 vlan-tagging
user@host# set interfaces ge-1/0/1.0 vlan-id 1178
user@host# set interfaces ge-1/0/1.0 family inet address 203.0.113.2/30
为 WAN 端 JCP 接口配置 VLAN:
user@host# set vlans vlan3 vlan-id 1178
将 WAN 端面向内部的接口配置为中继端口,并将其添加到 WAN 端 VLAN:
user@host# set interfaces sxe-0/0/1.0 family ethernet-switching interface-mode trunk
user@host# set interfaces sxe-0/0/1.0 family ethernet-switching vlan members vlan3
配置 WAN 端前面板端口并将其添加到 WAN 端 VLAN:
user@host# set interfaces xe-0/0/12.0 family ethernet-switching interface-mode access
user@host# set interfaces xe-0/0/12.0 family ethernet-switching vlan members vlan3
提交配置:
user@host# commit
配置用于创建服务链的 VNF 接口
分步过程
检查 VNF 接口的 MAC 地址:
user@host# run show system visibility network
VNF MAC Addresses
-----------------------------------------------------------
VNF                                       MAC
----------------------------------------- -----------------
VNF-1_ethdef0                             D0:DD:49:E8:B6:CA
VNF-1_ethdef1                             D0:DD:49:E8:B6:CB
VNF-1_eth2                                D0:DD:49:E8:B6:CC
VNF-1_eth3                                D0:DD:49:E8:B6:C7
VNF-2_ethdef0                             D0:DD:49:E8:B6:C8
VNF-2_ethdef1                             D0:DD:49:E8:B6:C9
VNF-2_eth2                                D0:DD:49:E8:B6:CD
VNF-2_eth3                                D0:DD:49:E8:B6:CE

VNF Internal IP Addresses
---------------------------------------------------------
VNF                                       IP
----------------------------------------- ---------------
VNF-1                                     192.0.2.100
VNF-2                                     192.0.2.101

Free Virtual Functions
----------------------
PF        VF
--------- ------------
hsxe0     0000:b7:03.6
hsxe0     0000:b7:03.4
hsxe0     0000:b7:03.5
hsxe0     0000:b7:02.3
hsxe0     0000:b7:02.2
hsxe0     0000:b7:02.1
hsxe0     0000:b7:02.7
hsxe0     0000:b7:02.6
hsxe0     0000:b7:02.5
hsxe0     0000:b7:02.4
hsxe1     0000:b7:07.4
hsxe1     0000:b7:06.7
hsxe1     0000:b7:06.6
hsxe1     0000:b7:06.5
hsxe1     0000:b7:06.4
hsxe1     0000:b7:06.3
hsxe1     0000:b7:06.2
hsxe1     0000:b7:06.1
hsxe1     0000:b7:07.5
hsxe1     0000:b7:07.6
hsxe2     0000:b7:0b.6
hsxe2     0000:b7:0b.5
hsxe2     0000:b7:0b.4
hsxe2     0000:b7:0a.4
hsxe2     0000:b7:0a.5
hsxe2     0000:b7:0a.6
hsxe2     0000:b7:0a.7
hsxe2     0000:b7:0a.1
hsxe2     0000:b7:0a.2
hsxe2     0000:b7:0a.3
hsxe3     0000:b7:0f.6
hsxe3     0000:b7:0f.5
hsxe3     0000:b7:0f.4
hsxe3     0000:b7:0e.1
hsxe3     0000:b7:0e.2
hsxe3     0000:b7:0e.3
hsxe3     0000:b7:0e.4
hsxe3     0000:b7:0e.5
hsxe3     0000:b7:0e.6
hsxe3     0000:b7:0e.7

VNF Interfaces
---------------------------------------------------------------------------------------------
VNF                  Interface Type      Source       Model      MAC                  VLAN-ID
-------------------- --------- --------- ------------ ---------- -------------------- -------
VNF-1                vnet4     network   default      virtio     d0:dd:49:e8:b6:ca    --
VNF-1                vnet5     bridge    eth0br       virtio     d0:dd:49:e8:b6:cb    --
VNF-1                VNF-1_eth2 vhostuser --          virtio     d0:dd:49:e8:b6:cc    --
VNF-1                VNF-1_eth3 vhostuser --          virtio     d0:dd:49:e8:b6:c7    --
VNF-2                vnet6     network   default      virtio     d0:dd:49:e8:b6:c8    --
VNF-2                vnet7     bridge    eth0br       virtio     d0:dd:49:e8:b6:c9    --
VNF-2                VNF-2_eth2 vhostuser --          virtio     d0:dd:49:e8:b6:cd    --
VNF-2                VNF-2_eth3 vhostuser --          virtio     d0:dd:49:e8:b6:ce    --

OVS Interfaces
------------------------
NAME              MTU
----------------- ------
ovs-sys-br        1500
dpdk2             9216
xdsl_eth0         9192
l3_h_ge_1_0_1     9216
l3_h_ge_1_0_0     1500
dpdk0             9216
VNF-2_eth2        1500
dpdk1             9216
VNF-1_eth3        1500
dpdk3             9216
VNF-1_eth2        1500
VNF-2_eth3        1500
通过控制台从 JCP 访问 VNF (VNF-1):
user@host> request virtual-network-functions console VNF-1
Internal instance: VNF-1
Connected to domain VNF-1
登录控制台:
user@host:~ # cli
user@host>
检查接口的状态:
-
user@host# show interfaces terse | no-more Interface Admin Link Proto Local Remote ge-0/0/0 up up gr-0/0/0 up up ip-0/0/0 up up lsq-0/0/0 up up lt-0/0/0 up up mt-0/0/0 up up sp-0/0/0 up up sp-0/0/0.0 up up inet inet6 sp-0/0/0.16383 up up inet ge-0/0/1 up up ge-0/0/2 up up dsc up up fti0 up up fxp0 up up fxp0.0 up up gre up up ipip up up irb up up lo0 up up lo0.16384 up up inet 127.0.0.1 --> 0/0 lo0.16385 up up inet 10.0.0.1 --> 0/0 10.0.0.16 --> 0/0 128.0.0.1 --> 0/0 128.0.0.4 --> 0/0 128.0.1.16 --> 0/0 lo0.32768 up up lsi up up mtun up up pimd up up pime up up pp0 up up ppd0 up up ppe0 up up st0 up up tap up up vlan up down -
user@host> show interfaces ge-0/0/0 | no-more Physical interface: ge-0/0/0, Enabled, Physical link is Up Interface index: 135, SNMP ifIndex: 508 Link-level type: Ethernet, MTU: 1514, LAN-PHY mode, Link-mode: Half-duplex, Speed: 1000mbps, BPDU Error: None, Loop Detect PDU Error: None, Ethernet-Switching Error: None, MAC-REWRITE Error: None, Loopback: Disabled, Source filtering: Disabled, Flow control: Enabled, Auto-negotiation: Enabled, Remote fault: Online Device flags : Present Running Interface flags: SNMP-Traps Internal: 0x4000 Link flags : None CoS queues : 8 supported, 8 maximum usable queues Current address: d0:dd:49:e8:b6:cb, Hardware address: d0:dd:49:e8:b6:cb Last flapped : 2020-05-11 10:22:06 UTC (00:46:40 ago) Input rate : 0 bps (0 pps) Output rate : 0 bps (0 pps) Active alarms : None Active defects : None PCS statistics Seconds Bit errors 0 Errored blocks 0 Ethernet FEC statistics Errors FEC Corrected Errors 0 FEC Uncorrected Errors 0 FEC Corrected Errors Rate 0 FEC Uncorrected Errors Rate 0 Interface transmit statistics: Disabled -
user@host> show interfaces fxp0 | no-more Physical interface: fxp0, Enabled, Physical link is Up Interface index: 65, SNMP ifIndex: 1 Type: Ethernet, Link-level type: Ethernet, MTU: 1514, Speed: 1000mbps Device flags : Present Running Interface flags: SNMP-Traps Link type : Full-Duplex Current address: d0:dd:49:e8:b6:ca, Hardware address: d0:dd:49:e8:b6:ca Last flapped : 2020-05-11 10:21:26 UTC (00:47:53 ago) Input packets : 1484 Output packets: 0 Logical interface fxp0.0 (Index 3) (SNMP ifIndex 13) Flags: Up SNMP-Traps Encapsulation: ENET2 Input packets : 1452 Output packets: 0 -
user@host> show interfaces ge-0/0/1 | no-more Physical interface: ge-0/0/1, Enabled, Physical link is Up Interface index: 136, SNMP ifIndex: 517 Link-level type: Ethernet, MTU: 1514, LAN-PHY mode, Link-mode: Half-duplex, Speed: 1000mbps, BPDU Error: None, Loop Detect PDU Error: None, Ethernet-Switching Error: None, MAC-REWRITE Error: None, Loopback: Disabled, Source filtering: Disabled, Flow control: Enabled, Auto-negotiation: Enabled, Remote fault: Online Device flags : Present Running Interface flags: SNMP-Traps Internal: 0x4000 Link flags : None CoS queues : 8 supported, 8 maximum usable queues Current address: d0:dd:49:e8:b6:cc, Hardware address: d0:dd:49:e8:b6:cc Last flapped : 2020-05-11 10:22:06 UTC (00:47:39 ago) Input rate : 0 bps (0 pps) Output rate : 0 bps (0 pps) Active alarms : None Active defects : None PCS statistics Seconds Bit errors 0 Errored blocks 0 Ethernet FEC statistics Errors FEC Corrected Errors 0 FEC Uncorrected Errors 0 FEC Corrected Errors Rate 0 FEC Uncorrected Errors Rate 0 Interface transmit statistics: Disabled -
user@host> show interfaces ge-0/0/2 | no-more
Physical interface: ge-0/0/2, Enabled, Physical link is Up
  Interface index: 137, SNMP ifIndex: 518
  Link-level type: Ethernet, MTU: 1514, LAN-PHY mode, Link-mode: Half-duplex,
  Speed: 1000mbps, BPDU Error: None, Loop Detect PDU Error: None,
  Ethernet-Switching Error: None, MAC-REWRITE Error: None, Loopback: Disabled,
  Source filtering: Disabled, Flow control: Enabled, Auto-negotiation: Enabled,
  Remote fault: Online
  Device flags   : Present Running
  Interface flags: SNMP-Traps Internal: 0x4000
  Link flags     : None
  CoS queues     : 8 supported, 8 maximum usable queues
  Current address: d0:dd:49:e8:b6:c7, Hardware address: d0:dd:49:e8:b6:c7
  Last flapped   : 2020-05-11 10:22:06 UTC (00:47:52 ago)
  Input rate     : 0 bps (0 pps)
  Output rate    : 0 bps (0 pps)
  Active alarms  : None
  Active defects : None
  PCS statistics                      Seconds
    Bit errors                             0
    Errored blocks                         0
  Ethernet FEC statistics              Errors
    FEC Corrected Errors                    0
    FEC Uncorrected Errors                  0
    FEC Corrected Errors Rate               0
    FEC Uncorrected Errors Rate             0
  Interface transmit statistics: Disabled
-
设置 root 密码:
user@host# set system root-authentication plain-text-password
出现第一个提示时,输入新的 root 密码。出现第二个提示时,再次输入新的 root 密码:
New password:
Retype new password:
配置完密码后,提交配置:
user@host# commit
commit complete
将 WAN 端面向内部的接口 (ge-0/0/1) 配置为 VLAN 标记的接口,并为其分配一个 IP 地址:
user@host# set interfaces ge-0/0/1 vlan-tagging
user@host# set interfaces ge-0/0/1 unit 0 vlan-id 77
user@host# set interfaces ge-0/0/1 unit 0 family inet address 11.11.11.1/24
user@host# commit
commit complete
将 WAN 端面向内部的接口 (ge-0/0/2) 配置为 VLAN 标记的接口并为其分配 IP 地址:
user@host# set interfaces ge-0/0/2 vlan-tagging
user@host# set interfaces ge-0/0/2 unit 0 vlan-id 123
user@host# set interfaces ge-0/0/2 unit 0 family inet address 22.22.22.1/30
user@host# commit
commit complete
通过控制台从 JCP 访问 VNF (VNF-2):
user@host> request virtual-network-functions console VNF-2
Internal instance: VNF-2
Connected to domain VNF-2
登录控制台:
user@host:~ # cli
user@host>
检查接口的状态:
-
user@host# show interfaces terse | no-more Interface Admin Link Proto Local Remote ge-0/0/0 up up gr-0/0/0 up up ip-0/0/0 up up lsq-0/0/0 up up lt-0/0/0 up up mt-0/0/0 up up sp-0/0/0 up up sp-0/0/0.0 up up inet inet6 sp-0/0/0.16383 up up inet ge-0/0/1 up up ge-0/0/2 up up dsc up up fti0 up up fxp0 up up fxp0.0 up up gre up up ipip up up irb up up lo0 up up lo0.16384 up up inet 127.0.0.1 --> 0/0 lo0.16385 up up inet 10.0.0.1 --> 0/0 10.0.0.16 --> 0/0 128.0.0.1 --> 0/0 128.0.0.4 --> 0/0 128.0.1.16 --> 0/0 lo0.32768 up up lsi up up mtun up up pimd up up pime up up pp0 up up ppd0 up up ppe0 up up st0 up up tap up up vlan up down -
user@host> show interfaces ge-0/0/0 | no-more Physical interface: ge-0/0/0, Enabled, Physical link is Up Interface index: 135, SNMP ifIndex: 508 Link-level type: Ethernet, MTU: 1514, LAN-PHY mode, Link-mode: Half-duplex, Speed: 1000mbps, BPDU Error: None, Loop Detect PDU Error: None, Ethernet-Switching Error: None, MAC-REWRITE Error: None, Loopback: Disabled, Source filtering: Disabled, Flow control: Enabled, Auto-negotiation: Enabled, Remote fault: Online Device flags : Present Running Interface flags: SNMP-Traps Internal: 0x4000 Link flags : None CoS queues : 8 supported, 8 maximum usable queues Current address: d0:dd:49:e8:b6:c9, Hardware address: d0:dd:49:e8:b6:c9 Last flapped : 2020-05-11 10:26:20 UTC (22:53:57 ago) Input rate : 0 bps (0 pps) Output rate : 0 bps (0 pps) Active alarms : None Active defects : None PCS statistics Seconds Bit errors 0 Errored blocks 0 Ethernet FEC statistics Errors FEC Corrected Errors 0 FEC Uncorrected Errors 0 FEC Corrected Errors Rate 0 FEC Uncorrected Errors Rate 0 Interface transmit statistics: Disabled -
user@host> show interfaces fxp0 | no-more Physical interface: fxp0, Enabled, Physical link is Up Interface index: 65, SNMP ifIndex: 1 Type: Ethernet, Link-level type: Ethernet, MTU: 1514, Speed: 1000mbps Device flags : Present Running Interface flags: SNMP-Traps Link type : Full-Duplex Current address: d0:dd:49:e8:b6:c8, Hardware address: d0:dd:49:e8:b6:c8 Last flapped : 2020-05-11 10:25:39 UTC (22:54:38 ago) Input packets : 41363 Output packets: 0 Logical interface fxp0.0 (Index 3) (SNMP ifIndex 13) Flags: Up SNMP-Traps Encapsulation: ENET2 Input packets : 41320 Output packets: 0 -
user@host> show interfaces ge-0/0/1 | no-more Physical interface: ge-0/0/1, Enabled, Physical link is Up Interface index: 136, SNMP ifIndex: 509 Link-level type: Ethernet, MTU: 1514, LAN-PHY mode, Link-mode: Half-duplex, Speed: 1000mbps, BPDU Error: None, Loop Detect PDU Error: None, Ethernet-Switching Error: None, MAC-REWRITE Error: None, Loopback: Disabled, Source filtering: Disabled, Flow control: Enabled, Auto-negotiation: Enabled, Remote fault: Online Device flags : Present Running Interface flags: SNMP-Traps Internal: 0x4000 Link flags : None CoS queues : 8 supported, 8 maximum usable queues Current address: d0:dd:49:e8:b6:cd, Hardware address: d0:dd:49:e8:b6:cd Last flapped : 2020-05-11 10:26:20 UTC (22:53:57 ago) Input rate : 0 bps (0 pps) Output rate : 0 bps (0 pps) Active alarms : None Active defects : None PCS statistics Seconds Bit errors 0 Errored blocks 0 Ethernet FEC statistics Errors FEC Corrected Errors 0 FEC Uncorrected Errors 0 FEC Corrected Errors Rate 0 FEC Uncorrected Errors Rate 0 Interface transmit statistics: Disabled -
user@host> show interfaces ge-0/0/2 | no-more
Physical interface: ge-0/0/2, Enabled, Physical link is Up
  Interface index: 137, SNMP ifIndex: 510
  Link-level type: Ethernet, MTU: 1514, LAN-PHY mode, Link-mode: Half-duplex,
  Speed: 1000mbps, BPDU Error: None, Loop Detect PDU Error: None,
  Ethernet-Switching Error: None, MAC-REWRITE Error: None, Loopback: Disabled,
  Source filtering: Disabled, Flow control: Enabled, Auto-negotiation: Enabled,
  Remote fault: Online
  Device flags   : Present Running
  Interface flags: SNMP-Traps Internal: 0x4000
  Link flags     : None
  CoS queues     : 8 supported, 8 maximum usable queues
  Current address: d0:dd:49:e8:b6:ce, Hardware address: d0:dd:49:e8:b6:ce
  Last flapped   : 2020-05-11 10:26:20 UTC (22:53:57 ago)
  Input rate     : 0 bps (0 pps)
  Output rate    : 0 bps (0 pps)
  Active alarms  : None
  Active defects : None
  PCS statistics                      Seconds
    Bit errors                             0
    Errored blocks                         0
  Ethernet FEC statistics              Errors
    FEC Corrected Errors                    0
    FEC Uncorrected Errors                  0
    FEC Corrected Errors Rate               0
    FEC Uncorrected Errors Rate             0
  Interface transmit statistics: Disabled
-
设置 root 密码:
user@host# set system root-authentication plain-text-password
出现第一个提示时,输入新的 root 密码。出现第二个提示时,再次输入新的 root 密码:
New password:
Retype new password:
配置完密码后,提交配置:
user@host# commit
commit complete
将 WAN 端面向内部的接口 (ge-0/0/1) 配置为 VLAN 标记的接口,并为其分配一个 IP 地址:
user@host# set interfaces ge-0/0/1 vlan-tagging
user@host# set interfaces ge-0/0/1 unit 0 vlan-id 123
user@host# set interfaces ge-0/0/1 unit 0 family inet address 22.22.22.2/30
user@host# commit
commit complete
将 WAN 端面向内部的接口 (ge-0/0/2) 配置为 VLAN 标记的接口并为其分配 IP 地址:
user@host# set interfaces ge-0/0/2 vlan-tagging
user@host# set interfaces ge-0/0/2 unit 0 vlan-id 1177
user@host# set interfaces ge-0/0/2 unit 0 family inet address 33.33.33.2/30
user@host# commit
commit complete
在 NFX350 中配置安全性
分步过程
清除当前安全设置:
user@host# delete security
配置安全选项:
user@host# set security forwarding-options family inet6 mode flow-based
配置安全策略:
user@host# set security policies default-policy permit-all
配置安全区域:
user@host# set security zones security-zone trust host-inbound-traffic system-services all
user@host# set security zones security-zone trust host-inbound-traffic protocols all
user@host# set security zones security-zone trust interfaces all
在 vSRX 虚拟防火墙 VNF 中配置安全性
分步过程
清除当前安全设置:
user@host# delete security
配置安全选项:
user@host# set security forwarding-options family inet6 mode flow-based
配置安全策略:
user@host# set security policies default-policy permit-all
配置安全区域:
user@host# set security zones security-zone trust host-inbound-traffic system-services all
user@host# set security zones security-zone trust host-inbound-traffic protocols all
user@host# set security zones security-zone trust interfaces all