Configure a autenticação baseada em MAC e o desvio de autenticação MAC (MAB)
Siga essas etapas para configurar um dispositivo com fio para autenticar dispositivos com base em seus endereços MAC.
Você pode usar a autenticação MAC junto com a autenticação baseada em certificados ou baseada em credencial como uma camada adicional de segurança.
O Juniper Mist Access Assurance oferece suporte ao MAC Authentication Bypass (MAB) para controle uniforme de acesso em redes com e sem fio. Este tópico fornece um exemplo para a configuração do MAB para um dispositivo com fio.
O exemplo mostra como criar a autenticação MAC para um dispositivo com fio, além da autenticação EAP-TLS baseada em certificados. A tarefa também inclui as etapas para criar uma política de autenticação para um dispositivo com fio que não oferece suporte a ponto 1x (como um hub Phillips).
Pré-requisitos
-
Você já deve ter configurado a autenticação baseada em certificados. Veja a autenticação baseada em certificado (EAP-TLS) configurada para rede sem fio
-
Um switch da Série EX da Juniper Networks.
Configure a autenticação baseada em MAC para dispositivos com fio
Saiba como configurar e validar a autenticação baseada em MAC para dispositivos com fio assistindo aos seguintes vídeos:
Well, what about wired devices? How do we authenticate an authorized wired client? Well, it turns out we could do it right here in the same place. So we could create a couple of more rules. So we can say OK, if we look at wired devices that are using certificates to authenticate , we could just call this rule wired certificate authentication. We can effectively apply the same matching criteria as for wireless. There's no difference whatsoever here.
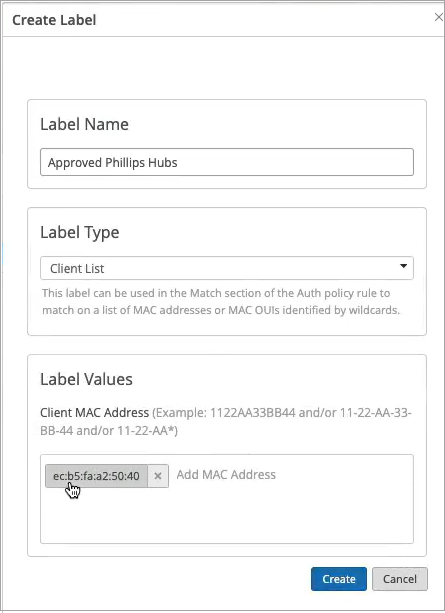
On the right-hand side, we'll decide where we want to move these devices after authentication and the right policy match. And finally, what about non-.1x capable devices on the wired side? So for example, I have here a Phillips hub that does not support .1x. How can I authenticate a Phillips app? So I could create a label for the Phillips device. The label will be client list. And I'll just say approved Phillips app. And I'll just put the MAC address of that device in. Oh. And you could put a list of MAC addresses. You can put the list of Mac OUIs. And remember that all of these labels that I'm creating in the UI - they're all available through the REST API. So there is always an endless possibility of integration with existing, say, inventory management systems that can just put all the new device MAC addresses in those lists for authentication and authorization.
So we'll just click Create. Create this label. And we'll create a rule. We'll call it approved Phillips devices. And here we are matching on wired devices that are doing MAC address authentication bypass that are part of this client list label. And in this case, we will move them to - well, I don't want to move them to Corp VLAN. That's not what I want. I will create an IoT VLAN. And in our case, that's going to be VLAN 3000. And I'm going to add this to an IoT VLAN. And now, we have our authentication policies configuration done.
OK, so how do we validate, right? So we've connected a couple of clients to the switch. One is a laptop that's doing .1x using certificate. Another one is the Phillips Hue app. That doesn't do any .1x, and just doing MAC authentication. So we could see those two clients are connected.
Let's take a look at the laptop one. So we could click on the port. We see that there is a client with a username flashing up. Let's take a look at the wired client insights. And what we can see here is that the user has been authenticated. You could see the port up and down events from the switch side. We see all the authentication phases, same as we saw in the wireless side. The client trusts the server. The server trusts the client certificate. We get all the metadata here. We then are saying client access is allowed. And voila. We matched the same authentication policy rule. Great. So now, we know that this part is working.
Now, we go to switch back. And let's look at the Philips device. That device is not doing any form of .1x authentication. So let's just take a look at the wired client insights. Yeah, and we are seeing that here the user is authenticated. And there is a client access allowed event here as well. And in this case, the authentication type is Mac address bypass - the MAC address that we've added to the client list. And voila. We are matching the right approved Phillips device rule.
Use as seguintes etapas para configurar a autenticação baseada em MAC em uma rede usando o portal Juniper Mist:
- Crie políticas de autenticação.
- Para fornecer autenticação para um dispositivo não-dot1.x no lado lan, crie um novo rótulo de política.
- Crie uma nova política de autenticação.
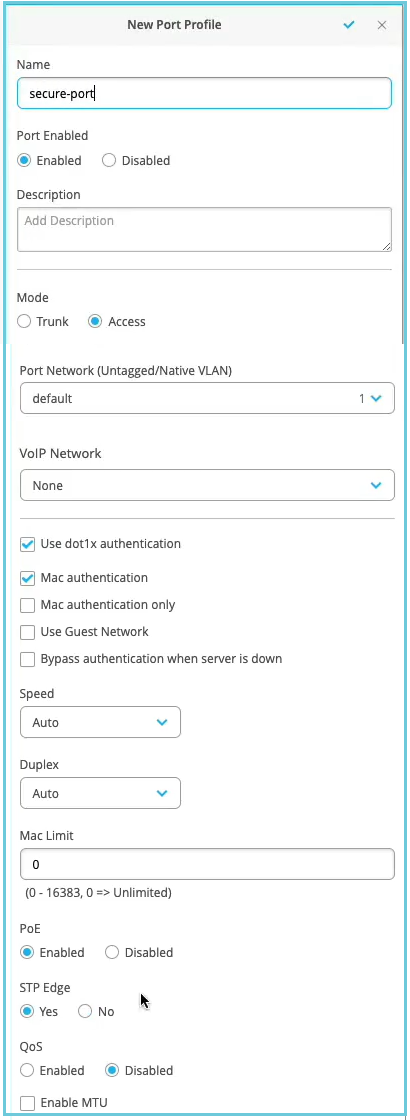
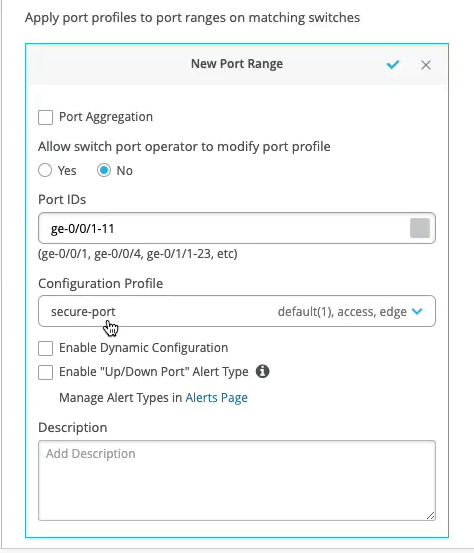
- Configure o switch para realizar a autenticação.
Agora sua rede está pronta para autenticar clientes com segurança. A nuvem Juniper Mist verifica os certificados de cliente e concede acesso e autorização com base na configuração da política de autenticação.
Você pode ver os clientes associados no portal Juniper Mist.
- Selecione clientes > clientes com fio para ver os detalhes do cliente
- Selecione o Monitor > níveis de serviço > Insights para ver os eventos dos clientes.


