Use certificados digitais
Siga estas etapas para gerar e usar certificados para o servidor RADIUS integrado ao Juniper Mist Access Assurance para cada organização.
Ao usar a autenticação EAP, o cliente e o servidor devem verificar a identidade um do outro. O cliente deve confiar no servidor com o qual está se comunicando e o servidor deve autenticar o cliente. O certificado do servidor é a primeira etapa nesse processo de autenticação mútua, e o cliente deve validá-lo ou confiar nele antes de prosseguir com a comunicação.
Se dermos uma olhada em qualquer transação EAP (digamos EAP-TLS ou EAP-TTLS), independentemente de ser autenticação sem fio ou com fio, a primeira etapa é o servidor se identificar enviando uma mensagem "Server Hello" para o dispositivo cliente.
Quando um dispositivo cliente recebe um certificado de servidor, ele examina a lista de autoridades de certificação (CAs) confiáveis no perfil de Wi-Fi ou LAN e verifica se o certificado do servidor está assinado por uma das CAs confiáveis. Opcionalmente, se configurado, verifica se o nome do servidor corresponde à lista de nomes de servidor confiáveis na configuração do cliente.
Recomendamos não ignorar a etapa de validação e o certificado do servidor confiável. Este é um alto risco de segurança e pode abrir ataques MITM (Man in the middle).
Você pode usar um dos métodos a seguir para gerar e usar certificados para o servidor RADIUS integrado ao Juniper Mist Access Assurance para cada organização.
- Certificado de CA — o Juniper Mist requer certificados de CA específicos para estabelecer confiança com seus dispositivos clientes. Esses certificados, emitidos por autoridades de certificação (CAs) confiáveis, permitem que o Juniper Mist Access Assurance conceda acesso de rede aos dispositivos clientes. A validação de dispositivos clientes pela Juniper Mist é baseada na apresentação de certificados pelos dispositivos, que devem ser assinados pela mesma CA.
- Certificado padrão do Juniper Mist Access Assurance — a organização da Mist mantém sua autoridade de certificação (CA) exclusiva e privada da Mist, responsável pela emissão do certificado do servidor do Access Assurance. Na ausência de configurações específicas, os clientes receberão um certificado padrão autenticado pela respectiva CA da Mist Org. Este certificado corresponde ao domínio "auth.mist.com".
- Certificado de servidor personalizado — O certificado de servidor personalizado é favorecido quando você prefere não modificar a configuração atual do cliente e deseja que os clientes confiem nos certificados de servidor emitidos pela mesma autoridade de certificação (CA) que forneceu os certificados do cliente. Você deve inserir a chave privada e o certificado assinado que obteve do servidor RADIUS.
Leia os procedimentos a seguir para entender como usar os certificados acima.
Usar certificado de autoridade de certificação (CA)
Para que a autenticação baseada em certificado EAP-TLS (Extensible Authentication Protocol–Camada de Transporte de Segurança) funcione, você deve adicionar o certificado de CA confiável no portal da Juniper Mist.
Esta etapa permite que a autenticação de acesso Juniper Mist confie em certificados de cliente assinados por suas CAs adicionadas.
Você pode obter o certificado de uma CA externa. A CA pode ser uma CA pública ou uma CA corporativa.
Assista ao vídeo a seguir para saber como gerar um certificado para teste ou uso em laboratório:
How to create certificates both CA certificates and client certificates that you could use for lab testing to repeat all the steps in our tutorials. So in order to do things easily and quickly, assuming there is no existing infrastructure, assuming there is nothing you can use that you're available on-hand, you could use some open source tools that are out there on the internet. I will use degree-based certificate authority and key management called XCA.
You can Google it. You can download it. It's available for everyone to use. So now, when we will use XCA tool, first thing we will need to do, we'll need to create a new database. You could think of this creating a specific BQ infrastructure right on your laptop. So we can just say missed access insurance tutorial. Database, save it in there, it will ask you to encrypt it, which is a good thing. Click OK. So now we have the database created.
So the first thing we will need to create our certificate infrastructure is the certificate authority. That's the thing that will sign all the certificates of all your client devices that you will be using for testing. And that's the ultimate source of trust in your BQ infrastructure. So I'm going to click on new certificate. I'm going to select that, this is going to be a self-signed certificate because technically, every certificate authority, the root certificate authority is a self-signed.
Has a self-signed certificate. We'll select the template called CA from this list, will then go to subject. We can give it some internal name but doesn't matter, we could just say lab mist CA. You can fill in some of the data in there. Again, it doesn't really matter what you will put in there. But for testing purposes, just use anything you really like, organization name. Common name is important. This is how you identify certificates in real life. So one of the important attributes is common name. And we will take a look at the other one later, which is called the subject alternative name.
So common name, let's just call it lab-mist-ca@justify.com. Maybe something like this. I'm going to click that. We'll need to create a private key. A private key is what will prove that the certificate-- oh, owned and certificate holder is actually that same device or it's same CA. So we'll generate a new key, we'll set it to be 4,000 bytes, create. It will automatically selected here. It's good. We'll go to extensions. The type will be certification authority. It will add a few attributes in the certificate saying this is a CA cert.
This is where we will add the subject to alternative name. So typically what you'll do is you click edit, you will say I want to copy common name and there. Click apply. That's it. This will typically go and take your common name and copy it into a assign attribute.
Nowadays, many clients are using SAN to validate-- certificate validity. And the key usage, what do we need there? We need certificate signs, CRL sign. That's pretty much it. So we'll click OK. This now created our certificate authority in here. So we have the certificate. This is a CA cert, it has a common name.
The expiry date is, well, next year, but typically CA cert would be valid for like 10 years or something like that. For our intents and purposes, this is just a lot testing one year is more than enough.
So what will then need to do is will create a client cert. So click select our CA, will click new certificate. Now see under signing section, we are going to use this CA cert for signing certificates. It's not going to be self-signed anymore. So now our certificate authority will sign a new certificate that will be issued by the client. This is how we will establish this chain of trust. So create, select the template-- TLS client. We'll go to subject. That just say this is going to be a test lab client. Doesn't matter.
So common name is important. So this is where I would recommend you to use something that is an actual username that you want to use later on with your testing, whether you have an identity provider with your test username or things like that. So in my case, I will use one username I have in my Okta IdP that I will use later on. So I'm going to just use my Juniper email address. I'm going to copy it. We'll need to generate a private key, again, 4,000 bits.
We'll go to extensions, we'll select end entity. We'll click on subject, alternative name. Again, we'll just say copy common name. We'll go to key usage, will now need to select that this is a client certificate not the service certificate. And we will need key encipherments, digital signature, it should be OK. Now we click OK. We now have a client certificate.
So now we see there is a little dropdown in there. So we have a CA but now sign the client certificate. So now we have a CA and now we have a client certificate. What we'll do will need to export the CA. I will click on export. The CA cert, we are only exporting the public certificate, we are not touching the private key. Private Key stays untouched. It it is never exported anywhere. This is the only thing that protects the ownership of that certificate.
So we are exporting the private key in our test folder-- .mistCRT that's all we need. Click OK. The next thing we'll need is we'll need to export the certificate and the private key that we will use for client testing. Again, normally in production environment, you're not going to export private keys, they will be automatically pushed and distributed through MDM securely so they're never exposed to the network or anybody. But in our case, since we're testing, that's OK to do for now. So we'll click export.
In this case, the export format is pfx. That's the format that will include the client certificate, the client private key, and the CA cert in one package. So you can later on imported to one of your testing clients. And generally, this format is well understood by different operating systems.
It will ask you to encrypt that package. So just do a very secure password of 1234. Now we have to search, export it. We have a CA cert and we have a client cert. For now, this is good enough for our testin
Para adicionar um certificado de CA:
- Clique em Adicionar Autoridade de Certificação.
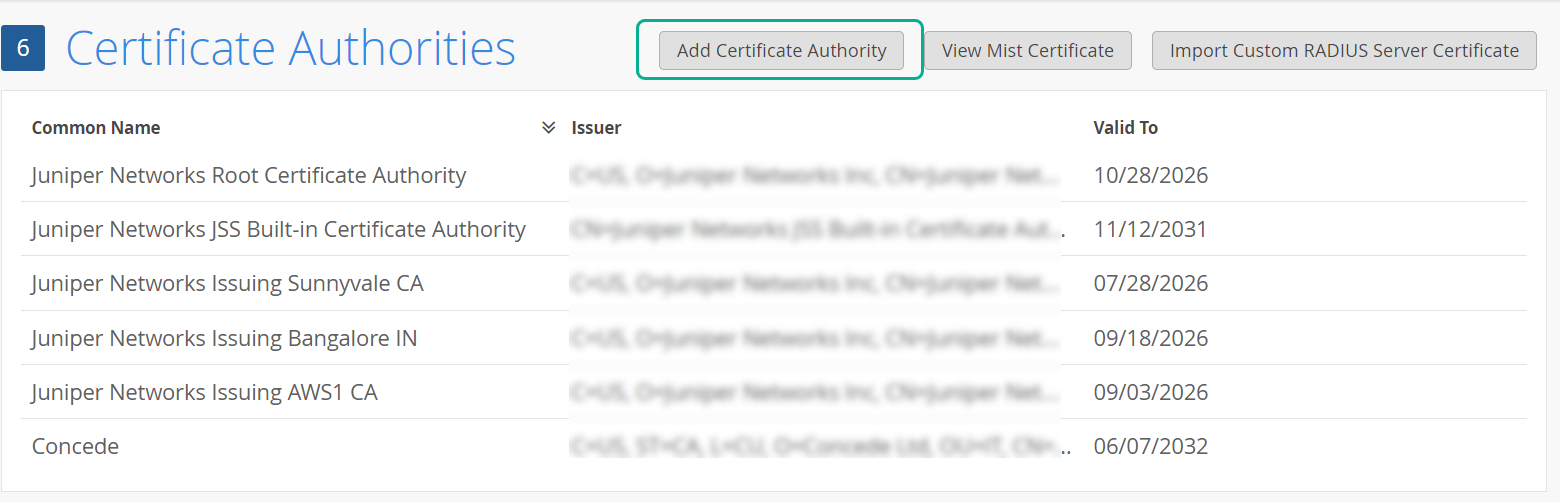
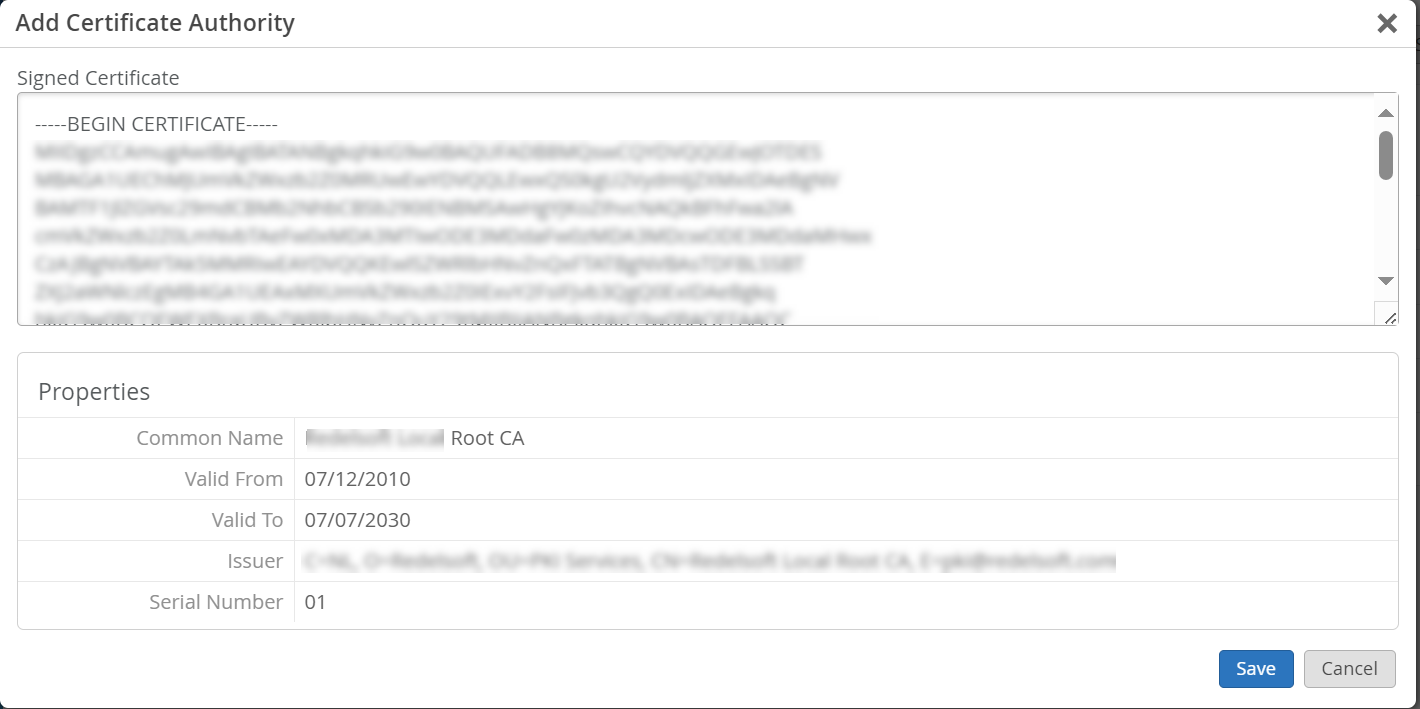
- Cole seu certificado de CA no campo Certificado Assinado.
Figura 1: Adicionar autoridade
 de certificação
O texto deve incluir as
—–BEGIN CERTIFICATE—–linhas e—–END CERTIFICATE—–.O sistema analisa e decodifica o certificado de CA importado e exibe as propriedades do certificado no painel Propriedades . Recomendamos que você adicione sua CA raiz, bem como todas as suas CAs intermediárias ou certificados emissores.
Usar certificado de servidor padrão da Juniper Mist Access Assurance
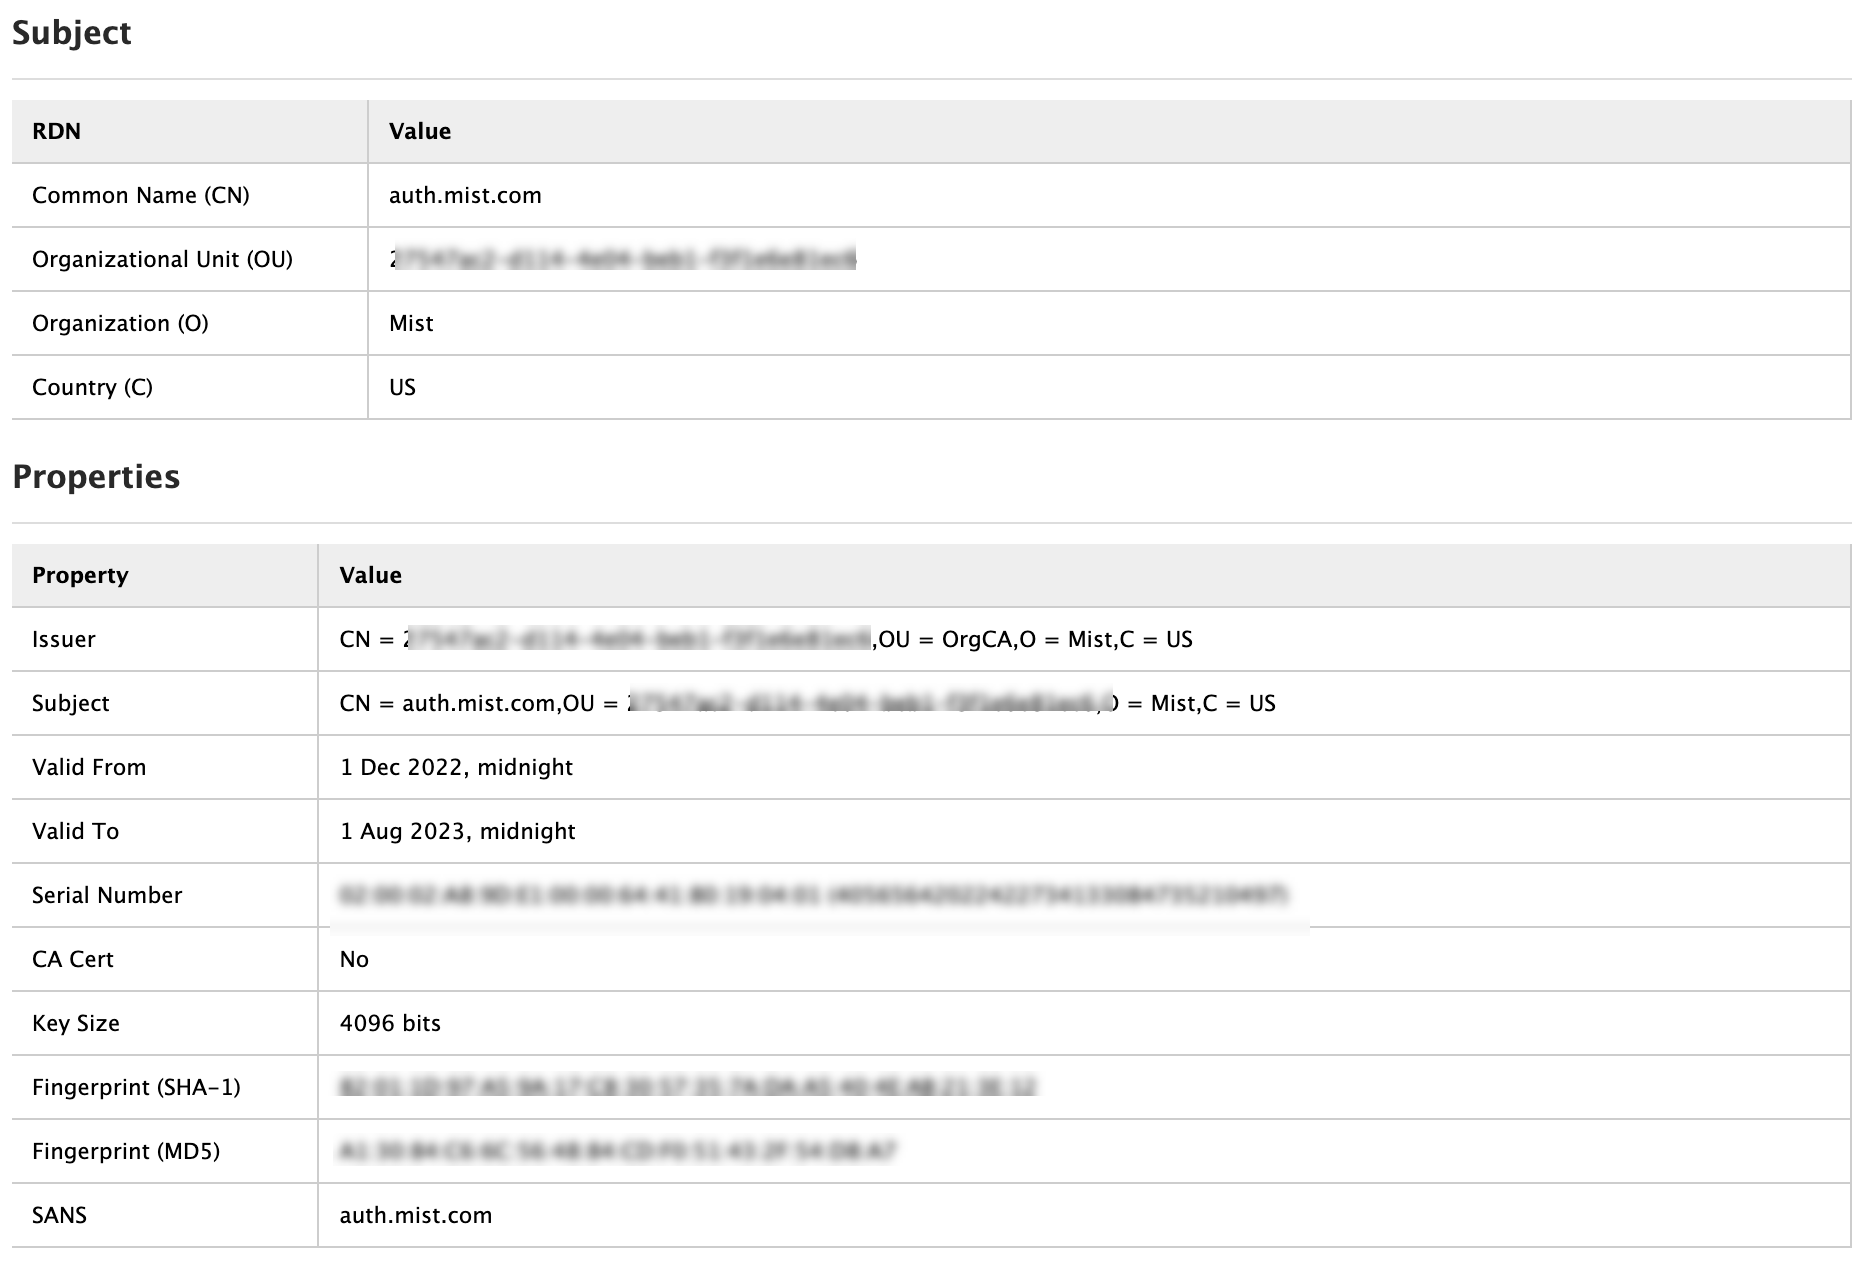
A nuvem Juniper Mist atua como uma autoridade de certificação privada (CA) para cada organização adicionada à nuvem Juniper Mist. A Juniper Mist emite um certificado de servidor. Se nenhum certificado estiver configurado, o portal da Juniper Mist apresentará um certificado de servidor padrão assinado pela CA da Juniper Mist para os dispositivos clientes.
O certificado será emitido para o nome auth.mist.com e exibirá as informações semelhantes às que você vê na Figura 2.
Para baixar o certificado do servidor Juniper Mist:
- Clique em Exibir certificado do Mist.
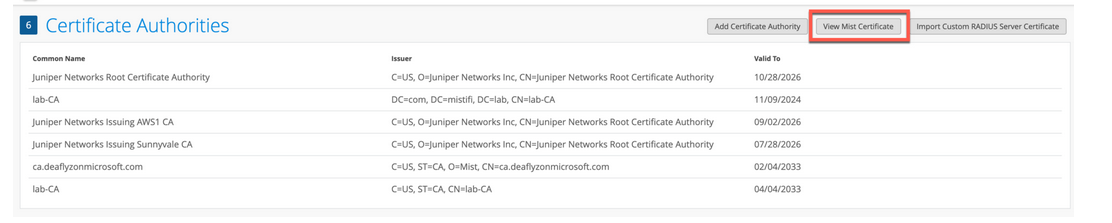 A tela exibe os detalhes do certificado assinado . Copie o conteúdo do certificado do campo Certificado assinado .Figura 3: Exibir e copiar o certificado
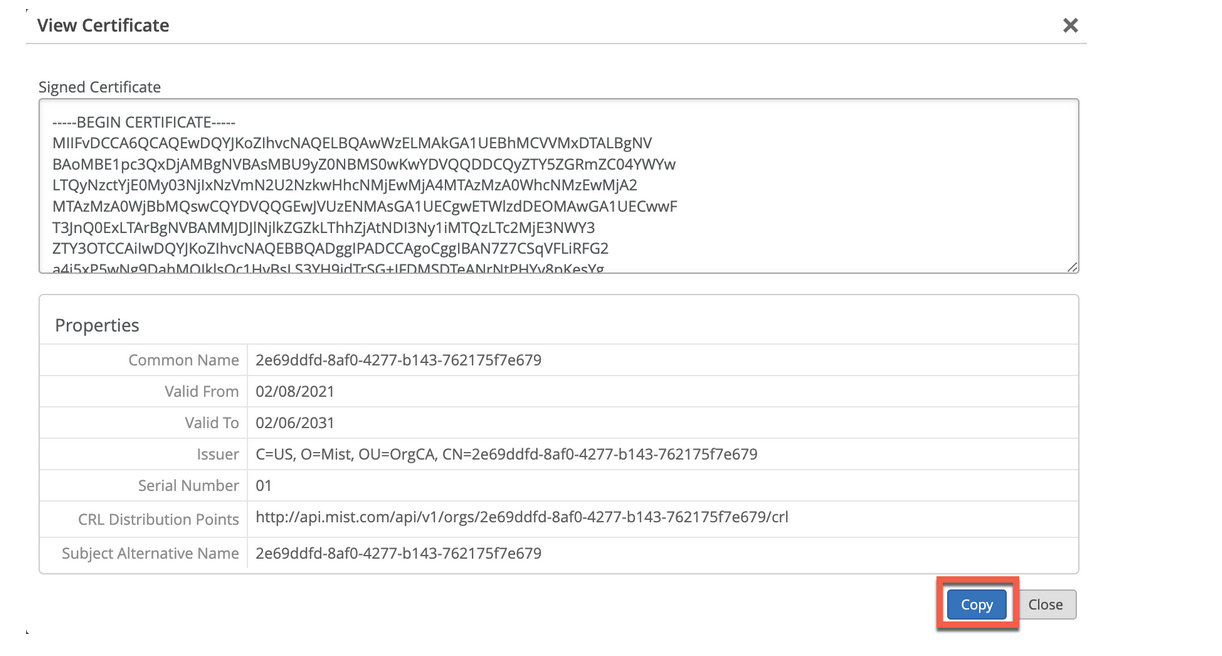 do Mist
Usar certificados de servidor personalizados
Talvez você já tenha uma PKI e queira manter a configuração existente intacta. Nesse cenário, você deve carregar o certificado público de sua CA raiz e o par de chaves pública/privada do servidor RADIUS no portal Juniper Mist.
Certifique-se de que seus dispositivos cliente também usem os mesmos certificados para que o servidor RADIUS valide o certificado de cada cliente (suplicante). Execute esta tarefa se quiser manter a configuração atual de seus clientes inalterada e quiser que os clientes confiem no certificado do servidor emitido pela mesma CA que emitiu seus certificados.
Para carregar seu certificado no portal da Juniper Mist:
- Clique em Importar certificado de raio personalizado para abrir a página do certificado.
Figura 4: Importar certificado
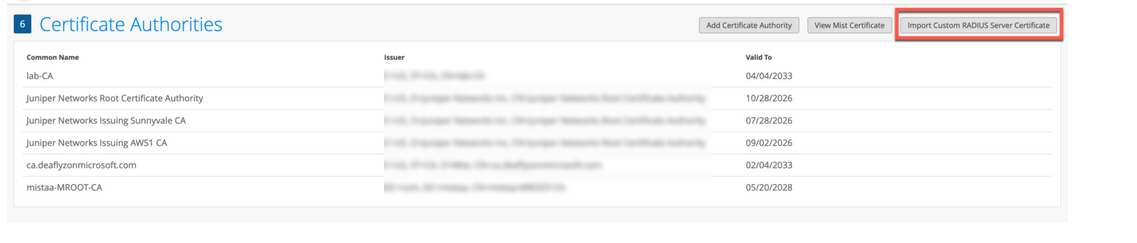 de servidor RADIUS personalizado
- Na página Importar certificado de servidor RADIUS personalizado, insira os detalhes do certificado de CA:
Figura 5: Inserir detalhes
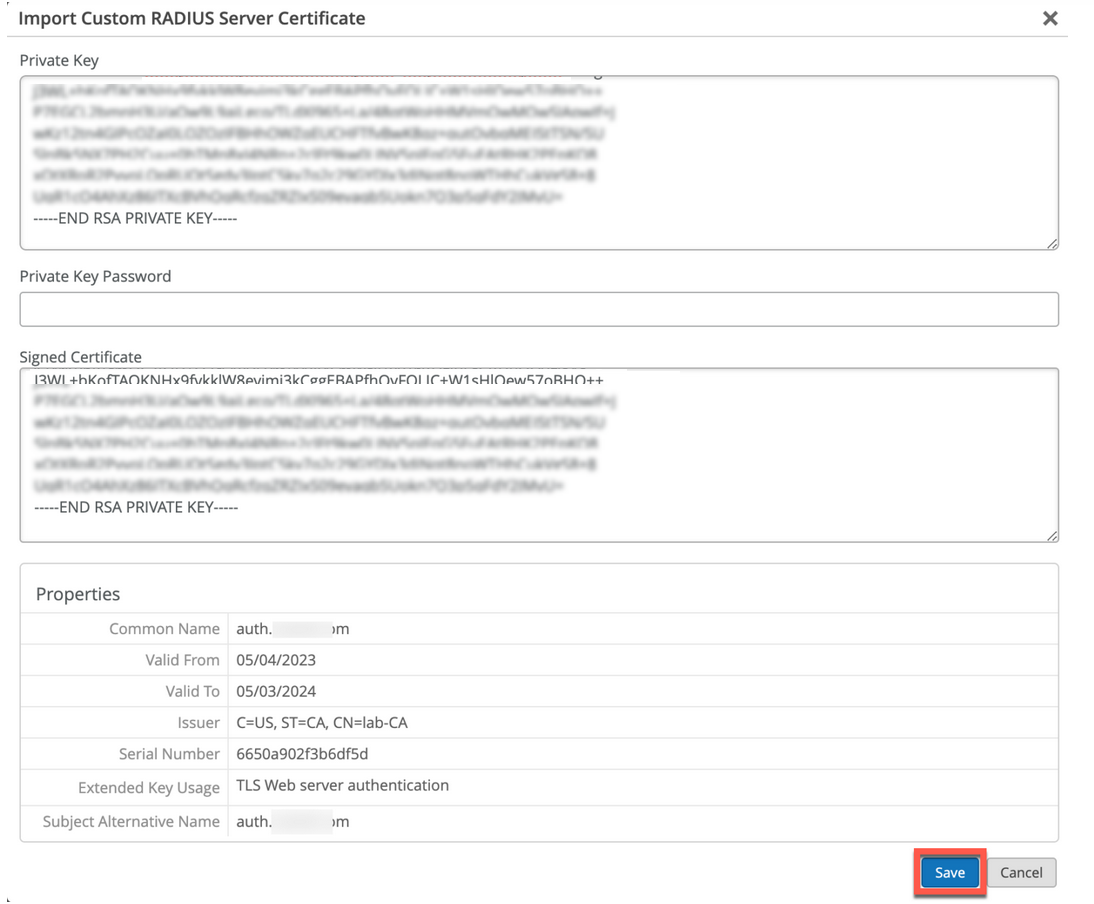 do certificado do servidor personalizado
- Chave privada — copie e cole as informações da chave privada. O texto deve incluir as
BEGIN RSA PRIVATE KEYlinhas eEND RSA PRIVATE KEY. - Senha da chave privada — Digite a senha da chave privada (se disponível).
- Certificado Assinado — Copie e cole o certificado como texto. Certifique-se de incluir todas as CAs intermediárias e o certificado de CA raiz. O texto deve incluir as
—–BEGIN CERTIFICATE—–linhas e—–END CERTIFICATE—–.
- Chave privada — copie e cole as informações da chave privada. O texto deve incluir as
Guidelines for using custom server certificates:
- Do not use a wildcard certificate, for example: *.abc.com for 802.1X authentication.
- You can use a certificate that contains a common name (CN) or a subject alternative name (SAN) for 802.1X authentication..
- We recommend the following x509 extension attributes. The majority of the client device operating systems support these extensions.
- Use certificate version 3 or v3 (not legacy v1)
- If the server name is being used as a validation criterion on the client side, then the certificate should include the SAN extension with the DNS name of the server.
- Include Extended Key Usage as a TLS web server authentication criterion (required for most Android devices).
Agora você pode prosseguir com o processo de autenticação baseada em certificado.
Veja também
Requisitos de certificado do cliente
Ao implementar a autenticação baseada em certificado com o Juniper Mist Access Assurance, os certificados de cliente devem atender a requisitos específicos para garantir a funcionalidade adequada em recursos como pesquisas de IdP e integração de MDM.
- Requisitos de Segurança
- Requisitos para pesquisas de provedor de identidade
- Comportamento de pesquisa do provedor de identidade para certificados de máquina
- Considerações sobre a integração do MDM
Requisitos de Segurança
Os certificados de cliente devem atender a estes padrões mínimos de segurança:
- Tipo de certificado: certificado X.509 v3
- Comprimento da chave: 2048 bits ou mais (4096 bits recomendados) ou ECDSA (P-256 ou mais forte)
- Algoritmo de assinatura: SHA-256 ou mais recente (SHA-384, SHA-512)
- Extensões necessárias: Uso estendido de chave com autenticação de cliente (1.3.6.1.5.5.7.3.2)
Requisitos para pesquisas de provedor de identidade
Para uma correspondência de identidade de usuário bem-sucedida com seu IdP, certifique-se de que seus certificados de cliente incluam um dos campos a seguir. A pesquisa precisa ocorrer usando o nome principal do usuário no IdP do nuvem (formato user@domain.xyz). Os campos a seguir são marcados na ordem descrita abaixo:
- Nome comum do assunto (NC)
- Nome alternativo da entidade - UPN (SAN:UPN)
- Nome alternativo do assunto - Email (SAN:Email)
Comportamento de pesquisa do provedor de identidade para certificados de máquina
Para uma correspondência de identidade de máquina bem-sucedida com seu IdP (principalmente diz respeito ao ID do Entra, já que outros IdP de nuvem não têm identidades de máquina), certifique-se de que seus certificados de cliente incluam um dos campos a seguir.
A pesquisa precisa ocorrer usando o nome do dispositivo (excluindo o nome de domínio) em seu EntraID. Os campos a seguir são marcados na ordem descrita abaixo:
- Nome comum do assunto (NC)
- Nome alternativo do assunto - DNS (SAN:DNS)
Considerações sobre a integração do MDM
Ao usar certificados com soluções MDM:
- Inclua identificadores de dispositivo no certificado (como DeviceId ou UDID no campo SAN:DNS) para pesquisas baseadas em dispositivo.
- Consulte a documentação de integração relevante para cada fornecedor de MDM no Portal de documentação da Juniper: Juniper Mist Access Assurance NAC
Teste a configuração do certificado com um pequeno conjunto de dispositivos antes de implantar em toda a organização para garantir a funcionalidade adequada em todos os recursos do Access Assurance.