ON THIS PAGE
Example: Configuring BGP Autodiscovery for LDP VPLS with User-Defined Mesh Groups
This example describes how to configure user-defined mesh groups for BGP autodiscovery for LDP VPLS, as specified in forwarding equivalency class (FEC) 129. FEC 129 uses BGP autodiscovery to convey endpoint information, so you do not need to manually configure pseudowires. You configure mesh groups on the border router to group the sets of PE routers that are automatically fully meshed and that share the same signaling protocol, either BGP or LDP. You can configure multiple mesh groups to map each fully meshed LDP-signaled or BGP-signaled VPLS domain to a mesh group.
Requirements
Before you begin, configure BGP autodiscovery for LDP VPLS. See Example: Configuring BGP Autodiscovery for LDP VPLS.
The hardware and software requirements for this example are the same as the requirements for the Example: Configuring BGP Autodiscovery for LDP VPLS. You will need to adapt the example configuration to the topology used in this example.
Overview
Configuration for a mesh group for FEC 129 is very similiar to the mesh-group configuration for FEC 128.
Note the following differences for FEC 129:
Each user-defined mesh group must have a unique route distinguisher. Do not use the route distinguisher that is defined for the default mesh group at the
[edit routing-intances]hierarchy level.Each user-defined mesh group must have its own import and export route target.
Each user-defined mesh group can have a unique Layer 2 VPN ID. By default, all the mesh groups that are configured for a VPLS routing instance use the same Layer 2 VPN ID as the one that you configure at the
[edit routing-instances]hierarchy level.
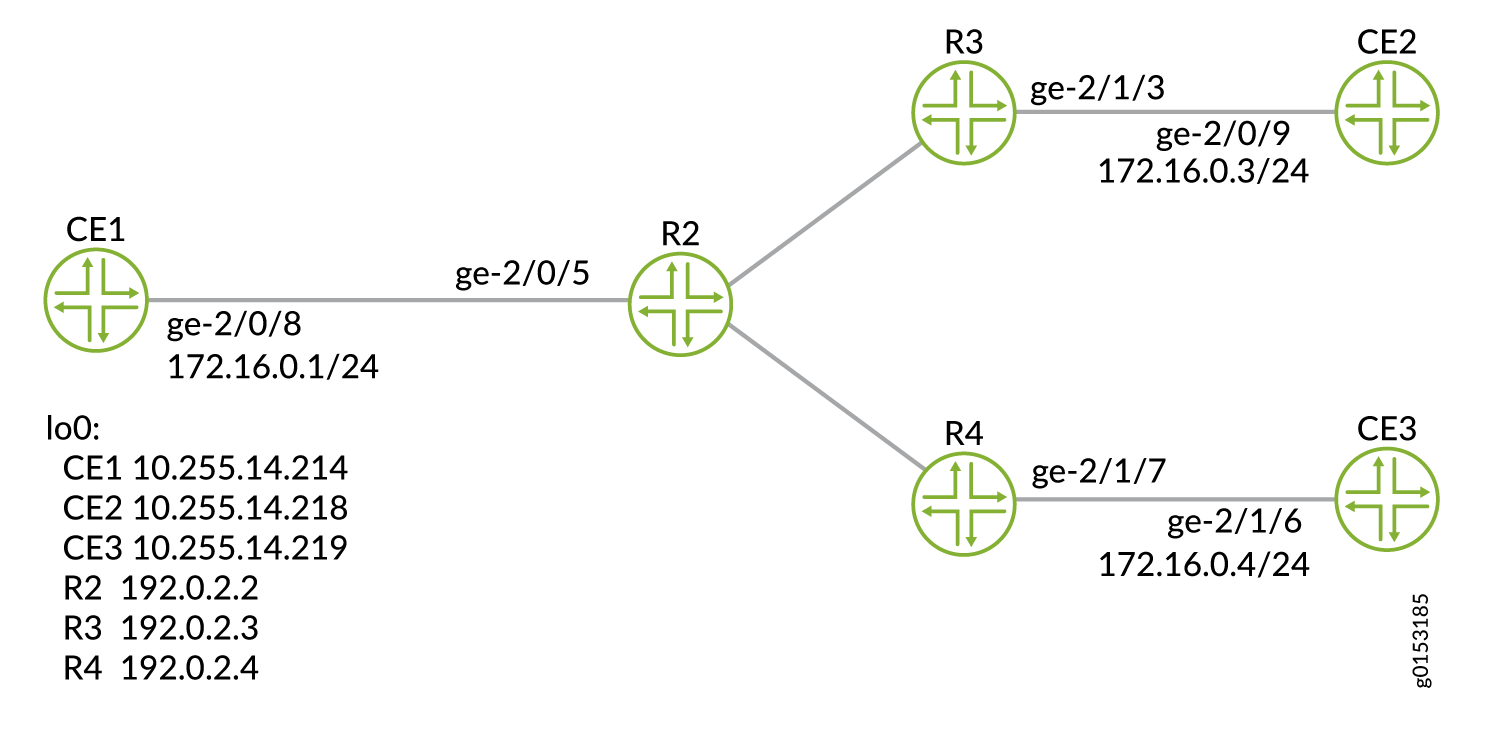
Topology Diagram
Figure 1 shows a topology that includes a user-defined mesh group.
Configuration
CLI Quick Configuration
To quickly configure a mesh group, copy the following commands, remove any line breaks, and then paste the commands into the CLI of each device.
Device CE1
set interfaces ge-2/0/8 unit 0 family inet address 172.16.0.1/24
set interfaces lo0 unit 0 family inet address 10.255.14.214/32
set protocols ospf area 0.0.0.0 interface lo0.0 passive
set protocols ospf area 0.0.0.0 interface ge-2/0/8.0
Device CE3
set interfaces ge-2/0/9 unit 0 family inet address 172.16.0.3/24
set interfaces lo0 unit 0 family inet address 10.255.14.218/32
set protocols ospf area 0.0.0.0 interface lo0.0 passive
set protocols ospf area 0.0.0.0 interface ge-2/0/9.0
Device CE4
set interfaces ge-2/1/6 unit 0 family inet address 172.16.0.4/24
set interfaces lo0 unit 0 family inet address 10.255.14.219/32
set protocols ospf area 0.0.0.0 interface lo0.0 passive
set protocols ospf area 0.0.0.0 interface ge-2/1/6.0
Device R2
set interfaces ge-2/0/5 encapsulation ethernet-vpls
set interfaces ge-2/0/5 unit 0 description to_CE1
set interfaces ge-2/0/5 unit 0 family vpls
set interfaces ge-2/0/10 unit 0 description to_R3
set interfaces ge-2/0/10 unit 0 family inet address 10.10.4.2/30
set interfaces ge-2/0/10 unit 0 family mpls
set interfaces ge-2/0/11 unit 0 description to_R4
set interfaces ge-2/0/11 unit 0 family inet address 10.10.5.1/30
set interfaces ge-2/0/11 unit 0 family mpls
set interfaces lo0 unit 0 family inet address 192.0.2.2/24
set protocols mpls interface ge-2/0/10.0
set protocols mpls interface ge-2/0/11.0
set protocols bgp local-address 192.0.2.2
set protocols bgp group pe-pe type internal
set protocols bgp group pe-pe connect-retry-interval 1
set protocols bgp group pe-pe family l2vpn auto-discovery-only
set protocols bgp group pe-pe family l2vpn signaling
set protocols bgp group pe-pe neighbor 192.0.2.3
set protocols bgp group pe-pe neighbor 192.0.2.4
set protocols ospf traffic-engineering
set protocols ospf area 0.0.0.0 interface lo0.0 passive
set protocols ospf area 0.0.0.0 interface ge-2/0/10.0
set protocols ospf area 0.0.0.0 interface ge-2/0/11.0
set protocols ldp interface ge-2/0/10.0
set protocols ldp interface ge-2/0/11.0
set protocols ldp interface lo0.0
set routing-instances inst512 instance-type vpls
set routing-instances inst512 interface ge-2/0/5.0
set routing-instances inst512 route-distinguisher 100:100
set routing-instances inst512 l2vpn-id l2vpn-id:1:2
set routing-instances inst512 vrf-target target:1:1
set routing-instances inst512 protocols vpls mesh-group metro1 vrf-target target:2:1
set routing-instances inst512 protocols vpls mesh-group metro1 route-distinguisher 100:200
set routing-options autonomous-system 64510
Device R3
set interfaces ge-2/0/10 unit 0 description to_R2
set interfaces ge-2/0/10 unit 0 family inet address 10.10.4.1/30
set interfaces ge-2/0/10 unit 0 family mpls
set interfaces ge-2/1/3 encapsulation ethernet-vpls
set interfaces ge-2/1/3 unit 0 description to_CE2
set interfaces ge-2/1/3 unit 0 family vpls
set interfaces lo0 unit 0 family inet address 192.0.2.3/24
set protocols mpls interface ge-2/0/10.0
set protocols bgp local-address 192.0.2.3
set protocols bgp group pe-pe type internal
set protocols bgp group pe-pe connect-retry-interval 1
set protocols bgp group pe-pe family l2vpn auto-discovery-only
set protocols bgp group pe-pe family l2vpn signaling
set protocols bgp group pe-pe neighbor 192.0.2.2
set protocols bgp group pe-pe neighbor 192.0.2.4
set protocols ospf traffic-engineering
set protocols ospf area 0.0.0.0 interface ge-2/0/10.0
set protocols ospf area 0.0.0.0 interface lo0.0 passive
set protocols ldp interface ge-2/0/10.0
set protocols ldp interface lo0.0
set routing-instances inst512 instance-type vpls
set routing-instances inst512 interface ge-2/1/3.0
set routing-instances inst512 route-distinguisher 100:100
set routing-instances inst512 l2vpn-id l2vpn-id:1:2
set routing-instances inst512 vrf-target target:1:1
set routing-instances inst512 protocols vpls
set routing-options autonomous-system 64510
Device R4
set interfaces ge-2/0/10 unit 0 description to_R2
set interfaces ge-2/0/10 unit 0 family inet address 10.10.5.2/30
set interfaces ge-2/0/10 unit 0 family mpls
set interfaces ge-2/1/7 encapsulation ethernet-vpls
set interfaces ge-2/1/7 unit 0 description to_CE3
set interfaces ge-2/1/7 unit 0 family vpls
set interfaces lo0 unit 0 family inet address 192.0.2.4/24
set protocols mpls interface ge-2/0/10.0
set protocols bgp local-address 192.0.2.4
set protocols bgp group pe-pe type internal
set protocols bgp group pe-pe connect-retry-interval 1
set protocols bgp group pe-pe family l2vpn auto-discovery-only
set protocols bgp group pe-pe family l2vpn signaling
set protocols bgp group pe-pe neighbor 192.0.2.2
set protocols bgp group pe-pe neighbor 192.0.2.3
set protocols ospf traffic-engineering
set protocols ospf area 0.0.0.0 interface ge-2/0/10.0
set protocols ospf area 0.0.0.0 interface lo0.0 passive
set protocols ldp interface ge-2/0/10.0
set protocols ldp interface lo0.0
set routing-instances inst512 instance-type vpls
set routing-instances inst512 interface ge-2/1/7.0
set routing-instances inst512 route-distinguisher 100:100
set routing-instances inst512 l2vpn-id l2vpn-id:1:2
set routing-instances inst512 vrf-target target:1:1
set routing-instances inst512 protocols vpls
set routing-options autonomous-system 64510
Procedure
Step-by-Step Procedure
To configure a mesh group:
Configure the interfaces.
[edit interfaces]
user@R2# set ge-2/0/5 encapsulation ethernet-vpls
user@R2# set ge-2/0/5 unit 0 description to_CE1
user@R2# set ge-2/0/5 unit 0 family vpls
user@R2# set ge-2/0/10 unit 0 description to_R3
user@R2# set ge-2/0/10 unit 0 family inet address 10.10.4.2/30
user@R2# set ge-2/0/10 unit 0 family mpls
user@R2# set ge-2/0/11 unit 0 description to_R4
user@R2# set ge-2/0/11 unit 0 family inet address 10.10.5.1/30
user@R2# set ge-2/0/11 unit 0 family mpls
user@R2# set lo0 unit 0 family inet address 192.0.2.2/24
Configure MPLS on the interfaces.
[edit protocols mpls]
user@R2# set interface ge-2/0/10.0
user@R2# set interface ge-2/0/11.0
Configure BGP.
[edit protocols bgp]
user@R2# set local-address 192.0.2.2
[edit protocols bgp group pe-pe]
user@R2# set type internal
user@R2# set connect-retry-interval 1
user@R2# set family l2vpn auto-discovery-only
user@R2# set family l2vpn signaling
user@R2# set neighbor 192.0.2.3
user@R2# set neighbor 192.0.2.4
Set the import and export route target for the default mesh group.
[edit protocols ospf]
user@R2# set traffic-engineering
user@R2# set area 0.0.0.0 interface lo0.0 passive
user@R2# set area 0.0.0.0 interface ge-2/0/10.0
user@R2# set area 0.0.0.0 interface ge-2/0/11.0
Configure LDP on the core-facing interfaces and on the loopback interface.
[edit protocols ldp]
user@R2# set interface ge-2/0/10.0
user@R2# set interface ge-2/0/11.0
user@R2# set interface lo0.0
Configure the VPLS routing instance.
Make sure that the route distinguisher in the mesh group is unique.
[edit routing-instances inst512]
user@R2# set instance-type vpls
user@R2# set interface ge-2/0/5.0
user@R2# set route-distinguisher 100:100
user@R2# set l2vpn-id l2vpn-id:1:2
user@R2# set vrf-target target:1:1
user@R2# set protocols vpls mesh-group metro1 vrf-target target:2:1
user@R2# set protocols vpls mesh-group metro1 route-distinguisher 100:200
Configure the autonomous system (AS) number.
[edit routing-options]
user@R2# set autonomous-system 64510
If you are done configuring the device, commit the configuration.
[edit]
user@R2# commit
Results
From configuration mode, confirm your configuration
by entering the show routing-instances command. If the
output does not display the intended configuration, repeat the instructions
in this example to correct the configuration.
user@R2# show interfaces
ge-2/0/5 {
    encapsulation ethernet-vpls;
    unit 0 {
        description PE1_to_CE1;
        family vpls;
    }
}
ge-2/0/10 {
    unit 0{
        description to_R3;
        family inet {
            address 10.10.4.2/30;
        }
        family mpls;
    }
}
ge-2/0/11 {
    unit 0 {
        description to_R4;
        family inet {
            address 10.10.5.1/30;
        }
        family mpls;
    }
}
lo0 {
    unit 0{
        family inet {
            address 192.0.2.2/24;
        }
    }
}
user@R2# show protocols
mpls {
    interface ge-2/0/10.0;
    interface ge-2/0/11.0;
}
bgp {
    local-address 192.0.2.2;
    group pe-pe {
        type internal;
        connect-retry-interval 1;
        family l2vpn {
            auto-discovery-only;
            signaling;
        }
        neighbor 192.0.2.3;
        neighbor 192.0.2.4;
    }
}
ospf {
    traffic-engineering;
    area 0.0.0.0 {
        interface lo0.0 {
            passive;
        }
        interface ge-2/0/10.0;
        interface ge-2/0/11.0;
    }
}
ldp {
    interface ge-2/0/10.0;
    interface ge-2/0/11.0;
    interface lo0.0;
}
user@R2# show routing-instances
inst512 {
    instance-type vpls;
    interface ge-2/0/5.0;
    route-distinguisher 100:100;
    l2vpn-id l2vpn-id:1:2;
    vrf-target target:1:1;
    protocols {
        vpls {
            mesh-group metro1 {
                vrf-target target:2:1;
                route-distinguisher 100:200;
            }
        }
    }
}
user@R2# show routing-options
autonomous-system 64510;
Verification
Confirm that the configuration is working properly.
- Verifying the Routes
- Checking Connectivity
- Checking the VPLS Connections
- Display Learned VPLS MAC Address Information
Verifying the Routes
Purpose
Verify that the expected routes are learned.
Action
From operational mode, enter the show route command.
user@R2> show route
inet.0: 9 destinations, 9 routes (9 active, 0 holddown, 0 hidden)
+ = Active Route, - = Last Active, * = Both

192.0.2.2/24         *[Direct/0] 4d 02:42:47
                    > via lo0.0
192.0.2.3/24         *[OSPF/10] 4d 02:41:56, metric 1
                    > to 10.10.4.1 via ge-2/0/10.0
192.0.2.4/24         *[OSPF/10] 4d 02:42:01, metric 1
                    > to 10.10.5.2 via ge-2/0/11.0
10.10.3.2/24       *[Local/0] 4d 02:42:47
                      Reject
10.10.4.0/30       *[Direct/0] 4d 02:42:46
                    > via ge-2/0/10.0
10.10.4.2/32       *[Local/0] 4d 02:42:47
                      Local via ge-2/0/10.0
10.10.5.0/30       *[Direct/0] 4d 02:42:46
                    > via ge-2/0/11.0
10.10.5.1/32       *[Local/0] 4d 02:42:47
                      Local via ge-2/0/11.0
203.0.113.0/24       *[OSPF/10] 4d 02:42:49, metric 1
                      MultiRecv

inet.3: 2 destinations, 2 routes (2 active, 0 holddown, 0 hidden)
+ = Active Route, - = Last Active, * = Both

192.0.2.3/24         *[LDP/9] 4d 02:01:06, metric 1
                    > to 10.10.4.1 via ge-2/0/10.0
192.0.2.4/24         *[LDP/9] 4d 02:01:06, metric 1
                    > to 10.10.5.2 via ge-2/0/11.0

mpls.0: 12 destinations, 12 routes (12 active, 0 holddown, 0 hidden)
+ = Active Route, - = Last Active, * = Both

0                  *[MPLS/0] 4d 02:42:49, metric 1
                      Receive
1                  *[MPLS/0] 4d 02:42:49, metric 1
                      Receive
2                  *[MPLS/0] 4d 02:42:49, metric 1
                      Receive
13                 *[MPLS/0] 4d 02:42:49, metric 1
                      Receive
299776             *[LDP/9] 4d 02:01:06, metric 1
                    > to 10.10.5.2 via ge-2/0/11.0, Pop
299776(S=0)        *[LDP/9] 4d 02:01:06, metric 1
                    > to 10.10.5.2 via ge-2/0/11.0, Pop
299792             *[LDP/9] 4d 02:01:06, metric 1
                    > to 10.10.4.1 via ge-2/0/10.0, Pop
299792(S=0)        *[LDP/9] 4d 02:01:06, metric 1
                    > to 10.10.4.1 via ge-2/0/10.0, Pop
800000             *[VPLS/7] 4d 02:01:05
                    > via vt-2/0/10.185597952, Pop
800001             *[VPLS/7] 4d 02:01:05
                    > via vt-2/0/10.185597953, Pop
vt-2/0/10.185597953*[VPLS/7] 4d 02:01:05, metric2 1
                    > to 10.10.5.2 via ge-2/0/11.0, Push 800001
vt-2/0/10.185597952*[VPLS/7] 4d 02:01:05, metric2 1
                    > to 10.10.4.1 via ge-2/0/10.0, Push 800001

bgp.l2vpn.0: 2 destinations, 2 routes (2 active, 0 holddown, 0 hidden)
+ = Active Route, - = Last Active, * = Both

100:100:192.0.2.3/96 AD
                   *[BGP/170] 4d 02:32:41, localpref 100, from 192.0.2.3
                      AS path: I, validation-state: unverified
                    > to 10.10.4.1 via ge-2/0/10.0
100:100:192.0.2.4/96 AD
                   *[BGP/170] 4d 02:32:41, localpref 100, from 192.0.2.4
                      AS path: I, validation-state: unverified
                    > to 10.10.5.2 via ge-2/0/11.0

inst512.l2vpn.0: 8 destinations, 8 routes (8 active, 0 holddown, 0 hidden)
+ = Active Route, - = Last Active, * = Both

100:100:192.0.2.2/96 AD
                   *[VPLS/170] 4d 02:01:05, metric2 1
                      Indirect
100:100:192.0.2.3/96 AD
                   *[BGP/170] 4d 02:32:41, localpref 100, from 192.0.2.3
                      AS path: I, validation-state: unverified
                    > to 10.10.4.1 via ge-2/0/10.0
100:100:192.0.2.4/96 AD
                   *[BGP/170] 4d 02:32:41, localpref 100, from 192.0.2.4
                      AS path: I, validation-state: unverified
                    > to 10.10.5.2 via ge-2/0/11.0
100:200:192.0.2.2/96 AD
                   *[VPLS/170] 4d 02:01:05, metric2 1
                      Indirect
192.0.2.3:NoCtrlWord:5:1:2:192.0.2.2:192.0.2.3/176
                   *[VPLS/7] 4d 02:01:05, metric2 1
                    > to 10.10.4.1 via ge-2/0/10.0
192.0.2.3:NoCtrlWord:5:1:2:192.0.2.3:192.0.2.2/176
                   *[LDP/9] 4d 02:01:05
                      Discard
192.0.2.4:NoCtrlWord:5:1:2:192.0.2.2:192.0.2.4/176
                   *[VPLS/7] 4d 02:01:05, metric2 1
                    > to 10.10.5.2 via ge-2/0/11.0
192.0.2.4:NoCtrlWord:5:1:2:192.0.2.4:192.0.2.2/176
                   *[LDP/9] 4d 02:01:05
                      Discard

ldp.l2vpn.0: 2 destinations, 2 routes (2 active, 0 holddown, 0 hidden)
+ = Active Route, - = Last Active, * = Both

192.0.2.3:NoCtrlWord:5:1:2:192.0.2.3:192.0.2.2/176
                   *[LDP/9] 4d 02:01:05
                      Discard
192.0.2.4:NoCtrlWord:5:1:2:192.0.2.4:192.0.2.2/176
                   *[LDP/9] 4d 02:01:05
                      Discard
Meaning
The output shows all the learned routes, including the autodiscovered (AD) routes.
Checking Connectivity
Purpose
Verify that Device CE1 can ping Device CE2 and Device CE3.
Action
user@CE1> ping 10.255.14.218
PING 10.255.14.218 (10.255.14.218): 56 data bytes
64 bytes from 10.255.14.218: icmp_seq=0 ttl=64 time=0.787 ms
64 bytes from 10.255.14.218: icmp_seq=1 ttl=64 time=0.651 ms
^C
--- 10.255.14.218 ping statistics ---
2 packets transmitted, 2 packets received, 0% packet loss
round-trip min/avg/max/stddev = 0.651/0.719/0.787/0.068 ms
user@CE1> ping 10.255.14.219
PING 10.255.14.219 (10.255.14.219): 56 data bytes
64 bytes from 10.255.14.219: icmp_seq=0 ttl=64 time=1.054 ms
64 bytes from 10.255.14.219: icmp_seq=1 ttl=64 time=0.669 ms
^C
--- 10.255.14.219 ping statistics ---
2 packets transmitted, 2 packets received, 0% packet loss
round-trip min/avg/max/stddev = 0.669/0.862/1.054/0.193 ms
Meaning
The output shows that VPLS is operational.
Checking the VPLS Connections
Purpose
Make sure that all of the FEC 129 VPLS connections come up correctly.
Action
user@R2> show vpls connections
Instance: inst512
  L2vpn-id: 1:2
  Local-id: 192.0.2.2
  Mesh-group connections: __ves__
    Remote-id                 Type  St     Time last up          # Up trans
    192.0.2.4                   rmt   Up     Oct 26 15:11:56 2012           1
      Remote PE: 192.0.2.4, Negotiated control-word: No
      Incoming label: 800001, Outgoing label: 800001
      Local interface: vt-2/0/10.185597953, Status: Up, Encapsulation: ETHERNET
        Description: Intf - vpls inst512 local-id 192.0.2.2 remote-id 192.0.2.4 neighbor 192.0.2.4
    192.0.2.3                   rmt   Up     Oct 26 15:11:56 2012           1
      Remote PE: 192.0.2.3, Negotiated control-word: No
      Incoming label: 800000, Outgoing label: 800001
      Local interface: vt-2/0/10.185597952, Status: Up, Encapsulation: ETHERNET
        Description: Intf - vpls inst512 local-id 192.0.2.2 remote-id 192.0.2.3 neighbor 192.0.2.3
Meaning
As expected, the connections are up.
Display Learned VPLS MAC Address Information
Purpose
Verify that all CE devices’ MAC addresses are learned and installed.
Action
user@R2> show vpls mac-table

MAC flags (S -static MAC, D -dynamic MAC, L -locally learned, C -Control MAC
           SE -Statistics enabled, NM -Non configured MAC, R -Remote PE MAC)

Logical system   : R2
Routing instance : inst512
 Bridging domain : __inst512__, VLAN : NA
   MAC                 MAC      Logical          NH     RTR
   address             flags    interface        Index  ID
   00:21:59:0f:35:32   D        ge-2/0/5.0
   00:21:59:0f:35:33   D        vt-2/0/10.185597952
   00:21:59:0f:35:d5   D        vt-2/0/10.185597953