Install vSRX Virtual Firewall with VMware vSphere Web Client
The following procedure describes how to install vSRX Virtual Firewall and connect vSRX Virtual Firewall interfaces to the virtual switches for the appropriate applications. Only the vSRX Virtual Firewall virtual switch has a connection to a physical adapter (the uplink) so that all application traffic flows through the vSRX Virtual Firewall VM to the external network.
To install vSRX Virtual Firewall with the VMware vSphere Web Client:
To upgrade an existing vSRX Virtual Firewall instance, see Migration, Upgrade, and Downgrade in the vSRX Virtual Firewall Release Notes.
Download the vSRX Virtual Firewall software package for VMware from the Juniper Networks website.
Note:Do not change the filename of the downloaded software image or the installation will fail.
Validate the vSRX Virtual Firewall .ova file if required. For more information, see Validate the vSRX .ova File for VMware.
-
Enter the vCenter server hostname or address in your browser (https://<ipaddress>:9443) to access the vSphere Web Client, and log in to the vCenter server with your credentials.
Select a host or other valid parent for a virtual machine and click Actions > All vCenter Actions > Deploy OVF Template.
Note:The Client Integration Plug-in must be installed before you can deploy OVF templates (see your VMware documentation).
Click Browse to locate the vSRX Virtual Firewall software package, and then click Next.
Click Next in the OVF Template Details window.
Click Accept in the End User License Agreement window, and then click Next.
Change the default vSRX Virtual Firewall VM name in the Name box and click Next. It is advisable to keep this name the same as the hostname you intend to give to the VM.
In the Datastore window, do not change the default settings for:
Datastore
Available Space
Table 1 lists the disk formats available to store the virtual disk. You can choose one of the three options listed.
Table 1: Disk Formats for Virtual Disk Storage Disk Format
Description
Thick Provision Lazy Zeroed
Allocates disk space to the virtual disk without erasing the previously stored data. The previous data is erased when the VM is used for the first time.
Thick Provision Eager Zeroed
Erases the previously stored data completely and then allocates the disk space to the virtual disk. Creation of disks in this format is time consuming.
Thin Provision
Allocates only as much datastore space as the disk needs for its initial operations. Use this format to save storage space.
Select a datastore to store the configuration file and virtual disk files in OVF template, and then click Next.
Select your management network from the list, and then click Next. The management network is assigned to the first network adapter, which is reserved for the management interface (fxp0).
Click Finish to complete the installation.
Open the Edit Settings page of the vSRX Virtual Firewall VM and select a virtual switch for each network adapter. Three network adapters are created by default. Network adapter 1 is for the management network (fxp0). To add a fourth adapter, select Network from New device list at the bottom of the page. To add more adapters, see Add vSRX Interfaces.
In Figure 1, network adapter 2 uses the management network for the uplink to the external network.
Figure 1: vSRX Virtual Firewall Edit Settings Page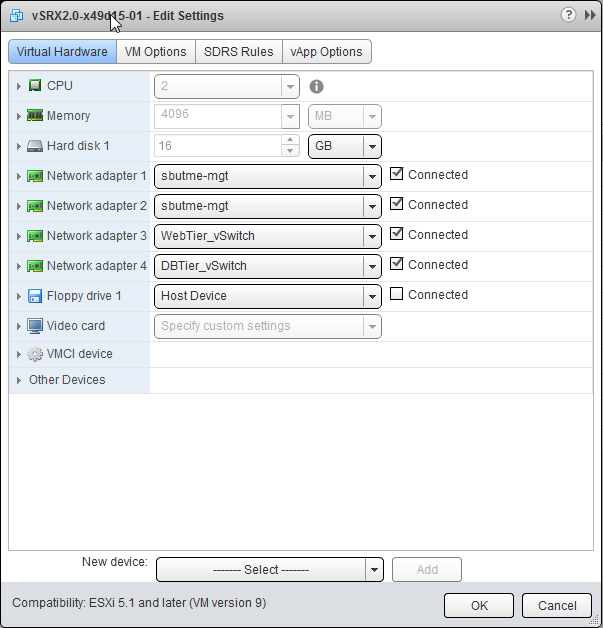
-
Enable promiscuous mode for the management virtual switch:
With vSRX Virtual Firewall platforms VMware uses the VMXNET 3 vNIC and requires promiscuous mode on the vSwitch for the management interface, fxp0.
This step is not required on vSRX Virtual Firewall 3.0 and there is no need for the ports to be connected to the control plane to have Promiscuous mode enabled.
-
Select the host where the vSRX Virtual Firewall VM is installed, and select Manage > Networking > Virtual switches.
-
In the list of virtual switches, select vSwitch0 to view the topology diagram for the management network connected to network adapter 1.
-
Click the Edit icon at the top of the list, select Security, and select Accept next to Promiscuous mode. Click OK.
Note:vSwitch1 corresponds to network adapter 2, vSwitch2 corresponds to network adapter 3, and so on.
-
Enable hardware-assisted virtualization to optimize performance of the vSRX Virtual Firewall Routing Engine that runs in a nested VM:
Power off the vSRX Virtual Firewall VM.
Right-click on the vSRX Virtual Firewall VM and select Edit Settings.
On the Virtual Hardware tab, expand CPU, select Expose hardware-assisted virtualization to guest OS, and click OK.
On the Manage tab, select Settings > VM Hardware and expand CPU to verify that the Hardware virtualization option is shown as Enabled.
The default vSRX Virtual Firewall VM login ID is root with no password. By default, vSRX Virtual Firewall is assigned a DHCP-based IP address if a DHCP server is available on the network.