SR-IOV and PCI
This section includes the following topics on SR-IOV for a vSRX Virtual Firewall instance deployed on KVM:
SR-IOV Overview
vSRX Virtual Firewall on KVM supports single-root I/O virtualization (SR-IOV) interface types. SR-IOV is a standard that allows a single physical NIC to present itself as multiple vNICs, or virtual functions (VFs), that a virtual machine (VM) can attach to. SR-IOV combines with other virtualization technologies, such as Intel VT-d, to improve the I/O performance of the VM. SR-IOV allows each VM to have direct access to packets queued up for the VFs attached to the VM. You use SR-IOV when you need I/O performance that approaches that of the physical bare metal interfaces.
In deployments using SR-IOV interfaces, packets are dropped when a MAC address is assigned to a vSRX Virtual Firewall Junos OS interface. This issue occurs because SR-IOV does not allow MAC address changes in either the PF or the VF.
SR-IOV in KVM does not remap interface numbers. The interface sequence in the vSRX Virtual Firewall VM XML file matches the interface sequence shown in the Junos OS CLI on the vSRX Virtual Firewall instance.
SR-IOV uses two PCI functions:
Physical Functions (PFs)—Full PCIe devices that include SR-IOV capabilities. Physical Functions are discovered, managed, and configured as normal PCI devices. Physical Functions configure and manage the SR-IOV functionality by assigning Virtual Functions. When SR-IOV is disabled, the host creates a single PF on one physical NIC.
Virtual Functions (VFs)—Simple PCIe functions that only process I/O. Each Virtual Function is derived from a Physical Function. The number of Virtual Functions a device may have is limited by the device hardware. A single Ethernet port, the Physical Device, may map to many Virtual Functions that can be shared to guests. When SR-IOV is enabled, the host creates a single PF and multiple VFs on one physical NIC. The number of VFs depends on the configuration and driver support.
SR-IOV HA Support with Trust Mode Disabled (KVM only)
- Understand SR-IOV HA Support with Trust Mode Disabled (KVM only)
- Configure SR-IOV support with Trust Mode Disabled (KVM only)
- Limitations
Understand SR-IOV HA Support with Trust Mode Disabled (KVM only)
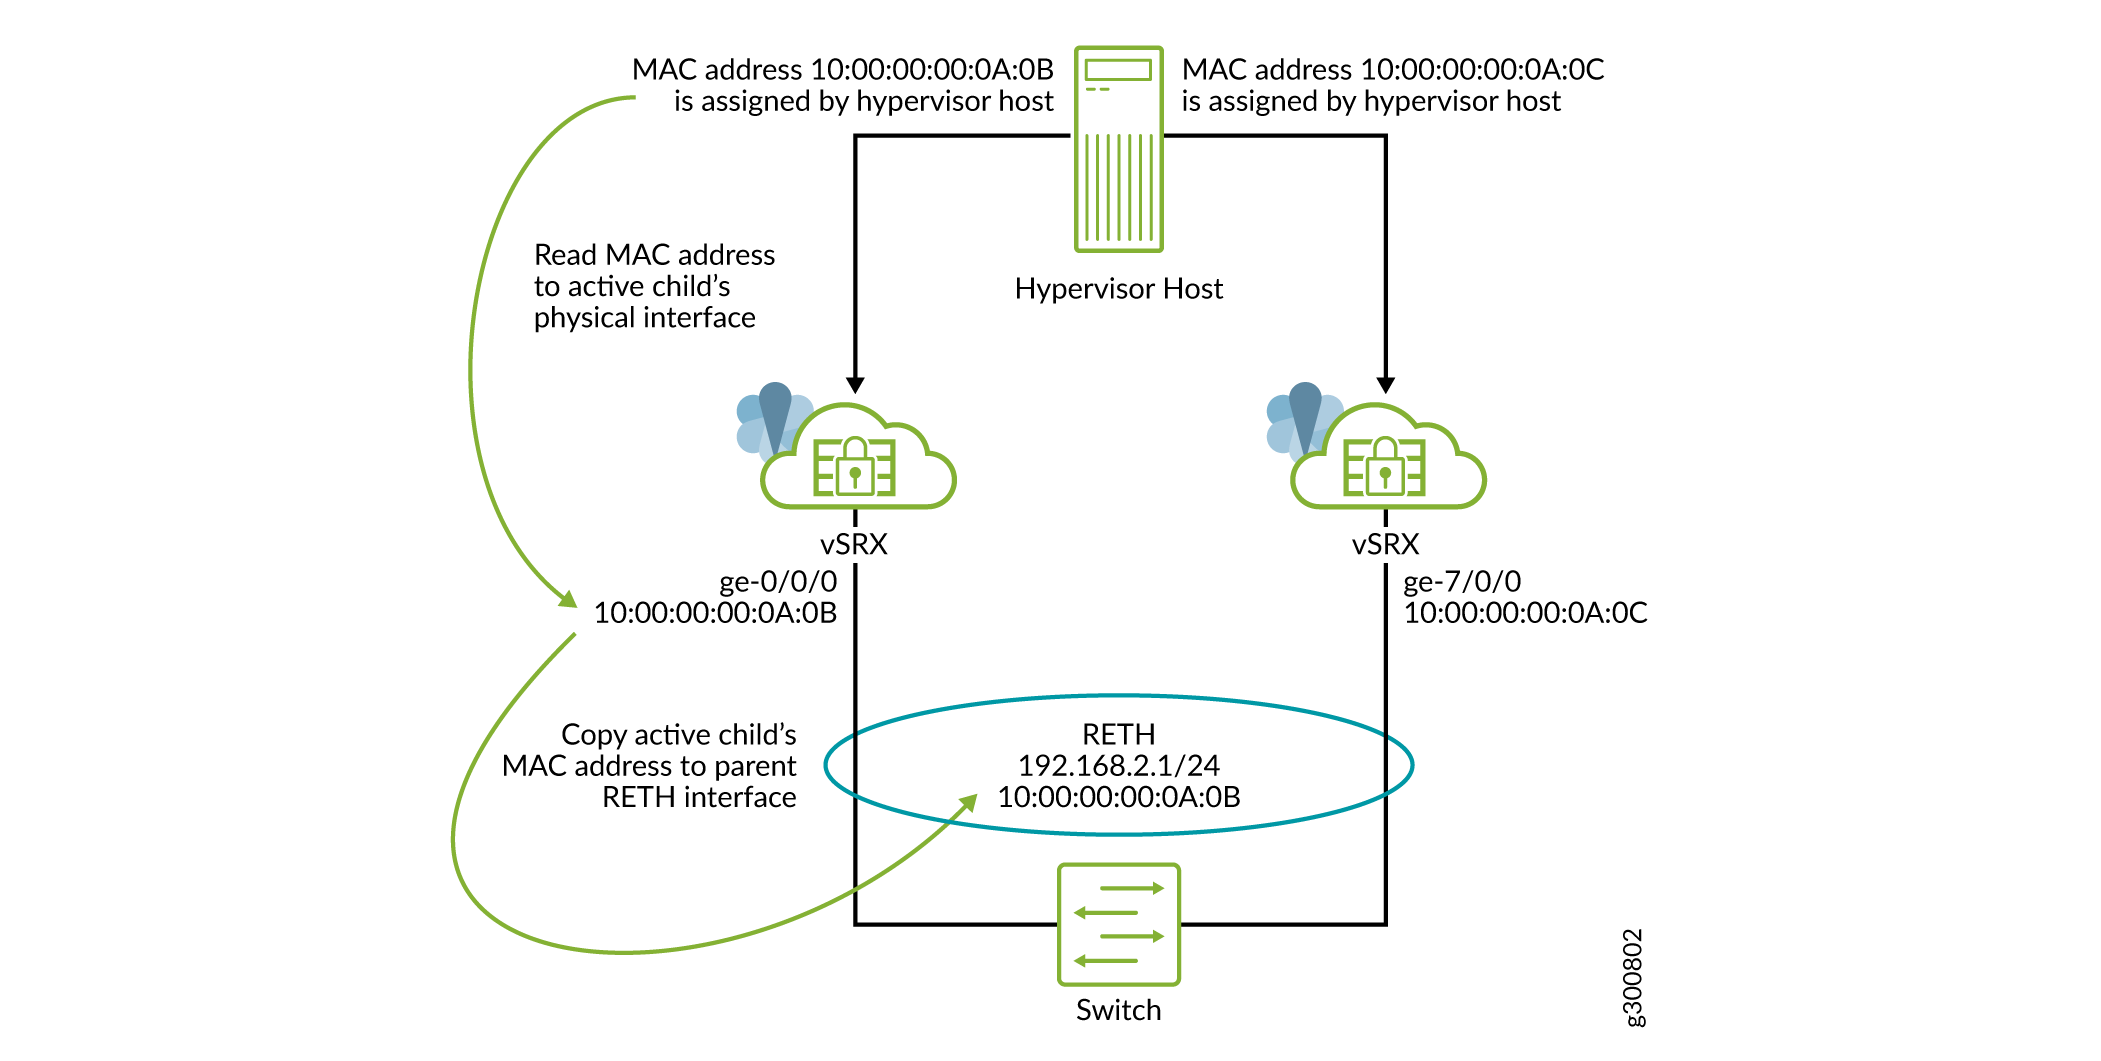
A Redundant Ethernet Interface (RETH) is a virtual interface consisting of equal number of member interfaces from each participating node of an SRX cluster. All logical configurations such as IP address, QoS, zones, and VPNs are bound to this interface. Physical properties are applied to the member or child interfaces. A RETH interface has a virtual MAC address which is calculated using the cluster id. RETH has been implemented as an aggregated interface/LAG in Junos OS. For a LAG, the parent (logical) IFDs MAC address is copied to each of the child interfaces. When you configure the child interface under the RETH interface, the RETH interface’s virtual MAC gets overwritten on the current MAC address field of the child physical interface. This also requires the virtual MAC address to be programmed on the corresponding NIC.
Junos OS runs as a VM on vSRX Virtual Firewall. Junos OS does not have direct access to the NIC and only has a virtual NIC access provided by the hypervisor which might be shared with other VMs running on the same host machine. This virtual access comes with certain restrictions such as a special mode called trust mode, which is required to program a virtual MAC address on the NIC. During deployments, providing the trust mode access might not be feasible because of possible security issues. To enable RETH model to work in such environments, MAC rewrite behavior is modified. Instead of copying the parent virtual MAC address to the children, we keep the children’s physical MAC address intact and copy the physical MAC address of the child belonging to the active node of the cluster to the current MAC of the reth interface. This way, MAC rewrite access is not required when trust mode is disabled.
In case of vSRX Virtual Firewall, the DPDK reads the physical MAC address provided by the hypervisor and shares it with the Junos OS control plane. In standalone mode, this physical MAC address is programmed on the physical IFDs. But the support for the same is unavailable in cluster mode, because of which the MAC address for the physical interface is taken from the Juniper reserved MAC pool. In an environment where trust mode is not feasible, the hypervisor is unable to provide the physical MAC address.
To overcome this problem, we have added support to use the hypervisor provided physical MAC address instead of allocating it from the reserved MAC pool. See Configure SR-IOV support with Trust Mode Disabled (KVM only).
Configure SR-IOV support with Trust Mode Disabled (KVM only)
Starting in Junos OS Release 19.4R1, SR-IOV HA is supported
with trust mode disabled. You can enable this mode by configuring
the use-active-child-mac-on-reth and use-actual-mac-on-physical-interfaces configuration statements at the [edit chassis cluster] hierarchy level. If you configure commands in a cluster, the hypervisor
assigns the child physical interface’s MAC address and the parent
RETH interface’s MAC address is overwritten by the active child
physical interface’s MAC address
You can configure SR-IOV with trust mode disabled, only if the revenue interfaces are SR-IOV. The fabric interfaces or links cannot use SR-IOV with trust mode disable when the actual MAC physical interfaces configured.
Using SRIOV with trust mode disabled is supported if only the revenue interfaces are SR-IOV.
You need to reboot the vSRX Virtual Firewall instance to enable this mode. Both the nodes in the cluster need to be rebooted for the commands to take effect.
You need to configure the commands use-active-child-mac-on-reth and use-actual-mac-on-physical-interfaces together to
enable this feature.
See Also
Limitations
SR-IOV HA support with trust mode disabled on KVM has the following limitations:
SR-IOV HA support with trust mode disabled is only supported on KVM based systems.
A reth interface can have maximum one port as a member on each vSRX Virtual Firewall cluster node.
You cannot use
security nat proxy-arpfeature for NAT pools because no G-ARP is sent out on failover for the IP addresses in NAT pools. Instead, one can set the routes to the NAT pool range in the upstream router to point to the vSRX Virtual Firewall reth interface’s IP address as the next-hop. Or, if directly connected hosts need to access the NAT pool addresses, these NAT pool addresses can be configured for proxy ARP under the reth interface.If the reth interface is configured with many VLANs, it might take some time to send all the G-ARPs on a failover. This might lead to a noticeable interruption in traffic.
A dataplane failover will result in a change of the MAC address of the reth interface. Therefore the failover is not transparent to directly connected neighboring Layer 3 devices (routers or servers). The vSRX Virtual Firewall reth IP address must be mapped to a new MAC address in the ARP table on the neighboring devices. vSRX Virtual Firewall will send out a G-ARP which will help these devices. In case these neighboring devices do not act on the G-ARP received from the vSRX Virtual Firewall or show a slow response, the traffic might be interrupted until that device updates it’s ARP table correctly.
-
The following vSRX Virtual Firewall features are not supported in deployments that use SR-IOV interfaces:
These limitations apply in deployments where the PF drivers cannot be updated or controlled. The limitations do not apply when vSRX Virtual Firewall is deployed on supported Juniper Networks devices.
-
High availability (HA)
-
IRB interfaces
-
IPv6 addressing
-
Jumbo frames
-
Layer 2 support
-
Multicast with other features such as OSPF and IPv6
-
Packet mode
-
Configure an SR-IOV Interface on KVM
If you have a physical NIC that supports SR-IOV, you can attach SR-IOV-enabled vNICs or virtual functions (VFs) to the vSRX Virtual Firewall instance to improve performance. We recommend that if you use SR-IOV, all revenue ports are configured as SR-IOV.
Note the following about SR-IOV support for vSRX Virtual Firewall on KVM:
Starting in Junos OS Release 15.1X49-D90 and Junos OS Release 17.3R1, a vSRX Virtual Firewall instance deployed on KVM supports SR-IOV on an Intel X710/XL710 NIC in addition to Intel 82599 or X520/540.
Starting in Junos OS Release 18.1R1, a vSRX Virtual Firewall instance deployed on KVM supports SR-IOV on the Mellanox ConnectX-3 and ConnectX-4 Family Adapters.
See the vSRX Virtual Firewall Performance Scale Up discussion in Understand vSRX with KVM for the vSRX Virtual Firewall scale up performance when deployed on KVM, based on vNIC and the number of vCPUs and vRAM applied to a vSRX Virtual Firewall VM.
Before you can attach an SR-IOV enabled VF to the vSRX Virtual Firewall instance, you must complete the following tasks:
Insert an SR-IOV-capable physical network adapter in the host server.
Enable the Intel VT-d CPU virtualization extensions in BIOS on your host server. The Intel VT-d extensions provides hardware support for directly assigning a physical devices to guest. Verify the process with the vendor because different systems have different methods to enable VT-d.
Ensure that SR-IOV is enabled at the system/server BIOS level by going into the BIOS settings during the host server boot-up sequence to confirm the SR-IOV setting. Different server manufacturers have different naming conventions for the BIOS parameter used to enable SR-IOV at the BIOS level. For example, for a Dell server ensure that the SR-IOV Global Enable option is set to Enabled.
We recommend that you use virt-manager to configure
SR-IOV interfaces. See the virsh attach-device command
documentation if you want to learn how to add a PCI host device to
a VM with the virsh CLI commands.
Also, you must configure the interfaces in the order of 1G, 10G, 40G, and 100G. If this order is not followed, then you need to reset the network adaptors.
To add an SR-IOV VF to a vSRX Virtual Firewall VM using the virt-manager graphical interface:
To add an SR-IOV VF to a vSRX Virtual Firewall VM using virsh CLI commands:
Define four virtual functions for eno2 interface, update the sriov_numvfs file with number 4.
root@LabHost:~# echo 4 > /sys/class/net/eno2/device/sriov_numvfs
root@LabHost:~# more /sys/class/net/eno2/device/sriov_numvfs
Identify the device.
Identify the PCI device designated for device assignment to the virtual machine. Use the
lspcicommand to list the available PCI devices. You can refine the output oflspciwithgrep.Use command
lspcito check the VF number according to the VF ID.root@ kvmsrv:~# lspci | grep Ether
……
83:00.0 Ethernet controller: Intel Corporation Ethernet Controller XL710 for 40GbE QSFP+ (rev 02)  -  Physical Function
83:00.1 Ethernet controller: Intel Corporation Ethernet Controller XL710 for 40GbE QSFP+ (rev 02)  -  Physical Function
83:02.0 Ethernet controller: Intel Corporation Ethernet Virtual Function 700 Series (rev 02)
83:02.1 Ethernet controller: Intel Corporation Ethernet Virtual Function 700 Series (rev 02)
83:02.2 Ethernet controller: Intel Corporation Ethernet Virtual Function 700 Series (rev 02)
83:02.3 Ethernet controller: Intel Corporation Ethernet Virtual Function 700 Series (rev 02)
83:02.4 Ethernet controller: Intel Corporation Ethernet Virtual Function 700 Series (rev 02)
83:02.5 Ethernet controller: Intel Corporation Ethernet Virtual Function 700 Series (rev 02)
83:02.6 Ethernet controller: Intel Corporation Ethernet Virtual Function 700 Series (rev 02)
83:02.7 Ethernet controller: Intel Corporation Ethernet Virtual Function 700 Series (rev 02)
83:0a.0 Ethernet controller: Intel Corporation Ethernet Virtual Function 700 Series (rev 02)
83:0a.1 Ethernet controller: Intel Corporation Ethernet Virtual Function 700 Series (rev 02)
83:0a.2 Ethernet controller: Intel Corporation Ethernet Virtual Function 700 Series (rev 02)
83:0a.3 Ethernet controller: Intel Corporation Ethernet Virtual Function 700 Series (rev 02)
83:0a.4 Ethernet controller: Intel Corporation Ethernet Virtual Function 700 Series (rev 02)
83:0a.5 Ethernet controller: Intel Corporation Ethernet Virtual Function 700 Series (rev 02)
83:0a.6 Ethernet controller: Intel Corporation Ethernet Virtual Function 700 Series (rev 02)
83:0a.7 Ethernet controller: Intel Corporation Ethernet Virtual Function 700 Series (rev 02)
………
Add SR-IOV device assignment from a vSRX Virtual Firewall XML profile on KVM and review device information.
The driver could use either vfio or kvm, depends on KVM server OS/kernel version and drivers for virtualization support. The address type references the unique PCI slot number for each SR-IOV VF (Virtual Function).
Information on the domain, bus, and function are available from output of the
virsh nodedev-dumpxmlcommand.<interface type="hostdev" managed="yes"> <driver name="vfio"/> <source> <address type="pci" domain="0x0000" bus="0x83" slot="0x02" function="0x3"/> </source> <address type="pci" domain="0x0000" bus="0x00" slot="0x05" function="0x0"/> </interface>
Add PCI device in edit setting and select VF according to the VF number.
Note:This operation should be done when VM is powered off. Also, do not clone VMs with PCI devices which might lead to VF or MAC conflict.
Start the VM using the
# virsh start name
of virtual machine
command.
Change History Table
Feature support is determined by the platform and release you are using. Use Feature Explorer to determine if a feature is supported on your platform.