Example: Install and Launch vSRX Virtual Firewall on Ubuntu
This example shows how to install and launch a vSRX Virtual Firewall instance on an Ubuntu server with KVM.
Requirements
This example uses the following hardware and software components:
Generic x86 server
Junos OS Release 15.1X49-D20 for vSRX Virtual Firewall
Ubuntu version 14.04.2
Before you begin:
This example assumes a fresh install of the Ubuntu server software.
Ensure that your host OS meets the requirements specified in Requirements for vSRX on KVM.
Overview
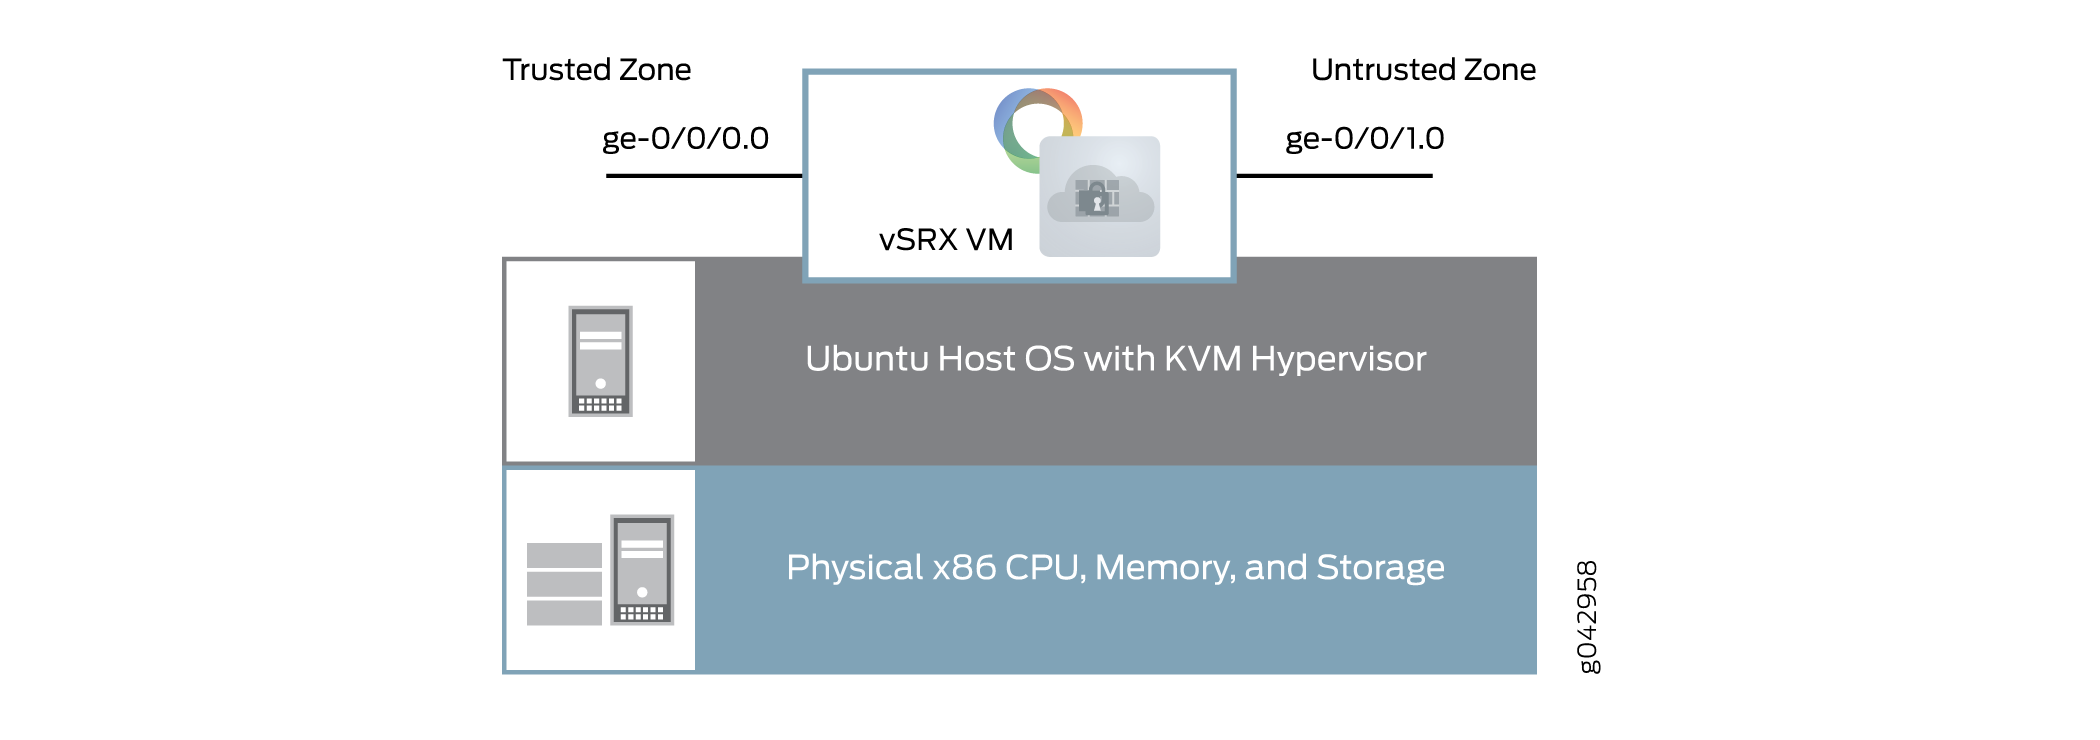
This example shows how to set up your Ubuntu host server and install and launch a vSRX Virtual Firewall VM. Figure 1 shows the basic structure of a vSRX Virtual Firewall VM on an Ubuntu server.
This example uses static IP addresses. If you are configuring the vSRX Virtual Firewall instance in an NFV environment, you should use DHCP.
Quick Configuration - Install and Launch a vSRX Virtual Firewall VM on Ubuntu
CLI Quick Configuration
To quickly configure this example, copy the following commands, paste them into a text file, remove any line breaks, change any details necessary to match your network configuration, and copy and paste the commands into the Ubuntu server terminal or vSRX Virtual Firewall console as specified.
Procedure
Step-by-Step Procedure
If the default virtual network does not already exist, copy the following commands and paste them into the Ubuntu server terminal to create the default virtual network.
cat <<EOF> /etc/libvirt/qemu/networks/default.xml
<network>
 <name>default</name>
 <forward mode='nat'/>
<nat>
 <port start ='1024' end='65535' />
 </nat>
<bridge name='virbr0' stp='on' delay='0' />
 <ip address='192.168.2.1' netmask='255.255.255.0'>
 <dhcp>
		<range start='192.168.2.2' end='192.168.2.254' />
 </dhcp>
 </ip>
</network>
 EOF
virsh net-define /etc/libvirt/qemu/networks/default.xml
virsh net-start default
virsh net-autostart default
Create the left, or trusted, virtual network on the Ubuntu server.
cat <<EOF> /etc/libvirt/qemu/networks/testleftnetwork.xml
<network>
 <name>TestLeft</name>
 <forward mode='route'/>
 <bridge name='virbr1' stp='on' delay='0' />
 <ip address='192.168.123.1' netmask='255.255.255.0'>
 <dhcp>
		<range start='192.168.123.100' end='192.168.123.250' />
 </dhcp>
 </ip>
</network>
 EOF
virsh net-define /etc/libvirt/qemu/networks/testleftnetwork.xml
virsh net-start TestLeft
virsh net-autostart TestLeft
Create the right, or untrusted, virtual network on the Ubuntu server.
cat <<EOF > /etc/libvirt/qemu/networks/testrightnetwork.xml
<network>
 	<name>TestRight</name>
 	<forward mode='nat'/>
<nat>
 <port start ='1024' end='65535' />
 </nat>
 	<bridge name='virbr2' stp='on' delay='0' />
 	<ip address='192.168.124.1' netmask='255.255.255.0'>
 	<dhcp>
 		<range start='192.168.124.100' end='192.168.124.250' />
	</dhcp>
 </ip>
</network>
EOF
virsh net-define /etc/libvirt/qemu/networks/testrightnetwork.xml
virsh net-start TestRight
virsh net-autostart TestRight
-
Download the vSRX Virtual Firewall KVM image from the Juniper Networks website at JuniperNetworks Website.
-
Copy the following commands and modify the
cpuparameter and flags to match your Ubuntu server CPU. Paste the resulting commands into the Ubuntu server terminal to copy the image to a mount point and create the vSRX Virtual Firewall VM.cp junos-vsrx-vmdisk-15.1X49-D20.2.qcow2 /mnt/vsrx20one.qcow2 virt-install --name vSRX20One --ram 4096 --cpu SandyBridge,+vmx,-invtsc, --vcpus=2 --arch=x86_64 --disk path=/mnt/vsrx20one.qcow2,size=16,device=disk,bus=ide,format=qcow2 --os-type linux --os-variant rhel7 --import --network=network:default,model=virtio --network=network:TestLeft,model=virtio --network=network:TestRight,model=virtio
Note:The CPU model and flags in the
virt-installcommand might vary based on the CPU and features in the Ubuntu server. -
To set the root password on the vSRX Virtual Firewall VM, copy and paste the command into the vSRX Virtual Firewall CLI at the
[edit]hierarchy level.set system root-authentication plain-text-password
-
To create a base configuration on the vSRX Virtual Firewall VM, copy the following commands, paste them into a text file, remove any line breaks, change any details necessary to match your network configuration, copy and paste the following commands into the vSRX Virtual Firewall CLI at the
[edit]hierarchy level, and then entercommitfrom configuration mode.set interfaces fxp0 unit 0 family inet dhcp-client set interfaces ge-0/0/0 unit 0 family inet address 192.168.123.254/24 set interfaces ge-0/0/1 unit 0 family inet dhcp-client set security zones security-zone trust interfaces ge-0/0/0.0 host-inbound-traffic system-services all set security zones security-zone untrust interfaces ge-0/0/1.0 host-inbound-traffic system-services dhcp set routing-instances CUSTOMER-VR instance-type virtual-router set routing-instances CUSTOMER-VR interface ge-0/0/0.0 set routing-instances CUSTOMER-VR interface ge-0/0/1.0 set security nat source rule-set source-nat from zone trust set security nat source rule-set source-nat to zone untrust set security nat source rule-set source-nat rule nat1 match source-address 0.0.0.0/0 set security nat source rule-set source-nat rule nat1 then source-nat interface
Step-by-Step Procedure
Step by Step Configuration
Use the following sections for a more detailed set of procedures to install and launch a vSRX Virtual Firewall VM.
- Add Virtual Networks
- Verify the Virtual Networks
- Download and Installing the vSRX Virtual Firewall Image
- Verify the vSRX Virtual Firewall Installation
- Create a Base Configuration on the vSRX Virtual Firewall Instance
- Verify the Basic Configuration on the vSRX Virtual Firewall Instance
Add Virtual Networks
Step-by-Step Procedure
You need to create virtual networks on the Ubuntu server to provide network connectivity to interfaces on the vSRX Virtual Firewall VM. Copy and paste these command into a terminal on the Ubuntu server.
This example uses three virtual networks:
default— Connects the fxp0 management interface.
Note:The default virtual network should already exist on the Ubuntu server. Use the
virsh net-listcommand to verify that the default network is present and active.TestLeft— Connects the ge-0/0/0 interface to the trusted zone.
TestRight— Connects the ge-0/0/1 interface to the untrusted zone.
If the default network does not exist, follow these steps:
Step-by-Step Procedure
Open a text editor on the Ubuntu server and create the default network XML (default.xml) file.
emacs /etc/libvirt/qemu/networks/default.xml
Set the forward mode to
nat, configure an IP address and subnet mask, and a bridge interface, and configure DHCP to assign IP addresses to interfaces on this virtual network.Note:Use the XML format specified by libvirt.
<network>
 <name>default</name>
 <forward mode='nat'/>
<nat>
 <port start ='1024' end='65535' />
 </nat>
<bridge name='virbr0' stp='on' delay='0' />
 <ip address='192.168.2.1' netmask='255.255.255.0'>
 <dhcp>
		<range start='192.168.2.2' end='192.168.2.254' />
 </dhcp>
 </ip>
</network>
Define and start the default virtual network, based on the default.xml file you created.
virsh net-define /etc/libvirt/qemu/networks/default.xml
virsh net-start default
virsh net-autostart default
Remove any previously configured TestLeft virtual network.
virsh net-destroy TestLeft
virsh net-undefine TestLeft
Remove any previously configured TestRight virtual network.
virsh net-destroy TestRight
virsh net-undefine TestRight
Open a text editor on the Ubuntu server and create the TestLeft network XML (testleftnetwork.xml) file.
emacs /etc/libvirt/qemu/networks/testleftnetwork.xml
Set the forward mode to
route, configure an IP address and subnet mask, and a bridge interface, and configure DHCP to assign IP addresses to interfaces on this virtual network.Note:Use the XML format specified by libvirt.
<network>
 <name>TestLeft</name>
 <forward mode='route'/>
 <bridge name='virbr1' stp='on' delay='0' />
 <ip address='192.168.123.1' netmask='255.255.255.0'>
 <dhcp>
		<range start='192.168.123.100' end='192.168.123.250' />
 </dhcp>
 </ip>
</network>
Open a text editor on the Ubuntu server and create the TestRight network XML (testrightnetwork.xml) file.
emacs /etc/libvirt/qemu/networks/testrightnetwork.xml
Set the forward mode to
nat, configure an IP address and subnet mask, and a bridge interface, and configure DHCP to assign IP addresses to interfaces on this virtual network.Note:Use the XML format specified by libvirt.
<network>
 	<name>TestRight</name>
 <forward mode='nat'/>
<nat>
 <port start ='1024' end='65535' />
 </nat>
 	<bridge name='virbr2' stp='on' delay='0' />
 	<ip address='192.168.124.1' netmask='255.255.255.0'>
 	<dhcp>
 		<range start='192.168.124.100' end='192.168.124.250' />
	</dhcp>
 </ip>
</network>
Define and start the TestLeft virtual network, based on the testleftnetwork.xml file you created.
virsh net-define /etc/libvirt/qemu/networks/testleftnetwork.xml
virsh net-start TestLeft
virsh net-autostart TestLeft
Define and start the TestRight virtual network, based on the testrightnetwork.xml file you created.
virsh net-define /etc/libvirt/qemu/networks/testrightnetwork.xml
virsh net-start TestRight
virsh net-autostart TestRight
Verify the Virtual Networks
Purpose
Verify the new virtual network configuration on the Ubuntu server.
Action
Use the virsh net-list command on the Ubuntu
server to verify that the new virtual interfaces are active and are
set to autostart on reboot.
virsh net-list
 Name             State      Autostart     Persistent
----------------------------------------------------------
default                 active      yes            yes
TestLeft                active      yes            yes
TestRight               active      yes            yes
Download and Installing the vSRX Virtual Firewall Image
Step-by-Step Procedure
To download and install the vSRX Virtual Firewall image on the Ubuntu server:
-
Download the vSRX Virtual Firewall KVM image from the Juniper Networks website: https://www.juniper.net/support/downloads/?p=vsrx#sw
-
Copy the vSRX Virtual Firewall image to an appropriate mount point.
hostOS# cp junos-vsrx-vmdisk-15.1X49-D20.2.qcow2 /mnt/vsrx20one.qcow2
-
Use the
virt-installcommand to create a vSRX Virtual Firewall VM. Modify thecpuparameter and flags to match your Ubuntu server CPU.hostOS# virt-install --name vSRX20One --ram 4096 --cpu SandyBridge,+vmx,-invtsc, --vcpus=2 --arch=x86_64 --disk path=/mnt/vsrx20one.qcow2,size=16,device=disk,bus=ide,format=qcow2 --os-type linux --os-variant rhel7 --import --network=network:default,model=virtio --network=network:TestLeft,model=virtio --network=network:TestRight,model=virtio
Note:The CPU model and flags in the
virt-installcommand might vary based on the CPU and features in the Ubuntu server.
Verify the vSRX Virtual Firewall Installation
Purpose
Verify the vSRX Virtual Firewall Installation.
Action
-
Use the
virsh consolecommand on the Ubuntu server to access the vSRX Virtual Firewall console and watch the progress of the installation. The installation can take several minutes to complete.hostOS# virsh console vSRx200ne
Starting install... ERROR internal error: process exited while connecting to monitor: libust[11994/11994]: Warning: HOME environment variable not set. Disabling LTTng-UST per-user tracing. (in setup_local_apps() at lttng-ust-comm.c:305) libust[11994/11995]: Error: Error opening shm /lttng-ust-wait-5 (in get_wait_shm() at lttng-ust-comm.c:886) libust[11994/11995]: Error: Error opening shm /lttng-ust-wait-5 (in get_wait_shm() at lttng-ust-comm.c:886) Booting `Juniper Linux' Loading Linux ... Consoles: serial port BIOS drive C: is disk0 BIOS drive D: is disk1 BIOS drive E: is disk2 BIOS drive F: is disk3 BIOS 639kB/999416kB available memory FreeBSD/i386 bootstrap loader, Revision 1.2 (builder@example.com, Thu Jul 30 23:20:10 UTC 2015) Loading /boot/defaults/loader.conf /kernel text=0xa3a2c0 data=0x6219c+0x11f8e0 syms=[0x4+0xb2ed0+0x4+0x1061bb] /boot/modules/libmbpool.ko text=0xce8 data=0x114 /boot/modules/if_em_vsrx.ko text=0x184c4 data=0x7fc+0x20 /boot/modules/virtio.ko text=0x2168 data=0x208 syms=[0x4+0x7e0+0x4+0x972] /boot/modules/virtio_pci.ko text=0x2de8 data=0x200+0x8 syms=[0x4+0x8f0+0x4+0xb22] /boot/modules/virtio_blk.ko text=0x299c data=0x1dc+0xc syms=[0x4+0x960+0x4+0xa0f] /boot/modules/if_vtnet.ko text=0x5ff0 data=0x360+0x10 syms=[0x4+0xdf0+0x4+0xf19] /boot/modules/pci_hgcomm.ko text=0x12fc data=0x1a4+0x44 syms=[0x4+0x560+0x4+0x61d] /boot/modules/chassis.ko text=0x9bc data=0x1d0+0x10 syms=[0x4+0x390+0x4+0x399] Hit [Enter] to boot immediately, or space bar for command prompt. Booting [/kernel]... platform_early_bootinit: Early Boot Initialization GDB: debug ports: sio GDB: current port: sio KDB: debugger backends: ddb gdb KDB: current backend: ddb Copyright (c) 1996-2015, Juniper Networks, Inc. All rights reserved. Copyright (c) 1992-2007 The FreeBSD Project. Copyright (c) 1979, 1980, 1983, 1986, 1988, 1989, 1991, 1992, 1993, 1994 The Regents of the University of California. All rights reserved. FreeBSD is a registered trademark of The FreeBSD Foundation. JUNOS 15.1X49-D15.4 #0: 2015-07-31 02:20:21 UTC <output omitted> The machine id is empty. Cleaning up ... Thu Aug 27 12:06:22 UTC 2015 Aug 27 12:06:22 init: exec_command: /usr/sbin/dhcpd (PID 1422) started Aug 27 12:06:22 init: dhcp (PID 1422) started Aug 27 12:06:23 init: exec_command: /usr/sbin/pppd (PID 1428) started Amnesiac (ttyd0) login: -
On the vSRX Virtual Firewall console, log in and verify the vSRX Virtual Firewall version installed.
login: root
--- JUNOS 15.1X49-D15.4 built 2015-07-31 02:20:21 UTC

root@%
root@% cli
root>
root> show version
Model: vSRX
Junos: 15.1X49-D15.4
JUNOS Software Release [15.1X49-D15.4]
Create a Base Configuration on the vSRX Virtual Firewall Instance
Step-by-Step Procedure
To configure a base setup on the vSRX Virtual Firewall instance, enter the following steps in
edit mode:
Create a root password.
[edit]
set system root-authentication plain-text-password
Set the IP address family for the management interface, and enable the DHCP client for this interface.
set interfaces fxp0 unit 0 family inet dhcp-client
Set the IP address for the ge-0/0/0.0 interface.
set interfaces ge-0/0/0 unit 0 family inet address 192.168.123.254/24
Set the IP address family for the ge-0/0/1.0 interface, and enable the DHCP client for this interface.
set interfaces ge-0/0/1 unit 0 family inet dhcp-client
Add the ge-0/0/0.0 interface to the trust security zone and allow all system services from inbound traffic on that interface.
set security zones security-zone trust interfaces ge-0/0/0.0 host-inbound-traffic system-services all
Add the ge-0/0/1.0 interface to the untrust security zone and allow only DHCP system services from inbound traffic on that interface.
set security zones security-zone untrust interfaces ge-0/0/1.0 host-inbound-traffic system-services dhcp
Create a virtual router routing instance and add the two interfaces to that routing instance.
set routing-instances CUSTOMER-VR instance-type virtual-router
set routing-instances CUSTOMER-VR interface ge-0/0/0.0
set routing-instances CUSTOMER-VR interface ge-0/0/1.0
Create a source NAT rule set.
set security nat source rule-set source-nat from zone trust
set security nat source rule-set source-nat to zone untrust
Configure a rule that matches packets and translates the source address to the address of the egress interface.
set security nat source rule-set source-nat  rule nat1 match source-address 0.0.0.0/0
set security nat source rule-set source-nat rule nat1 then source-nat interface
Results
From configuration mode, confirm your configuration
by entering the show interfaces command. If the output
does not display the intended configuration, repeat the instructions
in this example to correct the configuration.
show interfaces
From configuration mode, confirm your security policies by entering
the show security policies command. If the output does
not display the intended configuration, repeat the instructions in
this example to correct the configuration.
show security policies
from-zone trust to-zone trust {
    policy default-permit {
        match {
            source-address any;
            destination-address any;
            application any;
        }
        then {
            permit;
        }
    }
}
from-zone trust to-zone untrust {
    policy default-permit {
        match {
            source-address any;
            destination-address any;
            application any;
        }
        then {
            permit;
        }
    }
}
from-zone untrust to-zone trust {
    policy default-deny {
        match {
            source-address any;
            destination-address any;
            application any;
        }
        then {
            deny;
        }
    }
}
If you are done configuring the device, enter commit from configuration mode.
As a final step, exit configuration mode and use the request system reboot
command to reboot the vSRX Virtual Firewall VM. You can use the
virsh console command on the Ubuntu server to
reconnect to the vSRX Virtual Firewall after reboot.
Verify the Basic Configuration on the vSRX Virtual Firewall Instance
Purpose
Verify the basic configuration on the vSRX Virtual Firewall instance.
Action
Verify that the ge-0/0/0.0 interface has an assigned IP address from the TestLeft network DHCP address range, and that the ge-0/0/1.0 has an assigned IP address from the TestRight network DHCP address range.
root> show interfaces terse
Interface               Admin Link Proto    Local                 Remote
ge-0/0/0                up    up
ge-0/0/0.0              up    up   inet     192.168.123.254/24
gr-0/0/0                up    up
ip-0/0/0                up    up
lsq-0/0/0               up    up
lt-0/0/0                up    up
mt-0/0/0                up    up
sp-0/0/0                up    up
sp-0/0/0.0              up    up   inet
                                   inet6
sp-0/0/0.16383          up    up   inet
ge-0/0/1                up    up
ge-0/0/1.0              up    up   inet     192.168.124.238/24
dsc                     up    up
em0                     up    up
em0.0                   up    up   inet     128.0.0.1/2
em1                     up    up
em1.32768               up    up   inet     192.168.1.2/24
em2                     up    up
fxp0                    up    up
fxp0.0                  up    up   inet     192.168.2.1/24
ipip                    up    up
irb                     up    up
lo0                     up    up
lo0.16384               up    up   inet     127.0.0.1           --> 0/0
lo0.16385               up    up   inet     10.0.0.1            --> 0/0
                                            10.0.0.16           --> 0/0
                                            128.0.0.1           --> 0/0
                                            128.0.0.4           --> 0/0
                                            128.0.1.16          --> 0/0
lo0.32768               up    up
lsi                     up    up
mtun                    up    up
pimd                    up    up
pime                    up    up
pp0                     up    up
ppd0                    up    up
ppe0                    up    up
st0                     up    up
tap                     up    up
vlan                    up    down