Automate the Initialization of vSRX Virtual Firewall 3.0 Instances on VMware Hypervisor using VMware Tools
Overview
Open VM Tools is a set of services and modules that enhances the performance and user experience of vSRX Virtual Firewall. With this service, several features in VMware products are enabled for better management and easy user interactions with the guest OS. It includes kernel modules for enhancing the performance of virtual machines running Linux or other VMware–supported Unix–like guest operating systems. vSRX Virtual Firewall 3.0 supports VMware tools starting from Junos OS Release 20.2R1.
VMware Tools includes these components:
VMware Tools Service
VMware device Drivers
VMware user process
VMware Tools Control Panel
vSRX Virtual Firewall 3.0 runs on FreeBSD 11.x and later. FreeBSD 12 supports VMware open-vm-tools-10.3.0.
The VMware tools (binaries and libraries) are packaged into the vSRX Virtual Firewall image file and allow VM instances to query information from hypervisor and then set or use such information. by the VM instance itself.
During VM instance booting time, the boot-up script will look for Open Virtualization Format (OVF) settings or the machine ID setting. If the OVF settings are enabled, then the related VM CLI configurations are configured and the VM instance will use this CLI configuration when the VM instance is first powered on. We support autoconfiguration of hostname, IP address, gateway, DHCP, and DHCP server.
Benefits of VMware Tools for Autoconfiguration
Execute VMware-provided or user configured scripts in guest OS during various power operations.
Collect network, disk, and memory usage information from the guest periodically.
Generate heartbeat from guests to hosts to determine guests' availability.
Enable Time synchronization between a host and guest
Allows File transfer between a host and guest
Provides improved memory management and network performance
Supports general mechanisms and protocols for communication between host and guests and from guest to guest
Allows you to customize guest operating systems immediately after powering on virtual machines.
Provision VMware Tools for Autoconfiguration
There are 3 methods to make VMware tools support setting key-value are:
Set the VM options of parameter machine ID for each key.
Set vApp options of OVF property for each key.
Edit the *.ova package file to add the property for each key.
Use one of the methods to set the key-value.
If you want to change any VM parameters, use the VMware GUI. When VMWare hypervisor powers on the VM instance, open VMTool source code provides the functionality for the VM instance to query parameters from the hypervisor.
To set the VM options of parameter machine ID for settings keys:
-
On the Configuration
Parameters page, add a new parameter
with Name and
Value for each key.
Note:
For fxp0 IP address configuration, you can configure a key-value pair with a set of IP address or gateway, a set of DHCP address or DHCP server, or both.
When dhcp=yes, and both IP address and dhcp-server is configured, then dhcp-server takes higher prority.
When dhcp=no, or dhcp is not configured, then even if both IP address and dhcp-server are set, then IP address takes higher prority.
Figure 1: OVF Property Settings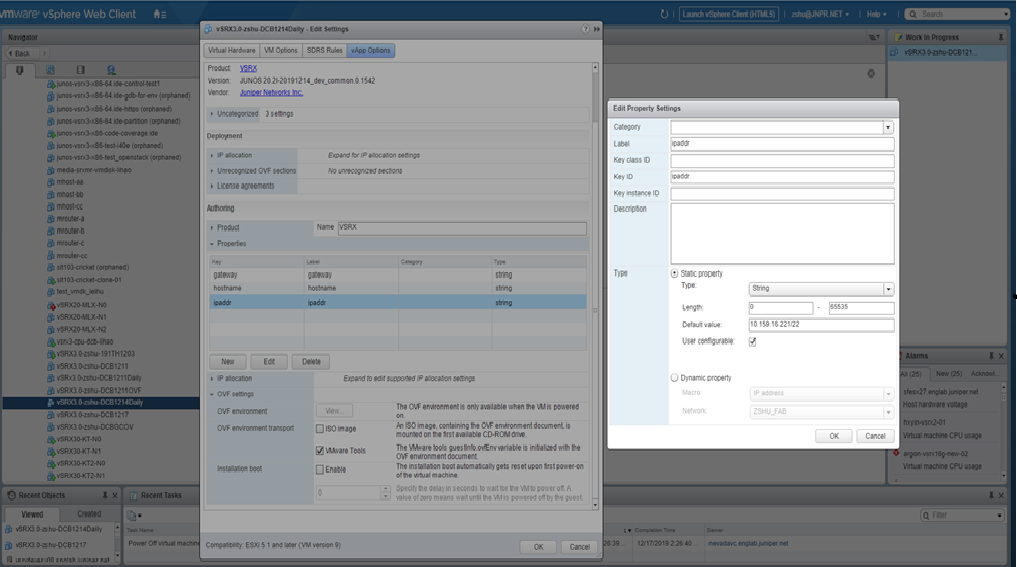
Example: OVF Setting
-
hostname: vSRX3.0-VMTOOL-Test
-
ipaddr=10.159.16.221/22
-
gateway= 10.159.16.2
-
dhcp-server = 10.159.16.1
-
dhcp=yes
Note:When deploy the VM with OVF setting, if you want to manually enter and provide the key-values at VMWare GUI, then providing one of IP address and dhcp server is enough.
But, for packaging OVF settings, providing all five key-vlaue pairs is better as you don’t need to enter the five keys, and only need to modify the value.
Check the vSRX Virtual Firewall 3.0 login prompt for root ID without password and check the loaded configuration for the following:
-
set system host-name vSRX3.0-VMTool-Test
-
set interfaces fxp0 unit 0 family inet dhcp server-address 10.159.16.1
-
To set the vApp options of OVF property for each key:
On the VMware ESXi vCenter server, access the VM on vSphere Web client (FLEX), go to Edit Virtual Machine Setting ->vApp Options->OVF setting, and under OVF environment transparent tab , select VMWare Tools.
Go to Edit Virtual Machine Setting->vApp Options->Properties and edit each key value.
To verify the configuration login and power-on for the first time as root and without password, verify the fxp0 and DHCP bindings or check the log files at /var/log/vmware_ovf.info and /var/log/setup_config.log.
To edit the OVF package file instructions:
Untar the *.ova. in the *.ova file. There are three files: *.ovf,*.mf, and *.vmdk.
Edit the *.ovf file to add some property for each key value under the production section.
-
To verify the configuration, deploy the vSRX Virtual Firewall 3.0 from vCenter server Web client and check the properties set for each key value or check the log files at /var/log/vmware_ovf.info and /var/log/setup_config.log.