Help us improve your experience.

Let us know what you think.

Do you have time for a two-minute survey?


Deploy vSRX Virtual Firewall from the Azure CLI

Starting in Junos OS Release 15.1X49-D80 and Junos OS Release 17.3R1, you can deploy the vSRX Virtual Firewall from the Azure CLI and customize the vSRX Virtual Firewall VM deployment settings and dependencies based on your network requirements in Microsoft Azure Cloud.

Use the following procedure to deploy and configure vSRX Virtual Firewall as a virtual security appliance in a Microsoft Azure virtual network from the Azure CLI. In this procedure, you use the Azure CLI running in Azure Resource Manager (ARM) mode.

Note:

Be sure you have an account for and a subscription to Microsoft Azure before deploying the vSRX Virtual Firewall to Azure (see Microsoft Azure).

If you do not have an Azure subscription, then you can create a free account before you begin. See the Microsoft Azure website for more details.

Note:

From the Azure portal, you must first manually deploy the vSRX Virtual Firewall image (only once) by using either the vSRX Next Generation Firewall (BYOL) or the vSRX Next Generation Firewall (PAYG) SKU to accept the EULA terms. This is a requirement before you can deploy the vSRX Virtual Firewall image from the Azure CLI. By default, the Azure portal deployment tool uses vSRX Next Generation Firewall (BYOL) SKU as the source image. Use your Microsoft account username and password to log into the Microsoft Azure portal.

You will encounter a MarketplacePurchaseEligibilityFailed error if do not first accept the EULA terms for the vSRX Virtual Firewall image in the Azure portal before attempting to deploy the vSRX Virtual Firewall image from the Azure CLI.

Install the Microsoft Azure CLI

To install and log in to the Microsoft Azure CLI:

  1. Install the Microsoft Azure CLI 1.0 as outlined in Install the Azure CLI. You have several options to install the Azure CLI package for either the Linux or Mac OS; be sure to select the correct installation package.
    Note:

    The vSRX Virtual Firewall for Azure deployment shell script deploy-azure-vsrx.sh is written in shell and Azure CLI version 1.0 commands and does not support Azure CLI version 2.0.

    Note:

    Deployment of vSRX Virtual Firewall to Microsoft Azure does not support the use of the Azure CLI from Microsoft Windows. This is because the deploy-azure-vsrx.sh shell script that is used as part of the deployment procedure can be run only from the Linux or Mac OS CLI.

  2. Log into the Azure CLI.

    > azure login

  3. At the prompt. copy the code that appears in the command output.
  4. Open a Web browser to http://aka.ms/devicelogin, enter the code, and then click Continue. Enter your Microsoft Azure username and password credentials. When the process completes, the command shell completes the login process.
    Note:

    If you have multiple Azure subscriptions, connecting to Azure grants access to all subscriptions associated with your credentials. One subscription is selected as the default, and used by the Azure CLI when performing operations. You can view the subscriptions, including the current default subscription, using the azure account list command.

  5. Ensure that the Azure CLI is in Azure Resource Manager (ARM) mode.

    > azure config mode arm

    Note:

    When the Azure CLI is initially installed, the CLI is in ARM mode.

Download the vSRX Virtual Firewall Deployment Tools

Juniper Networks provides a set of scripts, templates, parameter files, and configuration files in Juniper’s GitHub repository. These tools are intended to help simplify the deployment of the vSRX Virtual Firewall to Azure when using the Azure CLI.

Note:

For background information on the scripts, templates, parameter files, and configuration files, see Before You Deploy vSRX Using the Azure CLI.

To download the vSRX Virtual Firewall deployment tools:

  1. Access GitHub by using the following link: https://github.com/Juniper/vSRX-Azure.
  2. Click Clone or download to download to you computer the vSRX-Azure-master.zip file from Github containing all files and directories from vSRX-Azure. The vSRX-Azure-master directory includes the following directories and files:
  3. Extract the compressed vSRX-Azure-master.zip file to a location on your computer.

Change Parameter Values in the vSRX Virtual Firewall.parameter.json File

In the vsrx.parameters.json file, you need to modify parameter values specific to your vSRX Virtual Firewall deployment in Microsoft Azure. These parameters are used as part of the automatic deployment performed by the deploy-azure-vsrx.sh script.

Keep in mind that by default vSRX Virtual Firewall uses fxp0 as the egress interface to the Internet. For features requiring Internet connections that use a revenue port (such as VPN, Content Security, and so on), routing instances are required to isolate the traffic between the management network and the revenue network.

To change parameter values in the vsrx.parameters.json file:

  1. Open the vsrx.parameters.json file with a text editor.
  2. Modify the values in the vsrx.parameters.json file based on the specifics of your vSRX Virtual Firewall deployment. As an example, the following table outlines the parameters in the vsrx.parameters.json file found in sample-templates\arm-templates-tool\templates\vsrx-gateway that might require modification.
    CAUTION:

    It is critical that you change the vSRX Virtual Firewall-username and vSRX Virtual Firewall-password login credentials listed in the vsrx.parameters.json file before you launch the vSRX Virtual Firewall instance and login for the first time. Note that you cannot reset login credentials for the vSRX Virtual Firewall using the Microsoft Azure portal or the Azure CLI.

    Parameter

    Default Value

    Comment

    storageAccountName

    juniperstore01

    Must be unique for each deployment.

    storageContainerName

    vhds

    Name of the Microsoft Azure storage container (VHDs).

    vSRX Virtual Firewall-name

    vSRX Virtual Firewall-gw

    Specifies the vSRX Virtual Firewall hostname.

    vSRX Virtual Firewall-addr-ge-0-0-0

    192.168.10.20

    IP address of vSRX Virtual Firewall interface ge-0/0/0.0.

    vSRX Virtual Firewall-addr-ge-0-0-1

    192.168.20.20

    IP address of vSRX Virtual Firewall interface ge-0/0/1.0.

    vSRX Virtual Firewall-username

    demo

    Change to an appropriate username for the login credentials used to access the vSRX Virtual Firewall.

    vSRX Virtual Firewall-password

    Demo123456

    Change to an appropriate password for the login credentials used to access the vSRX Virtual Firewall.

    vSRX Virtual Firewall-sshkey

    ssh-rsa placeholder

    Specifies the root authentication password for the vSRX Virtual Firewall VM by entering an SSH public key string ( RSA or DSA). By default, the deploy-azure-vsrx.sh deployment script selects the password authentication method, unless –p, followed by the SSH RSA public key file (id_rsa.pub by default), is specified.

    Note:

    Starting in Junos OS Release 15.1X49-D100 for vSRX Virtual Firewall, both password and SSH public key authentication are supported, and password authentication is chosen by default.

    vSRX Virtual Firewall-disk

    placeholder

    The source image to create the vSRX Virtual Firewall instance. By default, the deploy-azure-vsrx.sh script uses the vSRX Next Generation Firewall (BYOL) SKU in the Azure Marketplace as the source image to deploy vSRX Virtual Firewall instance, unless –i is used to explicitly specify the vSRX Virtual Firewall instance image location.

    vnet-prefix

    192.168.0.0/16

    IP address prefix of the virtual network.

    vnet-mgt-subnet-basename

    mgt-subnet

    Name of management network connected to fxp0.

    vnet-mgt-subnet-prefix

    192.168.0.0/24

    IP address prefix of management network connected to fxp0.

    vnet-trust-subnet-basename

    trust-subnet

    Name of network connected to trust security zone: ge-0/0/1.0 on the vSRX Virtual Firewall.

    vnet-trust-subnet-prefix

    192.168.20.0/24

    IP address prefix of network connected to trust security zone: ge-0/0/1.0 on the vSRX Virtual Firewall.

    vnet-untrust-subnet-basename

    untrust-subnet

    Name of network connected to untrust security zone: ge-0/0/0.0 on the vSRX Virtual Firewall.

    vnet-untrust-subnet-prefix

    192.168.10.0/24

    IP address prefix of network connected to untrust security zone: ge-0/0/0.0 on the vSRX Virtual Firewall.

  3. Save your changes to the vsrx.parameters.json file.

Deploy the vSRX Virtual Firewall Using the Shell Script

The deploy-azure-vsrx.sh shell script deploys the vSRX Virtual Firewall virtual machine in a resource group that is based on your Azure Cloud geographic location. The script uses the storage account and network values defined in the vsrx.parameters.json file.

To deploy vSRX Virtual Firewall to the Azure virtual network:

  1. At the bash prompt in the Azure CLI, run the deploy-azure-vsrx.sh script. By default, the script deploys the vSRX Virtual Firewall VM using the vSRX Next Generation Firewall (BYOL) SKU as the source image from the Azure Marketplace. The following information is read from the vSRX Virtual Firewall.json file as part of the deployment:
    • VM Size: Standard_D3_v2

    • Publisher: Juniper Networks

    • SKU: vSRX Virtual Firewall-byol-azure-image

    • Offering: vSRX Virtual Firewall-next-generation-firewall

    The following is an example of the command syntax. In this example, the script uses the vSRX Virtual Firewall image to deploy the vSRX Virtual Firewall VM in resource group “example_rg” at the Azure location “westus.” The storage account and network values are defined in the vsrx.parameters.json file.

    > ./deploy-azure-vsrx.sh -g example_rg -l westus -f vSRX-Azure/sample-templates/arm-templates-tool/templates/vsrx-gateway/vsrx.json -e vSRX-Azure/sample-templates/arm-templates-tool/templates/vsrx-gateway/vsrx.parameters.json

    Note:

    When you specify the vSRX Virtual Firewall source image URL with the option -i, the script copies the vSRX Virtual Firewall source image to create the virtual hardware disk file and to set the vsrx-disk parameter in vsrx.parameters.json to this value.

    The default parameter values in the command syntax include:

    • example_rg is the resource group name (-g).

    • westus is the Azure location (-l).

    • vSRX Virtual Firewall.json in the folder vSRX-Azure/sample-templates/arm-templates-tool/templates/vsrx-gateway is the default Azure template file (-f).

    • vSRX Virtual Firewall.parameters.json in the folder vSRX-Azure/sample-templates/arm-templates-tool/templates/vsrx-gateway is the default parameter file (-e).

  2. Monitor the stages of deployment of vSRX Virtual Firewall to Microsoft Azure as they occur on screen. Deployment encompasses operations such as creating a resource group, storage account, template group (including configuration parameters).
    Note:

    Creation of the storage account can take approximately 3 to 5 minutes on average. However, in some cases, it might take as long as 15 to 20 minutes.

    When the deployment process completes, you will see the message “info: group deployment create command Ok.

Verify Deployment of vSRX Virtual Firewall to Microsoft Azure

To verify the deployment of the vSRX Virtual Firewall instance to Microsoft Azure:

  1. Open a Web browser to https://portal.azure.com/ and login to the Microsoft Azure portal using your login credentials. The Dashboard view appears in the Azure portal . You will see a unified dashboard for all your assets in Azure. Verify that the Dashboard includes all subscriptions to which you currently have access, and all resource groups and associated resources.
  2. To view the vSRX Virtual Firewall resource group and its resources after deployment is completed, from the right- hand menu, click Resource groups to access the Resource Groups page.

    Figure 1 shows an example of the Resources group page in the Microsoft Azure portal.

    Figure 1: Microsoft Azure Resource Groups Page Example Microsoft Azure Resource Groups Page Example
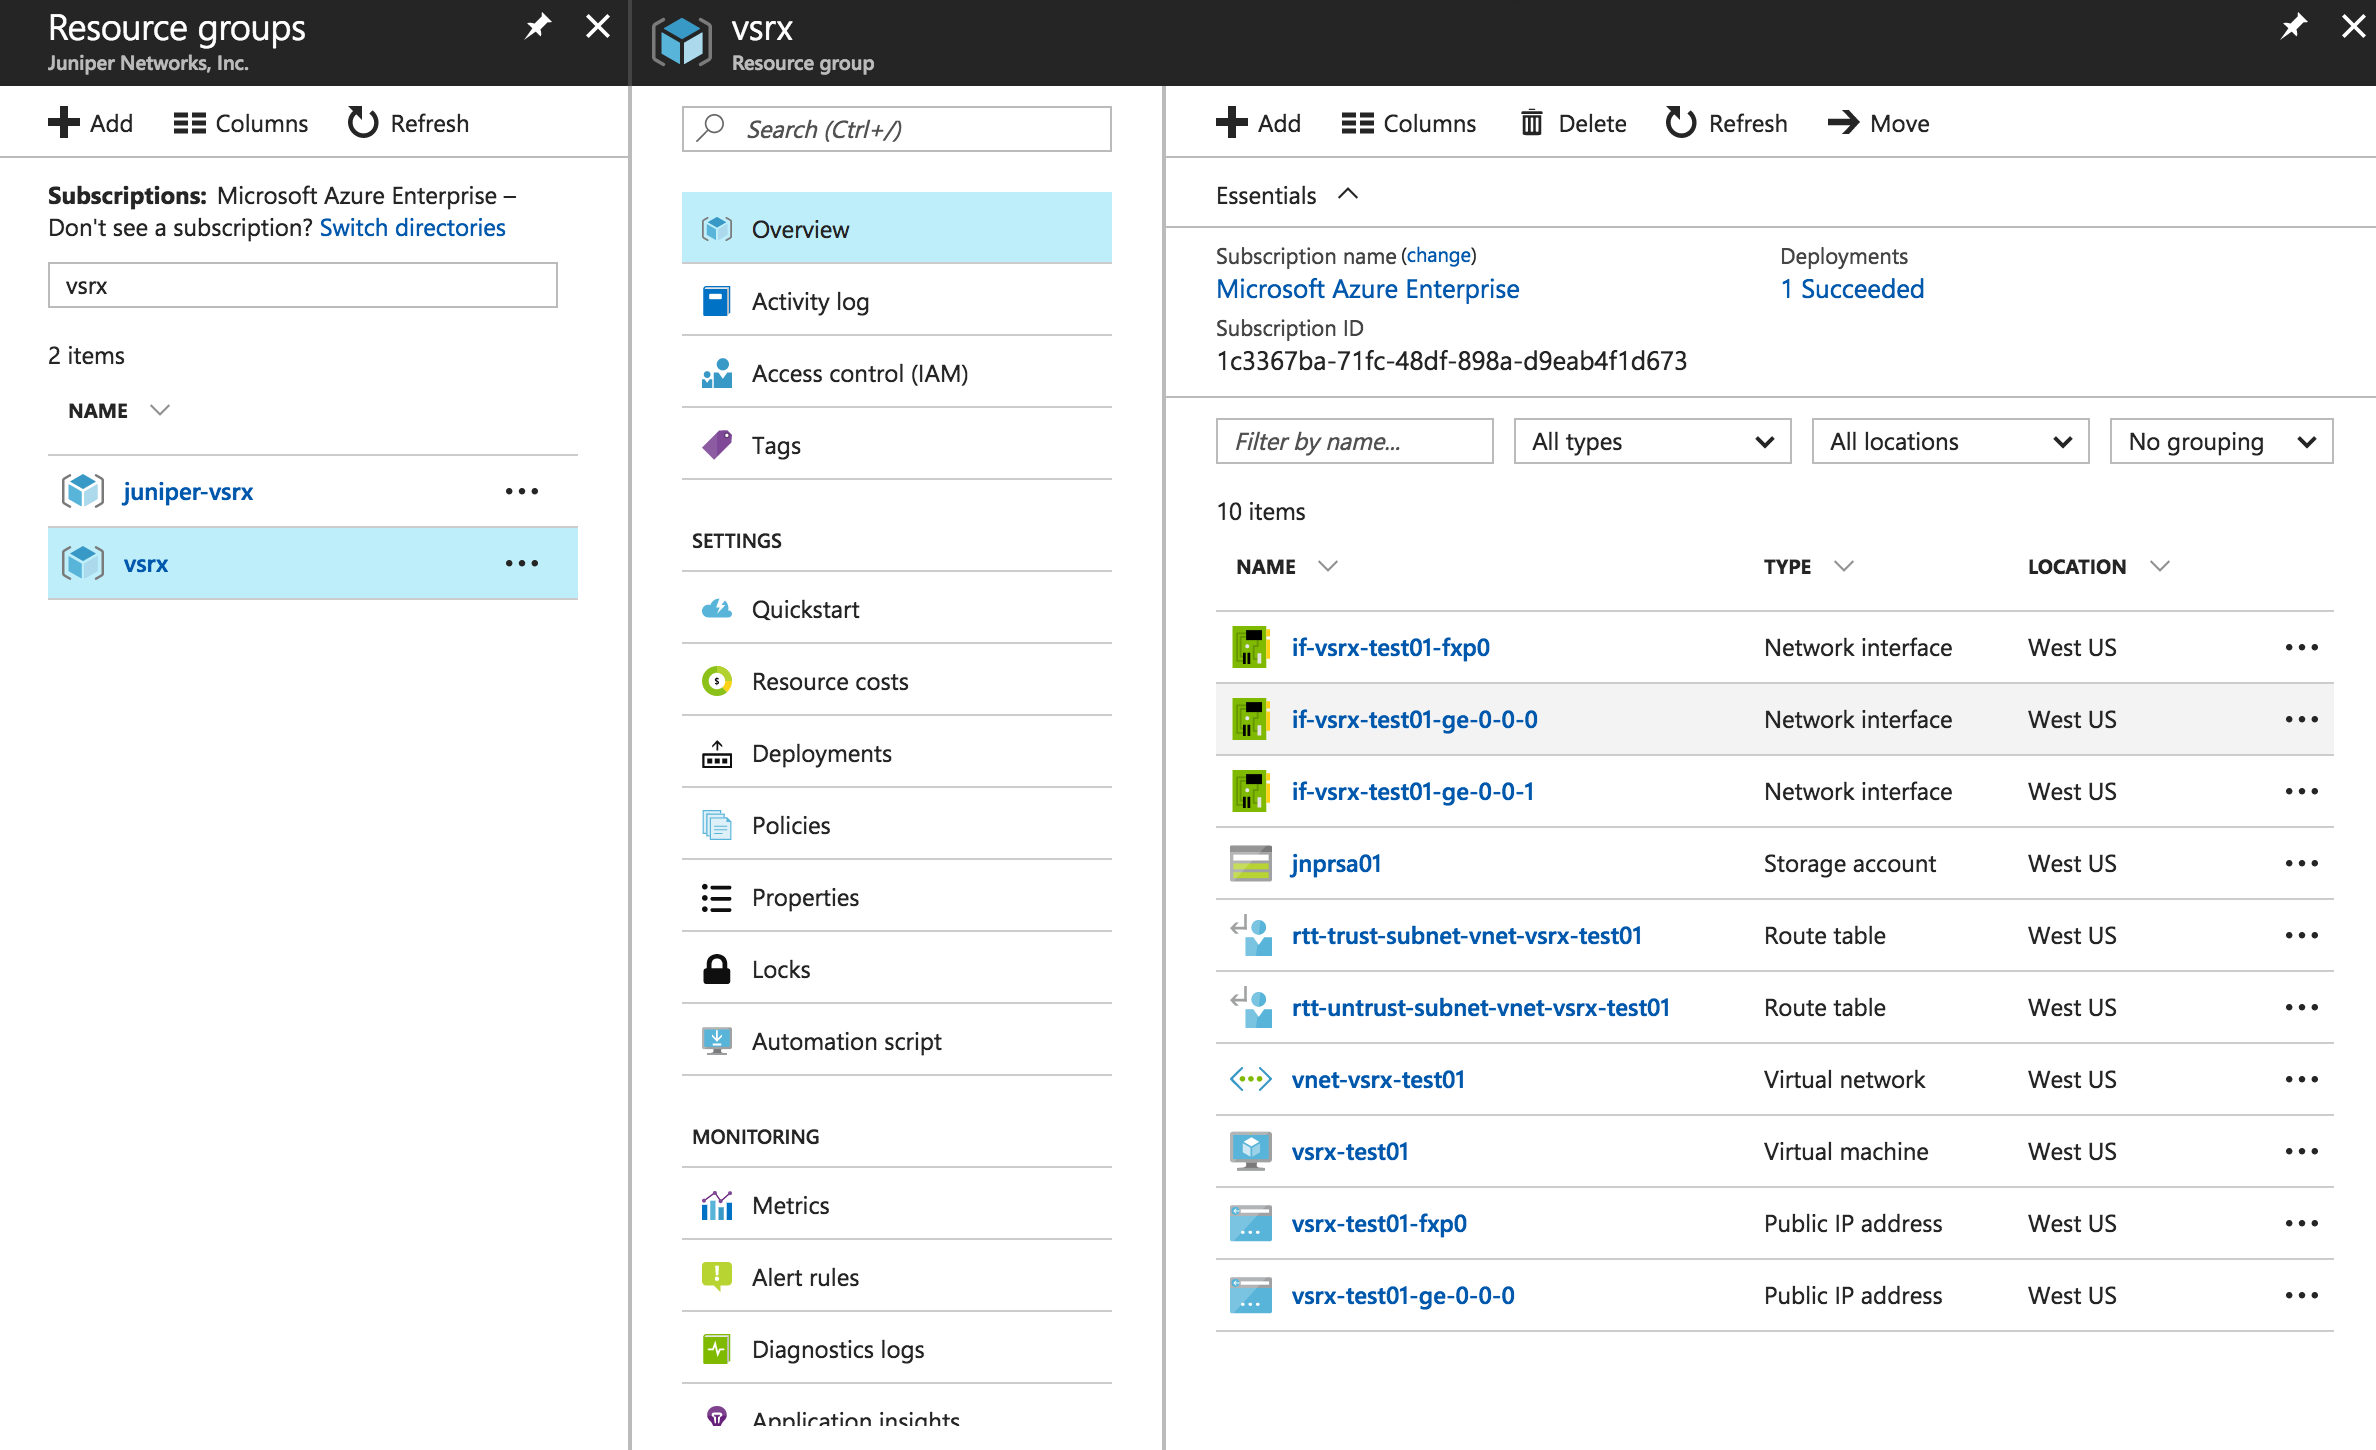
  3. To view details of the vSRX Virtual Firewall VM associated with the resource group, click the name of the vSRX Virtual Firewall.

    Figure 2 shows an example of the Resource groups VM in the Microsoft Azure portal.

    Figure 2: Microsoft Azure Resource Groups VM Example Microsoft Azure Resource Groups VM Example
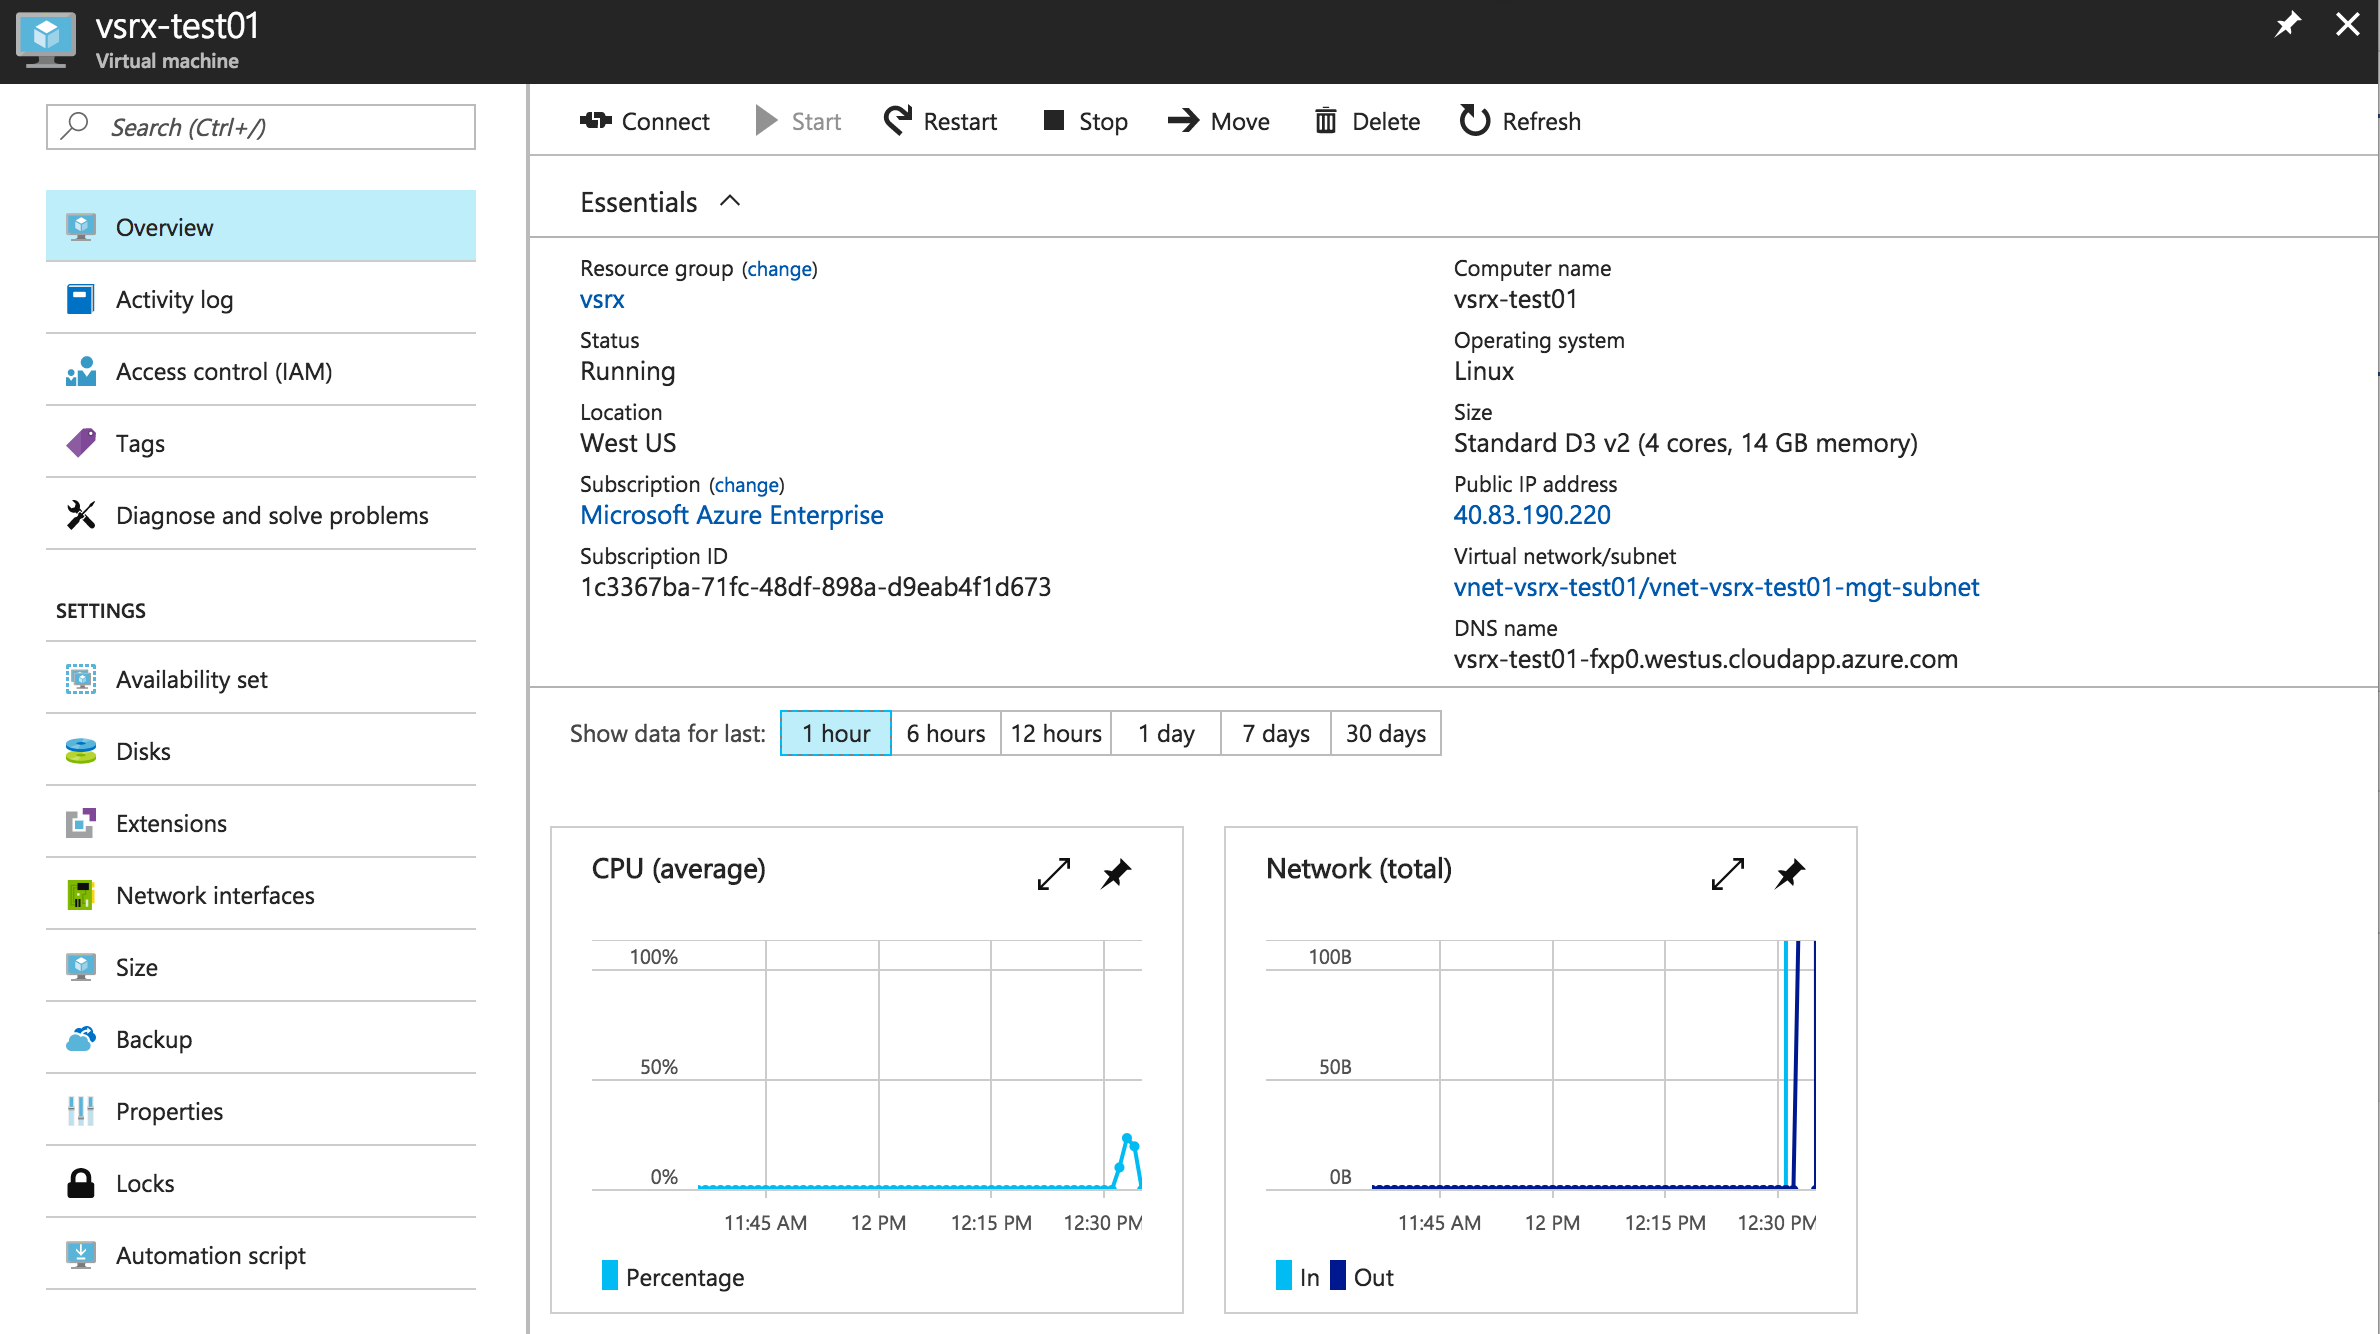
  4. To see a summary view of the VMs in your subscription, including the newly deployed vSRX Virtual Firewall, click the Virtual Machines icon in the left pane. On the Virtual machines page, check the vSRX Virtual Firewall VM status after deployment is completed. Observe that the status is Running.
    Note:

    You can stop, start, restart, and delete a VM from the Virtual machines page in the Microsoft Azure portal.

    Figure 3 shows an example of the Microsoft Azure Virtual machines page.

    Figure 3: Microsoft Azure Virtual Machines Page Example Microsoft Azure Virtual Machines Page Example

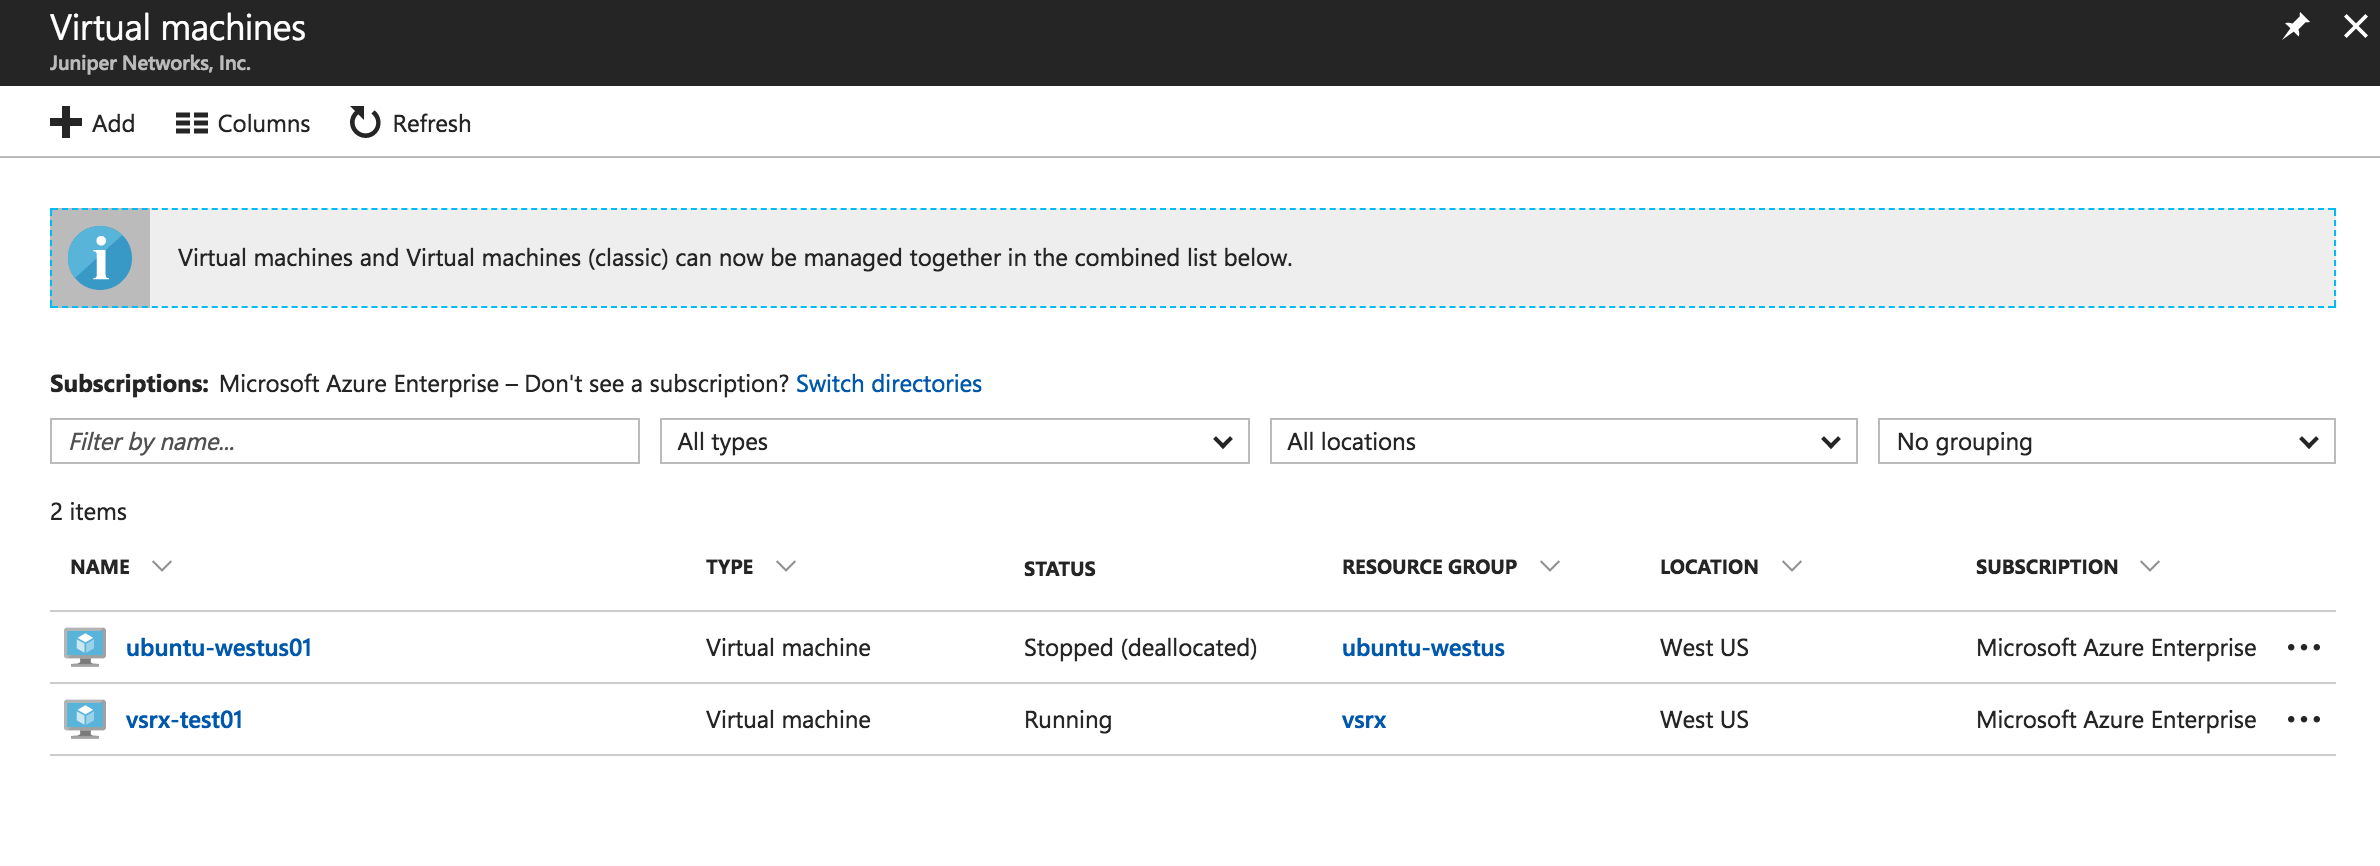
Log In to a vSRX Virtual Firewall Instance

After vSRX Virtual Firewall deployment is completed, the vSRX Virtual Firewall instance is automatically powered on and launched. At this point you can use an SSH client to log in to the vSRX Virtual Firewall instance.

Note:

In Microsoft Azure, individuals and enterprises can host servers and services on the cloud as a pay-as-you-go (PAYG) or bring-your-own-license (BYOL) service. For the vSRX Virtual Firewall on Microsoft Azure deployment, only the BYOL model is supported.

To log in to the vSRX Virtual Firewall VM:

  1. From the Azure portal, click Resource groups from the menu of services on the dashboard, and then select the vSRX Virtual Firewall VM. Locate the public IP address of the vSRX Virtual Firewall VM from the Settings blade.
  2. Use an SSH client to log in to a vSRX Virtual Firewall instance.
  3. At the prompt, enter the following login credentials:
    Note:

    Starting in Junos OS Release 15.1X49-D80 and Junos OS Release 17.3R1, only password authentication is supported. Starting in Junos OS Release 15.1X49-D100 for vSRX Virtual Firewall, both password and SSH public key authentication are supported, and password authentication is chosen by default.

    The vSRX Virtual Firewall instance is automatically configured for username and password authentication. To log in, use the login credentials that were defined in the vsrx.parameters.json file (see Change Parameter Values in the vSRX Virtual Firewall.parameter.json File). After initially logging to the vSRX Virtual Firewall, you can configure SSH public and private key authentication.

    # ssh <username@vsrx_vm_ipaddress>

  4. Configure the basic settings for the vSRX Virtual Firewall VM (see Configure vSRX Using the CLI).

Change History Table

Feature support is determined by the platform and release you are using. Use Feature Explorer to determine if a feature is supported on your platform.

Release
Description
15.1X49-D80
Starting in Junos OS Release 15.1X49-D80 and Junos OS Release 17.3R1, you can deploy the vSRX Virtual Firewall from the Azure CLI and customize the vSRX Virtual Firewall VM deployment settings and dependencies based on your network requirements in Microsoft Azure Cloud.
15.1X49-D80
Starting in Junos OS Release 15.1X49-D80 and Junos OS Release 17.3R1, only password authentication is supported.
15.1X49-D100
Starting in Junos OS Release 15.1X49-D100 for vSRX Virtual Firewall, both password and SSH public key authentication are supported, and password authentication is chosen by default.
15.1X49-D100
Starting in Junos OS Release 15.1X49-D100 for vSRX Virtual Firewall, both password and SSH public key authentication are supported, and password authentication is chosen by default.