Launch a vSRX Virtual Firewall Instance on an Amazon Virtual Private Cloud
The following procedures describe how to launch and configure a vSRX Virtual Firewall instance in the Amazon Virtual Private Cloud (Amazon VPC):
Step 1: Create an SSH Key Pair
An SSH key pair is required to remotely access a vSRX Virtual Firewall instance on AWS. You can create a new key pair in the Amazon EC2 Dashboard or import a key pair created by another tool.
To create an SSH key pair:
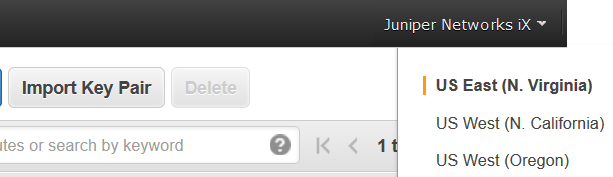
- In the Amazon EC2 Dashboard, select Key Pairs in the left pane. Verify that the region name shown in the toolbar
is the same as the region where you created the Amazon Virtual Private
Cloud (Amazon VPC).Figure 1: Verify Region
- Click Create Key Pair, specify a key pair name,
and click Create.
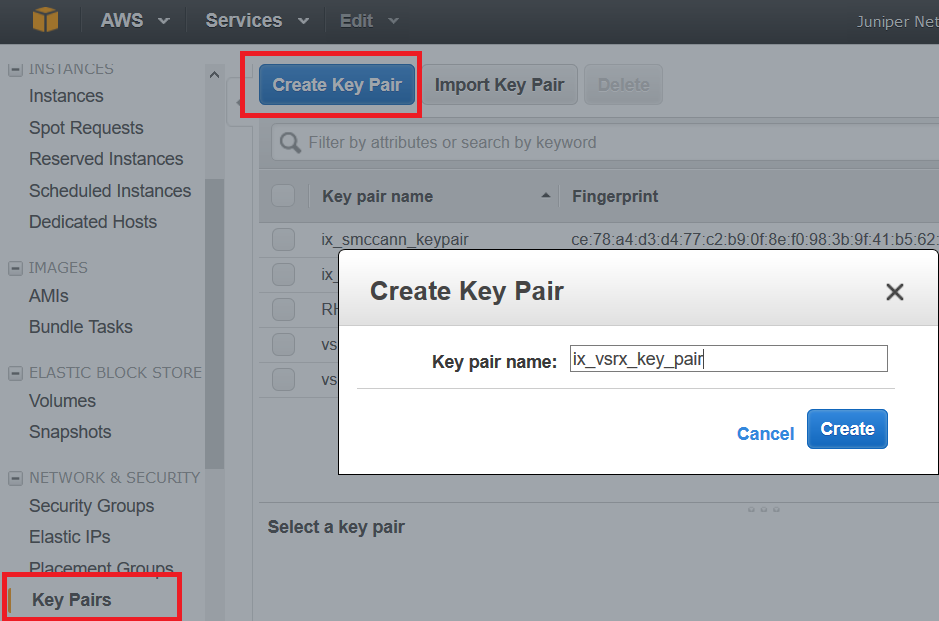
Alternately, use Import Key Pair to import a different key pair you generated with a third-party tool.
For more information on key rotation, see https://docs.aws.amazon.com/kms/latest/developerguide/rotate-keys.html.
Step 2: Launch a vSRX Virtual Firewall Instance
The AWS instance types supported for vSRX Virtual Firewall are listed in Table 1.
vSRX Virtual Firewall does not support M and C3 instances types. If you have spun your vSRX Virtual Firewall using any of these instances types, then you must change the instance type to either C4 or C5 instances type.
|
Instance Type |
vSRX Virtual Firewall Type |
vCPUs |
Memory (GB) |
RSS Type |
|---|---|---|---|---|
|
c5.large |
vSRX Virtual Firewall-2CPU-3G memory |
2 |
4 |
HW RSS |
|
c5.xlarge |
vSRX Virtual Firewall-4CPU-7G memory |
4 |
8 |
HW RSS |
|
c5.2xlarge |
vSRX Virtual Firewall-8CPU-15G memory |
8 |
16 |
HW RSS |
|
c5.4xlarge |
vSRX Virtual Firewall-16CPU-31G memory |
16 |
32 |
SW RSS |
|
c5.9xlarge |
vSRX Virtual Firewall-36CPU-69G memory |
36 |
72 |
SW RSS |
|
c5n.2xlarge |
vSRX Virtual Firewall-8CPU-20G memory |
8 |
21 |
HW RSS |
|
c5n.4xlarge |
vSRX Virtual Firewall-16CPU-41G memory |
16 |
42 |
HW RSS |
|
c5n.9xlarge |
vSRX Virtual Firewall-36CPU-93G memory |
36 |
96 |
HW RSS |
vSRX Virtual Firewall on AWS supports up to a maximum of eight network interfaces, but the actual maximum number of interfaces that can be attached to a vSRX Virtual Firewall instance is dictated by the AWS instance type in which it is launched. For AWS instances that allow more than eight interfaces, vSRX Virtual Firewall will support up to a maximum of eight interfaces only.
The following are the supported C5 instance types :
-
c5.large
-
c5.xlarge
-
c5.2xlarge
-
c5.4xlarge
-
c5.9xlarge
-
c5n.2xlarge
-
c5n.4xlarge
-
c5n.9xlarge
The following are the supported AMD-based AWS instances:
-
C5a.16xlarge
-
C5a.8xlarge
-
C5a.4xlarge
-
C5a.2xlarge
-
C5a.xlarge
For more information on instance details such as vCPUs, memory and so on, see Pricing Information
For more information on maximum network interfaces by instance type, see https://docs.aws.amazon.com/AWSEC2/latest/UserGuide/using-eni.html .
Instance Type Selection—Based on the changes that your require for your network, you might find that your instance is overutilized, (such as the instance type is too small) or underutilized, (such as the instance type is too large). If this is the case, you can change the size of your instance. For example, if your instance is too small for its workload, you can change it to another instance type that is appropriate for the workload. You might also want to migrate from a previous generation instance type to a current generation instance type to take advantage of some features; for example, support for IPv6. Consider change of instances for better performance and throughputs.
Starting with Junos OS Release 18.4R1, c5.large vSRX Virtual Firewall instances are supported. These are cost effective and provide better performance and throughput.
To launch a vSRX Virtual Firewall instance in the Amazon VPC:
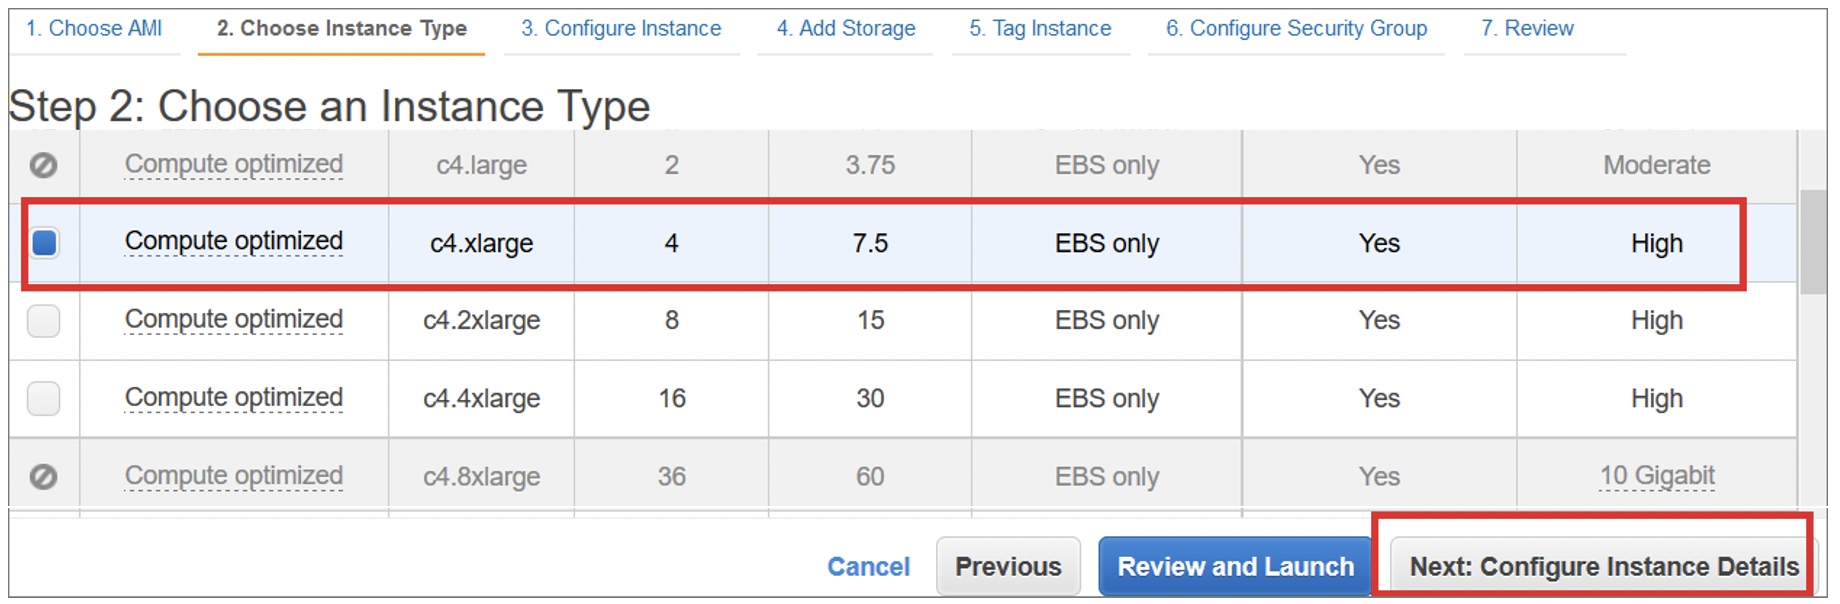
-
Select a supported instance type. See Table 1 for details.
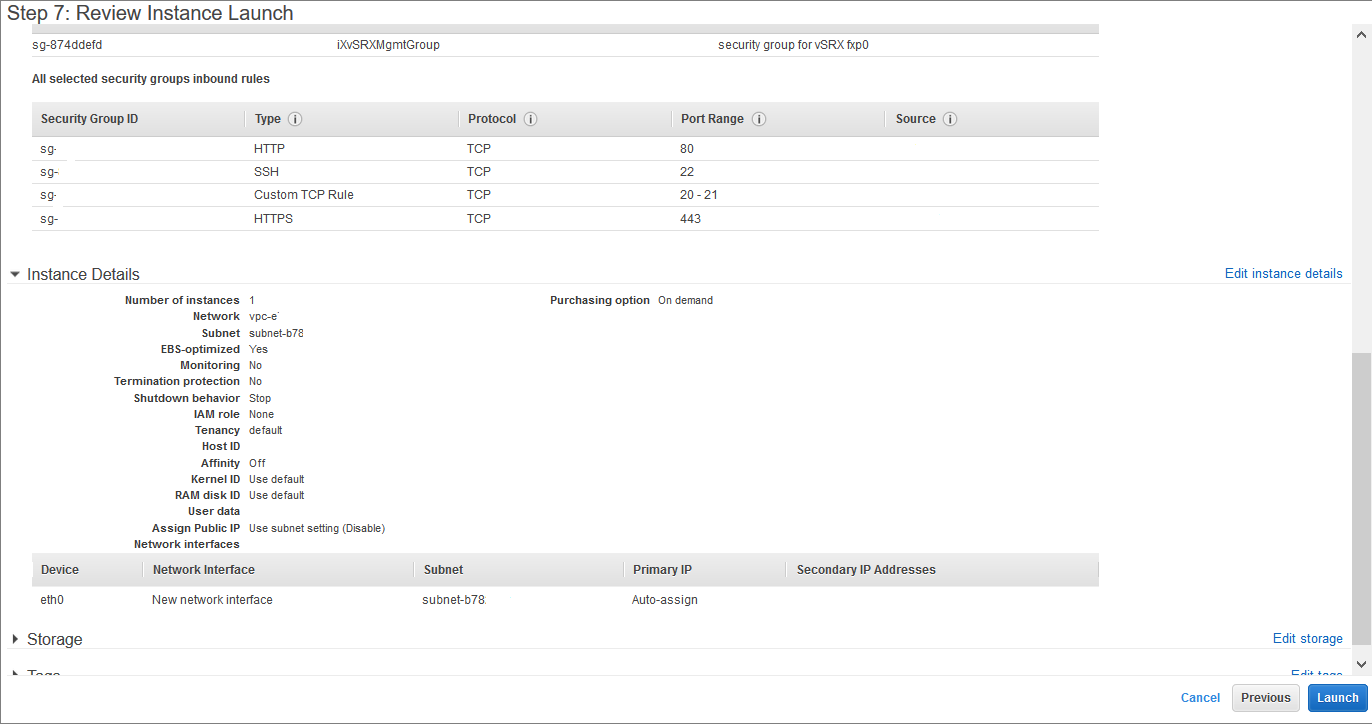
-
Click Review and Launch, review the settings for the vSRX Virtual
Firewall instance, and click Launch.
-
Select the instance name and the Amazon Machine Image (AMI) (for Junos - select the
available marketplace Junos AMI).

-
Select the instance type (c5/c6..and so on) as already described in the document and add
the key pair that was cretaed in Step 1.

-
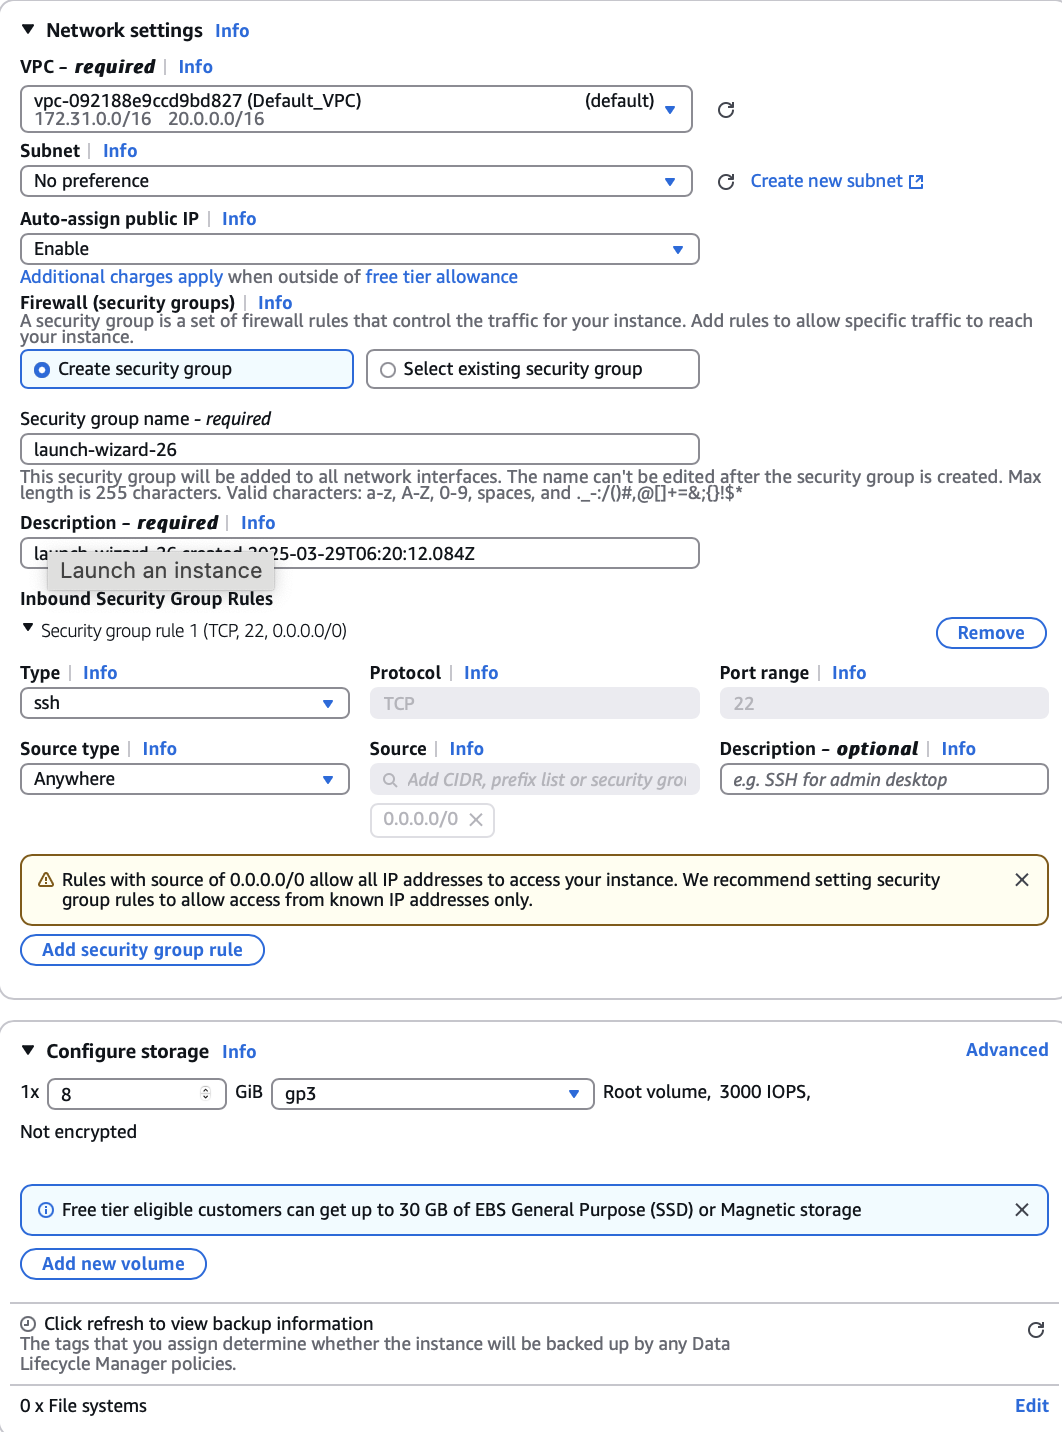
In network settings, select the VPC created in the previous step. Select the public subnet
created (or the subnet in which you want the management interface of the instance to come up
in). Assign an IP (public) if needed or one can attach an elastic IP as described in Step 5 to
the interface, after the instance is launched. Create a security group or attach a security
group already created in the prev step. Select proper inbound and outbound rules.
-
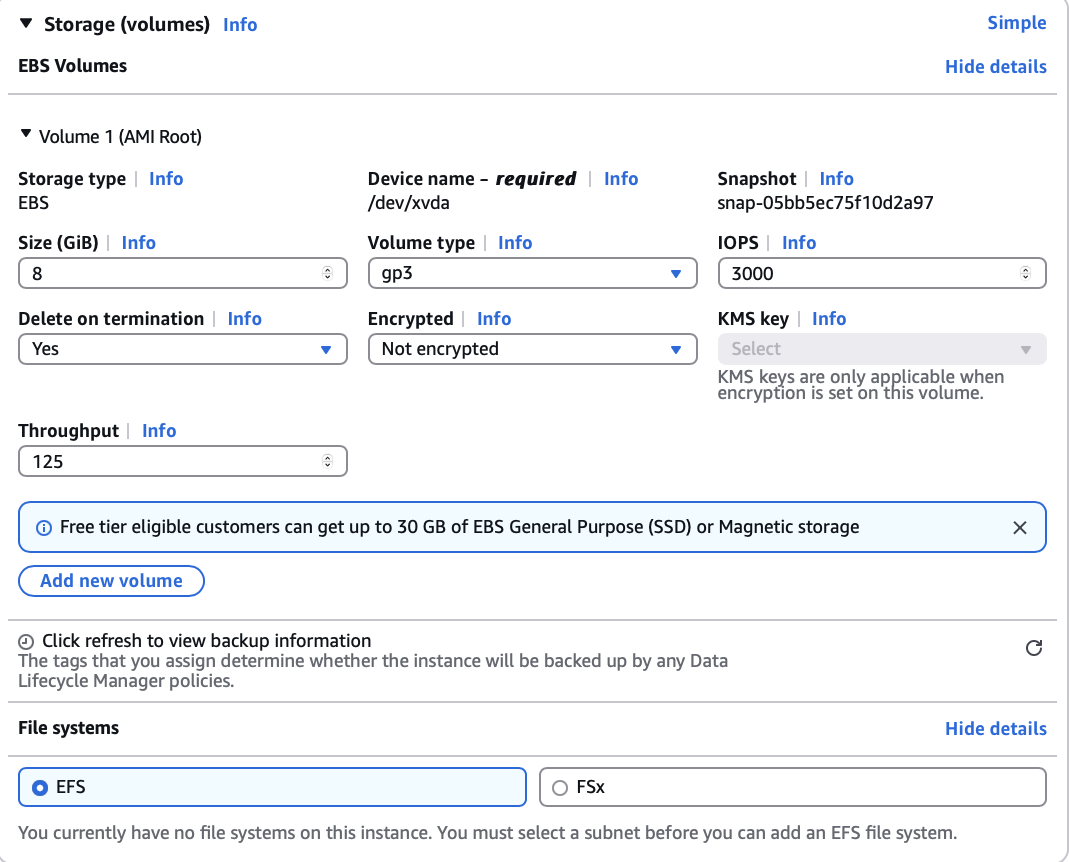
Configure storage and volume as per your requirement.
-
Configure the Advanced details. Select the created IAM profile, configure the shown
options as per your requirement.
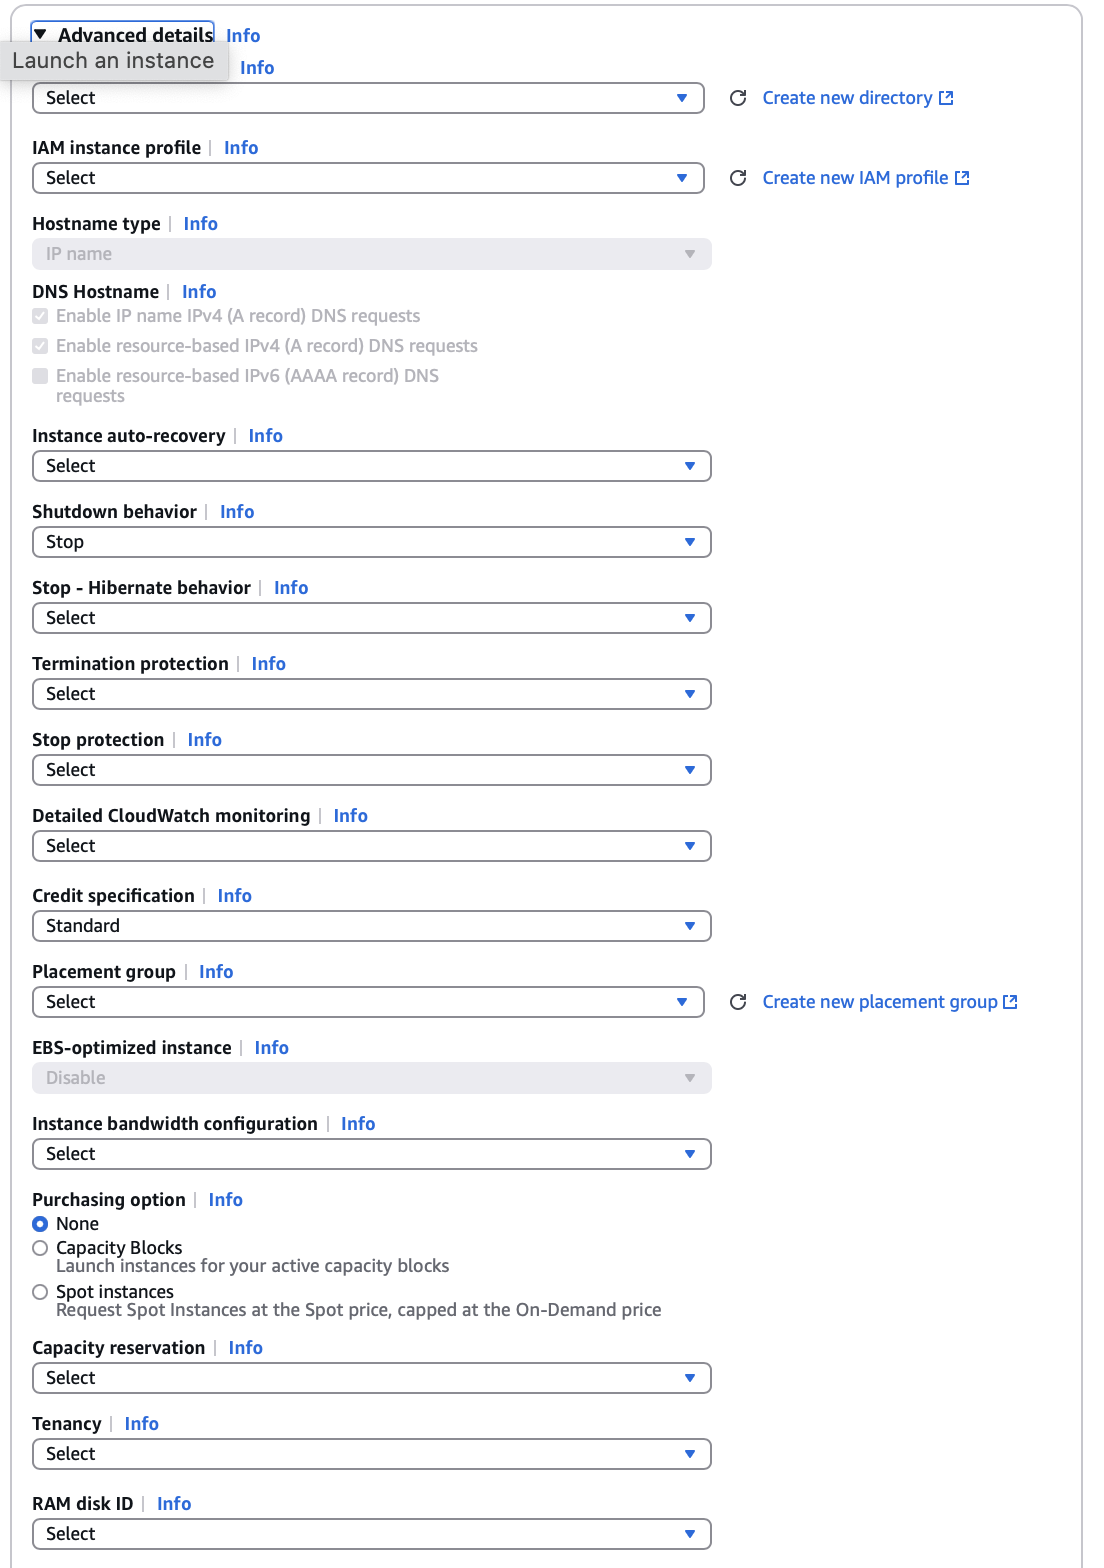
In CPU options - you can use default or you can select specific number of thread(s) per CPU core across #number of core(s).

-
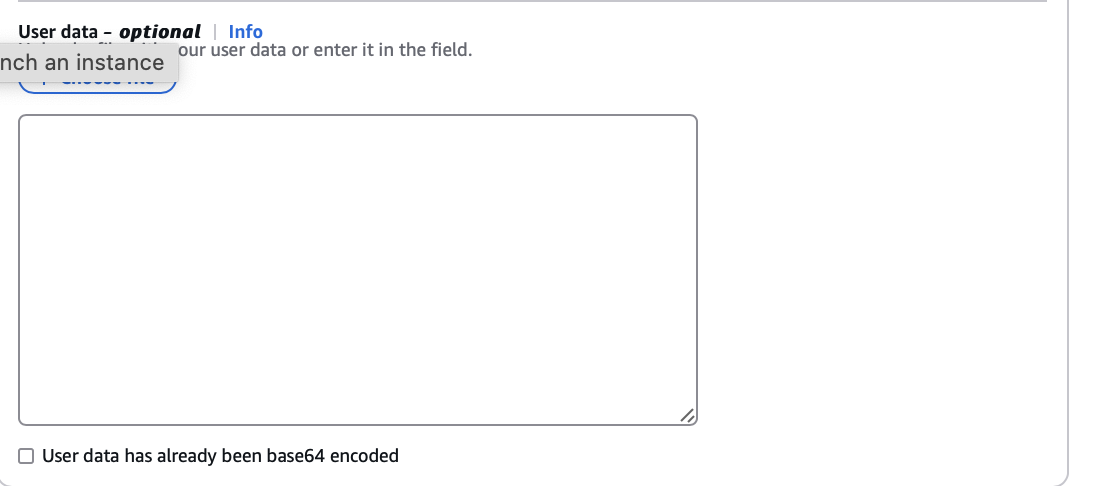
Configure userdata. This is can be the initial configuration that the instance can access
as soon as it is launched from the metadata server.
Step 3: View the AWS System Logs
To debug launch time errors, you can view the AWS system logs, as follows:
- In the Amazon EC2 Dashboard, select Instances.
- Select the vSRX Virtual Firewall instance, and select Actions > Instance Settings > Get System Logs.
Step 4: Add Network Interfaces for vSRX Virtual Firewall
AWS supports up to eight interfaces for an instance, depending on the AWS instance type selected. Use the following procedure for each of the revenue interfaces you want to add to vSRX Virtual Firewall (up to seven). The first revenue interface is ge-0/0/0, the second is ge-0/0/1, and so on (see Requirements for vSRX on AWS).
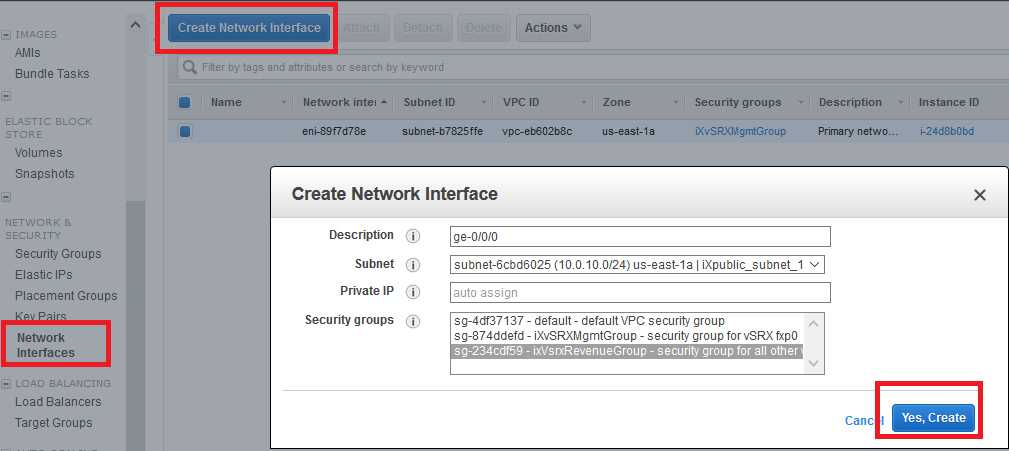
To add a vSRX Virtual Firewall revenue interface:
- Specify the interface settings as shown in Table 3, and click Yes, Create.
Table 3: Network Interface Settings Field
Setting
Description
Enter an interface description for each of the revenue interfaces.
Subnet
Select the public subnet created for the first revenue interface (ge-0/0/0) or the private subnet created for all the other revenue interfaces.
Private IP
Enter an IP address from the selected subnet or allow the address to be assigned automatically.
Security Groups
Select the security group created for the vSRX Virtual Firewall revenue interfaces.
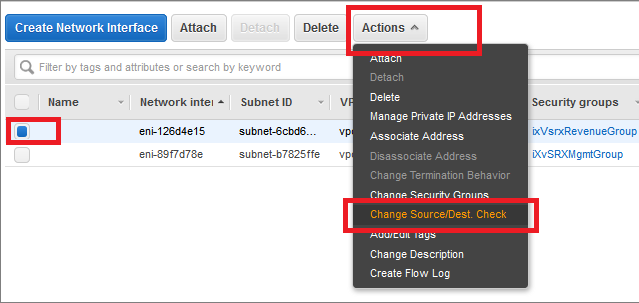
- Select the new interface, select Actions > Change
Source/Dest. Check, select Disabled, and click Save.Figure 2: Disable Source/Dest. Check
For a private revenue interface (ge-0/0/1 through ge-0/0/7), make a note of the network name you created or the network interface ID. You will add the name or interface ID later to the route table created for the private subnet.
Step 5: Allocate Elastic IP Addresses
For public interfaces, AWS does a NAT translation of the public IP address to a private IP address. The public IP address is called an Elastic IP address. We recommend that you assign an Elastic IP address to the public vSRX Virtual Firewall interfaces (fxp0 and ge-0/0/0). Note that when a vSRX Virtual Firewall instance is restarted, the Elastic IPs are retained, but public subnet IPs are released.
To create and allocate Elastic IPs:
Step 6: Add the vSRX Virtual Firewall Private Interfaces to the Route Tables
For each private revenue interface you created for vSRX Virtual Firewall, you must add the interface ID to the route table you created for the associated private subnet.
To add a private interface ID to a route table:
Repeat this procedure for each private network interface. You must reboot the vSRX Virtual Firewall instance to complete this configuration.
Step 7: Reboot the vSRX Virtual Firewall Instance
To incorporate the interface changes and complete the Amazon EC2 configuration, you must reboot the vSRX Virtual Firewall instance. Interfaces attached while the vSRX Virtual Firewall instance is running do not take effect until the instance is rebooted.
Always use AWS to reboot the vSRX Virtual Firewall instance. Do not use the vSRX Virtual Firewall CLI to reboot.
To reboot a vSRX Virtual Firewall instance:
- In the Amazon EC2 Dashboard, select Instances in the left pane.
- Select the vSRX Virtual Firewall instance, and select Actions > Instance State > Reboot.
It might take several minutes to reboot a vSRX Virtual Firewall instance.
Step 8: Log in to a vSRX Virtual Firewall Instance
In AWS deployments, vSRX Virtual Firewall instances provide the following capabilities by default to enhance security:
Allows you to login only through SSH.
cloud-init is used to setup SSH key login.
SSH password login is disabled for root account.
vSRX Virtual Firewall instances launched on Amazon’s AWS cloud infrastructure uses the cloud-init services provided by Amazon to copy the SSH public-key associated with your account that is used to launch the instance. You will then be able to login to the instance using the corresponding private-key.
Root login using SSH password is be disabled by default.
Use an SSH client to log in to a vSRX Virtual Firewall instance for the first time. To log in, specify the location where you saved the SSH key pair .pem file for the user account, and the Elastic IP address assigned to the vSRX Virtual Firewall management interface (fxp0).
Starting in Junos OS Release 17.4R1, the default user
name has changed from root@ to ec2-user@.
ssh -i <path>/<ssh-key-pair-name>.pem ec2-user@<fxpo-elastic-IP-address>
Root login using a Junos OS password is disabled by default. You can configure other users after the initial Junos OS setup phase.
If you do not have the key pair filename and Elastic IP address, use these steps to view the key pair name and Elastic IP for a vSRX Virtual Firewall instance:
- In the Amazon EC2 Dashboard, select Instances.
- Select the vSRX Virtual Firewall instance, and select eth0 in the Description tab to view the Elastic IP address for the fxp0 management interface.
- Click Connect above the list of instances to view the SSH key pair filename.
To configure the basic settings for the vSRX Virtual Firewall instance, see Configure vSRX Using the CLI.
vSRX Virtual Firewall pay-as-you-go images do not require any separate licenses.
Change History Table
Feature support is determined by the platform and release you are using. Use Feature Explorer to determine if a feature is supported on your platform.