vSRX Virtual Firewall Deployment in Oracle Cloud Infrastructure
The topics in this section help you launch vSRX Virtual Firewall instances in Oracle Cloud Infrastructure.
Overview
This topic provides you an overview and pre-requisites to deploy vSRX Virtual Firewall virtual Firewall in Oracle Cloud Infrastructure. vSRX Virtual Firewall provides security and networking services for virtualized private or public Oracle Cloud environments.
Starting in Junos OS Release 20.4R2, vSRX Virtual Firewall 3.0 is available for OCI deployments.
vSRX Virtual Firewall 3.0 image is not available in the OCI Marketplace. You must download the vSRX Virtual Firewall 3.0 software from Juniper Support Downloads and upload into an OCI compartment.
Pre-Requisites
-
Ensure you have proper accounts and permissions before you attempt to deploy the vSRX Virtual Firewall in OCI.
-
Copy the .oci image to an object storage compartment in your OCI account.
An example file name is junos-vsrx3-x86-64-xxxx.oci. After you purchase the vSRX Virtual Firewall 3.0 software you can downloaded the software from: Juniper Support page.
Note:.oci image extensions are built for the vSRX Virtual Firewall images to be deployed in OCI. This is because on OCI, when the qcow2 images are deployed, the default emulation selected for the vNIC is e-1000. The .oci images of the vSRX Virtual Firewall pass the metadata needed for the emulation type to be set to virtIO upon deployment of the vSRX Virtual Firewall which ensure a better throughput.
-
Create Virtual Network subnets for your deployment.
For better understanding of Oracle terminologies and their use in vSRX Virtual Firewall 3.0 deployments, see Understanding vSRX Virtual Firewall Deployment in Oracle Cloud Infrastructure.
Example Topology
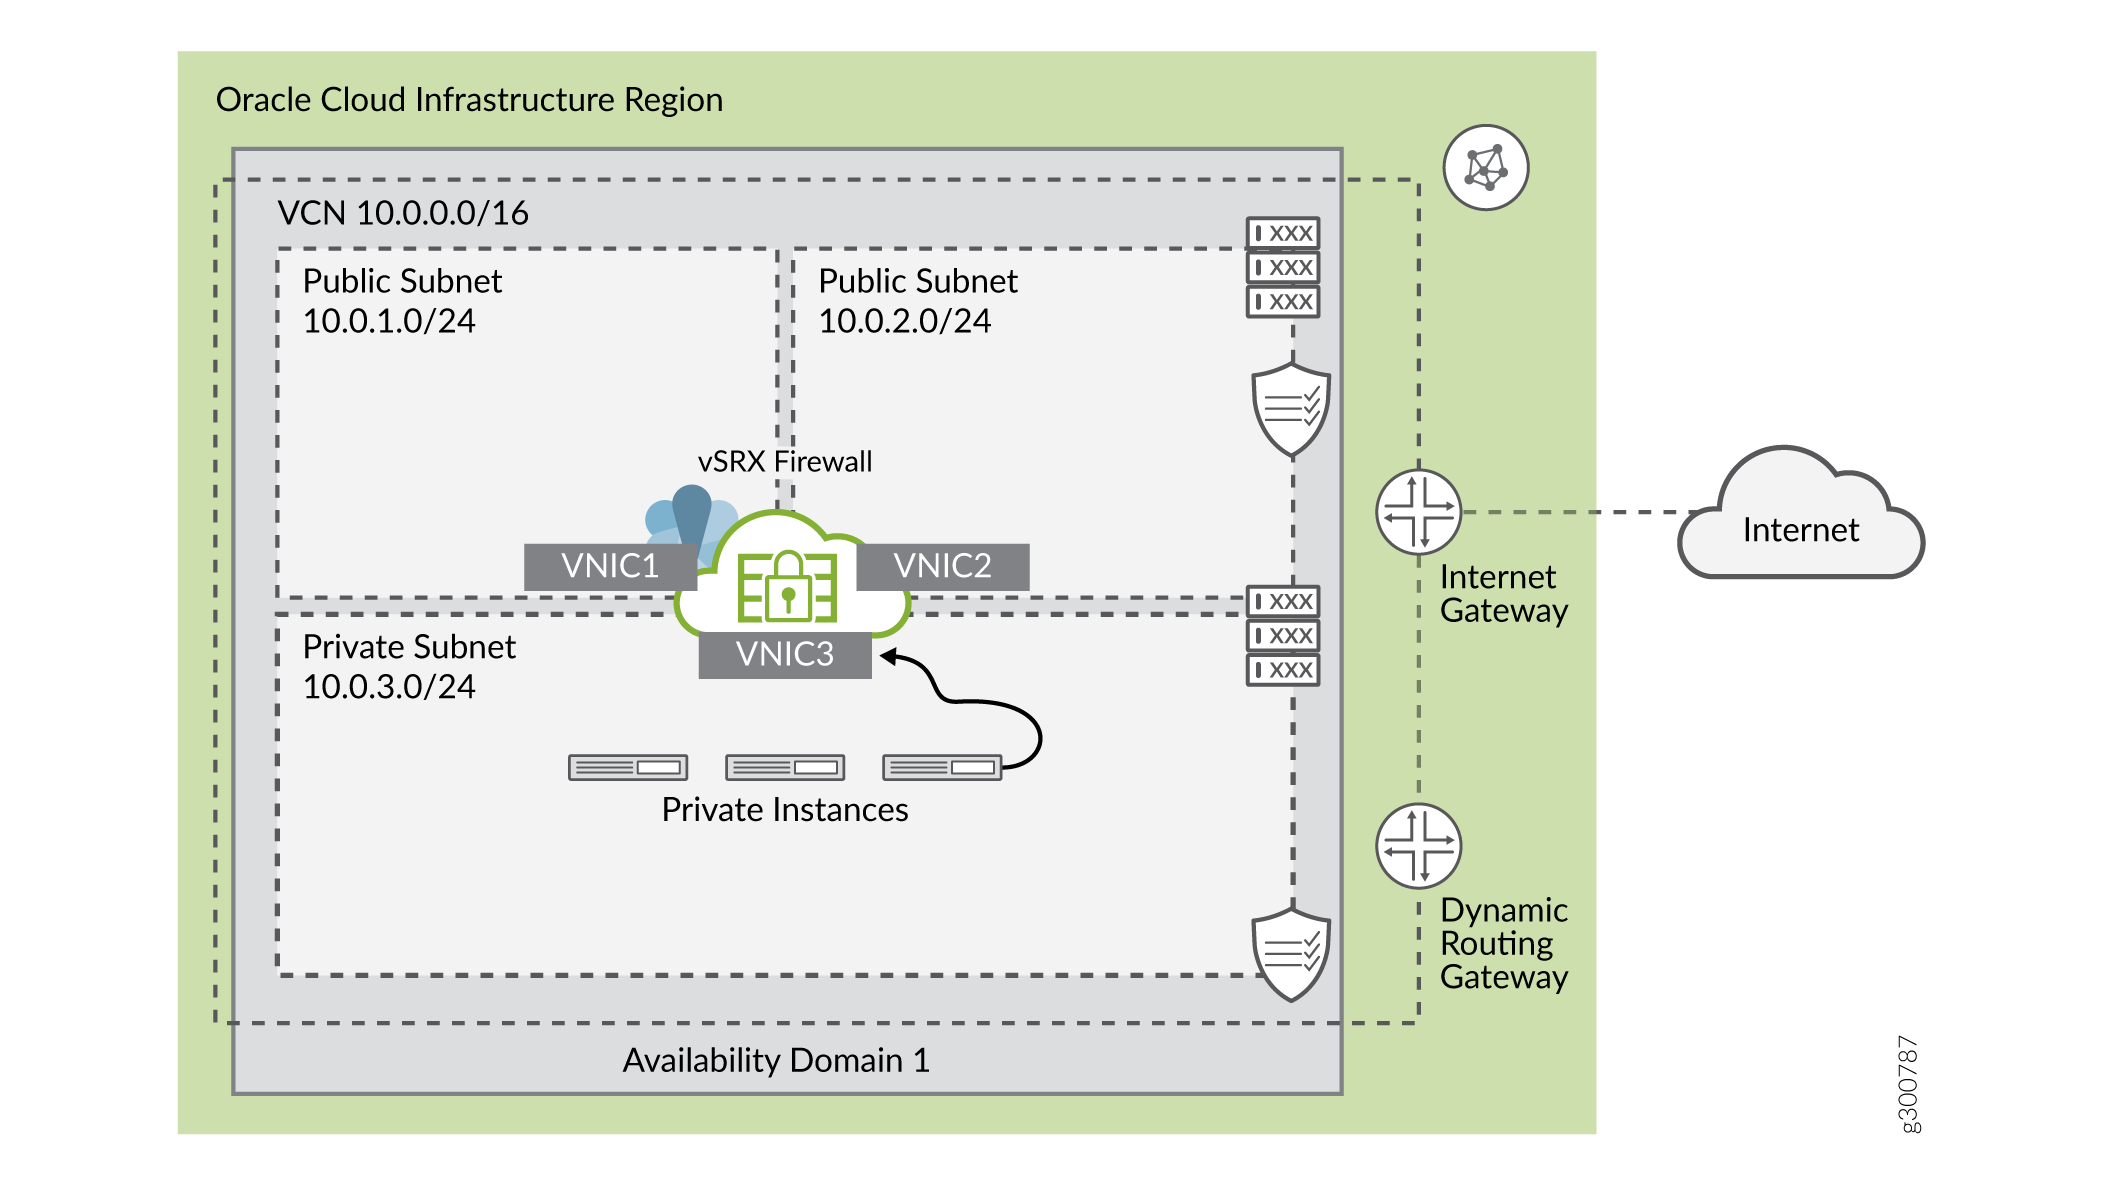
A common cloud configuration includes hosts that you want to grant access to the Internet, but you do not want anyone from outside your cloud to get access to your hosts. You can use vSRX Virtual Firewall in the OCI to NAT traffic inside the OCI from the public Internet.
The diagram shows an example VCN with three subnets:
-
Public (10.0.1.0/24), for management interfaces with access to the internet through an internet gateway
-
Public (10.0.2.0/24), for revenue (data) interfaces with access to the internet through an internet gateway
-
Private (10.0.3.0/24), a private subnet with no access to the internet
The following topology is used as an example for this deployment.
Launch vSRX Virtual Firewall Instances in the OCI
This topic provides details on how you can launch vSRX Virtual Firewall instances in the OCI.
-
Load the .oci onto OCI platform.
-
From the main menu click Object Storage.
Figure 2: Object Storage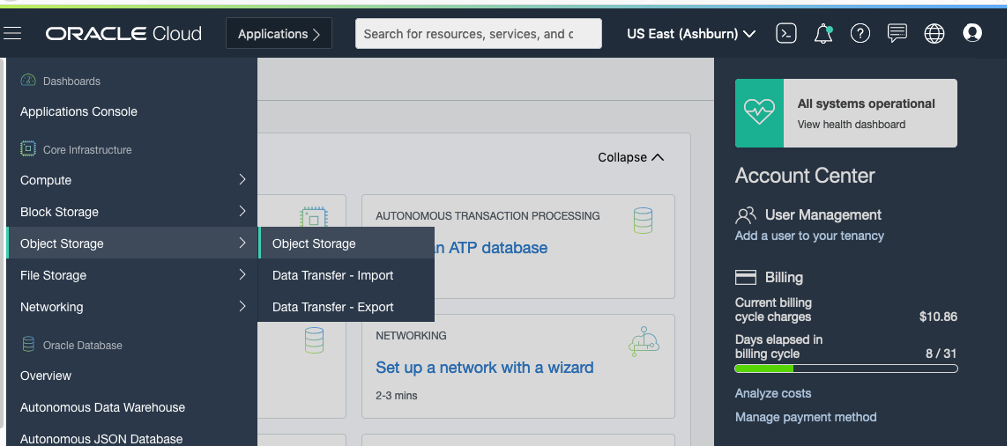
Select the compartment in which you want to create the bucket. If you have a bucket already, click the name of “your bucket”. Or create a bucket.
Figure 3: Create Bucket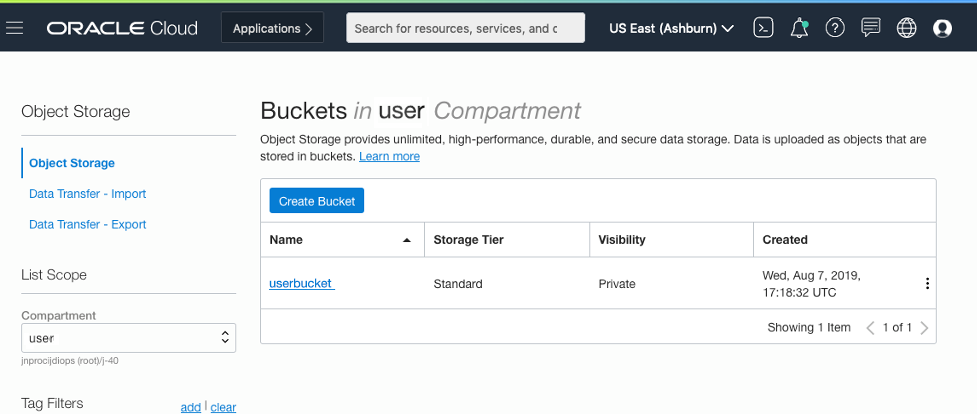
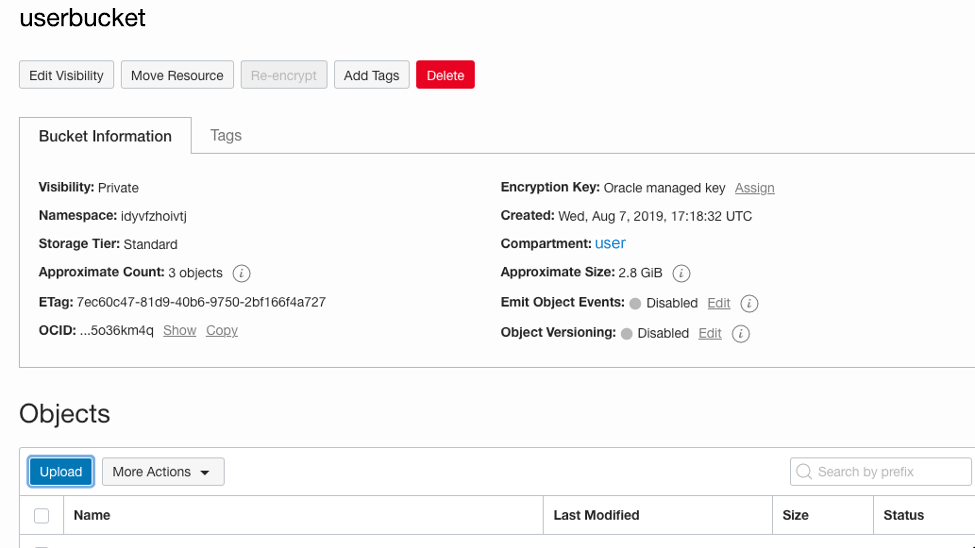
Then Click Upload Objects.
Provide the required information when a pop-up window appears.
Figure 4: Upload Objects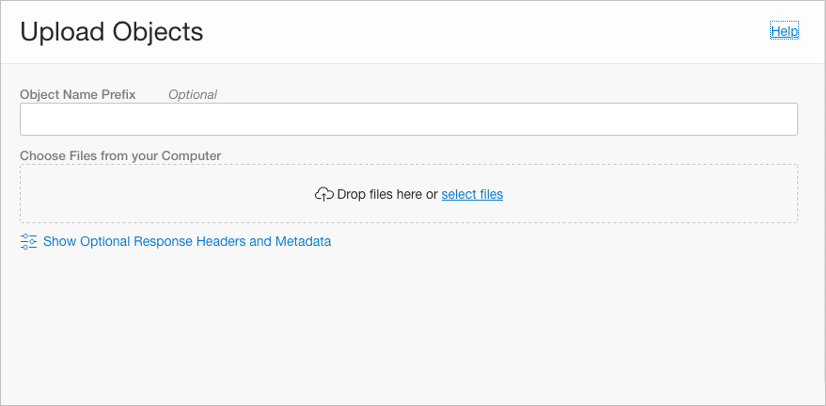
View Object Details: After the .oci image is loaded, choose the object right click the object and select View Object Details.
Figure 5: View Object Details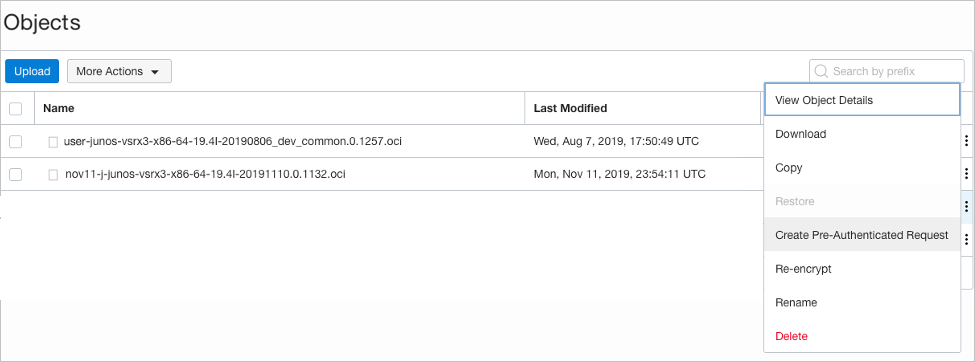 Note:
Note:There will be an URL path for this object as OCI ID, which can be used in the during importing images.
-
-
Create a virtual cloud network (VCN) with subnets. Multiple subnets within a single
VCN network is possible.
You will then launch your instance into one of the subnets of your VCN and connect to it.
Note:Ensure that the Sandbox compartment (or the compartment designated for you) is selected in the Compartment list on the left.
-
Open the Navigation menu. Under Core Infrastructure, go to Networking and click Virtual Cloud Networks.
-
Click Create VCN and enter the data for VCN Name, Compartment, select an IPv4 VCN CIDR Block, Public Subnet CIDR Block. Accept the defaults for any other fields and click Create VCN.
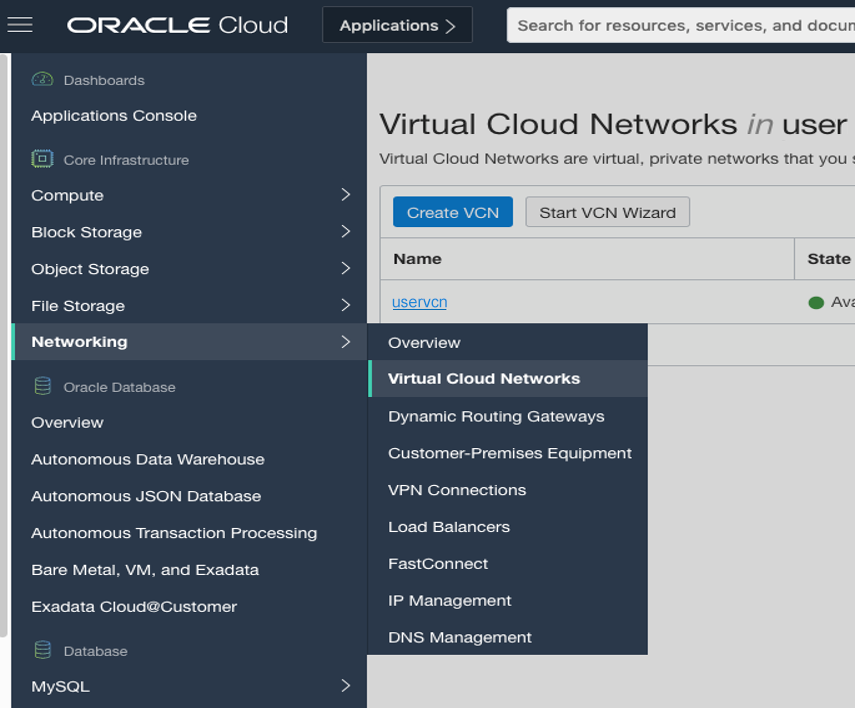 Figure 6: Create Virtual Cloud Network
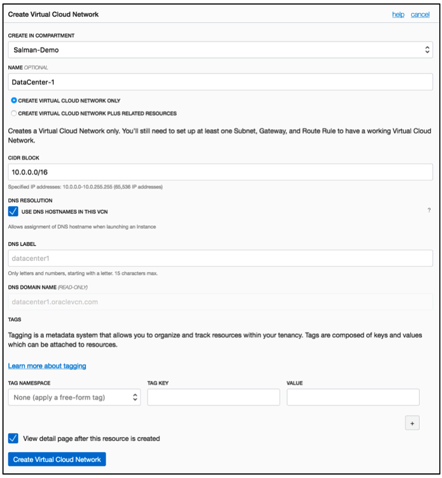 Figure 7: CIDR Block
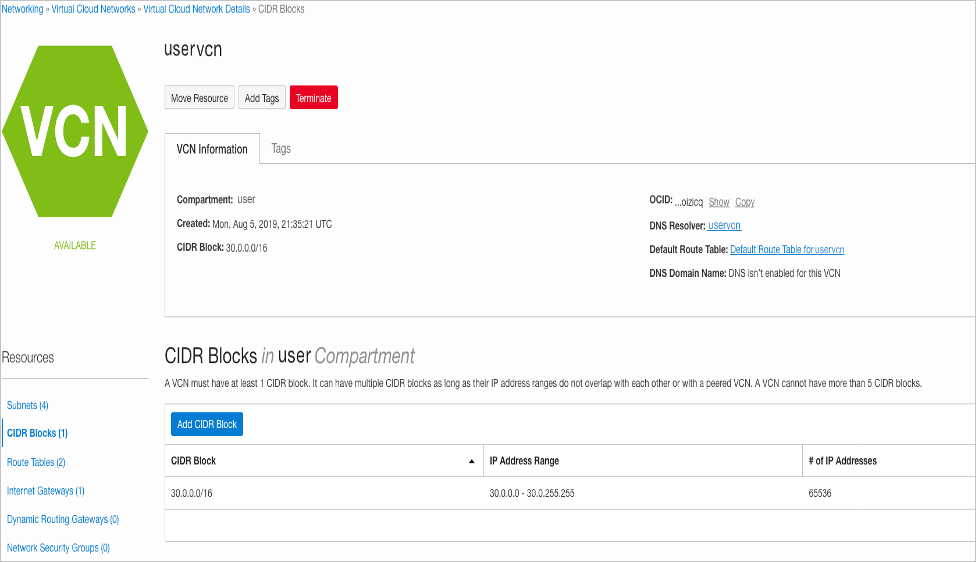
The cloud network created will have resources such as Internet and NAT gateway, Service gateway with access to the Oracle Services Network, A regional public subnet with access to the internet gateway, and A regional private subnet with access to the NAT gateway and service gateway.
-
-
Create Subnets for the vSRX Virtual Firewall VCN created.
vSRX Virtual Firewall requires two public subnets and one or more private subnets for each individual instance group. One public subnet is for the management interface (fxp0), and the other is for a revenue (data) interface. The private subnets, connected to the other vSRX Virtual Firewall interfaces, ensure that all traffic between applications on the private subnets and the internet must pass through the vSRX Virtual Firewall instance.
-
Configure the Public Subnet (Management Interface)
To create this public subnet, click Create Subnet and define a route rule for the route table Default Route Table in which the internet gateway is configured as the route target for all traffic (0.0.0.0/0) as shown below.
Figure 8: Route Rules
For details about how to create subnets, see VCNs and Subnets.
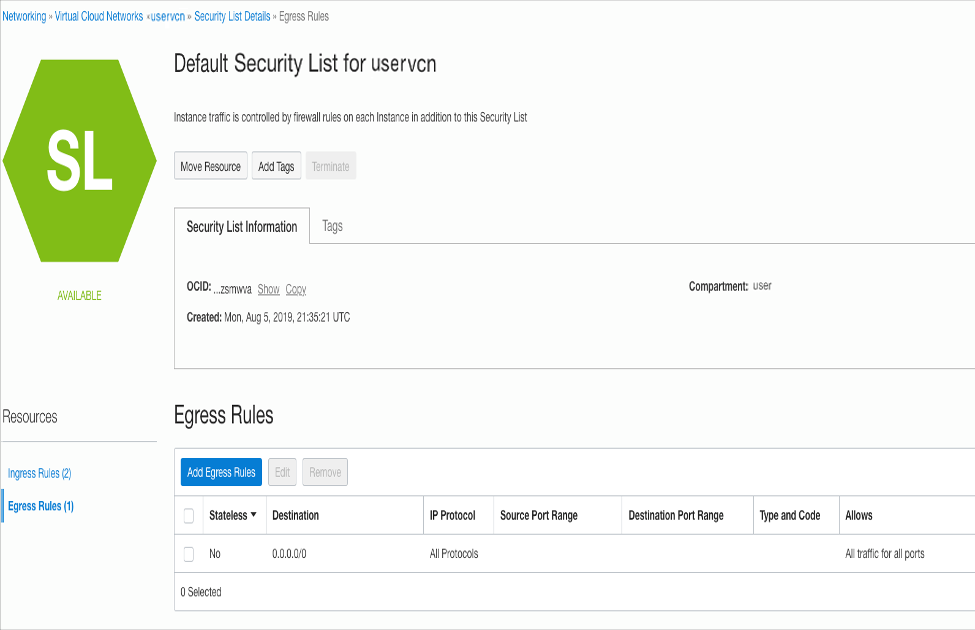
For the subnet's security list Default Security List, create an egress rule to allow traffic to all destinations. Create ingress rules that allow access on TCP port 22 from the public internet and on TCP port 80/443 for accessing the web application from the public internet as shown below.
Figure 9: Stateful Rules (Default Security List)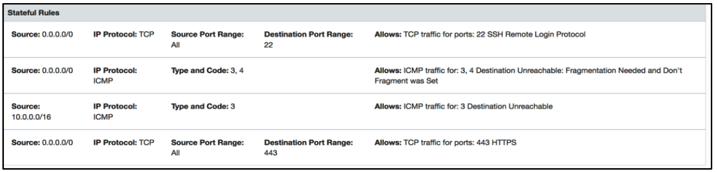
-
Configure the Public Subnet (Revenue Interface)
Create this public subnet, and define a route rule for the route table Public RT in which the internet gateway is configured as the route target for all traffic (0.0.0.0/0).
For the subnet's security list Public Subnet SL, create an egress rule to allow traffic to all destinations. Create ingress rules that allow access on TCP port 80/443 for accessing the web application from the public internet and on ICMP if needed to check the connectivity as shown below.
Figure 10: Stateful Rules (Public Subnet Security List)
-
Configure the Public Subnet (Management Interface)
-
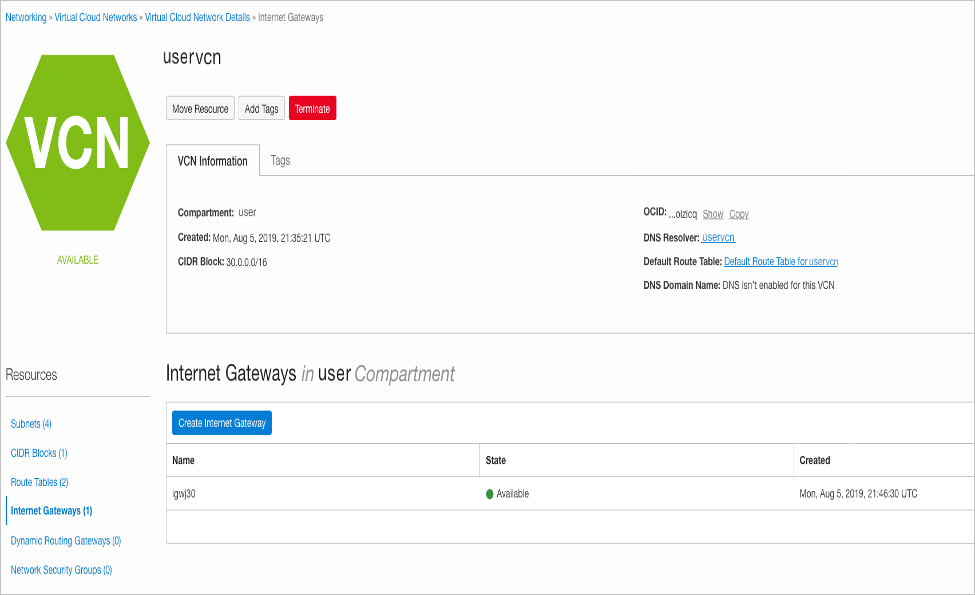
Create Internet Gateway. To create internet gateway click Internet
Gateways, set an internet gateway for the vSRX Virtual Firewall to be
reachable from outside.
Figure 11: Internet Gateway
-
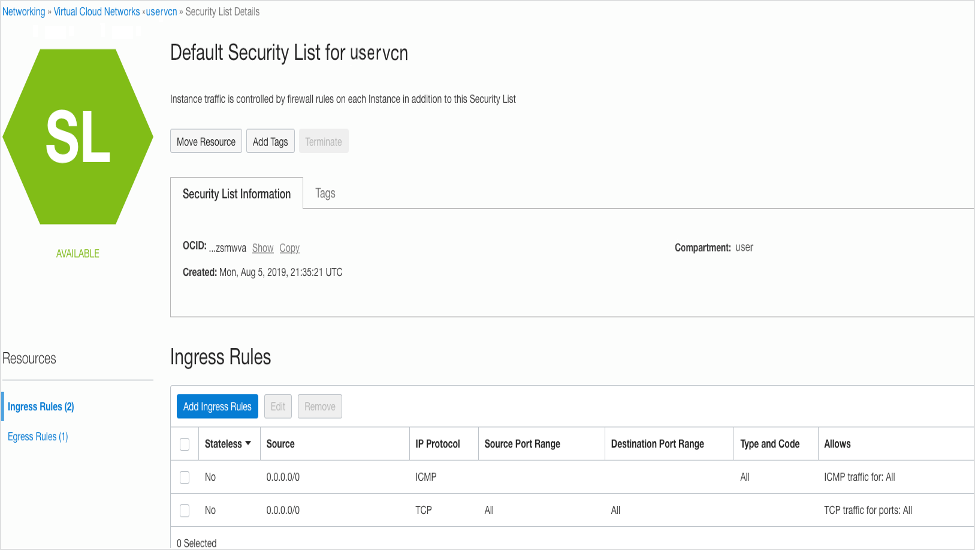
Security list information to enable the SSH option. Select the default security list
and the Ingress Rules like ICMP rule to allow ping from traffic by setting source CIDR
of any any.
Figure 12: Security List Information
-
Create your vSRX Virtual Firewall instance in the VNC created.
-
Open the navigation menu. Under Core Infrastructure, select Compute and click Instances, and then click on Create Instance.
-
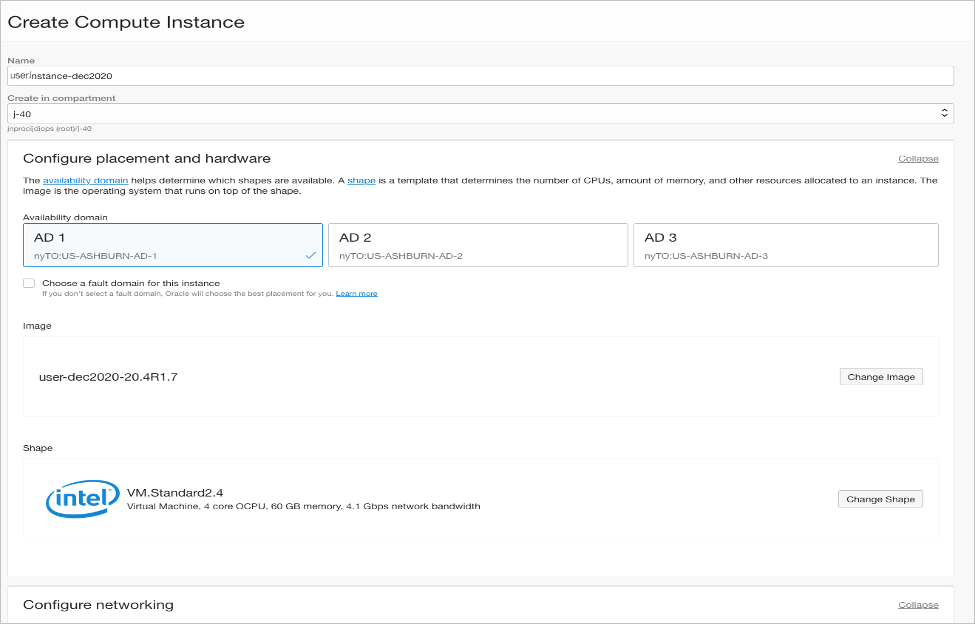
Figure 13: Create Compute Instance

-
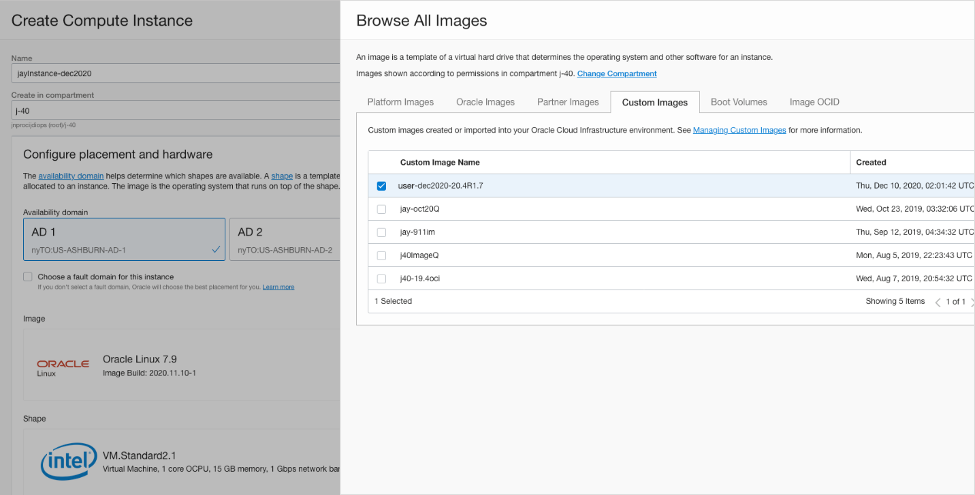
On the Create Instance page, enter the name of your instance.
Choose an operating system or image source: Click Change Image and then click Image Source to select the image that you want to use. Select Custom Images and choose the image from the compartment. OCI vSRX Virtual Firewall image you want and then click Select Image.
.Instance type – Virtual Machine.
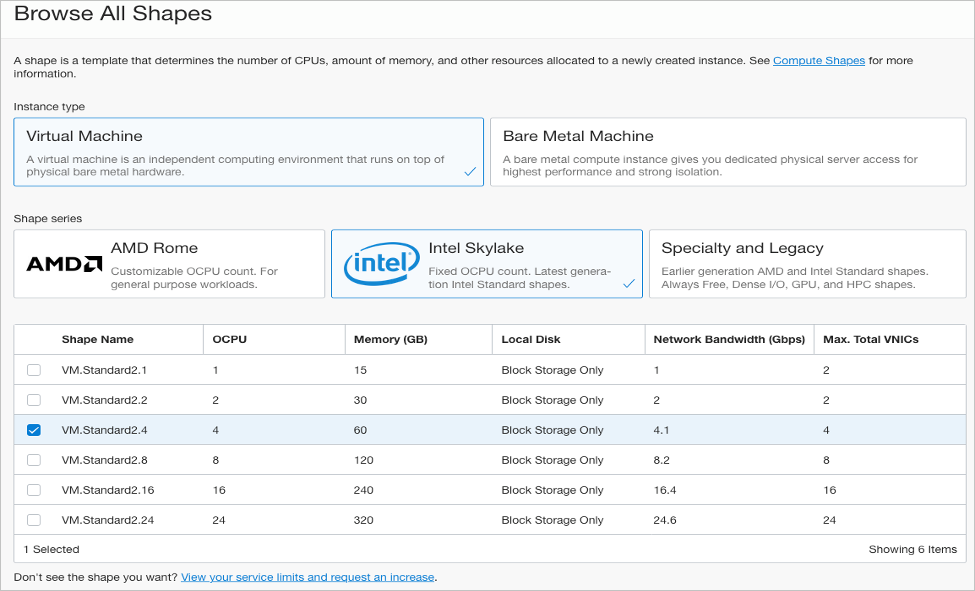
Choose Instance Shape: Click Change Shape to select the standard predefined OCI shape. Select the VM standard 2.4 which has 4 NICs and 4 OCPUs and click Selcect Shape.
Note:vSRX Virtual Firewall needs a minimum of 2 vCPUs to launch.
-
Under Networking tab select the virtual cloud network compartment, virtual cloud network, subnet compartments, subnet.
-
To create a public IP address for the instance, select the Assign a public IPv4 address option.
Note:Accept default options for Availability Domain, Instance Type, and Instance Shape.
-
Add SSH keys: Under Add SSH keys tab, you can paste a public key by selecting the Paste public keys option and paste the public SSH key that was generated or you can create a new SSH key to access the vSRX Virtual Firewall and then click Create.
After a few minutes, we can ssh the instance using the public IP allocated for the instance (this would be displayed on the instance). Reboot the instance after adding interfaces.
The instance is displayed in the Console in a provisioning state. Expect provisioning to take several minutes before the status updates to Running. Do not refresh the page. After the instance is running, allow another few minutes for the operating system to boot before you attempt to connect. When you are ready to connect to the instance, make a note of both the public IP address and the initial password.
After the instance is provisioned, details about it appear in the instance list as shown below.
Figure 14: vSRX Virtual Firewall Instance Launched in OCI Note:
Note:The default user-name for the vSRX Virtual Firewall instance is
oci-user. For example, to login to the vSRX Virtual Firewall using SSH:user@host % ssh -i <private-key> oci-user@<vsrx-ip-address> The authenticity of host 'vsrx-ip-address (vsrx-ip-address)' can't be established. ECDSA key fingerprint is SHA256:z4X9YoWseVnKIeXh1kcpsVmAxTv1/E5lOQ51MU0N66g. Are you sure you want to continue connecting (yes/no/[fingerprint])? yes Warning: Permanently added 'vsrx-ip-address' (ECDSA) to the list of known hosts. --- JUNOS 20.4R2.7 Kernel 64-bit XEN JNPR-11.0-20210220.a5d6a89_buil oci-user> oci-user> show version Model: vSRX Junos: 20.4R2.7
-
-
Adding interfaces for traffic.
Network interfaces need to be added after the instance has been created.
-
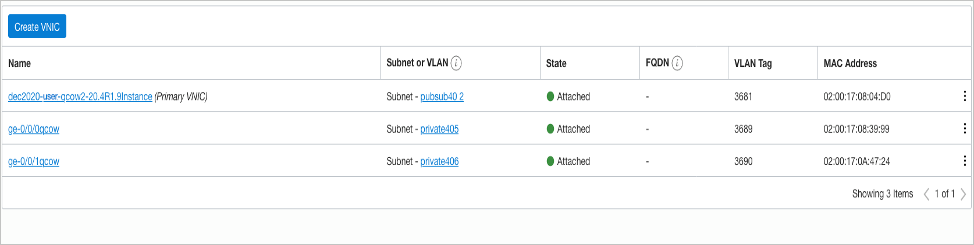
Click Attached VNICs and select Create VNIC (ge000 -public and ge001-private). Select the subnet that was created and click Save Changes to add VNICs to the instance.
Note:Order of attaching network interfaces is important. You must map the first network interface to fxp0, then the second interface to ge-0/0/0, then to ge-0/0/1 and so on.
Figure 15: Attached VNICs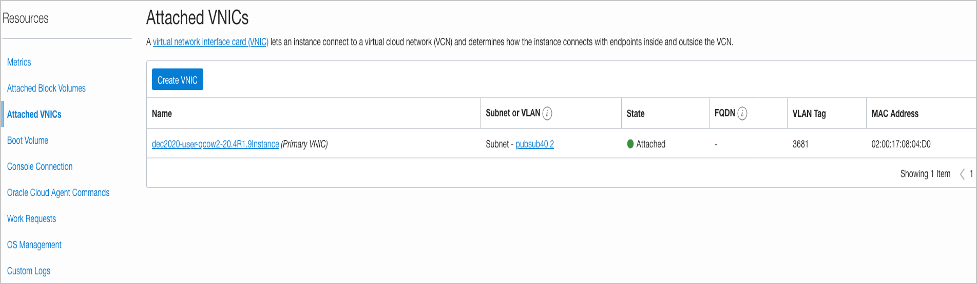
-