Onboarding the AWS suite and applications
This section outlines instructions for onboarding the AWS suite in CASB. You can choose to perform an automated or manual onboarding depending on your needs.
Automated onboarding
You can onboard the AWS suite automatically using the provided Terraform module.
Onboarding with Terraform
-
In the Management Console, select Administration > System Settings > Downloads.
-
Locate the file aws-onboarding-terraform-module-<version>.zip and download it.
-
Extract the contents of the zip file.
-
Locate and open the file README-Deployment steps.pdf.
-
Follow the instructions provided in the README file to complete the automated onboarding.
Manual onboarding
This section outlines instructions for configuring the AWS suite for manual onboarding in CASB, followed by the manual onboarding instructions.
Configuration steps
Before you onboard the AWS application, you must perform a set of configuration steps.
Note: These configuration steps are only necessary if you plan to onboard AWS in API mode. If you plan to onboard AWS in inline mode, skip to Onboarding steps.
To get started, log in to the AWS console (http://aws.amazon.com).
Then, perform the following configuration steps.
-
Step 1 – Create an Identity Access Management (IAM) role for Juniper CASB
-
Step 2 – Create a Cloud Trail
-
Step 3 – Create Simple Queue Service (SQS)
-
Step 4 – Configure Event Notifications for the Cloud Trail Bucket
-
Step 5 – Create an IAM Monitor policy
-
Step 6 – Create an IAM DLP policy
-
Step 7 – Create an IAM Cloud Security Posture Management (CSPM) policy
-
Step 8 – Create an IAM Key Management Service (KMS) policy
-
Step 9 – Attach the policies to the IAM role
Step 1 – Create an Identity Access Management (IAM) role for Juniper CASB
-
Click Roles and select Create role.
-
Select Role Type: Another AWS Account.
-
For Account ID, obtain this ID from the Juniper Networks team. This is the account ID for the AWS account in which the tenant Management Server is onboarded.
-
Under Options, check Require External ID.
-
Enter the following information:
-
External ID – Enter a unique attribute to be used while onboarding AWS S3 in CASB.
-
Require MFA – Do not check.
-
Click Next: Permissions. Do not attach any policies at this point.
-
Click Next: Tags and (optional) enter any tags you want to include to the Add Tags page.
-
Click Next: Review.
-
Enter a Role Name (for example, Juniper-AWS-Monitor) and click Create Role.
-
Search for the role name you created and click it.
-
Copy the role ARN.
-
Select Roles > Trust relationships tab > Juniper-AWS-Monitor summary view. Locate the Conditions section and copy the ExternalID value.
Step 2 – Create a Cloud Trail
-
From Services, go to Cloud Trail.
-
Select Trails from the left panel.
-
Click New Trail and enter the following information.
-
Trail name – ccawstrail (for example)
-
Storage location – Select Create a new S3 bucket to create a new bucket or Use existing S3 bucket to pick up existing buckets in which to store logs. Enter or select the desired bucket name.
-
Click Next. The Choose log events screen is displayed.
-
Events – Select Management events and (optionally) Data events.
-
Management Events – Select Read and Write.
-
Data Events (optional) – Configure data events if you want to see activity audit logs and AWS monitoring screens.
-
-
Click Next.
-
Click CreateTrail.
-
Copy the Cloud Trail ARN and S3 Bucket ARN.
Step 3 – Create Simple Queue Service (SQS)
-
Under Services, go to Simple Queue Service (SQS).
-
Click Create New Queue.
-
Enter a Queue Name and select Standard Queue as the queue type.
-
Click Create Queue.
-
Copy the new queue’s ARN.
-
Go to the Access Policy section.
-
Click the Edit button and paste the following policy information.
{
"Version": "2008-10-17",
"Id": " default_policy_ID",
"Statement": [{
"Sid": "__receiver_statement",
"Effect": "Deny",
"Principal": {"AWS": "<<Role_ARN>>"
},
"Action": [
"sqs:ReceiveMessage",
"sqs:ChangeMessageVisibility",
"sqs:DeleteMessage"
],
"Resource": "<<Queue_ARN>>""Condition": {
"ArnNotEquals": {
"aws:PrincipalArn": "<<Role_ARN>>"}
}
},{
"Sid": "__sender_statement",
"Effect": "Allow",
"Principal": {
"Service": "s3.amazonaws.com"
},
"Action": "sqs:SendMessage",
"Resource": "<<Queue_ARN>>",
"Condition": {"ArnEquals": {
"aws:SourceArn": "<<S3_Bucket_ARN>>"
}
}
}]
}
In the above code, make sure to replace all of the strings in double brackets ( << >> ) with the appropriate values:
-
Replace <<Role_ARN>> with the role ARN that you copied at the end of Step 1 – Create an IAM role for Juniper CASB.
-
Replace <<Queue_ARN>> with the queue ARN that you copied in step 5 of this section.
-
Replace <<S3_Bucket_ARN>> with the bucket ARN that you copied at the end of Step 2 – Create a Cloud Trail.
-
Click Create Queue.
Step 4 – Configure Event Notifications for the Cloud Trail Bucket
-
Under Buckets, go to the bucket that stores the CloudTrail logs (for example, awstrailevnts).
-
Click the Properties tab for the bucket.
-
Go to the Event Notifications section and click Create event notification.
-
Enter the following information for the notification.
-
Name – any naming (for example, SQS Notification)
-
Event Types – Select All object create events.
-
Filters - Enter any filters to apply to the notification.
-
Destination – Select SQS Queue.
-
Specify SQS Queue – Select the SQS queue that you created in Step 3 – Create Simple Queue Service.
Note: Make sure that your S3 Bucket and SQS queue are in the same region.
-
Click Save Changes.
The event is created.
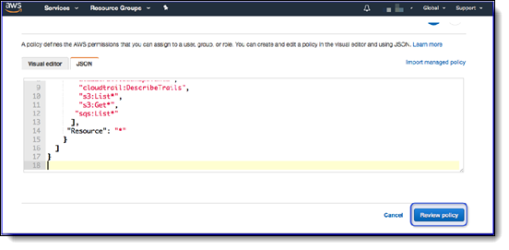
Step 5 – Create an IAM Monitor policy
-
Click Services and select IAM.
-
Select Policies and click Create Policy.
-
Click the JSON tab.
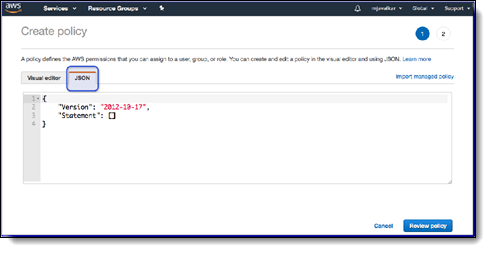
-
Copy and paste the following policy information.
{
"Statement": [
{
"Action": [
"cloudtrail:DescribeTrails",
"cloudtrail:LookupEvents",
"iam:Get*",
"iam:List*",
"s3:AbortMultipartUpload",
"s3:DeleteObject",
"s3:GetBucketAcl",
"s3:GetBucketLocation",
"s3:GetBucketNotification",
"s3:GetObject",
"s3:ListAllMyBuckets",
"s3:ListBucket",
"s3:ListMultipartUploadParts",
"s3:PutBucketAcl",
"s3:PutBucketNotification",
"s3:PutObject",
"s3:ListBucketMultipartUploads"
],
"Effect": "Allow",
"Resource": "*",
"Sid": "CasbAwsMonitorPolicy"
}
],
"Version": "2012-10-17"
}
-
Click Review Policy at the lower right portion of the screen.
-
Give the policy the name iam-monitor-policy and click Create Policy.
Step 6 – Create an IAM DLP policy
-
Click Services and select IAM.
-
Select Policies and click Create Policy.
-
Click the JSON tab.
-
Copy and paste the following policy information.
{
"Statement": [
{
"Action": [
"iam:GetUser",
"iam:ListUsers",
"iam:GetGroup",
"iam:ListGroups",
"iam:ListGroupsForUser",
"s3:ListAllMyBuckets",
"s3:GetBucketNotification",
"s3:GetObject",
"s3:GetBucketLocation",
"s3:PutBucketNotification",
"s3:PutObject",
"s3:GetObjectAcl",
"s3:GetBucketAcl",
"s3:PutBucketAcl",
"s3:PutObjectAcl",
"s3:DeleteObject",
"s3:ListBucket",
"sns:CreateTopic",
"sns:SetTopicAttributes",
"sns:GetTopicAttributes",
"sns:Subscribe",
"sns:AddPermission",
"sns:ListSubscriptionsByTopic",
"sqs:CreateQueue",
"sqs:GetQueueUrl",
"sqs:GetQueueAttributes",
"sqs:SetQueueAttributes",
"sqs:ChangeMessageVisibility",
"sqs:DeleteMessage",
"sqs:ReceiveMessage",
"cloudtrail:DescribeTrails"
],
"Effect": "Allow",
"Resource": "*",
"Sid": "CasbAwsDlpPolicy"
}
],
"Version": "2012-10-17"
}
-
Click Review Policy at the lower right portion of the screen.
-
Name the policy iam-api-policy and click Create Policy.
Step 7 – Create an IAM Cloud Security Posture Management (CSPM) policy
-
Click Services and select IAM.
-
Select Policies and click Create Policy.
-
Click the JSON tab.

-
Copy and paste the following policy information:
{
"Statement": [
{
"Action": [
"account:*",
"cloudhsm:AddTagsToResource",
"cloudhsm:DescribeClusters",
"cloudhsm:DescribeHsm",
"cloudhsm:ListHsms",
"cloudhsm:ListTags",
"cloudhsm:ListTagsForResource",
"cloudhsm:TagResource",
"cloudtrail:AddTags",
"cloudtrail:DescribeTrails",
"cloudtrail:GetEventSelectors",
"cloudtrail:GetTrailStatus",
"cloudwatch:DescribeAlarms",
"cloudwatch:DescribeAlarmsForMetric",
"cloudwatch:TagResource",
"config:Describe*",
"dynamodb:ListStreams",
"dynamodb:TagResource",
"ec2:CreateTags",
"ec2:Describe*",
"ecs:DescribeClusters",
"ecs:ListClusters",
"ecs:TagResource",
"elasticbeanstalk:AddTags",
"elasticfilesystem:CreateTags",
"elasticfilesystem:DescribeFileSystems",
"elasticloadbalancing:AddTags",
"elasticloadbalancing:DescribeLoadBalancers",
"elasticloadbalancing:DescribeTags",
"glacier:AddTagsToVault",
"glacier:ListVaults",
"iam:GenerateCredentialReport",
"iam:Get*",
"iam:List*",
"iam:PassRole",
"kms:DescribeKey",
"kms:ListAliases",
"kms:ListKeys",
"lambda:ListFunctions",
"lambda:TagResource",
"logs:DescribeLogGroups",
"logs:DescribeMetricFilters",
"rds:AddTagsToResource",
"rds:DescribeDBInstances",
"redshift:CreateTags",
"redshift:DescribeClusters",
"s3:GetBucketAcl",
"s3:GetBucketLocation",
"s3:GetBucketWebsite",
"s3:ListAllMyBuckets",
"s3:ListBucket",
"s3:PutBucketTagging",
"sdb:ListDomains",
"secretsmanager:ListSecrets",
"secretsmanager:TagResource",
"sns:GetTopicAttributes",
"sns:List*",
"tag:GetResources",
"tag:GetTagKeys",
"tag:GetTagValues",
"tag:TagResources",
"tag:UntagResources"
],
"Effect": "Allow",
"Resource": "*",
"Sid": "CasbAwsCspmPolicy"
}
],
"Version": "2012-10-17"
}
-
Click Review Policy.
-
Give the policy the name iam-cspm-policy and click Create Policy.
Step 8 – Create an IAM Key Management Service (KMS) policy
Perform the following steps if the S3 bucket has KMS enabled.
-
Click Services and select IAM.
-
Select Policies and click Create Policy.
-
Click the JSON tab.
-
From an S3 bucket, obtain the KMS key for the KMS policy information.
-
Click an S3 bucket.
-
Click Bucket Properties.
-
Scroll to the default encryption section and copy the AWS KMS key ARN.
If different keys are assigned to buckets, you will need to add them under Resource in the policy information (step 5).
-
Copy and paste the following policy information:
{
"Sid": "VisualEditor0",
"Effect": "Allow",
"Action": [
"kms:Decrypt",
"kms:Encrypt",
"kms:GenerateDataKey",
"kms:ReEncryptTo",
"kms:DescribeKey",
"kms:ReEncryptFrom"
],
"Resource": ["<AWS_KMS_key_ARN>"
]
}
-
Click Review Policy.
-
Give the policy the name iam-kms-policy and click Create Policy.
Step 9 – Attach the policies to the IAM role
-
In the AWS console, go to Services and select IAM.
-
Select Roles and search for the role that you created in Step 1 – Create an IAM role for Juniper CASB.
-
Click on that role and go to the Permissions tab.
-
Under Add permissions, select Attach policies.
-
Select the policies that you created in steps 5, 6, 7, and 8 earlier.
-
Save the role.
Onboarding steps
-
In the Juniper Management Console, go to Administration > App Management and click New.

-
Select AWS from the dropdown list.
-
Enter a Name (required) and a Description (optional) and click Next.
-
For the application, check Amazon Web Services and click Next.
-
Select one or more of the following protection models by clicking the toggle for each protection model to include.
-
Cloud Authentication
-
API Access
-
Cloud Security Posture
-
Click Next.
Notes
-
To onboard AWS in API mode, choose API Access.
-
Cloud Security Posture Management (CSPM) provides tools to monitor resources used in your organization and assess security risk factors against security best practices for AWS cloud applications. To enable use of CSPM, you must choose Cloud Security Posture as a protection mode.
-
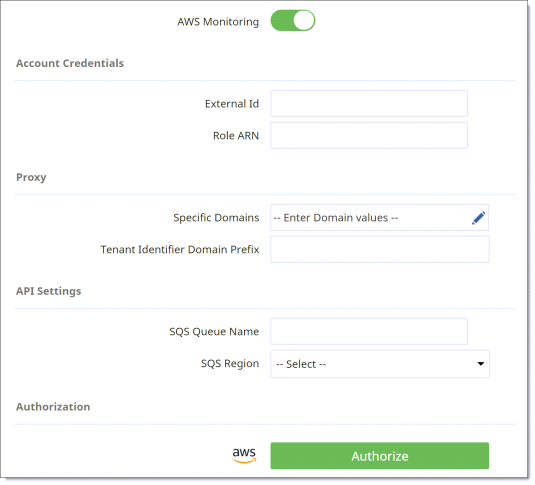
If you selected API Access:
-
Click the AWS Monitoring toggle and enter the following information in the API section of the Configuration page. This is the information you had generated in Step 2 of the configuration steps (Create an Identity Access Management (IAM) role for CASB).
-
External ID
-
Role ARN
-
SQS Queue Name and SQS Region (see Step 6 – Create Simple Queue Service [SQS])
-
-
In the Authentication section, click the Authorize button and click Next.
A popup message appears prompting you to confirm that the required policies (according to the selected protection modes) are assigned to the role.
Note: Be sure your browser is configured to allow pop-ups to be displayed.
-
Click Continue to confirm that the required policies are displayed.
When the authorization is complete, a green checkmark appears next to the Authorize button, and the button label now reads Re-Authorize.
-
Click Next to display a summary of the onboarding settings.
-
Click Save to complete onboarding.
The new cloud application is displayed as a tile on the App Management page.
-