Onboarding Salesforce applications
Configuration steps
CASB for Salesforce scans standard objects such as Accounts, Contacts, Campaigns, and Opportunities, as well as custom objects.
Enable CRM content
For DLP scanning to work with Salesforce, the Enable CRM setting must be enabled in Salesforce for all users. To enable Salesforce CRM content, log in to your Salesforce account and perform the following steps:
-
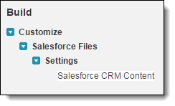
Using the Quick Find box at the top left, search for Salesforce CRM Content.
-
From the search results, click the Salesforce CRM Content link.
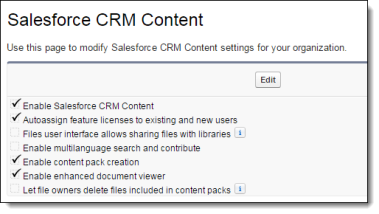
The Salesforce CRM Content settings box appears.
-
If the Enable Salesforce CRM Content and Autoassign feature licenses to existing and new users options are not checked, check them.
Enable scanning for structured data
If you are working with structured data, be sure that the Structured Data option is enabled.
Enable permissions for DLP scanning
System administrators have global access to Salesforce standard and custom objects. For non-administrators, the Push Topics and API Enabled permissions must be enabled for DLP to work, as follows.
To set the Push Topics option:
-
From the Manage Users menu, select Users.
-
From the All Users page, select a user.
-
In the User Detail page for that user, click the Standard Platform User link.

-
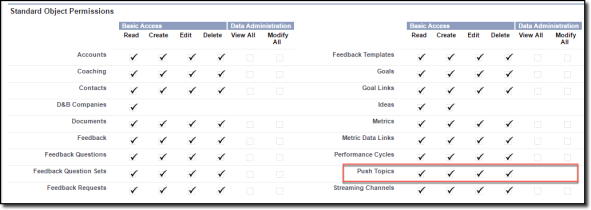
Scroll to the Standard Object Permissions section.
-
Under Basic Access/Push Topics, be sure that Read, Create, Edit, and Delete are checked.
To set the API Enabled option:
-
On the Standard Platform User page, scroll to the Administrative Permissions section.

-
Be sure that API Enabled is checked.
Enable permissions for viewing event log files
To view event monitoring data, user permissions must be enabled for the View Event Log Files and API Enabled settings.
Users with View All Data permissions also can view event monitoring data. For more information, refer to the following link:
Enable permissions for Audit Trail events
To process Audit Trail events, permissions must be enabled for View Setup and Configuration.

Enable permissions for Login History events
To process Login History events, permissions must be enabled for Manage Users, which also enables permissions for the following settings:
Requires Reset User Passwords and Unlock Users
View All Users
Manage Profiles and Permission Sets
Assign Permission Sets
Manage Roles
Manage IP Addresses
Manage Sharing
View Setup and Configuration
Manage Internal Users
Manage Password Policies
Manage Login Access Policies
Manage Two-Factor Authentication in User Interface
Enable permissions for querying files
In order to enable CASB to access all file events, you must enable permissions for the admin user that you will use to onboard Salesforce.
-
In your Salesforce account, go to Setup and use the search box to search for Permission Sets.
-
Create a new permission set, giving it any name of your choosing.
-
Select App Permissions.
-
In the Content section, check the box for Query All Files.
-
Save the permission set.
-
Use the Setup search box to search for Users.
-
Click the name of the admin user that you will use to onboard Salesforce.
-
In the Permission Set Assignments section, click Edit Assignments.
-
Select the permission set that you created in step 2 above.
-
Save the user account.
Enable permissions for viewing and modifying data
In order to enable CASB to access all data, you must enable permissions for the admin user that you will use to onboard Salesforce.
-
In your Salesforce account, go to Setup and use the search box to search for Users.
-
Click the name of the admin user that you will use to onboard Salesforce, and click the Edit button.
-
In the Administrative Permissions section, make sure that the View All Data and Modify All Data checkboxes are selected.
-
Save the user account.
Onboarding steps
-
Go to Administration > App Management and click New.
-
Select Salesforce from the list
-
Enter a Name (required) and a Description (optional) and click Next.
-
Select one or more protection modes:
-
API Access
-
Cloud Security Posture
-
Cloud Data Discovery
-
Click Next and enter configuration settings. The fields you see depend on the deployment and the protection modes you chose in the previous step.
-
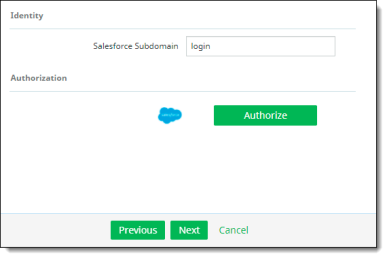
For API Access – Enter a Salesforce Subdomain.
-
For Cloud Security Posture – No other details are needed.
-
For Cloud Data Discovery -- No other details are needed.
-
Click Authorize.
-
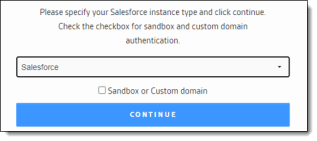
Select the Salesforce instance from the dropdown list.
-
If this authorization is for a custom or a sandbox domain, click the box. Then, click Continue.
-
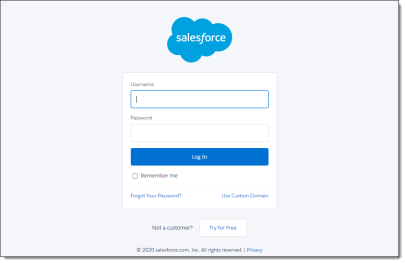
Enter the administrator login credentials for this Salesforce account. Make sure to use the same administrator account that you assigned permissions to in the Enable permissions for querying files section above. Then, click Log In.