Onboarding Microsoft 365 suite and applications
This section outlines the procedures for onboarding a Microsoft 365 suite and applications and enabling audit logging.
Note
The following user roles are required for onboarding.
-
Office Apps Administrator
-
SharePoint Administrator
-
Teams Administrator
-
Application Administrator
-
Cloud Application Administrator
-
Guest Inviter
-
Privileged Authentication Administrator
-
Privileged Role Administrator
-
Global Reader
-
Compliance Administrator
-
Compliance Data Administrator
Configuration steps
Microsoft 365 application suite
CASB can provide protection options to the entire suite of Microsoft 365 applications, including Microsoft Teams in addition to OneDrive and SharePoint.
The Microsoft 365 cloud type is an application suite. You can onboard the suite, and then select the applications for which to apply protection. Some configurations, such as key management, will apply to the entire suite and cannot be specified by application. Other configurations can be customized for each application in the suite.
CASB provides a dedicated dashboard for monitoring activity in the Microsoft 365 suite applications. You can select the Microsoft 365 dashboard from the Monitor menu.
Turning on audit log search and verifying mailbox management by default
For monitoring of applications in the Microsoft 365 suite, you must configure settings for these options:
Turn on audit log search. You must turn on audit logging in the Microsoft Security & Compliance Center before you can start searching the Microsoft 365 audit log. Turning on this option enables user and administrator activity from your organization to be recorded in the audit log. The information is retained for 90 days.
For more details and instructions about how to turn on audit log search and turn it off, see
https://docs.microsoft.com/en-us/office365/securitycompliance/turn-audit-log-search-on-or-off
SharePoint / OneDrive
Creating sites for new SharePoint or OneDrive users
When new users are added to a SharePoint or OneDrive account, you must perform the following procedure to start monitoring and protecting data in the personal sites for these users. You should also perform a user sync.
Perform the following steps to add sites for new SharePoint or OneDrive users.
-
Log in as the administrator.
-
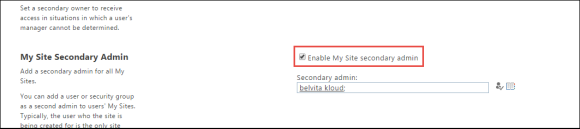
Go to Admin > SharePoint admin center > user profiles > My Site Settings > Setup My Sites.

-
Under Setup My Sites, check Enable My Site secondary admin, and select the admin as the site admin.
-
Go to User Profiles > Manage User Profiles.

-
Under Manage User Profiles, right-click the user’s profile, and click Manage site collection owners. User profiles are not displayed by default. They appear only when you search for them.
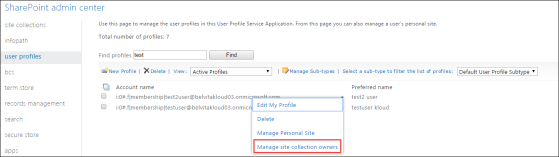
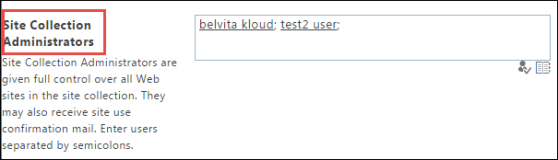
The site admin should now appear in the list of site collection administrators.
Creating a Quarantine site in SharePoint
You must create a SharePoint site called Quarantine-Site to enable the Quarantine action to work.
Onboarding steps
-
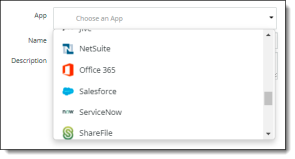
Go to Administration > App Management and click Add New.
-
Choose Office 365. This is the Office 365 application suite.
-
Click Next.
-
Enter a Name (required) and a Description (optional) for the new cloud application. For the name, use only alphabetical characters, numbers, and the underscore character (_). Do not use spaces or any other special characters.
-
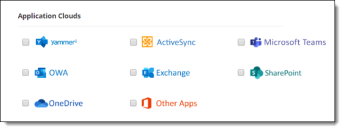
Select the Microsoft 365 applications in the suite that you want to protect. The named applications are the specific applications that are supported. The Other Apps selection includes any unsupported or partially supported applications such as Calendar, Dynamics365, Excel, Word, Planner, Sway, Stream, and Video.
-
Click Next.
-
Select one or more protection modes. The protection options you see vary, depending on the Microsoft 365 applications you selected in the previous step, and will apply to those applications. You cannot select protection modes for individual applications.
|
API Access |
Available for all Microsoft 365 applications. Must be also enabled if you enable Dynamic or Cloud Data Discovery. |
|
Cloud Security Posture |
Available for all Microsoft 365 applications. Select this mode if you want to implement Cloud Security Posture Management (CSPM) functionality, also known as SaaS Security Posture Management (SSPM) functionality, for this cloud. For more information about CSPN, see Cloud Security Posture Management (CSPM). |
|
Cloud Data Discovery |
Available for OneDrive and SharePoint applications. Select this mode if you want to implement Cloud Data Discovery functionality for this application. Also requires API Access to be enabled. |
-
Click Next.
-
Enter the following configuration information. The fields you see depend on the protection modes you selected.
-
Proxy
-
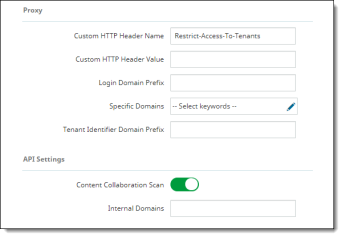
The Custom HTTP Header Name and Custom HTTP Header Value fields are configured on the cloud level (as opposed to the cloud application level). If this is the first Microsoft 365 cloud application you are onboarding, the values you enter in these two fields will apply to all other Microsoft 365 cloud applications you onboard. If this is not the first Microsoft 365 cloud application you are onboarding, these field values will be initialized from the first Microsoft 365 cloud you onboarded.
The remaining fields are configured for the cloud application you are onboarding. Enter values as needed.
-
Login Domain Prefix -- For example, companyname.com (as in <username>@companyname.com)
-
Specific Domains – Microsoft 365-specific domain names that need to be redirected. Enter or select domains for this cloud application.
-
Tenant Identifier Domain Prefix -- For example, casbprotect (as in casbprotect.onmicrosoft.com)
-
API Settings (required only for API Access protection mode) --
-
Content Collaboration Scan – Toggle is enabled by default. This setting enables events for File CheckIn/CheckOut to be processed. If this toggle is disabled, these events are not processed.
-
Internal Domains -- Enter one or more internal domains.
-
Archive Settings – Enables archiving of files that are either permanently deleted or replaced by Content Digital Rights policy actions. Archived files (including those for SharePoint and Teams) are placed in an Archive folder under a CASB Compliance Review folder created for the cloud application. You can then review the files and restore them if needed.
Notes
-
If you onboard Microsoft Teams as a Microsoft 365 application, be sure that an Active Sync directory is created, because the Azure AD is the source of user information. To create a directory, go to Administration > Enterprise Integration > User Directory.
-
When the authorized administrator for a cloud account is changed, previously archived content in the CASB Compliance Review folder that is owned by the previous administrator should be shared with the new authorized administrator to enable archived data to be reviewed and restored.
The Archive Settings option is available for onboarded cloud applications with API Access protection mode selected.
Two options are available:
-
Remove from Trash
-
Archive
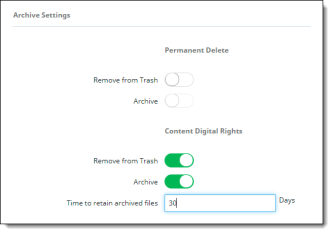
For Permanent Delete policy actions, both options are disabled by default; for Content Digital Rights, they are enabled by default.
Note
For OneDrive cloud applications (Microsoft 365), files for non-administrator user accounts are not removed from the Trash when the Remove from Trash flag is enabled.
Click the toggles to enable or disable the settings. If you select the Archive action, you must also select the Remove from Trash option for archiving to be enabled.
Enter the number of days for which to retain archived files. The default value is 30 days.
-
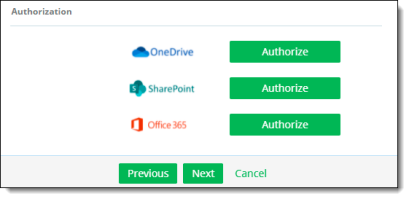
Authorization -- Authorize the Microsoft 365 components. You will need to provide your Microsoft 365 login credentials when prompted. Click the buttons as follows:
-
OneDrive and SharePoint -- Click each Authorize button. If you did not select either of these applications earlier, these buttons do not appear.
-
Office 365 – Clicking Authorize authorizes the Office 365 suite components you selected, except for OneDrive and SharePoint, which must be authorized separately. This authorization is for monitoring only.
-
Click Next.
-
View the summary page to verify that all information is correct. If it is, click Next.
The onboarding is complete. The cloud application is added to the list on the App Management page.
Enabling audit logging and managing mailbox auditing
Once you have onboarded a Microsoft 365 suite with applications, you must turn on audit logging in your Microsoft 365 account before you can search the audit log. Event polling will start 24 hours after audit logging is enabled.
For information and instructions regarding about audit logging for Microsoft 365, see the following Microsoft documentation: