Creating and managing user directories
The User Directory page (Administration > Enterprise Integration > User Directory) displays information about user directories you can create and manage.
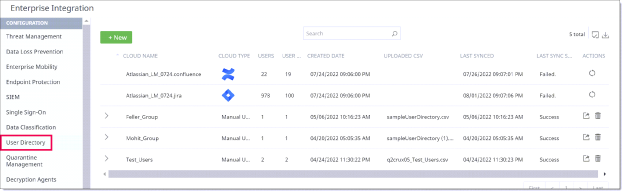
For each directory, the page shows the following information:
-
Cloud Name – The cloud application using the directory.
-
Cloud Type – The type of directory:
-
Manual upload -- The manual upload directory contains details for your cloud application users and the user groups to which they belong. These details are stored in a CSV file. By identifying user groups and their users, administrators can more easily control or monitor their access to data. You can create and configure multiple manual upload user directories.
-
Azure AD -- The cloud directory uses Azure Active Directory functionality to monitor user information and access. Azure AD directory information is displayed for each cloud application. In addition, you can create and configure one Azure AD directory.
-
Users – The current count of users in the directory.
-
User Groups – The current count of user groups in the directory.
-
Created Date – The date and time (local) on which the directory was created.
-
Uploaded CSV (manual upload directories only) –The name of the uploaded CSV file that contains the user and user group information.
-
Last Synced (cloud and administrator-created Azure AD directories only) – The date and time (local) on which the last successful directory sync occurred.
-
Last Sync Status (cloud and administrator-created Azure AD directories only) – The status of the last sync action, either Success, Failed, Paused, or In Progress.
-
If the status is Failed, try the sync again later. If the sync continues to fail, contact your administrator.
-
If the status is Paused, this indicates that the most recent sync attempt exceeded the sync deviation threshold. To restart the sync, click the sync icon in the Actions column and then click Yes on the warning pop-up.
For more information about the user directory sync threshold, see Creating activity alerts.
-
-
Actions – The actions you can take for the directory.
|
|
Cloud and administrator-created Azure AD directories only -- Sync the directory content to retrieve the latest information. |
|
|
Manual upload directories only -- Export CSV files for the directory. |
|
|
Administrator-created Azure AD and manual upload directories only -- Delete the directory. |


The following sections provide information about creating and managing manual upload and Azure AD user directories.
Manual upload user directory
Perform the steps in the following sections to create and manage a manual upload directory.
Creating a new manual upload directory
-
Go to Administration > Enterprise Integration > User Directory and click New.
-
Select Manual Upload from the Select Source dropdown list.
-
Enter a Name and a Description for the directory.
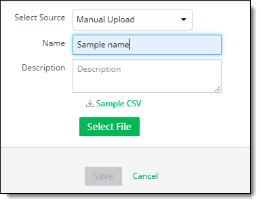
The Select File button becomes active and the option to download a sample CSV file is displayed. You can download the sample file to create a directory or use a blank CSV file of your own.
The CSV file must use the following format:
-
First column -- First name of cloud user
-
Second column -- Last name of cloud user
-
Third column -- Email ID of cloud user
-
Fourth column -- User group(s) to which the cloud user belongs. If the user belongs to multiple groups, separate the name of each group with a semicolon.
The sample file available for download is preformatted with these columns.
-
Once you have finalized the file with the needed user information, click Select File to upload it.
The file name appears above the Save button, and the Save button becomes active.
-
Click Save. The uploaded CSV file is added to the User Directory list.
Exporting a manually uploaded CSV file
-
In the Action(s) column, click the Export icon for the CSV file you want to export, and save the file to your computer.

Deleting a manually uploaded CSV file
-
In the Actions column, click the trash can icon for the file you want to delete, and click Yes to confirm the deletion.
Azure AD user directory
Perform the steps in the following sections to create and manage an Azure AD directory.
Creating a new Azure AD user directory
If no administrator-created Azure AD user directory exists, you can create one. If an administrator-created AD user directory already exists, you must delete it before another one can be created.
-
In the User Directory page, click New.
-
Select Azure AD from the Select Source list.
-
Enter a Name (required) and a Description (optional) for the directory.
-
Click Authorize.
An Azure AD creation successful message appears.
After the directory is created, you can perform a sync to retrieve the latest information.
Syncing an Azure AD user directory
-
In the Actions column, click the Sync icon for the Azure AD directory you want to sync.

A sync scheduled message appears at the bottom right corner of the page.

If the sync is successful, the date in the Last Sync column is updated, and the Sync Status shows a status of Success.