Creating API Access policies
-
Go to Protect > API Access Policy.
-
Make sure that the Real Time tab is in view. Then, click New.
Note
For DLP to work with Salesforce, you must have the following settings enabled in Salesforce:
-
Enable CRM must be enabled for all users.
-
Sharing settings must be other than Private.
-
For non-administrators, the Push Topics and API Enable permissions must be enabled.
-
Enter a Name (required) and a Description (optional).
-
Select a Content Inspection Type – None, DLP Scan, or Malware Scan. Then, configure the context and actions for the policy type.
-
API policies with DLP Scan or None as the content inspection type
-
API policies with Malware Scan as the content inspection type
API policies with DLP Scan or None as the content inspection type
If you choose DLP Scan as the content inspection type, you can select options for protection of several types of sensitive data for industries such as banking and health care. You must then select a policy template. For example, if you are creating a policy to encrypt all documents containing U.S. Social Security numbers, select Personal ID – US SSN as the policy template. If you are creating a policy to encrypt files of a specific type, select the file type as the policy template.
If you select None as the content inspection type, the DLP options are not available.
-
Click Next to select cloud applications, context, and actions.
-
Select the cloud applications for the policy.
You can apply additional context options specific to the cloud applications you select, depending on the options available for each application. For example:
-
If you are creating a policy for a OneDrive account, you will not see the context option for sites because that option is unique to SharePoint Online.
-
If you are creating a policy for SharePoint Online, you can select Sites as a context.
-
If you are creating a policy for Salesforce (SFDC), Users is the only context type option available.
To select all cloud applications, check FileSharing. This option allows you to select only context definitions that are common across the cloud applications in your enterprise.
-
Under Content Scanning, check Structured Data, Unstructured Data, or both, depending on which cloud applications you are including in the policy.
-
Structured data – Includes objects (for example, contact or lead tables used by Salesforce). Structured data objects cannot be quarantined or encrypted, and remediation actions cannot be performed on them. You cannot remove public links or remove collaborators. If you did not choose a Salesforce cloud for this policy, this option will be disabled.
-
Unstructured data – Includes files and folders.
Note For Dropbox applications, collaborators cannot be added or removed at the file level; they can be added or removed only on the parent level. As a result, the sharing context will not match for subfolders.
-
Do either of the following actions:
-
If the content inspection type is DLP Scan --
-
Select a Rule Template from the list. These are the templates you created previously (Protect > Content Rule Management). If the scanning type is Structured Data, the DLP rule templates are listed. If the scanning type is Unstructured Data, the document rule templates are listed.
-
To enable scanning by an external DLP service, click the External DLP toggle. To perform EDLP scanning, you must have external DLP configured from the Enterprise Integration page.
-
If the content inspection type is None --
-
Go to the next step.
-
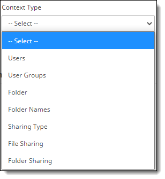
Under Context Rules, select a context type. Context rules identify to whom the policy is to be applied – for example, which cloud applications, users and user groups, devices, locations, or files and folders. The items you see in the list depend on the cloud applications you have selected for the policy.
-
Users – Enter the email IDs of the users to whom the policy applies or select All Users.
-
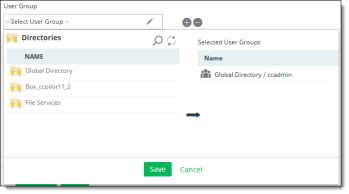
User Groups – If you have user groups, they will be populated in a list. You can select one, some, or all user groups. To apply a policy to multiple users, create a user group and add the user group name.
User groups are organized into directories. When you select User Group as a context type, the available directories containing the groups are listed in the left column.
User groups can be helpful in defining rules for access to specific types of sensitive data. By creating user groups, you can limit access to that data to the users in that group. User groups can also be helpful in managing encrypted content – for example, the finance department might need the extra security of having some of its data encrypted and accessible only to a small group of users. You can identify these users in a user group.
Select a directory to view the user groups it contains. The user groups for that directory are displayed.
Select the groups from the list and click the right-arrow icon to move them to the Selected User Groups column and click Save. These are the groups to which the policy will apply.

To search for a directory or group, click the Search icon at the top.
To refresh the list, click the Refresh icon at the top.
Notes
-
If you select All user groups, the policy you are creating will apply to all new user groups you create in the future.
-
For Dropbox, only the Users and User Groups options are supported.
-
When selecting users for Salesforce, provide the user’s email address, not the Salesforce username. Make sure that this email address is for a user, not an administrator. The user and administrator email addresses should not be the same.
-
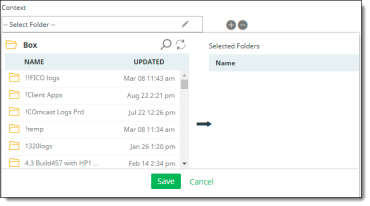
Folder (Box, OneDrive for Business, Google Drive, and Dropbox cloud applications only) – For policies that pertain to OneDrive for Business, select the folder (if any) to which the policy applies. For policies that pertain to Box, enter the folder ID of the folder to which the policy applies.
Note
In OneDrive applications, only folders owned by administrator users are displayed in policies with a Folder context type.
Creating secure folder policies (Box cloud applications only) -- A folder is treated as a secure folder when documents stored in it are encrypted. You can designate a secure folder by creating a secure folder policy. You might want to create such a policy if a folder was moved or copied and you want to be sure that the text in all of its files is encrypted, or if any network or service disruption occurred that might leave files in plain text.
To create a secure folder, set the context as Folder, the DLP Rule as None, and the action as Encrypt.
Secure folder audits -- CASB audits secure folders every two hours, checking each one for files that have plain text. If content with plain text is found in any file, it is encrypted. Files that are already encrypted (.ccsecure files) are ignored during the audit. To change the audit schedule, contact Juniper Networks Support.
-
Folder Names – Enter one or more folder names.
-
Collaboration (Slack Enterprise) - For policies that pertain to Slack Enterprise, select the Slack Enterprise cloud application to which the policy applies. The following context rules are specific to Slack Enterprise cloud applications:
-
Users -- All or Selected
-
Channels -- Group chat and Channels shared at Org level
-
Workspaces -- Workspaces (all Workspaces are listed, including non-authorized workspaces)
-
Sharing Type
-
Member Type -- Internal / External
-
Sites (SharePoint Online cloud applications only) – For policies that pertain to SharePoint Online, select the sites, subsites, and folders to which the policy applies.
Note
When you select Sites as a context type for SharePoint cloud applications, you must enter the full site name to allow CASB to perform a successful search.
-
Sharing Type – Identifies who the content can be shared with.
-
External – Content can be shared with users outside your organization's firewall (for example, business partners or consultants). These external users are known as external collaborators. Because sharing of content between organizations has become easier, this policy control can help you exercise greater control over what types of content you share with external collaborators.
If you choose a Sharing type of External, a Blocked Domain option is available. You can specify domains (such as popular email address domains) to be blocked from access.

-
Internal – Content can be shared with internal groups you specify. This policy control helps you exercise greater control over who within your organization can see specific types of content. For example, many legal and financial documents are confidential and should be shared only with specific employees or departments. If the policy you are creating is for a single cloud application, you can specify one, some, or all groups as shared groups by selecting the groups from the dropdown list in the Shared Groups field. If the policy applies to multiple cloud applications, the Shared Groups option defaults to All. You can also specify any shared groups as exceptions.

-
Private – Content is not shared with anyone; it is available only to its owner.
-
Public – Content is available to anyone inside or outside the company who has access to the public link. When the public link is active, anyone can access the content without a login.
-
File Sharing – Select External, Internal, Public, or Private. If there are any blocked domains for external sharing, enter the domain names.
-
Folder Sharing -- Select External, Internal, Public, or Private. If there are any blocked domains for external sharing, enter the domain names.
-
(Optional) Select any Context Exceptions (items to exclude from the policy).
If you selected the context types Sharing Type, File Sharing, or Folder Sharing, you can enable an additional option, Apply to Content Actions, to configure whitelisting of domains. Click the toggle to enable this option. Then, select Whitelist Domains, enter the applicable domains, and click Save.

-
Click Next.
-
Select actions. Actions define how policy violations are addressed and resolved. You can select an action based on the sensitivity of data and the severity of violations. For example, you might choose to delete content if a violation is serious; or you might remove access to the content by some of your collaborators.
Two types of actions are available:
-
Content actions
-
Collaboration actions

Content actions include:
-
Allow & Log – Logs file information for viewing purposes. Select this option to see what content is uploaded and what remediation steps, if any, are needed.
-
Content Digital Rights – Defines content classification, customization, and protection options. Select the CDR template to use for the policy.
Note regarding content actions that include watermarking:
For OneDrive and SharePoint applications, watermarks are not locked and can be removed by users.
-
Permanent Delete – Deletes a file permanently from a user's account. After a file is deleted, it cannot be recovered. Be sure that policy conditions are being detected properly before you enable this action in production environments. As a rule, use the permanent delete option only for serious violations in which avoiding access is critical.
-
User Remediation – If a user uploads a file that violates a policy, the user is given a specified time to remove or edit the content that caused the violation. For example, if a user uploads a file that exceeds a maximum file size, the user can be given three days to edit the file before it is permanently deleted. Enter or select the following information.
-
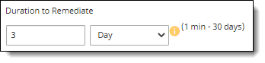
Duration to Remediate -- The time (up to 30 days) in which remediation must be completed, after which the file is rescanned. Enter a number and frequency for the remediation time allowance.
-
User Remediation Action and Notification –
-
Select a remediation action for the content. The options are Permanent Delete (delete the content permanently), Content Digital Rights (comply with conditions included in the Content Digital Rights template you choose), or Quarantine (place the content in quarantine for administrative review).
-
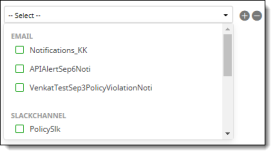
Select a notification type for informing the user about what action was taken on the file after the remediation time expired.
For more information about notifications, see Creating and managing notifications and alerts.
Note
Remediation is not available for cloud applications that store objects and records (structured data).
-
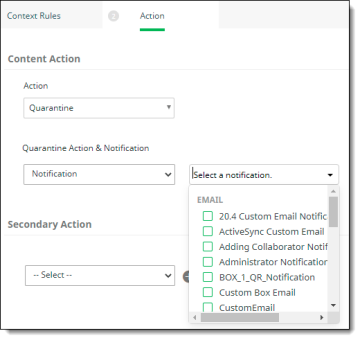
Quarantine – Quarantine does not delete a file. It restricts user access to the file by moving it to a special area to which only an administrator has access. The administrator can review the quarantined file and determine (depending on the violation) whether to encrypt it, delete it permanently, or restore it. The quarantine option can be used for files that you do not want to remove permanently, but that might require evaluation before further action.
Quarantine is not available for cloud applications that store structured data.
-
AIP Protect -- Applies Azure Information Protection (Azure IP) actions to the file. For information about applying Azure IP, see Azure IP.
-
Decrypt – For context type of folder, decrypts content for files when those files are moved to specific folders or when a file’s content is downloaded to a managed device, to specified users, groups, and locations, or to an authorized network. The Decrypt action is available only for policies with a content inspection method of None.
You can specify users or groups to be excluded from enforcement of the policy. In the field to the right, select the user or group names to exclude.
Notes
-
In the Exceptions list, blocked domains are called Whitelist Domains. If you have specified blocked domains, you can list domains to exclude from blocking.
-
For cloud applications that include unstructured data in the policy, several actions are available, including Allow & Log, Content Digital Rights, Permanent Delete, User Remediation, Quarantine, and AIP Protect.
-
For cloud applications that include only structured data, only the Log and Permanent Delete actions are available.
If the policy will apply to a Salesforce cloud application:
-
Not all available context and action options apply. For example, files can be encrypted, but not quarantined.
-
You can apply protection to both files and folders (unstructured data) and structured data objects.
Collaboration actions can be selected for Internal, External, and Public users. To select more than one user type, click the + icon at the right.
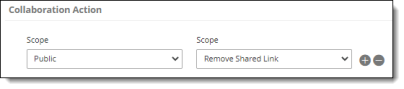
Select an option for the user type(s).
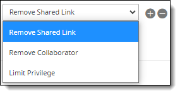
-
Remove Shared Link – A shared link makes content available without a login. If a file or folder includes a shared link, this option removes shared access to the file or folder. This action does not affect the content of the file -- only its access.
-
Remove Collaborator – Removes the names of internal or external users for a folder or file. For example, you might need to remove the names of employees who have left the company, or external partners who are no longer involved with the content. These users will no longer be able to access the folder or file.
Note For Dropbox applications, collaborators cannot be added or removed at the file level; they can be added or removed only on the parent level. As a result, the sharing context will not match for subfolders.
-
Limit Privilege – Limits the user action to one of two types: Viewer or Previewer.
-
Viewer enables the user to preview content in a browser, download, and create a shared link.
-
Previewer allows the user only to preview content in a browser.
The Limit Privilege action is applied on the file level only if the policy content is DLP. It is applied on the folder level if the policy content is NONE.
-
(Optional) Select a secondary action. Then, select a notification from the list.
Note If Remove Recipients is selected as a secondary action with external domains, the policy will act on all external domains if no domain values are entered. The value of All is not supported.
-
Click Next and review the policy summary. If the policy includes a Salesforce cloud, a CRM column will appear next to the FileSharing column.
-
Then, perform any of these actions:
-
Click Confirm to save and activate the policy. Once the policy is in effect, you can view policy activity through your dashboards on the Monitor page.
-
Click Previous to go back to previous screens and edit information as needed. If you need to change the policy type, do so before you save it, because you cannot change the policy type after you save it.
-
Click Cancel to cancel the policy.
Note
Once policies are created and violations are detected, it might take up to two minutes for violations to be reflected in dashboard reports.
API policies with Malware Scan as the content inspection type
-
In the Basic Details page, select Malware Scan.
-
Select scanning options.
Two options are available:
-
Native Scan Engine uses the native scanning engine.
-
External ATP Service uses an external service you choose from the ATP Service dropdown list.
-
Click Next to select context options.
-
Select a Context Type. The options available depend on the cloud application that you selected. Options may include Users, User Groups, Folder (for some cloud applications), Folder Names, Sharing Type, File Sharing, and Folder Sharing.
To include more than one context type in the policy, click the + sign to the right of the Context Type field.
-
Enter or select the context details for the context type(s) you chose.
|
Context type |
Context details |
|---|---|
|
Users |
Enter valid usernames or select All Users. |
|
User Groups |
User groups are organized into directories. When you select User Group as a context type, the available directories containing the groups are listed in the left column. Select a directory to view the user groups it contains. The user groups for that directory are displayed. Select the groups from the list and click the right-arrow icon to move them to the Selected User Groups column and click Save. These are the groups to which the policy will apply.
To search for a directory or group, click the Search icon at the top. To refresh the list, click the Refresh icon at the top. |
|
Folder |
Select folders to be included in the policy actions. |
|
Folder Names |
Enter the names of folders to be included in the policy actions. |
|
Sharing Type |
Select a scope for sharing:
|
|
File Sharing |
Select a scope for file sharing:
|
|
Folder Sharing |
Select a scope for folder sharing:
|
-
(Optional) Select any Context Exceptions (items that will be excluded from policy actions).
-
Select a Content Action. The options include Allow & Log, Permanent Delete, and Quarantine.
If you select Allow & Log or Permanent Delete, choose a notification type as a secondary action (optional). Then, select an email or channel notification from the list.
If you select Quarantine, select Notification from the Quarantine Action & Notification list. Then, select a quarantine notification.
-
Click Next and review the policy summary. If the policy includes a Salesforce cloud, a CRM column will appear next to the FileSharing column.
-
Then, perform any of these actions:
-
Click Confirm to save and activate the policy. Once the policy is in effect, you can view policy activity through your dashboards on the Monitor page.
-
Click Previous to go back to previous screens and edit information as needed. If you need to change the policy type, do so before you save it, because you cannot change the policy type after you save it.
-
Click Cancel to cancel the policy.