Create content rule templates
Content rules identify the content to apply to a policy. Content can include sensitive information in a file, such as usernames, credit card numbers, Social Security numbers, and file types.
For DLP rules, you can create templates that include sets of content rules and apply one of those templates to one or more policies. With content rule templates, you can classify content based on more than one context. Because content rules are configured as a separate process from policy creation, you can save time and enable consistent content information in all of the policies you create.
The content rule templates provided with the product, and those you create, are listed in the Content Rule Management page.
The Content Rule Management page has three tabs:
-
Document Rule Templates -- Specifies overall rules to apply to documents.
-
DLP Rule Templates -- Specifies DLP rules. When customers create a document rule template, they select a DLP rule if the document template is applied to DLP policies. You can use any of the templates provided with the product or create additional templates.
-
Data Types -- Specifies data types to apply to this rule. You can use any of the data types provided with the product or create additional data types.
Perform the steps in the following procedures to create additional data types and templates for configuring content rule management.
Creating new data types
-
Click the Data Types tab and click New.
-
Enter a Data Type Name (required) and a Description (optional) for the data type.
-
Select a data Type to apply. Options include Dictionary, Regex Pattern, File Type, File Extension, File Name, and Composite.
-
Click Next.
-
Enter additional information for the data type you selected.
-
Click Next to review a summary for the new data type.
-
Click Confirm to save the new data type, or Previous to make any corrections or updates.
You can configure data types as follows.
Dictionary
Use the Dictionary data type for plain text strings.
Select either Create Keyword or Upload File.
-
For Create Keyword – Enter a list of one or more keywords; for example, account number,account ps,american express,americanexpress,amex,bank card,bankcard
-
For Upload File – Click Upload a File and select a file to upload.
Regex Pattern
Enter a regular expression. For example:
\b\(?([0-9]{3})\)?[-.\t ]?([0-9]{3})[-.\t ]?([0-9]{4})\b
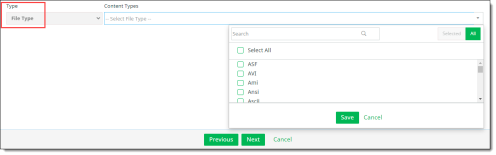
File Type
Check the boxes to select one or more file types or check Select All. Then click Save.
File Extension
Enter one or more file extensions (for example, .docx, .pdf, .png)
Click Save.
File Name
Enter one or more file names (for example, PII, Confidential)
Click Save.
Composite
You can select two Dictionary data types, or one Dictionary type and one Regex Pattern type.
-
If you select two Dictionary types, a Proximity option appears for the second Dictionary type. This option enables a match count of up to 50 words. No Exception option is available.
Enter a Match Count and a Proximity value for the second Dictionary type.
-
If you select one Dictionary type and one Regex Pattern type, enter a Match Count of up to 50 words and a Proximity value.
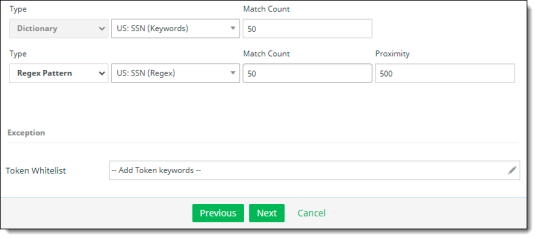
(Optional) To enter any exceptions, click in the Token Whitelist text box and enter one or more token keywords. Separate each item with a comma. Click Save to close the text box.
Exact Data Match
Exact data matching (EDM) allows CASB to identify data in records that matches criteria you specify.
As part of managing data types, you can create an EDM template using a CSV file with sensitive data for which you can define the matching criteria. You can then apply this template as part of a DLP rule in API policies.
Perform the following steps to create an exact data match type and apply DLP rule information.
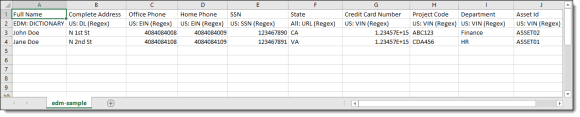
Step 1 -- Create or obtain a CSV file with the data to use for matching.
In the second row of the file, map the column headers with data types in CASB. This information will be used to identify the data types that will be matched. In this example, the Full Name column is mapped to the data type Dictionary, and the remaining column headings are mapped to the data type Regex.
Step 2 – Create a new data type -- Exact Data Match.
-
Click the Data Types tab and click New.
-
Enter a Name (required) and a Description.
-
Select Exact Data Match as the Type.
-
Click Next.
-
Click the Pre-Indexed toggle if sensitive data in the CSV file you are uploading has been hashed previously. For files without previous hashing, the data will be hashed when the file is uploaded.
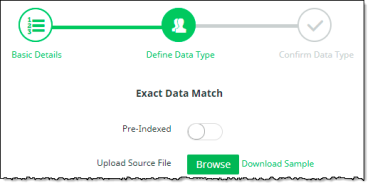
If you want to perform hashing on a file before you upload it, use a data hashing tool provided with CASB. Go to Administration > System Settings > Downloads and select the EDM Hashing Tool. Download the tool, install it, and apply data hashing to the file.
-
Click Upload and select the CSV file to use for the data match. To see a sample file, click Download Sample.
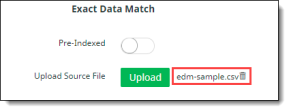
The uploaded file name is displayed. To remove it (for example, if you uploaded an incorrect file or want to cancel the procedure), click the trash can icon.
Note
You can replace the uploaded file later as long as the fields in the file are not changed.
-
Click Next.
A table is displayed that shows the source file name, the number of records it contains, and the number of data types it includes.
-
Click Next, review the summary information, and save the data type. You will use this data type in the next step.
Step 3 – Create a new DLP Rule template to configure the data matching properties.
-
In the DLP Rules tab, click New.
-
Enter a Rule Name (required) and a Description (optional).
-
Select Exact Data Match as the Rule Type and click Next.
-
Select Custom Content Rule as the Rule Template.
-
For Exact Data Match, select the EDM data type you created previously. The fields and mapped data types from the CSV file you uploaded previously are listed with a weightage option for each field.
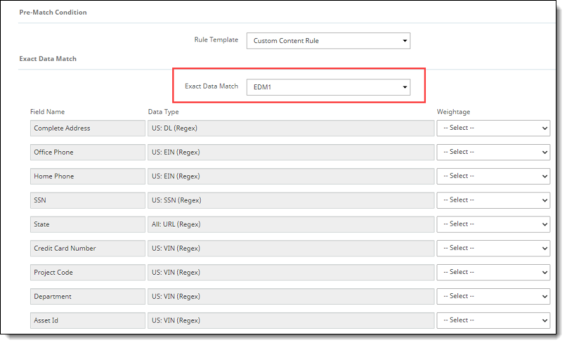
-
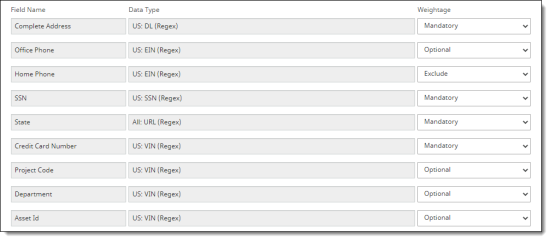
Select a weightage for each field. The weightages you choose are used along with the number of fields to match to determine if a record is considered a match. The options are:
-
Mandatory – The field must be matched for the record to be considered a match.
-
Optional – The field serves as “padding” when determining if a record is matched.
-
Exclude – The field is ignored for matching.
-
Whitelist – If one or more fields are whitelisted, the record is whitelisted and not considered a match even if it meets all other matching criteria.
-
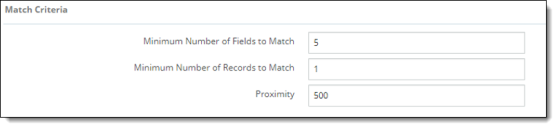
Select the matching criteria for field matching, record matching, and proximity.
-
For Minimum Number of Fields to Match, enter a value that equals or exceeds the number of fields with a mandatory weightage and equals or is less than the number of fields with an optional weightage. This is the number of fields that must match for this rule. For example, if you have four fields with a mandatory weightage and three fields with an optional weightage, enter a number between 4 and 7.
-
For Minimum Number of Records to Match, enter a value of at least 1. This number represents the minimum number of records that must be matched for the content to be considered in violation.
-
For Proximity, enter a number of characters that represents the distance between fields. The distance between any two matching fields must be less than this number for a match. For example, if the Proximity is 500 characters:
-
The following content would be a match because the proximity is fewer than 500 characters:
Field1value + 50 characters+Field3value + 300 characters + Field2value
-
The following content would not be a match because the proximity is greater than 500 characters:
Field1value + 50 characters+Field3value +600 characters + Field2value
-
Click Next.
-
Review the summary and save the new DLP rule.
You can now apply this DLP rule to inline or API Access policies.
Creating new DLP rule templates
-
Click the DLP Rule Templates tab and click New.
-
Enter a Rule Name (required) and a Description (optional).
-
Select DLP Rules as the rule type and click Next.
-
Select a Rule Template from the dropdown list. Then, perform either of the following steps.
-
If you selected the Custom Content Rule template, select a Rule Type and the accompanying value for that type. The options are:
-
Composite -- Select a unique name (for example, VIN, SSN, or Phone).
-
Dictionary – Select a keyword list (for example, US: SSN) and a match count.
-
Regex Pattern – Select a regular expression (regex pattern) and a match count.
The match count can be any value between 1 and 50. The match count indicates the minimum number of violating tokens to be considered for a violation.
Whatever match count you specify, the DLP engine detects up to 50 violating tokens and takes the actions you have configured (for example, highlighting, masking, redacting, and so on).
Note: If you select Dictionary, for XML files the attribute you choose must have a value for the DLP engine to recognize it as a match. If the attribute is specified but has no value (example: ScanComments=""), it does not match.
-
If you select a predefined rule template, the Rule Type and values are filled in.
-
Click Next and review the summary information for the DLP rule template.
-
Click Confirm to create and save the new template or click Previous to make any corrections needed.
If a template is deleted, the indicated action will no longer be allowed unless the associated policies are disabled or replaced with a different template.
Creating new document rule templates
-
Click the Document Rule Template tab and click New.
-
Enter a Rule Name (required) and a Description (optional).
-
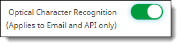
To include Optical Character Recognition (OCR) for API access policies, click the Optical Character Recognition toggle.
-
Click Next.
-
Enter or select the following information as needed for your template. For each information type to include, click the toggle to enable it.
-
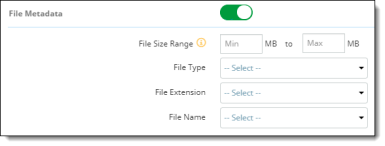
File Metadata – Enter a range of file sizes to include. Then select file information from the default data types provided with the product, or any data types you created in the Data Types tab.
-
File Size Range - Enter a range of file sizes to include in scanning.
Note: DLP and malware scanning are not performed on files larger than 50 MB. To be sure that DLP and malware scanning are available, enter range sizes of 49 MB or smaller in both fields.
-
File Type - Select a file type (for example, XML). This option is disabled when minimum and maximum file sizes are 50 MB or larger.
-
File Extension - Select a file extension (for example, .png).
-
File Name - Select File Name to specify the exact file name or select Regex Pattern to select a regular expression. In either case, use the drop-down menu to select the value for the policy to find and scan. This may be a predefined data type, or one that you created on the Data Types tab.
-
Data Classification

-
Select a classification label – Microsoft AIP or Titus. Then, enter a label name.

-
(Optional) Click the + sign at the right to include both classification labels.
-
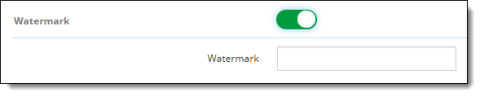
Watermark
-
Enter text for a watermark.
Note
For OneDrive and SharePoint applications, watermarks are not locked and can be removed by users.
-
Content Matching Rule

-
Select a DLP rule type from the list.
-
Click Next and review the summary information.
-
Click Save to confirm the template, or Previous to make any corrections.
The template can now be applied to policies you create.