Configuring data classification
CASB enables integration with Azure Information Protection (AIP) and Titus for data classification. The following sections outline how to configure these integrations.
Integration with Azure Information Protection (AIP)
CASB enables integration with Microsoft Azure Information Protection (AIP), which provides additional options for protecting your data. If you have a Microsoft Office account, you can use your Microsoft 365 credentials to add an AIP integration connection and apply it as an action to any policy you create, for any of your cloud applications.
AIP enables use of Active Directory Rights Management Services (AD RMS, also known as RMS), which is server software that addresses information rights management. RMS applies encryption and other functionality limitations for various types of documents (for example, Microsoft Word documents), to restrict what users can do with the documents. You can use RMS templates to protect an encrypted document from being decrypted by specific users or groups RMS templates group these rights together.
When you create an AIP integration connection, content policies you create provide an RMS Protection action that applies protection as specified in the RMS template you choose for the policy.
You can use labels to identify specific types of protection to the documents in your cloud. You can add labels to existing documents or assign or modify labels when the documents are created. Labels are included in the information for the policies you create. When you create a new label, you can click the Sync Labels icon in the AIP Configuration page to synchronize your labels and enable the newest labels to be assigned.
Retrieving parameters required for AIP RMS connection
To enable access to the required parameters:
-
Open Windows PowerShell in administrator mode.
-
Run the following command to install the AIP cmdlets. (This action will take a few minutes to complete.)
Install-Module -Name AADRM
-
Enter the following cmdlet to connect to the service:
Connect-AadrmService
-
In response to the authentication prompt, enter your Microsoft Azure AIP login credentials.

-
Once you are authenticated, enter the following cmdlet:
Get-AadrmConfiguration
The following configuration details are displayed
BPOSId :
9c11c87a-ac8b-46a3-8d5c-f4d0b72ee29aRightsManagementServiceId :
5c6bb73b-1038-4eec-863d-49bded473437LicensingIntranetDistributionPointUrl :
https://5c6bb73b-1038-4eec-863d-49bded473437.rms.na.aadrm.com/_wmcs/licensingLicensingExtranetDistributionPointUrl :
https://5c6bb73b-1038-4eec-863d-49bded473437.rms.na.aadrm.com/_wmcs/licensingCertificationIntranetDistributionPointUrl :
https://5c6bb73b-1038-4eec-863d-49bded473437.rms.na.aadrm.com/_wmcs/certificationCertificationExtranetDistributionPointUrl:
https://5c6bb73b-1038-4eec-863d-49bded473437.rms.na.aadrm.com/_wmcs/certificationAdminConnectionUrl :
https://admin.na.aadrm.com/admin/admin.svc/Tenants/5c6bb73b-1038-4eec-863d-49bded473437AdminV2ConnectionUrl :
https://admin.na.aadrm.com/adminV2/admin.svc/Tenants/5c6bb73b-1038-4eec-863d-49bded473437OnPremiseDomainName :
Keys : {c46b5d49-1c4c-4a79-83d1-ec12a25f3134}
CurrentLicensorCertificateGuid :
c46b5d49-1c4c-4a79-83d1-ec12a25f3134Templates : { c46b5d49-1c4c-4a79-83d1-ec12a25f3134,
5c6d36g9-c24e-4222-7786e-b1a8a1ecab60}
FunctionalState : Enabled
SuperUsersEnabled : Disabled
SuperUsers : {admin3@contoso.com, admin4@contoso.com}
AdminRoleMembers :
{Global Administrator -> 5834f4d6-35d2-455b-a134-75d4cdc82172, ConnectorAdministrator -> 5834f4d6-35d2-455b-a134-75d4cdc82172}KeyRolloverCount : 0
ProvisioningDate : 1/30/2014 9:01:31 PM
IPCv3ServiceFunctionalState : Enabled
DevicePlatformState :
{Windows -> True, WindowsStore -> True, WindowsPhone -> True, Mac ->FciEnabledForConnectorAuthorization : True
DocumentTrackingFeatureState : Enabled
From this output, you will need the highlighted items for the AIP integration connection.
-
Run the following command to obtain the base 64 key information:
install-module MSOnline
-
Run the following command to connect to the service:
Connect-MsolService
-
In response to the authentication prompt, enter your Azure AIP login credentials again.

-
Run the following command:
Import-Module MSOnline
-
Run the following command to obtain the key information needed for the AIP integration connection:
New-MsolServicePrincipal
The following information is displayed, which includes the key type (Symmetric) and key ID.
cmdlet New-MsolServicePrincipal at command pipeline position 1
Supply values for the following parameters:
-
Enter a display name of your choice.
DisplayName: Sainath-temp
The following information is displayed. You will need the highlighted information when you create the AIP integration connection.
The following symmetric key was created as one was not supplied qWQikkTF0D/pbTFleTDBQesDhfvRGJhX+S1TTzzUZTM=
DisplayName : Sainath-temp
ServicePrincipalNames : {06a86d39-b561-4c69-8849-353f02d85e66}
ObjectId : edbad2f2-1c72-4553-9687-8a6988af450f
AppPrincipalId : 06a86d39-b561-4c69-8849-353f02d85e66
TrustedForDelegation : False
AccountEnabled : True
Addresses : {}
KeyType : Symmetric
KeyId : 298390e9-902a-49f1-b239-f00688aa89d6
StartDate : 7/3/2018 8:34:49 AM
EndDate : 7/3/2019 8:34:49 AM
Usage : Verify
Configuring AIP protection
Once you have retrieved the parameters needed for the connection, you can create the connection in the Azure AIP page.
To enable AIP configuration:
-
Go to Administration > Enterprise Integration.
-
Select Data Classification.
-
If the Azure Information Protection tab is not displayed, click it.
-
Click the toggle to enable Azure Information Protection configuration.
-
Once AIP configuration is enabled, the Authorize button appears for you to access Azure information. (If you have authorized previously, the button is labeled Re-Authorize.)
-
When the Microsoft login page appears, follow the prompts to enter your Microsoft login credentials.
Syncing labels
When a cloud application is onboarded in CASB, you can create new policies or assign policies in Azure. You can sync Azure labels instantly from the AIP Configuration page. These labels will be listed with the policy information in the Management Console.
To sync labels:
-
Go to Administration > Enterprise Integration > Data Classification > Azure Information Protection.
-
Click the Sync icon at the right above the list of labels to obtain the most recent Azure labels.
When the sync is completed, the newly added labels are displayed, and are ready to be assigned. The date of the last sync action appears next to the Sync icon.
Label information
Labels are listed in a table in the lower part of the AIP Configuration page. For each label, the list includes the label name, description, and active status (true=active; false=not active). Depending on how the label was configured, the table might include additional details (AIP Tooltip), a sensitivity level, and the label’s parent name.
To search for a label in the list, enter all or part of the label name in the Search box above the list, and click the Search icon.
Creating a policy with RMS protection
Once you have created an AIP connection, you can create or update a policy to include RMS protection for your documents. Perform the following steps to create a policy for RMS protection. For more information about options for policy types, content rules, and context rules, see Configuring Juniper Secure Edge CASB for policy management.
-
Create a policy.
-
Enter a name and a description for the policy.
-
Select content and context rules for the policy.
-
Under Actions, select RMS Protect.
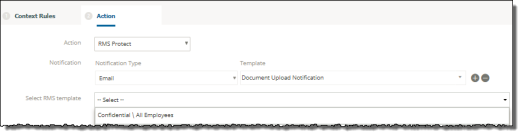
-
Select a notification type and template.
-
Select an RMS template for the policy. The template you select applies specific protections to the documents. Examples of predefined templates include those listed here. You can create additional templates as needed.
-
Confidential \ All Employees -- Confidential data that requires protection, which allows all employees full permissions. Data owners can track and revoke content.
-
Highly Confidential \ All Employees -- Highly confidential data that allows employees view, edit, and reply permissions. Data owners can track and revoke content.
-
General -- Business data that is not intended for public consumption but that can be shared with external partners as required. Examples include a company internal telephone directory, organizational charts, internal standards, and most internal communication.
-
Confidential -- Sensitive business data that could cause damage to the business if shared with unauthorized people. Examples include contracts, security reports, forecast summaries, and sales account data.
-
Confirm the policy information and save the policy.
When users open a protected document, the policy will apply the protections specified in the RMS protection action.
Creating additional RMS policy templates
-
Log in to the Azure portal.
-
Go to Azure Information Protection.
-
Verify that the service is active by reviewing the protection activation status.

-
If the service is not activated, select Activate.
-
Enter a name (label) for the template you want to create.
-
Select Protect.

-
Select Protection.
-
Select Azure (cloud key) to use the Azure Rights Management service for protection of documents.

-
Select Add Permissions to specify user permissions.
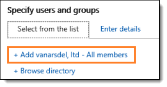
-
From the Select from List tab, choose either
-
<organization_name> - all members, which includes all users in your organization, or
-
Browse directory to search for specific groups.
To search for individual email addresses, click the Enter Details tab.
-
Under Choose Permissions from preset or custom, select one of the permission levels, then use the check boxes to specify the types of permissions.
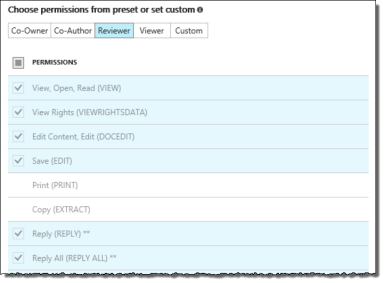
-
Click OK when you are finished adding permissions.
-
To apply the permissions, click Publish, then click Yes to confirm.
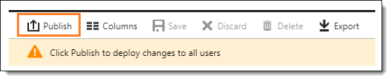
The template is added to the dropdown list for the RMS Protect action.
Integration with Titus
-
Go to Administration > Enterprise Integration > Data Classification.
-
Click the Titus tab.
-
Click the Titus toggle to enable integration.
-
Click Upload Schema and select the file containing the data classification configurations.