Administrative user management
CASB provides role-based access control to provide clear distinction of user access privileges and responsibilities. You can add new users as needed.
All user information is identical for the Management Server and the Hybrid Key Management System (HKMS), although the sets of users are maintained separately.
Adding new users
To add users:
-
Go to Administration > User Management and click the Administrative User Management tab.
-
Click New.
-
Enter the following information:
-
User Name – Enter a valid email address for the user.
-
Role – Use the check boxes to select one or more roles for the user.
-
System Administrator – Can perform all system administration functions, including onboarding cloud applications, adding and removing users, creating and assigning keys, and restarting the Management Server.
-
Key Administrator – Can create, assign, and remove keys, and monitor other system functions.
-
Application Administrator – Can create and manage applications and monitor other system functions.
-
Read-Only User – Can monitor system functions through the Management Console, view alerts, and export reports. Cannot create or modify functions such as onboarding cloud applications, adding users, editing user information, or configuring system settings.
-
Compliance User – Can only access a subset of Management Console functions related to compliance. Can view data and download reports on the screens they have access to, but cannot create or modify functions.
Note
Hosted deployments include two additional users with unique roles: Services Administrator and Operations Administrator. These users are assigned by Juniper Networks and cannot be deleted.
-
Click Apply.
-
Click Save. The new user is added to the list. The new user will receive an email notification with a temporary password and will be asked to select a permanent password.
Setting up a user account password policy
CASB provides a default password policy. You can change the default settings to meet your organization’s needs.
To change the user account password policy:
-
Go to Administration > User Management.
-
Click the User Account Password Policy link.
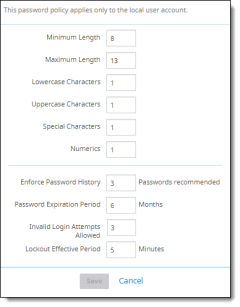
The Password Policy screen is displayed. (The Save button becomes active once you begin entering changes.)
-
Change the policy items as needed:
|
Field |
Description |
|---|---|
|
Minimum Length |
Specifies the minimum number of characters that can make up a password for a user account. You can set a value of between 1 and 13 characters. To specify that no password is required, set the number of characters to (zero). A minimum of 8 characters is recommended. This number is long enough to provide adequate security, but not too difficult for users to remember. This value also helps to provide adequate defense against a brute force attack. |
|
Maximum Length |
Specifies the maximum number of characters that can make up a password for a user account. If you specify 0 (zero), the allowed length will be unlimited. A setting of 0 (unlimited) or a relatively large number such as 100 is recommended. |
|
Lowercase Characters |
Specifies the minimum number of lowercase characters that must be present in a password for a user account. If you enter 0 (zero), no lowercase characters are allowed in the password. A minimum of 1 lowercase character is recommended. |
|
Uppercase Characters |
Specifies the minimum number of uppercase characters that must be present in a password for a user account. If you enter 0 (zero), no uppercase characters are allowed in the password. A minimum of 1 uppercase character is recommended. |
|
Special Characters |
Specifies the minimum number of special characters (for example, @ or $) that can make up a password for a user account. If you enter 0 (zero), no special characters are required in the password. A minimum of 1 special character is recommended. |
|
Numerics |
Specifies the minimum number of numeric characters that must be present in a password for a user account. If you enter 0 (zero), no numeric characters are required in the password. A minimum of 1 numeric character is recommended. |
|
Enforce Password History |
Specifies the number of unique new passwords that must be associated with a user account before an old password can be reused. A low number allows users to use the same small number of passwords repeatedly. For example, if you select 0, 1, or 2, users can reuse old passwords more quickly. Setting a higher number will make using old passwords more difficult. |
|
Password Expiration Period |
Specifies the period of time (in days) that a password can be used before the system requires the user to change it. You can set passwords to expire after a number of days between 1 and 99, or you can specify that passwords never expire by setting the number of days to 0 (zero). |
|
Invalid Login Attempts Allowed |
Specifies the number of failed login attempts that will cause a user account to be locked. A locked account cannot be used until it is reset by an administrator or until the number of minutes specified by the Lockout Effective Period policy setting expires. You can set a value from 1 through 999. If you want the account never to be locked, you can set the value to 0 (zero). |
|
Lockout Effective Period |
Specifies the number of minutes that an account remains locked out before automatically becoming unlocked. The available range is from 1 through 99 minutes. A value of 0 (zero) means that the account will be locked out until an administrator unlocks it. |
-
Click Save.
Account status for system administrator and non-administrator roles
Non-administrator user accounts are disabled automatically after more than 90 days of non-use. When an account is disabled, the user will see a message on the Management Console login screen notifying them that their account is disabled. A system administrator must re-enable the account before the user can log in to the Management Console.
Note
Accounts for system administrators, service administrators, and operations administrators cannot be disabled. Only accounts for Key Administrator, Application Administrator, and Application Monitor roles can be disabled and re-enabled.
On the Administrative User Management tab of the User Management page, the toggles represent the following conditions:
-
System Administrators: The toggle is visible, enabled by default. and shows as grayed out.
-
Services Administrators and Operations Administrators: The toggle is visible, enabled by default, and shows as grayed out.
-
System Administrators can disable or enable the status of users with Key Administrator, Application Administrator and Application Monitor roles.
-
For existing System Administrators who have not completed the user onboarding process, the toggle shows a status of disabled.
-
For newly created System Administrators who have not completed the user onboarding process, the toggle is not visible.
-
For System Administrators who have completed the onboarding process but have not logged into the application yet, the toggle is enabled but grayed out.
-
For Key Administrator, Application Administrator, and Application Monitor roles: These users' accounts are disabled after 90 days of non-use. They will be blocked when they try to log in to the Management Console.
Note
System Administrators whose accounts were disabled previously are now enabled (active).
The following sections provide instructions for system administrators to disable and re-enable non-administrator user accounts.
Disabling a non-administrator user account
-
Click the bright green toggle for the enabled non-administrator account.
-
When prompted, confirm the action to disable the account.
Re-enabling a disabled non-administrator user account
-
Click the dimmed, colorless toggle for the disabled non-administrator account.
-
When prompted, confirm the action to re-enable the account.
Reassigning the Super Administrator role
A tenant can only have one Super Administrator account. If you want to reassign the Super Administrator role to a different user, you must do it while logged in with the current Super Administrator account.
-
In the Management Console, select Administration > System Settings > Tenant Configuration.
-
If you are logged in with the Super Administrator role, you will see the Re Assignment of Super Administrator option.
-
Select the desired user from the drop-down menu. Only users who currently have the System Administrator role are shown here.
-
Click Send OTP to receive a one-time password.
-
Retrieve the password from your email and enter it in the Enter OTP field. Click Validate.
-
Click Save. The Super Administrator role is transferred to the user you selected.