You can upgrade your existing
Juniper Security Director
version to the latest available version.
Note:
Services will be temporarily unavailable during the upgrade process. The upgrade might
take 40 minutes to complete, VM will reboot, and after which services will be restored. We
recommend scheduling the upgrade during a maintenance window with ample time.
Before You BeginDownload the Juniper Security Director Software Bundle (.tgz file) to your local machine from Software Downloads page and then transfer the file to your staging
server.
A staging server is an intermediate server where the software upgrade bundle
is downloaded.
Host the upgrade bundle on a staging server that is reachable by the
Juniper Security Director VM. The VM supports bundle downloads through SCP, HTTP, or
HTTPS when using a CA‑signed certificate. Self‑signed HTTPS certificates are not
supported.
-
For SCP downloads, provide the staging server’s username, password, IP address or FQDN,
and the file path.
-
For HTTP or HTTPS downloads, provide the file path to the upgrade bundle.
To upgrade Juniper Security Director version:
-
Log in to the Juniper Security Director UI.
-
Select .
The System Management page is displayed. You can view the existing software version
displayed on the page.
-
Click Upgrade System.
-
Complete the configuration as described in Table 1.
Table 1: Fields on the Upgrade System Page
| Field |
Description |
| Download bundle options |
Select an option: SCP or HTTP/HTTPS |
|
Download bundle option: SCP
|
|
Software bundle path
|
Enter the staging server path to the software bundle. You must provide the
software bundle location in the following format:
-
With port — user@server:port/relative-path or
user@server:port//absolute-path. For example,
root@10.0.0.1:22//var/www/html/Juniper-Security-Director-24.4.1-1703.tgz
-
Without port — user@server:relative-path or
user@server:/absolute-path. For example,
root@10.0.0.1:/root/Juniper-Security-Director-24.4.1-1703.tgz
|
|
Password
|
Enter the password to connect to the staging server.
|
|
Download bundle option: HTTP/HTTPS
|
|
Software bundle path
|
Enter the staging server path to the software bundle in the following
format:
HTTP or HTTPS format without authentication:
http://server/path or
https://server/path.
HTTP or HTTPS format with authentication:
http://user@server/path or
https://user@server/path
|
|
Password
|
Enter the staging server password if the software bundle path includes a
username. |
| Use Proxy |
Enable the toggle if you want to use proxy. |
| Proxy URL |
Enter the proxy server URL. HTTP or HTTPS format without authentication:
http://server[:port] or
https://server[:port]
HTTP or HTTPS format with
authentication: http://user@server[:port] or
https://user@server[:port]
|
| Proxy Password |
Enter the proxy password if the proxy URL includes a username.
|
-
Click OK.
The upgrade process is triggered, and the Job Status page is displayed. After the
upgrade is complete, close the Job Status page. The detailed status of the job is
displayed on the Job Status page. The status of the upgrade is displayed on the System
Management page.
On successful upgrade, the upgraded version is displayed on the System Management
page.
If the upgrade fails, check if:
-
VM has connectivity to the staging server.
-
Incorrect bundle location is provided.
-
Missing bundle in the specified location.
-
Invalid bundle or invalid bundle format is provided.
You can check the status of the upgrade using the CLI command
show bundle
            install status
. For more information, see
show bundle install.
Create the Root Administrator
When you upgrade a VM created before Juniper Security Director Release 26.2.1 to the
latest release, the system prompts you to create the root-admin user by specifying a
password. VMs created before Release 26.2.1 do not include a predefined root-admin
user.
Figure 1: Create the root-admin User
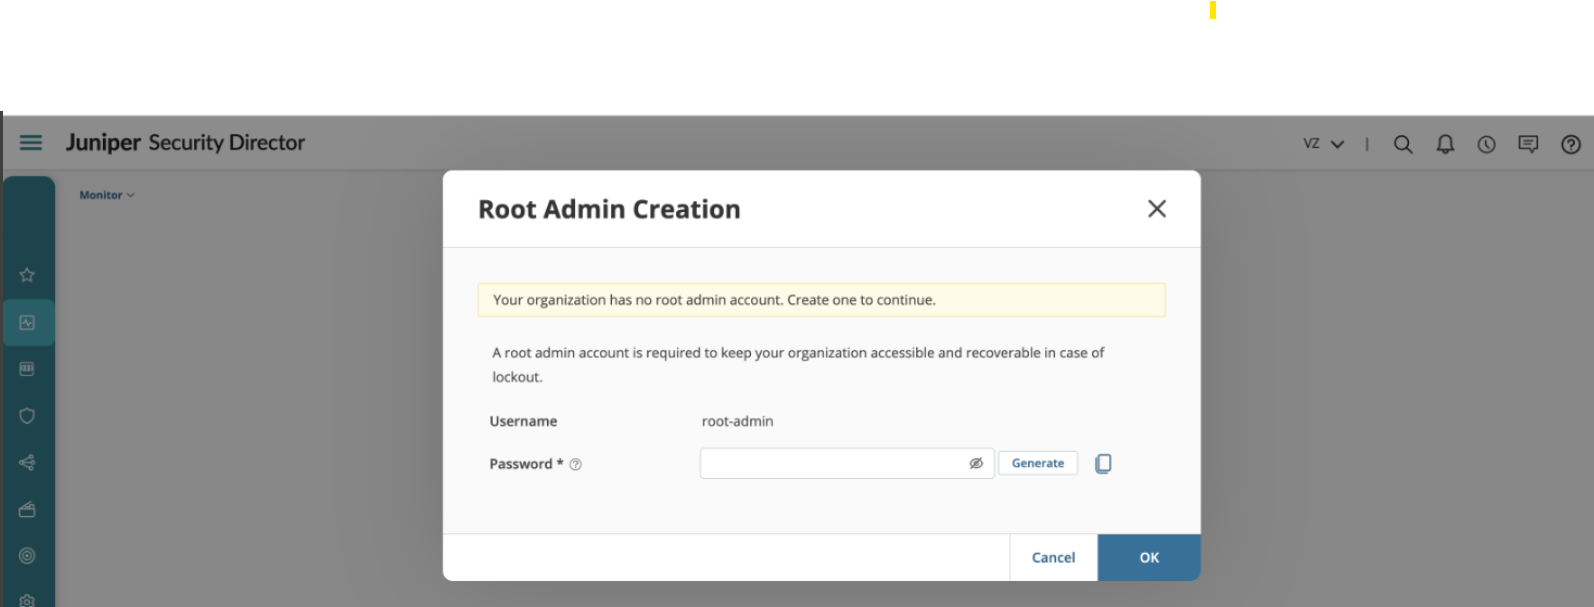
Enter the password or click Generate to create one. Click the copy
icon ( ) to copy and share the password with the user.
