
Deploy Juniper Security Director Using KVM
This topic guides you through the Juniper Security Director VM deployment using KVM.
Before You Begin
-
Choose the hardware requirements, see Hardware Requirements.
-
You must have 4 dedicated IP addresses and ensure that you have access to SMTP, NTP, and DNS servers, see Software Requirements.
Note: If the deployment is a regulated/air-gapped environment, ensure that the VM also has access to signatures.juniper.net for IDP/Applications Signatures download.
Step 1: Download the Juniper Security Director Software
-
Download the Juniper Security Director software (.bin) from the Software Downloads page to your local machine.
- Download the
Juniper Security Director Software Bundle (.tgz file) to your local machine from
Software Downloads page and then transfer the file to your
staging server.
A staging server is an intermediate server where the software bundle is downloaded and is accessible via SCP from the VM.
Step 2: Deploy the VM
Run the
chmod +x Juniper-Security-Director-<version>-kvm.bincommand.On the terminal:
Run
./Juniper-Security-Director-<version>-kvm.bincommand.If you only need to extract the artifact, this can be done on any supported Ubuntu machine without requiring KVM. The artifacts are compatible with any Linux distribution that supports KVM-based virtual machines. Any distribution-specific dependencies apply solely to the deployment wrapper (.bin), not to the artifacts themselves.
Run
./Juniper-Security-Director-<version>-kvm.bin --no-launchcommandThis checks if all the related packages are existing.
Enter the base folder for extracting the KVM files. Ensure the base folder has read and write permissions for the current user.
For example, /user/Downloads/
The VM directory is created, for example, /user/Downloads/Juniper-Security-Director-<version>. The QCOW2 disk 0 file is successfully extracted in the VM directory.
A checksum validation is performed to verify that the disk 0 file remains intact and uncorrupted after extraction.
Enter a unique VM name.
Enter the KVM configuration parameters when prompted.
Table 1: Configuration Parameter Descriptions Parameter Description Hostname Enter the hostname of the Juniper Security Director VM. CLI admin user password Enter the CLI Admin User password. It must be of minimum length 8, maximum length 32. The password must have at least 3 of the following: A digit (0-9)
A upper case alphabet (A-Z)
A lower case alphabet (a-z)
A special character (~`!@#$%^&*()_-+={}[]:;"'<,>.?/|)
You won’t see the characters as you type, so be careful to enter the password correctly.
Management IP address Enter the management IP address in CIDR format. Default gateway Default gateway IP address of the network. DNS server addresses Enter the DNS server address. Search domains (Optional) Enter search domains. UI virtual IP address Enter the UI virtual IP address. UI FQDN (Highly recommended) Enter the fully qualified domain name that resolves to UI IP address. Device connection virtual IP address Enter the device connection virtual IP address. Device connection FQDN (Highly recommended) Enter the fully qualified device name that resolves to device connection virtual IP address. Log collector virtual IP address Enter the log collector virtual IP address. Log collector FQDN (Highly recommended) Enter the fully qualified domain name that resolves to log collector virtual IP address. Software bundle SCP Path Enter the software bundle path. It must be in the following format: With port — user@server:port/relative-path or user@server:port//absolute-path
If the port is not specified, default value of 22 is used
.Without port — user@server:relative-path or user@server:/absolute-path.
For Windows VM as the staging server, you must provide the bundle location in the following format: user@<windowsvm>:/C:/<path>/Juniper-Security-Director-<version>.tgz
SCP password Enter the SCP password. You won’t see the characters as you type, so be careful to enter the password correctly.
NTP server Enter the NTP server details. Security Director CIDR (optional) The default value is 10.42.0.0/21.
The network must be /21 or bigger (For example, 10.42.0.0/21) and must not overlap with the VM management subnet.
The configuration is saved to kvm-env.ini file (do not rename this file) and the ISO image is created, for example, /user/Downloads/Juniper-Security-Director-<version>/Security-Director-OnPrem-kvm.iso.
Table 2 lists the files in the directory.
Table 2: Files in the Directory Files Description kvm-env.ini An INI file containing environment variables of the VM and deployment parameters. Security-Director-OnPrem-disk-0.qcow2 Primary or boot disk image for the Juniper Security Director VM. Security-Director-OnPrem-disk-1.qcow2 Application data disk used by the Juniper Security Director VM.
Security-Director-OnPrem-disk-2.qcow2 Log analytics disk used by the Juniper Security Director VM.
Security-Director-OnPrem-kvm.iso ISO image created from kvm-env.ini, used as a seed disk to automatically apply initial VM configuration during boot. Note: Contains passwords in plain text and permission is set to 600.<vm_name>.xml Libvirt domain definition for the VM. launch-vm.sh File containing path to all extracted artifacts. It is used to create and start the Juniper Security Director VM. Enter the configuration ID for the VM configuration option as per your requirement. See Juniper Security Director System Requirements for KVM for the recommended VM configuration option details.
Enter the disk provisioning type as Thin, Thick (Zeroed upon use), or Thick (Fully pre-zeroed).
Ensure sufficient free space is available for Thick provisioning. Depending on the disk size, this process may take several minutes.
The disk1 and disk 2 QCOW2 files are created.
Enter the bridge interface name. Ensure that bridge interface exists and is working.
The VM config file is created, for example, /user/Downloads/Juniper-Security-Director-<version>/<vm-name>-vm.xml.
The launch file is created, for example, /user/Downloads/Juniper-Security-Director-<version>/launch-vm.sh
On selecting --no-launch option, launch-vm.sh will not be created.
Without the --no-launch option, the bridge interface must exist on the system. With the --no-launch option, the existence of the bridge interface is not checked.
If you want to update the .xml file, then use
virsh edit <vm-name>command.To create the VM, run
virsh define
                    <path-to-vm-xml>/vm-name.xml
To create and start the VM, run the following command:
/user/Downloads/Juniper-Security-Director-<version>/launch-vm.shClick Yes to start Juniper Security Director.
Congratulations! Now the Juniper Security Director VM has been created and started. You can
monitor the deployment and installation process via Virtual Machine Manager graphical
console or serial console. To view application services messages run show
journal CLI command.
After the deployment is complete, use the UI virtual IP address or FQDN (domain name) that you configured during the VM deployment to log in to the Web GUI. See Log In to the Juniper Security Director Web UI.
Upgrade the VM
If you want to upgrade the VM from VM configuration option 1 to VM configuration option 2 as mentioned in Juniper Security Director System Requirements for KVM, perform the following:
In this procedure, we've used virsh. You can choose any tool that is available. You can upgrade memory or CPU via CLI commands or from Virtual Machine Manager graphical console.
Shutdown the Juniper Security Director VM. Run
virsh shutdown <vm-name>CLI command.Upgrade the memory to 208G. Run the following CLI commands:
virsh setmaxmem <vm-name> 208G --configvirsh setmem <vm-name> 208G --config
Upgrade the CPU to 40. Run the following CLI commands:
virsh setvcpus <vm-name> 40 --config --maximumvirsh setvcpus <vm-name> 40 –-config
Resize disk images. Run the following CLI commands:
qemu-img resize <path-to-disk-1.qcow2> 525Gqemu-img resize <path-to-disk-2.qcow2> 3.5T
Start the Juniper Security Director VM. Run
virsh start <vm-name>command.
Reset CLI Password Using Virtual Machine Manager
To reset the password for the cliadmin:
In the Virtual Machine Manager, right-click on the VM and select Shut Down to power off the VM.
Once the VM is powered off, right-click on the VM again and select Run. Double-click on the VM to open the console.
During the boot process, wait for a password Reset Key to be displayed in the CLI. This process might take a few minutes.
Copy the password Reset Key and keep it securely. The CLI reset password is printed on the virt-manager GUI. To see the password reset key from serial console, run
show journalcommand.You don't need to power on the VM if you have already saved the password Reset Key from a previous boot process.
Open the kvm-env.ini file which was created earlier and edit the following fields:
PasswordResetKey—Set the value of this property to the passkey or token that you copied during the VM reboot.
CLI_PASSWORD—Set the value of this property to your new desired password. Enter the password that meets the following requirements:
- The password should be at least 8 characters long and not more than 32 characters.
The password must include at least three of the following:
Numbers (0-9)
Uppercase letters (A-Z)
Lowercase letters (a-z)
Special characters (~!@#$%^&*()_-+={}[];:"'<,>.?/|)
Save the changes.
Delete the old ISO file and create a new one.
Run
mkisofs -o <name.iso> -J -R kvm-env.inicommand.Erase the passwords from kvm-env.ini file. Secure the ISO image file by setting the file permission to 600.
Update ISO Configuration Through Virtual Machine Manager
If you do any changes to the ISO image, then the existing ISO image should be removed and the new image must be added.
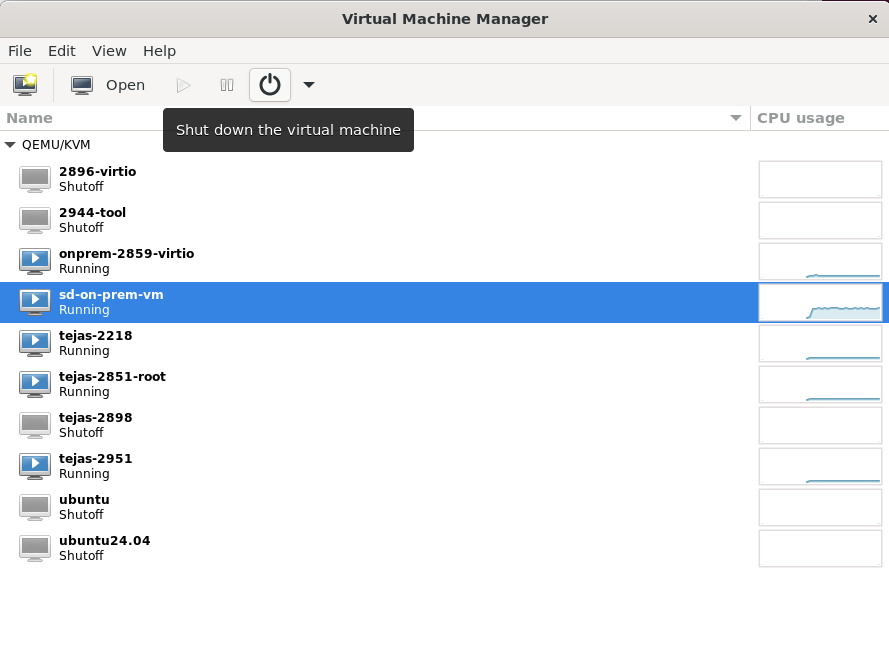
In the Virtual Machine Manager, select the VM and click the icon to Shut down the VM.
Select Edit > Virtual Machine Details to edit the hardware settings. The VM console is displayed.
Click the show virtual hardware details
 icon
in the VM console.
icon
in the VM console.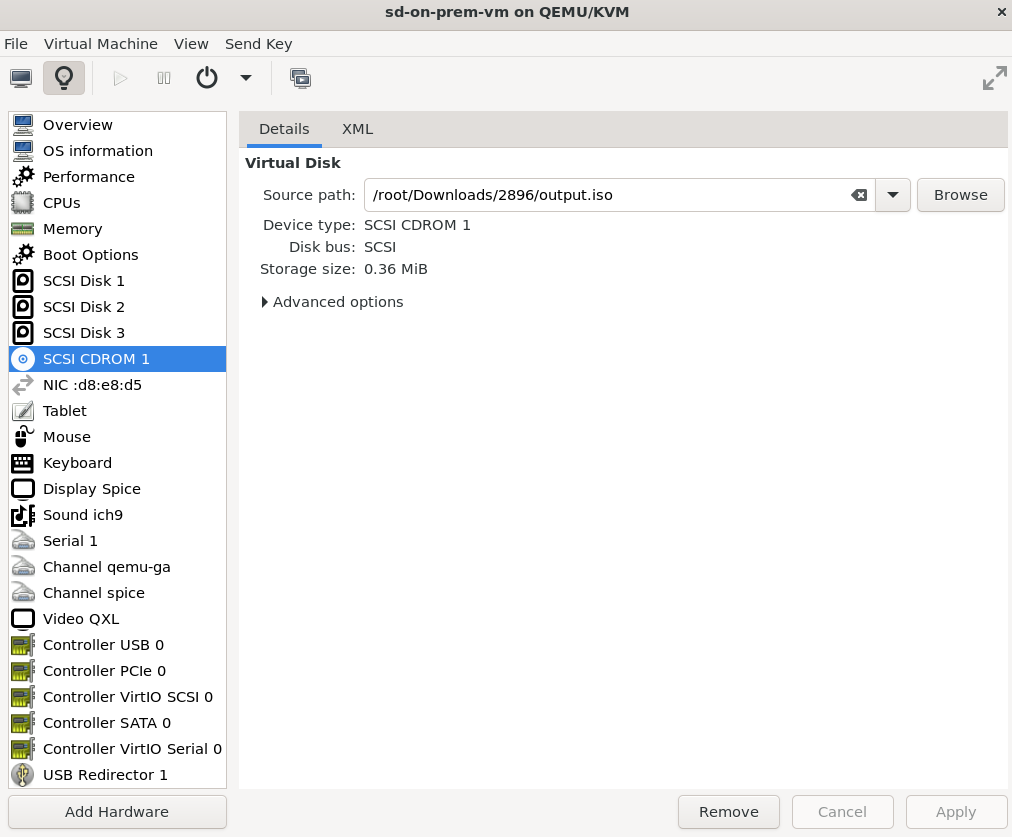
Right-click SCSI CDROM 1 and select Remove Hardware. Click Delete to confirm and remove the hardware.
Select Add Hardware. Check Select or create custom storage and click Manage.
Select the new ISO image. Set Device type as CDROM device and Bus type as SCSI. Click Finish.
Click the Power on the virtual machine
 icon
to start the Juniper Security Director VM.
icon
to start the Juniper Security Director VM. The password will be reset to the new password only if the value of PasswordResetKey property matches the password Reset Key.
Update ISO Configuration Through virsh CLI
Using virsh CLI shut down the VM.
Run
virsh shutdown <vm-name>command.Remove the existing ISO image.
Run
virsh change-media sdd --eject --configcommand.Insert the newly created image.
Run
virsh change-media sdd --insert --configcommand.Power on the VM. Run
virsh start
              <vm-name>
command.