Path Configuration
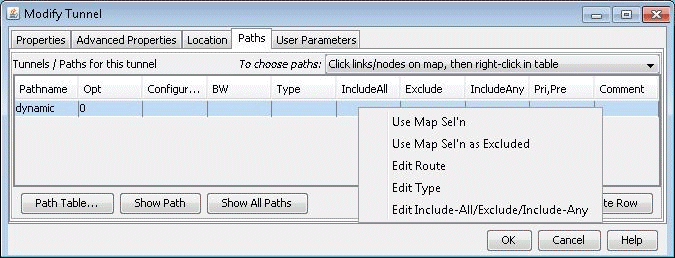
When adding or modifying a single tunnel, a particular path can be configured in the Paths tab of the Add or Modify Tunnel window shown below.

First select the desired source and destination nodes from the Node A and Node Z fields.
Next, click on the first row of the table in the Tunnels/Paths for the tunnel section to highlight it. To configure a route for the tunnel, double-click on the cell in the Pathname column and remove the word Dynamic. There are various methods to add routes described below.
Click links/nodes on map, then right-click in table.
This method can be selected from the To choose paths dropdown box, and allows the user to choose the links making up the path and lets the program piece them together in the right order from source to destination. After selecting this option, click on the links (holding down the <CTRL> key for multiple selections) making up the path from the source node to the destination in any order so that they are highlighted.
Tips: Note that if you accidentally highlight a link, you can remove the highlighting by holding down the <CTRL> key and clicking on it a second time. If a region is too crowded you can zoom into that region to facilitate selection.
When you are done selecting the links of the path, right-click on the table row and select Use Map Sel’n from the popup menu.
Click consecutive nodes starting at Node A:
After selecting this option, select the map window. Note that your cursor will appear as a cross-hair on the topology map. Click each node of the path starting from the beginning node and proceeding sequentially to the end node. When you have reached the last node, double-click on the map to stop. The path is automatically filled in for the highlighted row of the Add Tunnel window in the Configured Route column.
Note:If there are parallel links, this method, unlike method (a) will not specify which parallel link to use.
Tunnel Path Selection window:
To open the Tunnel Path Selection window, right-click over the row for an existing path and select “Edit Route.” This option will allow users to add a route by selecting the nodes or links of the path from a list. For more information, refer to the Paragon Planner User Interface Guide, “The Network and Modify Menus” chapter section on Demands. The Tunnel Path Selection window has the same functionality as the Demand Path Selection window.
Directly typing in the path:
Another option is to directly type in the path in the Configured Route column by double-clicking the cell in that column and entering in a path with nodes delimited with the ‘-’ symbol for a strict route (or ‘**’ for a loose route). To specify a specific link between two nodes, intermediate segments can be specified using linknames. For example, SFO-LINK10-LINK6-LINK8-LINK15B could be used to specify a path from San Francisco (SFO) to Philadelphia (PHI)..
