Creating Users / Assigning Users to Groups
Once user groups have been setup with the desired permissions, you can create users and assign them to user groups. To create a user, click on Add User icon button on the bottom of the Users tab of the User Administration window.
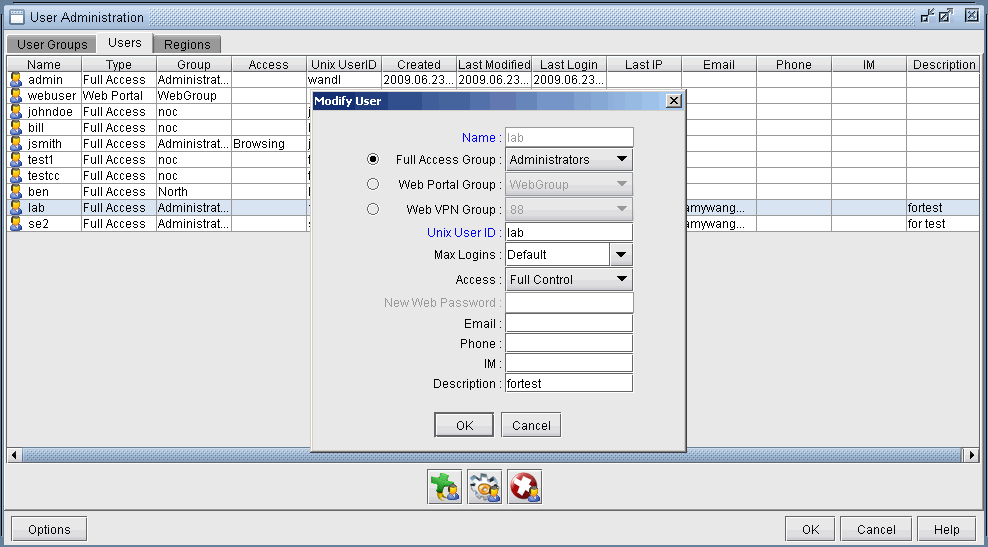
Type a login name next to Name. Next, choose the radio button for the appropriate group type (Full Access, Web Portal, or Web VPN). Then select one of the available groups for that group type.
For Full Access users, please choose a valid Unix User ID to map the new NorthStar Planner user to. This should be the same as the login name. (Note: To add a new user ID, you must access the server via telnet or ssh window, switch to root user, and either run “admintool” (requires display of the desktop) or use the “useradd” command (for example, “useradd -g staff -d /export/home/wandl wandl” would add user wandl in group staff with home directory /export/home/wandl). Subsequently, you may create a password for that user using the command “passwd userid” substituting userid with the Unix User ID. Note that you can similarly modify or delete a Unix user ID as root user using the commands “usermod” and “userdel”.)
For Web Portal and Web VPN users, enter in a password to log in to the web interface.
Optionally specify additional contact information such as Email, Phone, IM, and a Description for this new user.
Max Logins can be configured to control the maximum number of times a specific user can be logged into the NorthStar Planner server.
Access level (Full Control, Browsing, Restricted, or Blocked) can be configured to further control the access level of a user.
Full Control Access: The Full Control user can modify, perform design and simulation on the network model in NorthStar Planner.
Browsing Access: The Browsing user can only open a network model in NorthStar Planner for viewing, but is not allowed to perform any modification, design, or simulation on the network model.
Restricted Access: The Restricted user has Browsing privileges, but with even stricter limitations to view only certain networks, files and directories: Once logged in, the Restricted user can only navigate to the Home Directory and its child directories. Only spec.* and newdemand.* network files are displayed in the File Manager. The user cannot access "Hidden" files. All Report Manager reports are read-only, and are not regenerated before displaying in the Report Manager. Certain menus are disabled.
Block Access: The user is blocked from opening a network model in NorthStar Planner. The length of time a user is blocked from accessing the system is defined by the Block Period in the Update GUI Login Policy section.
Once a NorthStar Planner user name has been added, that user name will also appear in the User Groups tab of the User Administration window under the group to which it belongs. To modify an existing user, select the user in the Users tab, and click the Modify Icon button at the bottom of the window. To delete an existing user, select the user and click the Delete Icon button.
If the user name has been mapped to a valid Unix User ID, the new user should be able to log in to the NorthStar Planner client and interface, when assigned the appropriate privileges, using either the user name and the corresponding password for this Unix User ID.